
With Product Feed Manager, you can instantly connect your store to Google Merchant Center using the Content API. This means your products sync automatically, no more manually generating, downloading, and uploading feed files. Once set up, any updates you make to your products in your store (like price changes, stock updates, or new items) will be pushed directly to Google Merchant Center, keeping your listings accurate and up to date without extra work.
In this guide, we’ll show you the process to send your products to GMC.
However, to use this method you need to authorize with the Google Merchant Center first, and to do so you will need the following information:
- Client ID
- Client Secret
- Merchant ID
- Redirect URL
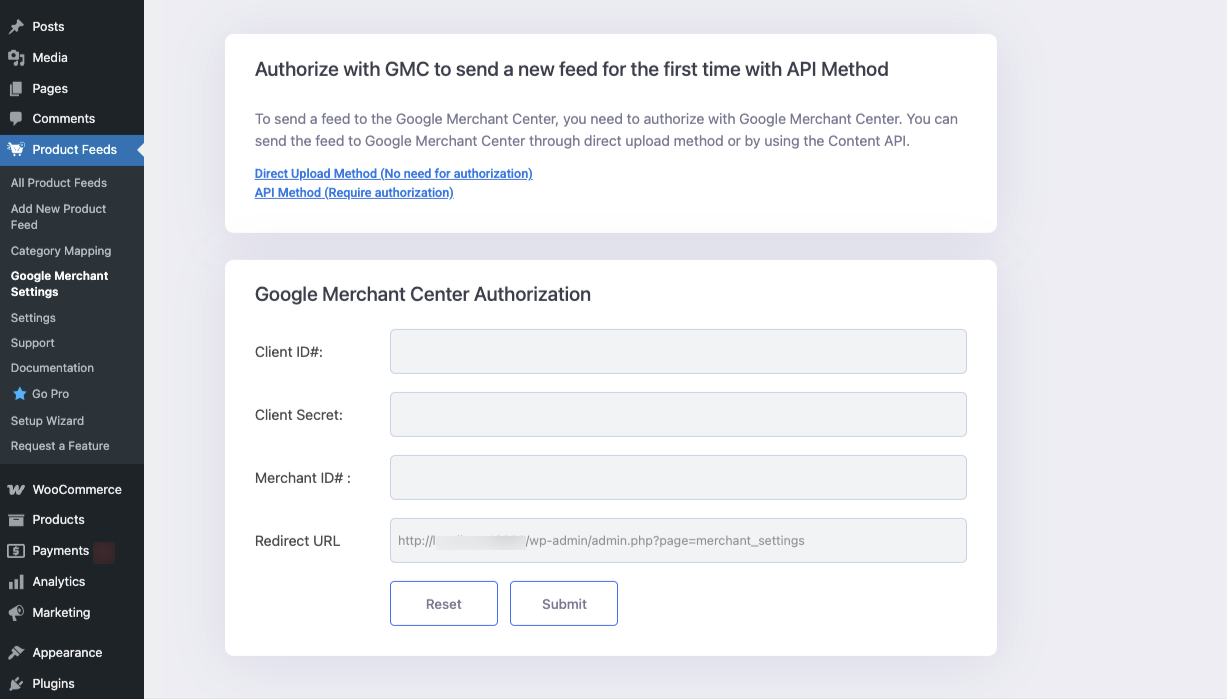
You will see that the Redirect URL is already added, but you need to collect the Client ID, Client Secret, and Merchant ID to authorize with the Google Merchant Center.
Follow the steps below to learn how to auto-sync products to Google Merchant Shop:
Step 1: Create a Project #
1. Go to https://console.developers.google.com/ or https://console.cloud.google.com/
2. Choose an existing Project or create a new one.

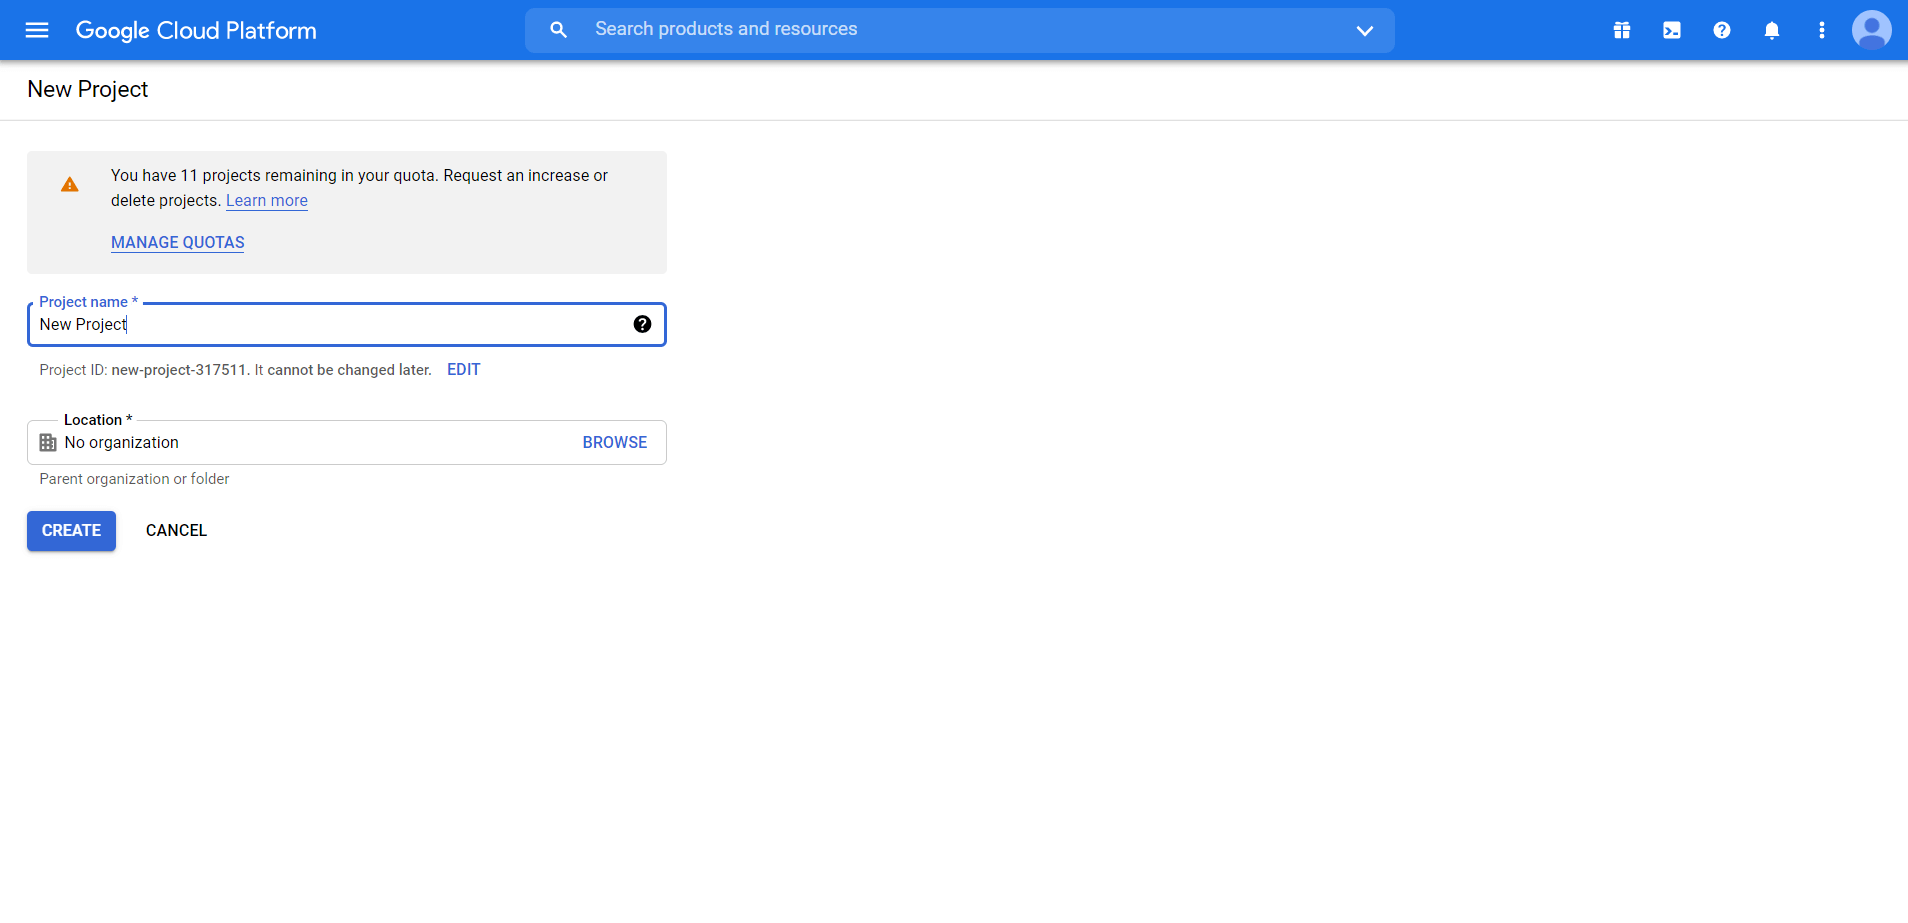
3. If you choose to create a Project, it will take you to New Project Page.
4. Here choose Project Name, and Organization (if you have a G-suite acc). If you want you can edit the project Id as well, (which cannot be changed once the project is created).
Step 2: Enable Content API for Shopping #
1. Once the Project is created, it will take you to the project dashboard. On the left Menu panel, click on APIs & Services.
2. Here, click on Enable APIs and Services. It will take you to the API library.
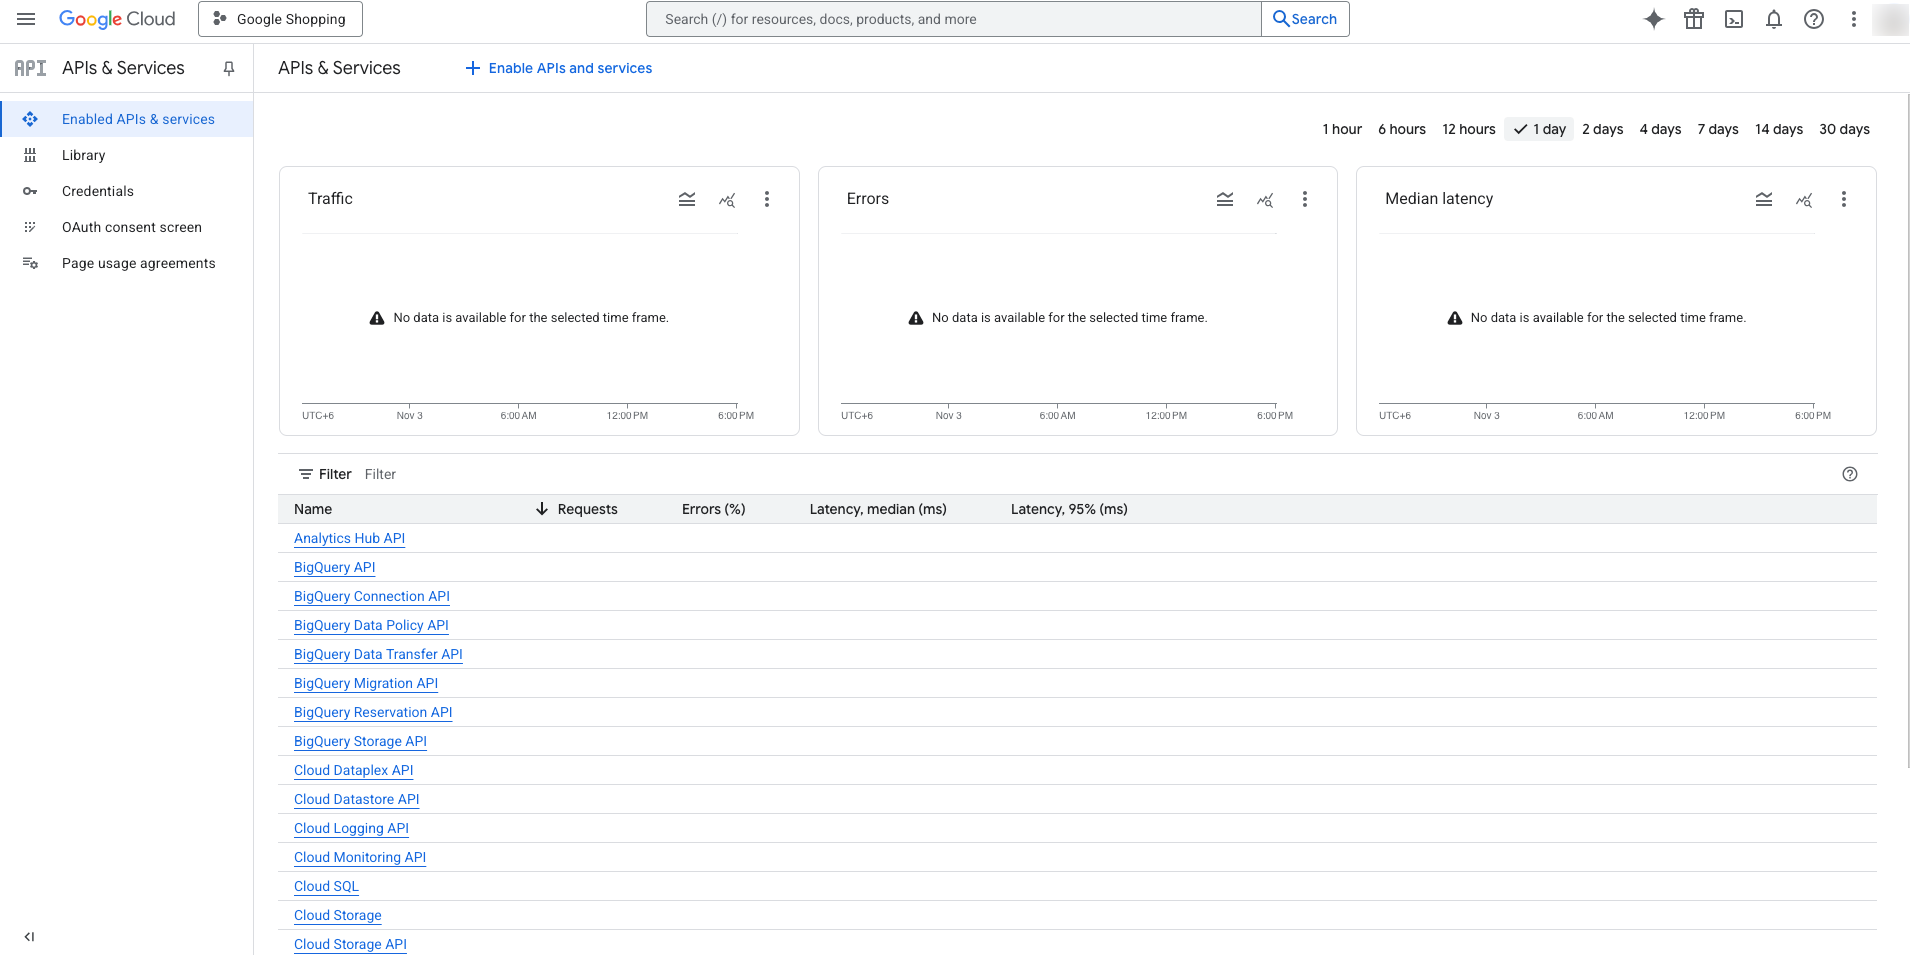
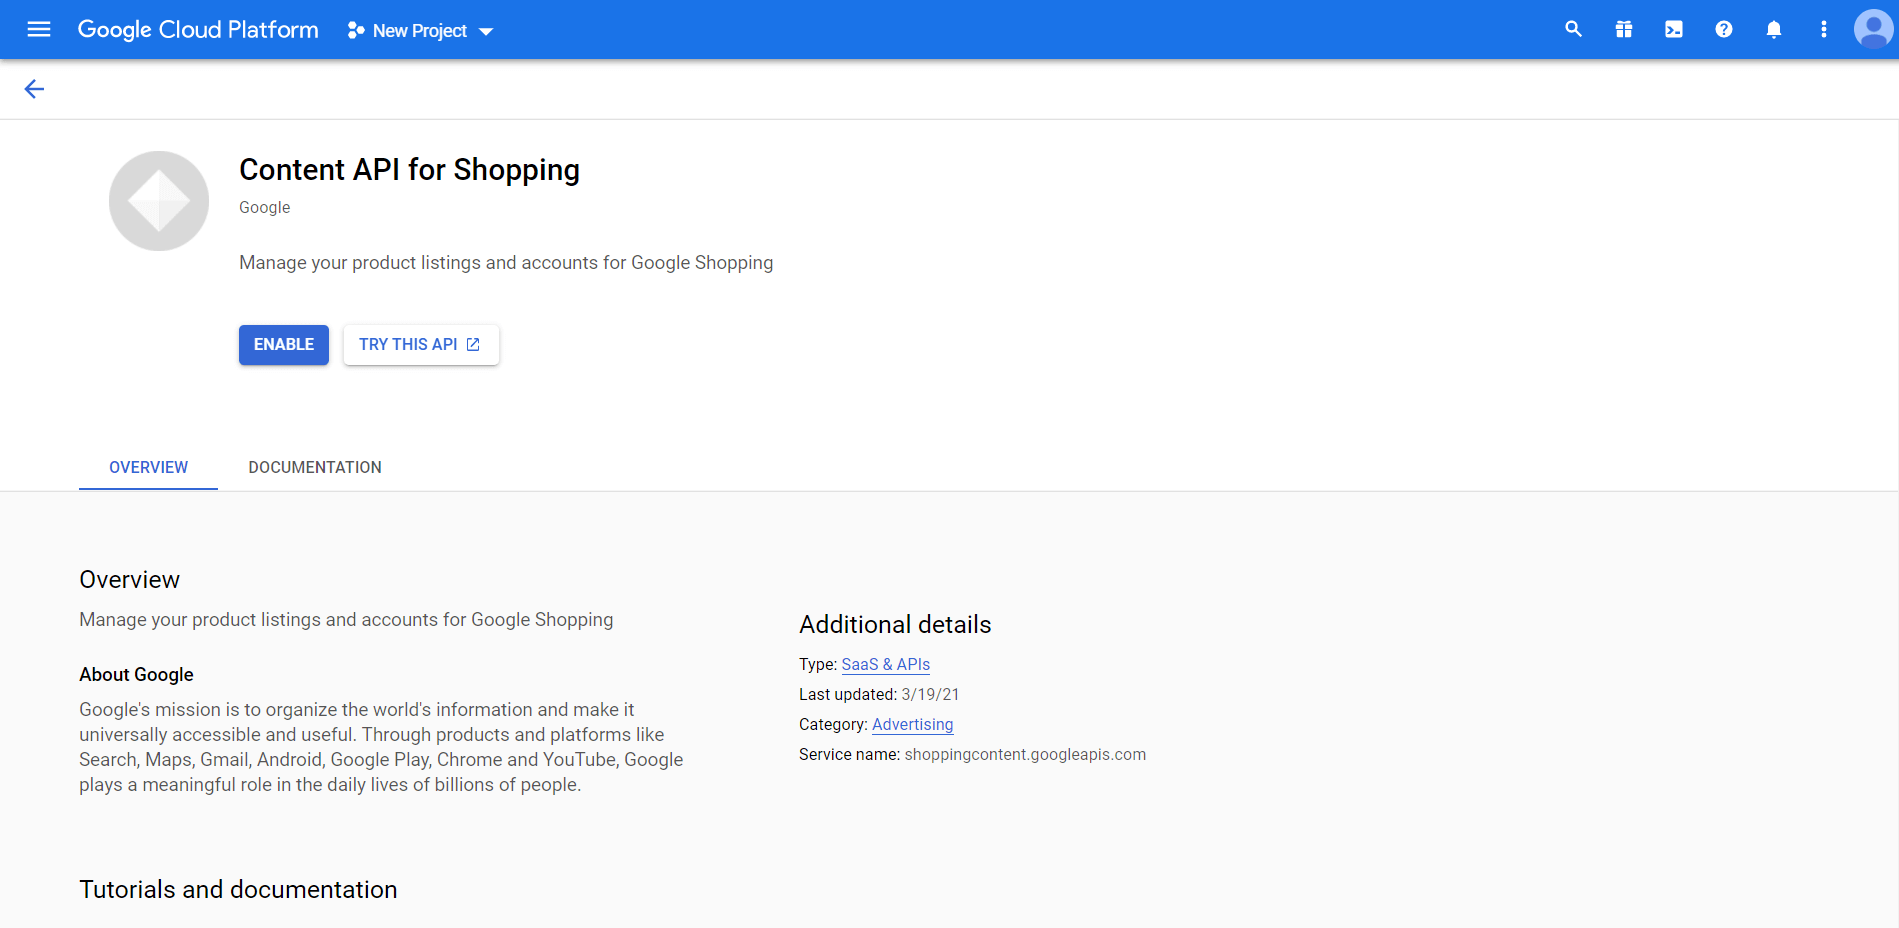
3. Search with “Content API for Shopping” and you will find an API service with the same name.

4. Click on it to view the API service overview and Enable it.
Step 3: Configure OAuth Consent Screen #
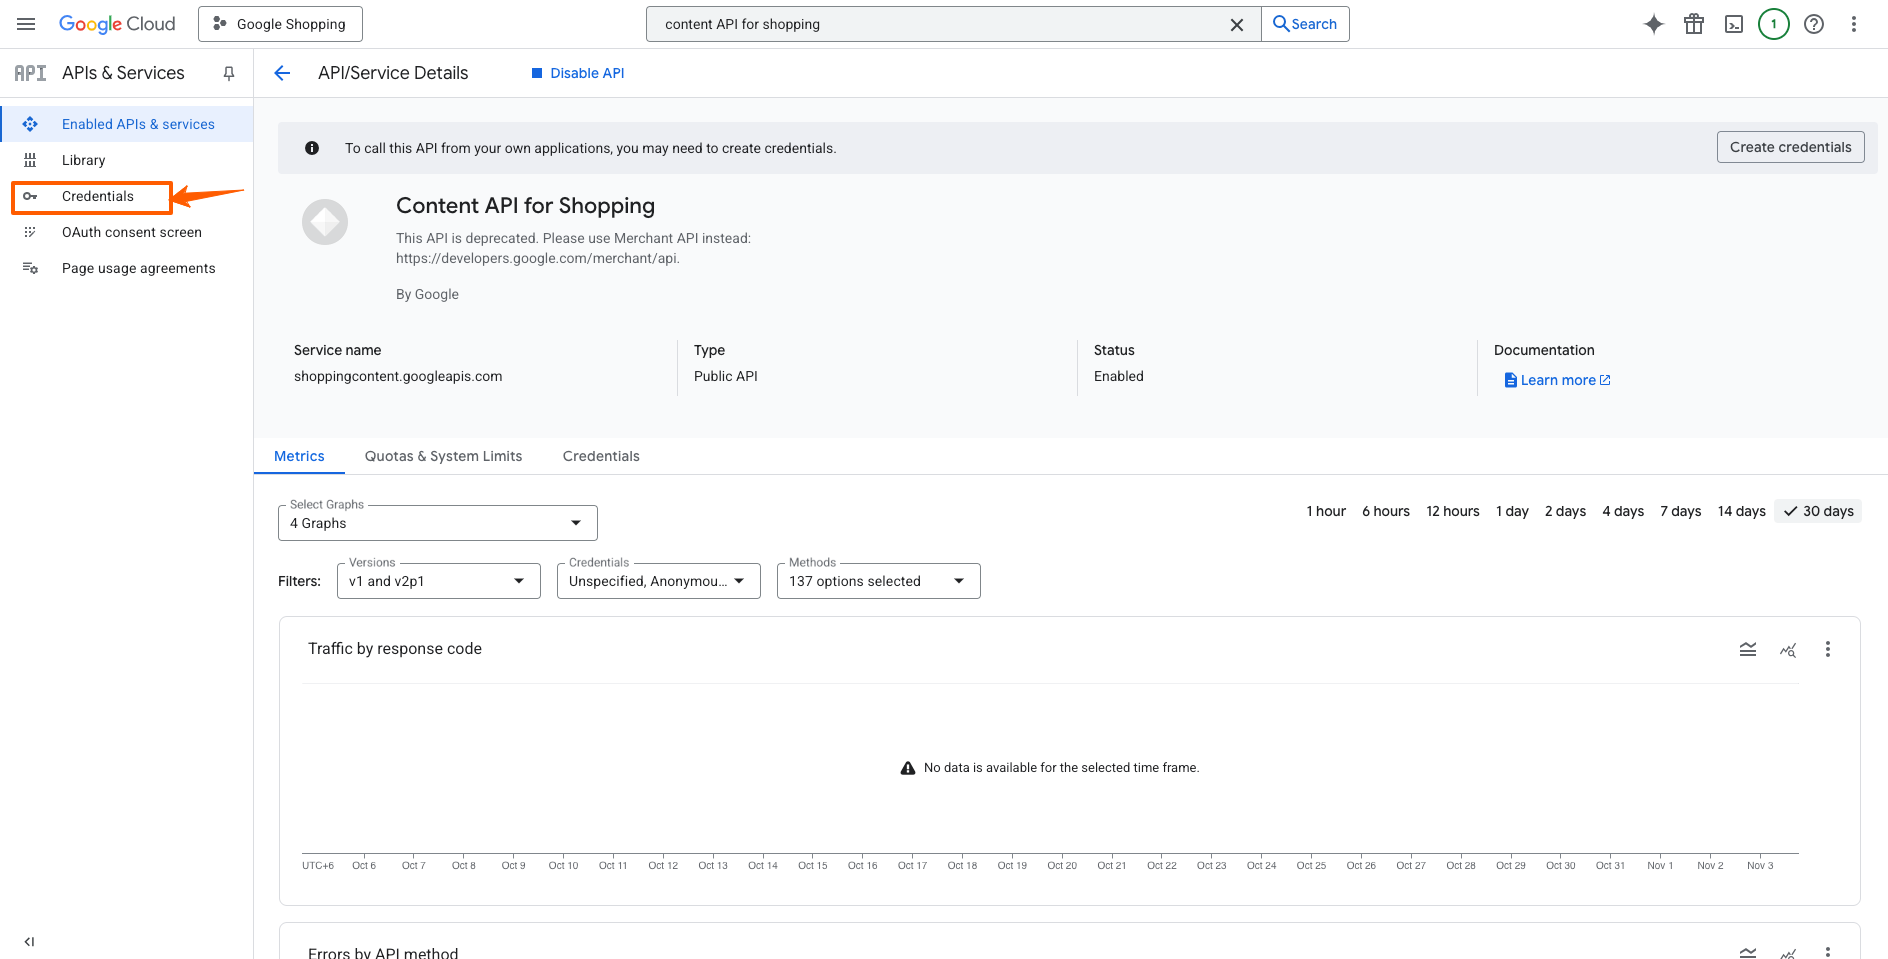
1. Once you enable the Content API for Shopping, it will take you to the Content API for the Shopping Overview dashboard. Here click on the Credentials menu option from the left side of the window
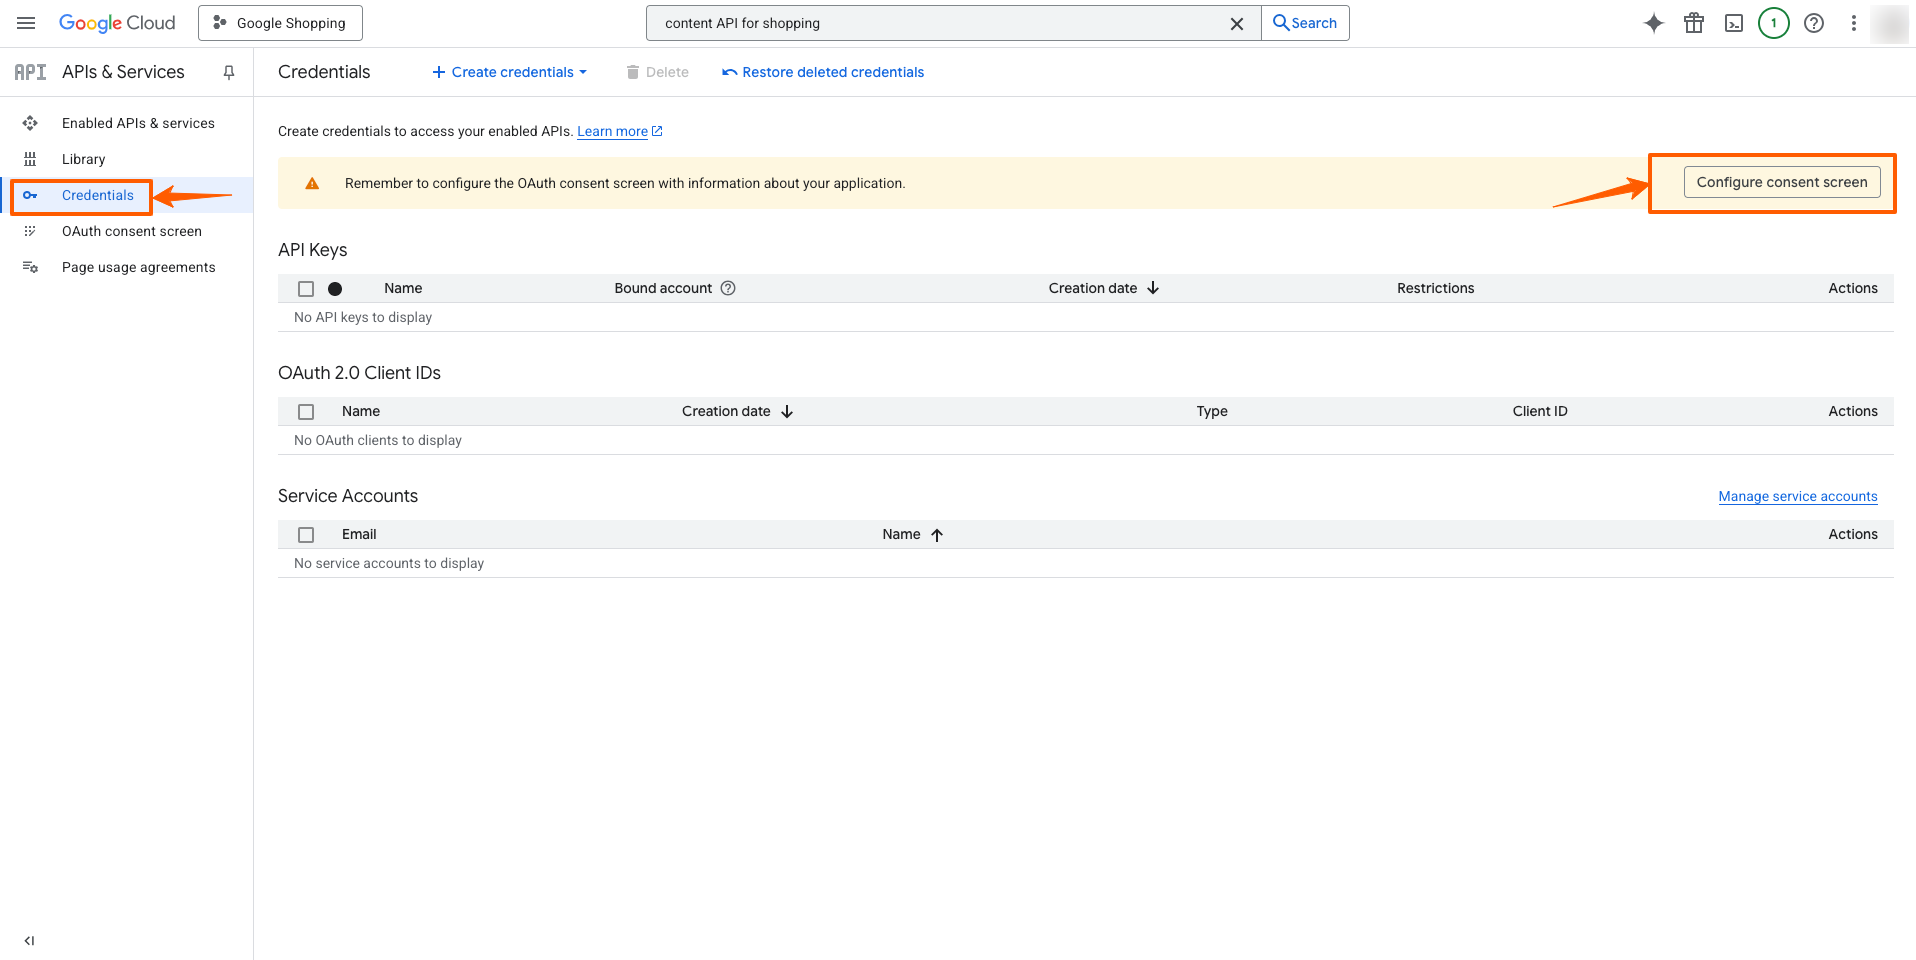
2. Click on the “Configure Consent Screen” button on the right side.
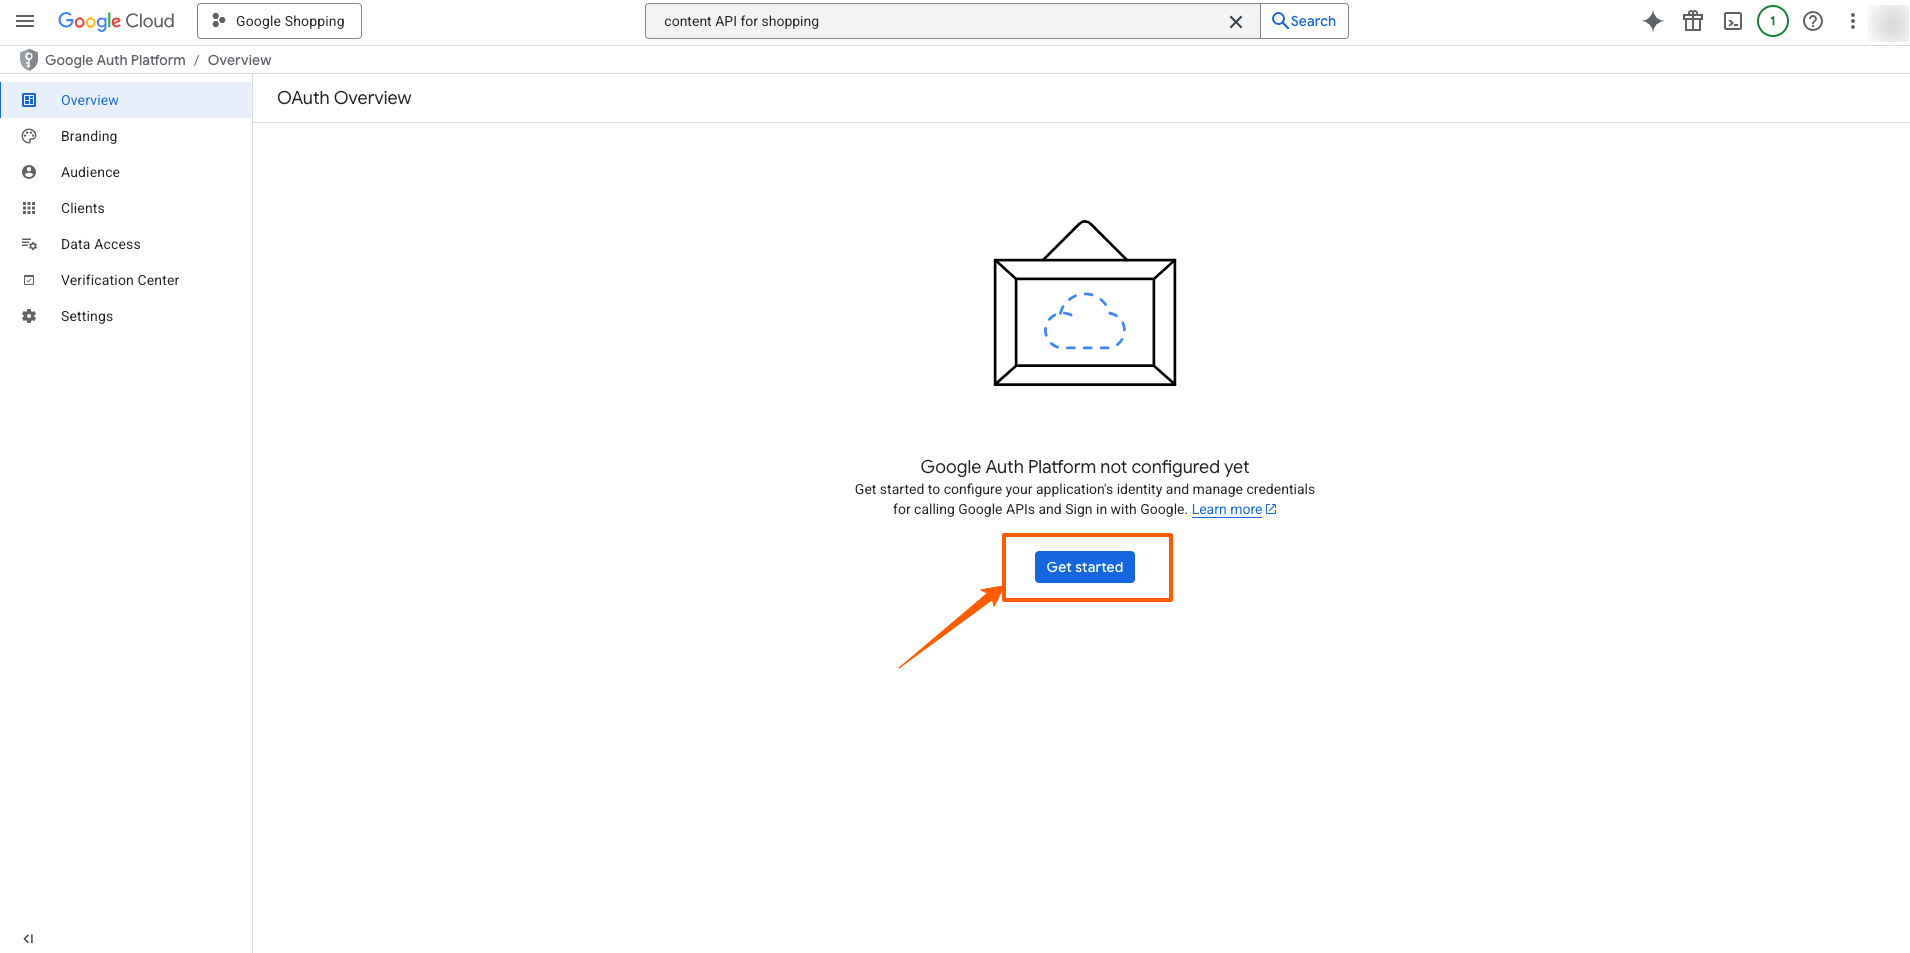
3. If you see that the Google Auth Platform not configured yet. Click on “Get Started”
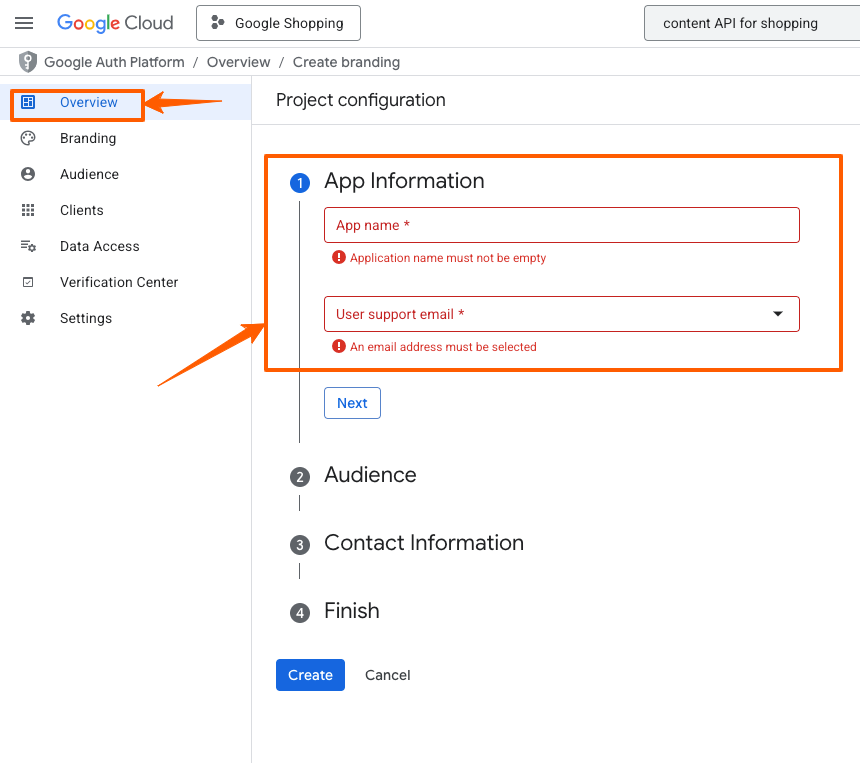
4. In the Overview Section, Provide you App Information and User Support email and click on next
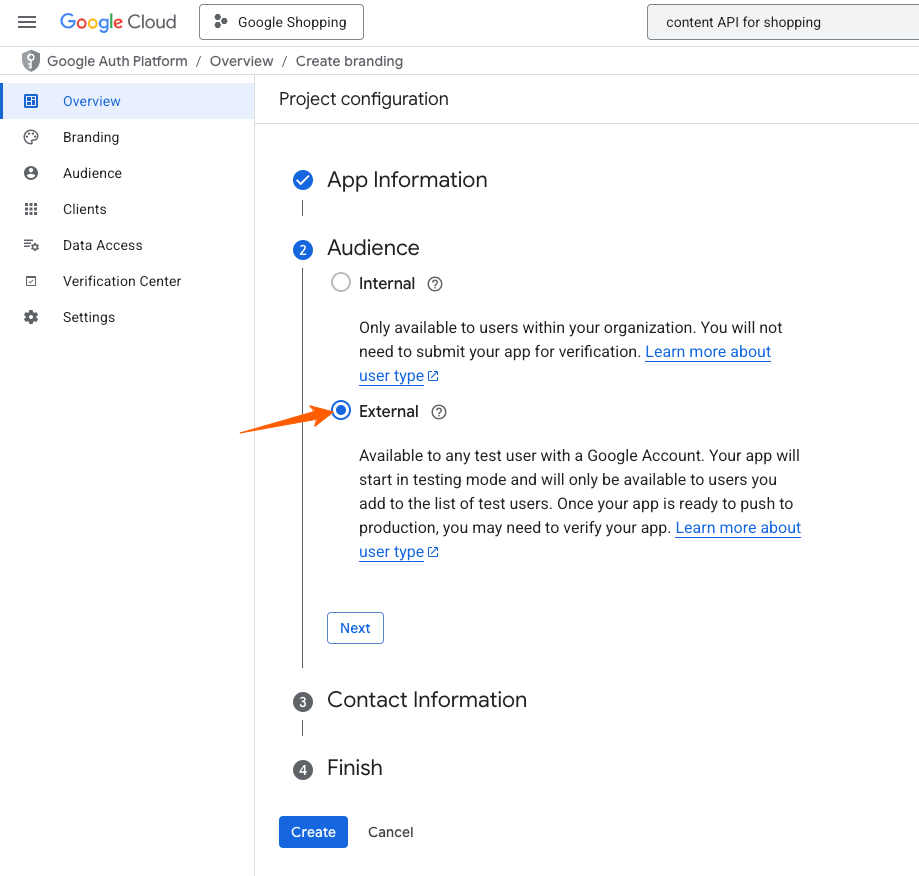
5. Now choose External and click on Next
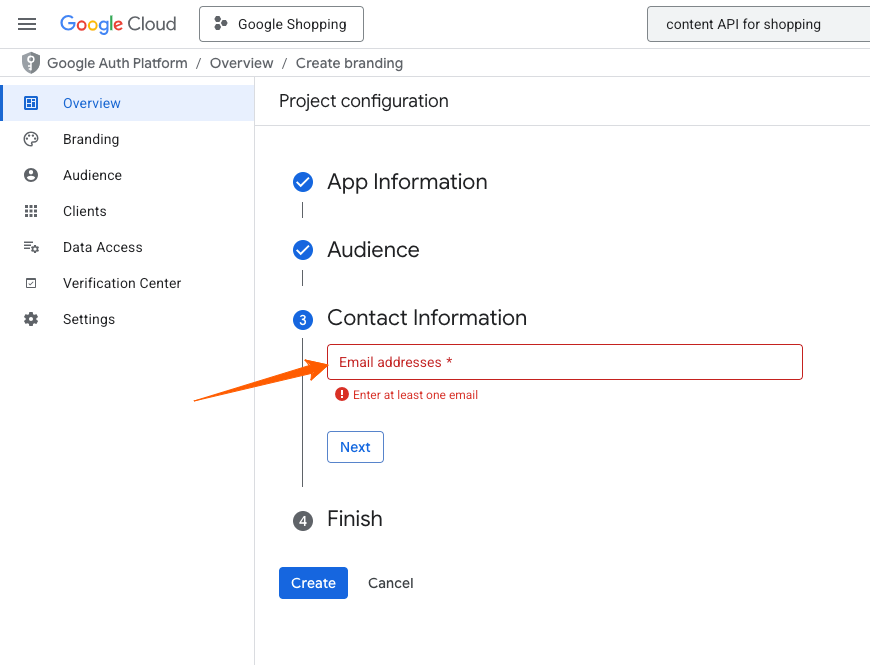
6. Now provide the Contact Information (Email)
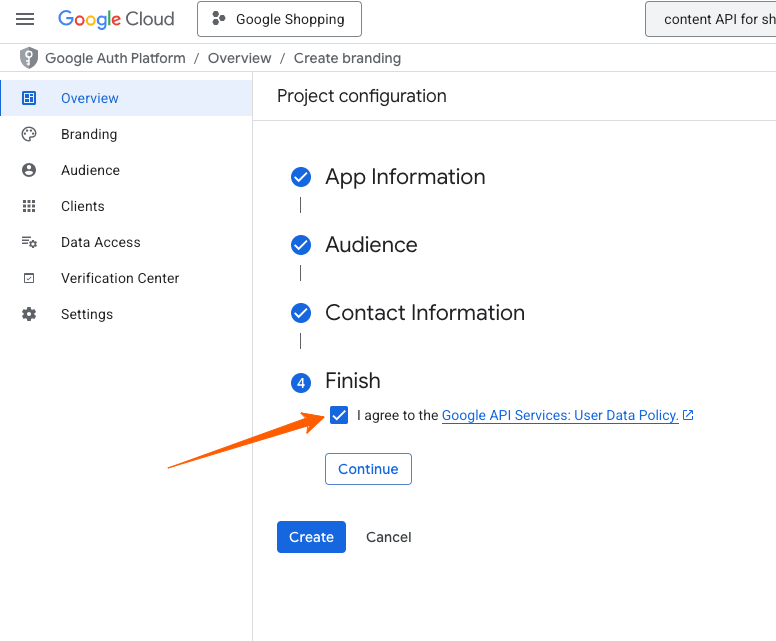
7. Now check the terms and condition and click “Create”
8. Now on the Branding Section
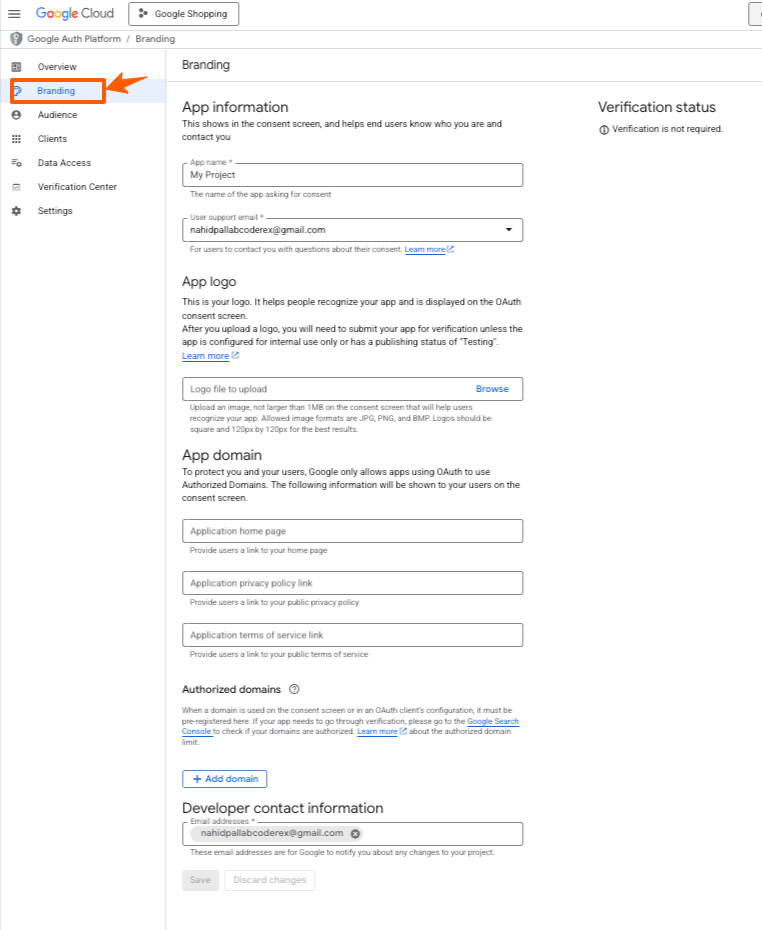
Here you will need the following information:
–App Information – Give a name to your app and provide your support e-mail address. You may
also, upload a logo for your app.
-App domain – Here you may provide links to your site’s home page, privacy policy page, and Terms of
Service page. Then click on the Add Domain button and submit your website’s domain name without ‘“https://www.”. (If you have an authorized domain, then this may already be added by default). FYI: The domain you submit here must be a top-level domain, I.e. it should be a normal domain with a .com, .org, or other such cases. So a dev server domain such as “dev.website.com” will not be accepted.
-Developer contact information – Here you may use a personal e-mail to get Google notifications.
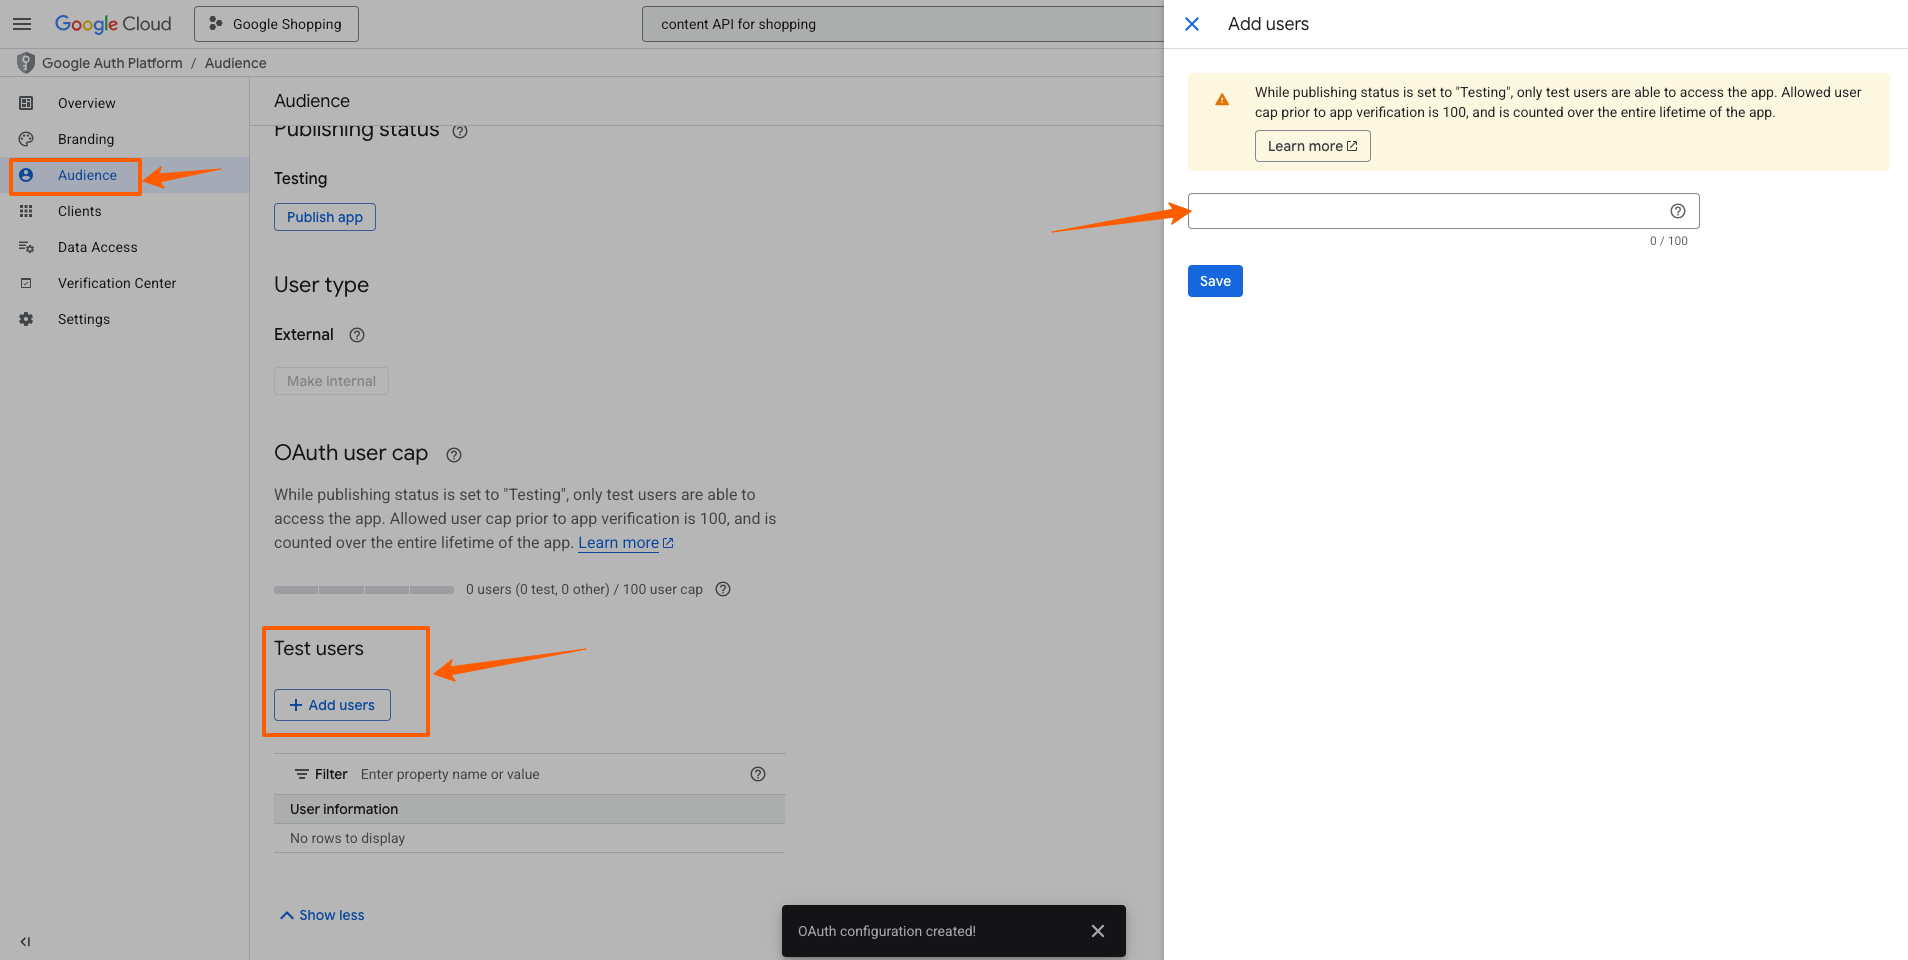
9. In the Audience Section, you can set up test users
10. Now in the Client Section, you need to Create OAuth client ID
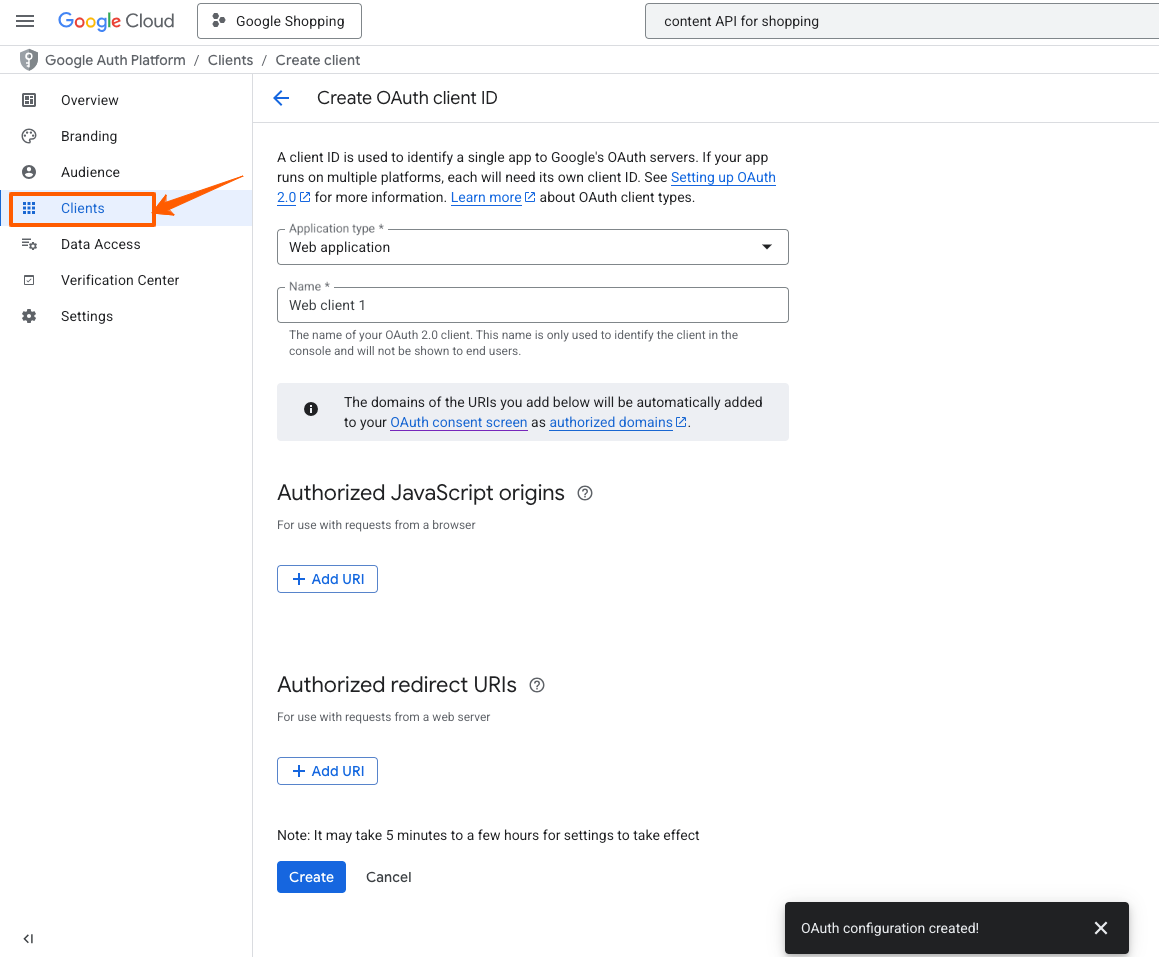
11. Now choose Application type and Name
Put in the Authorized redirect URIs for that go to Product Feed > Google Merchant Settings. Here, copy the Redirect URL from the Redirect URL field.
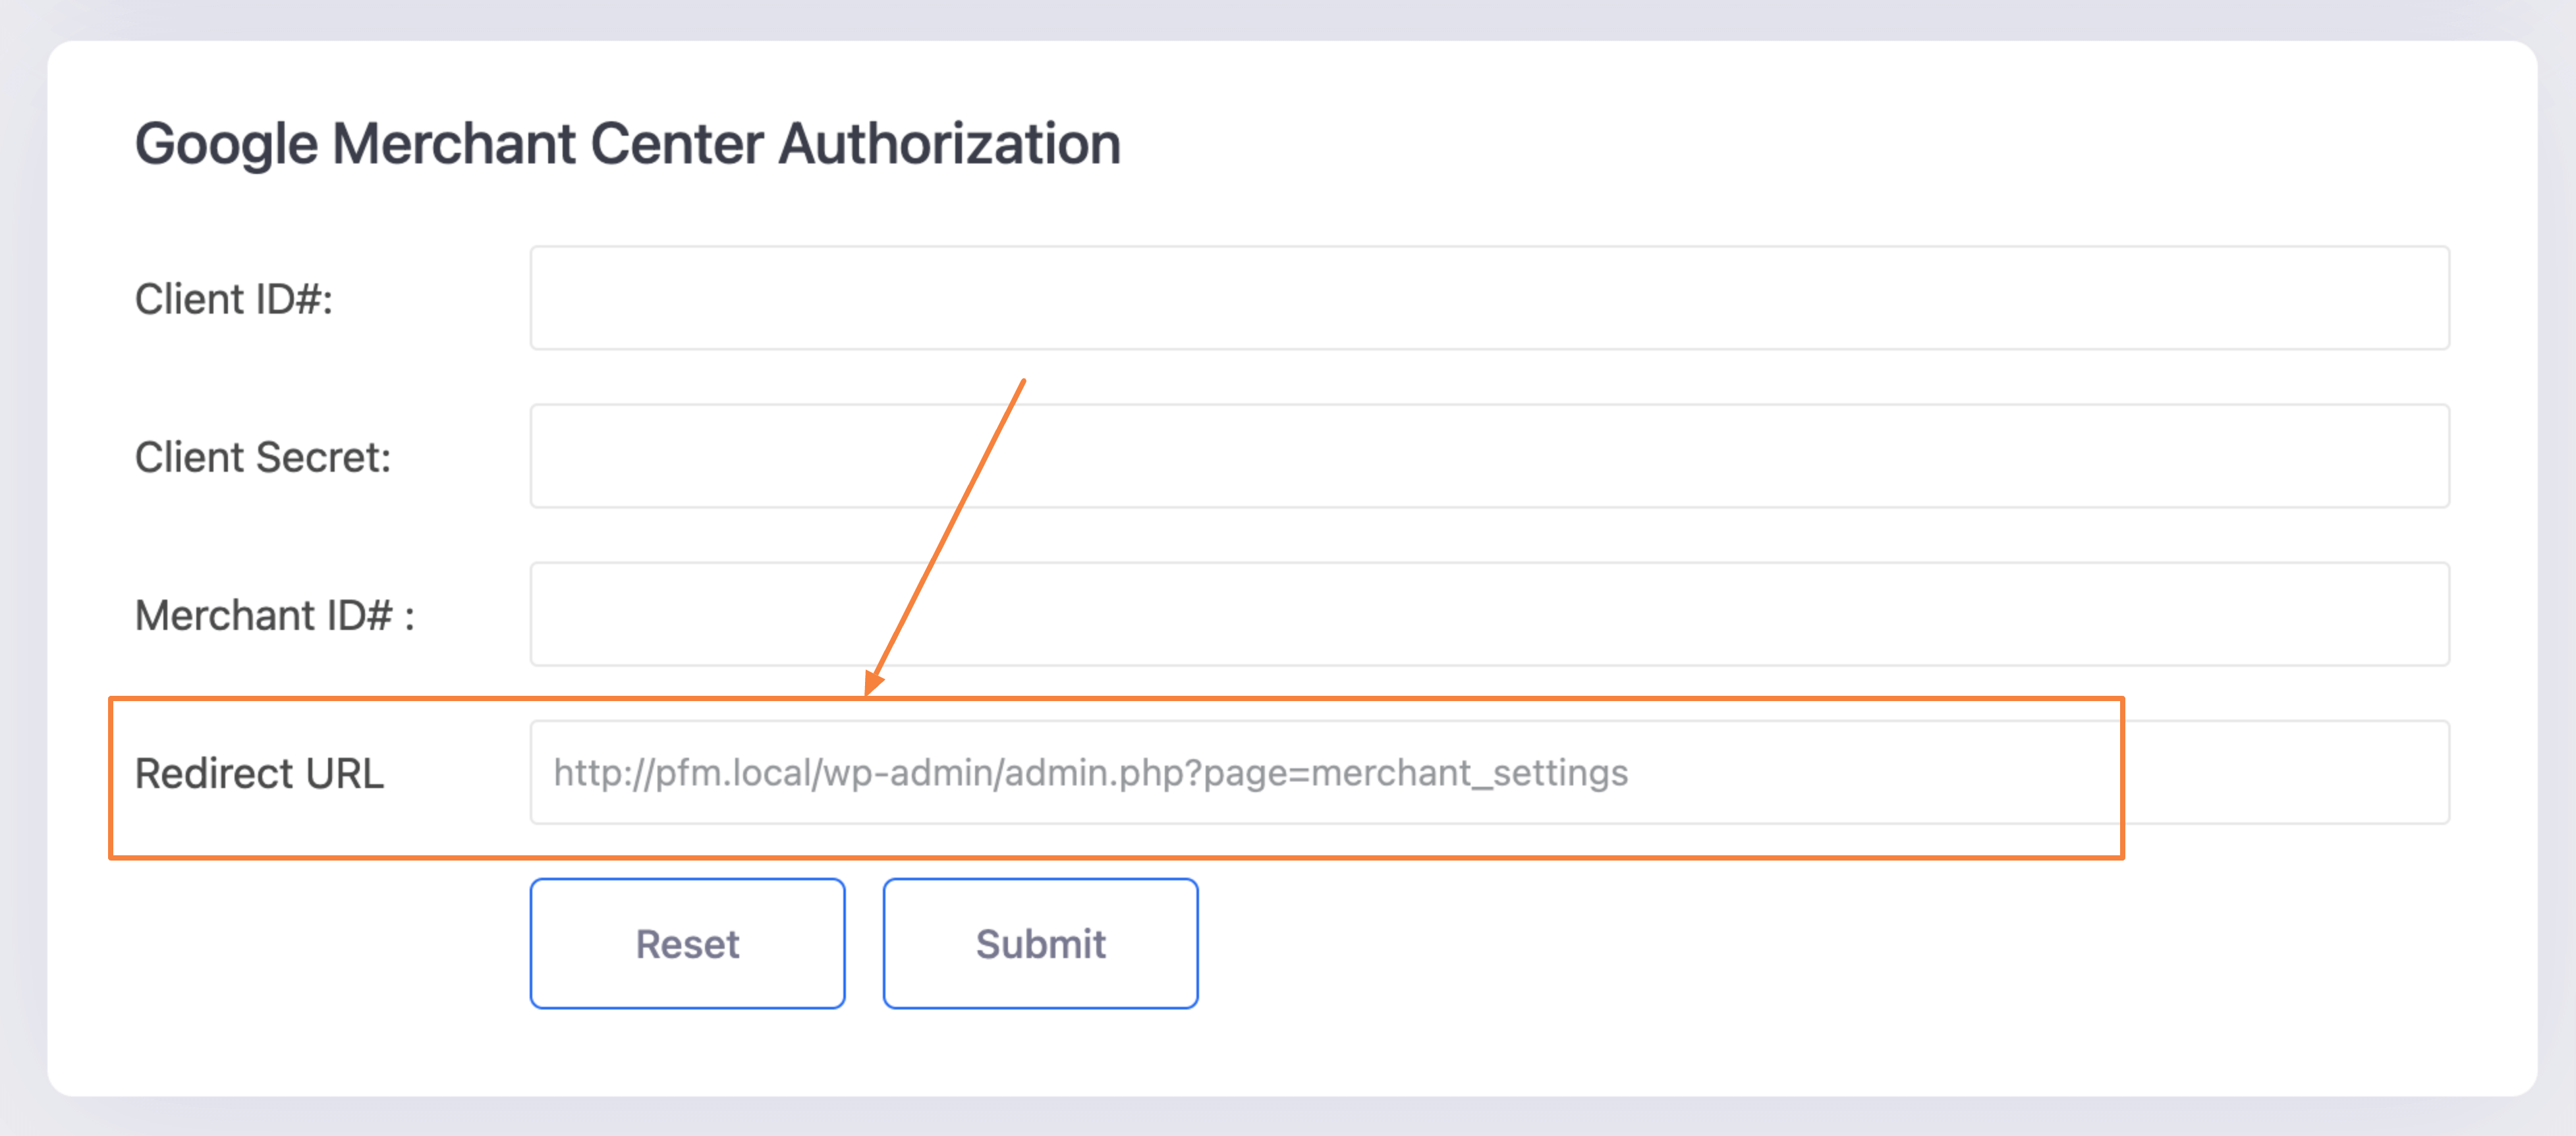
12. Now go back to your Google console tab and paste the URL. Then click on create.
Click on ADD URI for Authorized redirect URIs. Here add the Redirect URL that you just copied from the plugin. Then click on Create.
13. Your OAuth client will be created, and your Client ID and Client Secret will be generated.
You will find your:
Client ID
Client secret
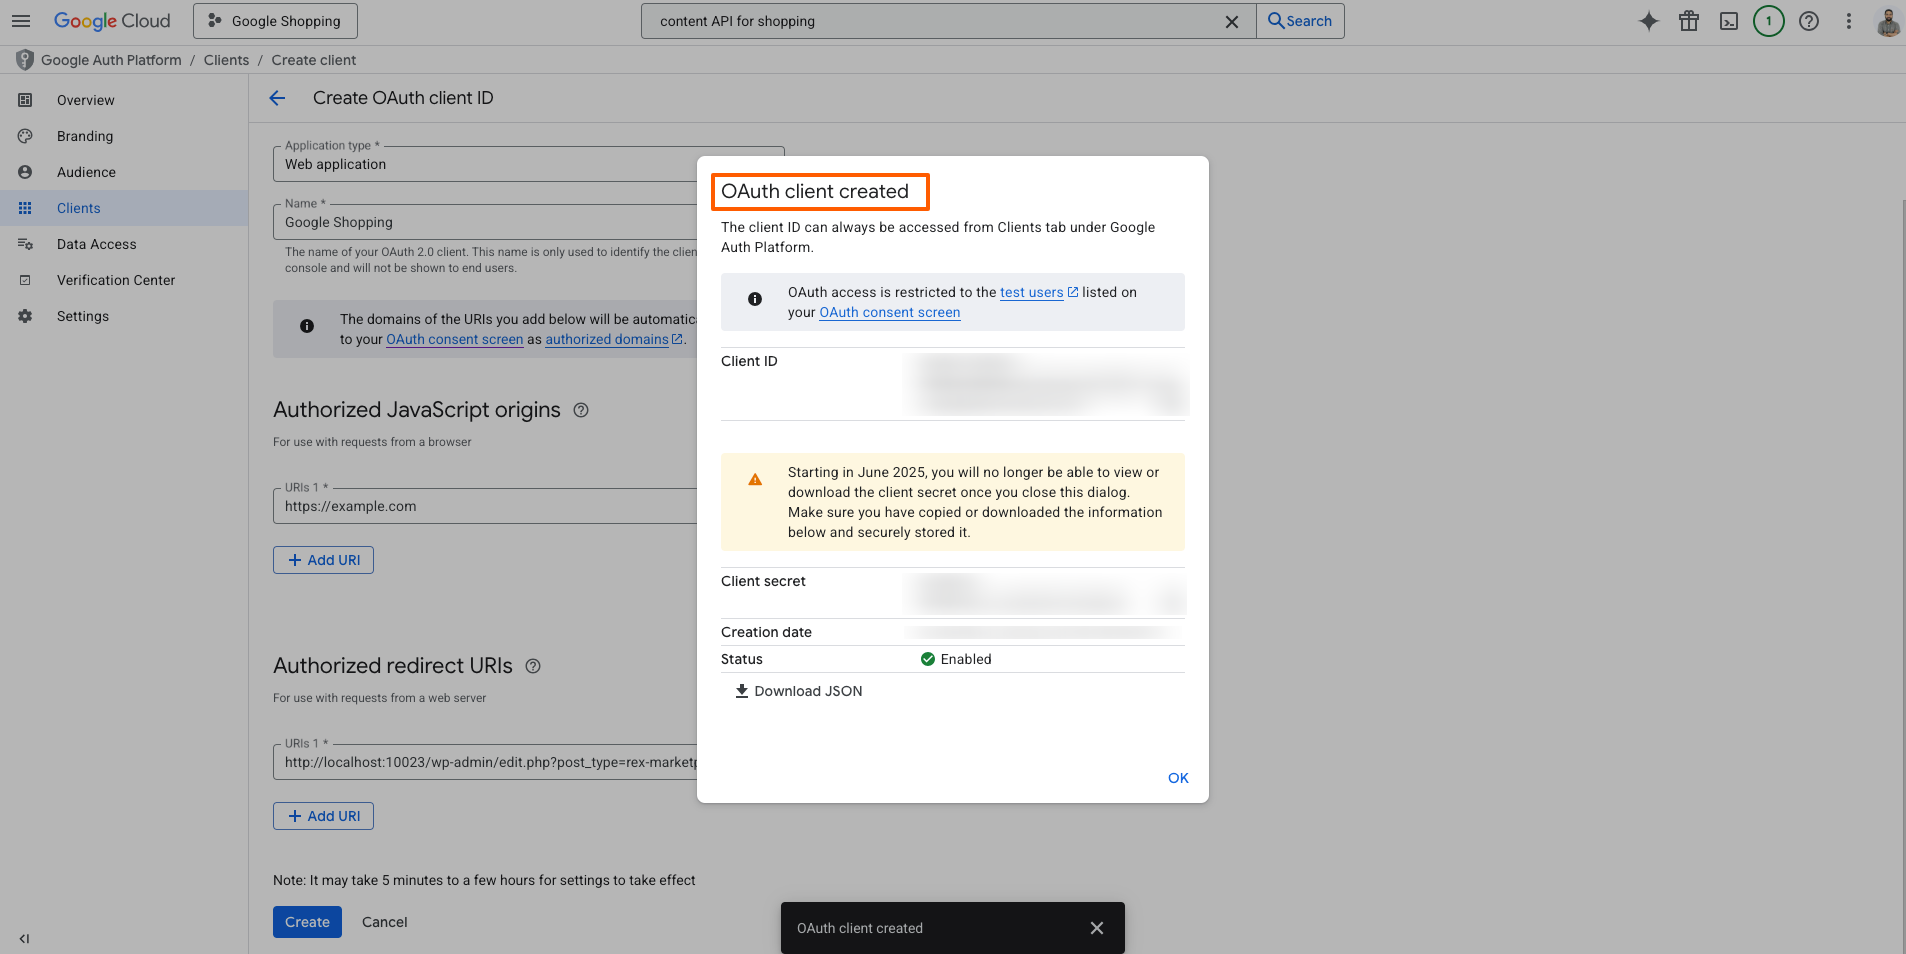
14. Copy the Client ID and Client Secret
15. Also, on another tab, go to https://merchants.google.com/ and log in to your Google Merchant Account. (Make sure your Google Merchant Account Settings are properly configured). Collect your Merchant ID from the top right corner of the window.

Step 4: Create Credentials & Authorize With Google Merchant Center #
1. Then Go back to Google Merchant Settings page open and paste Client ID, Client Secret, and the Merchant ID in the respective fields, like shown in the screenshot below:

2. Click on Submit, and a section will appear above asking you to Authenticate. Click on it and it will
confirm that you are authorized.
3. After clicking the Submit button and successfully the Authentication is completed it will be like the screenshot below:

You have set up an Auto-sync successfully and your products will be visible on Google Merchant Center after being processed by Google
Step 5: Send Products to Google Merchant Center #
Once you are authorized with Google Merchant Center, now when you generate a Google feed, you will get an option from Settings called Send Products via Google Content API. Enable this option and after that Publish or Update your Feed.
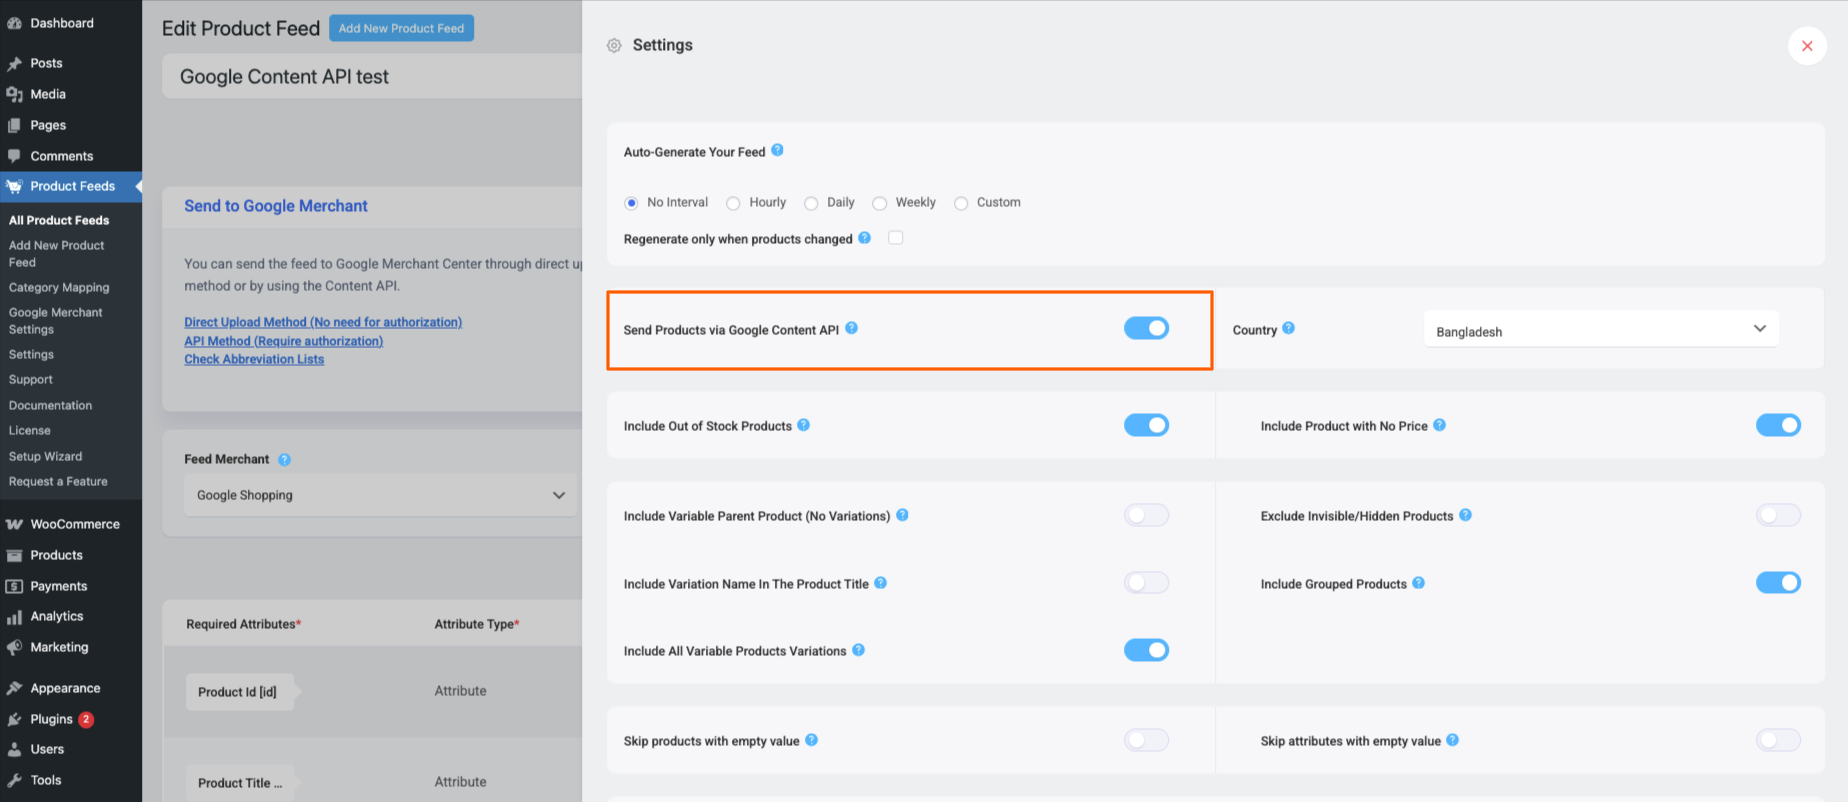
You have set up now and your products will be visible on Google Merchant Center after being processed by Google
** Please note that for each GMC account you can use the Content API method for one feed only.
Quick Note #
Once you authorized successfully to the Google Merchant Center, you can see the message like this in the Product Feed Manager dashboard’s Google Merchant Settings page:
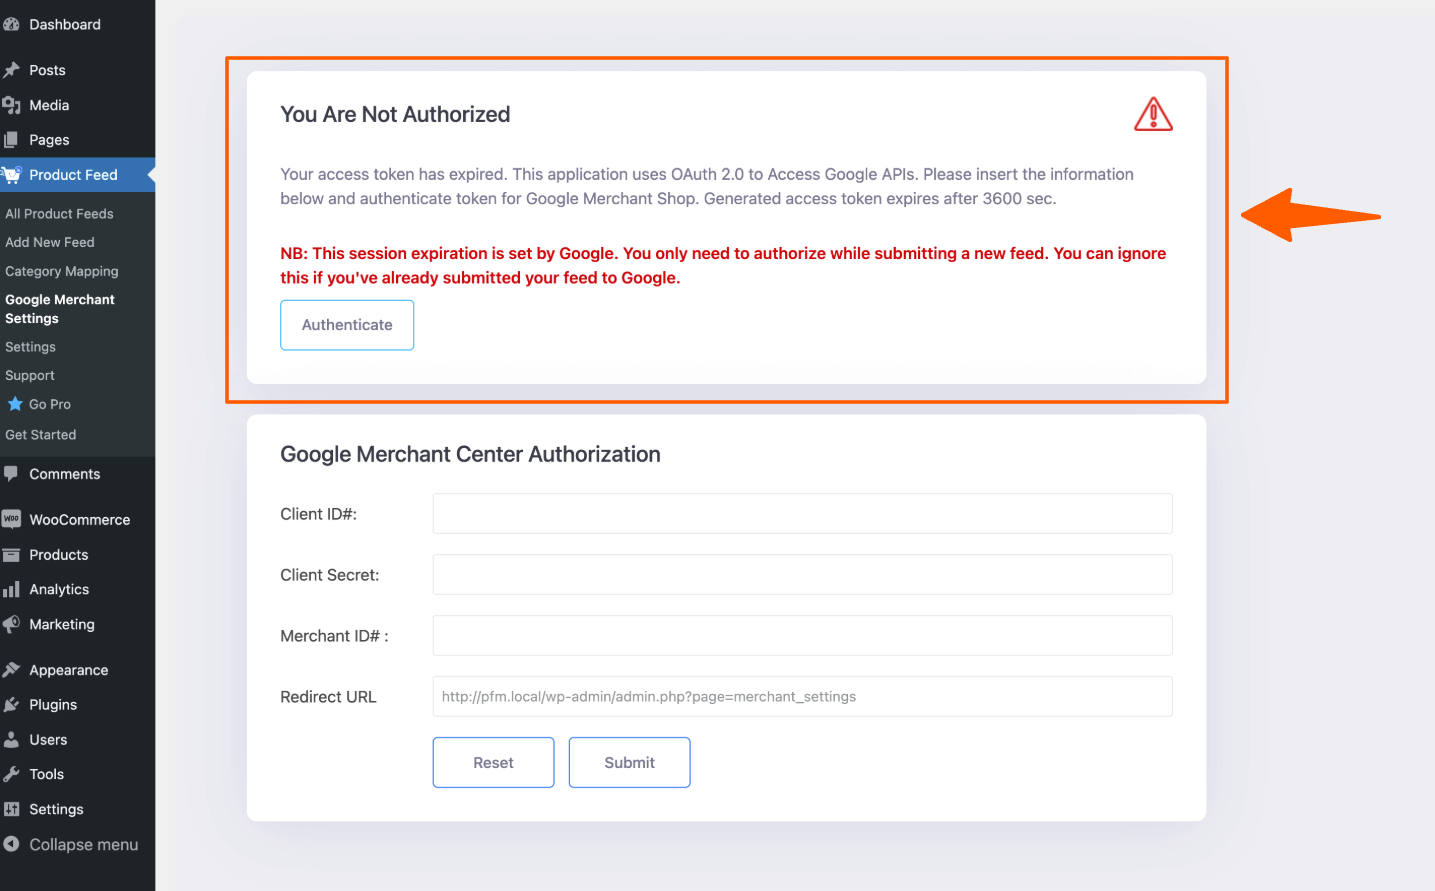
The reason you’re seeing the authentication message is because the token expires after 1 hour. This limit is set by the Google Merchant Center.
However, once the feed is successfully authenticated, you don’t need to authenticate it again—even if the message appears.
You can safely ignore the message as long as the feed has already been authorized.
** Also, please note that for each individual feed, authorization is required only once. After you’ve completed the authorization for a specific feed, you won’t need to do it again for that feed in the future.
That’s it. Your products will be visible on Google Merchant Center after being processed by Google