Skip to content
RexTheme Logo
  • Home
  • Plugins
    • WP VR
    • Product Feed
    • Social Booster
    • Cart Lift
  • Docs
  • Support
  • Blog
  • Account
    • Log In
  • Contact Us
  • NL
  • DE

Product Feed Manager

  • Introduction To WooCommerce Product Feed Manager
  • Getting Started with Product Feed Manager
  • Install and Activate WPFM
  • Generate Product Feed
  • Category Mapping
  • Auto-sync With Google Merchant Shop
  • Add Extensive Custom Fields
  • Add More Supported Merchant Sites
  • How to Upgrade to Pro – WPFM
  • eBay MIP Feed Generation
  • Useful Options On Controls Tab
  • Fix WooCommerce’s (JSON-LD) Structured Data Bug
  • Control Products Per Batch In Batch Processing
  • Exclude Tax From Structured Data Prices
  • Using Google Merchant Promotions Feed
  • Exclude “Out Of Stock” Products From WooCommerce Product Feed
  • Connect Facebook Pixel With WooCommerce For Dynamic Ads
  • Product Feed Optimization with Yoast SEO Product Title, Meta Description and Primary Category
  • Getting Started With WooCommerce Product Feed Manager
  • How To Install And Activate WPFM
  • How To Generate Product Feed For The First Time
  • Basic Plugin Overview – WooCommerce Product Feed Manager
  • How To Use Category Mapping For Product Feed
  • How To Enable Your Desired Merchant Or Marketplace For Feed Generation
  • Add Extensive Custom Fields Of Unique Identifiers For WooCommerce Products
  • Add Custom Fields For Important Product Attributes
  • How To Add Extensive Custom Fields To WooCommerce Products
  • Fix WooCommerce (JSON-LD) Structured Data For Approval In Google Shopping
  • How To Exclude Tax From Structured Data Prices
  • How To Use Custom Filter When Generating Product Feed
  • Troubleshooting Common Issues – WooCommerce Product Feed Manager
  • How To Use Category Filter When Generating Product Feed
  • How To Use Tag Filter When Generating Product Feed
  • How To Use Product Filter Options When Generating Feed
  • How To Schedule Auto-update of Feed On Set Intervals
  • How To Include Variable Products To The Feed
  • How To Include Private Products In Product Feed

WP VR

  • Introduction To WP VR
  • Getting Started With WP VR
  • How To Install And Activate WP VR
  • How To Create A Simple Virtual Tour In 5 Minutes – WP VR
  • How to Embed A Virtual Tour And Customize It – WP VR
  • WP VR Basic Plugin Overview
  • How To Add A Scene To Your Virtual Tour
  • How To Use Scene Settings To Customize A Scene
  • How To Add Hotspots To A Scene In Your Virtual Tour
  • How To Use Hotspots To Show Information, Images Or Videos
  • How To Use Hotspots To Go From One Scene To Another
  • How To Customize Hotspot Icons And Color
  • How To Use Exclusive Features On General Settings To Customize A Virtual Tour
  • How To Upgrade To Pro – WPVR
  • How To Export And Import Virtual Tours
  • How To Embed A Virtual Tour Using WPVR Gutenberg Block
  • How To Embed A Virtual Tour Using WPVR Elementor Widget
  • How To Use WP VR Oxygen Element To Embed A Virtual Tour
  • How To Embed A Youtube 360 Video On Your Website Using WPVR
  • How To Embed A Google Street View Tour On Your Website Using WPVR
  • Embed A Self Hosted Video on WPVR Hotspots
  • How To Set Up WPVR Exclusive Settings
  • How To Exclude WPVR From Autoptimize
  • Control Script And Style Loading For The Virtual Tours
  • How To Disable WordPress Large Image Handler For Virtual Tours
  • How To Duplicate A Virtual Tour
  • How To Integrate Fluent Forms On A Virtual Tour
  • How To Integrate WooCommerce To A Virtual Tour
  • How To Embed Virtual Tours On Non-WordPress Websites
  • How To Enable Gyroscope Support On Virtual Tours
  • How To Set Up A Scene Gallery On Virtual Tours
  • How To Add Background Music To Virtual Tours
  • How To Limit Keyboard Controls For Navigation And Zoom
  • How To Limit The Use Of Mouse Scroll To Zoom Or Drag To Move A Tour
  • Using Custom Icons For Navigation And Control Buttons In A Virtual Tour
  • How To Add A Home Button To Your Virtual Tour
  • How To Create A Virtual Tour With Partial Panoramas
  • How To Create A Virtual Tour With Mobile Phone Panorama Images
  • How To Set Default Scene Face On A Virtual Tour
  • How To Set A Dynamic Front End Notice On Virtual Tours For Mobile Phone Viewers
  • Demo Virtual Tours
  • Basic Virtual Tour
  • Demo Virtual Tour – WPVR Pro
  • Demo Tour – WPVR (Free)
  • Custom Scene Gallery – WPVR
  • Custom Control Icons – WPVR
  • Google Street View Tour – WPVR Pro
  • Getting Started with WP VR
  • Video Tutorials – WPVR
  • Demo Partial Panorama Virtual Tour – WPVR Pro
  • Bar/Pub Showcase
  • How To Add A Preview Image To Your Virtual Tour – WPVR
  • How to Enable Auto Rotation For Your Virtual Tour
  • How To use a WPVR Shortcode to Embed a Virtual Tour
  • How to Add Your Company Logo in Your Virtual Tour – WPVR
  • Troubleshooting Common Issues – WPVR
  • How To Auto Resize Images On Mobile Devices for Virtual Tours
  • How To Set Custom Zoom Settings On A Scene In Your Virtual Tour – WPVR
  • How to Set 360 Image Grab Limit On A Scene in Your Virtual Tour – WPVR
  • How To Solve Virtual Tour Not Showing Up – WPVR
  • How To Exclude Assets of WPVR From Autoptimize
  • How To Embed Youtube Videos Inside Virtual Tours Using WPVR
  • How To Create Full Screen Virtual Tours – WPVR

Social Booster

  • Social Booster
  • Install and Activate Social Booster
  • Getting Started with Social Booster
  • How Social Booster Works
  • Social Booster Dashboard Overview
  • Connect Facebook For Auto-Posting
  • Connect Twitter For Auto-Posting
  • Auto-Post And Share With Social Booster
  • Connect Tumblr For Auto-Posting
  • Connect LinkedIn For Social Auto-Posting
  • Connect Reddit For Auto-Posting
  • Connect Pinterest For Social Auto-Posting
  • Schedule Post With Social Booster
  • Set Multiple Profiles On Social Booster

Cart Lift

  • Introduction To Cart Lift
  • Getting Started With Cart Lift
  • Install And Activate Cart Lift
  • A Basic Plugin Overview – Cart Lift
  • Configure And Use Cart Lift Effectively
  • How To Track Abandoned Carts Automatically
  • How To Set Up Your Abandoned Cart Recovery Campaign
  • How To Get Notifications For Abandoned Carts And Recovery
  • How To Integrate SMTP Through Cart Lift
  • Get Full Analytics Report On Recovery Campaign
  • How To Upgrade To Pro – Cart Lift

Media Storage To Cloud

  • WP Media Storage To Cloud
  • Getting Started – Media Storage To Cloud
  • How to install and activate Media to Cloud Storage
  • WP Media Storage To Cloud Dashboard Overview
  • How To Connect Amazon S3 Bucket
  • How To Connect Google Cloud Storage
  • How To Set Up IAM User For Amazon S3 Bucket
  • How To Set Up Google Cloud Storage Bucket To Serve Media Files
  • How To Connect DigitalOcean Spaces
  • How To Create An Amazon CloudFront Distribution
  • How To Create An Amazon CloudFront Origin Access Identity
  • Troubleshooting For Common Issues – Media Storage To Cloud
  • How To Create Free HTTPS Certificate On Amazon S3

Variation Swatches

  • Variation Swatches for WooCommerce – Getting Started
  • Variation Swatches For WooCommerce – Dashboard Overview
  • Variation Swatches For WooCommerce – Install And Activate
  • Change Dropdown to Button Swatches for WooCommerce Variations
  • How To Set Up WooCommerce Color Swatches For Color Variation
  • How To Set Up WooCommerce Image Swatches For Image Variation
  • How To Set Up Label Swatches For WooCommerce Product Variations
  • How To Customize Variation Swatch Hover Style
  • How To Customize Variation Swatches Global Style
  • How To Customize Variation Swatches Selected Style

VR Places Theme

  • How To Install And Activate VR Places Theme
  • How To Customize Global Settings for VR Places Theme
  • Home
  • Docs
  • WP VR

Control Script And Style Loading For The Virtual Tours

Table of Contents
  • Control WP VR Script And Style Loading On Your Site
  • Exclude WPVR JS Files From Autoptimizer
  • Exclude WPVR JS Files From SG Optimizer

You can control the WP VR assets, such as scripts and styles, to load only on the pages/posts you want.

Simply follow the steps below

Control WP VR Script And Style Loading On Your Site #

1. Go to the Dashboard > WP VR > Get Started and on the top-right side, click on the Settings tab.

WP-VR Home Page

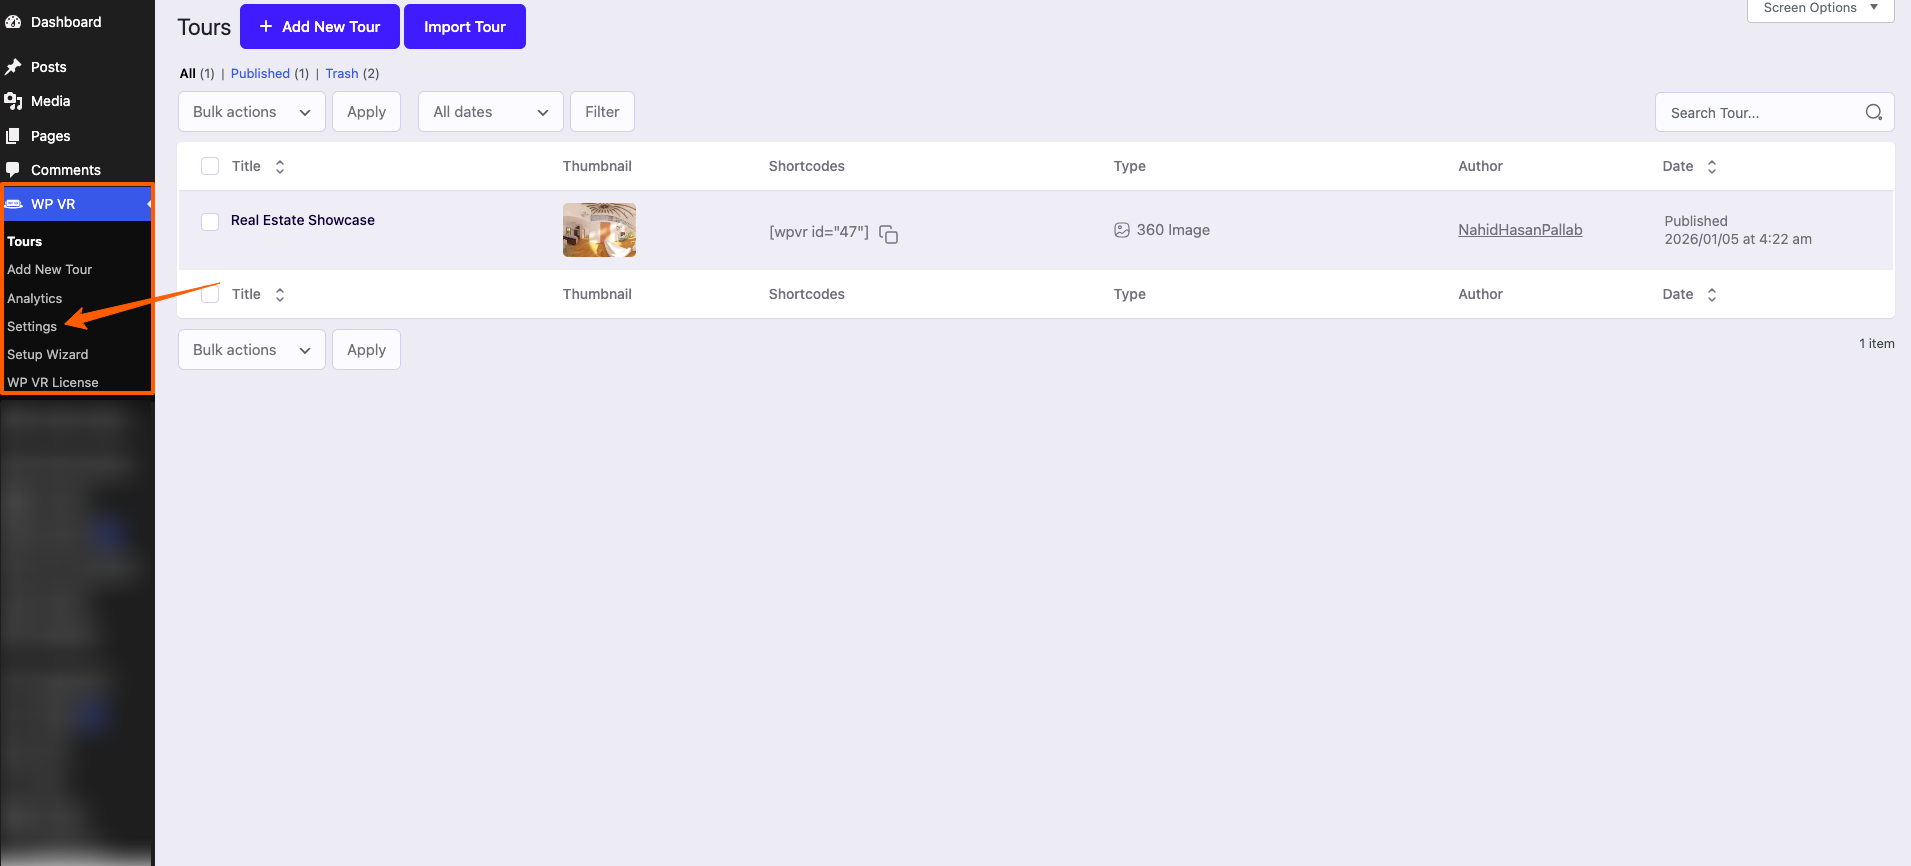
It will take you o the General Setup Options page where you will find all the exclusive settings of WP VR.

WP-VR General Settings

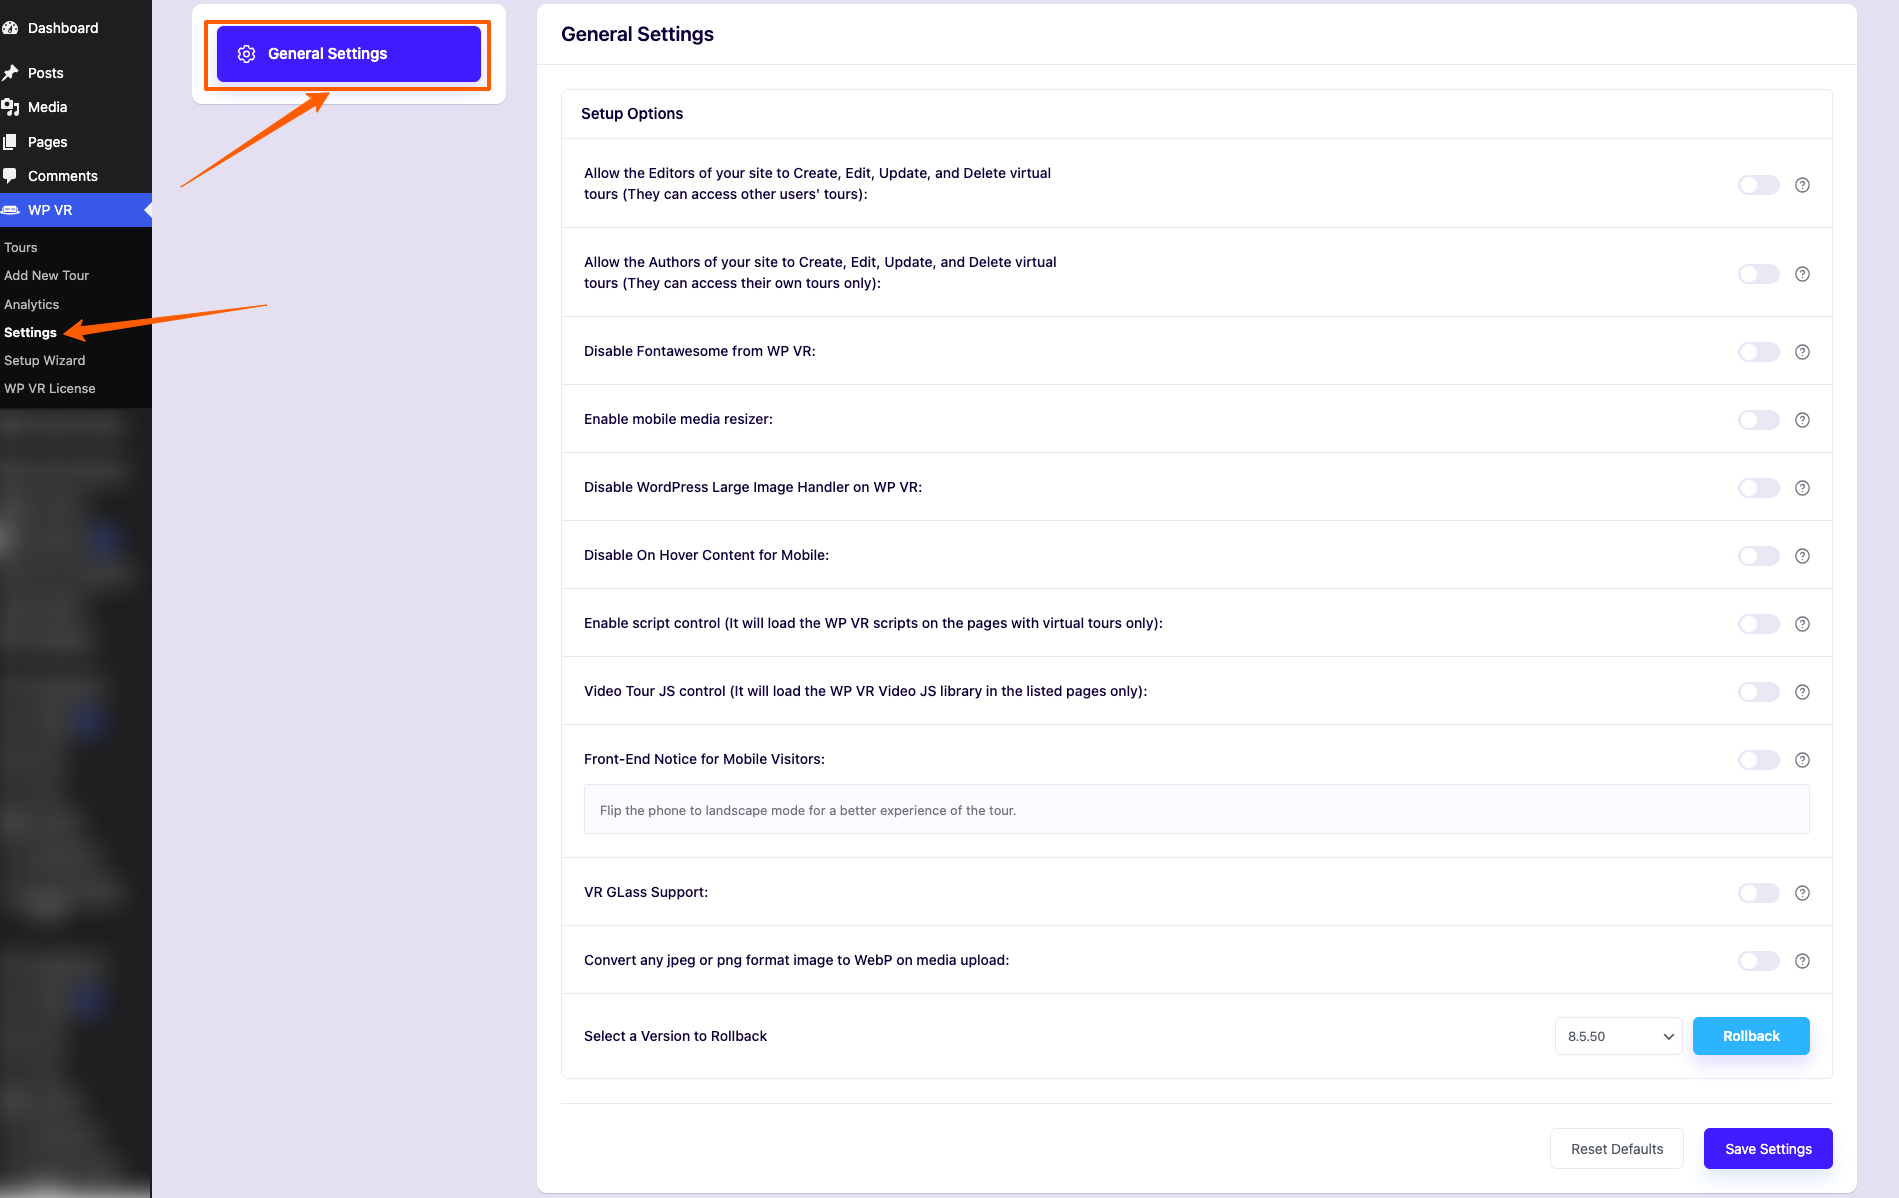
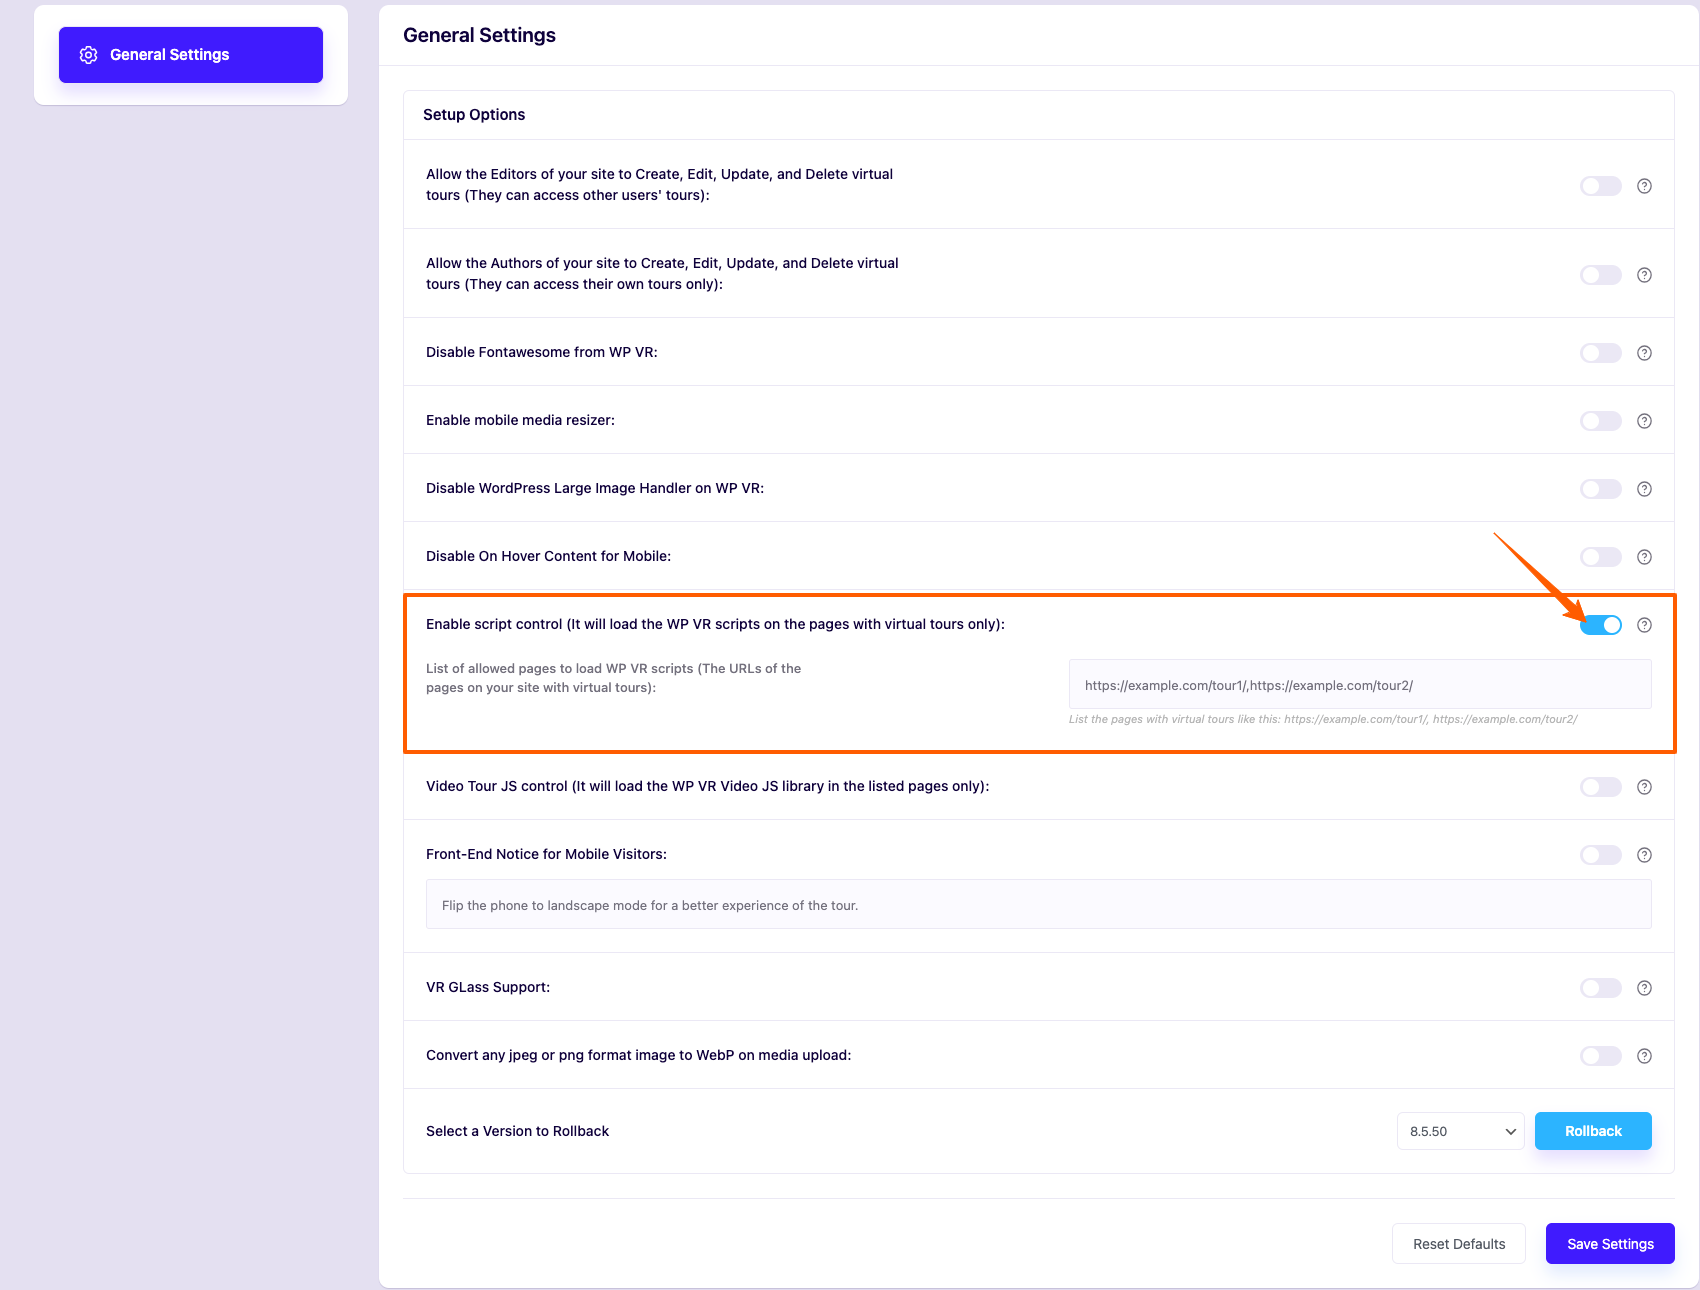
2. Look for the options called Enable Script Control and enable it.

Enable Script Control

Turning it on will ensure that WP VR assets will no longer be loaded in any page on your site.

3. Now, go to the pages/posts where you want to load WP VR assets, seeming the pages where you embedded a virtual tour using WP VR, and copy their URLs.

Copy URL of Tour Page

4. Then go back to the Settings section of WPVR and look for the the option “List of allowed pages to load WP VR scripts“.

Pages Allowed To Load Scripts

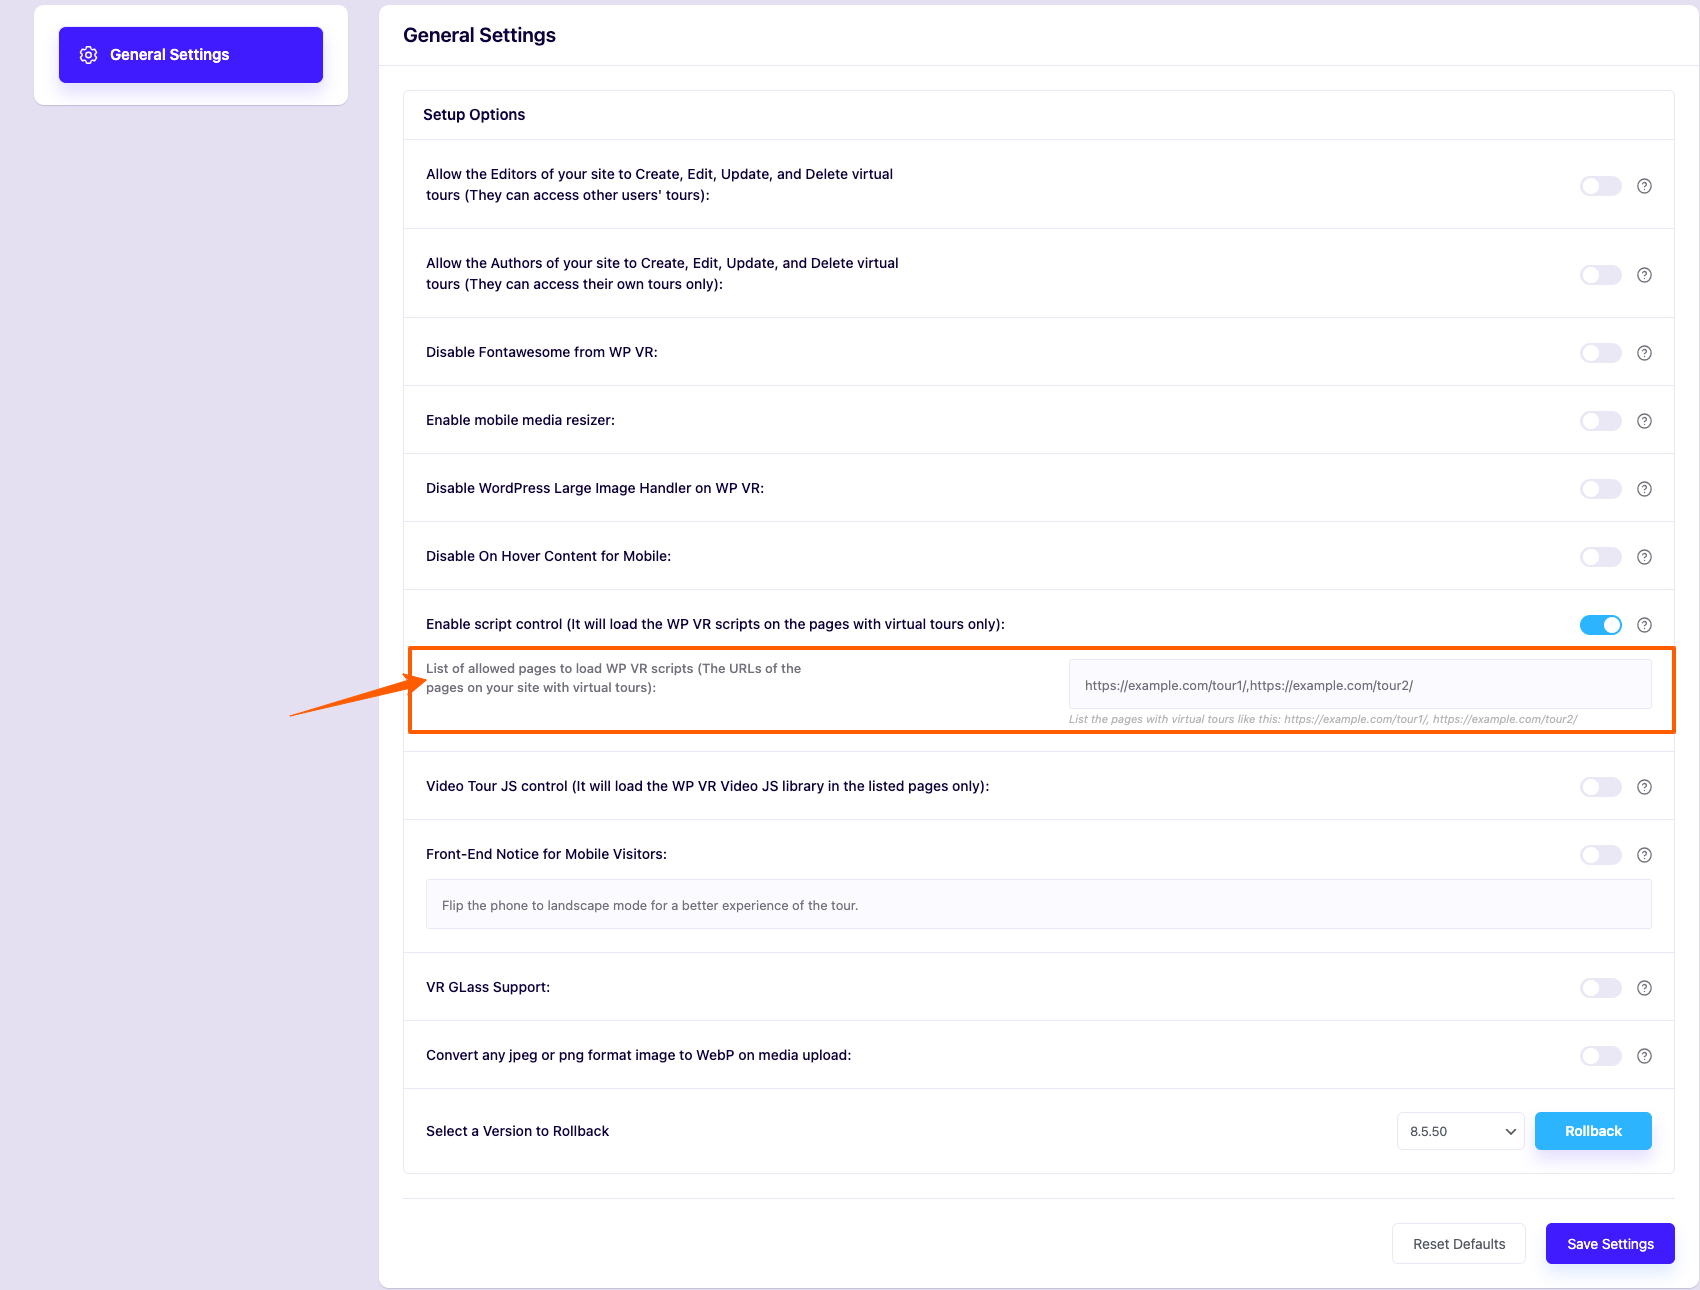
One the field, paste the URLs that you just copied with commas between multiple URLs and no spaces.

For example, suppose you have two pages:

  • https://mywebsite/test-1
  • https://mywebsite/test-2

So here, you have to input them with just commas in between and no spaces.

Just like this:
https://mywebsite/test-1,https://mywebsite/test-2

5. Then click on the Save button below.

And that’s it. Now, WPVR scripts and styles will be loaded only on the pages/posts that you have listed here.

If you’re using any optimization plugin, you have to regenerate the optimized assets.

Suppose you’re using the plugin Autoptimizer, here is how you can do it:

Exclude WPVR JS Files From Autoptimizer #

If you are using Autoptimizer, it will minify the JS files of WPVR and the tour will not show up.

So you have to exclude the plugin folders from the Autoptimizer.

Go to Autoptimizer and under CSS, JS, and HTML section, you’ll see the ‘Exclude scripts from Autoptimize:‘ field.

Exclude WPVR JS From Autoptimizer

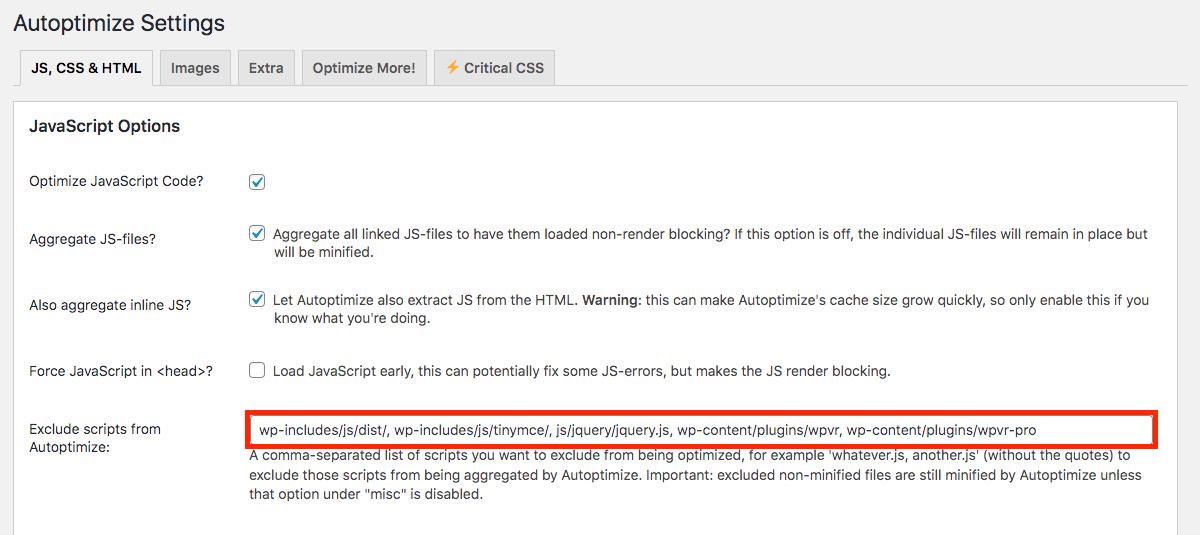
If you’re using the free version of WPVR, add a comma (,) and include wp-content/plugins/wpvr.

If you’re using the pro version of WPVR, add a comma (,) and include wp-content/plugins/wpvr, wp-content/plugins/wpvr-pro.

Now scroll down and click on the Save Changes and Empty Cache button.

From now on, your virtual tours will show up on your site and the JS files of your website will still be optimized.

Exclude WPVR JS Files From SG Optimizer #

If you are using SG Optimizer, it may minify the JS files of WPVR and the tour may not show up.

So, you can exclude the pages with virtual tours from optimization to avoid this issue.

Go to SuperCacher then choose Exclude URLs.

Exclude URLs from SG Optimizer

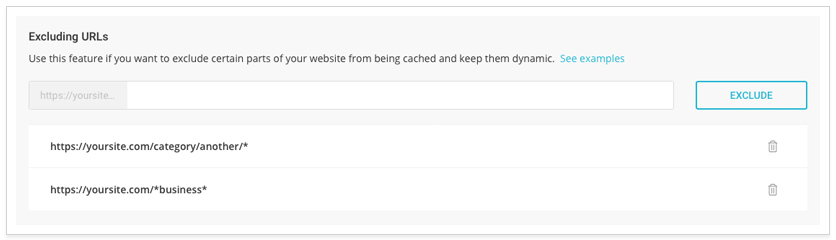
Copy the URLs of the posts or pages where you have published a virtual tour and paste it in this field.

You can list multiple URLs to exclude from being cached or optimized.

You can learn more about excluding URLs from SG Optimizer from here.

Share This Article :
Updated on August 13, 2020
How To Exclude WPVR From Autoptimize How To Disable WordPress Large Image Handler For Virtual Tours
Table of Contents
  • Control WP VR Script And Style Loading On Your Site
  • Exclude WPVR JS Files From Autoptimizer
  • Exclude WPVR JS Files From SG Optimizer
RexTheme Logo
Our Plugins
  • WP VR
  • Product Feed Manager
  • Social Booster
  • Cart Lift
Resources
  • Privacy Policy
  • Terms of Service
  • Affiliate Program
  • Contact Us
Payment Methods
Payment methods

© . All rights reserved by RexTheme