Skip to content
RexTheme Logo
  • Home
  • Plugins
    • WP VR
    • Product Feed
    • Social Booster
    • Cart Lift
  • Docs
  • Support
  • Blog
  • Account
    • Log In
  • Contact Us
  • NL
  • DE

Product Feed Manager

  • Introduction To WooCommerce Product Feed Manager
  • Getting Started with Product Feed Manager
  • Install and Activate WPFM
  • Generate Product Feed
  • Category Mapping
  • Auto-sync With Google Merchant Shop
  • Add Extensive Custom Fields
  • Add More Supported Merchant Sites
  • How to Upgrade to Pro – WPFM
  • eBay MIP Feed Generation
  • Useful Options On Controls Tab
  • Fix WooCommerce’s (JSON-LD) Structured Data Bug
  • Control Products Per Batch In Batch Processing
  • Exclude Tax From Structured Data Prices
  • Using Google Merchant Promotions Feed
  • Exclude “Out Of Stock” Products From WooCommerce Product Feed
  • Connect Facebook Pixel With WooCommerce For Dynamic Ads
  • Product Feed Optimization with Yoast SEO Product Title, Meta Description and Primary Category
  • Getting Started With WooCommerce Product Feed Manager
  • How To Install And Activate WPFM
  • How To Generate Product Feed For The First Time
  • Basic Plugin Overview – WooCommerce Product Feed Manager
  • How To Use Category Mapping For Product Feed
  • How To Enable Your Desired Merchant Or Marketplace For Feed Generation
  • Add Extensive Custom Fields Of Unique Identifiers For WooCommerce Products
  • Add Custom Fields For Important Product Attributes
  • How To Add Extensive Custom Fields To WooCommerce Products
  • Fix WooCommerce (JSON-LD) Structured Data For Approval In Google Shopping
  • How To Exclude Tax From Structured Data Prices
  • How To Use Custom Filter When Generating Product Feed
  • Troubleshooting Common Issues – WooCommerce Product Feed Manager
  • How To Use Category Filter When Generating Product Feed
  • How To Use Tag Filter When Generating Product Feed
  • How To Use Product Filter Options When Generating Feed
  • How To Schedule Auto-update of Feed On Set Intervals
  • How To Include Variable Products To The Feed
  • How To Include Private Products In Product Feed

WP VR

  • Introduction To WP VR
  • Getting Started With WP VR
  • How To Install And Activate WP VR
  • How To Create A Simple Virtual Tour In 5 Minutes – WP VR
  • How to Embed A Virtual Tour And Customize It – WP VR
  • WP VR Basic Plugin Overview
  • How To Add A Scene To Your Virtual Tour
  • How To Use Scene Settings To Customize A Scene
  • How To Add Hotspots To A Scene In Your Virtual Tour
  • How To Use Hotspots To Show Information, Images Or Videos
  • How To Use Hotspots To Go From One Scene To Another
  • How To Customize Hotspot Icons And Color
  • How To Use Exclusive Features On General Settings To Customize A Virtual Tour
  • How To Upgrade To Pro – WPVR
  • How To Export And Import Virtual Tours
  • How To Embed A Virtual Tour Using WPVR Gutenberg Block
  • How To Embed A Virtual Tour Using WPVR Elementor Widget
  • How To Use WP VR Oxygen Element To Embed A Virtual Tour
  • How To Embed A Youtube 360 Video On Your Website Using WPVR
  • How To Embed A Google Street View Tour On Your Website Using WPVR
  • Embed A Self Hosted Video on WPVR Hotspots
  • How To Set Up WPVR Exclusive Settings
  • How To Exclude WPVR From Autoptimize
  • Control Script And Style Loading For The Virtual Tours
  • How To Disable WordPress Large Image Handler For Virtual Tours
  • How To Duplicate A Virtual Tour
  • How To Integrate Fluent Forms On A Virtual Tour
  • How To Integrate WooCommerce To A Virtual Tour
  • How To Embed Virtual Tours On Non-WordPress Websites
  • How To Enable Gyroscope Support On Virtual Tours
  • How To Set Up A Scene Gallery On Virtual Tours
  • How To Add Background Music To Virtual Tours
  • How To Limit Keyboard Controls For Navigation And Zoom
  • How To Limit The Use Of Mouse Scroll To Zoom Or Drag To Move A Tour
  • Using Custom Icons For Navigation And Control Buttons In A Virtual Tour
  • How To Add A Home Button To Your Virtual Tour
  • How To Create A Virtual Tour With Partial Panoramas
  • How To Create A Virtual Tour With Mobile Phone Panorama Images
  • How To Set Default Scene Face On A Virtual Tour
  • How To Set A Dynamic Front End Notice On Virtual Tours For Mobile Phone Viewers
  • Demo Virtual Tours
  • Basic Virtual Tour
  • Demo Virtual Tour – WPVR Pro
  • Demo Tour – WPVR (Free)
  • Custom Scene Gallery – WPVR
  • Custom Control Icons – WPVR
  • Google Street View Tour – WPVR Pro
  • Getting Started with WP VR
  • Video Tutorials – WPVR
  • Demo Partial Panorama Virtual Tour – WPVR Pro
  • Bar/Pub Showcase
  • How To Add A Preview Image To Your Virtual Tour – WPVR
  • How to Enable Auto Rotation For Your Virtual Tour
  • How To use a WPVR Shortcode to Embed a Virtual Tour
  • How to Add Your Company Logo in Your Virtual Tour – WPVR
  • Troubleshooting Common Issues – WPVR
  • How To Auto Resize Images On Mobile Devices for Virtual Tours
  • How To Set Custom Zoom Settings On A Scene In Your Virtual Tour – WPVR
  • How to Set 360 Image Grab Limit On A Scene in Your Virtual Tour – WPVR
  • How To Solve Virtual Tour Not Showing Up – WPVR
  • How To Exclude Assets of WPVR From Autoptimize
  • How To Embed Youtube Videos Inside Virtual Tours Using WPVR
  • How To Create Full Screen Virtual Tours – WPVR

Social Booster

  • Social Booster
  • Install and Activate Social Booster
  • Getting Started with Social Booster
  • How Social Booster Works
  • Social Booster Dashboard Overview
  • Connect Facebook For Auto-Posting
  • Connect Twitter For Auto-Posting
  • Auto-Post And Share With Social Booster
  • Connect Tumblr For Auto-Posting
  • Connect LinkedIn For Social Auto-Posting
  • Connect Reddit For Auto-Posting
  • Connect Pinterest For Social Auto-Posting
  • Schedule Post With Social Booster
  • Set Multiple Profiles On Social Booster

Cart Lift

  • Introduction To Cart Lift
  • Getting Started With Cart Lift
  • Install And Activate Cart Lift
  • A Basic Plugin Overview – Cart Lift
  • Configure And Use Cart Lift Effectively
  • How To Track Abandoned Carts Automatically
  • How To Set Up Your Abandoned Cart Recovery Campaign
  • How To Get Notifications For Abandoned Carts And Recovery
  • How To Integrate SMTP Through Cart Lift
  • Get Full Analytics Report On Recovery Campaign
  • How To Upgrade To Pro – Cart Lift

Media Storage To Cloud

  • WP Media Storage To Cloud
  • Getting Started – Media Storage To Cloud
  • How to install and activate Media to Cloud Storage
  • WP Media Storage To Cloud Dashboard Overview
  • How To Connect Amazon S3 Bucket
  • How To Connect Google Cloud Storage
  • How To Set Up IAM User For Amazon S3 Bucket
  • How To Set Up Google Cloud Storage Bucket To Serve Media Files
  • How To Connect DigitalOcean Spaces
  • How To Create An Amazon CloudFront Distribution
  • How To Create An Amazon CloudFront Origin Access Identity
  • Troubleshooting For Common Issues – Media Storage To Cloud
  • How To Create Free HTTPS Certificate On Amazon S3

Variation Swatches

  • Variation Swatches for WooCommerce – Getting Started
  • Variation Swatches For WooCommerce – Dashboard Overview
  • Variation Swatches For WooCommerce – Install And Activate
  • Change Dropdown to Button Swatches for WooCommerce Variations
  • How To Set Up WooCommerce Color Swatches For Color Variation
  • How To Set Up WooCommerce Image Swatches For Image Variation
  • How To Set Up Label Swatches For WooCommerce Product Variations
  • How To Customize Variation Swatch Hover Style
  • How To Customize Variation Swatches Global Style
  • How To Customize Variation Swatches Selected Style

VR Places Theme

  • How To Install And Activate VR Places Theme
  • How To Customize Global Settings for VR Places Theme
  • Home
  • Docs
  • WP VR

How to Enable Auto Rotation For Your Virtual Tour

Table of Contents
  • Enable Auto Rotation For Your Virtual Tour
  • Rotation Speed and Direction
  • Resume Auto Rotation After
  • Stop Auto Rotation After

You can enable auto rotation feature so that when a person visits your virtual tour, the tour will rotate automatically.

Also, you can set the rotation speed and direction as well.

Let’s have a look at how you can enable auto-rotation for your virtual tours and customize it.

Enable Auto Rotation For Your Virtual Tour #

Follow the steps below to set up auto-rotation on your virtual tour.

1. While editing or creating a tour, go to the Basic Settings tab under the General tab.

WPVR Tour Edit Mode

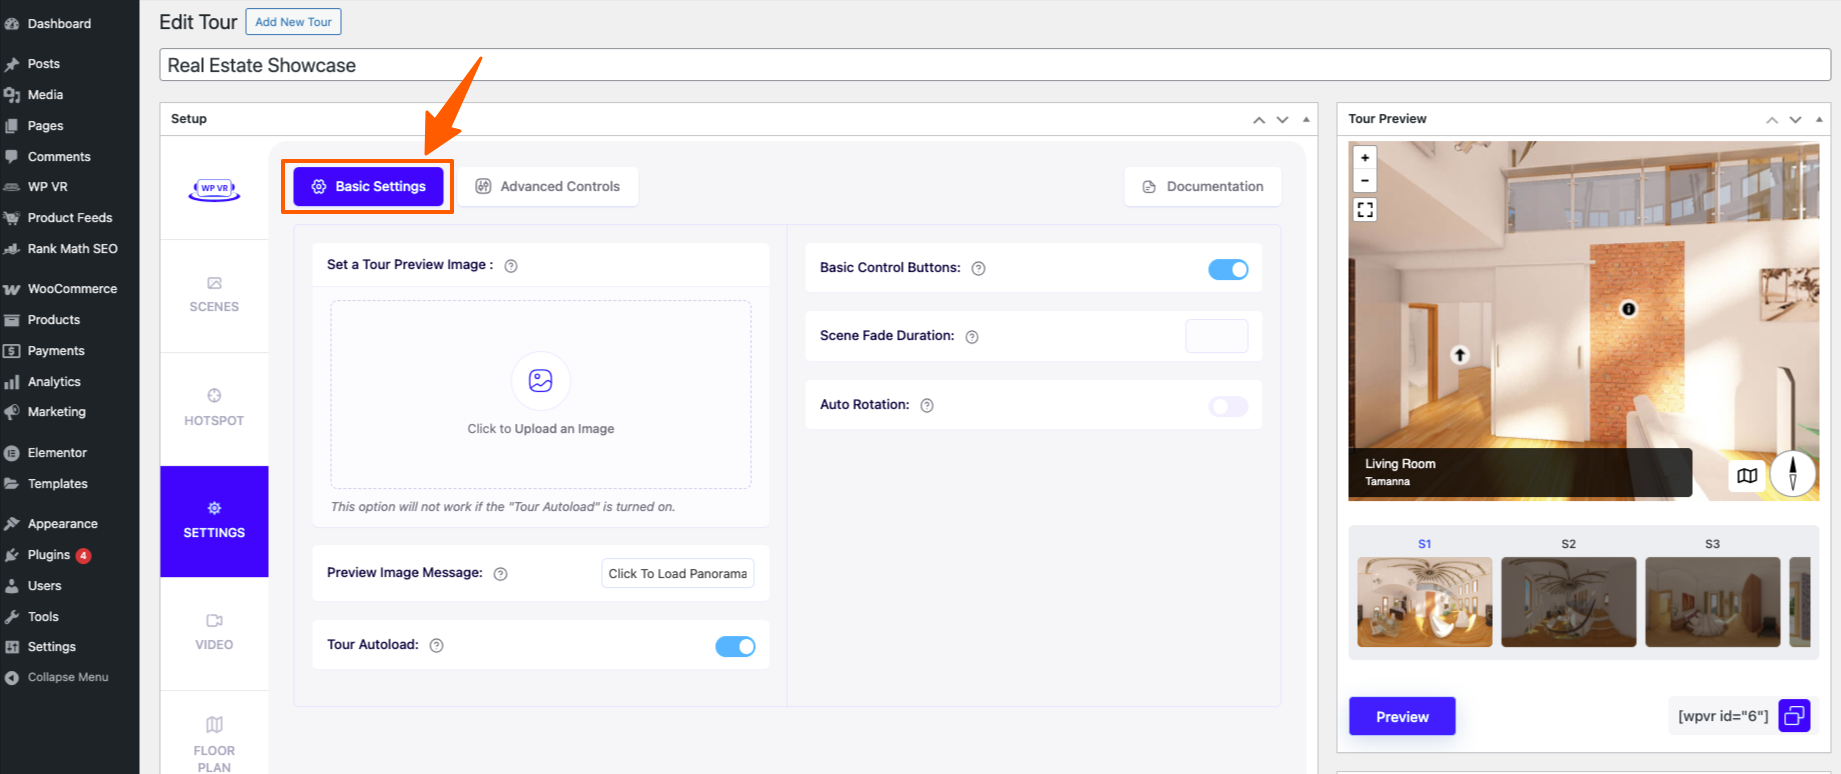
2. On the right side, you will get the option called Auto Rotation. Enable it.

Enable Auto-Rotation

Once you enable it, you will get 3 new options:

  • Rotation Speed and Direction
  • Resume Auto-rotation After
  • Stop Auto-rotation after.

Now use these options to set up auto-rotation properly.

Rotation Speed and Direction #

Here, you have to assign a numeric value which will determine the direction and speed of the rotation.

Rotation Speed and Direction

A positive value will make the tour rotate clockwise and a negative value will make the tour rotate anti-clockwise.

The higher the number, the faster the tour will rotate.

By default, it is set to -5 which means the tour will rotate anticlockwise, at a fair speed.

Resume Auto Rotation After #

Resume Auto Rotation

When taking a virtual tour, if a person may click on the tour, the rotation will stop.

Assigning a numeric value on the “Resume Auto Rotation After” field will mean that, once the rotation is stopped, the tour will again start rotating after this amount of time.

**The value is in milliseconds, so if you want to assign it a duration of 3 seconds, then you need to input the value as 3000.

This field will take values in milliseconds. It means, if you set it as 5000, the value will be set as 5 seconds.

Stop Auto Rotation After #

Stop Auto Rotation

Assigning a numeric value in this field will mean that the tour will stop rotating after this amount of time.

**The value is in milliseconds, so if you want to assign it a duration of 3 seconds, then you need to input the value as 3000.

Please note that you can’t enable both Resume Auto-rotation After and Stop Auto-rotation after options at the same time. Any one of them will work at a time.

3. After you enable auto-rotation and configure it, click on Preview, and you will be able to experience the auto-ration on the tour preview.

It’s really easy and simple.

Share This Article :
Updated on August 19, 2020
How To Add A Preview Image To Your Virtual Tour – WPVR How To use a WPVR Shortcode to Embed a Virtual Tour
Table of Contents
  • Enable Auto Rotation For Your Virtual Tour
  • Rotation Speed and Direction
  • Resume Auto Rotation After
  • Stop Auto Rotation After
RexTheme Logo
Our Plugins
  • WP VR
  • Product Feed Manager
  • Social Booster
  • Cart Lift
Resources
  • Privacy Policy
  • Terms of Service
  • Affiliate Program
  • Contact Us
Payment Methods
Payment methods

© . All rights reserved by RexTheme