Skip to content
RexTheme Logo
  • Home
  • Plugins
    • WP VR
    • Product Feed
    • Social Booster
    • Cart Lift
  • Docs
  • Support
  • Blog
  • Account
    • Log In
  • Contact Us
  • NL
  • DE

Product Feed Manager

  • Introduction To WooCommerce Product Feed Manager
  • Getting Started with Product Feed Manager
  • Install and Activate WPFM
  • Generate Product Feed
  • Category Mapping
  • Auto-sync With Google Merchant Shop
  • Add Extensive Custom Fields
  • Add More Supported Merchant Sites
  • How to Upgrade to Pro – WPFM
  • eBay MIP Feed Generation
  • Useful Options On Controls Tab
  • Fix WooCommerce’s (JSON-LD) Structured Data Bug
  • Control Products Per Batch In Batch Processing
  • Exclude Tax From Structured Data Prices
  • Using Google Merchant Promotions Feed
  • Exclude “Out Of Stock” Products From WooCommerce Product Feed
  • Connect Facebook Pixel With WooCommerce For Dynamic Ads
  • Product Feed Optimization with Yoast SEO Product Title, Meta Description and Primary Category
  • Getting Started With WooCommerce Product Feed Manager
  • How To Install And Activate WPFM
  • How To Generate Product Feed For The First Time
  • Basic Plugin Overview – WooCommerce Product Feed Manager
  • How To Use Category Mapping For Product Feed
  • How To Enable Your Desired Merchant Or Marketplace For Feed Generation
  • Add Extensive Custom Fields Of Unique Identifiers For WooCommerce Products
  • Add Custom Fields For Important Product Attributes
  • How To Add Extensive Custom Fields To WooCommerce Products
  • Fix WooCommerce (JSON-LD) Structured Data For Approval In Google Shopping
  • How To Exclude Tax From Structured Data Prices
  • How To Use Custom Filter When Generating Product Feed
  • Troubleshooting Common Issues – WooCommerce Product Feed Manager
  • How To Use Category Filter When Generating Product Feed
  • How To Use Tag Filter When Generating Product Feed
  • How To Use Product Filter Options When Generating Feed
  • How To Schedule Auto-update of Feed On Set Intervals
  • How To Include Variable Products To The Feed
  • How To Include Private Products In Product Feed

WP VR

  • Introduction To WP VR
  • Getting Started With WP VR
  • How To Install And Activate WP VR
  • How To Create A Simple Virtual Tour In 5 Minutes – WP VR
  • How to Embed A Virtual Tour And Customize It – WP VR
  • WP VR Basic Plugin Overview
  • How To Add A Scene To Your Virtual Tour
  • How To Use Scene Settings To Customize A Scene
  • How To Add Hotspots To A Scene In Your Virtual Tour
  • How To Use Hotspots To Show Information, Images Or Videos
  • How To Use Hotspots To Go From One Scene To Another
  • How To Customize Hotspot Icons And Color
  • How To Use Exclusive Features On General Settings To Customize A Virtual Tour
  • How To Upgrade To Pro – WPVR
  • How To Export And Import Virtual Tours
  • How To Embed A Virtual Tour Using WPVR Gutenberg Block
  • How To Embed A Virtual Tour Using WPVR Elementor Widget
  • How To Use WP VR Oxygen Element To Embed A Virtual Tour
  • How To Embed A Youtube 360 Video On Your Website Using WPVR
  • How To Embed A Google Street View Tour On Your Website Using WPVR
  • Embed A Self Hosted Video on WPVR Hotspots
  • How To Set Up WPVR Exclusive Settings
  • How To Exclude WPVR From Autoptimize
  • Control Script And Style Loading For The Virtual Tours
  • How To Disable WordPress Large Image Handler For Virtual Tours
  • How To Duplicate A Virtual Tour
  • How To Integrate Fluent Forms On A Virtual Tour
  • How To Integrate WooCommerce To A Virtual Tour
  • How To Embed Virtual Tours On Non-WordPress Websites
  • How To Enable Gyroscope Support On Virtual Tours
  • How To Set Up A Scene Gallery On Virtual Tours
  • How To Add Background Music To Virtual Tours
  • How To Limit Keyboard Controls For Navigation And Zoom
  • How To Limit The Use Of Mouse Scroll To Zoom Or Drag To Move A Tour
  • Using Custom Icons For Navigation And Control Buttons In A Virtual Tour
  • How To Add A Home Button To Your Virtual Tour
  • How To Create A Virtual Tour With Partial Panoramas
  • How To Create A Virtual Tour With Mobile Phone Panorama Images
  • How To Set Default Scene Face On A Virtual Tour
  • How To Set A Dynamic Front End Notice On Virtual Tours For Mobile Phone Viewers
  • Demo Virtual Tours
  • Basic Virtual Tour
  • Demo Virtual Tour – WPVR Pro
  • Demo Tour – WPVR (Free)
  • Custom Scene Gallery – WPVR
  • Custom Control Icons – WPVR
  • Google Street View Tour – WPVR Pro
  • Getting Started with WP VR
  • Video Tutorials – WPVR
  • Demo Partial Panorama Virtual Tour – WPVR Pro
  • Bar/Pub Showcase
  • How To Add A Preview Image To Your Virtual Tour – WPVR
  • How to Enable Auto Rotation For Your Virtual Tour
  • How To use a WPVR Shortcode to Embed a Virtual Tour
  • How to Add Your Company Logo in Your Virtual Tour – WPVR
  • Troubleshooting Common Issues – WPVR
  • How To Auto Resize Images On Mobile Devices for Virtual Tours
  • How To Set Custom Zoom Settings On A Scene In Your Virtual Tour – WPVR
  • How to Set 360 Image Grab Limit On A Scene in Your Virtual Tour – WPVR
  • How To Solve Virtual Tour Not Showing Up – WPVR
  • How To Exclude Assets of WPVR From Autoptimize
  • How To Embed Youtube Videos Inside Virtual Tours Using WPVR
  • How To Create Full Screen Virtual Tours – WPVR

Social Booster

  • Social Booster
  • Install and Activate Social Booster
  • Getting Started with Social Booster
  • How Social Booster Works
  • Social Booster Dashboard Overview
  • Connect Facebook For Auto-Posting
  • Connect Twitter For Auto-Posting
  • Auto-Post And Share With Social Booster
  • Connect Tumblr For Auto-Posting
  • Connect LinkedIn For Social Auto-Posting
  • Connect Reddit For Auto-Posting
  • Connect Pinterest For Social Auto-Posting
  • Schedule Post With Social Booster
  • Set Multiple Profiles On Social Booster

Cart Lift

  • Introduction To Cart Lift
  • Getting Started With Cart Lift
  • Install And Activate Cart Lift
  • A Basic Plugin Overview – Cart Lift
  • Configure And Use Cart Lift Effectively
  • How To Track Abandoned Carts Automatically
  • How To Set Up Your Abandoned Cart Recovery Campaign
  • How To Get Notifications For Abandoned Carts And Recovery
  • How To Integrate SMTP Through Cart Lift
  • Get Full Analytics Report On Recovery Campaign
  • How To Upgrade To Pro – Cart Lift

Media Storage To Cloud

  • WP Media Storage To Cloud
  • Getting Started – Media Storage To Cloud
  • How to install and activate Media to Cloud Storage
  • WP Media Storage To Cloud Dashboard Overview
  • How To Connect Amazon S3 Bucket
  • How To Connect Google Cloud Storage
  • How To Set Up IAM User For Amazon S3 Bucket
  • How To Set Up Google Cloud Storage Bucket To Serve Media Files
  • How To Connect DigitalOcean Spaces
  • How To Create An Amazon CloudFront Distribution
  • How To Create An Amazon CloudFront Origin Access Identity
  • Troubleshooting For Common Issues – Media Storage To Cloud
  • How To Create Free HTTPS Certificate On Amazon S3

Variation Swatches

  • Variation Swatches for WooCommerce – Getting Started
  • Variation Swatches For WooCommerce – Dashboard Overview
  • Variation Swatches For WooCommerce – Install And Activate
  • Change Dropdown to Button Swatches for WooCommerce Variations
  • How To Set Up WooCommerce Color Swatches For Color Variation
  • How To Set Up WooCommerce Image Swatches For Image Variation
  • How To Set Up Label Swatches For WooCommerce Product Variations
  • How To Customize Variation Swatch Hover Style
  • How To Customize Variation Swatches Global Style
  • How To Customize Variation Swatches Selected Style

VR Places Theme

  • How To Install And Activate VR Places Theme
  • How To Customize Global Settings for VR Places Theme
  • Home
  • Docs
  • WP VR

How To Set Up WPVR Exclusive Settings

Table of Contents
  • WP VR Exclusive Settings
  • 1. Allow the Editors of your site to Create, Edit, Update and Delete virtual tours
  • 2. Allow the Authors of your site to Create, Edit, Update and Delete virtual tours
  • 3. Disable Fontawesome from WP VR
  • 4. Disable WordPress Large Image Handler on WP VR
  • 5. Script Control For The Virtual Tours
  • 6. Select A Version To Rollback

WPVR has a few exclusive settings to give you more control over the virtual tours and the plugin on your site.

Let’s have a look at these exclusive settings.

WP VR Exclusive Settings #

1. Go to Dashboard > WPVR > Get Started.

WP VR Exclusive Settings

2. On the top-right side, click on the Settings tab and you will find all the exclusive settings for WP VR.

WP VR General Setup Options

These settings include the following:

  1. Allow the Editors of your site to Create, Edit, Update, and Delete virtual tours
  2. Allow the Authors of your site to Create, Edit, Update and Delete virtual tours
  3. Disable Fontawesome from WP VR
  4. Disable WordPress Large Image Handler on WP VR
  5. – Enable script control
    – List of allowed pages to load WP VR scripts
  6. Select a Version to Rollback

Let’s have a look at what each of these options does.

1. Allow the Editors of your site to Create, Edit, Update and Delete virtual tours #

Allow Editors to Create Tours

Enabling this option will allow the editors of your site to create, edit, update, and delete virtual tours. They will have access to all the tours created on your site.

2. Allow the Authors of your site to Create, Edit, Update and Delete virtual tours #

Allow Authors to Create Tours

Enabling this option will allow the authors of your site to create, edit, update and delete virtual tours. However, they will only have access to the tours that they created.

3. Disable Fontawesome from WP VR #

Disable Fontawesome

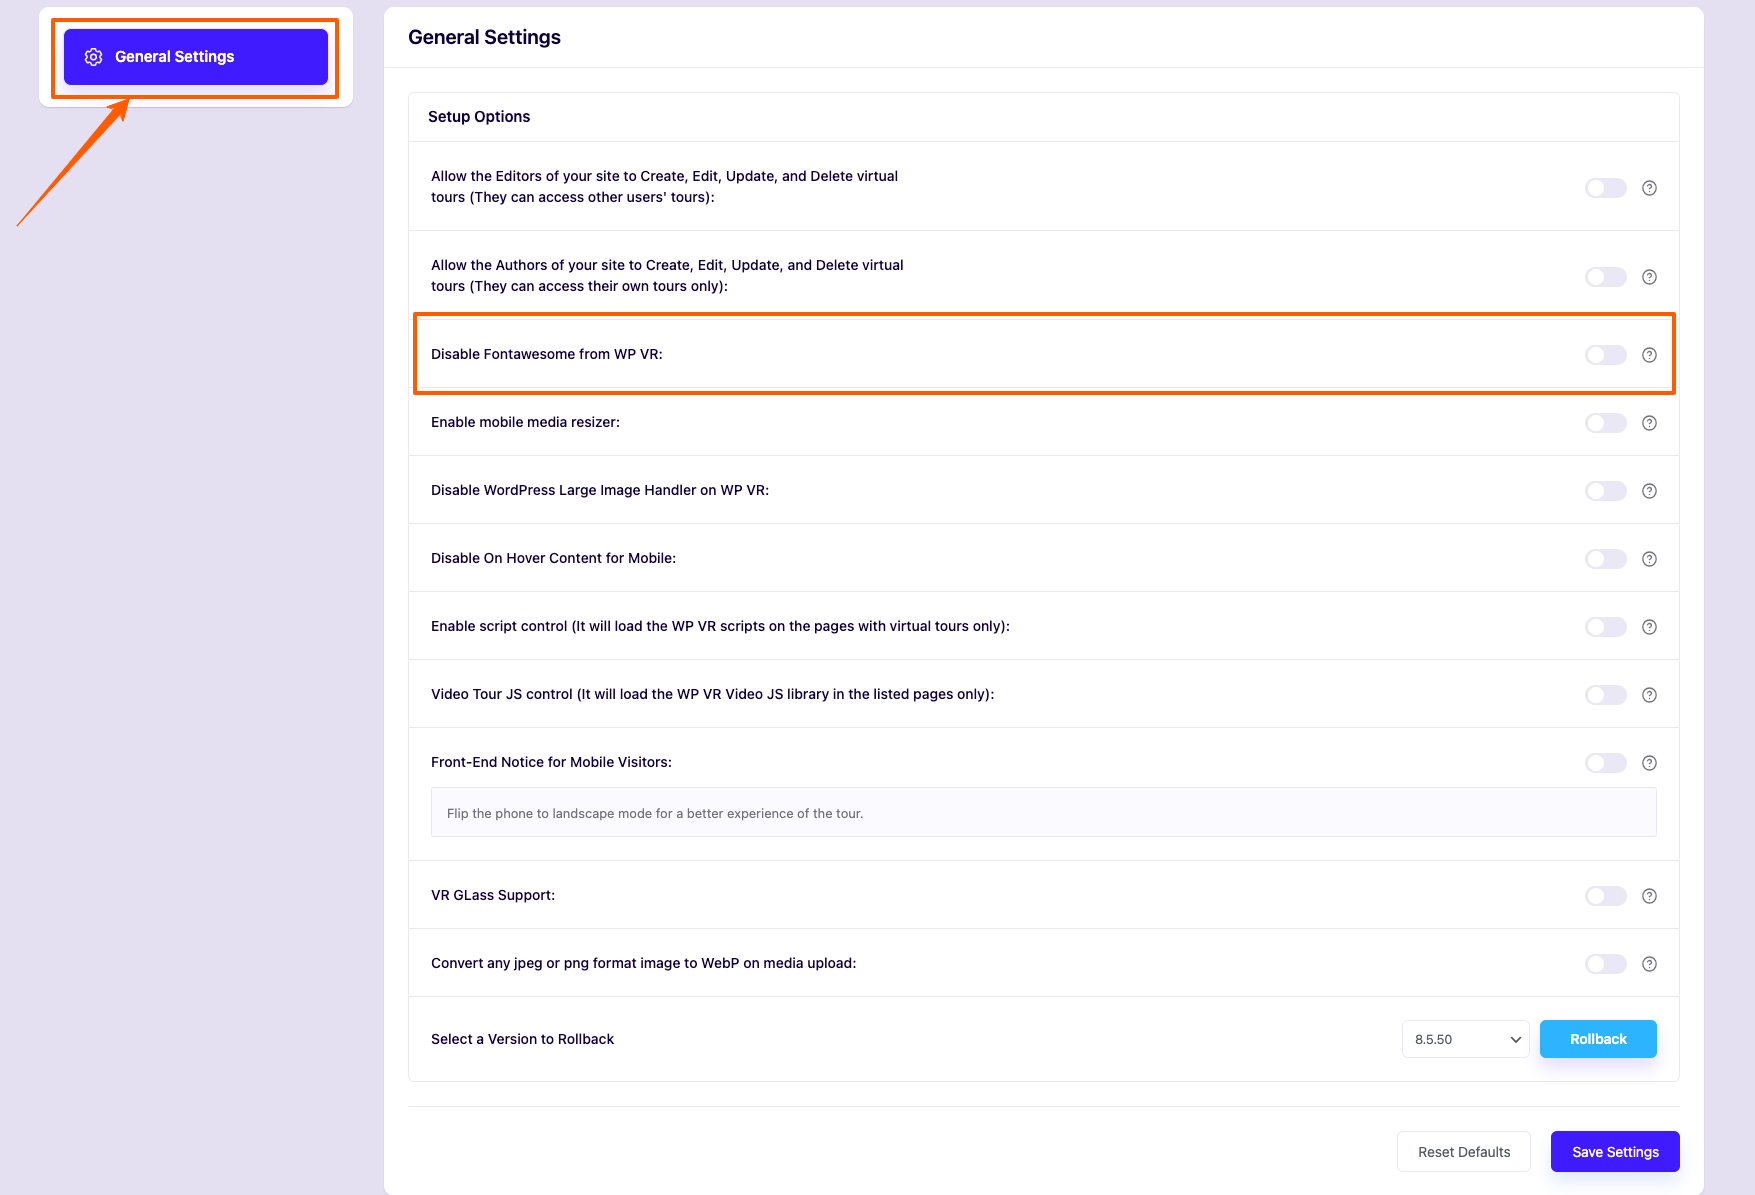
WP VR uses the Fontawesome library for hotspot and control button icons.

However, if your theme is already using the Fontawesome library, then there is no reason to load the library again through the plugin.

In that case, you can enable this option and the plugin will not load the library on its own and use the library directly from the theme.

4. Disable WordPress Large Image Handler on WP VR #

Disable WordPress Large Image Handler

Sometimes you need to upload very large images to create a high-quality virtual tour.

But WordPress has a default large image handler that will detect the large images and convert them into a smaller size (with a default threshold of 2560px).

This option will allow you to disable the WordPress default large image handler for your site so that you can upload large images without any change in size and quality.

5. Script Control For The Virtual Tours #

The next 2 options,

  • Enable script control.
  • List of allowed pages to load WP VR scripts,

are related and have to be used simultaneously.

Basically, these options will let you make sure that WP VR assets are only loaded in the pages that you decide.

Here’s how to use it.

i. Enable the option called “Enable Script Control“.

Enable Script Control

Turning it on will ensure that WP VR assets will no longer be loaded in any page on your site.

ii. Copy the URLs of the pages/posts where you embedded virtual tour(s).

iii. Now, go to the field under “List of allowed pages to load WP VR scripts“.

Pages Allowed To Load Scripts

Here, paste the URLs that you just copied with commas between multiple URLs and no spaces.

iv. Then click on the Save button below.

That’s it. Now WP VR assets will only be loaded when visiting the URLs that you included here.

**Please note that enabling this option means you won’t be able to view tours on the preview mode of pages or posts. So we suggest you turn it off until publishing your desired page/post and then you can include the URL here and enable it again.

6. Select A Version To Rollback #

Rollback WPVR Version

This option is there so that you can be safe from any mishaps.

If for any reason, one of our updates seems to be buggy to you, you can roll back to an older version of the plugin using this option.

Simply choose a version and click on Rollback and the plugin will be rolled back to your desired version.

**Please note, this option applies to the basic WPVR (free version) only.

Now that you’ve learned about the exclusive settings options of WPVR, you can enable or disable any option you want, to have more control over your virtual tours.

Share This Article :
Updated on August 13, 2020
Embed A Self Hosted Video on WPVR Hotspots How To Exclude WPVR From Autoptimize
Table of Contents
  • WP VR Exclusive Settings
  • 1. Allow the Editors of your site to Create, Edit, Update and Delete virtual tours
  • 2. Allow the Authors of your site to Create, Edit, Update and Delete virtual tours
  • 3. Disable Fontawesome from WP VR
  • 4. Disable WordPress Large Image Handler on WP VR
  • 5. Script Control For The Virtual Tours
  • 6. Select A Version To Rollback
RexTheme Logo
Our Plugins
  • WP VR
  • Product Feed Manager
  • Social Booster
  • Cart Lift
Resources
  • Privacy Policy
  • Terms of Service
  • Affiliate Program
  • Contact Us
Payment Methods
Payment methods

© . All rights reserved by RexTheme