Limited Time Offer

Special Sale - 20% Off

12DAY
12HR
45MIN
30SEC
Get 20% OFF
Skip to content
RexTheme
  • Plugins
    • WP VR
      WP VR – Quality WP Virtual Tour CreatorCreate stunning virtual tours easily, on your own, using 360 Panoramas.
    • Product Feed Manager
      Product Feed Manager For WooCommerceMaximize Sales With The Largest Marketplaces.
    • Cart Lift
      Cart Lift To Recover Abandoned CartsRecover abandoned carts for your WooCommerce Store easily.
    • UGCify – User Generated Content for WooCommerceImprove the shopping experience across your entire store.
    • Checkoutify
      Checkoutify Checkout Field Manager for WooCommerceThe Ultimate WooCommerce Checkout Customizer.
    • Catalog Mode for WooCommerce
      Catalog Mode For WooCommerceTurn your WooCommerce store into a product showcase catalog.
    • Dynamic Discount
      Dynamic Discount for WooCommerceBoost your AOV significantly with custom dynamic discount offers.
    • Advanced Shipping Logo
      Advanced Shipping for WooCommerceSet conditional shipping and boost customer satisfaction.
    • Marketplace Auto-sync for WooCommerce
      Marketplace Auto Sync for WooCommerce – Automate Your Business GrowthAuto-sync products with leading marketplaces.
    • View All Plugins
  • Sell Kit Bundle
  • Blog
  • Resources
    • Docs
    • Support
    • Brand Assets
  • My Account
    • Log In
  • NL
  • DE

How can we help you?

Documentation

WP VR

84
  • Getting Started
    • Getting Started With WP VR
    • How To Install And Activate WP VR
    • How To Create A Simple Virtual Tour In 2 Minutes – WP VR
    • WP VR Basic Plugin Overview
  • Upgrade To WPVR Pro
    • How To Upgrade To Pro – WP VR
    • License Renewal Guide for WP VR Pro
    • WP VR VAT/TAX Policy
    • License Plan Upgrade Guide for WP VR Pro
  • WPVR Premium Add-ons
    • How To Integrate Fluent Forms On A Virtual Tour
    • How To Integrate WooCommerce To A Virtual Tour
    • How To Embed Virtual Tours On Non-WordPress Websites
    • WP VR Embed Addon – Features Overview
  • How To - Basic Settings
    • How To Use Exclusive Features On Settings Tab To Customize A Virtual Tour
    • How To Add A Preview Image To Your Virtual Tour – WPVR
    • How to Enable Auto Rotation For Your 360 Virtual Tour – WP VR
    • How to Customize the Tour Layout
  • Setting Up Control Buttons
    • Using Custom Icons For Navigation And Control Buttons In A Virtual Tour
    • How to Share Virtual Tours on Social Media
    • How To Configure A Call To Action (CTA) Button in Virtual Tour
  • Turn Panorama Images Into Live Scenes
    • How To Add A Scene To Your Virtual Tour
    • How to Set 360 Image Grab Limit On A Scene in Your Virtual Tour – WPVR
    • How To Use Scene Settings To Customize A Scene
  • Use Hotspots for Navigation & Information
    • How To Add Hotspots To A Scene In Your Virtual Tour
    • How To Use Hotspots To Show Information, Images Or Videos
    • How To Use Hotspots To Go From One Scene To Another
    • How To Customize Hotspot Icons And Color
    • Embed A Self Hosted Video on WPVR Hotspots
    • How To Embed Youtube Videos Inside Virtual Tours Using WPVR
    • How To Set Hotspot Content Easily Inside Virtual Tour – Using WYSIWYG HTML Editor
    • How to use the Custom Icon Class
  • Create 360 Degree Video Tours
    • How To Embed A Youtube 360 Video On Your Website Using WPVR
    • How To Create A Virtual Tour Using Self Hosted 360 Degree Interactive Video with WPVR
  • Embed Google Street Views
    • How To Embed A Google Street View Tour On Your Website Using WPVR
  • Partial Panorama & Full View Virtual Tours
    • How To Create A Virtual Tour With Partial Panoramas or iPhone Panoramas
    • How To Create A Virtual Tour With Mobile Phone Panorama Images
    • How To Create Full Screen Virtual Tours – WPVR
    • How To Set A 360 Panorama Background Virtual Tour
  • Publish Virtual Tours on Your Website
    • How To use a WPVR Shortcode to Embed a Virtual Tour
    • How to Set Up Password Protection For Your 360 Virtual Tour – WP VR
    • How to Publish Virtual Tours Using QR Code
  • Import, Export, & Duplicate Virtual Tours
    • How To Duplicate A Virtual Tour
    • How To Export And Import Virtual Tours
  • Troubleshooting - Solve Common Issues
    • Troubleshooting Common Issues – WPVR
    • How To Solve Virtual Tour Not Showing Up – WPVR
    • How To Exclude Assets of WPVR From Autoptimize
    • How To Manage Your WPVR User Account Settings & Subscription Plan
    • WP VR Tour Not Displaying on Review and On the Published Webpage
    • WP VR Troubleshooting Guide: Embedding 360 Tours on External Platforms
  • Optimize Virtual Tour for Mobile Devices
    • How To Set A Dynamic Front End Notice On Virtual Tours For Mobile Phone Viewers
    • How To Auto Resize Images On Mobile Devices for Virtual Tours
    • How To Set Custom Height for Mobile Devices to Your Virtual Tours
  • Demo Virtual Tours
    • Basic Virtual Tour
    • Google Street View Tour – WPVR Pro
    • Video Tutorials – WPVR
    • Demo Partial Panorama Virtual Tour – WPVR Pro
    • Bar/Pub Showcase
  • Advanced Settings for Virtual Tours
    • How To Set Up WPVR Exclusive Settings
    • Control Script And Style Loading For The Virtual Tours
    • How To Disable WordPress Large Image Handler For Virtual Tours
    • How To Enable Gyroscope Sensor On 360 Virtual Tours
    • How To Add Background Music To Virtual Tours
    • How To Limit Keyboard Controls For Navigation And Zoom
    • How To Limit The Use Of Mouse Scroll To Zoom Or Drag To Move A Tour
    • How to Add A Virtual Tour Icon or Your Company Logo in 360 Degree Tours – WPVR
    • How To Set YouTube Explainer Videos Inside Virtual Tours 
    • How To Enable The Support for VR Headset for Phones
    • How To Set Individual Hotspot Icon Color and Animation In Panorama Images
    • How To Set Virtual Floor Plans Inside Your Tours – WPVR
    • How to do SEO optimization for Embeded tour
    • How To Set Scene Transition (Scene Entrance Animation)
    • How to Set Custom Zoom Settings in WPVR
    • WP VR Analytics: How to Track and Analyze Your Virtual Tours
    • How To Set Up A Scene Gallery On Virtual Tours
    • How To Set a Default Scene Face on a Virtual Tour
  • WP VR Plugin Integrations
    • How To Embed A Virtual Tour Using WPVR Gutenberg Block
    • How To Embed A Virtual Tour Using WPVR Elementor Widget
    • How To Use WP VR Oxygen Element To Embed A Virtual Tour
    • WP VR & Dokan Integration: Empower Vendors to Create 360° Virtual Tours
    • How To Embed A Virtual Tour Using WPBakery Element
    • How To Publish A Virtual Tour Using WPVR Panorama Module for Divi
    • How To Embed WPVR Virtual Tours Using Visual Composer Element

Product Feed Manager

120
  • Getting Started
    • Introduction To Product Feed Manager For WooCommerce
    • Getting Started With Product Feed Manager For WooCommerce
    • How To Install And Activate Product Feed Manager
    • How To Generate Product Feed For The First Time
    • Product Feed Manager – Basic Plugin Overview
    • All Supported Plugins & Integrations With Product Feed Manager For WooCommerce
  • Upgrade To PFM Pro
    • License Renewal for Product Feed Manager Pro
    • Product Feed Manager VAT/TAX Policy
    • License Plan Upgrade Guide for Product Feed Manager Pro
  • Upload Feed To Merchants
    • How to Upload your Product Feed on the Facebook Store
    • Upload your WooComerce Product Feed directly to the Google Merchant Center – (No Need For Authorization)
    • How To Auto-sync Your Store’s Products To Google Merchant Center Using Content API
    • How To Auto-sync Product Feed To Google Merchant Center
    • How To Auto-sync Your Store’s Products To Google Merchant Center Using Merchant API
  • Feed Generation Instructions
    • How To Generate A Google Shopping Feed With Product Feed Manager
    • How to Generate A WooCommerce Product Feed For Facebook
    • How To Generate A Custom Product Feed Easily
    • How To Create A Feed For eBay MIP
    • How to create a Target Product feed for Target Marketplace
    • How to create a WooCommerce product feed for Wish.com
    • How to create a WooCommerce product feed for Sears Marketplace
    • How to create a WooCommerce product feed for NewEgg Marketplace
    • How to create a WooCommerce product feed for Walmart
    • How to create a WooCommerce product feed for Instagram Catalog
    • How to upload products on Instagram Shop
    • How to generate WooCommerce Product Feed for Amazon
    • How to generate WooCommerce Product Feed for Zbozi
    • How to Generate WooCommerce Product Feed for Skroutz
    • How To Create A Feed For eBay Seller Center
    • How to generate WooCommerce Product Feed for Rozekta
    • How to generate WooCommerce Product Feed for Pinterest
    • How to generate WooCommerce Product Feed for TikTok Ads Catalog
    • How to generate a WooCommerce Product Feed for OpenAI Commerce (ChatGPT)
    • How to generate WooCommerce Product Feed for Yandex
  • All Google Feeds
    • How to create a WooCommerce product feed for Google Remarketing (DRM)
    • How to create a WooCommerce product feed for Google Local Products
    • How to create a WooCommerce product feed for Google Local Products Inventory
    • How to create a WooCommerce product feed for Google Manufacturer Center
    • How to create a WooCommerce feed for Google Merchant Center Promotion Using Product Feed Manager
    • How to create a WooCommerce product feed for Google Shopping Actions
    • How to create a WooCommerce product feed for Google Dynamic Display Ads (Google Ads)
    • How to create a WooCommerce product feed for Google Express (Former Google Shopping Actions Program)
    • How to create a WooCommerce product feed for Google Local Inventory Ads
    • How to create a WooCommerce product feed for Google Custom Search Ads
    • How to create a WooCommerce product feed for Google Dynamic Search Ads
    • How to create a WooCommerce product feed for Google Review
  • Category Mapping
    • How To Use Category Mapping For Product Feed
    • How To Use Category Mapping For Google Product Category
    • How To Configure Category Mapping For Facebook Product Category
  • Understanding Feed Attributes
    • Add Custom Fields For Important Product Attributes
    • How To Add A Static Prefix or Suffix To An Attribute In The Feed
    • How To Add A Custom Attribute To The Feed
    • How To Add Or Remove An Additional Product Attribute In The Feed
    • How to include WooCommerce Shipping values into your feed (Except Google & Facebook)
    • Price Attributes Mapping and Understanding The Different Use Cases
    • Understanding And Configuring Feed Attributes and Their Values
    • How To Add Currency To Your Product Price
    • How to Combine Multiple Attribute Values Using the Combined Attributes Feature
  • Understanding Basic Feed Configuration
    • Product Feed Optimization with Yoast SEO Product Title, Meta Description and Primary Category
    • How To Schedule Auto-update of Feed On Set Intervals
    • Learning About Feed File Types And How To Download Or View Feed
    • How To Add UTM Parameters To Product URLs
    • Optimize Product Feed Data With Effective Output Filters
    • How To Use RankMath Primary Category In The Feed
    • How to include Shipping values into WooCommerce product feed (Google & Facebook)
    • How to include Tax values into your WooCommerce Product Feed (Google & Facebook)
    • How To Remove HTML Tags Or Shortcodes From A Feed
    • How To Use UTF-8 Encode To Convert HTMLEntities To Symbols In A Feed Attribute Value
    • How To Convert Symbols To HTMLEntities In A Feed Attribute Value
    • How To Include CDATA In An XML Feed Attribute Tag
    • How To Remove Decimal From Price For Marktplaats Feed
    • How To Replace Space With Hyphen In A Feed Attribute Data
    • How To Use A Custom Field Value In The Product Feed
    • How To Use Yoast Primary Category In The Feed
    • How To Exclude Draft Products From The Feed
    • How to Add WooCommerce’s GTIN, UPC, EAN, or ISBN to Product Feed
    • Understanding The Basics Of Feed Settings
    • Product Feed Analytics for WooCommerce: A Complete Guide
  • Feed Filters: Help Customize Feed
    • How To Exclude Invisible Products / Hidden Products From Product Feed
    • How To Use Category Filter When Generating Product Feed
    • How To Use Tag Filter When Generating Product Feed
    • How To Use Feed Filter Options When Generating Feed
    • How To Include Variable Products To The Feed
    • How To Include Private Products In Product Feed
    • How To Include Product Variation Term To The Product Name
    • How To Use Custom Filter When Generating Product Feed
    • How To Use The Product Filter Option To Include/ Exclude Specific Products
    • How To Use Brands Filter When Generating Product Feed
    • Best-Selling Products: Generate a WooCommerce Product Feed to Boost Sales
  • Feed Rules: Help Modify Product Data
    • How to use the Feed Rule feature to manipulate attribute values
    • How to use the Feed Rules feature to manipulate your product price
  • Feed Validation
    • Feed Validator for Google Shopping
    • Feed Validator for Facebook Catalog
    • Feed Validator for Pinterest Product Catalog
    • Feed Validator for TikTok Ads Catalog
    • Feed Validator for OpenAI Commerce Feed
  • Useful Control Options
    • Add Extensive Custom Fields Of Unique Identifiers For WooCommerce Products
    • How To Add Extensive Custom Fields To WooCommerce Products
    • How To Exclude Tax From Structured Data Prices
    • How to Schedule Feed Updates Based on Product Data Changes
    • How To Set Custom Time Intervals For Auto-Feed Update
    • Useful Options On Settings Tab
    • Control Products Per Batch In Batch Processing
    • Connect Facebook Pixel With WooCommerce For Dynamic Ads
    • How to set 5-Minutes Time Interval for Updating Feed
  • PFM Plugin Integrations
    • How To Include Brand Value From Perfect Brands For WooCommerce In The Feed
    • Enable Error Log for Product Feed Manager For WooCommerce
    • How to convert product feed price with WPML / WCML
    • How to generate product feed in multiple languages with Polylang
    • How To Generate Product Feed In Multiple Languages With WPML
    • How To Include Discount Rules In The Feed Using Discount Rules For WooCommerce And PFM
    • How To Generate Product Feed In Multiple Languages | PFM + TranslatePress
  • Fix JSON-LD Structured Data For Variable Products
    • Fix WooCommerce (JSON-LD) Structured Data For Approval In Google Shopping
  • Troubleshoot
    • Product Missing On Facebook Commerce Manager – Facebook & Instagram
    • Google Shopping Product Feed Specification – Attributes List
    • Troubleshooting Common Issues – Product Feed Manager For WooCommerce
    • How to Troubleshoot Feed Errors in Product Feed Manager

Cart Lift

18
  • Getting started
    • Introduction To Cart Lift
    • Install And Activate Cart Lift
    • A Basic Plugin Overview – Cart Lift
    • Configure And Use Cart Lift Effectively
  • Troubleshooting Common Issues
    • Troubleshooting For Common Issues – Cart Lift
  • Upgrade To Cart Lift Pro
    • How To Upgrade To Pro – Cart Lift
    • License Plan Upgrade Guide for Cart Lift Pro
  • Abandoned Cart Recovery Conditions
    • How To Track Abandoned Carts Automatically
    • How To Set Up Your Abandoned Cart Recovery Campaign
    • How To Use Twilio SMS Service To Recover Abandoned Carts – Cart Lift Pro
    • How To Get Notifications For Abandoned Carts And Recovery
    • Get Full Analytics Report On Recovery Campaign
    • Shortcodes for Email Fields in Cart Lift
    • How to Pause / Resume Individual Abandoned Cart Recovery
    • How To Set Condition To Automatically Delete Abandoned Orders After A Particular Number Of Days
    • How To Set Conditions To Exclude Carts From Abandoned Cart Recovery Campaigns
    • How To Configure Popup Editor
    • How To Configure reCAPTCHA V3 Settings in Cart Lift

Dynamic Discounts for WooCommerce

18
  • Getting Started
    • How To Install & Activate the Dynamic Discounts for WooCommerce
    • How To Create A Discount Rule For The First Time
    • Basic Plugin Overview – Dynamic Discounts for WooCommerce
  • Discount Conditions
    • How To Set Product Based Discount
    • How To Set Cart Based Discount
    • How to Set Discount Conditions for Bulk Purchases in WooCommerce
    • How To Set Discount Conditions Based on Customer Purchase History
    • How To Set Discount Conditions For Product Variations
    • How To Apply discount To The cheapest product In The Cart
    • How to Set Discount Based On Category and Tag
    • How To Set Buy X Get Y Discount
    • How To Set Stock-Based Discount
    • How To Set A Bundle Discount
    • How To Set Buy X Get X Discount
    • How To Apply Discount To Nth Quantity
    • How To Set The Cheapest Product On Cart Discount
    • How To Set “Offer One Or More Free Products” Discount
    • How to Set Attribute Specific Discount For Product Variants

Checkoutify

5
  • Getting Started
    • How To Install & Activate Checkoutify Pro – Checkout Customizer
    • How to Replace Your WooCommerce Checkout Using Checkoutify – Checkout Customizer
    • How To Create and Customise an Order Bump
    • How to Create a Custom Field in Checkoutify
  • Customizing Checkout
    • Creating a Multi-Step Checkout Using Checkoutify – Checkout Customizer

Advanced Shipping for WooCommerce

18
  • Getting Started
    • How To Install & Activate The Advanced Shipping For WooCommerce
    • Basic Plugin Overview – Advanced Shipping For WooCommerce
    • How To Add Advanced Shipping To An Existing Shipping Zone
    • How to Set Shipping Conditions For The First Time Using Advanced Shipping
  • Shipping Conditions
    • How To Set Product-Specific Shipping Conditions
    • How To Set Category-Based Shipping Conditions
    • How To Set Shipping Conditions Based On WooCommerce Product Tag
    • How To Set Shipping Conditions Based On WooCommerce User Role
    • How To Set Shipping Conditions Based on Product’s Weight, Volume, Length, Height, and Width
    • How to Add Price Based Shipping Conditions in Advanced Shipping
    • How to Add Weight Based Shipping Conditions in Advanced Shipping
    • Quantity Based Shipping Conditions: Easy Steps to Set Them Up in WooCommerce
    • How to Set Time and Day Based Shipping Conditions in Advanced Shipping
    • How to Set Country Based Shipping Conditions in Advanced Shipping
    • How to Set City Based Shipping Conditions in Advanced Shipping
    • How to Set State Based Shipping Conditions in Advanced Shipping
    • How to Set ZIP Code Based Shipping Conditions in Advanced Shipping
    • How to Set Zone Based Shipping Conditions in Advanced Shipping

Catalog Mode for WooCommerce

7
  • Getting Started
    • How To Install & Activate the Catalog Mode for WooCommerce
    • Basic Plugin Overview – Catalog Mode For WooCommerce
  • Settings
    • How To Set Users Rules For Catalog Mode
    • How To Configure Catalog Mode Options
    • How to Manage the Exclusion List in Catalog Mode
    • How To Configure the Inquiry Form in Catalog Mode
    • How to Create and Manage Custom Buttons and Labels

Marketplace Auto-Sync for WooCommerce

4
  • Getting Started
    • How To Install & Activate Marketplace Auto Sync
    • Basic Plugin Overview – Marketplace Auto Sync
    • How To Set Up an Auto Sync For The First Time
    • How To Auto-sync with Google Merchant Center

UGCify

3
  • Getting Started
    • How To Install And Activate UGCify
    • Basic Plugin Overview – UGCify
    • How UGCify Looks on Your Product Page
  • Home
  • Docs
  • Product Feed Manager
  • Understanding Basic Feed Configuration
View Categories

Product Feed Analytics for WooCommerce: A Complete Guide

Product Feed Manager (PFM) includes a built in Analytics dashboard that shows how your WooCommerce product feeds are performing across every channel you sell on, from a single screen. Instead of checking Google Merchant Center, ChatGPT Ads Manager, or other platforms separately, you can see feed level revenue, orders, and traffic source data directly inside WordPress.

Product Feed Analytics for WooCommerce: A Complete Guide 1

This guide explains

  • What the PFM Analytics dashboard is and where to find it
  • How feed attributed data is tracked, and its one key requirement
  • How to read the Overview cards, the Performance Over Time chart, Top Feeds, Top Products, and UTM Analytics
  • How to use this data to see which feeds and channels are actually driving revenue

What Is PFM Analytics? #

PFM Analytics is a reporting dashboard inside Product Feed Manager that connects your product feed activity to real WooCommerce orders. It answers a question feed platforms alone cannot answer on their own: once a shopper clicks your product on Google Shopping, ChatGPT, or another channel, did that click actually turn into a sale on your store?

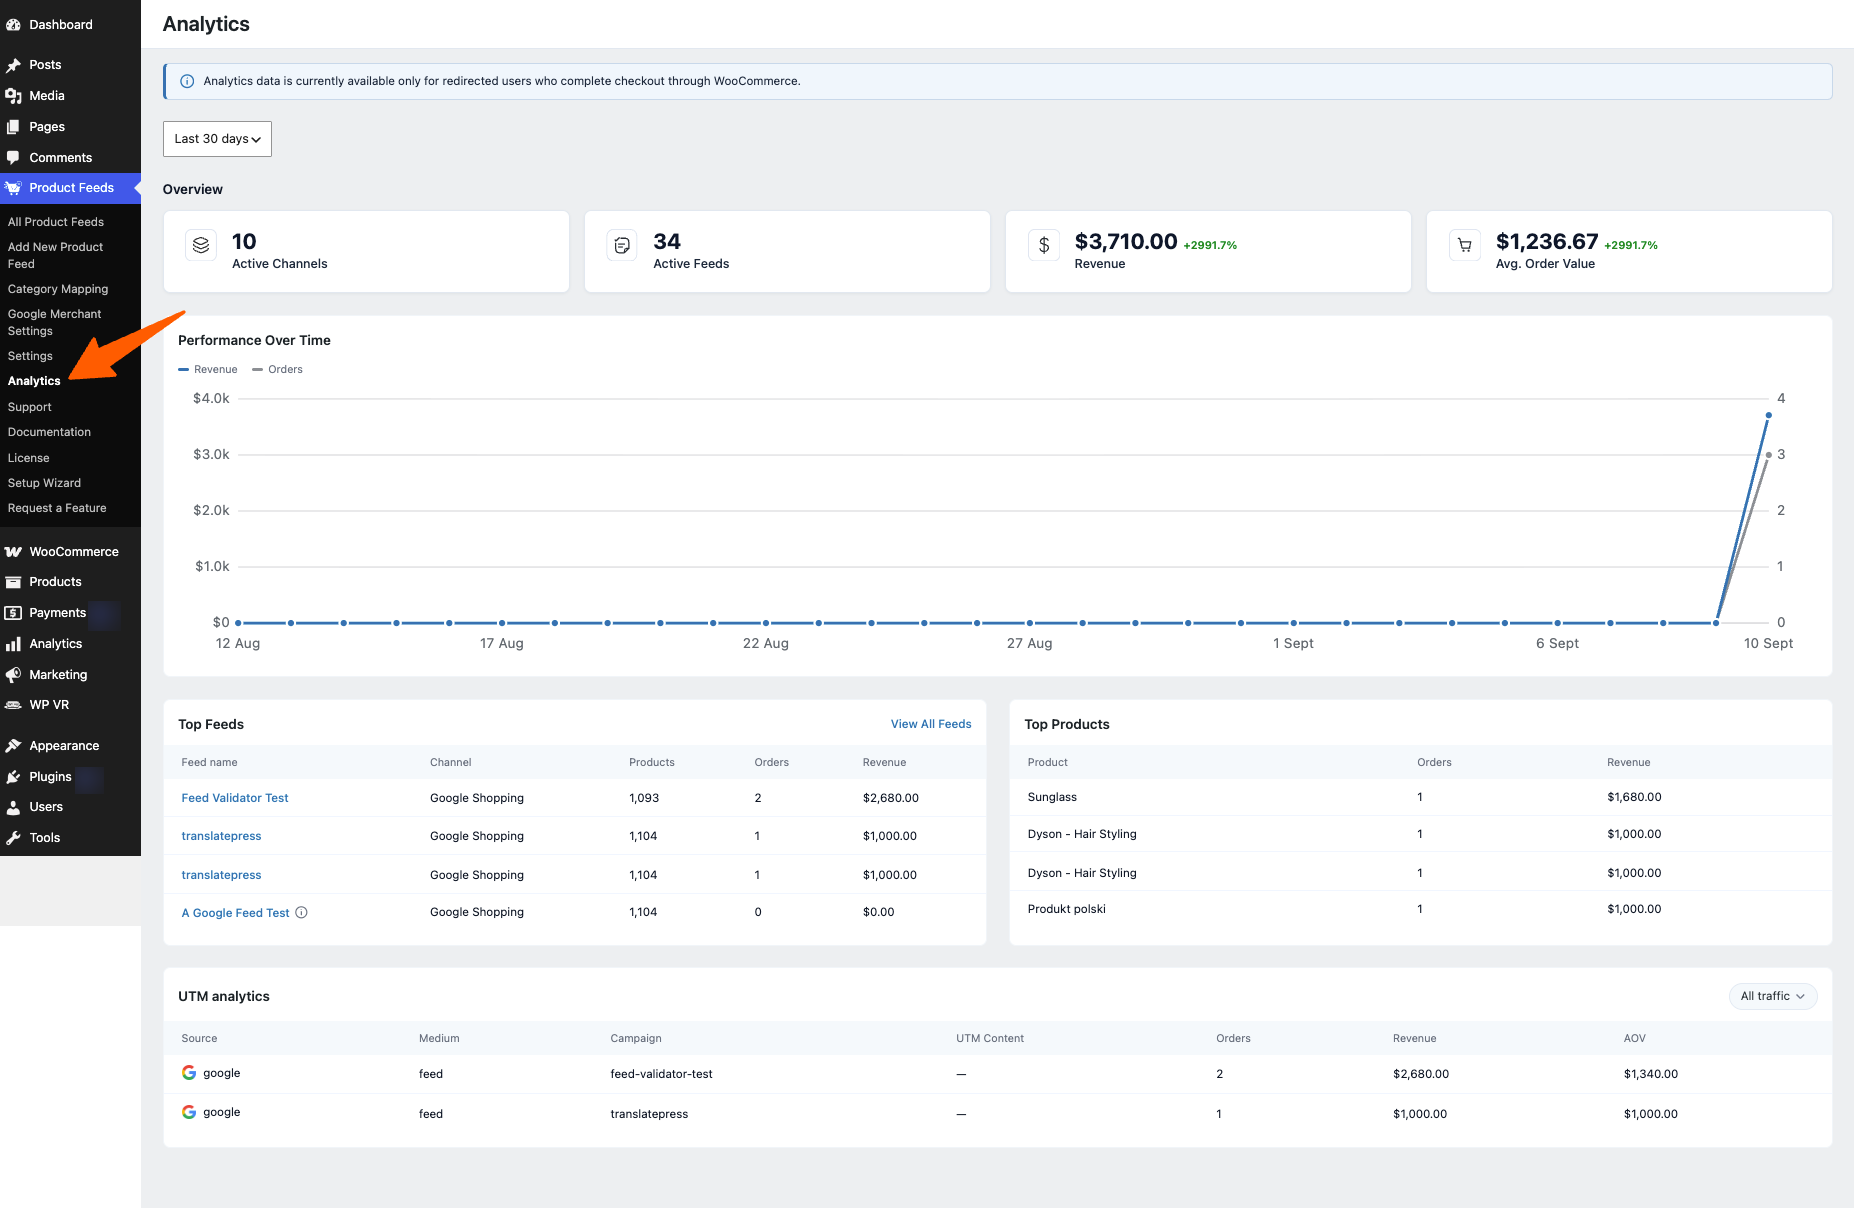
You will find it under Product Feeds, then Analytics, in your WordPress admin sidebar.
Product Feed Analytics for WooCommerce: A Complete Guide 2

Enable UTM Tracking on Each Feed #

Product Feed Analytics for WooCommerce: A Complete Guide 3

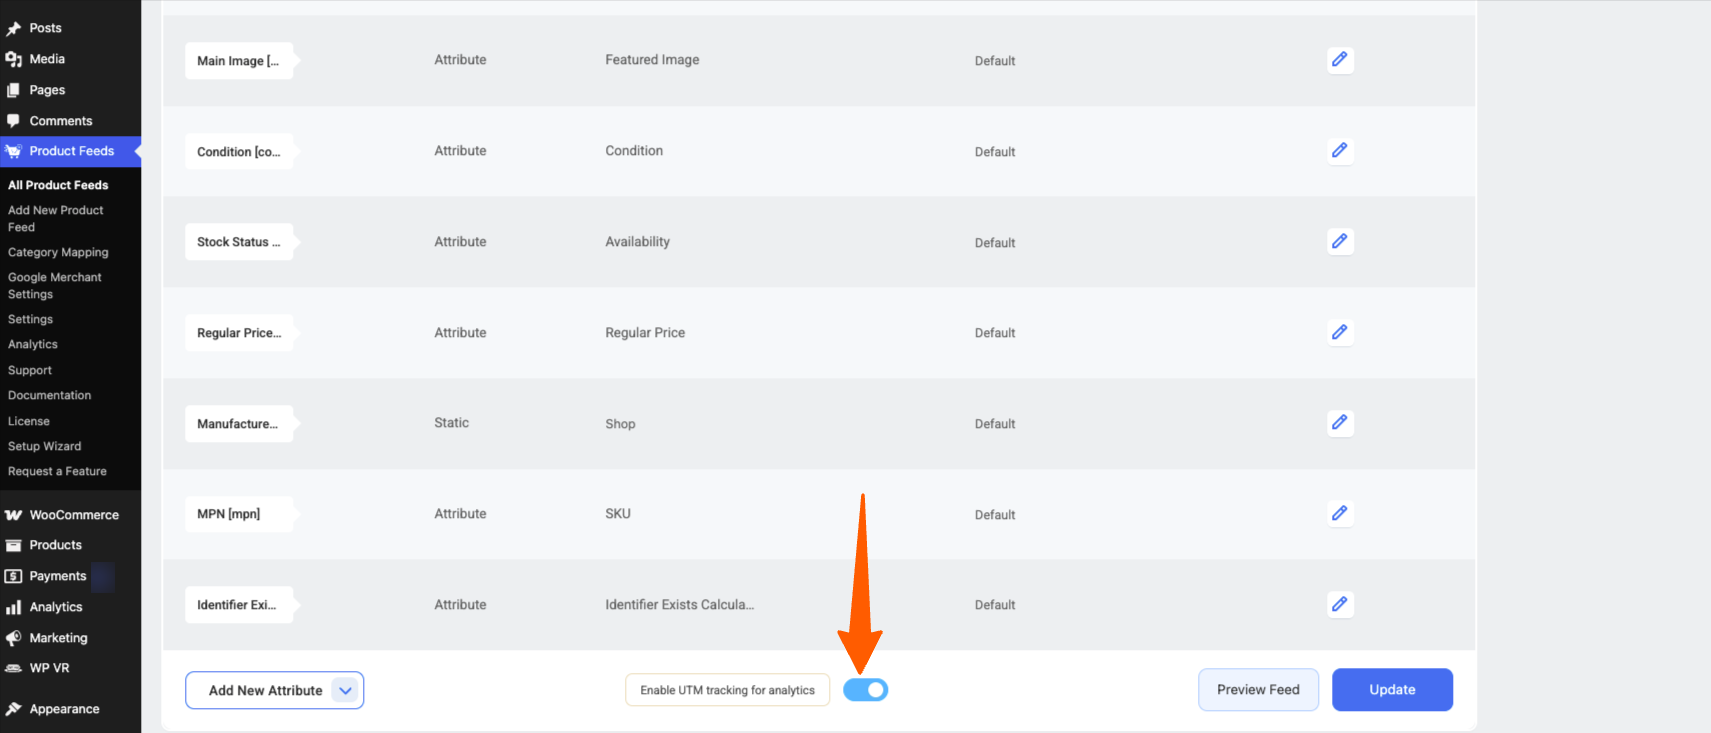
This is a per feed toggle, not a global setting. Even if the redirected checkout requirement in Section 2 is met, a feed will not contribute any data to Analytics until this toggle is switched on for that specific feed.

To turn it on:

  • Open the individual feed you want to track, under Product Feeds, then All Product Feeds
  • Find the Enable UTM tracking for analytics toggle in that feed’s settings
  • Switch it on and update the feed
Product Feed Analytics for WooCommerce: A Complete Guide 4

Once enabled, PFM adds UTM parameters (source, medium, and campaign, set to the feed name) to every product link in that feed. You can change the parameters from the Feed settings as well. Only from that point on will clicks and resulting orders from that feed be attributed and shown in the Analytics dashboard.

Since this is set per feed, review it for each feed individually. A feed you forgot to enable this on will keep sending traffic normally, it will simply be invisible in your Analytics reports.

How Analytics Tracking Works #

Analytics data is currently available only for redirected users who complete checkout through WooCommerce.

This means PFM attributes orders by tagging the links in your product feeds with UTM parameters, then matching that traffic to orders completed on your WooCommerce checkout. If a shopper clicks a feed link, lands on your store, and checks out through WooCommerce, that order shows up in Analytics.

Orders that do not follow this redirected checkout path, for example purchases completed entirely on a third party platform without redirecting the shopper back to your store, will not appear in these reports.

If your Analytics dashboard looks empty or numbers seem lower than expected, this requirement is almost always the reason. It is not a sign that your feeds are underperforming or misconfigured.

1. Filtering by Date Range

At the top of the dashboard, a date range selector (defaulting to Last 30 days) controls every card, chart, and table on the page. Change it [7 days, 30 days, 90 days, or custom] to review performance over a different period.

2. Understanding the Overview Cards

Four summary cards sit at the top of the dashboard, giving you a quick pulse check before you dig into the details below.

  • Active Channels: The number of merchant channels (Google Shopping, ChatGPT, Meta, and so on) that currently have at least one feed configured
  • Active Feeds: The total number of feeds you currently have set up and running across all channels
  • Revenue: Total WooCommerce revenue attributed to orders that came from a feed link, for the selected date range. The percentage next to it shows the change compared to the previous period of the same length
  • Avg. Order Value: Average value of the feed attributed orders in the selected date range (Revenue divided by Orders), with the same period over period percentage change

Performance Over Time

This chart plots Revenue and Orders across the selected date range, with Revenue on the left axis and Orders on the right axis. Use it to spot trends, such as a spike after launching a new feed or a channel, or a dip that lines up with a feed being paused or disapproved.

Top Feeds

The Top Feeds table ranks your individual feeds by performance, so you can quickly see which feeds are actually generating orders and revenue, and which ones are not pulling their weight despite having a large number of products.

  • Feed name: The name of the feed, as a clickable link to open that feed directly
  • Channel: The merchant channel the feed was generated for, for example Google Shopping
  • Products: The number of products currently included in that feed
  • Orders: The number of orders attributed to that feed in the selected date range
  • Revenue: The total revenue attributed to that feed in the selected date range

Top Products

The Top Products table shows which individual products are generating the most orders and revenue through your feeds, regardless of which feed they came from. This is useful for spotting best sellers you may want to prioritize with better images, pricing, or promotions in your feeds.

UTM Analytics

The UTM Analytics table breaks feed driven traffic down by its UTM source, medium, and campaign, giving you a channel level view of where your revenue is actually coming from.

  • Source: The UTM source of the traffic, for example google
  • Medium: The UTM medium PFM tags feed traffic with, for example feed
  • Campaign: The UTM campaign value, which PFM sets to the feed name by default so you can trace revenue back to a specific feed
  • UTM Content: An optional UTM content value, shown as a dash when not set
  • Orders / Revenue / AOV: The number of orders, total revenue, and average order value attributed to that specific source, medium, and campaign combination

Use the All traffic filter above the table to narrow this view down to a specific source when you want to focus on one channel at a time.

FAQs #

Why is my Analytics dashboard showing no data?

There are two common reasons. First, Analytics only tracks orders where the shopper clicked a feed link, was redirected to your store, and completed checkout through WooCommerce. Second, and often overlooked, the Enable UTM tracking for analytics toggle must be switched on inside that specific feed. If either condition is not met, that feed’s data will not appear.

Where do the UTM values come from?

PFM automatically tags the product links in your feeds with UTM parameters, typically setting the campaign to the feed name, so orders can be traced back to the exact feed that generated them.

I enabled the toggle but I still don’t see data for that feed. Why?

UTM tracking only applies to product links generated after the toggle is turned on. Orders placed using older, untagged links from before you enabled it will not retroactively appear in Analytics. Give it some time after enabling for new tagged traffic to come through.

Do I need to turn on UTM tracking for every feed separately?

Yes. Enabling UTM tracking for analytics is a per-feed setting, not a global one. If you want Analytics to reflect performance across all your feeds, you need to switch it on inside each individual feed.

Where do the UTM values come from?

Once the toggle is enabled on a feed, PFM automatically tags that feed’s product links with UTM parameters, typically setting the campaign to the feed name, so orders can be traced back to the exact feed that generated them.

Does the percentage next to Revenue and Avg. Order Value mean growth?

Yes. It compares the selected date range to the immediately preceding period of equal length, so a large positive percentage usually reflects a low or empty comparison period rather than guaranteed ongoing growth.

Can I see performance for a single channel only?

Yes. Use the UTM Analytics filter to switch from All traffic to a specific source, or open View All Feeds and filter by channel.

Does Analytics track orders from every channel PFM supports?

Analytics tracks any order that follows the redirected checkout path described above, regardless of channel. Channels or listings that do not redirect the shopper back to WooCommerce checkout will not be reflected here.

Still stuck? How can we help?

How can we help?

Updated on September 10, 2026
Table of Contents
  • What Is PFM Analytics?
  • Enable UTM Tracking on Each Feed
  • How Analytics Tracking Works
  • FAQs
RexTheme

Stay updated with our latest releases and useful guides.

By subscribing RexTheme you agree to Privacy Policy.

Products

  • WP VR
  • Product Feed Manager
  • Cart Lift
  • UGCify
  • Sell Kit Bundle

Resources

  • Terms of Service
  • Privacy Policy
  • Refund Policy
  • Affiliate Policy
  • Support Policy
  • Bug Bounty Program

Company

  • About Us
  • Blog
  • Documentations
  • Changelog
  • Affiliate Program
  • Brand Assets
  • Contact Us

Copyright © 2013 - RexTheme