Since WP VR 9.3.0, a scene can use a 360° image, and a video tour can use a 360° MP4 video, stored on a CDN or in cloud storage instead of the WordPress Media Library. Paste the file’s direct URL, and WP VR checks it in your browser before saving: images must load publicly with CORS allowed, and videos must also pass a test render through WebGL, the graphics technology the 360° player uses. A tour with a URL that fails the check can’t be saved.
This keeps large panoramas and videos off your web server, which saves disk space and bandwidth and lets a CDN serve them faster to visitors.
One trade-off: Enable mobile media resizer (WP VR > Settings) only works for Media Library images, so phones load the full external file, and the scene gallery uses it as the thumbnail.
| Info | Availability |
|---|---|
| Version | WP VR 9.3.0 or later (this guide: 9.3.2) |
| Plan | Free and Pro. Free scene limits still apply |
| Editors | New UI and Classic UI |
| Storage | Amazon S3, Cloudflare R2, Google Cloud Storage, and other CDNs that serve direct file links |
| Images | JPEG, PNG or WebP, equirectangular 360° (cubemap faces too, in the Classic UI with Pro) |
| Videos | Direct MP4 links only, equirectangular 360° |
Before you start #
The file must be publicly reachable by a direct link, and the storage must send CORS headers that allow your website. Without CORS, the file can load in a browser tab but the 360° viewer cannot draw it.
- A direct file link. The URL must point to the file itself, such as
https://cdn.example.com/tours/lobby.jpg. Share pages, preview pages and links that need a login do not work. - Public read access. Open the URL in a private browser window. If the image or video loads without signing in, it is public.
- HTTPS. Use HTTPS file URLs. WP VR rejects HTTP video links on HTTPS sites, and browsers may block or rewrite HTTP images on HTTPS pages.
- CORS enabled. The storage or CDN must send an
Access-Control-Allow-Originheader that includes your site’s domain (or*). WP VR displays panoramas with WebGL, which refuses cross-origin files that lack this header. - A supported file. Images: JPEG, PNG or WebP. TIFF works only when uploaded to the Media Library, because most browsers can’t display it from a URL. Videos: MP4 only. WebM, MOV, AVI and streaming formats (HLS
.m3u8, DASH.mpd) are rejected for CDN playback. - Correct 360° shape. Equirectangular files with a 2:1 ratio display correctly. Because phones get the full file, keep external panoramas at or below 4096 × 2048 px if many visitors use mobile, or test the tour on a phone.
CORS is set in your storage provider, not in WordPress. The next section shows how.
Set up CORS on your storage #
Add a CORS rule that allows GET and HEAD requests from your website. Replace https://www.example.com with your site’s address (scheme and domain, no trailing slash). Use * instead only if the files are meant to be used on any site. If you also preview tours on a staging site, add that address too.
Amazon S3 #
- In the Amazon S3 console, choose General purpose buckets, then open your bucket.
- Open the Permissions tab.
- Under Cross-origin resource sharing (CORS), choose Edit.
- Paste the rule below and choose Save changes.
[
  {
    "AllowedOrigins": ["https://www.example.com"],
    "AllowedMethods": ["GET", "HEAD"],
    "AllowedHeaders": ["*"],
    "ExposeHeaders": ["Content-Length", "Content-Range", "Accept-Ranges"],
    "MaxAgeSeconds": 3600
  }
]
If the files are served through CloudFront, the distribution must also forward the CORS headers; otherwise the browser never receives them. AWS: Configuring CORS
Cloudflare R2 #
- In the Cloudflare dashboard, go to R2 object storage and select your bucket.
- Select Settings.
- Under CORS Policy, select Add CORS policy.
- On the JSON tab, paste the same rule as for Amazon S3, then select Save.
The bucket must allow public access through a public development URL or a custom domain. If a custom domain was already serving the files, purge its cache after adding the policy, or cached copies keep loading without CORS headers. Cloudflare: Configure CORS
Google Cloud Storage #
CORS for Cloud Storage cannot be set in the Google Cloud console; use the gcloud CLI instead.
- Save this as
cors.json:
[
  {
    "origin": ["https://www.example.com"],
    "method": ["GET", "HEAD"],
    "responseHeader": ["Content-Type", "Content-Length", "Content-Range", "Accept-Ranges"],
    "maxAgeSeconds": 3600
  }
]- Run this command, replacing
BUCKET_NAMEwith your bucket:
gcloud storage buckets update gs://BUCKET_NAME --cors-file=cors.jsonUse file links in the form https://storage.googleapis.com/BUCKET_NAME/FILE. Google Cloud: Set up CORS
Other CDNs #
Look for a CORS, response headers or “allowed origins” setting in your CDN, and make it send Access-Control-Allow-Origin with your site’s address. After the change, clear the CDN cache.
Add an external 360° image to a scene #
Paste the image URL into the scene’s External Image URL (New UI) or External URL (Classic UI) field; WP VR verifies it before the scene is created or saved.
New UI #
- Open the tour and click + Add next to Scenes. The Upload Scene window opens.
- Select the External Image URL tab.
- Paste the link into Direct Image URL (S3, Cloudflare R2, GCS, CDN).
- Click Add Scene. The button shows Verifying… while WP VR checks the image; if it passes, the image is added to the list in the window.
- Optionally, change the Scene name, then click + Create Scene.
- Click Publish to save the tour.
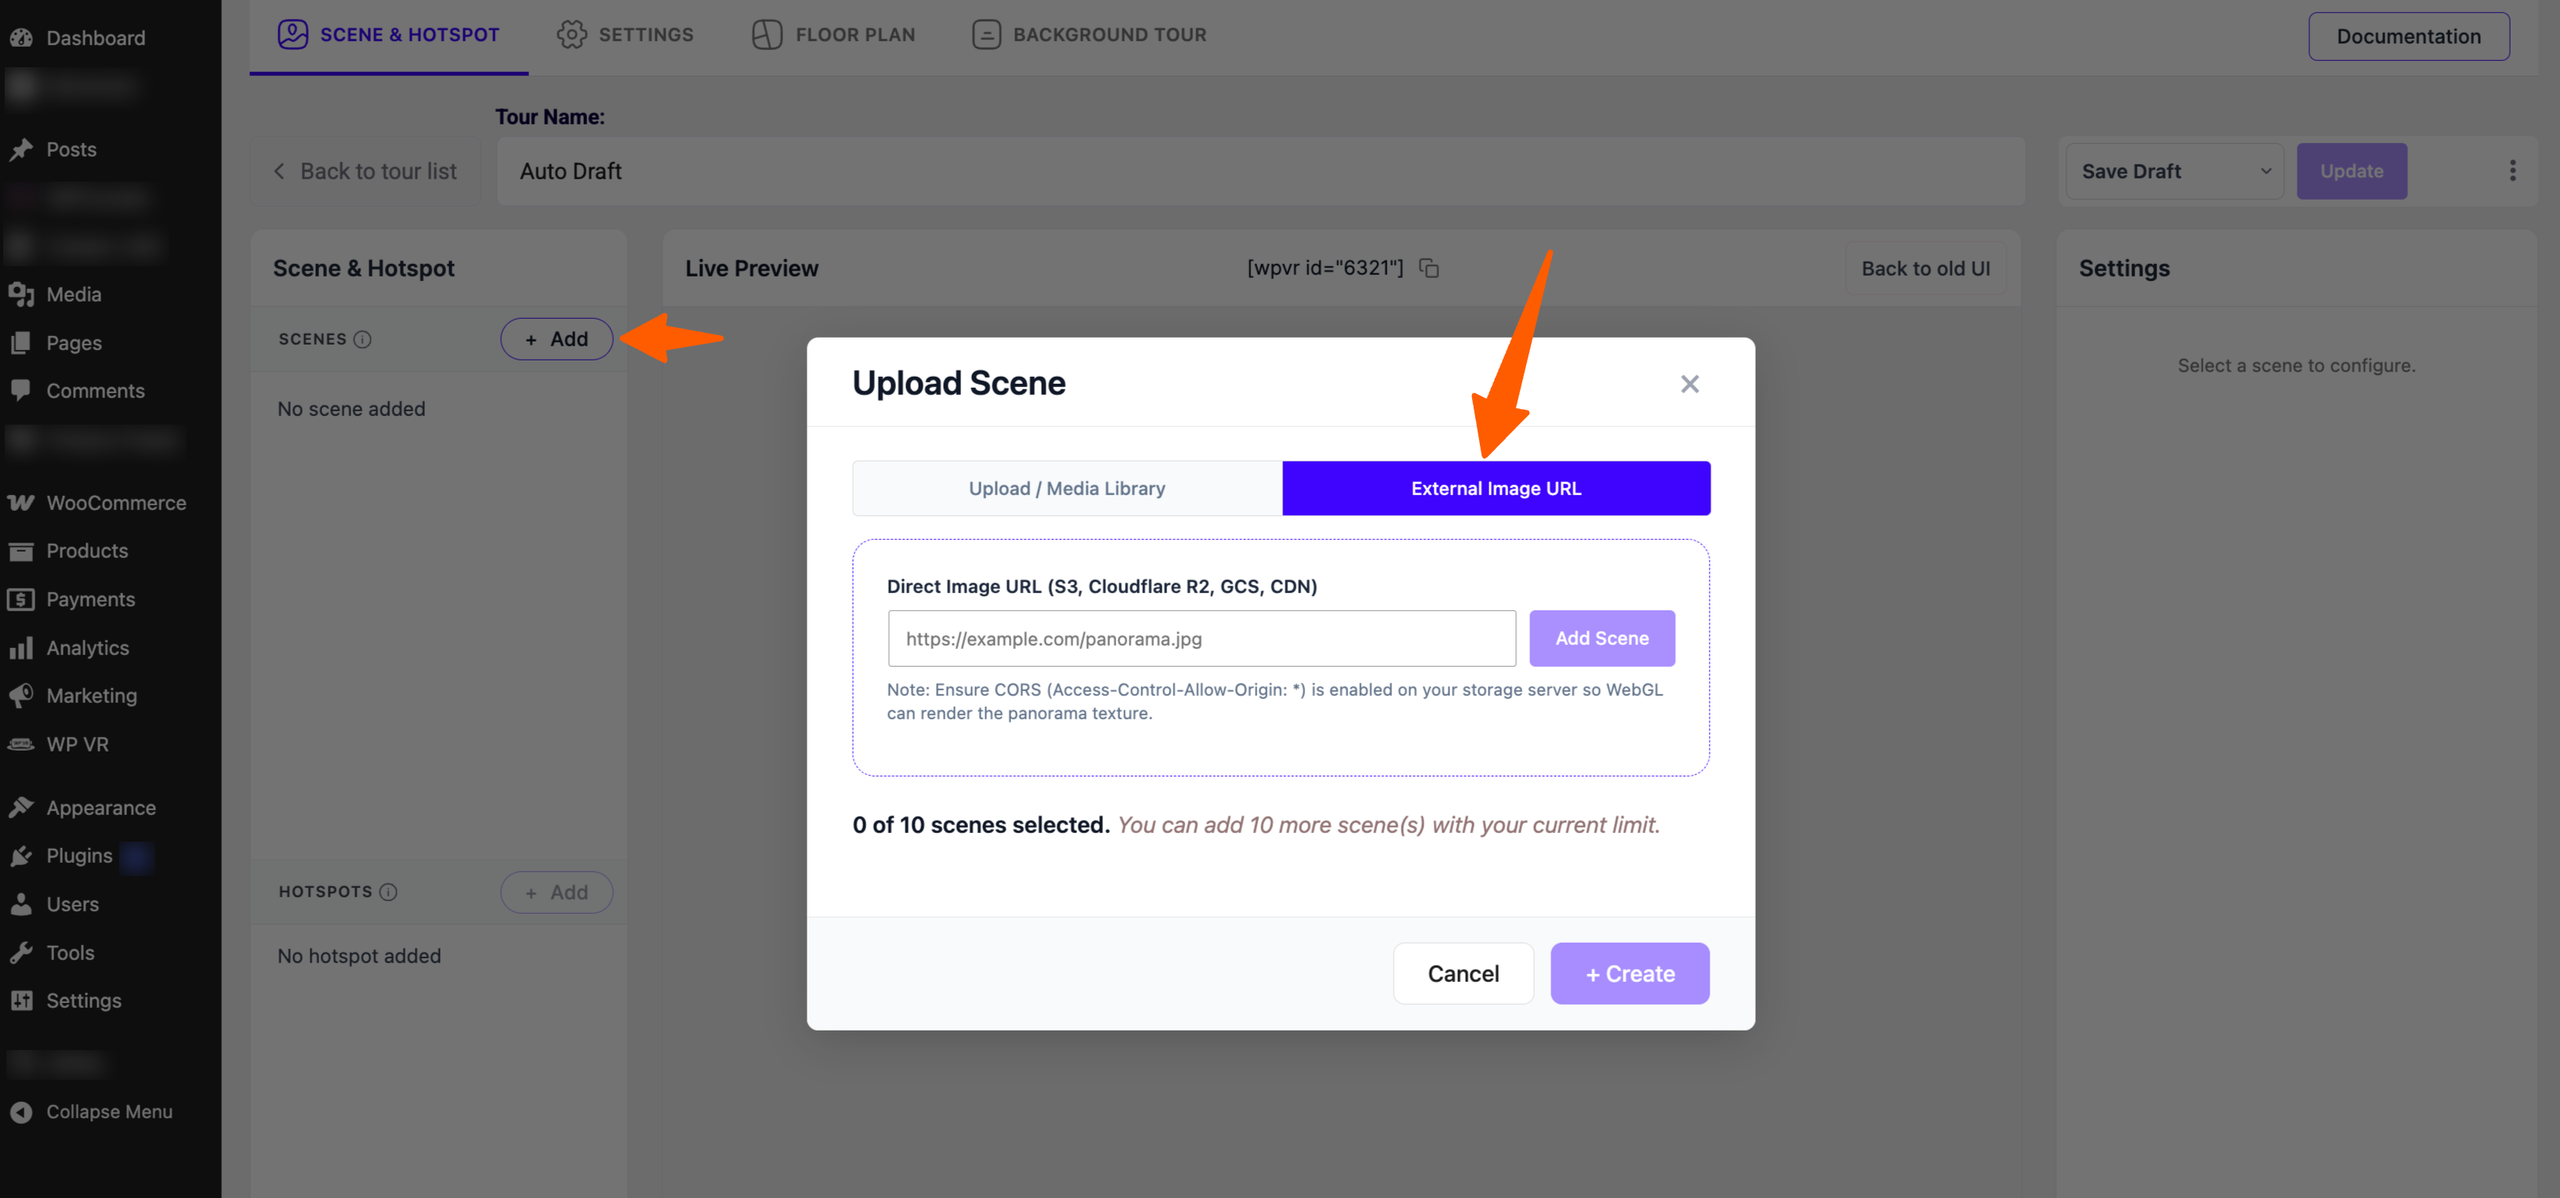
To change the image of an existing scene, select the scene and click Change Image above the panorama preview. In the Change Scene Image window, select External Image URL, paste the new link and click Apply URL.
Classic UI #
- Open the tour and go to the Scenes tab.
- In the scene’s image field, select External URL instead of Media Library.
- Paste the link into the URL field.
- Click Apply URL. If the check passes, “Image applied successfully!” appears with the image size; otherwise a message explains the problem.
- Click Update (or Publish) to save the tour.
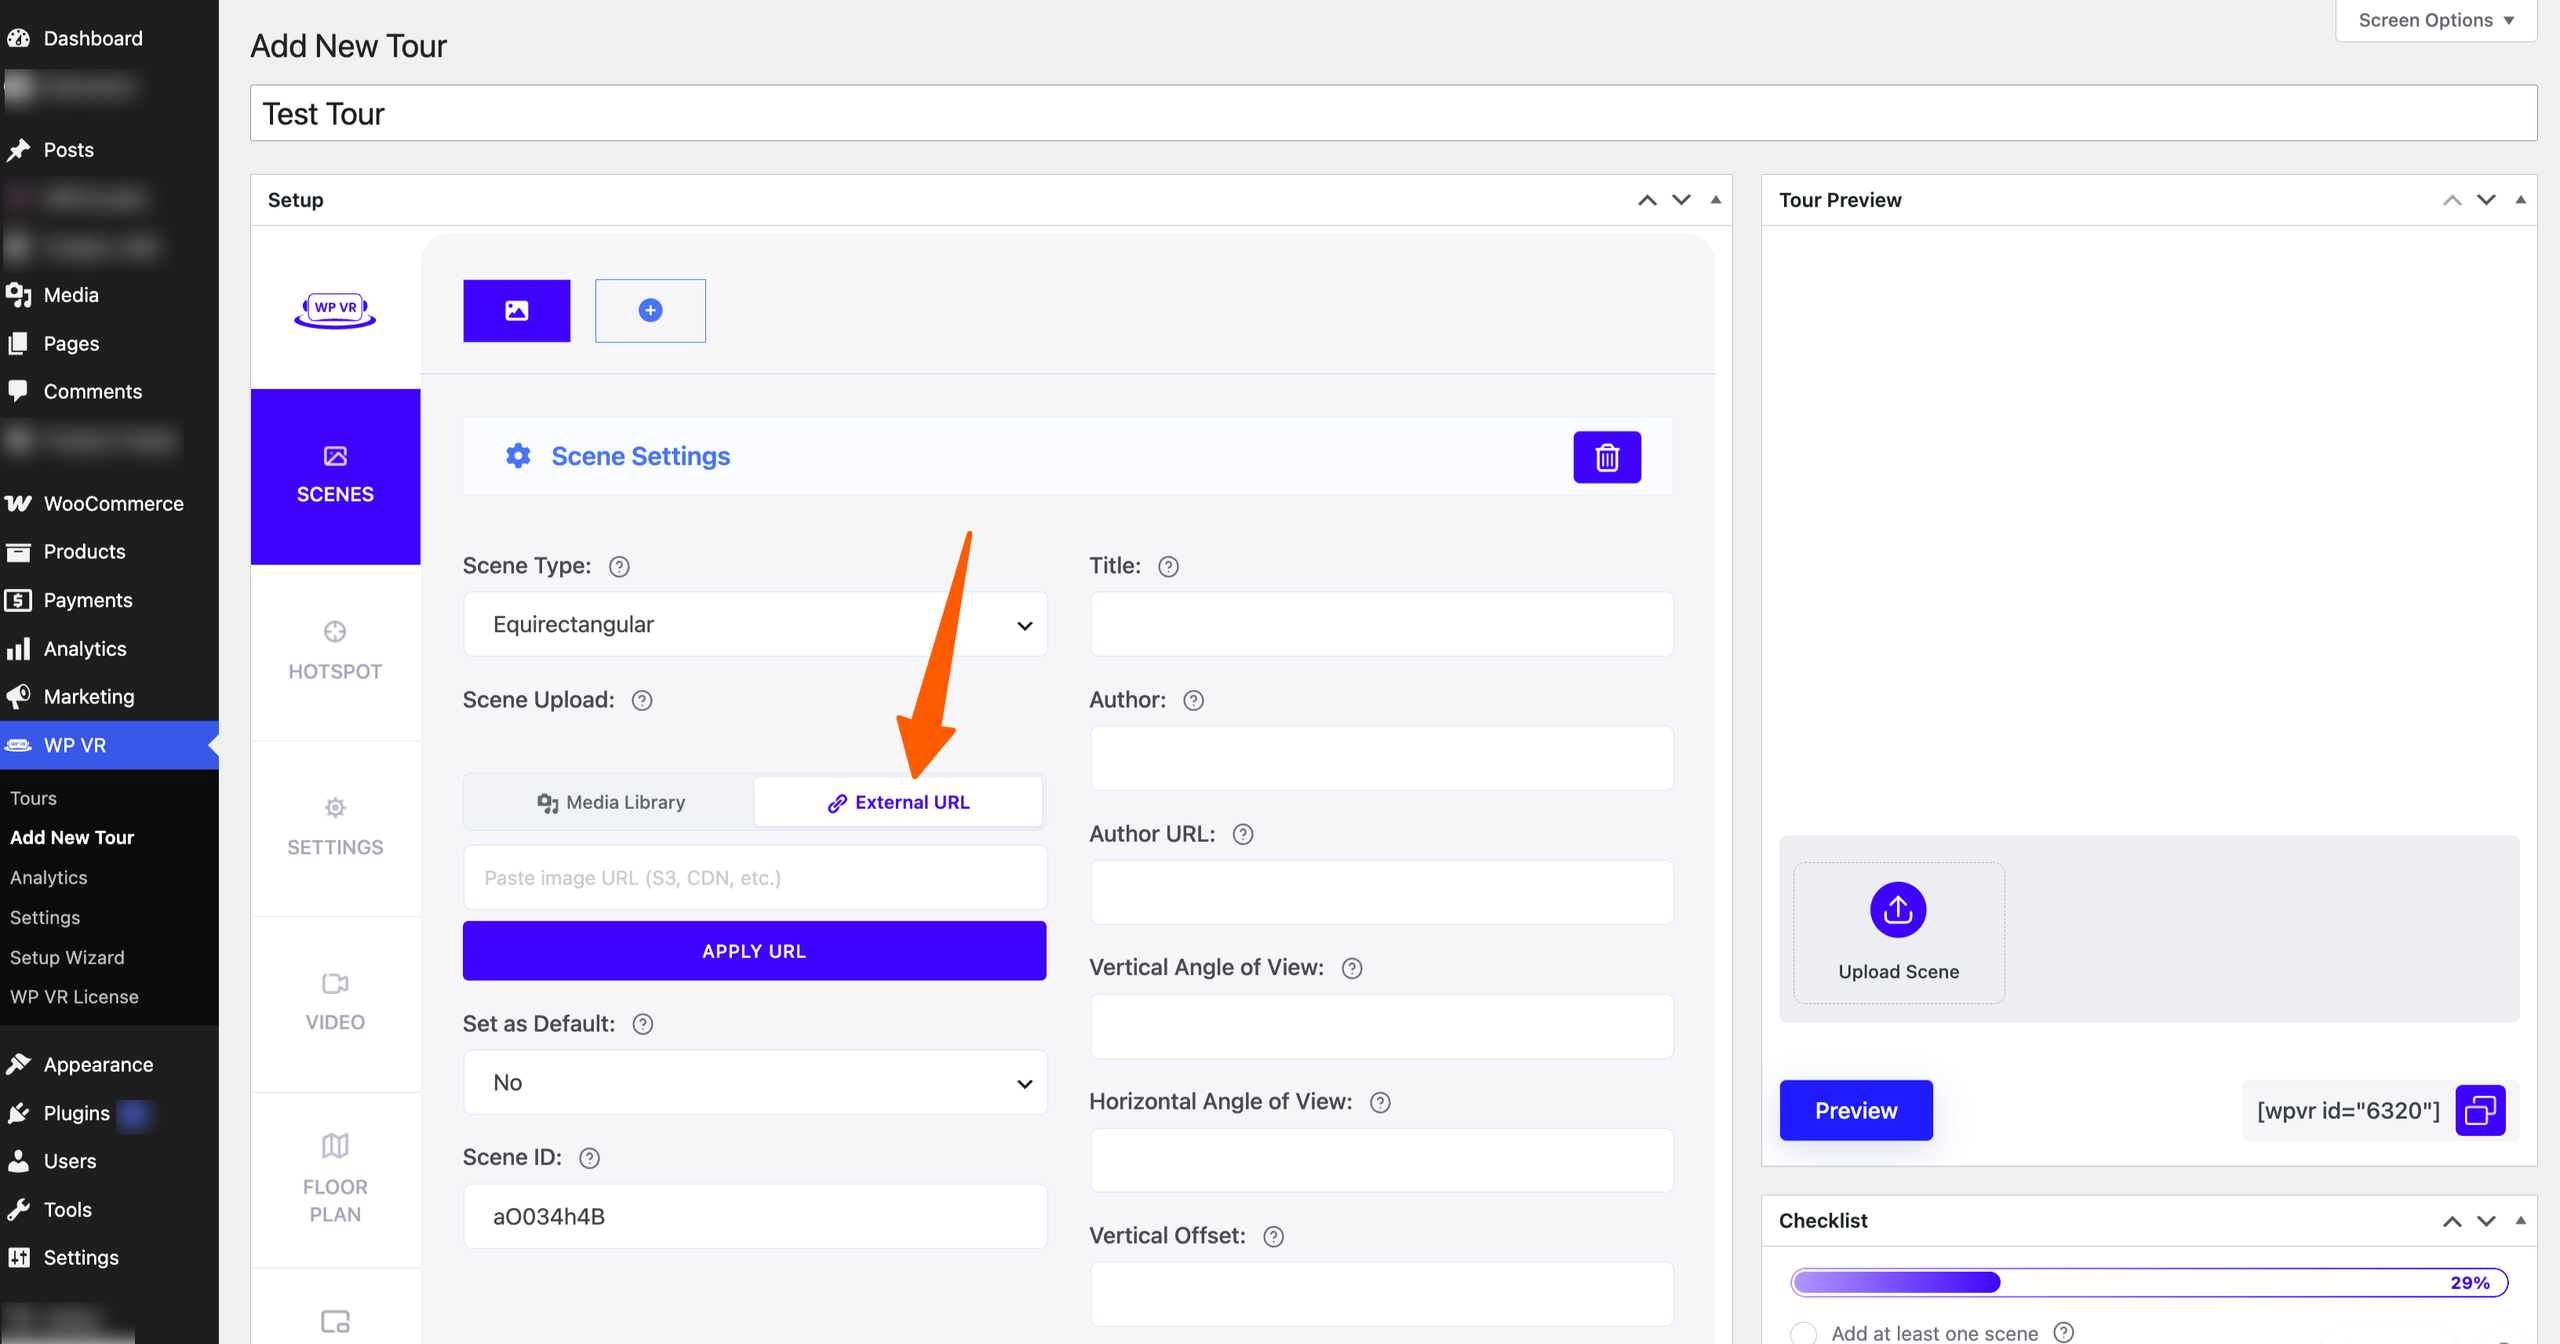
In both editors, if a pasted URL fails the check, the tour won’t save until you fix or remove that URL.
Add an external 360° video to a video tour #
Choose CDN URL as the video source and paste a direct link to an MP4 file; WP VR loads it and test-renders a frame through WebGL before applying it. For YouTube or Vimeo, use the YouTube / Vimeo source instead.
New UI #
- Go to WP VR > Tours > Add New, enter a name and choose 360° Video, or open an existing video tour.
- Under Video Source:, select CDN URL.
- Paste the link into Video URL:, for example
https://cdn.example.com/video.mp4. - Click Apply URL. The button shows Verifying… while the video is checked.
- When the check passes, the video appears in the preview. Click Publish.
Classic UI #
- Open the tour and go to the Video tab.
- Set Video Tour to On.
- Set Video Source to CDN URL.
- Paste the link into Video URL and click Apply URL. A message confirms the video or explains the problem.
- Click Update (or Publish).
To replace the video, paste a new link and click Apply URL again; Remove clears it.
In both editors, a CDN video URL that fails the check blocks saving until you fix or remove it. As a rule of thumb, encode the video as H.264 MP4 at 4K (3840 × 1920) or lower so most phones can play it.
Troubleshooting #
Most rejected URLs are caused by missing CORS headers or by a link that is not a direct, public file link.
Find the message WP VR shows below the field:
| Message | Where | What it means | What to do |
|---|---|---|---|
| Please enter a valid HTTP or HTTPS image URL. / …video URL. | Both editors | The link doesn’t start with http:// or https:// | Copy the full link, starting with https:// |
| The URL entered is not valid. / The URL entered is not a valid URL format. | Classic / New UI | The link is malformed | Copy the link again from your storage |
| Image is accessible, but the remote server blocked CORS (Access-Control-Allow-Origin)… | Classic UI | The image loads, but the storage doesn’t allow your site | Add the CORS rule from “Set up CORS on your storage”, clear the CDN cache, then try again |
| Unable to load image. Ensure the URL is a direct public image link… | Both editors | The image can’t be reached, isn’t public, the link opens a web page, or the browser can’t display the format (such as TIFF). In the New UI this message also covers missing CORS | Open the link in a private browser window; it should show only the image. Then check the CORS rule and use JPEG, PNG or WebP |
| Connection timed out. The image host (or server) took too long to respond. | Both editors | The image didn’t load within 10 seconds | Check the link and CDN, use a smaller file, then try again |
| Unable to load this video. Use a public MP4 link… | Both editors | The video can’t be reached, isn’t public, the browser can’t decode it, or CORS is missing. This is the usual message when CORS is missing | Check the link in a private window, add the CORS rule, and use H.264 MP4 |
| The video host blocked cross-origin access. Enable CORS for this site on the CDN. | Both editors | The video loads, but the browser refused to use it without CORS | Add the CORS rule, clear the CDN cache, then try again |
| This video cannot be used for 360° rendering… | Both editors | The video loads but can’t be drawn in 3D | Re-encode as H.264 MP4 at 4K or lower, and check CORS |
| Please use a direct 360° MP4 video URL for CDN playback. | Both editors | The link is a YouTube or Vimeo page, or ends in .webm, .ogg, .ogv, .mov, .avi, .m3u8, .mpd or .html | Use YouTube / Vimeo as the source for those platforms, or convert the file to MP4 |
| Please enter a YouTube or Vimeo URL, or select CDN URL for a direct video file. | Both editors (on save) | A direct file link was pasted under YouTube / Vimeo | Switch the video source to CDN URL |
| Use an HTTPS video URL on an HTTPS site. | Both editors | The video link starts with http:// on an HTTPS site | Use the https:// version of the link |
| Video verification timed out… | Both editors | The video didn’t load within 15 seconds | Check the link and CDN, then click Apply URL again |
| WebGL is unavailable… | Both editors (video only) | The browser has WebGL turned off | Turn on hardware acceleration in the browser settings, or use another browser |
| Please resolve the panorama image URL error before saving. / …CDN video URL error… | New UI (on save) | A pasted URL failed its check | Fix or remove the URL in the scene or video settings, then save again |
| Unable to play this video… | Live tour page | The video player couldn’t play the file for a visitor | Check the link is still public, the encoding is H.264 MP4 and CORS allows your site’s address |
The URL was accepted, but the scene is black on the live page. The CORS rule may allow only your admin address (for example example.com, while visitors use www.example.com). Add every address your site is served from, then clear the CDN and page cache.
Still stuck? Upload the file to the Media Library instead. It does not need CORS. If the issue persists, please contact our support team at support@rextheme.com or via https://rextheme.com/support/.
FAQ #
Is this a Pro feature?
No. External image and video URLs work in the free plugin. The free limit of 5 scenes per tour still applies; Pro removes it.
Do I need to change anything in WordPress?
No. Only the storage or CDN needs a CORS rule.
Can I mix Media Library and external images in one tour?
Yes. Each scene has its own image source.
Can I use private files or signed (temporary) URLs?
No. Signed links expire, and the tour would stop loading for visitors. Use public files.
Can I use a Google Drive or Dropbox share link?
Usually not. Share links open a web page, not the file itself, and these services don’t let you control CORS. Use a storage service or CDN that serves direct file links.
Does the URL check slow down my tour?
No. The check runs only in the editor when you add or apply a URL. Visitors load the file straight from your CDN.
What if I move the files to a new bucket later?
The tour keeps the old URL. Update each scene or video with the new link and update the tour again.