Limited Time Offer

Special Sale - 20% Off

12DAY
12HR
45MIN
30SEC
Get 20% OFF
Skip to content
RexTheme
  • Plugins
    • WP VR
      WP VR – Quality WP Virtual Tour CreatorCreate stunning virtual tours easily, on your own, using 360 Panoramas.
    • Product Feed Manager
      Product Feed Manager For WooCommerceMaximize Sales With The Largest Marketplaces.
    • Cart Lift
      Cart Lift To Recover Abandoned CartsRecover abandoned carts for your WooCommerce Store easily.
    • Checkoutify
      Checkoutify Checkout Field Manager for WooCommerceThe Ultimate WooCommerce Checkout Customizer.
    • Catalog Mode for WooCommerce
      Catalog Mode For WooCommerceTurn your WooCommerce store into a product showcase catalog.
    • Dynamic Discount
      Dynamic Discount for WooCommerceBoost your AOV significantly with custom dynamic discount offers.
    • Advanced Shipping Logo
      Advanced Shipping for WooCommerceSet conditional shipping and boost customer satisfaction.
    • Marketplace Auto-sync for WooCommerce
      Marketplace Auto Sync for WooCommerce – Automate Your Business GrowthAuto-sync products with leading marketplaces.
    • View All Plugins
  • Sell Kit Bundle
  • Blog
  • Resources
    • Docs
    • Support
    • Brand Assets
  • My Account
    • Log In
  • NL
  • DE

How can we help you?

Documentation

WP VR

84
  • Getting Started
    • Getting Started With WP VR
    • How To Install And Activate WP VR
    • How To Create A Simple Virtual Tour In 2 Minutes – WP VR
    • WP VR Basic Plugin Overview
  • Upgrade To WPVR Pro
    • How To Upgrade To Pro – WP VR
    • License Renewal Guide for WP VR Pro
    • WP VR VAT/TAX Policy
    • License Plan Upgrade Guide for WP VR Pro
  • WPVR Premium Add-ons
    • How To Integrate Fluent Forms On A Virtual Tour
    • How To Integrate WooCommerce To A Virtual Tour
    • How To Embed Virtual Tours On Non-WordPress Websites
    • WP VR Embed Addon – Features Overview
  • How To - Basic Settings
    • How To Use Exclusive Features On Settings Tab To Customize A Virtual Tour
    • How To Add A Preview Image To Your Virtual Tour – WPVR
    • How to Enable Auto Rotation For Your 360 Virtual Tour – WP VR
    • How to Customize the Tour Layout
  • Setting Up Control Buttons
    • Using Custom Icons For Navigation And Control Buttons In A Virtual Tour
    • How to Share Virtual Tours on Social Media
    • How To Configure A Call To Action (CTA) Button in Virtual Tour
  • Turn Panorama Images Into Live Scenes
    • How To Add A Scene To Your Virtual Tour
    • How To Set Default Scene Face On A Virtual Tour
    • How to Set 360 Image Grab Limit On A Scene in Your Virtual Tour – WPVR
    • How To Use Scene Settings To Customize A Scene
  • Use Hotspots for Navigation & Information
    • How To Add Hotspots To A Scene In Your Virtual Tour
    • How To Use Hotspots To Show Information, Images Or Videos
    • How To Use Hotspots To Go From One Scene To Another
    • How To Customize Hotspot Icons And Color
    • Embed A Self Hosted Video on WPVR Hotspots
    • How To Embed Youtube Videos Inside Virtual Tours Using WPVR
    • How To Set Hotspot Content Easily Inside Virtual Tour – Using WYSIWYG HTML Editor
    • How to use the Custom Icon Class
  • Create 360 Degree Video Tours
    • How To Embed A Youtube 360 Video On Your Website Using WPVR
    • How To Create A Virtual Tour Using Self Hosted 360 Degree Interactive Video with WPVR
  • Embed Google Street Views
    • How To Embed A Google Street View Tour On Your Website Using WPVR
  • Partial Panorama & Full View Virtual Tours
    • How To Create A Virtual Tour With Partial Panoramas or iPhone Panoramas
    • How To Create A Virtual Tour With Mobile Phone Panorama Images
    • How To Create Full Screen Virtual Tours – WPVR
    • How To Set A 360 Panorama Background Virtual Tour
  • Publish Virtual Tours on Your Website
    • How To use a WPVR Shortcode to Embed a Virtual Tour
    • How to Set Up Password Protection For Your 360 Virtual Tour – WP VR
    • How to Publish Virtual Tours Using QR Code
  • Import, Export, & Duplicate Virtual Tours
    • How To Duplicate A Virtual Tour
    • How To Export And Import Virtual Tours
  • Troubleshooting - Solve Common Issues
    • Troubleshooting Common Issues – WPVR
    • How To Solve Virtual Tour Not Showing Up – WPVR
    • How To Exclude Assets of WPVR From Autoptimize
    • How To Manage Your WPVR User Account Settings & Subscription Plan
    • WP VR Tour Not Displaying on Review and On the Published Webpage
    • WP VR Troubleshooting Guide: Embedding 360 Tours on External Platforms
  • Optimize Virtual Tour for Mobile Devices
    • How To Set A Dynamic Front End Notice On Virtual Tours For Mobile Phone Viewers
    • How To Auto Resize Images On Mobile Devices for Virtual Tours
    • How To Set Custom Height for Mobile Devices to Your Virtual Tours
  • Demo Virtual Tours
    • Basic Virtual Tour
    • Google Street View Tour – WPVR Pro
    • Video Tutorials – WPVR
    • Demo Partial Panorama Virtual Tour – WPVR Pro
    • Bar/Pub Showcase
  • Advanced Settings for Virtual Tours
    • How To Set Up WPVR Exclusive Settings
    • Control Script And Style Loading For The Virtual Tours
    • How To Disable WordPress Large Image Handler For Virtual Tours
    • How To Enable Gyroscope Sensor On 360 Virtual Tours
    • How To Add Background Music To Virtual Tours
    • How To Limit Keyboard Controls For Navigation And Zoom
    • How To Limit The Use Of Mouse Scroll To Zoom Or Drag To Move A Tour
    • How to Add A Virtual Tour Icon or Your Company Logo in 360 Degree Tours – WPVR
    • How To Set YouTube Explainer Videos Inside Virtual Tours 
    • How To Enable The Support for VR Headset for Phones
    • How To Set Individual Hotspot Icon Color and Animation In Panorama Images
    • How To Set Virtual Floor Plans Inside Your Tours – WPVR
    • How to do SEO optimization for Embeded tour
    • How To Set Scene Transition (Scene Entrance Animation)
    • How to Set Custom Zoom Settings in WPVR
    • WP VR Analytics: How to Track and Analyze Your Virtual Tours
    • How To Set Up A Scene Gallery On Virtual Tours
  • WP VR Plugin Integrations
    • How To Embed A Virtual Tour Using WPVR Gutenberg Block
    • How To Embed A Virtual Tour Using WPVR Elementor Widget
    • How To Use WP VR Oxygen Element To Embed A Virtual Tour
    • WP VR & Dokan Integration: Empower Vendors to Create 360° Virtual Tours
    • How To Embed A Virtual Tour Using WPBakery Element
    • How To Publish A Virtual Tour Using WPVR Panorama Module for Divi
    • How To Embed WPVR Virtual Tours Using Visual Composer Element

Product Feed Manager

118
  • Getting Started
    • Introduction To Product Feed Manager For WooCommerce
    • Getting Started With Product Feed Manager For WooCommerce
    • How To Install And Activate Product Feed Manager
    • How To Generate Product Feed For The First Time
    • Product Feed Manager – Basic Plugin Overview
    • All Supported Plugins & Integrations With Product Feed Manager For WooCommerce
  • Upgrade To PFM Pro
    • License Renewal for Product Feed Manager Pro
    • Product Feed Manager VAT/TAX Policy
    • License Plan Upgrade Guide for Product Feed Manager Pro
  • Upload Feed To Merchants
    • How to Upload your Product Feed on the Facebook Store
    • Upload your WooComerce Product Feed directly to the Google Merchant Center – (No Need For Authorization)
    • How To Auto-sync Your Store’s Products To Google Merchant Center Using Content API
    • How To Auto-sync Product Feed To Google Merchant Center
  • Feed Generation Instructions
    • How To Generate A Google Shopping Feed With Product Feed Manager
    • How to Generate A WooCommerce Product Feed For Facebook
    • How To Generate A Custom Product Feed Easily
    • How To Create A Feed For eBay MIP
    • How to create a Target Product feed for Target Marketplace
    • How to create a WooCommerce product feed for Wish.com
    • How to create a WooCommerce product feed for Sears Marketplace
    • How to create a WooCommerce product feed for NewEgg Marketplace
    • How to create a WooCommerce product feed for Walmart
    • How to create a WooCommerce product feed for Instagram Catalog
    • How to upload products on Instagram Shop
    • How to generate WooCommerce Product Feed for Amazon
    • How to generate WooCommerce Product Feed for Zbozi
    • How to Generate WooCommerce Product Feed for Skroutz
    • How To Create A Feed For eBay Seller Center
    • How to generate WooCommerce Product Feed for Rozekta
    • How to generate WooCommerce Product Feed for Pinterest
    • How to generate WooCommerce Product Feed for TikTok Ads Catalog
    • How to generate WooCommerce Product Feed for OpenAI Commerce
    • How to generate WooCommerce Product Feed for Yandex
  • All Google Feeds
    • How to create a WooCommerce product feed for Google Remarketing (DRM)
    • How to create a WooCommerce product feed for Google Local Products
    • How to create a WooCommerce product feed for Google Local Products Inventory
    • How to create a WooCommerce product feed for Google Manufacturer Center
    • How to create a WooCommerce feed for Google Merchant Center Promotion Using Product Feed Manager
    • How to create a WooCommerce product feed for Google Shopping Actions
    • How to create a WooCommerce product feed for Google Dynamic Display Ads (Google Ads)
    • How to create a WooCommerce product feed for Google Express (Former Google Shopping Actions Program)
    • How to create a WooCommerce product feed for Google Local Inventory Ads
    • How to create a WooCommerce product feed for Google Custom Search Ads
    • How to create a WooCommerce product feed for Google Dynamic Search Ads
    • How to create a WooCommerce product feed for Google Review
  • Category Mapping
    • How To Use Category Mapping For Product Feed
    • How To Use Category Mapping For Google Product Category
    • How To Configure Category Mapping For Facebook Product Category
  • Understanding Feed Attributes
    • Add Custom Fields For Important Product Attributes
    • How To Add A Static Prefix or Suffix To An Attribute In The Feed
    • How To Add A Custom Attribute To The Feed
    • How To Add Or Remove An Additional Product Attribute In The Feed
    • How to include WooCommerce Shipping values into your feed (Except Google & Facebook)
    • Price Attributes Mapping and Understanding The Different Use Cases
    • Understanding And Configuring Feed Attributes and Their Values
    • How To Add Currency To Your Product Price
    • How to Combine Multiple Attribute Values Using the Combined Attributes Feature
  • Understanding Basic Feed Configuration
    • Product Feed Optimization with Yoast SEO Product Title, Meta Description and Primary Category
    • How To Schedule Auto-update of Feed On Set Intervals
    • Learning About Feed File Types And How To Download Or View Feed
    • How To Add UTM Parameters To Product URLs
    • Optimize Product Feed Data With Effective Output Filters
    • How To Use RankMath Primary Category In The Feed
    • How to include Shipping values into WooCommerce product feed (Google & Facebook)
    • How to include Tax values into your WooCommerce Product Feed (Google & Facebook)
    • How To Remove HTML Tags Or Shortcodes From A Feed
    • How To Use UTF-8 Encode To Convert HTMLEntities To Symbols In A Feed Attribute Value
    • How To Convert Symbols To HTMLEntities In A Feed Attribute Value
    • How To Include CDATA In An XML Feed Attribute Tag
    • How To Remove Decimal From Price For Marktplaats Feed
    • How To Replace Space With Hyphen In A Feed Attribute Data
    • How To Use A Custom Field Value In The Product Feed
    • How To Use Yoast Primary Category In The Feed
    • How To Exclude Draft Products From The Feed
    • How to Add WooCommerce’s GTIN, UPC, EAN, or ISBN to Product Feed
    • Understanding The Basics Of Feed Settings
  • Feed Filters: Help Customize Feed
    • How To Exclude Invisible Products / Hidden Products From Product Feed
    • How To Use Category Filter When Generating Product Feed
    • How To Use Tag Filter When Generating Product Feed
    • How To Use Feed Filter Options When Generating Feed
    • How To Include Variable Products To The Feed
    • How To Include Private Products In Product Feed
    • How To Include Product Variation Term To The Product Name
    • How To Use Custom Filter When Generating Product Feed
    • How To Use The Product Filter Option To Include/ Exclude Specific Products
    • How To Use Brands Filter When Generating Product Feed
    • Best-Selling Products: Generate a WooCommerce Product Feed to Boost Sales
  • Feed Rules: Help Modify Product Data
    • How to use the Feed Rule feature to manipulate attribute values
    • How to use the Feed Rules feature to manipulate your product price
  • Feed Validation
    • Feed Validator for Google Shopping
    • Feed Validator for Facebook Catalog
    • Feed Validator for Pinterest Product Catalog
    • Feed Validator for TikTok Ads Catalog
    • Feed Validator for OpenAI Commerce Feed
  • Useful Control Options
    • Add Extensive Custom Fields Of Unique Identifiers For WooCommerce Products
    • How To Add Extensive Custom Fields To WooCommerce Products
    • How To Exclude Tax From Structured Data Prices
    • How to Schedule Feed Updates Based on Product Data Changes
    • How To Set Custom Time Intervals For Auto-Feed Update
    • Useful Options On Settings Tab
    • Control Products Per Batch In Batch Processing
    • Connect Facebook Pixel With WooCommerce For Dynamic Ads
    • How to set 5-Minutes Time Interval for Updating Feed
  • PFM Plugin Integrations
    • How To Include Brand Value From Perfect Brands For WooCommerce In The Feed
    • Enable Error Log for Product Feed Manager For WooCommerce
    • How to convert product feed price with WPML / WCML
    • How to generate product feed in multiple languages with Polylang
    • How To Generate Product Feed In Multiple Languages With WPML
    • How To Include Discount Rules In The Feed Using Discount Rules For WooCommerce And PFM
    • How To Generate Product Feed In Multiple Languages | PFM + TranslatePress
  • Fix JSON-LD Structured Data For Variable Products
    • Fix WooCommerce (JSON-LD) Structured Data For Approval In Google Shopping
  • Troubleshoot
    • Product Missing On Facebook Commerce Manager – Facebook & Instagram
    • Google Shopping Product Feed Specification – Attributes List
    • Troubleshooting Common Issues – Product Feed Manager For WooCommerce
    • How to Troubleshoot Feed Errors in Product Feed Manager

Cart Lift

18
  • Getting started
    • Introduction To Cart Lift
    • Install And Activate Cart Lift
    • A Basic Plugin Overview – Cart Lift
    • Configure And Use Cart Lift Effectively
  • Troubleshooting Common Issues
    • Troubleshooting For Common Issues – Cart Lift
  • Upgrade To Cart Lift Pro
    • How To Upgrade To Pro – Cart Lift
    • License Plan Upgrade Guide for Cart Lift Pro
  • Abandoned Cart Recovery Conditions
    • How To Track Abandoned Carts Automatically
    • How To Set Up Your Abandoned Cart Recovery Campaign
    • How To Use Twilio SMS Service To Recover Abandoned Carts – Cart Lift Pro
    • How To Get Notifications For Abandoned Carts And Recovery
    • Get Full Analytics Report On Recovery Campaign
    • Shortcodes for Email Fields in Cart Lift
    • How to Pause / Resume Individual Abandoned Cart Recovery
    • How To Set Condition To Automatically Delete Abandoned Orders After A Particular Number Of Days
    • How To Set Conditions To Exclude Carts From Abandoned Cart Recovery Campaigns
    • How To Configure Popup Editor
    • How To Configure reCAPTCHA V3 Settings in Cart Lift

Dynamic Discounts for WooCommerce

18
  • Getting Started
    • How To Install & Activate the Dynamic Discounts for WooCommerce
    • How To Create A Discount Rule For The First Time
    • Basic Plugin Overview – Dynamic Discounts for WooCommerce
  • Discount Conditions
    • How To Set Product Based Discount
    • How To Set Cart Based Discount
    • How to Set Discount Conditions for Bulk Purchases in WooCommerce
    • How To Set Discount Conditions Based on Customer Purchase History
    • How To Set Discount Conditions For Product Variations
    • How To Apply discount To The cheapest product In The Cart
    • How to Set Discount Based On Category and Tag
    • How To Set Buy X Get Y Discount
    • How To Set Stock-Based Discount
    • How To Set A Bundle Discount
    • How To Set Buy X Get X Discount
    • How To Apply Discount To Nth Quantity
    • How To Set The Cheapest Product On Cart Discount
    • How To Set “Offer One Or More Free Products” Discount
    • How to Set Attribute Specific Discount For Product Variants

Checkoutify

5
  • Getting Started
    • How To Install & Activate Checkoutify Pro – Checkout Customizer
    • How to Replace Your WooCommerce Checkout Using Checkoutify – Checkout Customizer
    • How To Create and Customise an Order Bump
    • How to Create a Custom Field in Checkoutify
  • Customizing Checkout
    • Creating a Multi-Step Checkout Using Checkoutify – Checkout Customizer

Advanced Shipping for WooCommerce

18
  • Getting Started
    • How To Install & Activate The Advanced Shipping For WooCommerce
    • Basic Plugin Overview – Advanced Shipping For WooCommerce
    • How To Add Advanced Shipping To An Existing Shipping Zone
    • How to Set Shipping Conditions For The First Time Using Advanced Shipping
  • Shipping Conditions
    • How To Set Product-Specific Shipping Conditions
    • How To Set Category-Based Shipping Conditions
    • How To Set Shipping Conditions Based On WooCommerce Product Tag
    • How To Set Shipping Conditions Based On WooCommerce User Role
    • How To Set Shipping Conditions Based on Product’s Weight, Volume, Length, Height, and Width
    • How to Add Price Based Shipping Conditions in Advanced Shipping
    • How to Add Weight Based Shipping Conditions in Advanced Shipping
    • Quantity Based Shipping Conditions: Easy Steps to Set Them Up in WooCommerce
    • How to Set Time and Day Based Shipping Conditions in Advanced Shipping
    • How to Set Country Based Shipping Conditions in Advanced Shipping
    • How to Set City Based Shipping Conditions in Advanced Shipping
    • How to Set State Based Shipping Conditions in Advanced Shipping
    • How to Set ZIP Code Based Shipping Conditions in Advanced Shipping
    • How to Set Zone Based Shipping Conditions in Advanced Shipping

Catalog Mode for WooCommerce

7
  • Getting Started
    • How To Install & Activate the Catalog Mode for WooCommerce
    • Basic Plugin Overview – Catalog Mode For WooCommerce
  • Settings
    • How To Set Users Rules For Catalog Mode
    • How To Configure Catalog Mode Options
    • How to Manage the Exclusion List in Catalog Mode
    • How To Configure the Inquiry Form in Catalog Mode
    • How to Create and Manage Custom Buttons and Labels

Marketplace Auto-Sync for WooCommerce

4
  • Getting Started
    • How To Install & Activate Marketplace Auto Sync
    • Basic Plugin Overview – Marketplace Auto Sync
    • How To Set Up an Auto Sync For The First Time
    • How To Auto-sync with Google Merchant Center

UGCify

2
  • Getting Started
    • How To Install And Activate UGCify
    • Basic Plugin Overview – UGCify
  • Home
  • Docs
  • UGCify
  • Getting Started
View Categories

Basic Plugin Overview – UGCify

UGCify – UGC for WooCommerce that automatically collects, manages, and displays customer photos and videos on your product pages, turning real purchases into social proof that drives conversions. 

This document walks through each section of the UGCify admin panel, so you know exactly where everything lives from day one.

After installing and activating the plugin and the License, on the WordPress dashboard, click on UGCify. Then, on the sub-modules, you’ll see all the features.

Basic Plugin Overview – UGCify 1

Quick Overview of all the Submenus: #

#Menu ItemDescription
1DashboardOverview of UGC performance — submissions, approval rate, views/clicks, conversion lift, and top-performing content.
2Review QueueModeration hub. Approve, reject, reply to, flag, or bulk-manage all customer submissions before they go live.
3Influencer PortalInvite and manage verified creators. Track rights acceptance, upload volume, and portal access settings.
4Block StudioVisual gallery template builder with live preview. Set layout, colors, card style, and copy the embed shortcode.
5UGC FormCustomise the multi-step customer review form — rating stars, media upload, about-you fields, and thank-you screen.
6EmailsConfigure 10+ automated email triggers (order complete, review approved, points redeemed, badge earned, etc.).
7Import & CurationsPull content from Instagram (OAuth), YouTube, and TikTok into your gallery via hashtag mapping or URL import.
8A/B TestingRun split tests on gallery images, layout types, and widget placement to find the highest-converting variant.
9AutomationConnect to Mail Mint to build trigger-based review-request email sequences with branching and segmentation.
10RewardsAuto-issue discount coupons and points when photo reviews are approved. Badge and gamification settings live here.
11SettingsSpam detection, reCAPTCHA, WooCommerce review migration (import/export), and S3 cloud storage configuration.
12Help & FeedbackLinks to documentation, support ticket submission, and the WordPress.org review page.
13LicenseEnter and manage your Pro license key. Unlock premium features and receive automatic plugin updates.
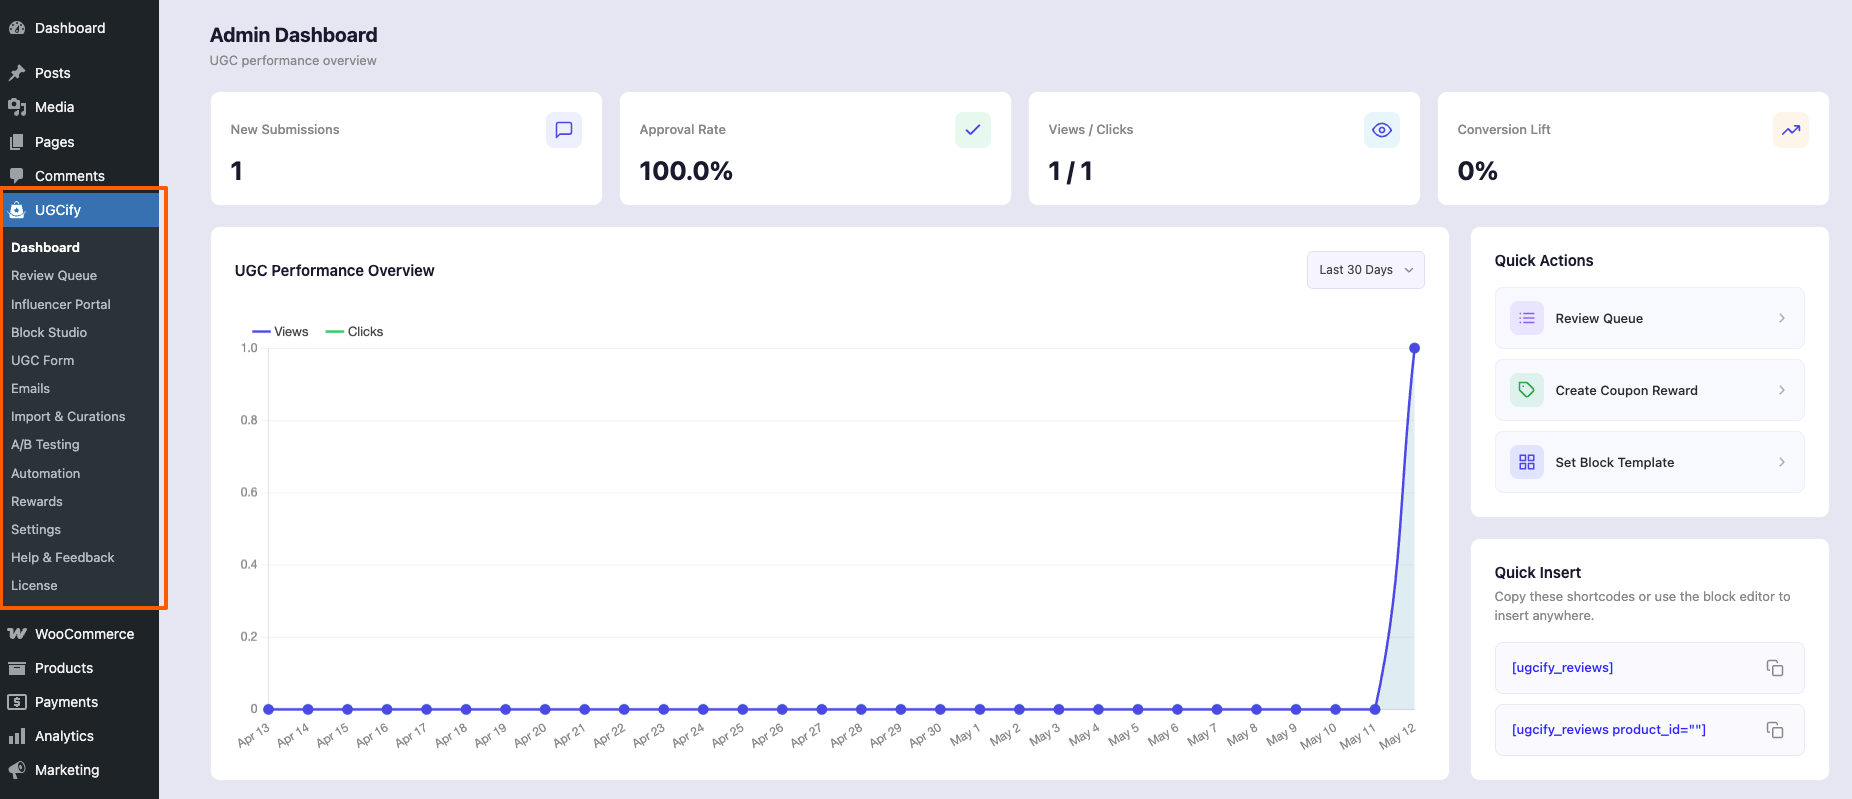
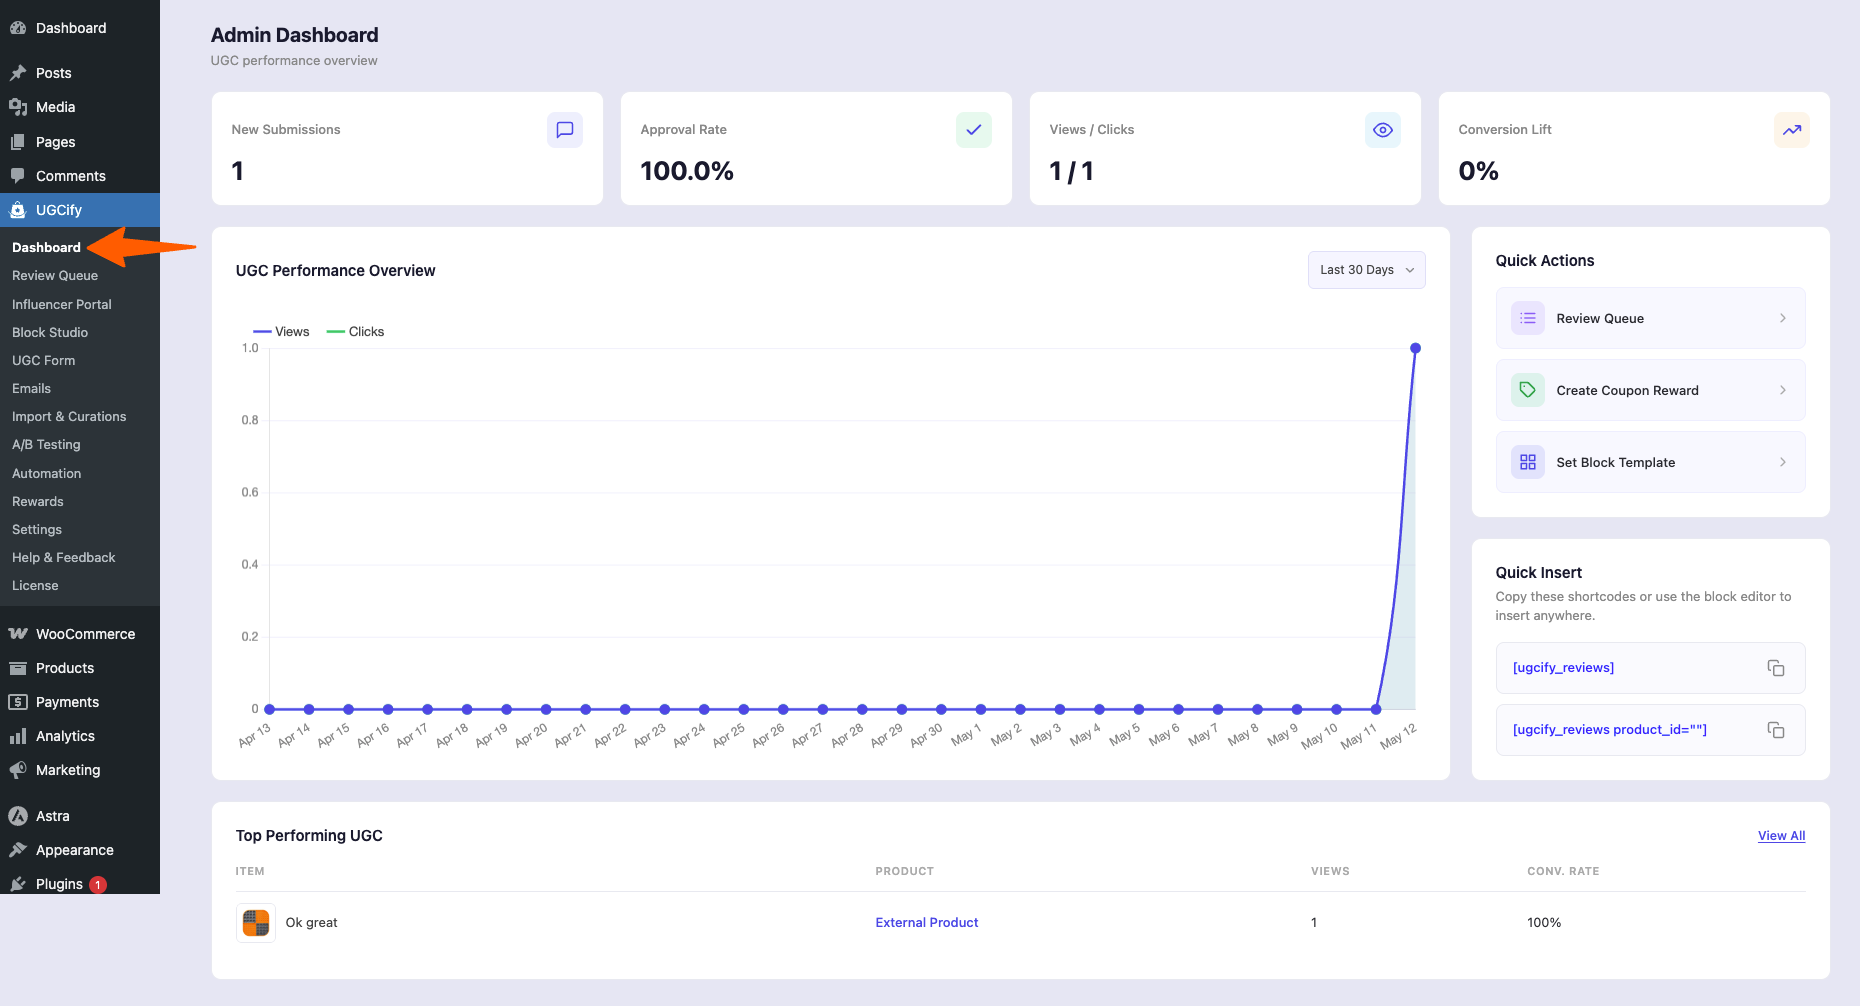
1. Dashboard #

The Dashboard is your UGC command centre. The four KPI cards at the top:

  1. New Submissions,
  2. Approval Rate,
  3. Views / Clicks, and
  4. Conversion Lift

Update in real time. The performance chart below tracks views and clicks over the last 30 days. Use the Quick Actions panel on the right to jump to the Review Queue, create a coupon reward, or set a block template without extra navigation.

Basic Plugin Overview – UGCify 2

Dashboard — KPI cards, performance chart, Quick Actions, and shortcode snippets
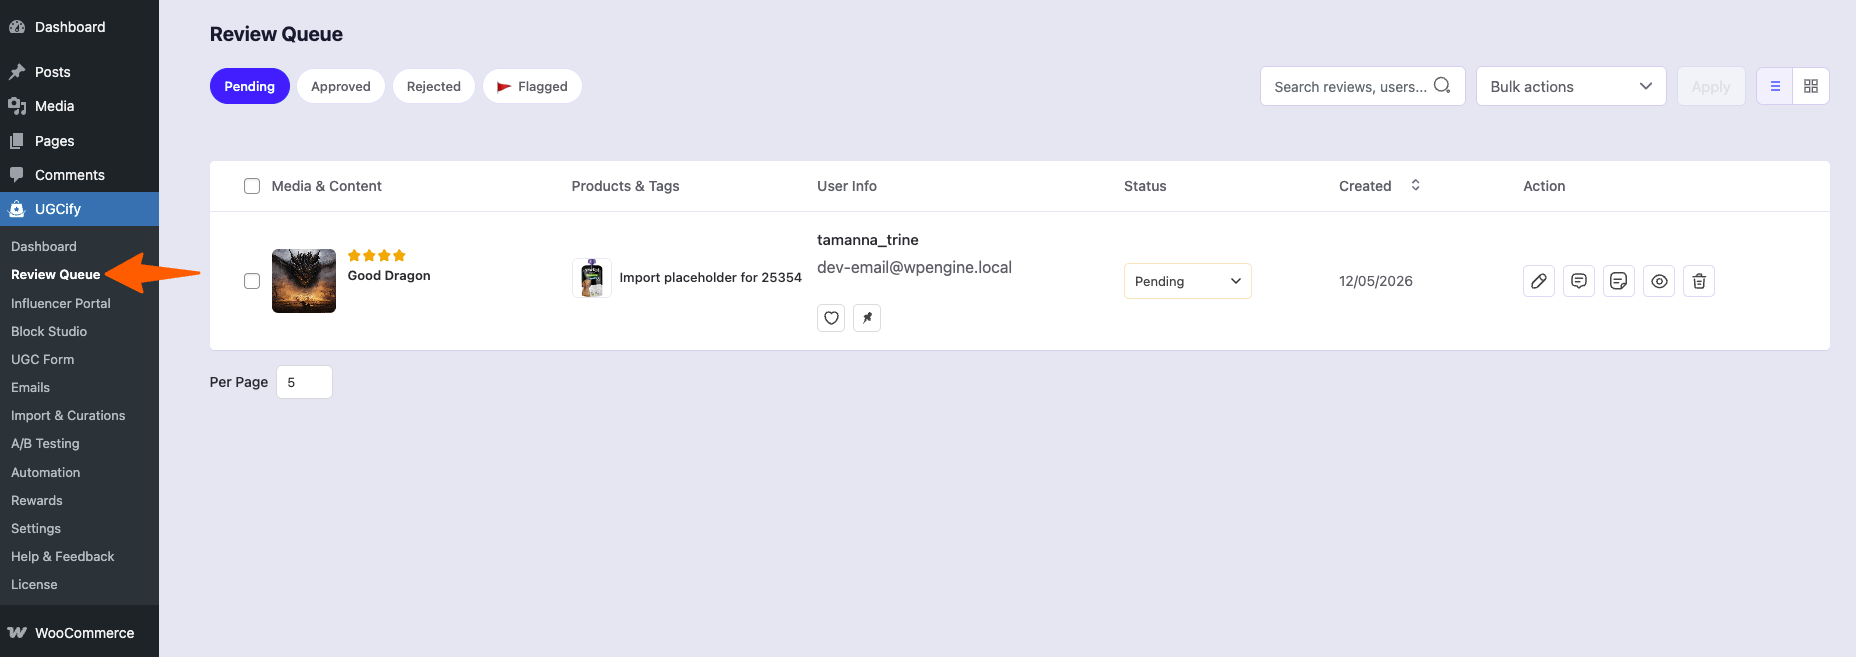
2. Review Queue #

Every submission lands here first. You can approve, reject, reply to, or flag any review from this single screen. Bulk actions let you process multiple submissions at once. Approved reviews are immediately published to the relevant product page; rejected ones are hidden from the storefront but remain in the queue for reference.

Basic Plugin Overview – UGCify 3

3. Influencer Portal #

The Influencer Portal lets you recruit and manage verified creators. The Creators tab shows each creator’s status, number of uploads, rights acceptance, and join date. Use the Invitations tab to send token-based invitations with a configurable expiry. The Settings tab controls the portal page, upload limits, rights agreement text, and the public creator label that appears next to approved creator content on your storefront.

Basic Plugin Overview – UGCify 4

Influencer Portal Settings — rights agreement, upload limits, and public attribution controls

4. Block Studio #

Block Studio is a visual gallery builder with a live preview canvas. Pick a layout (Masonry, Grid, List, Carousel, or Slider), then open the accordion panels on the left to adjust the header area, colors and styles, review card details, media behaviour, shoppable product tags, and advanced custom CSS. The preview updates instantly as you change settings. Switch between Desktop, Tablet, and Mobile to check responsiveness. Copy the generated shortcode from the Advanced panel to embed the gallery anywhere.

Basic Plugin Overview – UGCify 5

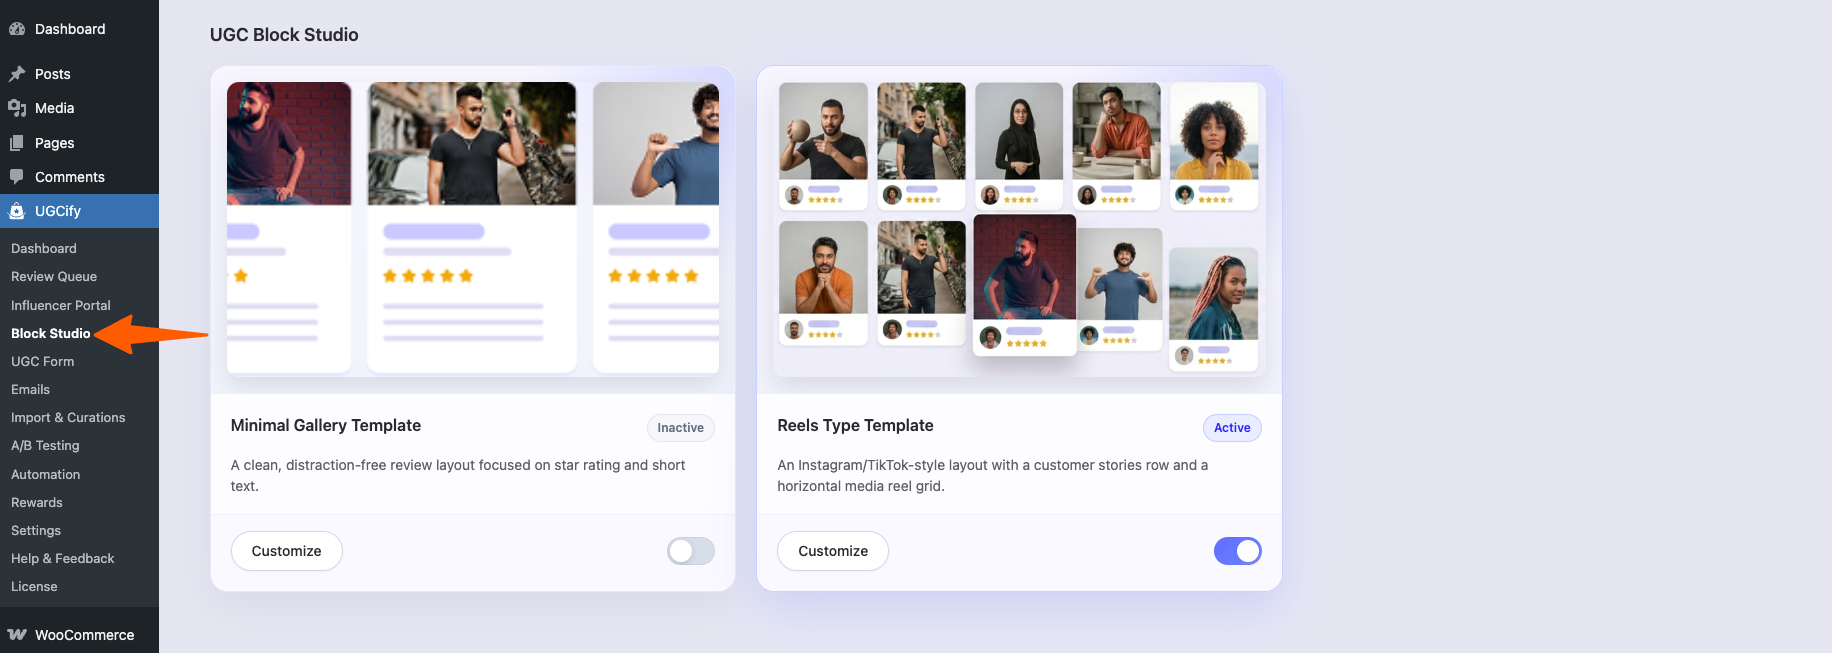
Block Studio — masonry layout with live preview and settings panels

5. UGC Form #

Customise the step-by-step review submission form your customers see when they click “Write a review.” Five tabs map to the five form steps: Rating (star prompt and star style), Media (photo/video upload — supports JPEG, PNG, GIF, MP4, MKV up to 10 MB), About You, Review (headline and body text), and Thank You. The left panel controls general settings, button labels, and color theming, with a live preview on the right.

Basic Plugin Overview – UGCify 6

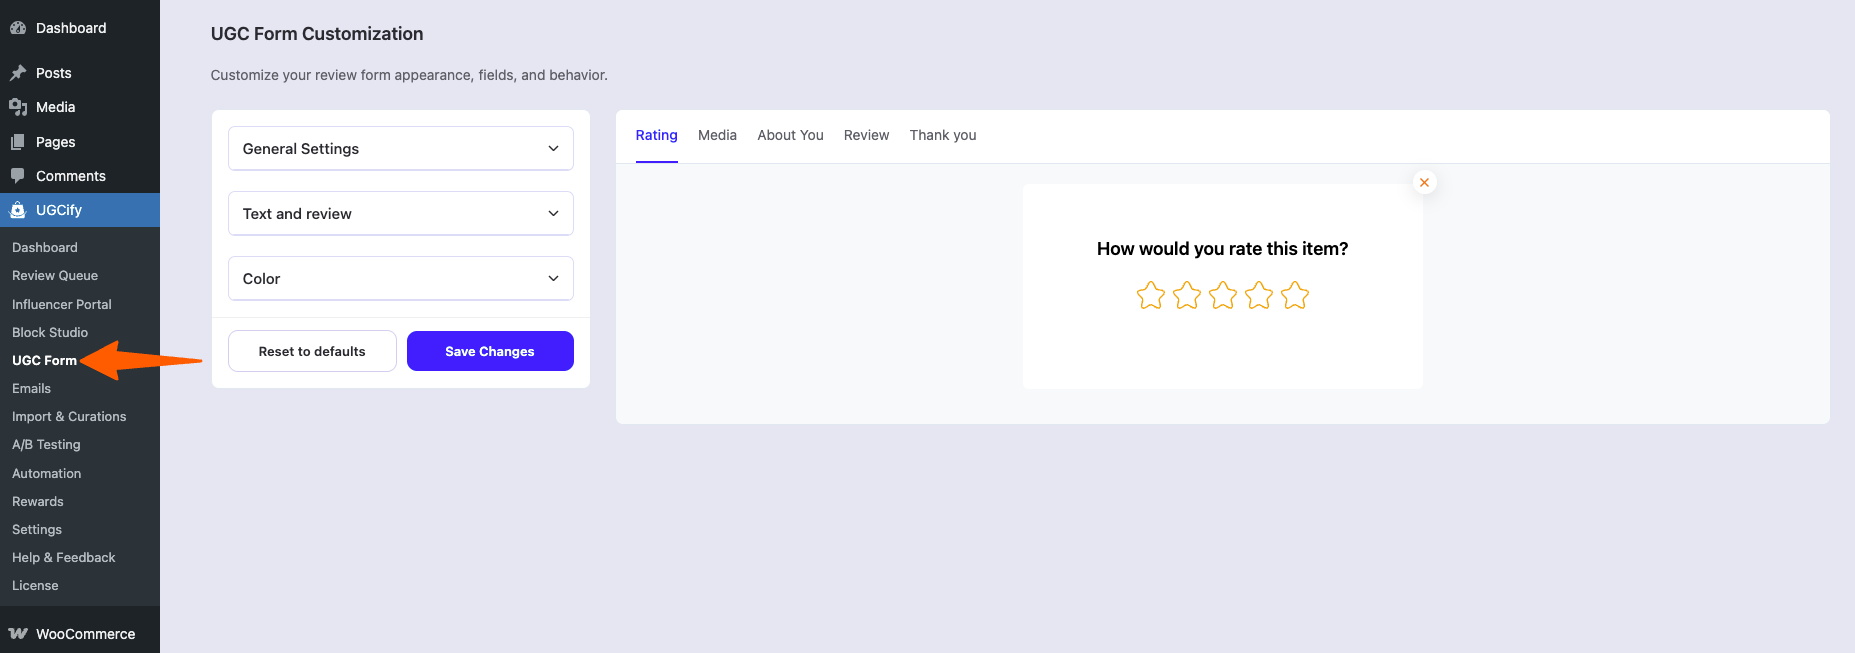
UGC Form — Rating step with live preview of the star-rating screen

6. Emails #

The Emails section manages all automated notifications. Ten triggers are listed on the Emails tab — toggle any on or off, or click Edit to open the drag-and-drop email editor for that trigger. Common triggers include Order Complete (the primary review-request email), Review Approved, Review Rejected, Review Reply, Points Redeemed, and Badge Gained. The Global Settings tab sets the shared from name, reply-to address, brand colors, header logo, and footer text that apply to every email.

Basic Plugin Overview – UGCify 7

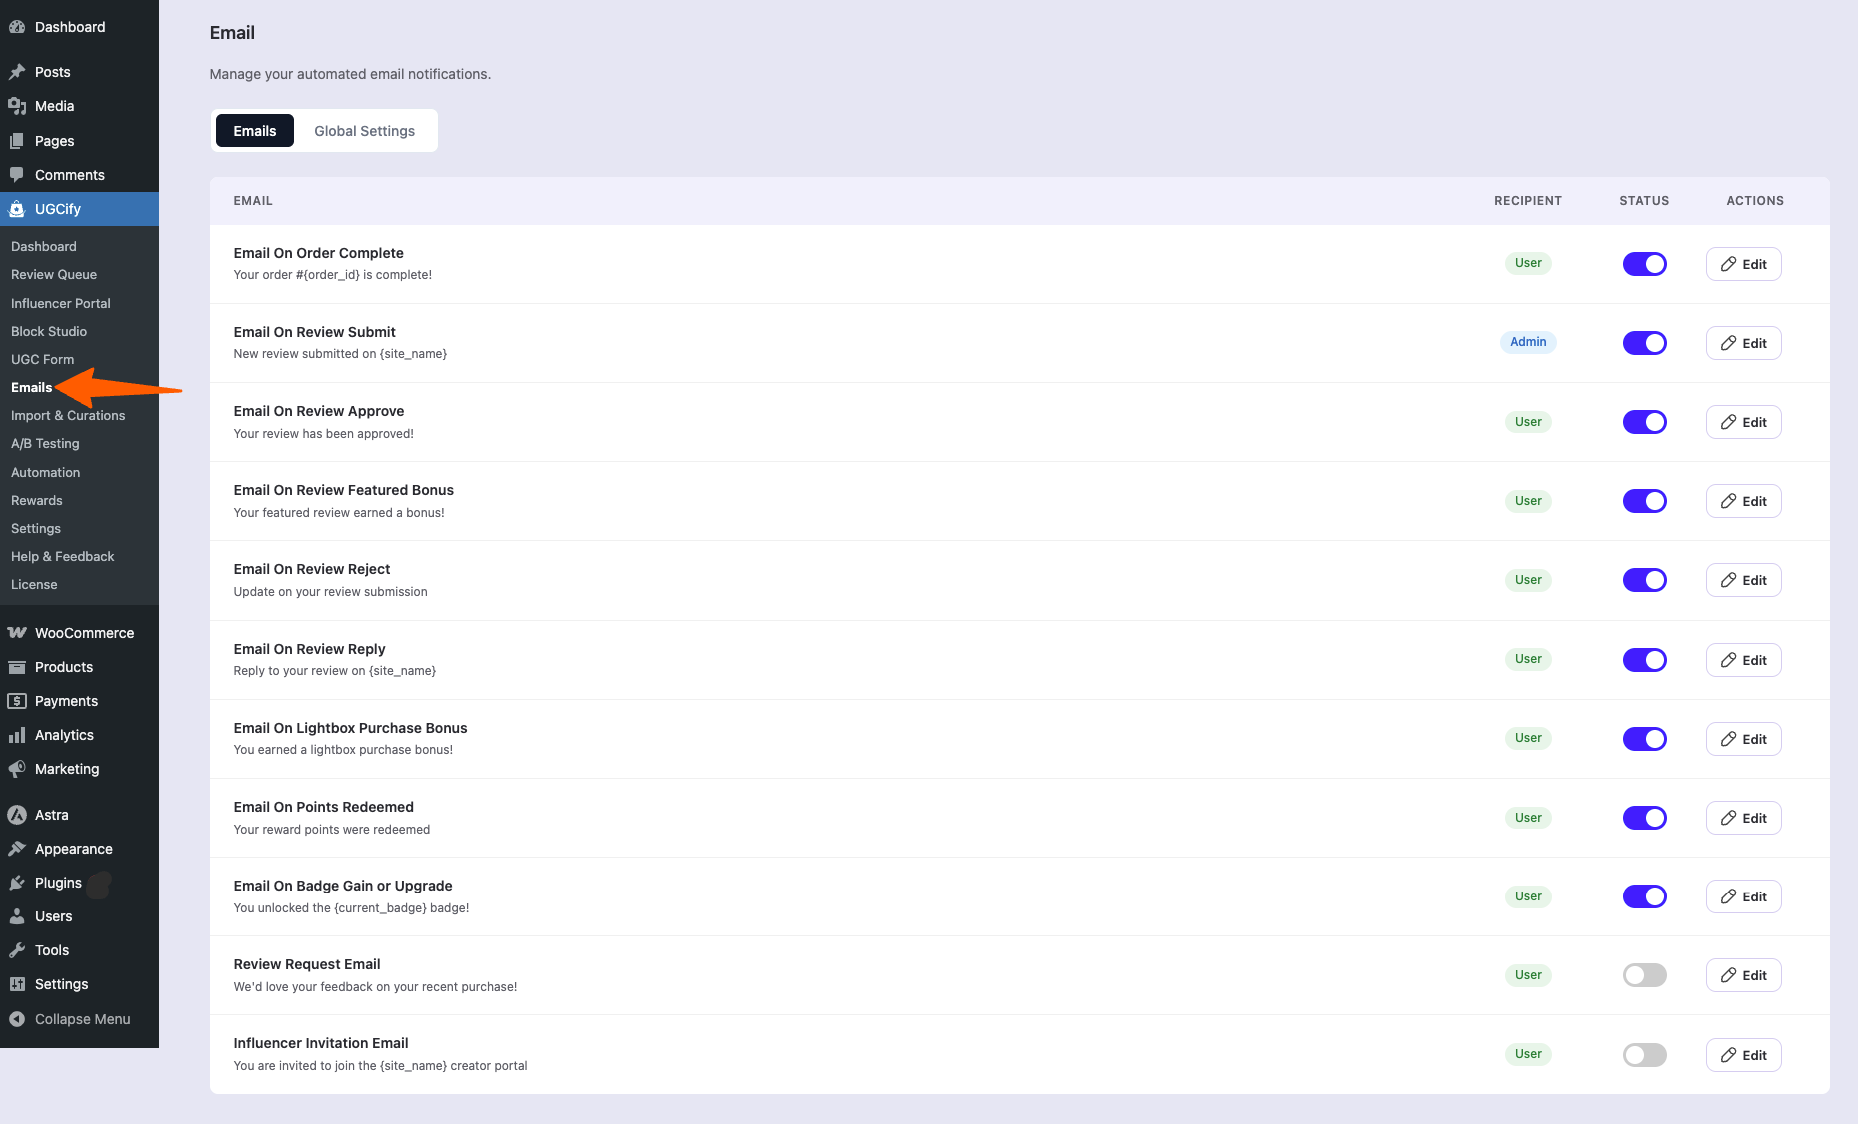
Emails — list of automated triggers with recipient type, status toggles, and Edit actions

7. Import & Curations #

Bring in content from outside your store. The Instagram tab lets you connect a Business account via Meta OAuth, define hashtags, and map each hashtag to a WooCommerce product — the plugin syncs matching public posts on a configurable schedule. The YouTube tab imports video reviews by URL (title and thumbnail are fetched automatically via the YouTube oEmbed API). TikTok videos are displayed using TikTok’s native embed player. All imported content enters the Review Queue for moderation before going live.

Basic Plugin Overview – UGCify 8

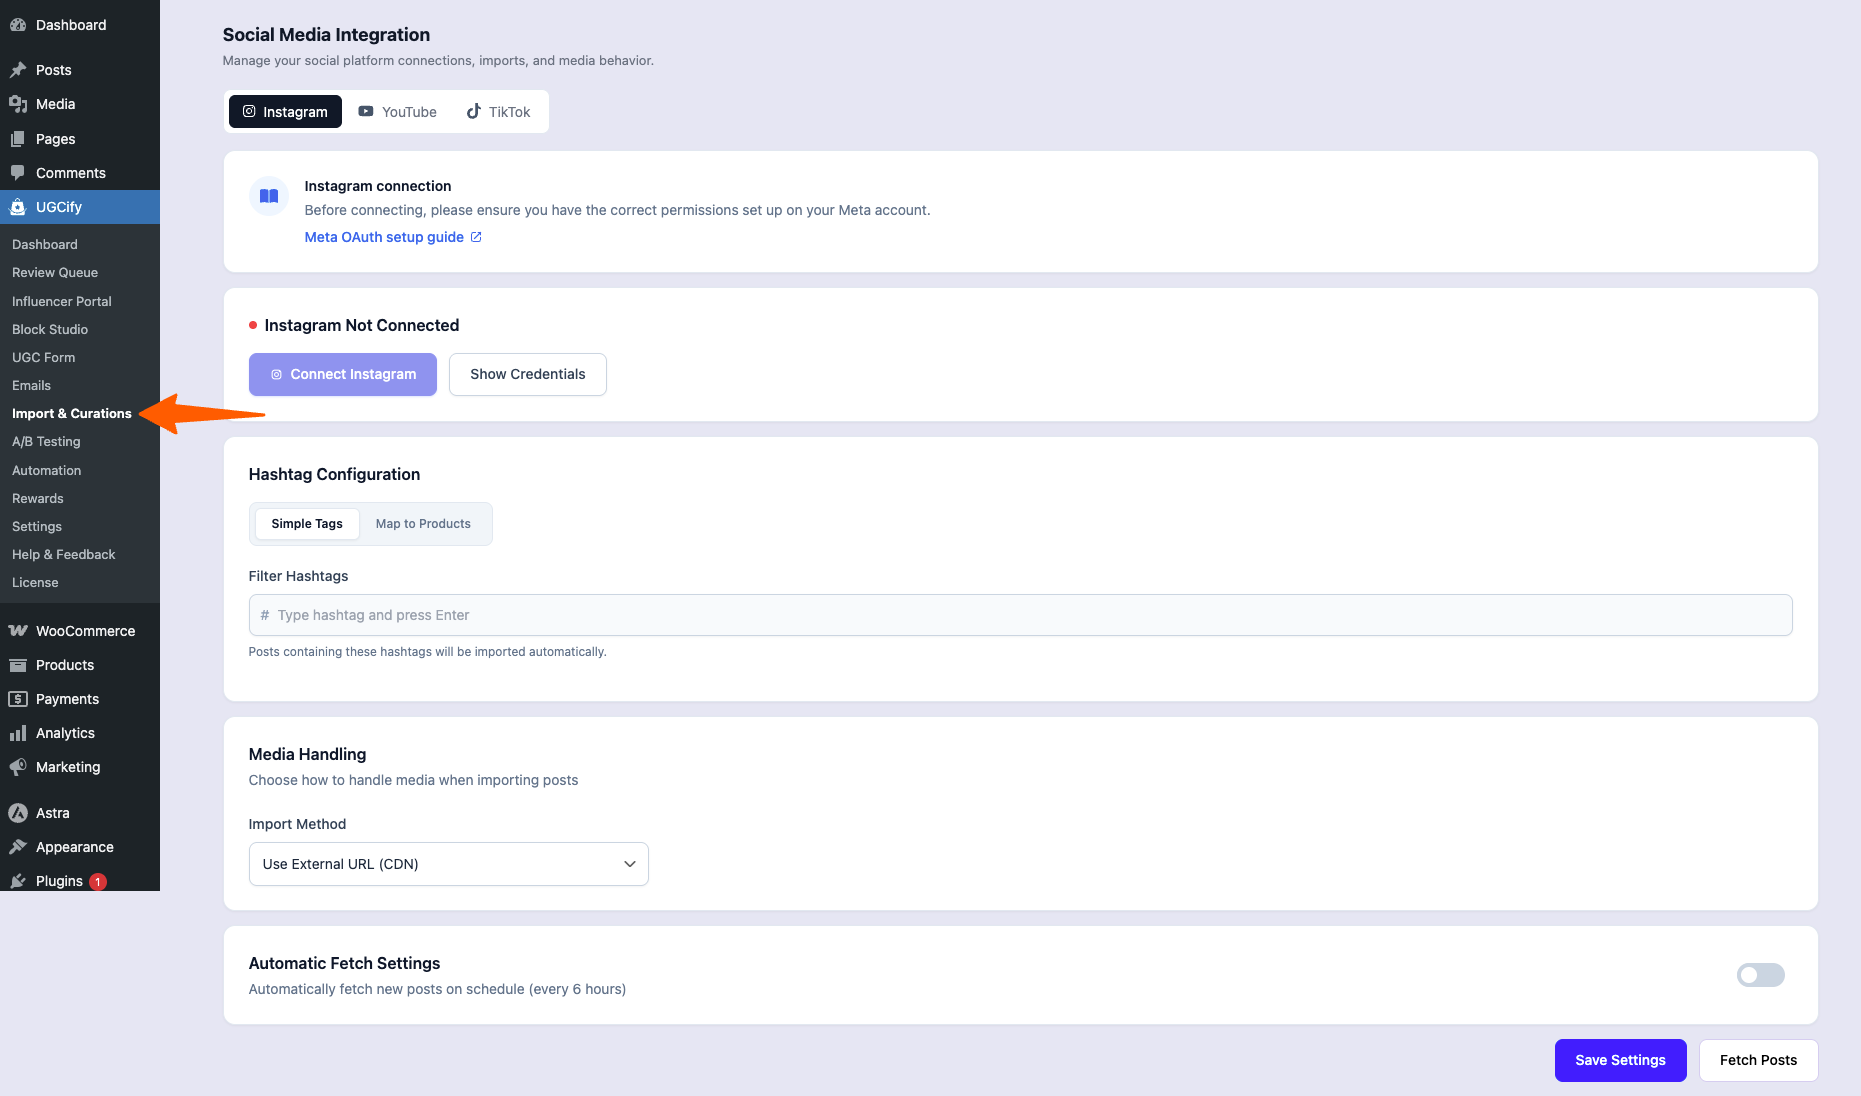
Import & Curations — YouTube video URL import

8. A/B Testing #

Run controlled experiments to find the highest-converting UGC presentation. Three test types are available: Image A/B Testing (compare two featured photos for the same product), Gallery Layout (Masonry vs. Grid vs. List), and UGC Position (test different placements on the product page). Create a test by entering a name, searching for the target product, selecting the test type, and clicking Start. The results table shows current status, winner, and test type for every experiment.

A_B Testing – UGCify

A/B Testing — test creation dialog with Gallery Layout selected
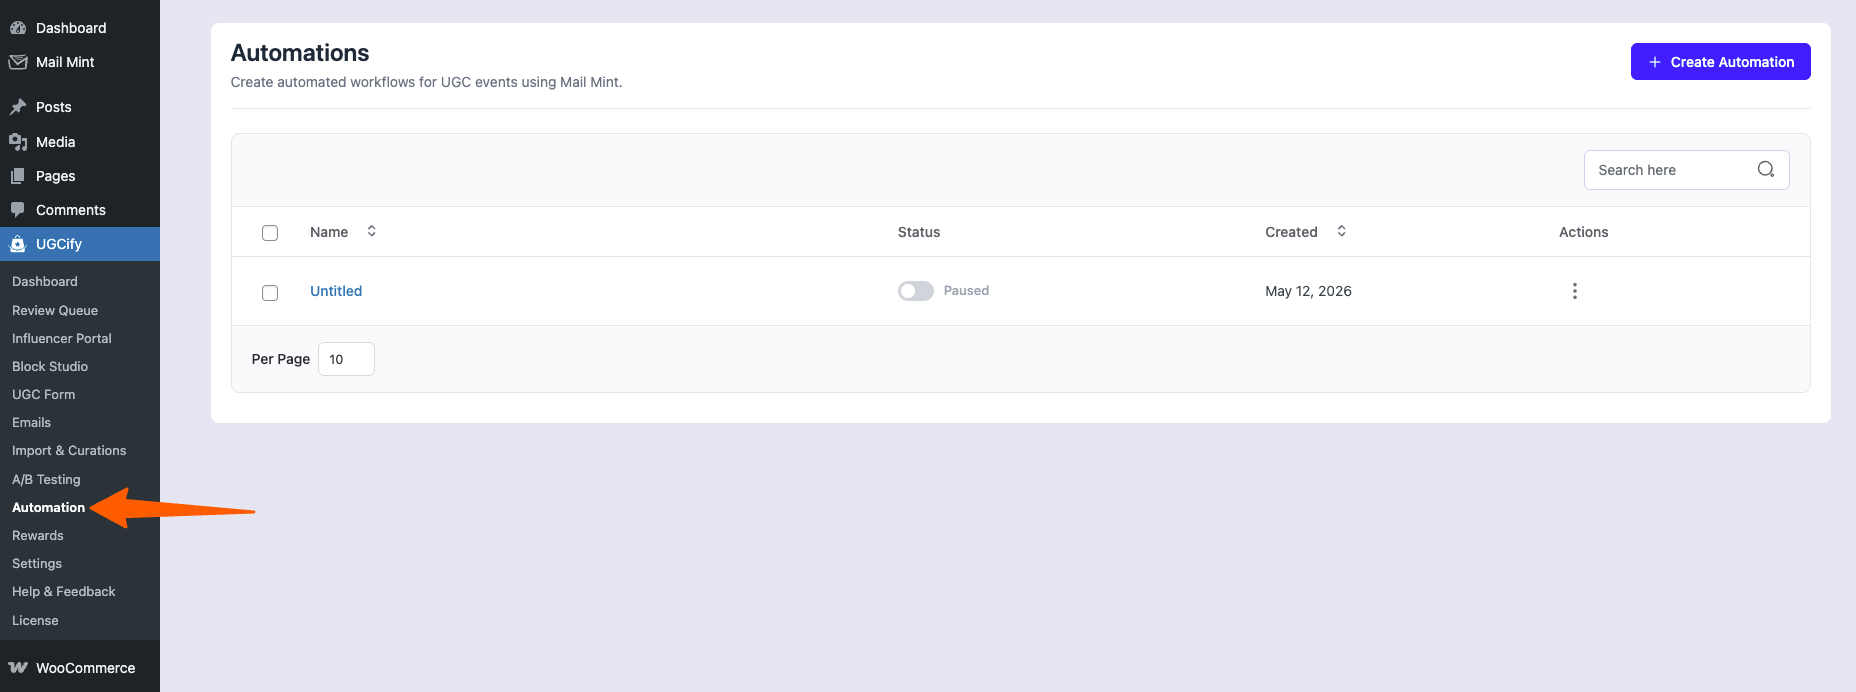
9. Automation #

Automation connects UGCify to Mail Mint for advanced review-request workflows. Once Mail Mint is active, you can build canvas-based email sequences triggered by review events — for example, send a request 7 days after delivery, wait 3 days, then send a reminder if no review has been submitted. Without Mail Mint, the basic email triggers in the Emails section still function independently.
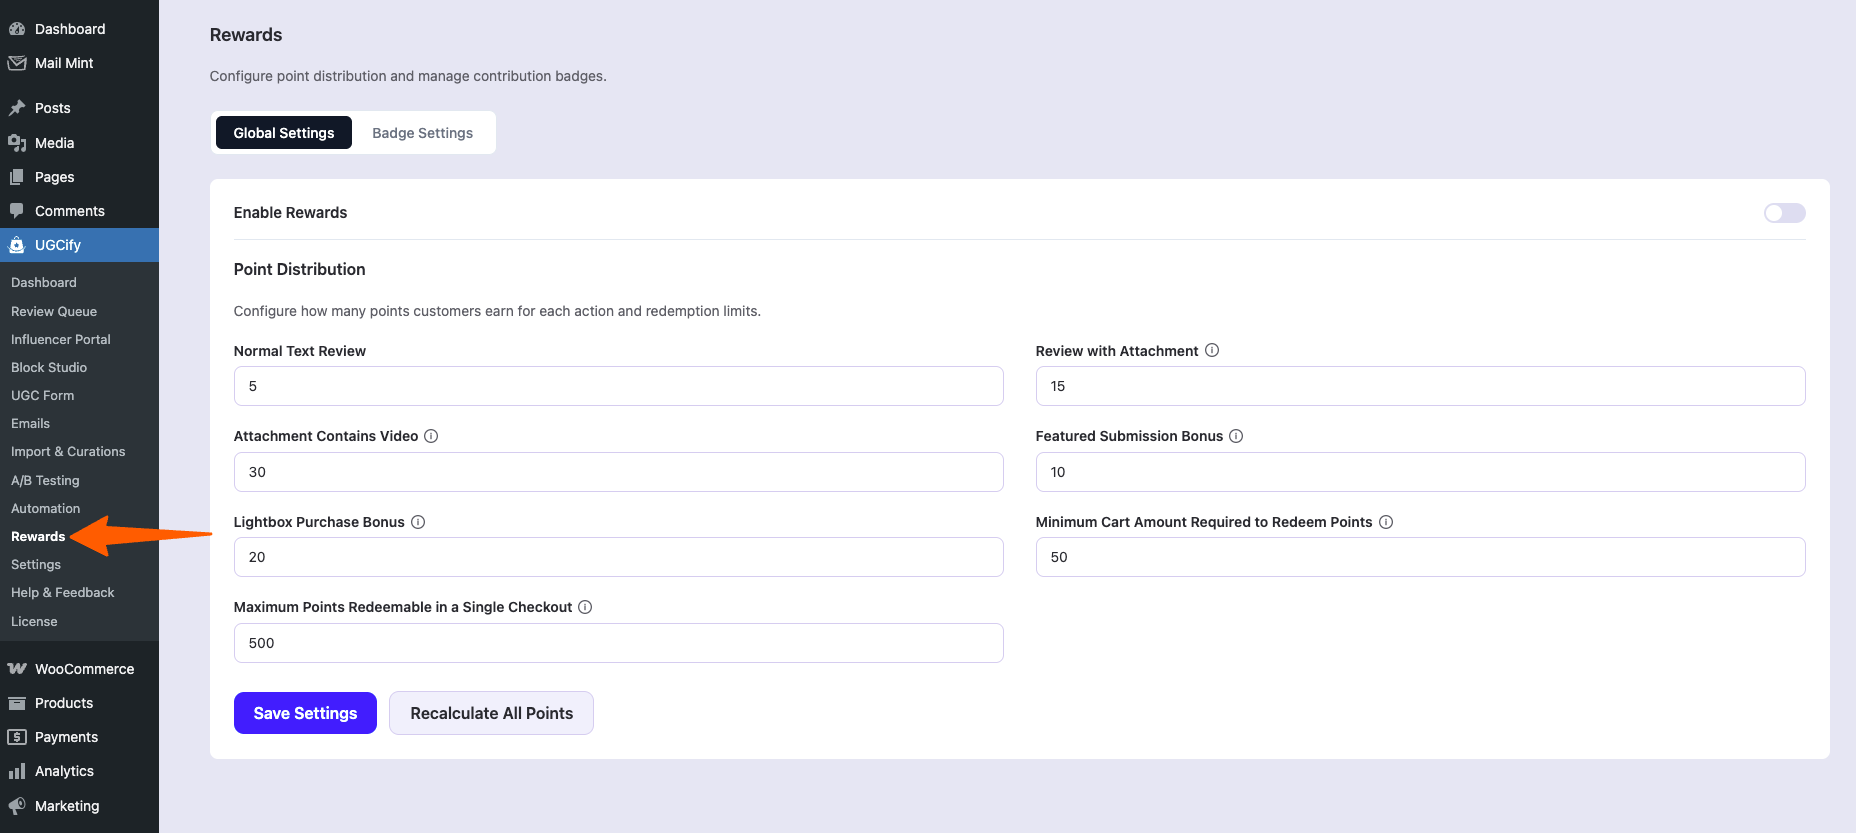
Basic Plugin Overview – UGCify 9

10. Rewards #

Encourage more and higher-quality submissions by rewarding customers automatically. When a photo review is approved, UGCify can issue a WooCommerce discount coupon or credit points to the reviewer’s account. The Rewards section also manages badge definitions for the gamification system — customers earn and level up badges based on review activity, which can be displayed on their account page and in your gallery.

Basic Plugin Overview – UGCify 10

11. Settings #

Three sub-pages live under Settings. Fraud Management offers keyword-based spam detection and Google reCAPTCHA (v2 or v3) to block bot submissions. Review Migration lets you import existing native WooCommerce reviews into UGCify in one click, with an export option for moving data out. Storage Management redirects media uploads to any S3-compatible bucket (Amazon S3, Cloudflare R2, DigitalOcean Spaces) by entering your bucket credentials.

Settings — Fraud Management with Spam Detection and reCAPTCHA tabs

12. Help & Feedback / License #

Help & Feedback links to the documentation site, the support ticket form, and the WordPress.org review page. The License page is where Pro users enter and manage their license key — once active, Pro features unlock and the plugin checks for updates automatically every 12 hours from the RexTheme update server.

13. License #

Basic Plugin Overview – UGCify 11

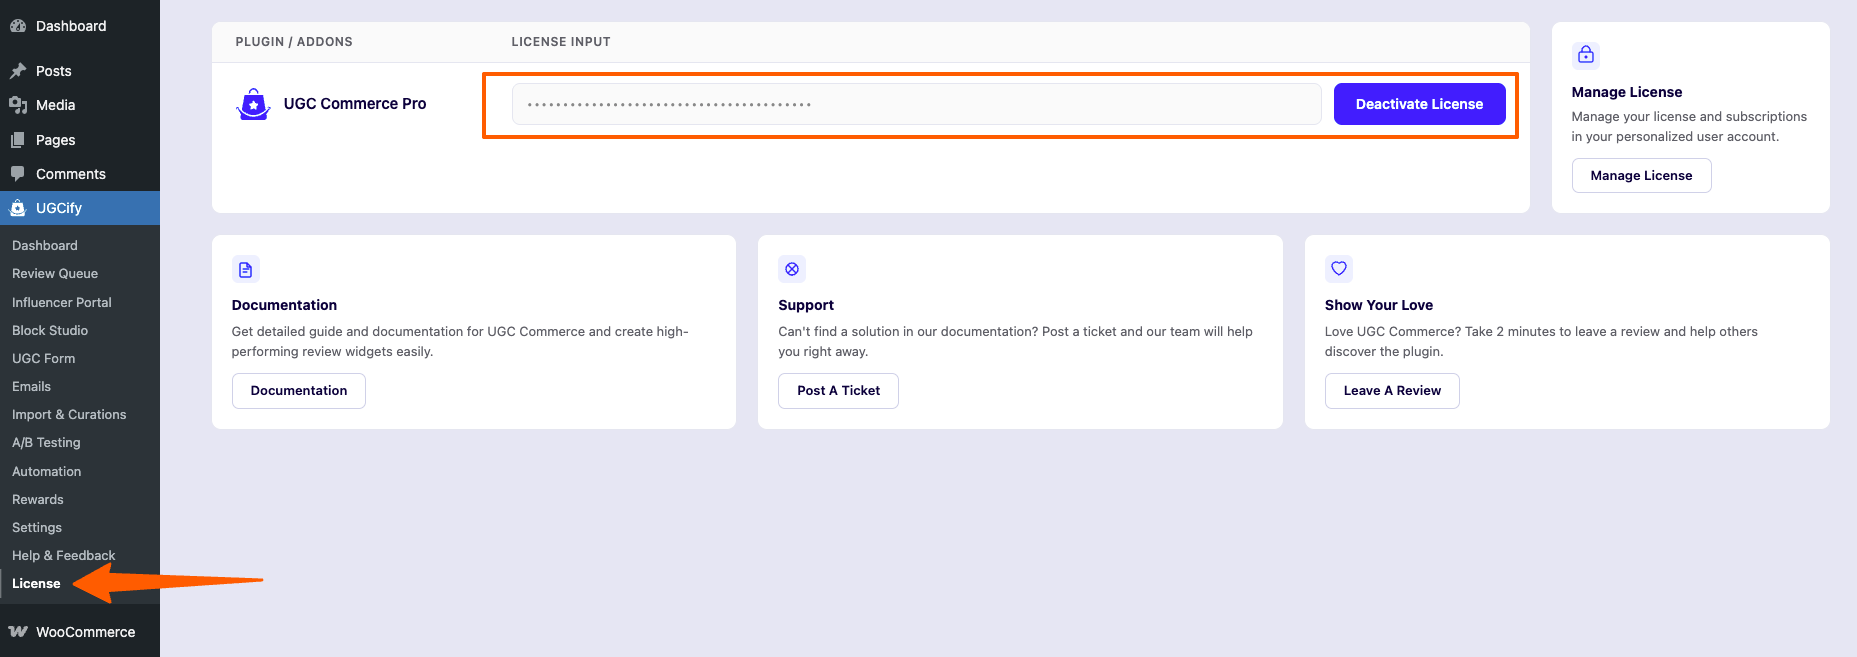
License page — Pro license management with links to documentation and support

That’s a quick overview of the UGCify. Setup takes under 5 minutes.

After activation, UGCify redirects you to a 6-step setup wizard that configures your first email, gallery layout, and form settings.

Compatible with Astra, Storefront, OceanWP, Kadence, GeneratePress, and any WooCommerce-ready theme.

Still stuck? How can we help?

How can we help?

Updated on May 12, 2026
Table of Contents
  • Quick Overview of all the Submenus:
    • 1. Dashboard
    • 2. Review Queue
    • 3. Influencer Portal
    • 4. Block Studio
    • 5. UGC Form
    • 6. Emails
    • 7. Import & Curations
    • 8. A/B Testing
    • 9. Automation
    • 10. Rewards
    • 11. Settings
    • 12. Help & Feedback / License
    • 13. License
RexTheme

Stay updated with our latest releases and useful guides.

By subscribing RexTheme you agree to Privacy Policy.

Products

  • WP VR
  • Product Feed Manager
  • Cart Lift
  • Checkoutify
  • Dynamic Discount
  • Advanced Shipping
  • Catalog Mode
  • Marketplace Auto-sync

Resources

  • Terms of Service
  • Privacy Policy
  • Refund Policy
  • Affiliate Policy
  • Support Policy
  • Bug Bounty Program

Company

  • About Us
  • Blog
  • Documentations
  • Changelog
  • Affiliate Program
  • Brand Assets
  • Contact Us

Copyright © 2013 - RexTheme