Limited Time Offer

Special Sale - 25% Off

12DAY
12HR
45MIN
30SEC
Get 25% OFF
Ga naar de inhoud
RexThema
  • Plugins
    • WP VR
      WP VR – Quality WP Virtual Tour CreatorCreate stunning virtual tours easily, on your own, using 360 Panoramas.
    • Product Feed Manager
      Product Feed Manager For WooCommerceMaximize Sales With The Largest Marketplaces.
    • Wagenlift
      Cart Lift To Recover Abandoned CartsRecover abandoned carts for your WooCommerce Store easily.
    • Checkoutify
      Checkoutify Checkout Field Manager for WooCommerceThe Ultimate WooCommerce Checkout Customizer.
    • Catalog Mode for WooCommerce
      Catalog Mode For WooCommerceTurn your WooCommerce store into a product showcase catalog.
    • Dynamic Discount
      Dynamic Discount for WooCommerceBoost your AOV significantly with custom dynamic discount offers.
    • Advanced Shipping Logo
      Advanced Shipping for WooCommerceSet conditional shipping and boost customer satisfaction.
    • Marketplace Auto-sync for WooCommerce
      Marketplace Auto Sync for WooCommerce – Automate Your Business GrowthAuto-sync products with leading marketplaces.
    • Bekijk alle plug-ins
  • Sell Kit Bundle
  • Blog
  • Bronnen
    • Docs
    • Ondersteuning
    • Brand Assets
  • My Account
    • Aanmelden
  • EN
  • DE

How can we help you?

Documentatie

Wagenlift

18
  • Getting started
    • Inleiding tot wagenlift
    • Installeren en activeren wagenlift
    • Een basisoverzicht van de plugin - winkelwagenlift
    • Karlift configureren en effectief gebruiken
  • Troubleshooting Common Issues
    • Probleemoplossing voor veelvoorkomende problemen - wagenlift
  • Upgrade To Cart Lift Pro
    • Hoe te upgraden naar Pro - karlift
    • License Plan Upgrade Guide for Cart Lift Pro
  • Abandoned Cart Recovery Conditions
    • Hoe automatisch verlaten winkelwagens volgen
    • Hoe uw campagne voor herstel van achtergelaten wagens opzetten
    • Hoe Twilio SMS Service gebruiken om achtergelaten winkelwagens terug te krijgen - Cart Lift Pro
    • Hoe meldingen te krijgen voor achtergelaten winkelwagens en herstel
    • Ontvang een volledig analyserapport over de herstelcampagne
    • Shortcodes voor e-mailvelden in winkelwagenlift
    • How to Pause / Resume Individual Abandoned Cart Recovery
    • How To Set Condition To Automatically Delete Abandoned Orders After A Particular Number Of Days
    • How To Set Conditions To Exclude Carts From Abandoned Cart Recovery Campaigns
    • How To Configure Popup Editor
    • How To Configure reCAPTCHA V3 Settings in Cart Lift

Product Feed Manager

114
  • Aan de slag
    • Inleiding tot Product Feed Manager voor WooCommerce
    • Aan de slag met Product Feed Manager voor WooCommerce
    • How To Install And Activate Product Feed Manager
    • Hoe genereer je voor het eerst Product Feed
    • Product Feed Manager – Basic Plugin Overview
    • All Supported Plugins & Integrations With Product Feed Manager For WooCommerce
  • Upgrade naar PFM Pro
    • License Renewal for Product Feed Manager Pro
    • Product Feed Manager VAT/TAX Policy
    • License Plan Upgrade Guide for Product Feed Manager Pro
  • Upload Feed To Merchants
    • How to Upload your Product Feed on the Facebook Store
    • Upload your WooComerce Product Feed directly to the Google Merchant Center – (No Need For Authorization)
    • How To Auto-sync Your Store’s Products To Google Merchant Center Using Content API
    • Hoe automatisch productfeeds synchroniseren met Google Merchant Center
  • Instructies voor het genereren van voer
    • How To Generate A Google Shopping Feed With Product Feed Manager
    • How to Generate A WooCommerce Product Feed For Facebook
    • Zo genereer je gemakkelijk een aangepaste productfeed
    • How To Create A Feed For eBay MIP
    • Hoe maak je een Target Product feed voor Target Marktplaats?
    • Zo maak je een WooCommerce productfeed voor Wish.com
    • Hoe maak je een WooCommerce productfeed voor Sears Marketplace?
    • Hoe maak je een WooCommerce productfeed voor NewEgg Marketplace?
    • Hoe maak je een WooCommerce productfeed voor Walmart?
    • Hoe maak je een WooCommerce productfeed voor Instagram Catalogus
    • Hoe producten uploaden op Instagram Shop
    • How to generate WooCommerce Product Feed for Amazon
    • How to generate WooCommerce Product Feed for Zbozi
    • How to Generate WooCommerce Product Feed for Skroutz
    • How To Create A Feed For eBay Seller Center
    • How to generate WooCommerce Product Feed for Rozekta
    • How to generate WooCommerce Product Feed for Pinterest
    • How to generate WooCommerce Product Feed for TikTok Ads Catalog
    • How to generate WooCommerce Product Feed for OpenAI Commerce
  • Alle Google Feeds
    • Hoe maak je een WooCommerce productfeed voor Google Remarketing (DRM)?
    • Hoe maak je een WooCommerce productfeed voor Google Local Products?
    • Hoe maak je een WooCommerce productfeed voor Google Local Products Inventory?
    • Hoe maak je een WooCommerce product feed voor Google Fabrikant Centrum
    • How to create a WooCommerce feed for Google Merchant Center Promotion Using Product Feed Manager
    • Hoe maak je een WooCommerce product feed voor Google Shopping Acties
    • Hoe maak je een WooCommerce productfeed voor Google Dynamic Display Ads (Google Ads)?
    • Hoe maak je een WooCommerce productfeed voor Google Express (voormalig Google Shopping Actions Program)?
    • Hoe maak je een WooCommerce product feed voor Google Local Inventory Ads
    • Hoe maak je een WooCommerce productfeed voor Google Custom Search Ads?
    • Hoe maak je een WooCommerce productfeed voor Google Dynamic Search Ads?
    • Hoe maak je een WooCommerce productfeed voor Google Review?
  • Categorie Kartering
    • Hoe Category Mapping gebruiken voor Product Feed
    • Hoe Category Mapping gebruiken voor Google Product Category
    • Hoe Category Mapping configureren voor Facebook Product Category
  • Understanding Feed Attributes
    • Aangepaste velden toevoegen voor belangrijke productkenmerken
    • Hoe voeg je een statisch voor- of achtervoegsel toe aan een attribuut in de feed?
    • Een aangepast attribuut aan de feed toevoegen
    • Een extra productkenmerk toevoegen of verwijderen in de feed
    • Hoe WooCommerce Verzendwaarden opnemen in je feed (Behalve Google & Facebook)
    • Price Attributes Mapping and Understanding The Different Use Cases
    • Understanding And Configuring Feed Attributes and Their Values
    • Hoe valuta toevoegen aan uw productprijs
    • How to Combine Multiple Attribute Values Using the Combined Attributes Feature
  • Understanding Basic Feed Configuration
    • Product Feed Optimalisatie met Yoast SEO Product Title, Meta Description en Primary Category
    • Hoe het automatisch bijwerken van voer op ingestelde intervallen te plannen
    • Leren over typen feed-bestanden en hoe feed te downloaden of te bekijken
    • UTM-parameters toevoegen aan product-URL's
    • Producttoevoergegevens optimaliseren met doeltreffende uitvoerfilters
    • Hoe RankMath primaire categorie in de feed te gebruiken
    • Hoe Verzendwaarden opnemen in WooCommerce product feed (Google & Facebook)
    • Hoe belastingwaarden op te nemen in je WooCommerce Product Feed (Google & Facebook)
    • Hoe verwijder je HTML-tags of shortcodes uit een feed?
    • Hoe UTF-8-codering gebruiken om HTMLE-entiteiten om te zetten in symbolen in een feed-attribuutwaarde
    • Hoe symbolen converteren naar HTMLEntiteiten in een feed attribuutwaarde
    • Hoe CDATA op te nemen in een XML Feed Attribute Tag
    • Hoe verwijder je een decimaal uit de prijs voor Marktplaats Feed?
    • Hoe spatie vervangen door koppelteken in een feed attribuut gegevens
    • Hoe een aangepaste veldwaarde gebruiken in de Product Feed
    • Hoe Yoast primaire categorie in de feed te gebruiken
    • How To Exclude Draft Products From The Feed
    • How to Add WooCommerce’s GTIN, UPC, EAN, or ISBN to Product Feed
    • Understanding The Basics Of Feed Settings
  • Feed Filters: Help Customize Feed
    • Hoe onzichtbare producten / verborgen producten uitsluiten van de producttoevoer
    • Hoe categorie filter gebruiken bij het genereren van Product Feed
    • Hoe Tag Filter gebruiken bij het genereren van Product Feed
    • Hoe filteropties voor feed gebruiken bij het genereren van feed
    • Hoe variabele producten aan het voer toevoegen
    • Hoe privéproducten opnemen in Product Feed
    • Hoe een productvariant op te nemen in de productnaam
    • Hoe een aangepast filter te gebruiken bij het genereren van productfeeds
    • How To Use The Product Filter Option To Include/ Exclude Specific Products
    • How To Use Brands Filter When Generating Product Feed
    • Best-Selling Products: Generate a WooCommerce Product Feed to Boost Sales
  • Feed Rules: Help Modify Product Data
    • Hoe de Feed Rule-functie gebruiken om attribuutwaarden te manipuleren
    • How to use the Feed Rules feature to manipulate your product price
  • Feed Validation
    • Feed Validator for Google Shopping
    • Feed Validator for Facebook Catalog
  • Nuttige controleopties
    • Uitgebreide aangepaste velden met unieke id's toevoegen voor WooCommerce producten
    • Hoe uitgebreide aangepaste velden toevoegen aan WooCommerce producten
    • Hoe belasting uitsluiten van gestructureerde dataprijzen
    • How to Schedule Feed Updates Based on Product Data Changes
    • Hoe aangepaste tijdsintervallen instellen voor automatische feed-update
    • Nuttige opties op het tabblad Instellingen
    • Controleproducten per batch in batch verwerking
    • Verbind Facebook Pixel met WooCommerce Voor Dynamic Ads
    • How to set 5-Minutes Time Interval for Updating Feed
  • PFM Plugin Integrations
    • How To Include Brand Value From Perfect Brands For WooCommerce In The Feed
    • Foutenlogboek inschakelen voor Product Feed Manager voor WooCommerce
    • Hoe product feed prijs om te zetten met WPML / WCML
    • Hoe maak je product feed in meerdere talen met Polylang
    • Hoe maak je productfeeds in meerdere talen met WPML?
    • How To Include Discount Rules In The Feed Using Discount Rules For WooCommerce And PFM
    • How To Generate Product Feed In Multiple Languages | PFM + TranslatePress
  • Fix JSON-LD gestructureerde gegevens voor variabele producten
    • Fix WooCommerce (JSON-LD) gestructureerde gegevens voor goedkeuring in Google Shopping
  • Problemen oplossen
    • Product ontbreekt op Facebook Commerce Manager - Facebook & Instagram
    • Google Shopping Product Feed Specificatie - Attributenlijst
    • Problemen oplossen - Product Feed Manager voor WooCommerce
    • How to Troubleshoot Feed Errors in Product Feed Manager

WP VR

84
  • Aan de slag
    • Aan de slag met WP VR
    • Hoe WP VR installeren en activeren
    • How To Create A Simple Virtual Tour In 2 Minutes – WP VR
    • WP VR Basis Plugin Overzicht
  • Upgrade naar WPVR Pro
    • How To Upgrade To Pro – WP VR
    • License Renewal Guide for WP VR Pro
    • WP VR VAT/TAX Policy
    • License Plan Upgrade Guide for WP VR Pro
  • WPVR Premium Add-ons
    • Hoe vloeiende formulieren integreren in een virtuele tour
    • Hoe WooCommerce integreren in een virtuele tour
    • Hoe virtuele tours insluiten op niet-WordPress-websites
    • WP VR Embed Addon – Features Overview
  • Hoe - Basisinstellingen
    • How To Use Exclusive Features On Settings Tab To Customize A Virtual Tour
    • Een voorbeeldafbeelding toevoegen aan uw virtuele tour - WPVR
    • Hoe automatische rotatie in te schakelen voor uw 360 virtuele tour - WP VR
    • How to Customize the Tour Layout
  • Bedieningsknoppen instellen
    • Aangepaste pictogrammen gebruiken voor navigatie en bedieningsknoppen in een virtuele tour
    • How to Share Virtual Tours on Social Media
    • How To Configure A Call To Action (CTA) Button in Virtual Tour
  • Panoramabeelden omzetten in live scènes
    • Hoe een scène toevoegen aan uw virtuele tour
    • Hoe de standaard scène in te stellen op een virtuele tour
    • Hoe stel je een limiet in voor het grijpen van 360 beelden op een scène in je virtuele tour - WPVR
    • Scène-instellingen gebruiken om een scène aan te passen
  • Hotspots gebruiken voor navigatie en informatie
    • Hoe hotspots toevoegen aan een scène in uw virtuele tour
    • Hoe hotspots gebruiken om informatie, afbeeldingen of video's te tonen
    • Hoe hotspots gebruiken om van de ene scène naar de andere te gaan
    • Hoe hotspotpictogrammen en -kleur aan te passen
    • Een zelf gehoste video insluiten op WPVR Hotspots
    • Hoe Youtube-video's insluiten in virtuele tours met WPVR
    • Hoe eenvoudig hotspot-inhoud instellen in een virtuele tour - met behulp van WYSIWYG HTML-editor
    • How to use the Custom Icon Class
  • 360 graden video tours maken
    • Hoe je een Youtube 360-video op je website zet met WPVR
    • Hoe maak je een virtuele tour met zelf gehoste interactieve 360 graden-video met WPVR?
  • Google Street Views insluiten
    • Hoe u een Google Street View-tour op uw website kunt opnemen met WPVR
  • Gedeeltelijk panorama en volledig uitzicht
    • Een virtuele tour maken met gedeeltelijke panorama's of iPhone panorama's
    • Een virtuele tour maken met panoramabeelden van mobiele telefoons
    • Virtuele rondleidingen op volledig scherm - WPVR
    • Hoe een 360 Panorama Achtergrond Virtuele Tour instellen
  • Publiceer virtuele rondleidingen op uw website
    • Hoe een WPVR Shortcode gebruiken om een virtuele tour in te sluiten
    • How to Set Up Password Protection For Your 360 Virtual Tour – WP VR
    • How to Publish Virtual Tours Using QR Code
  • Virtuele rondleidingen importeren, exporteren en dupliceren
    • Een virtuele tour dupliceren
    • Virtuele rondleidingen exporteren en importeren
  • Problemen oplossen - Veelvoorkomende problemen oplossen
    • Problemen oplossen - WPVR
    • Virtual Tour niet zichtbaar - WPVR
    • Hoe Activa van WPVR uitsluiten van automatisch optimaliseren
    • Hoe u uw WPVR gebruikersaccountinstellingen en abonnementsplan kunt beheren
    • WP VR Tour Not Displaying on Review and On the Published Webpage
    • WP VR Troubleshooting Guide: Embedding 360 Tours on External Platforms
  • Virtuele tour optimaliseren voor mobiele apparaten
    • Hoe een dynamische vooraankondiging instellen op virtuele rondleidingen voor mobiele telefoons
    • Afbeeldingen op mobiele apparaten automatisch verkleinen voor virtuele rondleidingen
    • Hoe aangepaste hoogte voor mobiele apparaten instellen voor uw virtuele rondleidingen
  • Demonstratie Virtuele Rondleidingen
    • Basis virtuele rondleiding
    • Google Street View Tour - WPVR Pro
    • Videotrainingen - WPVR
    • Demo Partial Panorama Virtual Tour - WPVR Pro
    • Bar/Pub Showcase
  • WP VR Plugin Integrations
    • Hoe een virtuele tour insluiten met het WPVR Gutenberg-blok
    • Een virtuele tour insluiten met WPVR Elementor Widget
    • Hoe WP VR Oxygen Element gebruiken om een virtuele tour in te sluiten
    • WP VR & Dokan Integration: Empower Vendors to Create 360° Virtual Tours
    • How To Embed A Virtual Tour Using WPBakery Element
    • Een virtuele tour publiceren met WPVR Panorama Module voor Divi
    • Hoe WPVR virtuele tours insluiten met behulp van Visual Composer Element
  • Geavanceerde instellingen voor virtuele rondleidingen
    • Hoe WPVR exclusieve instellingen instellen
    • Control Script en stijl laden voor de virtuele reizen
    • Hoe WordPress Large Image Handler uitschakelen voor virtuele tours
    • Hoe Gyroscoop Sensor Inschakelen op 360 Virtuele Tours
    • Achtergrondmuziek toevoegen aan virtuele rondleidingen
    • Hoe toetsenbordbediening voor navigatie en zoom te beperken
    • Hoe beperk je het gebruik van de muis om te zoomen of te slepen om een tour te verplaatsen?
    • Hoe voeg je een Virtual Tour-pictogram of je bedrijfslogo toe in 360 graden tours - WPVR
    • Hoe YouTube Explainer-video's binnen virtuele rondleidingen plaatsen 
    • Hoe de ondersteuning voor VR Headset in te schakelen voor telefoons
    • Hoe individuele kleur en animatie van hotspotpictogrammen instellen in panorama-afbeeldingen�
    • Hoe u virtuele plattegronden in uw tours kunt plaatsen - WPVR
    • How to do SEO optimization for Embeded tour
    • How To Set Scene Transition (Scene Entrance Animation)
    • How to Set Custom Zoom Settings in WPVR
    • WP VR Analytics: How to Track and Analyze Your Virtual Tours
    • Hoe een scènegalerij opzetten bij virtuele rondleidingen

Dynamic Discounts for WooCommerce

18
  • Aan de slag
    • How To Install & Activate the Dynamic Discounts for WooCommerce
    • How To Create A Discount Rule For The First Time
    • Basic Plugin Overview – Dynamic Discounts for WooCommerce
  • Discount Conditions
    • How To Set Product Based Discount
    • How To Set Cart Based Discount
    • How to Set Discount Conditions for Bulk Purchases in WooCommerce
    • How To Set Discount Conditions Based on Customer Purchase History
    • How To Set Discount Conditions For Product Variations
    • How To Apply discount To The cheapest product In The Cart
    • How to Set Discount Based On Category and Tag
    • How To Set Buy X Get Y Discount
    • How To Set Stock-Based Discount
    • How To Set A Bundle Discount
    • How To Set Buy X Get X Discount
    • How To Apply Discount To Nth Quantity
    • How To Set The Cheapest Product On Cart Discount
    • How To Set “Offer One Or More Free Products” Discount
    • How to Set Attribute Specific Discount For Product Variants

Checkoutify

5
  • Aan de slag
    • How To Install & Activate Checkoutify Pro – Checkout Customizer
    • How to Replace Your WooCommerce Checkout Using Checkoutify – Checkout Customizer
    • How To Create and Customise an Order Bump
    • How to Create a Custom Field in Checkoutify
  • Customizing Checkout
    • Creating a Multi-Step Checkout Using Checkoutify – Checkout Customizer

Advanced Shipping for WooCommerce

18
  • Aan de slag
    • How To Install & Activate The Advanced Shipping For WooCommerce
    • Basic Plugin Overview – Advanced Shipping For WooCommerce
    • How To Add Advanced Shipping To An Existing Shipping Zone
    • How to Set Shipping Conditions For The First Time Using Advanced Shipping
  • Shipping Conditions
    • How To Set Product-Specific Shipping Conditions
    • How To Set Category-Based Shipping Conditions
    • How To Set Shipping Conditions Based On WooCommerce Product Tag
    • How To Set Shipping Conditions Based On WooCommerce User Role
    • How To Set Shipping Conditions Based on Product’s Weight, Volume, Length, Height, and Width
    • How to Add Price Based Shipping Conditions in Advanced Shipping
    • How to Add Weight Based Shipping Conditions in Advanced Shipping
    • Quantity Based Shipping Conditions: Easy Steps to Set Them Up in WooCommerce
    • How to Set Time and Day Based Shipping Conditions in Advanced Shipping
    • How to Set Country Based Shipping Conditions in Advanced Shipping
    • How to Set City Based Shipping Conditions in Advanced Shipping
    • How to Set State Based Shipping Conditions in Advanced Shipping
    • How to Set ZIP Code Based Shipping Conditions in Advanced Shipping
    • How to Set Zone Based Shipping Conditions in Advanced Shipping

Catalog Mode for WooCommerce

7
  • Aan de slag
    • How To Install & Activate the Catalog Mode for WooCommerce
    • Basic Plugin Overview – Catalog Mode For WooCommerce
  • Instellingen
    • How To Set Users Rules For Catalog Mode
    • How To Configure Catalog Mode Options
    • How to Manage the Exclusion List in Catalog Mode
    • How To Configure the Inquiry Form in Catalog Mode
    • How to Create and Manage Custom Buttons and Labels

Marketplace Auto-Sync for WooCommerce

4
  • Aan de slag
    • How To Install & Activate Marketplace Auto Sync
    • Basic Plugin Overview – Marketplace Auto Sync
    • How To Set Up an Auto Sync For The First Time
    • How To Auto-sync with Google Merchant Center
  • Home
  • Docs
  • Advanced Shipping for WooCommerce
  • Aan de slag
View Categories

Basic Plugin Overview – Advanced Shipping For WooCommerce

Here’s a quick plugin overview of Advanced Shipping For Woocommerce.

Advanced shipping for WooCommerce Plugin Overview #

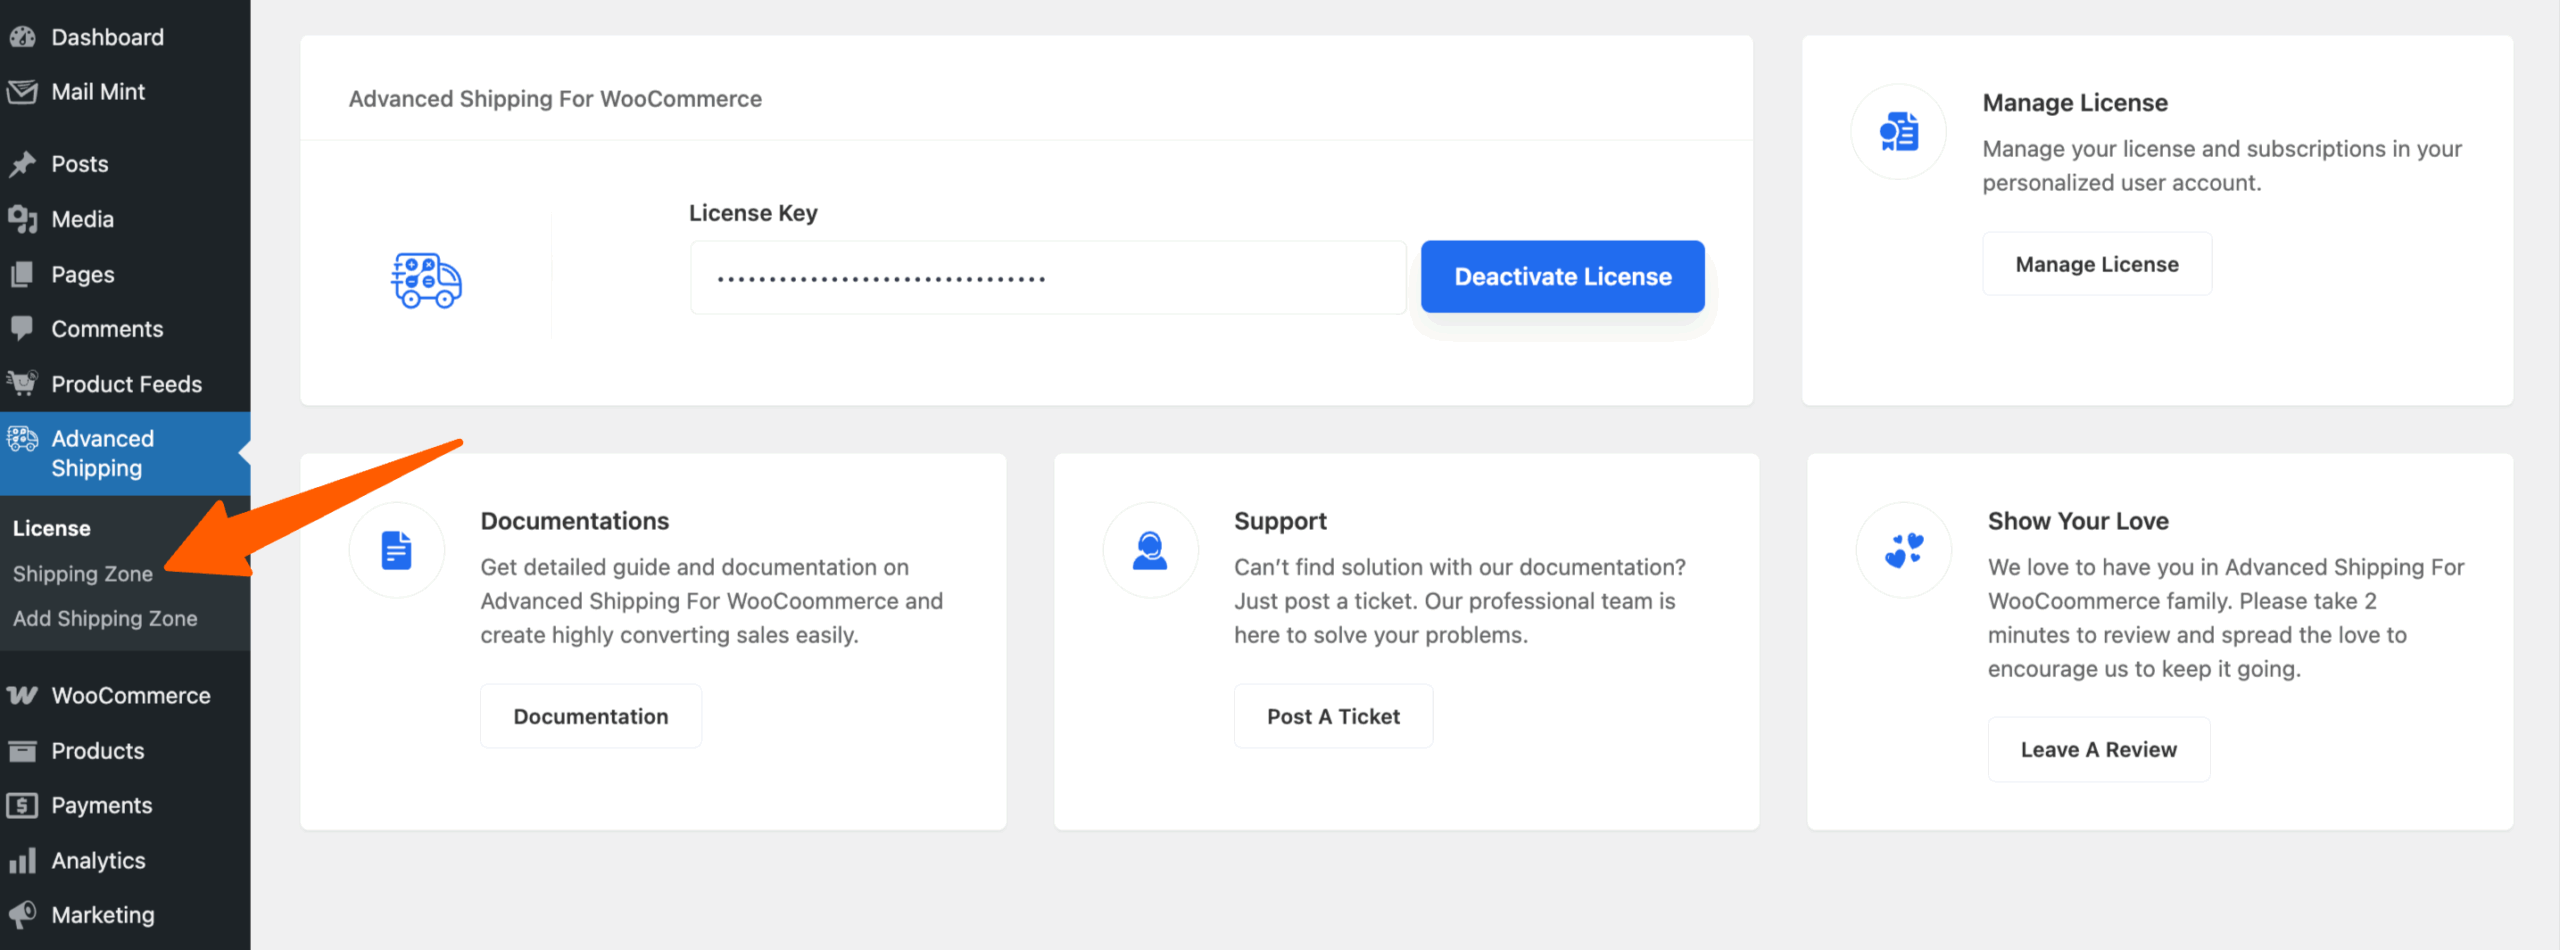
After installing and activating the plugin and the License, on the WordPress dashboard click on Advanced Shipping.

Basic Plugin Overview – Advanced Shipping For WooCommerce 1

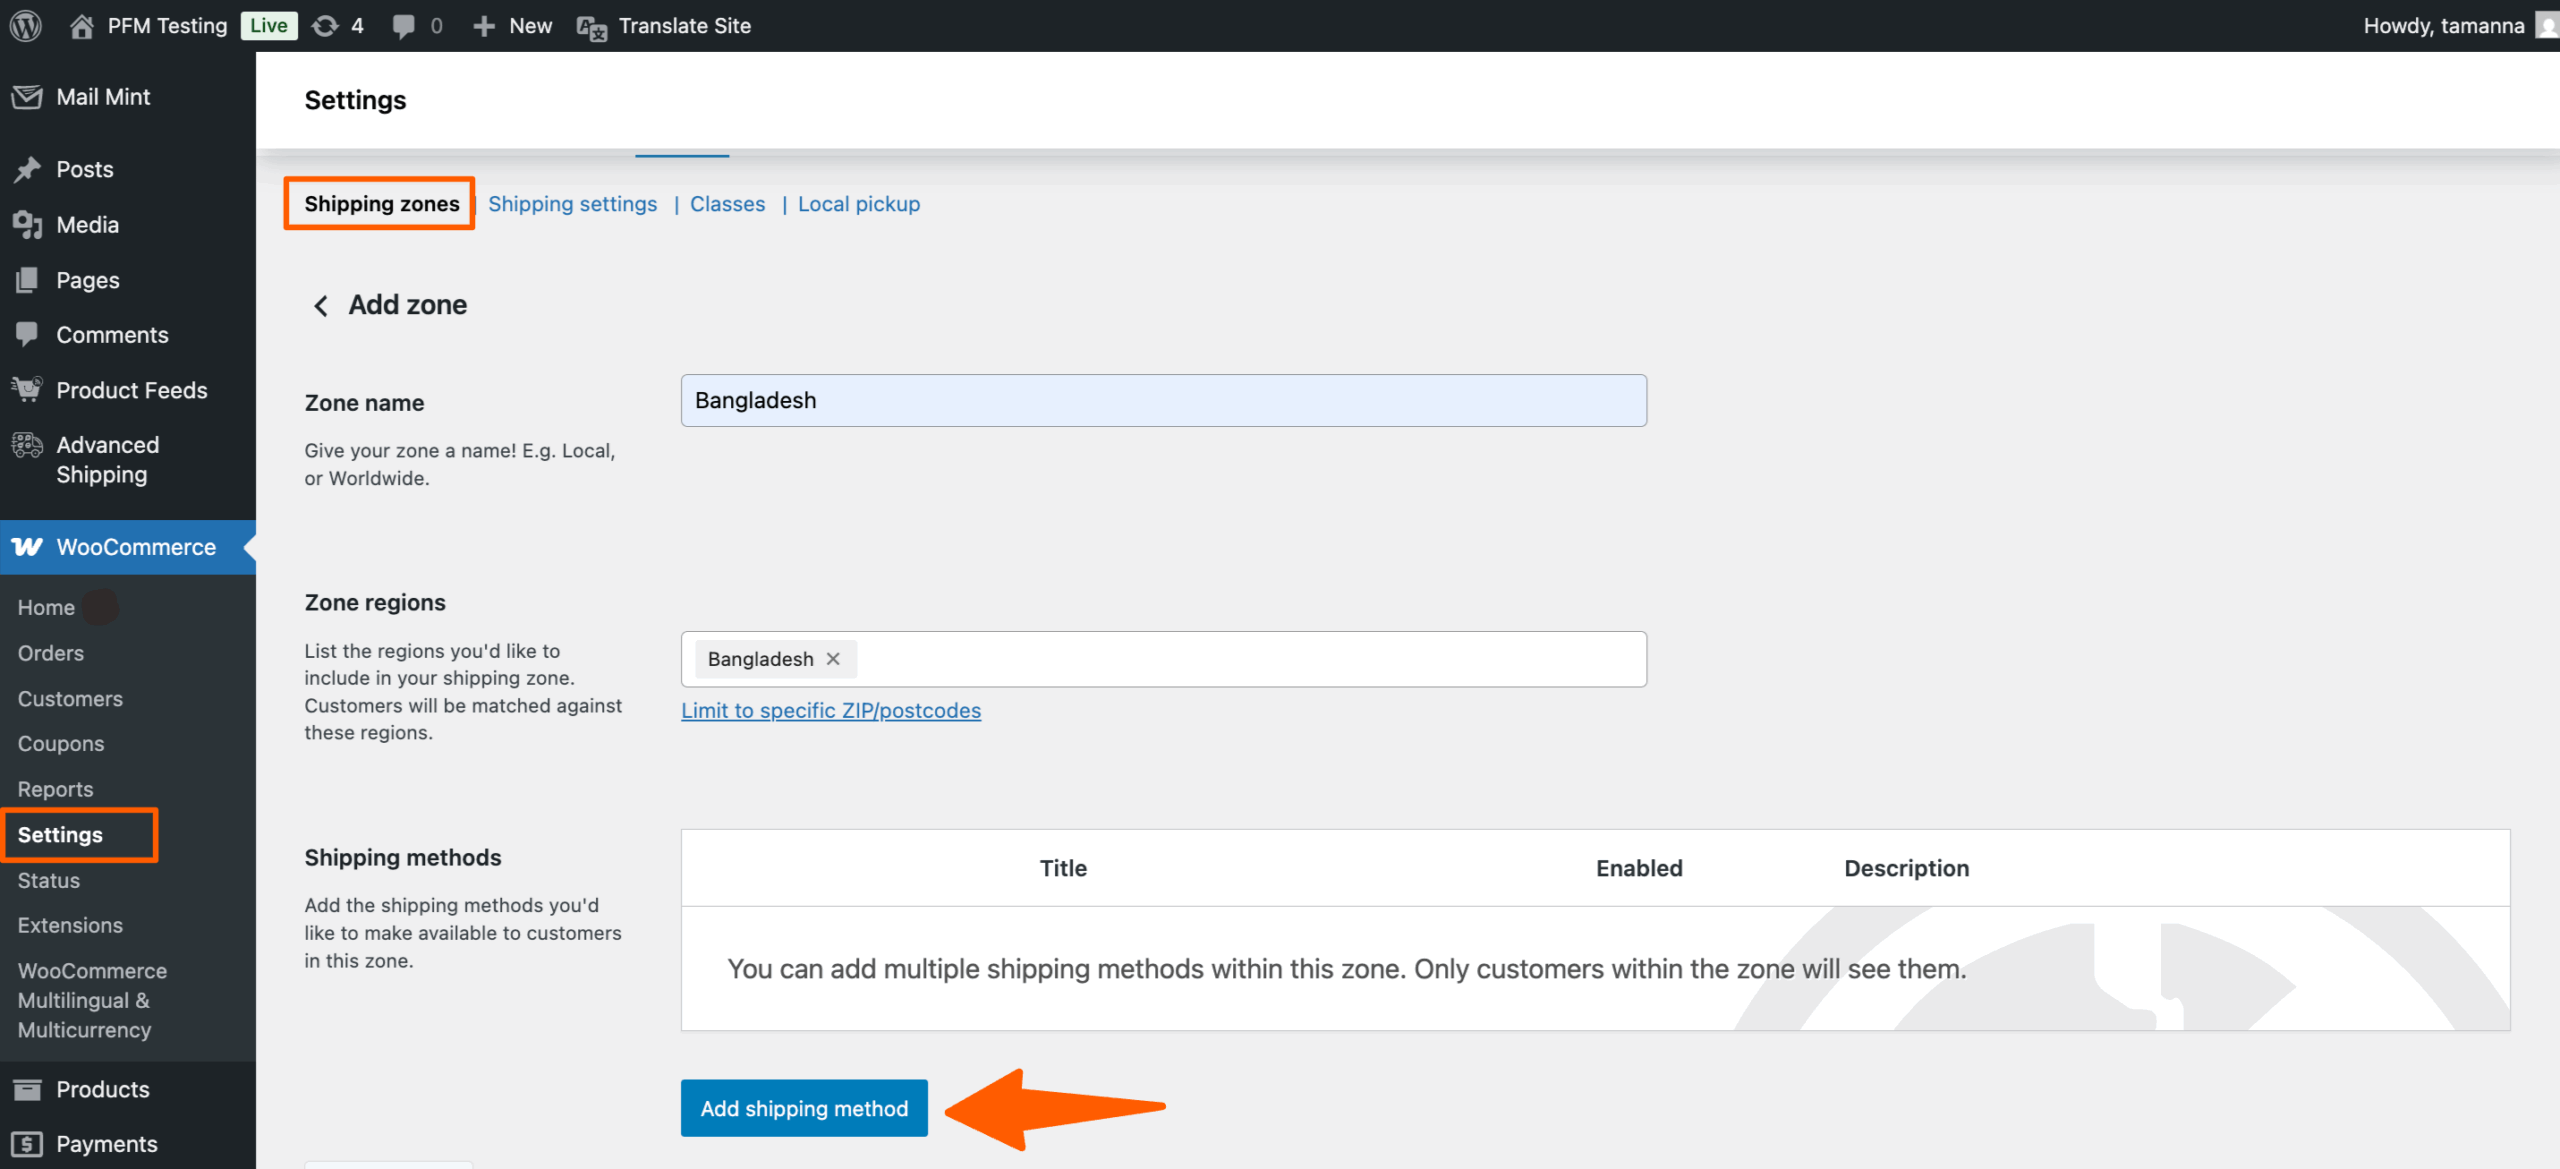
Then on the sub-modules you’ll see 3 options. Click on the Shipping Zone.

Then you’ll be redirected to the WooCommerce Shipping Zone Settings page.

Configure the Zone and Click on the Add Shipping Method button and on the popup you’ll get the Advanced Shipping Method listed.

Basic Plugin Overview – Advanced Shipping For WooCommerce 2

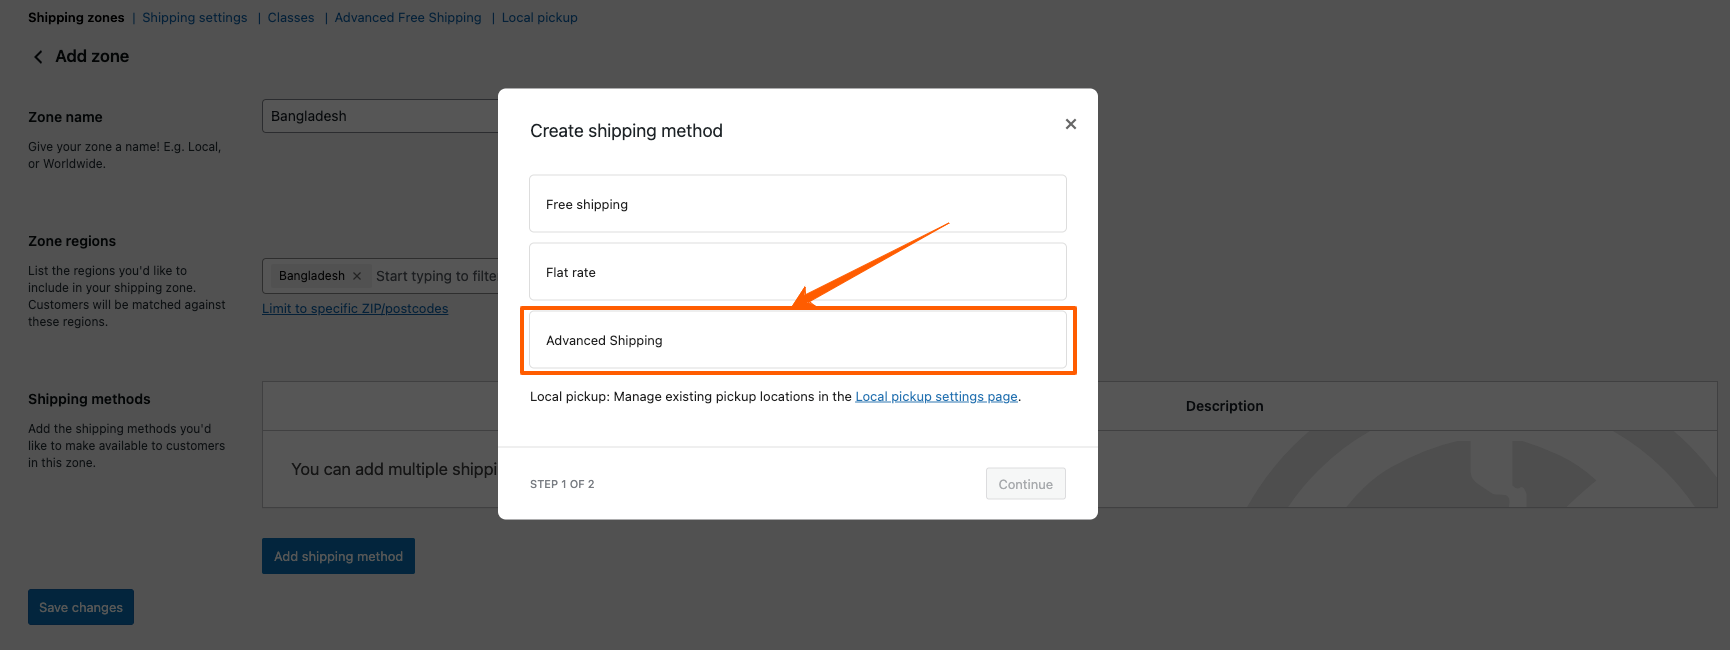
Then select the “Advanced Shipping” in the “Create Shipping Method” Popup and click continue

Basic Plugin Overview – Advanced Shipping For WooCommerce 3

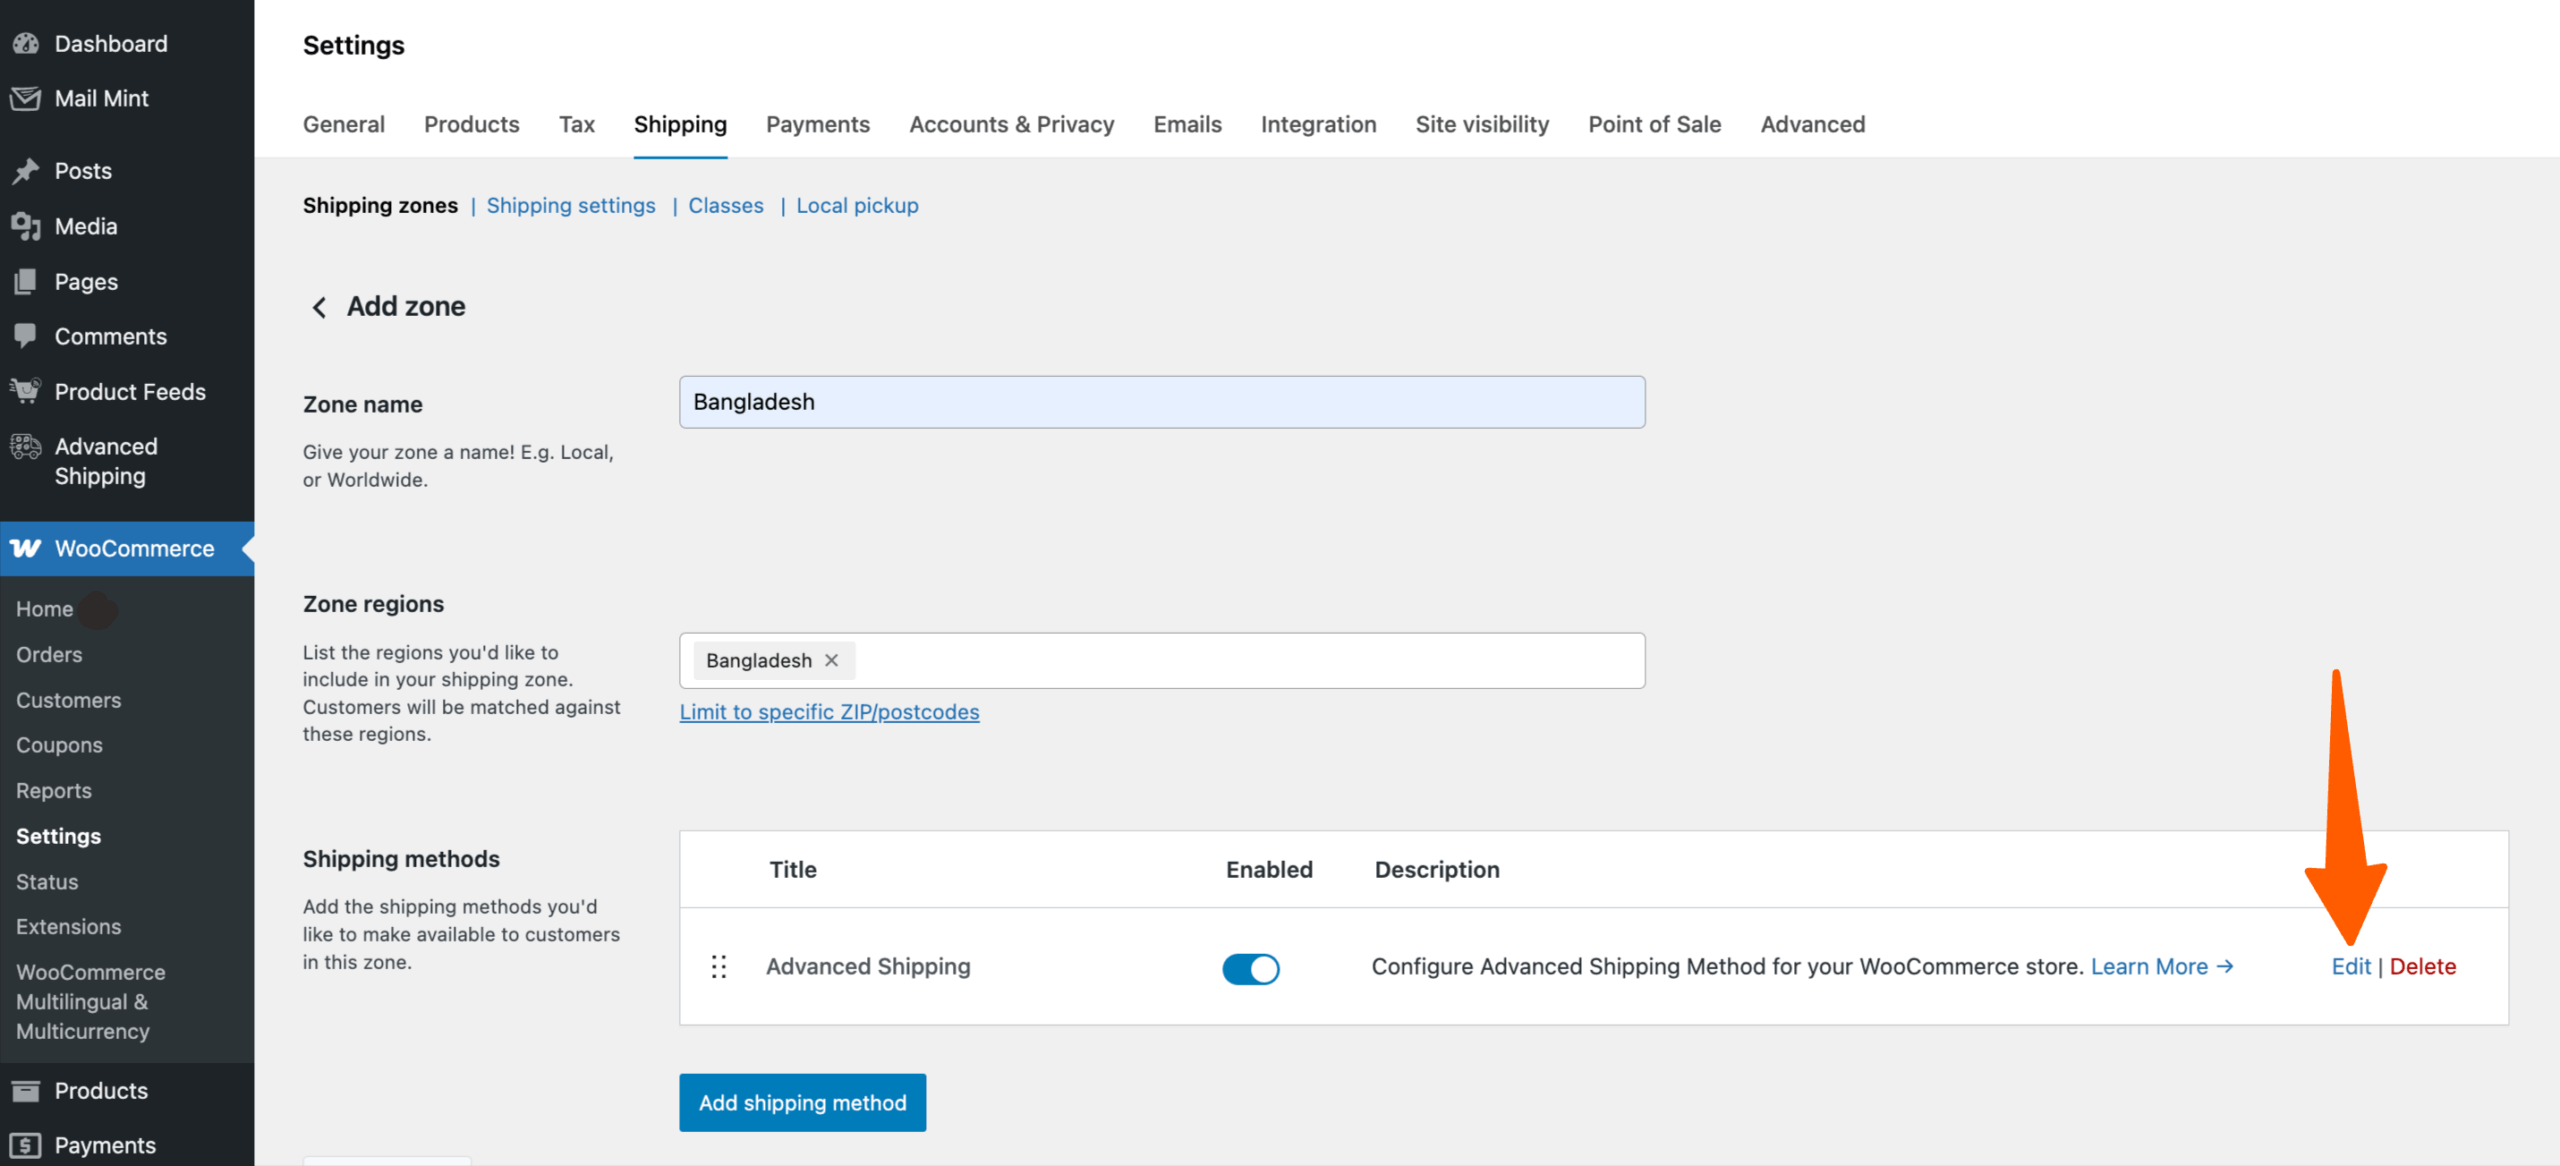
After Selecting the Advanced Shipping from the popup. Click on the Edit to set the shipping rules.

Basic Plugin Overview – Advanced Shipping For WooCommerce 4

Advanced Shipping Features #

Here you’ll get all the advanced shipping features available by the Advanced Shipping plugin.

Free Shipping #

First, let’s see how you can set up Free Shipping using Advanced Shipping For WooCommerce.

In this you get two options in the Free Shipping Requirements. One is Minimum Order Value and the other one is Minimum Item Quantity.

  • Minimum Order Value: This requirement means Free Shipping will be applied based on Total Cart Value
  • Minimum Item Quantity: This requirement means Free Shipping will be applied based on Item Quantity in the Cart
Basic Plugin Overview – Advanced Shipping For WooCommerce 5

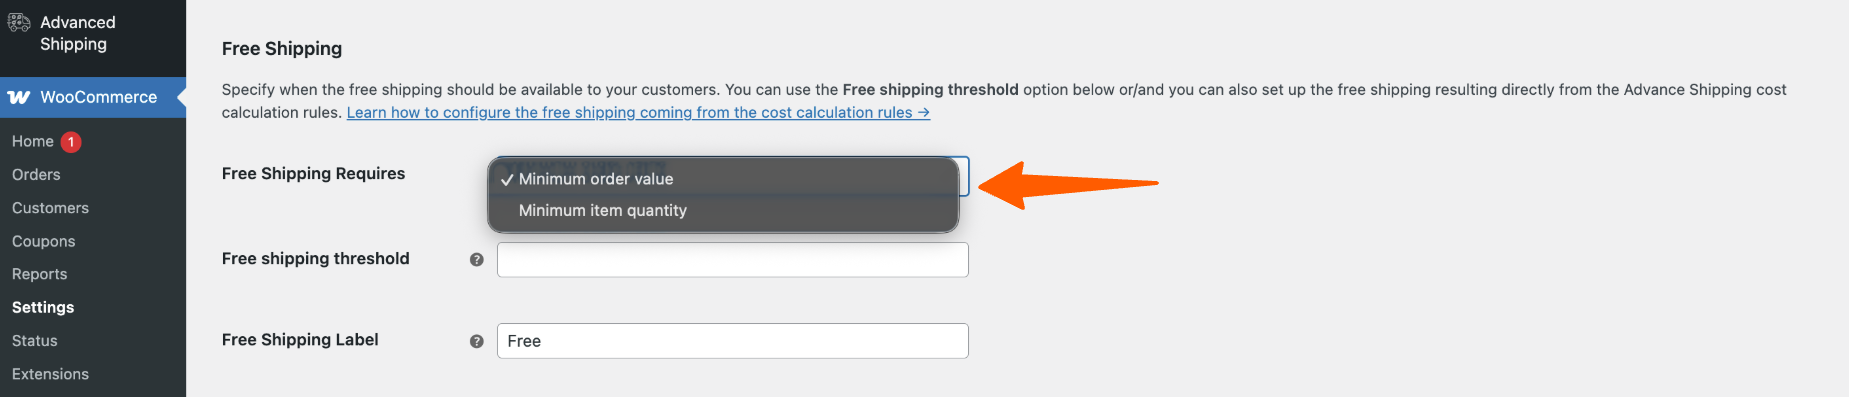
For example, If you set up “Minimum Order Value” and set up threshold of 250$ then your customers must spend minimum of 250$ on your store to get the free shipping.

For example, If you set up “Minimum item quantity” and set up threshold of 10, then your customers must have minimum of 10 items in their cart to get the free shipping.

Tax #

With this option, you can set up whether you want to enter shipping costs with or without taxes. Following are the settings for that,

Tax Status

You’ll get two options here,

  • None: If you select None, then Advanced Shipping won’t use the Tax settings you have set up on your WooCommerce store.
  • Taxable: If you select the Taxable option, then Advanced Shipping will use the tax rates that’s defined in your WooCommerce. (Example: Standard, Reduced, Zero)
    Go to WooCommerce > Settings > Tax to check this.
Basic Plugin Overview – Advanced Shipping For WooCommerce 6

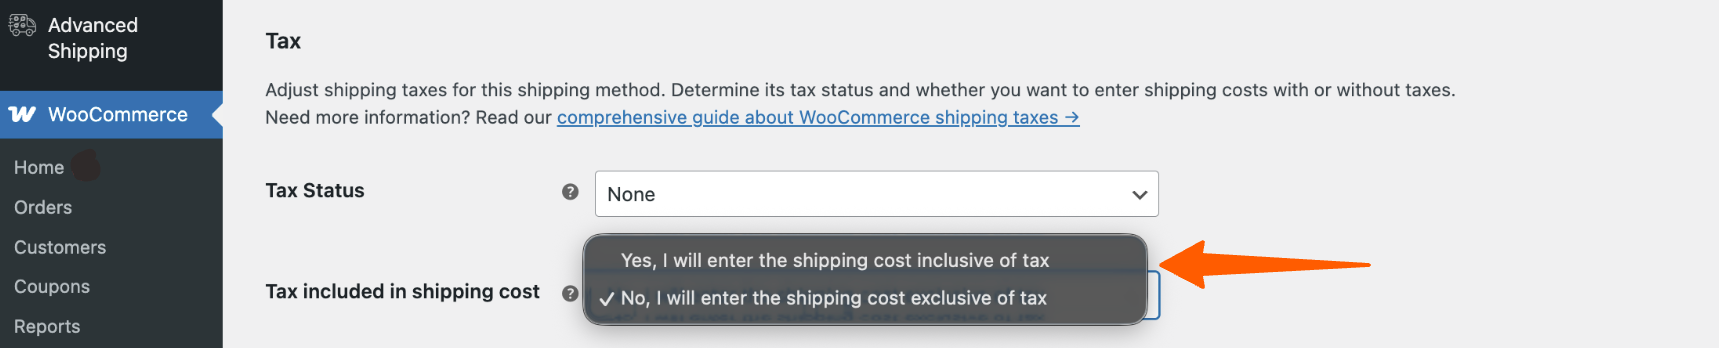
Tax Included In Shipping Cost

You’ll get two options here,

  • Shipping Cost Inclusive: If you select this, then the shipping calculation rules you create in the following options will be inclusive to tax.
  • Shipping Cost Exclusive: If you select this, then the shipping calculation rules you create in the following options will not include tax.
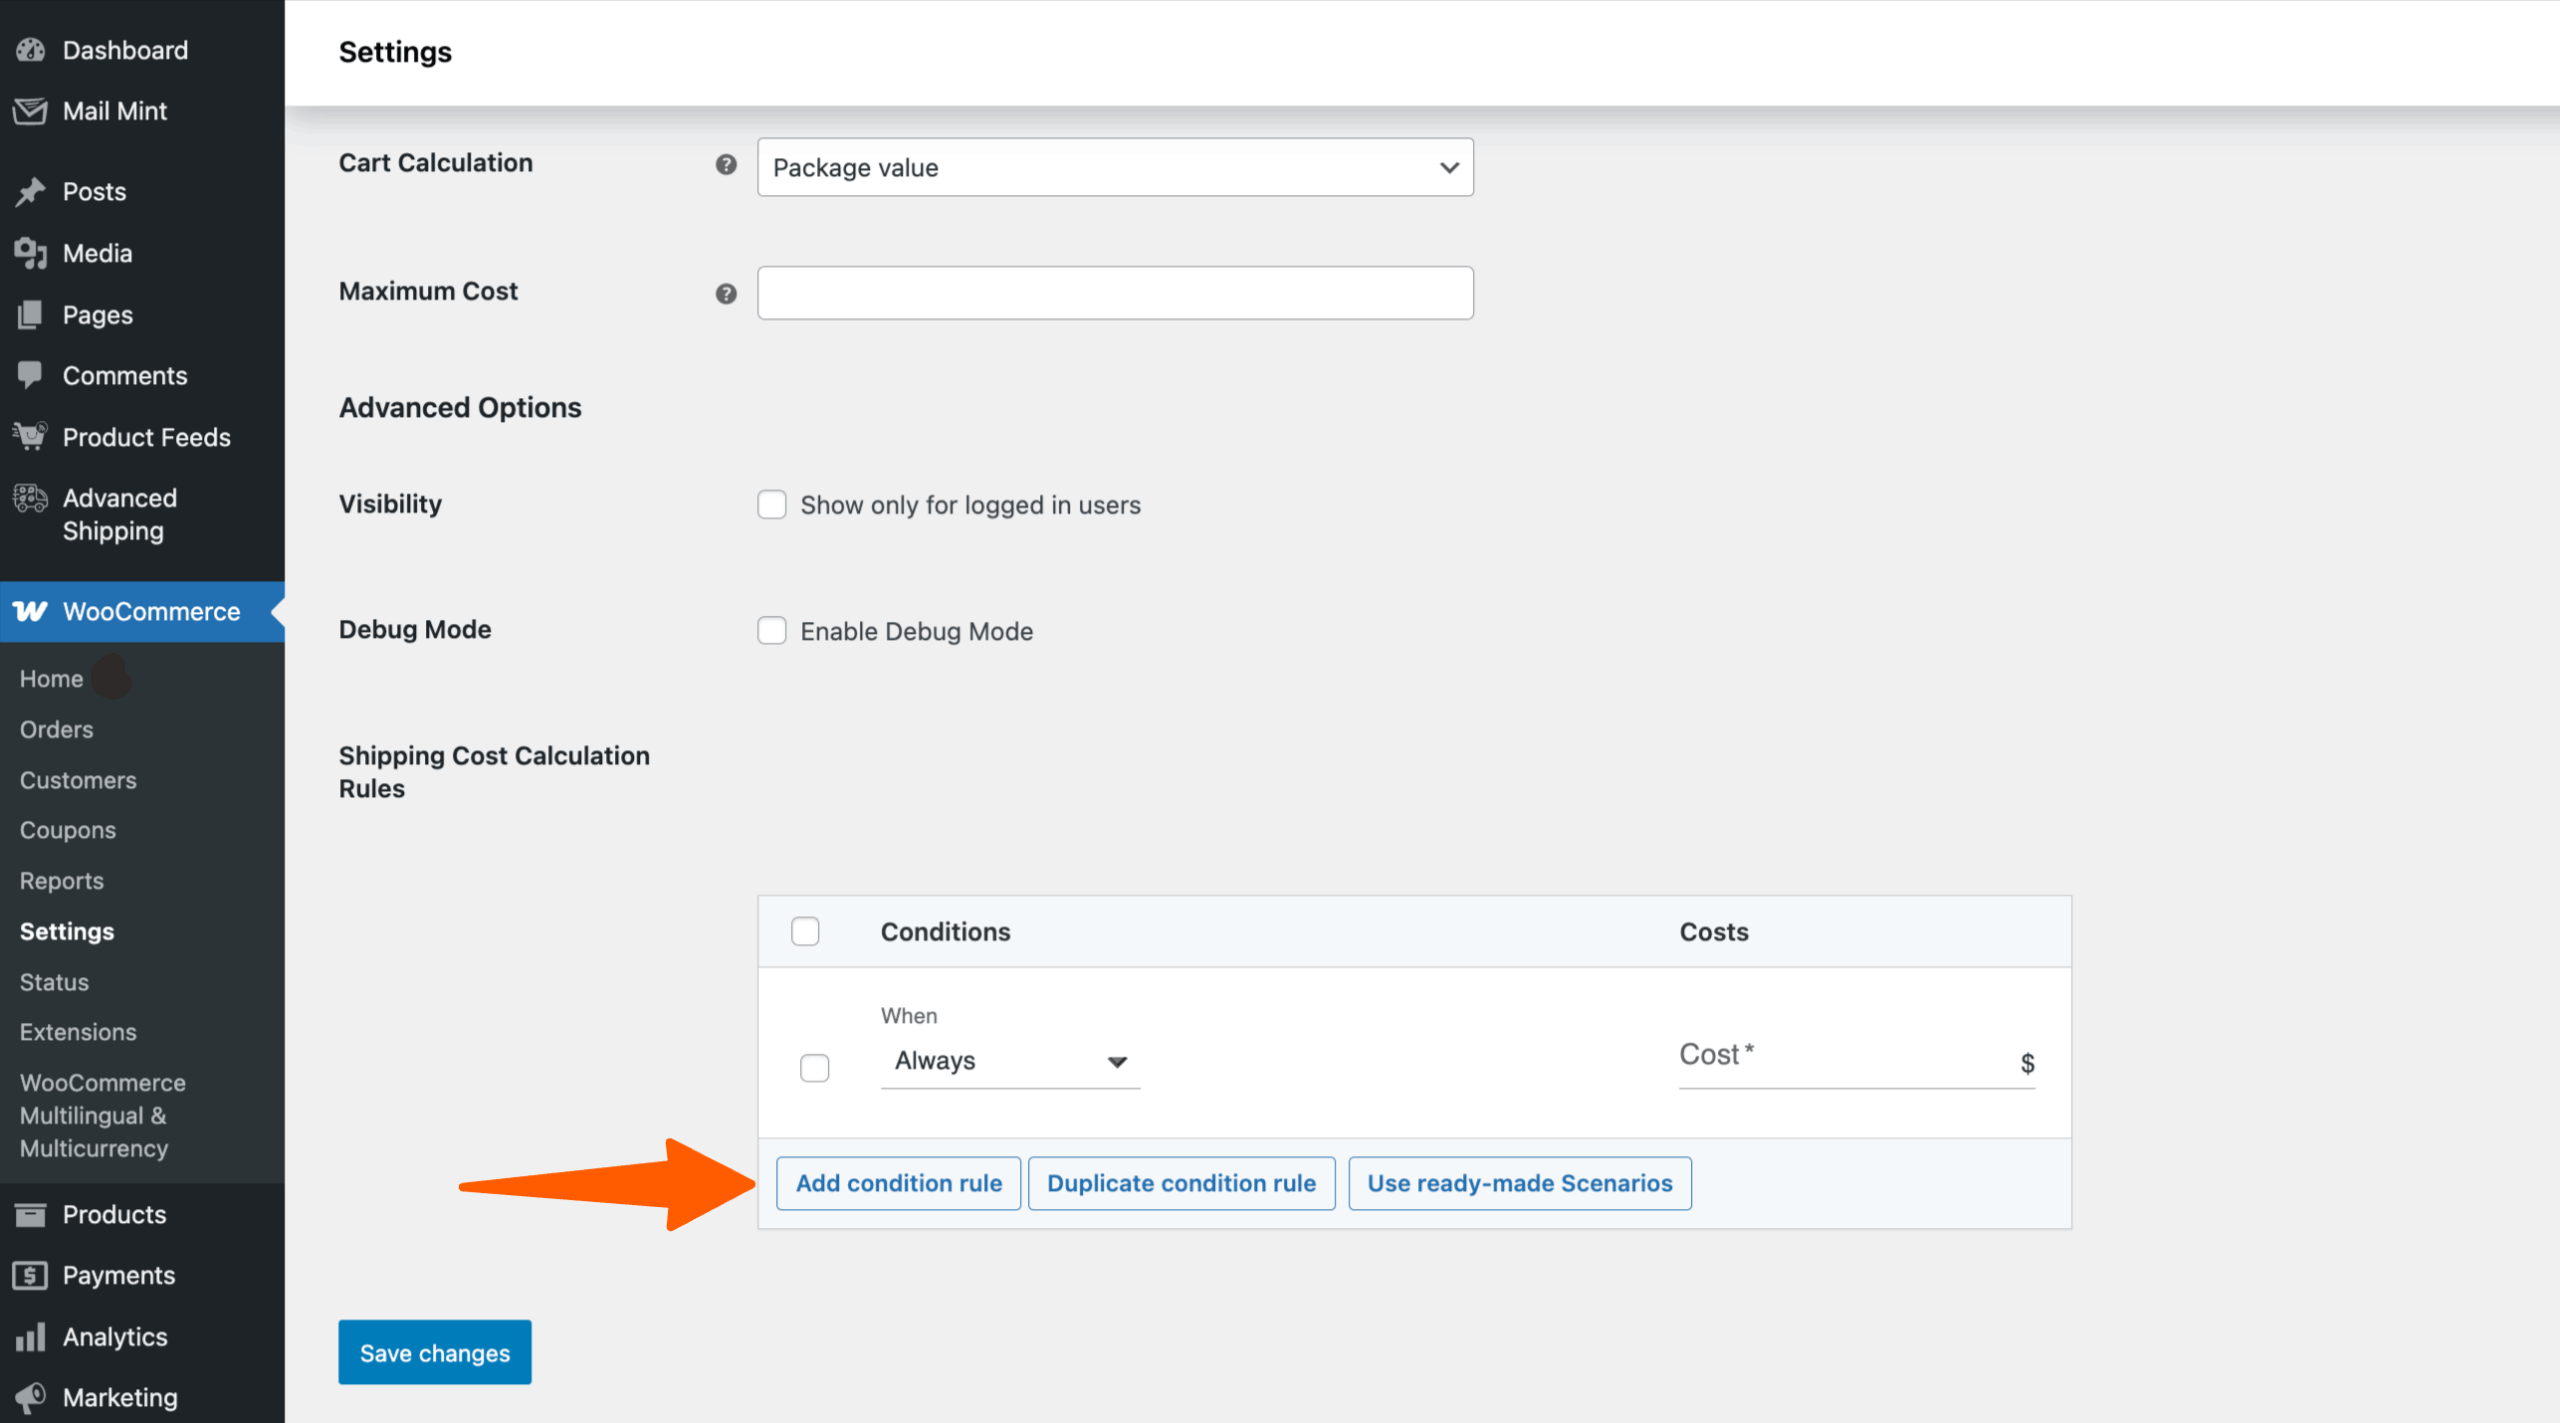
Basic Plugin Overview – Advanced Shipping For WooCommerce 7

Cost Calculation #

Add different conditions on how you want the shipping cost to be calculated.

Rule Calculation #

Basic Plugin Overview – Advanced Shipping For WooCommerce 8
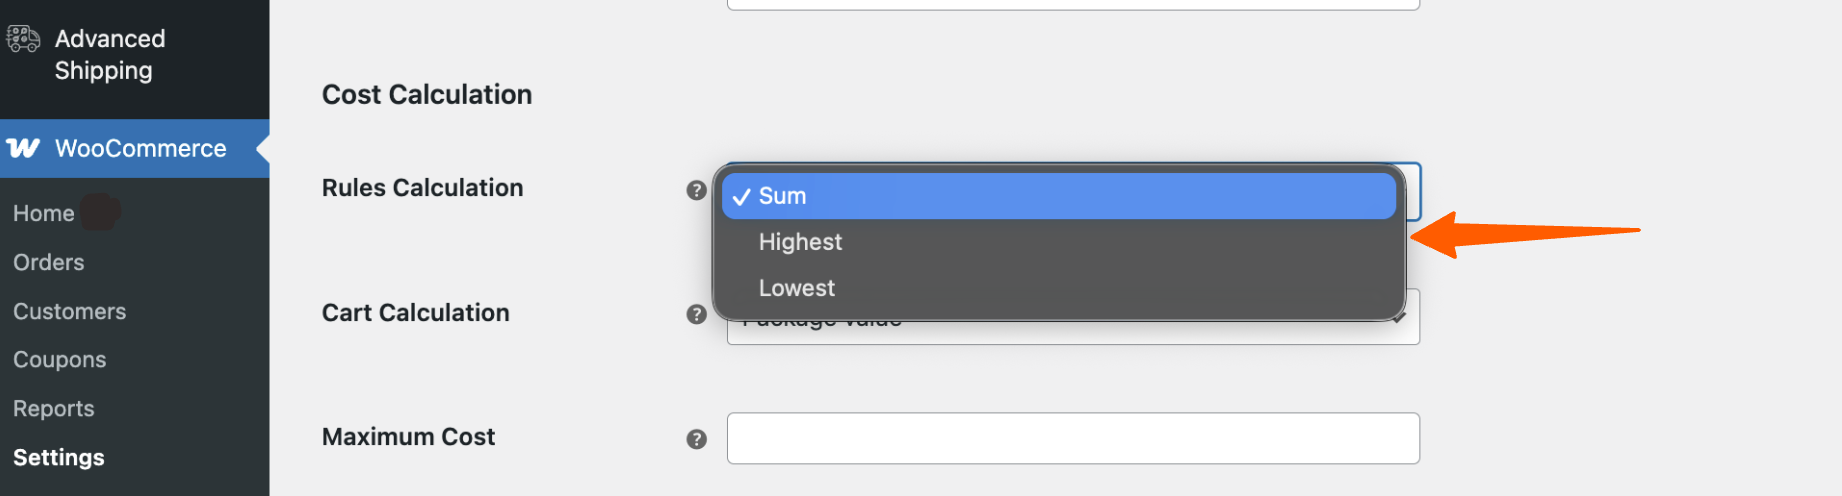
  • Sum: If there are multiple Shipping rules/condition added, then the shipping cost will be the sum of all the shipping costs for the individual rule
  • Highest: If there are multiple Shipping rules/condition added, then only the individual shipping cost, which is the highest, will be considered as the shipping cost
  • Lowest: If there are multiple Shipping rules/condition added, then only the individual shipping cost, which is the lowest, will be considered as the shipping cost

Cart Calculation #

Basic Plugin Overview – Advanced Shipping For WooCommerce 9
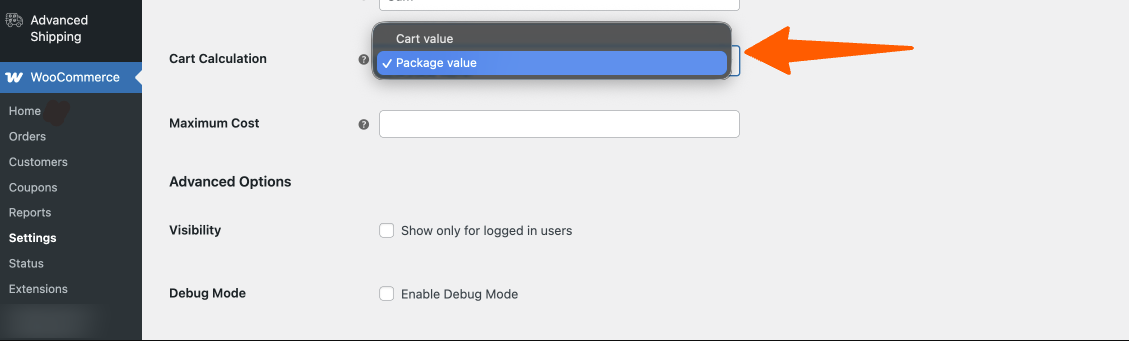
  • Package Value: If you select Package Value, you can set different options for physical products and online products. if the product is physical, then a shipping charge will be added, if the product is a virtual/downloadable product then it will be excluded from the shipping charge.
  • Cart Value: If you select Cart Value, all the items in your customer cart will be counted no matter whether the products are physical or virtual.

Advanced Option #

In this option, you may select whether you want to show the shipping calculations to only the logged-in users or not.

Show shipping only for logged in users

Condition Type #

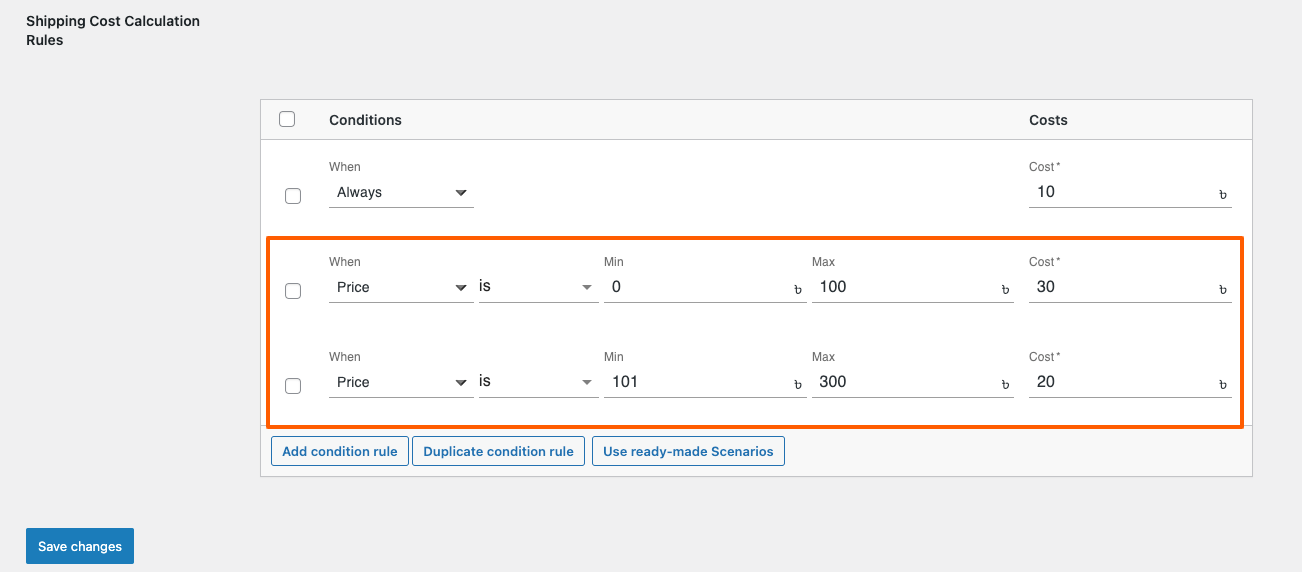
You may set up different conditional rules for creating different shipping strategies using the Advanced Shipping For WooCommerce plugin. You can create them from scratch or you can use the ready made scenarios.

Basic Plugin Overview – Advanced Shipping For WooCommerce 10

Use ready-made Scenarios

Click on the Use ready-made Scenarios if you want to use ready made Shipping Rules/Conditions

Basic Plugin Overview – Advanced Shipping For WooCommerce 11

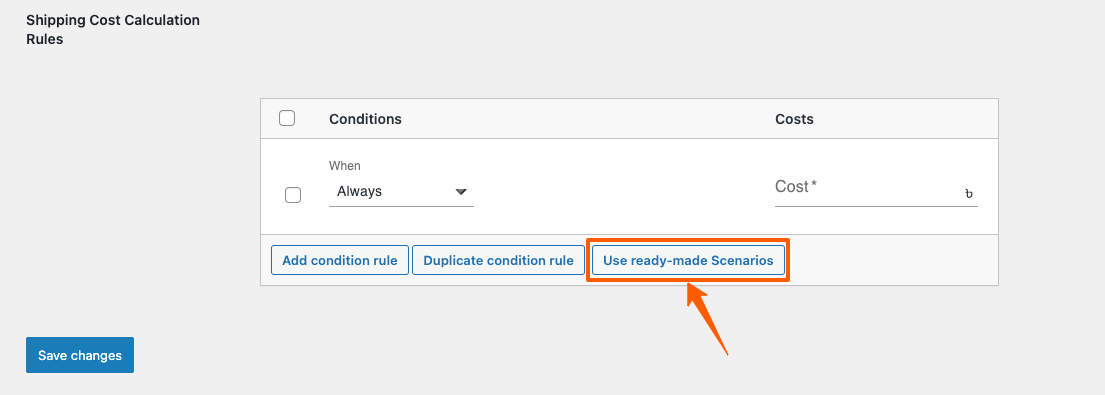
Currently we have a Ready Made Shipping Rule Table based on Price

Basic Plugin Overview – Advanced Shipping For WooCommerce 12


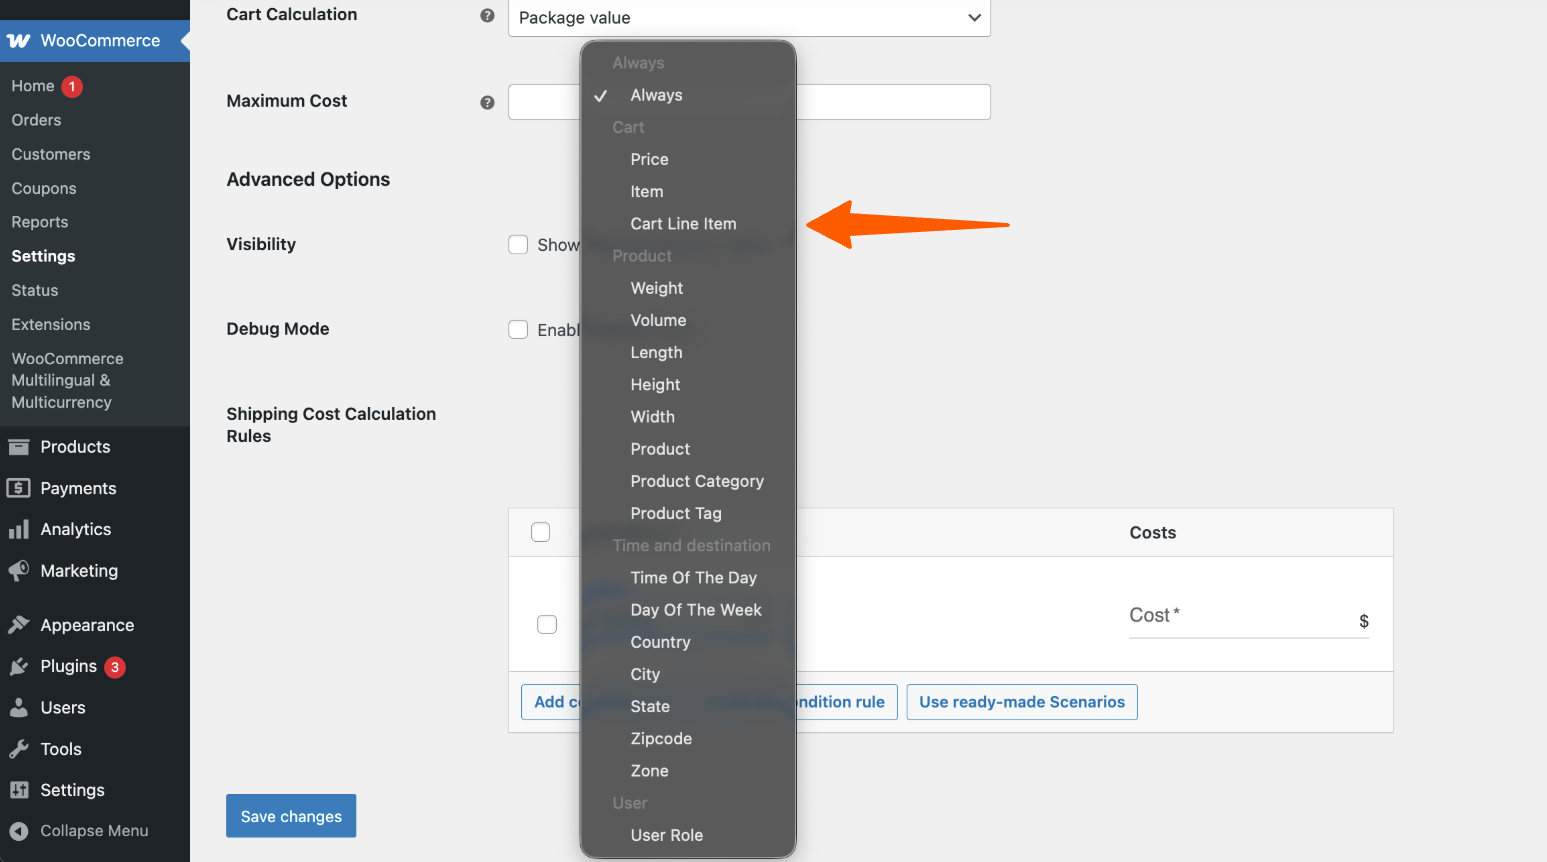
If you click on Add condition rule, In the Condition type, you’ll get 4 Categories of options available to select. Cart, Product, Time and Destination, User.

Basic Plugin Overview – Advanced Shipping For WooCommerce 13

Now, that you have an overview of this plugin, give it a try and see for yourself that our Advanced Shipping is the only Shipping plugin that you need!

Still stuck? How can we help?

How can we help?

Updated on October 23, 2025
Inhoudsopgave
  • Advanced shipping for WooCommerce Plugin Overview
  • Advanced Shipping Features
    • Free Shipping
    • Tax
    • Cost Calculation
    • Rule Calculation
    • Cart Calculation
    • Advanced Option
    • Condition Type
RexThema

Stay updated with our latest releases and useful guides.

By subscribing RexTheme you agree to Privacy Policy.

Products

  • WP VR
  • Product Feed Manager
  • Wagenlift
  • Checkoutify
  • Dynamic Discount
  • Advanced Shipping
  • Catalog Mode
  • Marketplace Auto-sync

Bronnen

  • Voorwaarden voor de dienstverlening
  • Privacybeleid
  • Refund Policy
  • Affiliate Policy
  • Support Policy
  • Bug Bounty Program

Company

  • Blog
  • Documentations
  • Changelog
  • Affiliate programma
  • Brand Assets
  • Contacteer ons

Copyright © 2013 - RexTheme