Google Shopping needs you to include a few additional product attributes if the products fall under the category ‘166 – Apparel & Accessories‘.
These attributes are as follows:
- Grootte
- Kleur
- Patroon
- Materiaal
- Age group
- Geslacht
But, WooCommerce doesn’t provide fields to input these data by default.
With PFM, you will be able to enable extensive custom fields for these important product attributes in your WooCommerce products.
Enabling Custom Fields For Important Product Attributes #
Follow the steps below to enable the custom fields for these important product attributes in your WooCommerce products.
*Make sure you have the Pro version and license of the plugin activated.
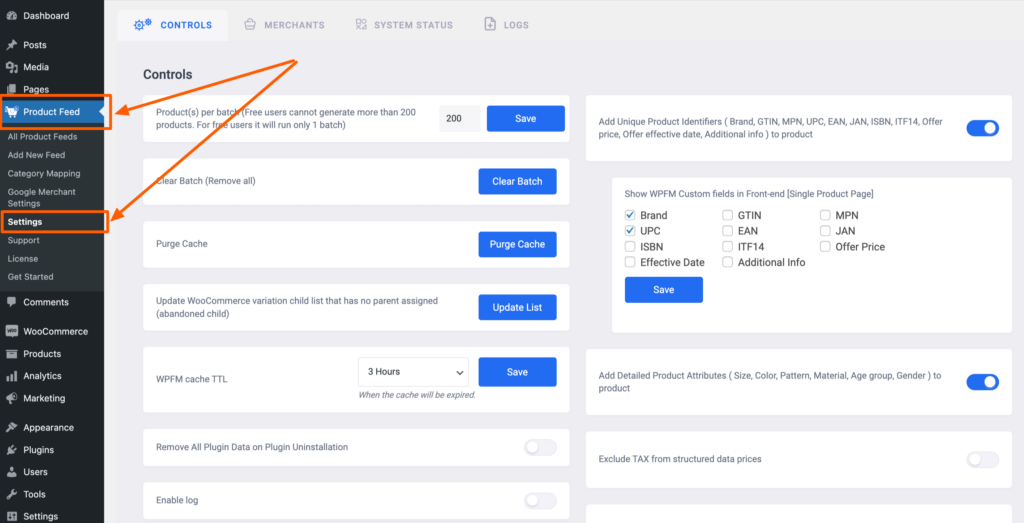
1. Go to Dashboard > Product feed > Settings

On top, you will see a few tabs. By default, it’ll take you to the Controls tab.

2. Here, you will find the option called “Add Detailed Product Attributes“. Enable it.
3. Once enabled, you will be able to find the following custom fields for important product attributes added to your products:
- Grootte
- Kleur
- Patroon
- Materiaal
- Age group
- Geslacht
Where Are These Custom Fields Added? #
These custom fields will be added under the Product Data section when editing a product.
However, there will be a slight difference in where the fields are based on the product type.
For a simple product, the fields will be under a menu called PFM Custom Fields. However, for a variable product, these fields will be added within each variant since each variant usually has unique values for these product attributes.
Here are step-by-step instructions to find the fields for each product type.
i. PFM Custom Fields For A Simple Product #
1. Go to Dashboard > Products > All Products and edit a simple product.
2. Scroll down to the Product Data section.

3. Here, you will see that there is a tab called PFM Custom Fields. Click on it.

As you can see, it’s a simple product. So all the custom fields are added under the WPFM Custom Fields tab.
ii. PFM Custom Fields For A Variable Product #
1. Go to Dashboard > Products > All Products and edit a variable product.
2. Scroll down to the Product Data section.
3. Now, go to the Variations tab and you will find all the variants of this product listed there.

5. Click on a variant and scroll down to find the custom fields added.

That’s it. You can now input the values in the respective fields, and then use them when generating product feed.
Using Custom Field Values When Generating Product Feed #
Once you have inputted the values in the custom fields and saved them, you will be able to assign these values for attributes when generating the product feed.
Simply click on the value for an attribute and look for the field names of the respective custom fields to assign the values.

For every custom field, there is a value tag that you need to assign.
For example, if you use the custom field to assign the Color attribute, then you need to choose the value tag ‘WPFM product color‘.
Likewise, as mentioned, there are unique field names or tags that you need to choose for the rest of the unique identifiers as well. Here’s the list:
| Attribuut | Value Tag |
|---|---|
| Product Color | WPFM product color |
| Product Size | WPFM product size |
| Product Pattern | WPFM product pattern |
| Materiaal | WPFM product material |
| Leeftijdsgroep | WPFM product age group |
| Geslacht | WPFM product gender |
Now that you know how to use these custom fields, you can use them effectively to add important detailed product attributes to your products and generate accurate product feeds.