Skip to content
RexTheme Logo
  • Home
  • Plugins
    • WP VR
    • Product Feed
    • Social Booster
    • Cart Lift
  • Docs
  • Support
  • Blog
  • Account
    • Log In
  • Contact Us
  • NL
  • DE

Product Feed Manager

  • Introduction To WooCommerce Product Feed Manager
  • Getting Started with Product Feed Manager
  • Install and Activate WPFM
  • Generate Product Feed
  • Category Mapping
  • Auto-sync With Google Merchant Shop
  • Add Extensive Custom Fields
  • Add More Supported Merchant Sites
  • How to Upgrade to Pro – WPFM
  • eBay MIP Feed Generation
  • Useful Options On Controls Tab
  • Fix WooCommerce’s (JSON-LD) Structured Data Bug
  • Control Products Per Batch In Batch Processing
  • Exclude Tax From Structured Data Prices
  • Using Google Merchant Promotions Feed
  • Exclude “Out Of Stock” Products From WooCommerce Product Feed
  • Connect Facebook Pixel With WooCommerce For Dynamic Ads
  • Product Feed Optimization with Yoast SEO Product Title, Meta Description and Primary Category
  • Getting Started With WooCommerce Product Feed Manager
  • How To Install And Activate WPFM
  • How To Generate Product Feed For The First Time
  • Basic Plugin Overview – WooCommerce Product Feed Manager
  • How To Use Category Mapping For Product Feed
  • How To Enable Your Desired Merchant Or Marketplace For Feed Generation
  • Add Extensive Custom Fields Of Unique Identifiers For WooCommerce Products
  • Add Custom Fields For Important Product Attributes
  • How To Add Extensive Custom Fields To WooCommerce Products
  • Fix WooCommerce (JSON-LD) Structured Data For Approval In Google Shopping
  • How To Exclude Tax From Structured Data Prices
  • How To Use Custom Filter When Generating Product Feed
  • Troubleshooting Common Issues – WooCommerce Product Feed Manager
  • How To Use Category Filter When Generating Product Feed
  • How To Use Tag Filter When Generating Product Feed
  • How To Use Product Filter Options When Generating Feed
  • How To Schedule Auto-update of Feed On Set Intervals
  • How To Include Variable Products To The Feed
  • How To Include Private Products In Product Feed

WP VR

  • Introduction To WP VR
  • Getting Started With WP VR
  • How To Install And Activate WP VR
  • How To Create A Simple Virtual Tour In 5 Minutes – WP VR
  • How to Embed A Virtual Tour And Customize It – WP VR
  • WP VR Basic Plugin Overview
  • How To Add A Scene To Your Virtual Tour
  • How To Use Scene Settings To Customize A Scene
  • How To Add Hotspots To A Scene In Your Virtual Tour
  • How To Use Hotspots To Show Information, Images Or Videos
  • How To Use Hotspots To Go From One Scene To Another
  • How To Customize Hotspot Icons And Color
  • How To Use Exclusive Features On General Settings To Customize A Virtual Tour
  • How To Upgrade To Pro – WPVR
  • How To Export And Import Virtual Tours
  • How To Embed A Virtual Tour Using WPVR Gutenberg Block
  • How To Embed A Virtual Tour Using WPVR Elementor Widget
  • How To Use WP VR Oxygen Element To Embed A Virtual Tour
  • How To Embed A Youtube 360 Video On Your Website Using WPVR
  • How To Embed A Google Street View Tour On Your Website Using WPVR
  • Embed A Self Hosted Video on WPVR Hotspots
  • How To Set Up WPVR Exclusive Settings
  • How To Exclude WPVR From Autoptimize
  • Control Script And Style Loading For The Virtual Tours
  • How To Disable WordPress Large Image Handler For Virtual Tours
  • How To Duplicate A Virtual Tour
  • How To Integrate Fluent Forms On A Virtual Tour
  • How To Integrate WooCommerce To A Virtual Tour
  • How To Embed Virtual Tours On Non-WordPress Websites
  • How To Enable Gyroscope Support On Virtual Tours
  • How To Set Up A Scene Gallery On Virtual Tours
  • How To Add Background Music To Virtual Tours
  • How To Limit Keyboard Controls For Navigation And Zoom
  • How To Limit The Use Of Mouse Scroll To Zoom Or Drag To Move A Tour
  • Using Custom Icons For Navigation And Control Buttons In A Virtual Tour
  • How To Add A Home Button To Your Virtual Tour
  • How To Create A Virtual Tour With Partial Panoramas
  • How To Create A Virtual Tour With Mobile Phone Panorama Images
  • How To Set Default Scene Face On A Virtual Tour
  • How To Set A Dynamic Front End Notice On Virtual Tours For Mobile Phone Viewers
  • Demo Virtual Tours
  • Basic Virtual Tour
  • Demo Virtual Tour – WPVR Pro
  • Demo Tour – WPVR (Free)
  • Custom Scene Gallery – WPVR
  • Custom Control Icons – WPVR
  • Google Street View Tour – WPVR Pro
  • Getting Started with WP VR
  • Video Tutorials – WPVR
  • Demo Partial Panorama Virtual Tour – WPVR Pro
  • Bar/Pub Showcase
  • How To Add A Preview Image To Your Virtual Tour – WPVR
  • How to Enable Auto Rotation For Your Virtual Tour
  • How To use a WPVR Shortcode to Embed a Virtual Tour
  • How to Add Your Company Logo in Your Virtual Tour – WPVR
  • Troubleshooting Common Issues – WPVR
  • How To Auto Resize Images On Mobile Devices for Virtual Tours
  • How To Set Custom Zoom Settings On A Scene In Your Virtual Tour – WPVR
  • How to Set 360 Image Grab Limit On A Scene in Your Virtual Tour – WPVR
  • How To Solve Virtual Tour Not Showing Up – WPVR
  • How To Exclude Assets of WPVR From Autoptimize
  • How To Embed Youtube Videos Inside Virtual Tours Using WPVR
  • How To Create Full Screen Virtual Tours – WPVR

Social Booster

  • Social Booster
  • Install and Activate Social Booster
  • Getting Started with Social Booster
  • How Social Booster Works
  • Social Booster Dashboard Overview
  • Connect Facebook For Auto-Posting
  • Connect Twitter For Auto-Posting
  • Auto-Post And Share With Social Booster
  • Connect Tumblr For Auto-Posting
  • Connect LinkedIn For Social Auto-Posting
  • Connect Reddit For Auto-Posting
  • Connect Pinterest For Social Auto-Posting
  • Schedule Post With Social Booster
  • Set Multiple Profiles On Social Booster

Cart Lift

  • Introduction To Cart Lift
  • Getting Started With Cart Lift
  • Install And Activate Cart Lift
  • A Basic Plugin Overview – Cart Lift
  • Configure And Use Cart Lift Effectively
  • How To Track Abandoned Carts Automatically
  • How To Set Up Your Abandoned Cart Recovery Campaign
  • How To Get Notifications For Abandoned Carts And Recovery
  • How To Integrate SMTP Through Cart Lift
  • Get Full Analytics Report On Recovery Campaign
  • How To Upgrade To Pro – Cart Lift

Media Storage To Cloud

  • WP Media Storage To Cloud
  • Getting Started – Media Storage To Cloud
  • How to install and activate Media to Cloud Storage
  • WP Media Storage To Cloud Dashboard Overview
  • How To Connect Amazon S3 Bucket
  • How To Connect Google Cloud Storage
  • How To Set Up IAM User For Amazon S3 Bucket
  • How To Set Up Google Cloud Storage Bucket To Serve Media Files
  • How To Connect DigitalOcean Spaces
  • How To Create An Amazon CloudFront Distribution
  • How To Create An Amazon CloudFront Origin Access Identity
  • Troubleshooting For Common Issues – Media Storage To Cloud
  • How To Create Free HTTPS Certificate On Amazon S3

Variation Swatches

  • Variation Swatches for WooCommerce – Getting Started
  • Variation Swatches For WooCommerce – Dashboard Overview
  • Variation Swatches For WooCommerce – Install And Activate
  • Change Dropdown to Button Swatches for WooCommerce Variations
  • How To Set Up WooCommerce Color Swatches For Color Variation
  • How To Set Up WooCommerce Image Swatches For Image Variation
  • How To Set Up Label Swatches For WooCommerce Product Variations
  • How To Customize Variation Swatch Hover Style
  • How To Customize Variation Swatches Global Style
  • How To Customize Variation Swatches Selected Style

VR Places Theme

  • How To Install And Activate VR Places Theme
  • How To Customize Global Settings for VR Places Theme
  • Home
  • Docs
  • WP VR

How To Use Scene Settings To Customize A Scene

Table of Contents
  • Title
  • Author & Author URL
  • Setting Angle Of View
  • Vertical Offset
  • Set Default Scene Face
  • Limit Scene Grab
  • i. Limit Vertical Scene Grab
  • ii. Limit Horizontal Scene Grab
  • Customize Scene Zoom
  • i. Default Zoom
  • ii. Max Zoom
  • iii. Min Zoom

Once you have added a scene, you will see on the right side, there are several features that you can use to customize a scene.

Features to customize a scene

In this lesson, you will get a brief idea about all the features there, that you can use to customize each scene.

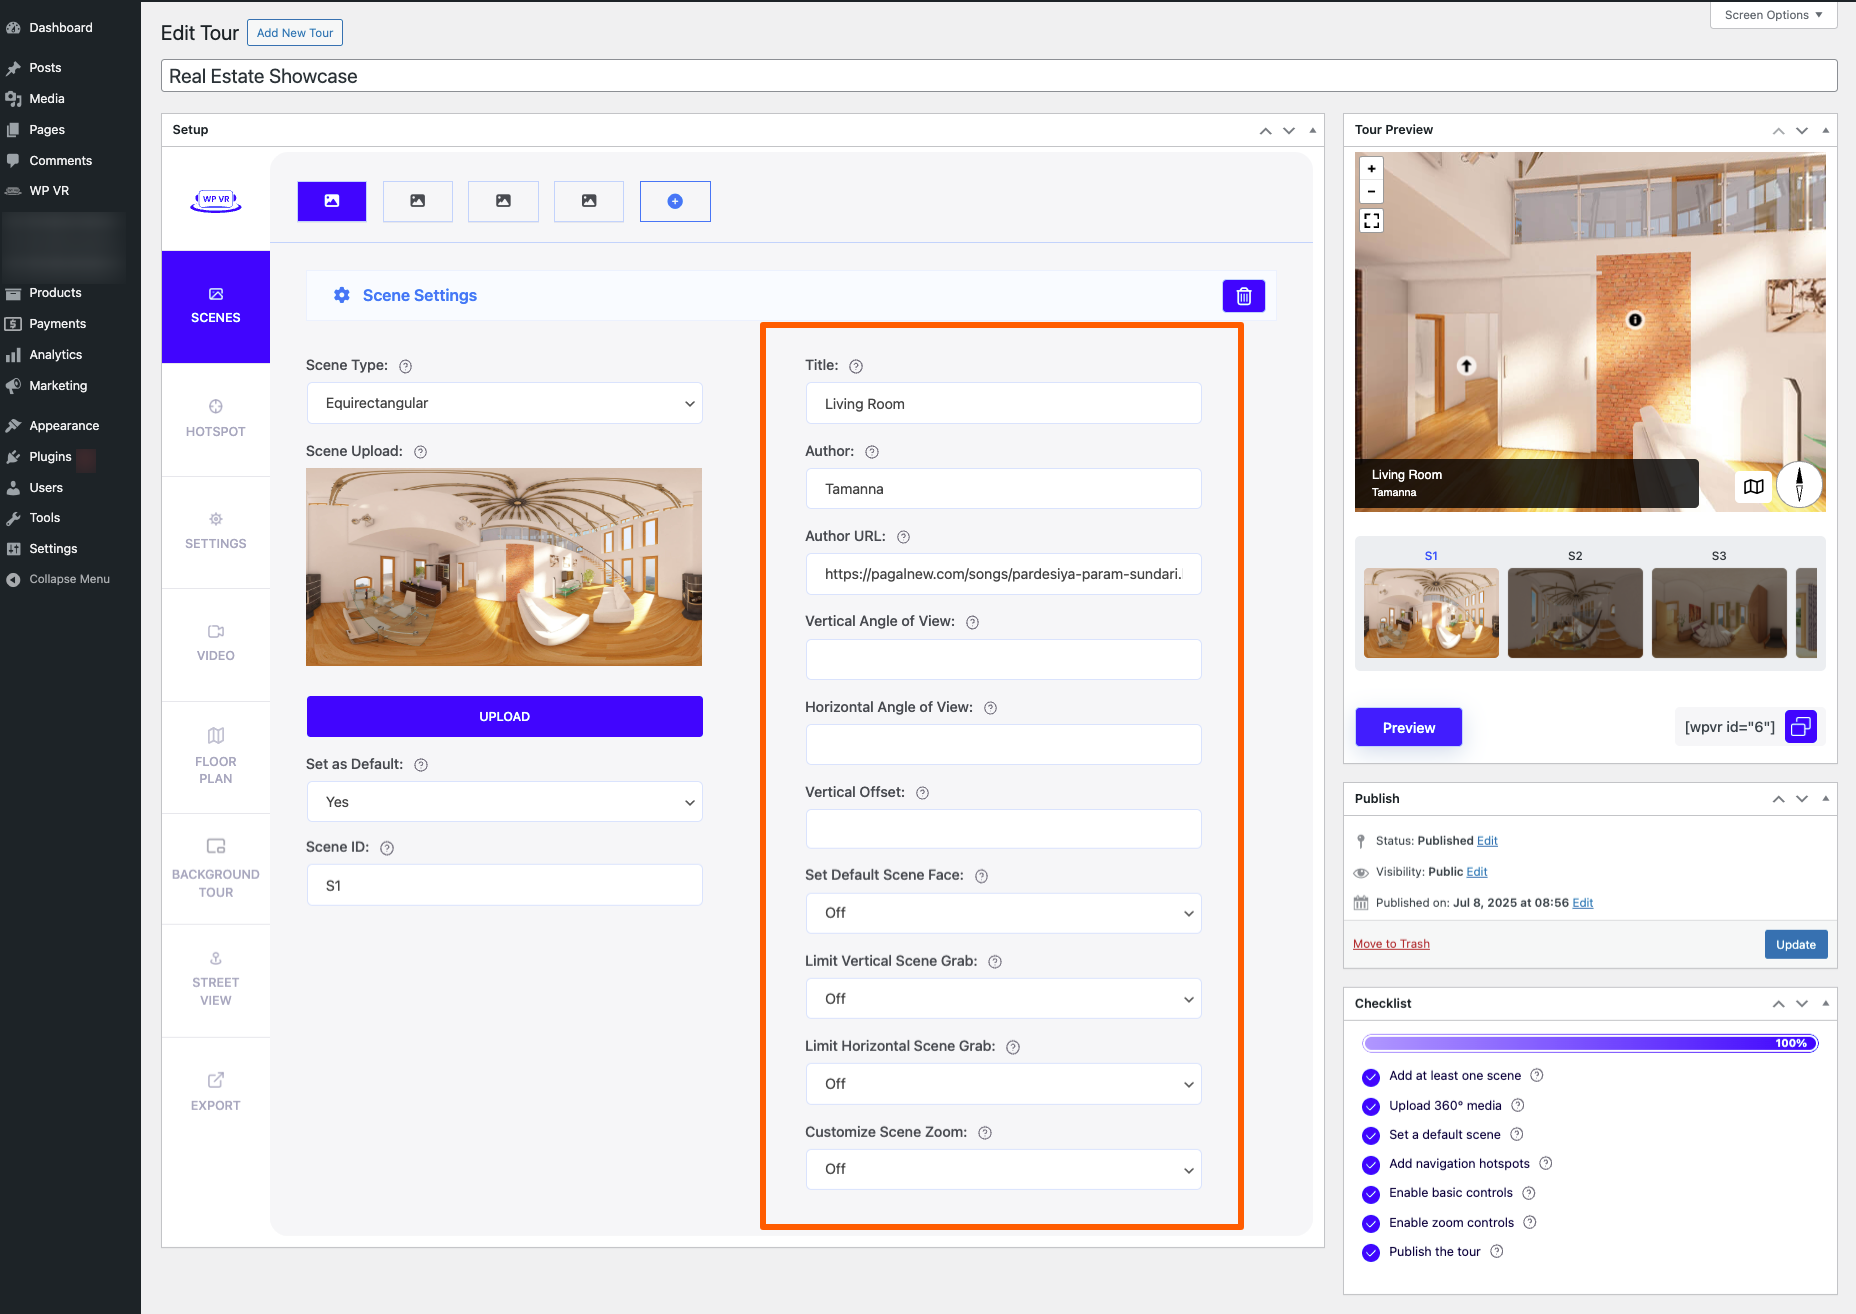
Now, you will find the following features on the right side to customize a scene:

  • Title
  • Author
  • Author URL
  • Vertical Angle of View
  • Horizontal Angle of View
  • Vertical Offset
  • Set Default Scene Face
  • Limit Vertical Scene Grab
  • Limit Horizontal Scene Grab
  • Customize Scene Zoom

Let us briefly learn how each of them work.

Title #

You can add a Title to this scene which could be the name of the room, or location, or any title you want.

For example, let’s say you have a tour of a house, and this scene represents the bed room. Then you use the title Bed Room.

Tour Title

It will look as shown in the image below:

Scene Title Added

Author & Author URL #

You can add a sub-text below the Title using the Author field, and link it to an URL using the Author URL field.

The main intention for this field was to let you add a reference to who created the tour, for example, you can use your company name and link.

However, you can also use it for other purposes such as indicating a contact number or address of the place.

For example, you can add the address and link it to the Google map directions.

Author name and url

It will look as shown in the image below.

Author and URL added

*You can use just the Author and not the Title if you want to, but it might now look that great.

Setting Angle Of View #

You will find two fields called Vertical Angle Of View and Horizontal Angle Of View.

In case you have an ordinary Panoramic image (i.e. not 360 degree), then normally the image gets stretched into a 360 degree tour, which ruins the image.

These features will let you set a boundary of how much the image will be stretched out so that you can still create a virtual tour out of it.

Angle of view

You can then Limit Scene Grab (which will be explained below) to turn it into a Partial Panorama.

Here’s guide on using Partial Panorama:

  • How to create a virtual tour using a partial panorama

Vertical Offset #

vertical offset

This feature is only usable if you have an irregular 360 image that needs to be stretched from a different point than a normal 360 panoramic image (vertically).

Set Default Scene Face #

Default Scene Face

You can decide which direction or view a person will be facing when entering a scene.

Normally, the center of the image, you upload, is viewed first. But you can change that using this feature.

Follow these small steps to set it up.

1. Enable Default Scene Face by marking it as Yes. You will get two new fields called Pitch and Yaw.

2. On the Tour Preview, click on the spot where you want a person to be looking at by default.

3. Below the Tour Preview, you will see some coordinates called Pitch and Yaw.

These indicate the position where you clicked.

4. Copy the coordinates for Pitch and Yaw and paste them in the respective Pitch and Yaw field under the default scene face.

5. Now click on the Preview button below, and you will see that the scene is loaded while viewing in the direction you wanted.

Limit Scene Grab #

Limit Scene Grab

You will find two options called Limit Vertical Scene Grab and Limit Horizontal Scene Grab.

Using these features, you will be able to decide how much a person can look up or down, or left or right.

Follow the steps below to use these features.

i. Limit Vertical Scene Grab #

This will limit the view when looking up and down.

1. Turn on Limit Vertical Scene Grab and you will find two new options called Max Pitch and Min Pitch.

2. For Max Pitch, choose a positive value below 90, for example 60.

3. For Max Pitch, choose a negative value more than -90, for example -60.

4. Now click on Preview below and you will see you will be limited to a total of 120 degrees when looking up or down, i.e., you won’t be able to look completely up or complete down.

ii. Limit Horizontal Scene Grab #

This will limit the view when looking left or right.

1. Turn on Limit Horizontal Scene Grab and you will find two new options called Max Yaw and Min Yaw.

2. For Max Yaw, choose a positive value below 180, for example 140.

3. For Max Pitch, choose a negative value more than -180, for example -140.

4. Now click on Preview below and you will see you will be limited to a total of 280 degrees when looking left or right from the default view, i.e., you will no longer be able to take a 360 turn on either directions.

Customize Scene Zoom #

Scene Zoom Limit

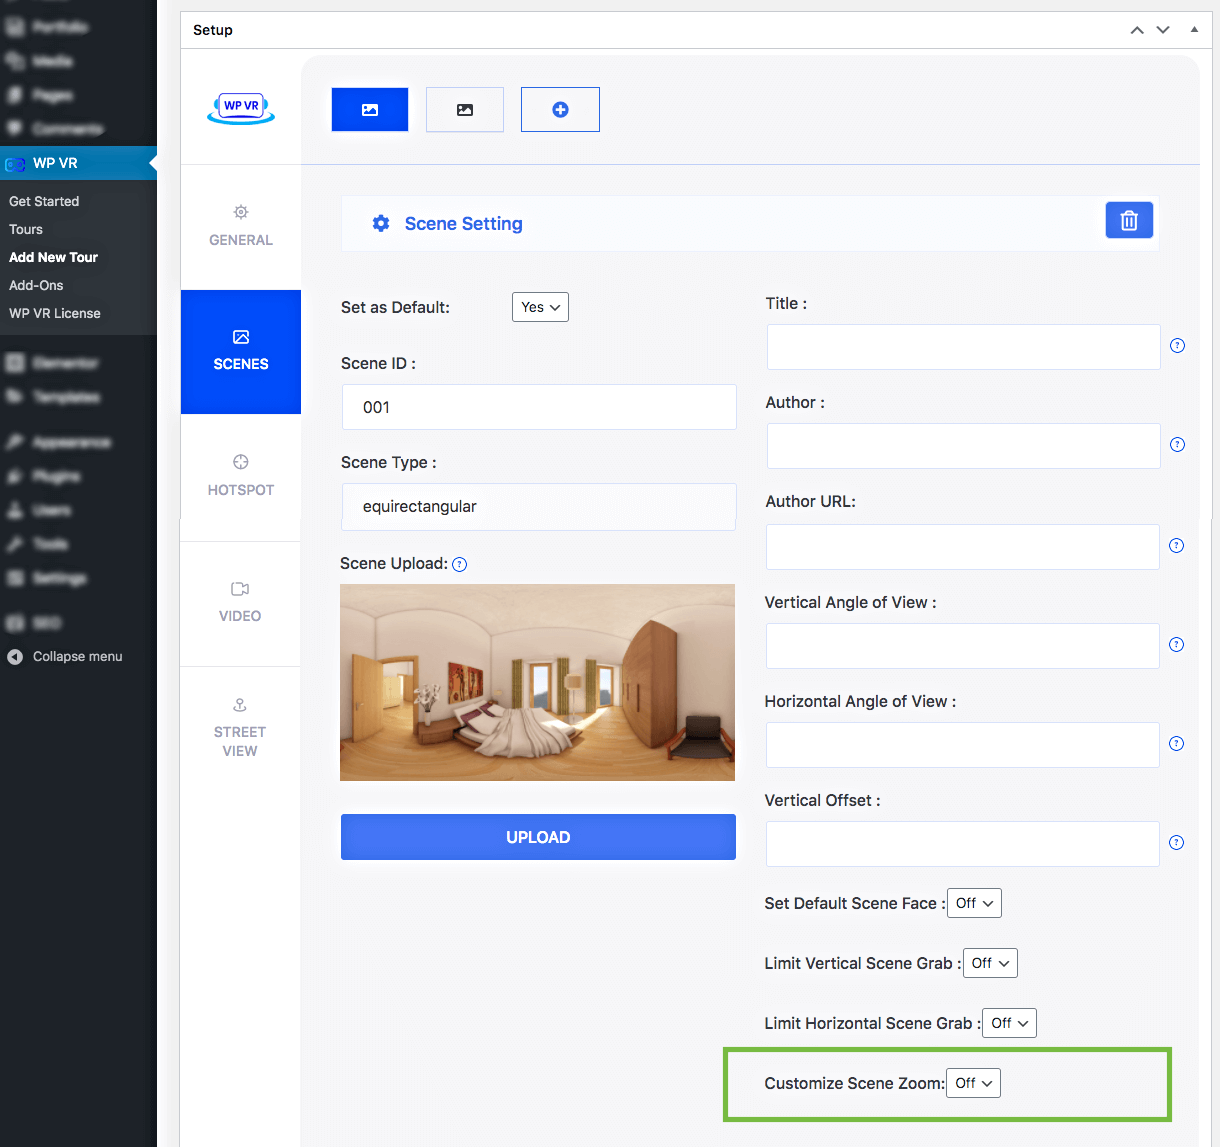
You can even control the zoom amount on the tour using this feature.

Turn on Customize Scene Zoom and you will find three new fields called Default Zoom, Max Zoom, and Min Zoom.

**The zoom ranges from 50 to 120.

i. Default Zoom #

You can set a how much the scene will be zoomed in or zoomed out when first viewed.

ii. Max Zoom #

You can set how much a person can zoom out.

iii. Min Zoom #

You can set how much a person can zoom in.

For all the 3 cases, you can choose a value ranging from 50 to 120.

Then you can preview the tour to see it’s effect.

That’s it. That’s how you use all the scene settings to customize a scene.

Now as I have mentioned, these are specific customization for each scene.

So if you have set up these features, it will only take effect on the scene you are editing.

To use it on a second scene, switch to the second scene by clicking on the icon above and set these up for it.

Share This Article :
Updated on August 13, 2020
How To Add A Scene To Your Virtual Tour How To Add Hotspots To A Scene In Your Virtual Tour
Table of Contents
  • Title
  • Author & Author URL
  • Setting Angle Of View
  • Vertical Offset
  • Set Default Scene Face
  • Limit Scene Grab
  • i. Limit Vertical Scene Grab
  • ii. Limit Horizontal Scene Grab
  • Customize Scene Zoom
  • i. Default Zoom
  • ii. Max Zoom
  • iii. Min Zoom
RexTheme Logo
Our Plugins
  • WP VR
  • Product Feed Manager
  • Social Booster
  • Cart Lift
Resources
  • Privacy Policy
  • Terms of Service
  • Affiliate Program
  • Contact Us
Payment Methods
Payment methods

© . All rights reserved by RexTheme