


In this doc, I will show you how you can easily create your WooCommerce product feed for Google Dynamic Search Ads.
Follow these easy steps to generate a WooCommerce Product Feed for Google Dynamic Search Ads.
Step 1: Create New Feed & Map Your Product Attributes #
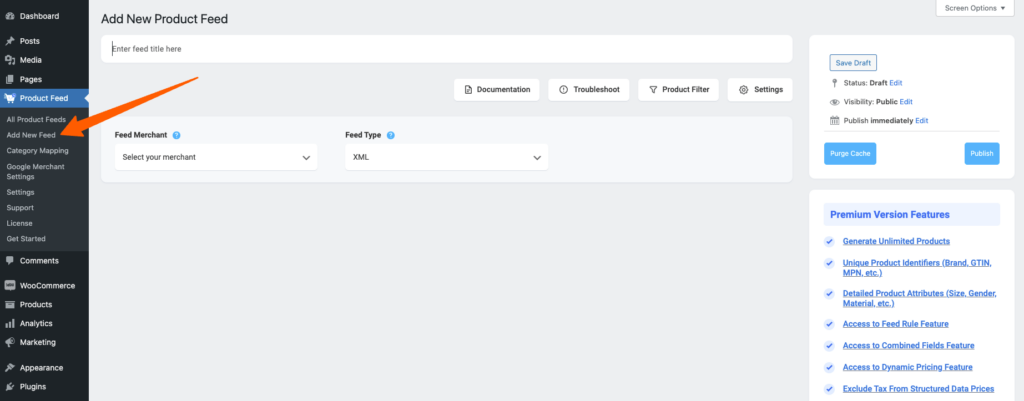
Go to your product feed dashboard.
Click on the Add New Feed button.
It will take you to the feed creation page.
Now, here,
1. On top, you will get the option to add a title to the feed. Give your feed a name.

2. Just under the title, you will see an option to select your preferred merchant. Simply click on the Feed Merchant dropdown button and select your preferred merchant from the dropdown or you can search in the dropdown box.

Select your preferred merchant and all the required attributes will be loaded below.
Let’s select Google Dynamic Search Ads for this feed.

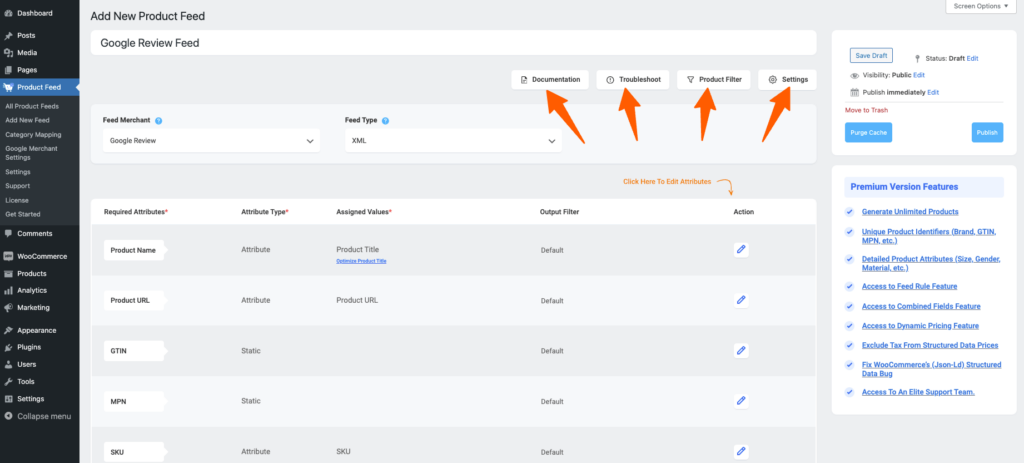
3. Here, you will see that most of the values are assigned already, you need to assign values to the rest of the attributes.
You need to assign values for the following attributes:
- GTIN —
GTIN is the Global Trade Item Number that uniquely identifies your product. This GTIN number helps Google make your products more visible to your customers.
GTIN number is provided by the manufacturer of the product, and you should keep the GTIN field empty if you don’t have this info but do not insert a random number into this field.
- MPN —
This value should be unique to each product. So you have to save this value in a custom field within each product and use that value here.
However, you can set the SKU as the MPN value of your MPN attribute.
- Manufacturer —
This should be the Brand name of the product you are selling. If you are the manufacturer, you can set the type as Static and input your company name here.
If you have different brand names for different products, you will have to save the value in a custom field or product attribute and then use that value here.
**You may also use Perfect Brands for WooCommerce, which will make it easier to assign and use brand names.
4. Also, if you want to add new attributes, you can click on the Add New Attribute button, and you will get the list of the optional Attributes of the Google Dynamic Search Ads.
Or you can add a custom attribute by clicking on the Add New Custom Attribute button.
Step 2: Feed Configuration #
1. Scroll up to the top and here, you will see that there are four options, Product Filter and Product Settings.
- Instellingen
- Product Filter
- Problemen oplossen
- Documentatie
2. First, let us configure the features in the Product Settings. Click on the Product Settings button, and a drawer will open from the right side of the screen.
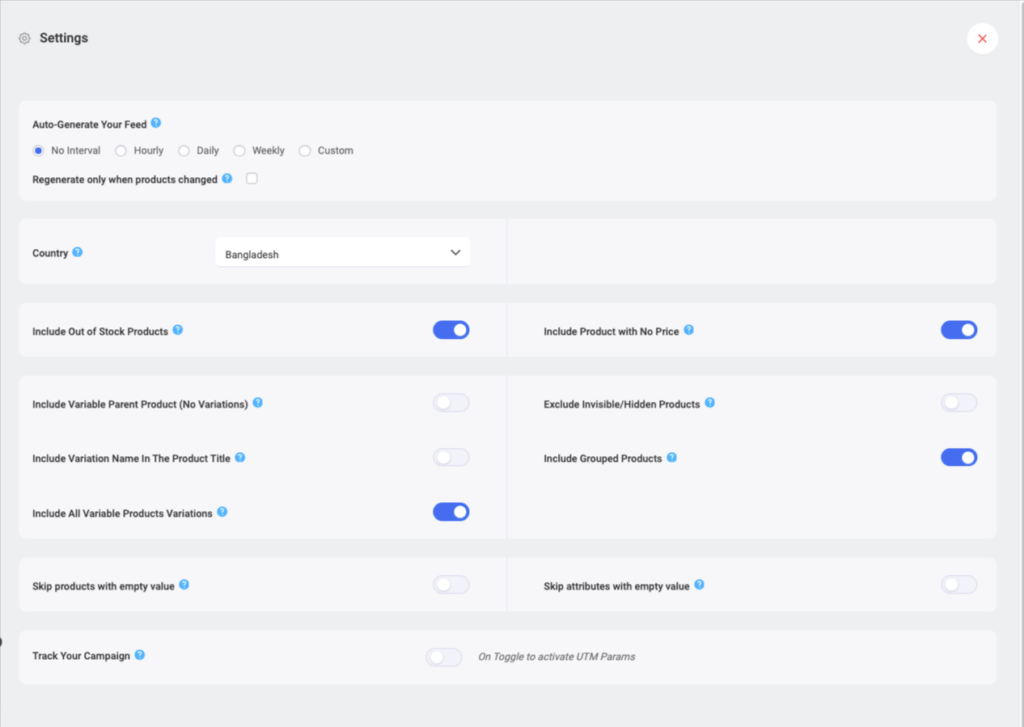
3. De eerste optie die je ziet is Automatisch je feed genereren.
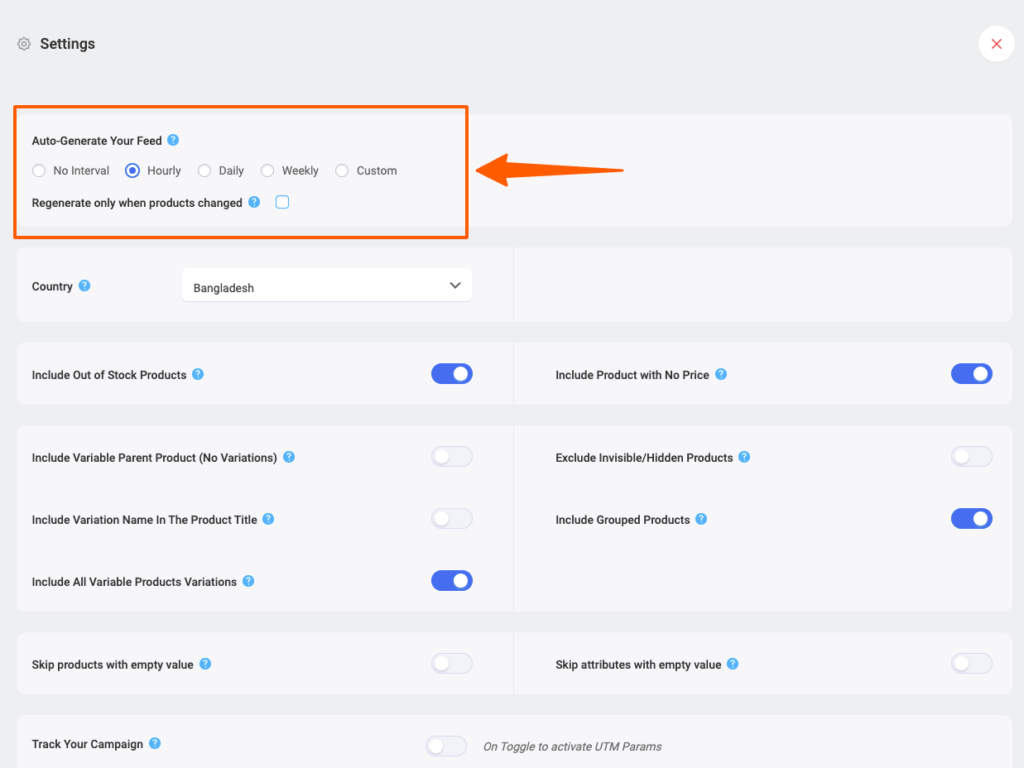
Deze optie wordt gebruikt om een automatische update van de feed te plannen na bepaalde intervallen. Kies een optie om een auto-update in te stellen of laat het staan op "Geen interval" als je geen auto-update van de feed wilt instellen.
4. Gebruik vervolgens indien nodig de volgende opties.
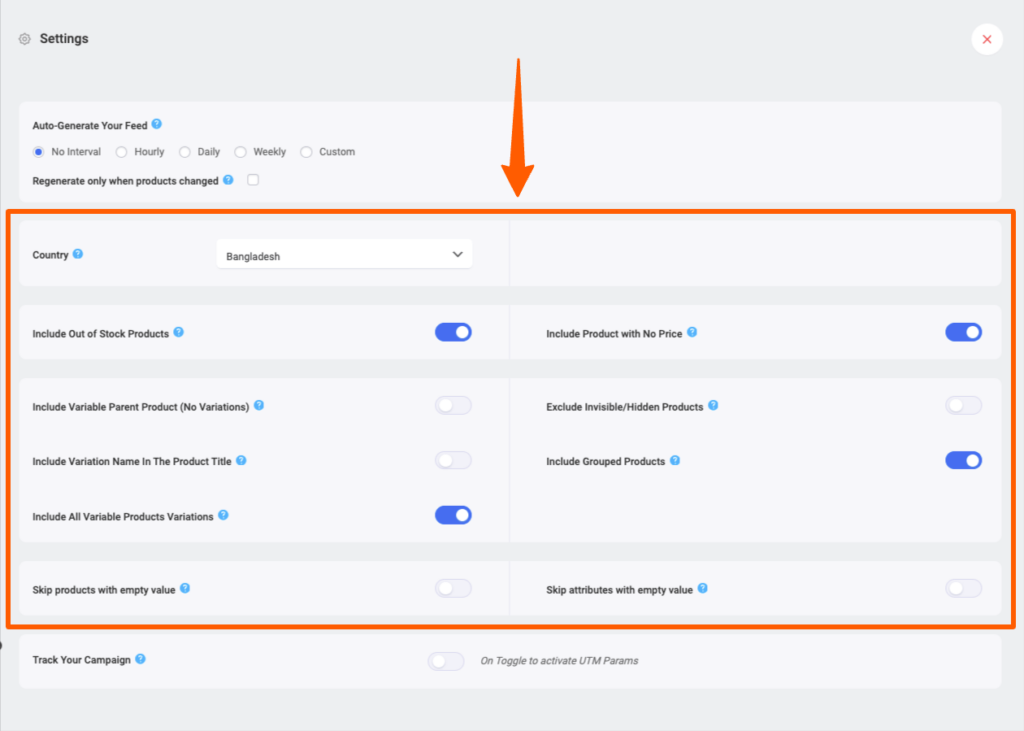
- Selecteer land/regio
- Selecteer een regio uit dit vervolgkeuzemenu als je de verzendgegevens in je feed wilt opnemen. Zodra je de regio hebt geselecteerd, moet je het kenmerk Verzenden aan je feed toevoegen om de waarden voor Verzenden te krijgen.
- U kunt dit document volgen om te leren hoe u de verzendinformatie in uw feed kunt opnemen.
- Inclusief uitverkochte producten
-Als je de uitverkochte producten wilt opnemen, kun je de optie inschakelen.
-Voor deze feed gebruiken we deze optie niet en houden we de waarde op "Nee". - Include Variable Parent Product (Without Variations)
-If you want to include the parent feed for variable products, then you can enable the option.
-Few merchants such as Google Shopping or Facebook don’t require you to submit parent products, however, there are many other merchants such as eBay MIP, that require you to submit product products in the feed.
-For this feed, let’s not use this option and keep its value as “No“. - Include All Variable Products Variations -
-Als je alleen eenvoudige producten wilt opnemen in de feed en geen variabele producten, houd de waarde dan op "No".
-Als je zowel eenvoudige producten als variabele producten wilt indienen bij Google Shopping, houd de waarde dan op "Yes".
-Laten we deze functie gebruiken en markeren als "Yes", voor deze feed. - Include Variation Name In The Product Title
-Few merchants such as Google Shopping, suggest you add the variation term to the Product name in case you are uploading variable products, however, it is completely optional.
-So if you want to include the variant terms to the variable product names, then you can set its value as “Yes“.
-Let’s use this feature, and mark it as “Yes“, for this feed. - Inclusief gegroepeerde producten
-Als u gegroepeerde producten hebt, dan kunt u het beste het bovenliggende product van het gegroepeerde product dat u hebt gemaakt indienen.
-Dus moet u deze optie aanvinken met "Ja". - Exclude Invisible/Hidden Products
-You might have certain products on your store that are marked as hidden or invisible on WooCommerce.
-If you want to generate feed for Simple products only, then you can mark this option as “Yes” to exclude invisible products from the feed.
-However, product variants are by default marked as Invisible on WooCommerce. So if you include variable products to the feed, then you should mark this as “No“.
-Since in this feed we are including product variants, we will not use this feature and keep it as “No“. - Elk attribuut overslaan als de waarde leeg is
-Inschakelen van deze functie sluit alle attributen van een product uit als de waarde van het attribuut ontbreekt.
-Voor deze feed zullen we deze optie niet gebruiken en de waarde ervan op "Nee" houden.
5. U vindt dan een optie om Track Your Campaign (Analytics parameters) toe te voegen.
Use this option if you wish to add analytics parameters to product links on your product feed so that you can keep track of the products’ performance on Google Merchant Center.
6. Now, close the drawer and click on the Product Filter option. A new drawer will slide in from the right side of the window.
7. Click on the dropdown, and You will get the following options:

Choose the Products you want to include in the feed.
You may choose to include All Published Products in your store, or you may use one of the three filter options, Custom Filter, Category Filter, and Tag Filter, to include the products you require (or exclude the ones you do not want to include).
For a basic feed, you can keep it the same.
Step 3: Publish WooCommerce Product Feed For Google Dynamic Search Ads #
Now, that you’ve configured your feed, it is time to publish the feed.
Click on the Publish button on the right.
Click on the Publish button and your feed will start generating.
Zodra het genereren van uw feed voltooid is, kunt u de feed bekijken of downloaden.
That’s it. Your WooCommerce XML product feed for Google Dynamic Search Ads is generated.
You can now send this feed to Google Merchant Center through the Content API method, which is a bit complicated process. Or, you can download and upload this file to your merchant account manually and list your products on Google Merchant Center.