Springen zu Inhalt
RexTheme
  • Erweiterungen
    • WP VR
      WP VR – Qualitative WP-Virtueltour-CreatorErstelle beeindruckende virtuelle Touren einfach selbst mit 360-Bildern.
    • Product Feed Manager
      Produktfeed-Manager für WooCommerceMaximiere Verkäufe mit den größten Marktplätzen.
    • Cart Lift
      Wagenheber für verlassene WarenkörbeErhöhe die Rückgewinnung abgelegener Warenkörbe für deinen WooCommerce-Shop einfach.
    • Checkoutify
      Checkoutify Checkout Feldverwaltung für WooCommerceDer Ultimate WooCommerce Checkout-Customizer.
    • Catalog Mode for WooCommerce
      Katalog-Modus für WooCommerceWandeleinen WooCommerce-Shop zu einem Produktansichtskatalog.
    • Dynamic Discount
      Dynamischer Rabatt für WooCommerceSteig deinen AOV signifikant mit personalisierten dynamischen Rabatten.
    • Advanced Shipping Logo
      Erweiterte Versandfunktion für WooCommerceSet bedingte Versandbedingungen und steigere Kund Zufriedenheit.
    • Marketplace Auto-sync for WooCommerce
      Marktplatz-Auto-Sync für WooCommerce – Automatisiere dein GeschäftswachstumAuto-Sync Produkte mit führenden Marketplätzen.
    • Anzeigen aller Plugins
  • Verkaufe Kit-Bundle
  • Blog
  • Ressourcen
    • Dokumente
    • Unterstützung
    • Markenassets
  • Mein Konto
    • Anmelden
  • English
  • Dutch

Wie können wir Ihnen helfen?

Dokumentation

Kartrahmen

18
  • Anfangnehmen
    • Einführung in den Kartrifler
    • Installieren und aktivieren Sie den Warenlifter.
    • Ein grundlegendes Plugin-Überblick – Cart Lift
    • Konfigurieren und den Warenlift effektiv nutzen
  • Auftragsauswertung häufiger Probleme
    • Fehlerbehebung für häufige Probleme – Warenkar-Lift
  • Erhöhe Dich zu Cart Lift Pro
    • Wie man auf Pro Upgradet – Cart Lift
    • Upgradeleitfaden für Cart Lift Pro-Lizenzplan
  • Abandonierter Warenkorb-Wiederherstellungsbedingungen
    • Wie man verlassene Warenkörbe automatisch verfolgt
    • Wie Sie Ihren Warenkorb-Retrieval-Bereich einrichten
    • Wie man das Twilio-SMS-Service für den Warenkorb-Retrieval-Prozess bei Cart Lift Pro einsetzt – Cart Lift Pro
    • Wie Sie Benachrichtigungen für verlassene Wägen und Wiederherstellung erhalten
    • Erhalte die vollständige Analytik-Report über den Wiederherstellungs-Campagnen
    • Shortcodes für E-Mail-Felder im Cart Lift
    • Wie man einzelne Warenkorb-Rückerholungen pausieren/Wiederherstellen kann
    • Wie man eine Bedingung setzt, um verlassene Bestellungen nach einer bestimmten Anzahl an Tagen automatisch zu löschen
    • Wie man Bedingungen setzt, um Warenkästen aus Abandoned Cart-Retrieval-Kampagnen auszuschließen
    • Wie Konfigurieren Sie den Popup-Editor
    • Wie man reCAPTCHA V3-Einstellungen in Cart Lift konfiguriert

Produktfeed-Manager

118
  • Anleitung anfangen
    • Einführung des Produktfeed-Managers für WooCommerce
    • Einstieg mit dem Produktfeed-Manager für WooCommerce
    • Wie installieren und aktivieren Sie den Produktfeed-Manager
    • Wie Generieren Sie den Produktfeed zum ersten Mal
    • Produktfeed-Manager – Grundlegende Plugin-Einführung
    • Alle unterstützten Plugins & Integrationen mit Product Feed Manager für WooCommerce
  • Erhöhen Sie zu PFM Pro
    • Neuer Lizenzvertrag für Product Feed Manager Pro
    • Produktfeed-Manager UST/LST-Politik
    • Upgrade-Anleitung für Product Feed Manager Pro-Lizenzplan
  • Upload Feed an Mercharnten
    • Wie hochzuladen deine Produktfeed auf dem Facebook Store
    • Lade Ihren WooComerce-Produktfeed direkt in den Google Merchant Center hoch — (Keine Authentifizierung notwendig)
    • Wie man Produkte seines Shops automatisch mit Google Merchant Center synchronisiert über den Content API
    • Wie man Produktfeeds automatisch auf Google Merchant Center synchronisiert
  • Anweisungen zur Erzeugung von Feed
    • Wie man einen Google-Shopping-Feed mit dem Produktfeed-Manager generiert
    • Wie generiert man einen WooCommerce-Produktfeed für Facebook
    • Wie man einen benutzerdefinierten Produktfeed einfach erstellt
    • Wie man ein Feed für eBay MIP erstellt
    • Wie man einen Target-Produktfeed für den Target-Marketplace erstellt
    • Wie man einen WooCommerce-Produktfeed für Wish.com erstellt
    • Wie man einen WooCommerce-Produktfeed für die Sears-Marktplatz erstellt
    • Wie man einen WooCommerce-Produktfeed für die NewEgg-Marktplatz erstellt
    • Wie man einen WooCommerce-Produktfeed für Walmart erstellt
    • Wie man einen WooCommerce-Produktfeed für den Instagram-Catalog erstellt
    • Wie hochgeladen werden Produkte auf Instagram Shop
    • Wie generiert man ein WooCommerce-Produktfeed für Amazon
    • Wie generiere ich ein WooCommerce-Produktfeed für Zbozi
    • Wie generiere ich ein WooCommerce-Produktfeed für Skroutz
    • Wie man ein Feed für die eBay Verkäuferzentrale erstellt
    • Wie generiere ich ein WooCommerce-Produktfeed für Rozekta
    • Wie generiert man ein WooCommerce-Produkt-Feed für Pinterest
    • Wie generieren Sie einen WooCommerce-Produktfeed für TikTok Ads Catalog
    • Wie generiert man ein WooCommerce-Produktfeed für OpenAI Commerce
    • Wie generiert man ein WooCommerce-Produktfeed für Yandex
  • Alle Google-Feeds
    • Wie man einen WooCommerce-Produktfeed für Google Remarketing (DRM) erstellt
    • Wie man einen WooCommerce-Produktfeed für Google Local Products erstellt
    • Wie man einen WooCommerce-Produktfeed für Google Local Products Inventory erstellt
    • Wie man einen WooCommerce-Produktfeed für Google Manufacturer Center erstellt
    • Wie man einen WooCommerce-Feed für Google Merchant Center Promotion mit dem Produktfeed-Manager erstellt
    • Wie man einen WooCommerce-Produktfeed für Google Shopping Actions erstellt
    • Wie man einen WooCommerce-Produktfeed für Google Dynamic Display Ads (Google Ads) erstellt
    • Wie man einen WooCommerce-Produktfeed für Google Express (ehemaliges Google Shopping Actions Programm) erstellt
    • Wie man einen WooCommerce-Produktfeed für Google Local Inventory Ads erstellt
    • Wie man einen WooCommerce-Produktfeed für Google Custom Search Ads erstellt
    • Wie man einen WooCommerce-Produktfeed für Google Dynamic Search Ads erstellt
    • Wie man einen WooCommerce-Produktfeed für Google Reviews erstellt
  • Kategorienzuordnung
    • Wie man Kategorien für Produktfeeds zuweist
    • Wie man Kategoriezuordnung für Google Produktkategorien verwendet
    • Wie Konfigurieren Sie Kategorienmapping für Facebook Produktkategorie
  • Verstehen von Futtermittelattributen
    • Füge benutzerdefinierte Felder für wichtige Produktattribute hinzu
    • Wie man einen statischen Präfix oder Suffix zu einem Attribut im Feed hinzufügt
    • Wie man ein benutzerdefiniertes Attribut zum Feed hinzufügt
    • Wie man ein zusätzlicheres Produktattribut im Feed hinzufügt oder entfernt
    • Wie man WooCommerce-Versandwerte in deinen Feed einbezieht (Außer bei Google und Facebook)
    • Preisattribut-Zuordnung und Verständnis verschiedener Anwendungsfälle
    • Verstehen und Konfigurieren von Feed-Attributen und deren Werten
    • Wie man Währung zu Produktpreisen hinzufügt
    • Wie man mehrere Attributwerte mit der Kombinierten Attribute-Funktion kombiniert
  • Verstehen der grundlegenden Speistkonfiguration
    • Produktfeed-Optimierung mit Yoast SEO Produkttitel, Metadescription und Primärkategorie
    • Wie man den Automatik-Update-Vorgang auf festen Intervallen planen kann
    • Lernen Sie Feed-Dateitypen und das Herunterladen/Aufzeigen von Feed kennen.
    • Wie man UTM-Parameter zu Produkt-URLs hinzufügt
    • Optimiere Produktfeed-Daten mit effektiven Ausgabefiltern
    • Wie verwenden Sie RankMath Primärrubrik im Feed
    • Wie man Versandwerte in den WooCommerce-Produktfeed (Google & Facebook) einbezieht
    • Wie du Steuermwerte in deinen WooCommerce-Produktfeed (Google & Facebook) einbeziehst
    • Wie Man HTML-Tags Oder Shortcodes Aus Einer Feed-Quelle Entfernt
    • Wie man UTF-8-Encode verwendet, um HTMLEntitäten in einem Feed-Attribut-Wert in Symbole umzumwandeln
    • Wie man Symbole in HTMLEntitäten in einem Feed-Attribut-Wert konvertiert
    • Wie man CDATA in einem XML-Feed-Attributtag einbindet
    • Wie Entfernt Dezimalstellen Von Preisen Für Marktplaats-Feed
    • Wie ersetzt man Leerzeichen mit Bindestrichen in einem Feed-Attribut-Datenfeld
    • Wie man eine benutzerdefinierte Feldwert im Produktfeed verwendet
    • Wie man die Hauptkategorie von Yoast im Feed verwendet
    • Wie Exkludiere Ich Entwurfsprodukte Aus Dem Feed
    • Wie man WooCommerce's GTIN, UPC, EAN oder ISBN im Produktfeed hinzufügt
    • Verstehen der Grundlagen der Feed-Einstellungen
  • Feed-Filtern: Hilfe zur Anpassung des Flusses
    • Wie Exkludiere Invisible Produkte/Versteckte Produkte aus dem Produktfeed
    • Wie man Kategorie-Filter bei der Produktfeed-Generierung verwendet
    • Wie man den Tag-Filter bei der Produktfeed-Generierung verwendet
    • Wie man Filteroptionen bei der Feed-Generierung verwendet
    • Wie man Variable-Produkte in den Feed einbezieht
    • Wie man Private-Produkte in den Produktfeed einbezieht
    • Wie man Produkt-Variationstermine in den Produktnamen einfügt
    • Wie verwenden Sie benutzerdefinierte Filter throughout Product Feed Generation
    • Wie man die Produkt-Filteroption verwendet, um spezifische Produkte einzubeziehen/exkludieren
    • Wie man den Marken-Filter bei der Produktfeed-Generierung verwendet
    • Best-Verkauftes: Erstelle ein WooCommerce-Produktfeed, um Verkaufszahlen zu steigern
  • Feedregeln: Hilfe zur Änderung von Produktdata
    • Wie man das Feed Rule-Feature verwendet, um Attributwerte zu manipulieren
    • Wie man die Feed Rules-Funktion nutzt, um den Produktpreis zu manipulieren
  • Validierung des Feeds
    • Feed Validator für Google Shopping
    • Feed-Validator für Facebook-Catalog
    • Feed Validator für Pinterest Produktkatalog
    • Feed Validator für TikTok Ads Catalog
    • Feed Validator für OpenAI Commerce Feed
  • Nützliche Kontrolloptionen
    • Füge ausführliche benutzerdefinierte Felder für eindeutige Identifikatoren für WooCommerce-Produkte hinzu
    • Wie man erweiterte benutzerdefinierte Felder zu WooCommerce-Produkten hinzufügt
    • Wie Exkludiere Steuern aus Strukturierten-Daten-Preisen
    • Wie planst du Feed-Updates basierend auf Produktdatenänderungen?
    • Wie man benutzerdefinierte Zeitintervalle für automatische Aktualisierungen einstellt
    • Nützliche Optionen im Einstellungen-Fach
    • Steuerung von Produkten pro Batch im Batchverarbeitungsprozess
    • Verbinden Facebook Pixel mit WooCommerce für dynamische Anzeigen
    • Wie setze ich 5-Minuten-Intervall für die Aktualisierung des Feeds?
  • PFM-Plugin-Integrationen
    • Wie man den Brand-Wert von Perfect Brands für WooCommerce im Feed einbezieht
    • Aktiviere Fehlernachrichtenlog für Product Feed Manager für WooCommerce
    • Wie man Produktfeed-Preise mit WPML/WCML konvertiert
    • Wie generiere ich ein Produktfeed in mehreren Sprachen mit Polylang
    • Wie man mit WPML Produktfeeds in mehreren Sprachen generiert
    • Wie man Rabattregeln im Feed mit Discount Rules for WooCommerce und PFM einbezieht
    • Wie Man Ein Mehrsprachiges Produktfeed Generiert | PFM + TranslatePress
  • Optimiere JSON-LD für variable Produkte
    • Bewerte WooCommerce (JSON-LD)-Strukturierte Daten für Google Shopping
  • Problembeheben
    • Produkt fehlt im Facebook Commerce Manager – Facebook & Instagram
    • Google Shopping-Produktfeed-Spezifikation – Attributensatz
    • Störfallbehandlung häufiger Probleme – Produktfeed-Manager für WooCommerce
    • Wie beheben Sie Fehleingaben im Produktfeed-Manager?

WP VR

84
  • Getting Started
    • Einstieg in WP VR
    • Wie installieren und aktivieren Sie WP VR?
    • Wie man eine einfache virtuelle Tour in 2 Minuten erstellt – WP VR
    • Überblick zum WP VR Basic Plugin
  • Erhöhen Sie zu WPVR Pro
    • Wie man zu Pro upgradet – WP VR
    • Leitfaden zur Lizenzverlängerung für WP VR Pro
    • WP VR UST/JM-Richtlinie
    • Upgradeleitfaden für WP VR Pro-Lizenzplan
  • WPVR Premium-Add-Ons
    • Wie man Fluent Forms in einer virtuellen Tour integriert
    • Wie Man WooCommerce In Eine Virtuelle Tour Einbindet
    • Wie Man Virtuelle Touren Auf Nicht-WordPress-Webseiten Einbetten Kann
    • WP VR Embed Addon – Funktionsübersicht
  • Wie - Grund-Einstellungen
    • Wie man exklusive Funktionen im Einstellungen-Tab für die Anpassung einer virtuellen Tour verwendet
    • How To Add A Preview Image To Your Virtual Tour – WPVR
    • How to Enable Auto Rotation For Your 360 Virtual Tour – WP VR
    • How to Customize the Tour Layout
  • Setting Up Control Buttons
    • Using Custom Icons For Navigation And Control Buttons In A Virtual Tour
    • How to Share Virtual Tours on Social Media
    • How To Configure A Call To Action (CTA) Button in Virtual Tour
  • Turn Panorama Images Into Live Scenes
    • How To Add A Scene To Your Virtual Tour
    • How To Set Default Scene Face On A Virtual Tour
    • How to Set 360 Image Grab Limit On A Scene in Your Virtual Tour – WPVR
    • How To Use Scene Settings To Customize A Scene
  • Use Hotspots for Navigation & Information
    • How To Add Hotspots To A Scene In Your Virtual Tour
    • How To Use Hotspots To Show Information, Images Or Videos
    • How To Use Hotspots To Go From One Scene To Another
    • How To Customize Hotspot Icons And Color
    • Embed A Self Hosted Video on WPVR Hotspots
    • How To Embed Youtube Videos Inside Virtual Tours Using WPVR
    • How To Set Hotspot Content Easily Inside Virtual Tour – Using WYSIWYG HTML Editor
    • How to use the Custom Icon Class
  • Create 360 Degree Video Tours
    • How To Embed A Youtube 360 Video On Your Website Using WPVR
    • How To Create A Virtual Tour Using Self Hosted 360 Degree Interactive Video with WPVR
  • Embed Google Street Views
    • How To Embed A Google Street View Tour On Your Website Using WPVR
  • Partial Panorama & Full View Virtual Tours
    • How To Create A Virtual Tour With Partial Panoramas or iPhone Panoramas
    • How To Create A Virtual Tour With Mobile Phone Panorama Images
    • How To Create Full Screen Virtual Tours – WPVR
    • How To Set A 360 Panorama Background Virtual Tour
  • Publish Virtual Tours on Your Website
    • How To use a WPVR Shortcode to Embed a Virtual Tour
    • How to Set Up Password Protection For Your 360 Virtual Tour – WP VR
    • How to Publish Virtual Tours Using QR Code
  • Import, Export, & Duplicate Virtual Tours
    • How To Duplicate A Virtual Tour
    • How To Export And Import Virtual Tours
  • Troubleshooting - Solve Common Issues
    • Troubleshooting Common Issues – WPVR
    • How To Solve Virtual Tour Not Showing Up – WPVR
    • How To Exclude Assets of WPVR From Autoptimize
    • How To Manage Your WPVR User Account Settings & Subscription Plan
    • WP VR Tour Not Displaying on Review and On the Published Webpage
    • WP VR Troubleshooting Guide: Embedding 360 Tours on External Platforms
  • Optimize Virtual Tour for Mobile Devices
    • How To Set A Dynamic Front End Notice On Virtual Tours For Mobile Phone Viewers
    • How To Auto Resize Images On Mobile Devices for Virtual Tours
    • How To Set Custom Height for Mobile Devices to Your Virtual Tours
  • Demo Virtual Tours
    • Basic Virtual Tour
    • Google Street View Tour – WPVR Pro
    • Video Tutorials – WPVR
    • Demo Partial Panorama Virtual Tour – WPVR Pro
    • Bar/Pub Showcase
  • Advanced Settings for Virtual Tours
    • How To Set Up WPVR Exclusive Settings
    • Control Script And Style Loading For The Virtual Tours
    • How To Disable WordPress Large Image Handler For Virtual Tours
    • How To Enable Gyroscope Sensor On 360 Virtual Tours
    • How To Add Background Music To Virtual Tours
    • How To Limit Keyboard Controls For Navigation And Zoom
    • How To Limit The Use Of Mouse Scroll To Zoom Or Drag To Move A Tour
    • How to Add A Virtual Tour Icon or Your Company Logo in 360 Degree Tours – WPVR
    • How To Set YouTube Explainer Videos Inside Virtual Tours 
    • How To Enable The Support for VR Headset for Phones
    • How To Set Individual Hotspot Icon Color and Animation In Panorama Images
    • How To Set Virtual Floor Plans Inside Your Tours – WPVR
    • How to do SEO optimization for Embeded tour
    • How To Set Scene Transition (Scene Entrance Animation)
    • How to Set Custom Zoom Settings in WPVR
    • WP VR Analytics: How to Track and Analyze Your Virtual Tours
    • How To Set Up A Scene Gallery On Virtual Tours
  • WP VR Plugin Integrations
    • How To Embed A Virtual Tour Using WPVR Gutenberg Block
    • How To Embed A Virtual Tour Using WPVR Elementor Widget
    • How To Use WP VR Oxygen Element To Embed A Virtual Tour
    • WP VR & Dokan Integration: Empower Vendors to Create 360° Virtual Tours
    • How To Embed A Virtual Tour Using WPBakery Element
    • How To Publish A Virtual Tour Using WPVR Panorama Module for Divi
    • How To Embed WPVR Virtual Tours Using Visual Composer Element

Dynamic Discounts for WooCommerce

18
  • Getting Started
    • How To Install & Activate the Dynamic Discounts for WooCommerce
    • How To Create A Discount Rule For The First Time
    • Basic Plugin Overview – Dynamic Discounts for WooCommerce
  • Discount Conditions
    • How To Set Product Based Discount
    • How To Set Cart Based Discount
    • How to Set Discount Conditions for Bulk Purchases in WooCommerce
    • How To Set Discount Conditions Based on Customer Purchase History
    • How To Set Discount Conditions For Product Variations
    • How To Apply discount To The cheapest product In The Cart
    • How to Set Discount Based On Category and Tag
    • How To Set Buy X Get Y Discount
    • How To Set Stock-Based Discount
    • How To Set A Bundle Discount
    • How To Set Buy X Get X Discount
    • How To Apply Discount To Nth Quantity
    • How To Set The Cheapest Product On Cart Discount
    • How To Set “Offer One Or More Free Products” Discount
    • How to Set Attribute Specific Discount For Product Variants

Checkoutify

5
  • Getting Started
    • How To Install & Activate Checkoutify Pro – Checkout Customizer
    • How to Replace Your WooCommerce Checkout Using Checkoutify – Checkout Customizer
    • How To Create and Customise an Order Bump
    • How to Create a Custom Field in Checkoutify
  • Customizing Checkout
    • Creating a Multi-Step Checkout Using Checkoutify – Checkout Customizer

Advanced Shipping for WooCommerce

18
  • Getting Started
    • How To Install & Activate The Advanced Shipping For WooCommerce
    • Basic Plugin Overview – Advanced Shipping For WooCommerce
    • How To Add Advanced Shipping To An Existing Shipping Zone
    • How to Set Shipping Conditions For The First Time Using Advanced Shipping
  • Shipping Conditions
    • How To Set Product-Specific Shipping Conditions
    • How To Set Category-Based Shipping Conditions
    • How To Set Shipping Conditions Based On WooCommerce Product Tag
    • How To Set Shipping Conditions Based On WooCommerce User Role
    • How To Set Shipping Conditions Based on Product’s Weight, Volume, Length, Height, and Width
    • How to Add Price Based Shipping Conditions in Advanced Shipping
    • How to Add Weight Based Shipping Conditions in Advanced Shipping
    • Quantity Based Shipping Conditions: Easy Steps to Set Them Up in WooCommerce
    • How to Set Time and Day Based Shipping Conditions in Advanced Shipping
    • How to Set Country Based Shipping Conditions in Advanced Shipping
    • How to Set City Based Shipping Conditions in Advanced Shipping
    • How to Set State Based Shipping Conditions in Advanced Shipping
    • How to Set ZIP Code Based Shipping Conditions in Advanced Shipping
    • How to Set Zone Based Shipping Conditions in Advanced Shipping

Catalog Mode for WooCommerce

7
  • Getting Started
    • How To Install & Activate the Catalog Mode for WooCommerce
    • Basic Plugin Overview – Catalog Mode For WooCommerce
  • Settings
    • How To Set Users Rules For Catalog Mode
    • How To Configure Catalog Mode Options
    • How to Manage the Exclusion List in Catalog Mode
    • How To Configure the Inquiry Form in Catalog Mode
    • How to Create and Manage Custom Buttons and Labels

Marketplace Auto-Sync for WooCommerce

4
  • Getting Started
    • How To Install & Activate Marketplace Auto Sync
    • Basic Plugin Overview – Marketplace Auto Sync
    • How To Set Up an Auto Sync For The First Time
    • How To Auto-sync with Google Merchant Center
  • Home
  • Docs
  • WP VR
  • WP VR Plugin Integrations
View Categories

How To Embed A Virtual Tour Using WPVR Elementor Widget

If you’re building stunning pages with Elementor page builder, embedding immersive 360° virtual tours is seamless thanks to the dedicated WP VR Elementor widget. WP VR – the leading free and Pro 360 panorama and virtual tour plugin for WordPress – integrates perfectly with Elementor, allowing you to add interactive tours to any section without coding.

This method is ideal for real estate websites, travel blogs, hotel showcases, or e-commerce product views. Embedding WP VR virtual tours via Elementor enhances user engagement, increases dwell time, and boosts SEO through rich interactive content.

Why Use the WP VR Elementor Widget to Embed Virtual Tours? #

  • Drag-and-Drop Simplicity: No shortcodes needed – just search and drop the widget.
  • Full Customization: Easily control width, height, radius, and responsiveness.
  • Mobile-Responsive: Tours adapt perfectly to all devices.
  • SEO-Friendly: Interactive 360° elements improve on-page time and user experience signals.
  • Compatible with Free & Pro: Works with both versions of WP VR.

Once you create a virtual tour, follow the steps below to embed a virtual tour using WPVR Elementor Widget.

1. After creating the tour, remember the Tour ID.

Remember Tour ID

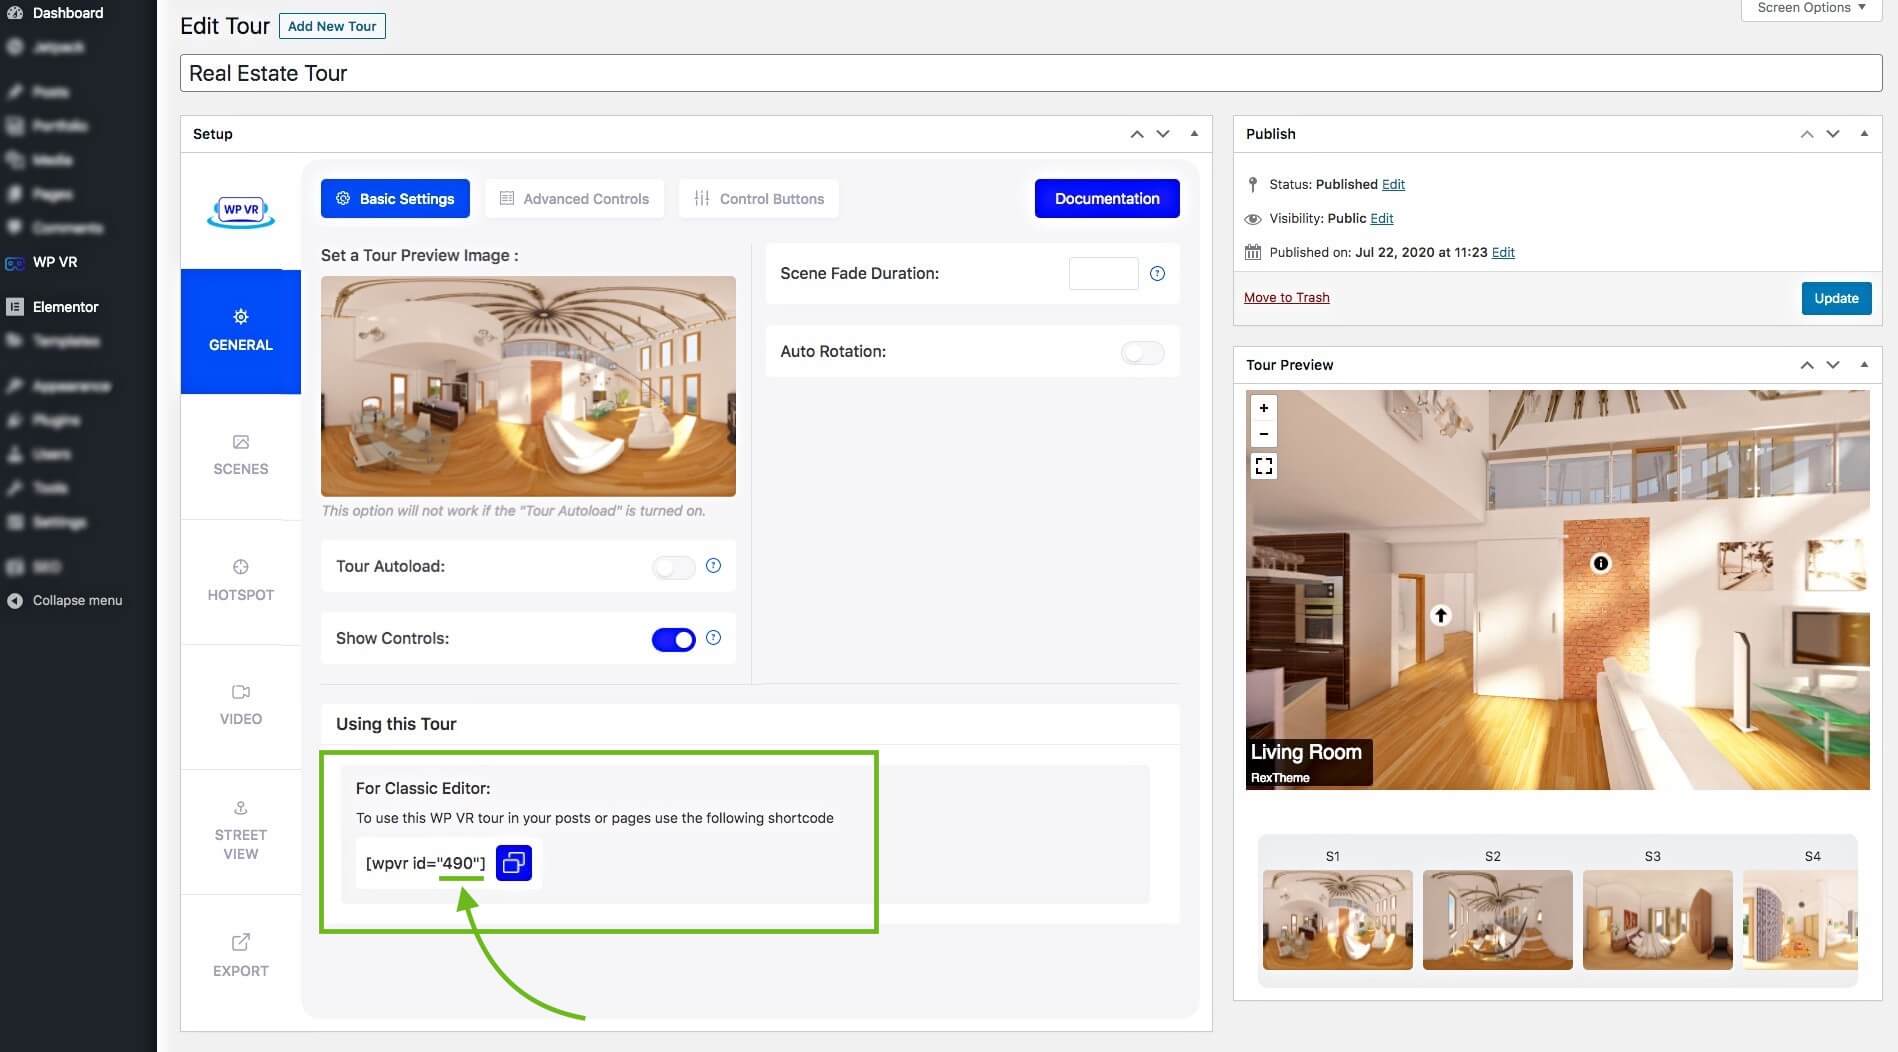
**You can also collect it from the Dashboard > WPVR > Tours.

2. Edit the page/post using Elementor Page Builder, where you want to embed this virtual tour.

3. On the widget area of Elemenor, search for the WPVR widget.

WPVR Elementor Widget

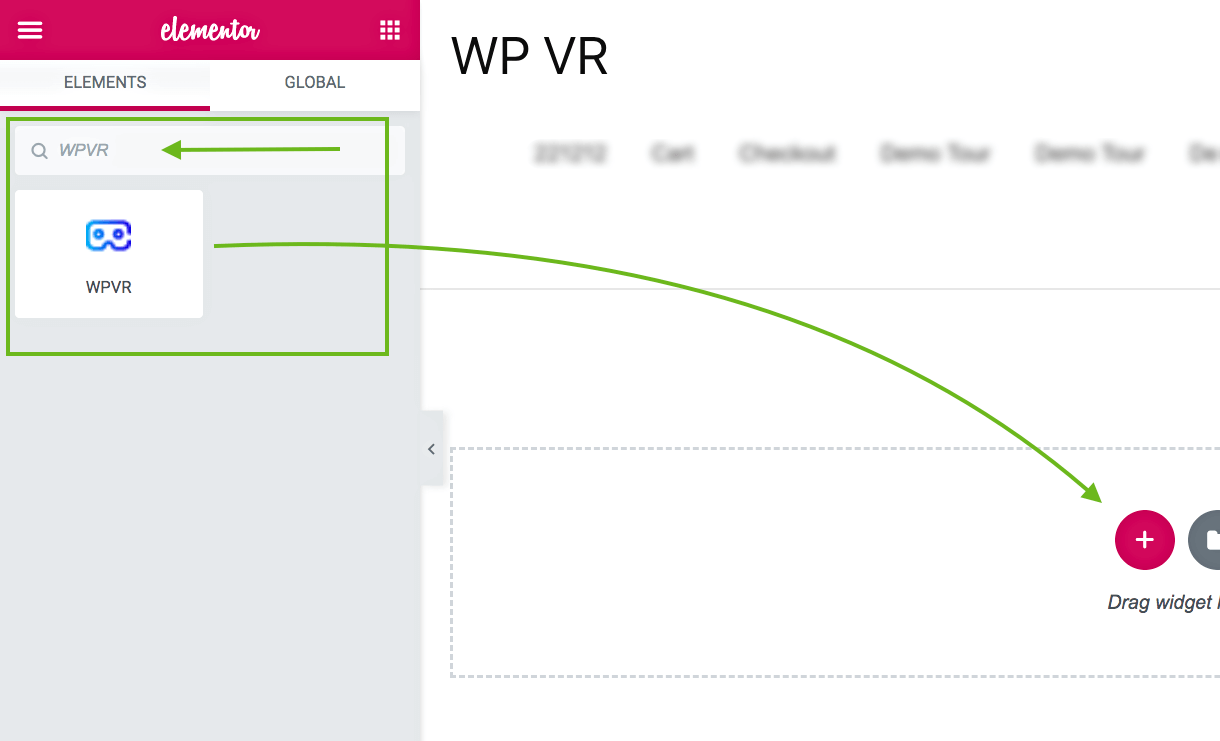
4. Drag-and-drop the WPVR widget to whichever section you want.

WPVR Elementor widget added

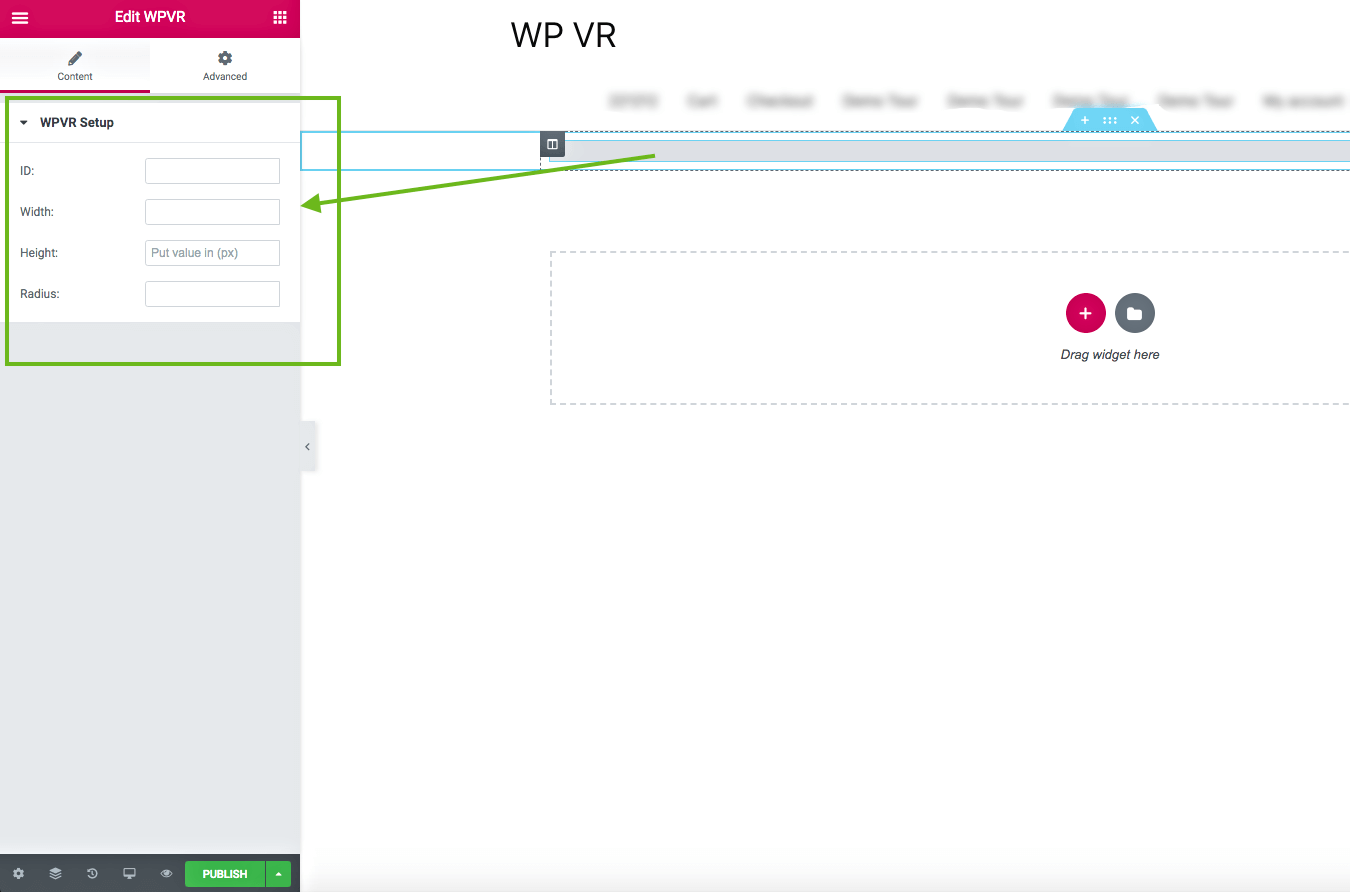
It will add the widget and you will be required to provide “Id”, “Width”, “Height”, and “Radius”.

  • Id –
    – Insert the Id of your desired WPVR tour that you wish to embed.
    – Do not input the Tour name.
  • Width –
    – Assign a positive numeric pixel value. For example: 600px.
    – Or, you can use a percentage that will take the percentage width of the container of the page. Example: 90%.
    – If you wish the tour to be full-width of the whole page, then input the text “100vw”.
  • Height –
    – Only assign a positive numeric pixel value. For example – 400px
    – Do not use percentage or any text
  • Radius –
    – Assign a positive numeric pixel value. For example – 10px
    – Or you can use a percentage. For example – 10%

5. Once you provide the required data, you will get a preview of the tour on your web page.

Elementor - tour preview

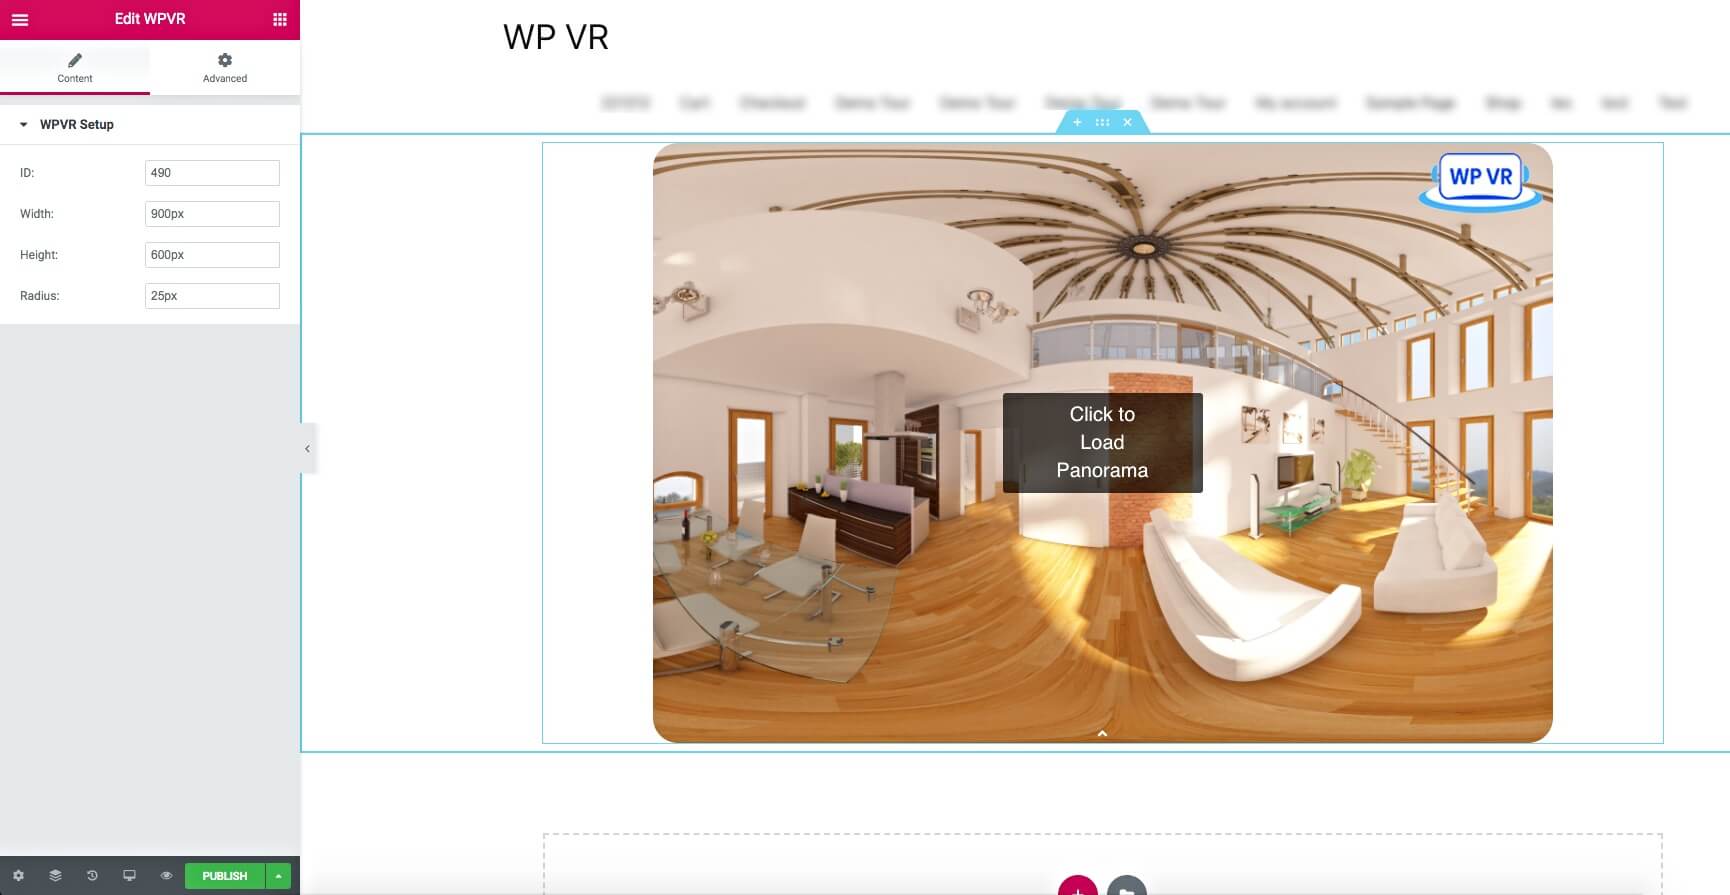
6. Now, you can preview or publish the page, and you will see that a virtual tour has embedded on your site.

Pro Tips for Embedding WP VR Tours in Elementor #

  • For hero sections: Use 100vw width + fixed height (e.g., 600px) and zero radius.
  • Add mobile-specific height (Pro feature) via advanced options if needed.
  • Combine with Elementor sections, backgrounds, or animations for stunning layouts.
  • Test on mobile devices for perfect responsiveness.

The WP VR Elementor widget makes adding professional 360 virtual tours effortless – elevate your WordPress site today!

More WP VR Tutorials:

  • Embed with Gutenberg Block
  • Create Your First Virtual Tour
  • Custom Mobile Optimization

Still stuck? How can we help?

How can we help?

Updated on January 8, 2026
Table of Contents
  • Why Use the WP VR Elementor Widget to Embed Virtual Tours?
  • Pro Tips for Embedding WP VR Tours in Elementor
RexTheme

Stay updated with our latest releases and useful guides.

By subscribing RexTheme you agree to Privacy Policy.

Products

  • WP VR
  • Product Feed Manager
  • Cart Lift
  • Checkoutify
  • Dynamic Discount
  • Advanced Shipping
  • Catalog Mode
  • Marketplace Auto-sync

Resources

  • Terms of Service
  • Privacy Policy
  • Refund Policy
  • Affiliate Policy
  • Support Policy
  • Bug Bounty Program

Company

  • About Us
  • Blog
  • Documentations
  • Changelog
  • Affiliate Program
  • Brand Assets
  • Contact Us

Copyright © 2013 - RexTheme