Christmas
TwentyFive
Get 25% Discount
Zum Inhalt springen
RexThema
  • Startseite
  • Plugins
    • WP VR
    • Produkt-Feed
    • Wagenheber
  • Dokumente
  • Unterstützung
  • Blog
  • Konto
    • Anmelden
  • Kontakt
  • EN
  • NL

Wagenheber

  • Introduction To Cart Lift
  • Getting Started With Cart Lift
  • Install And Activate Cart Lift
  • A Basic Plugin Overview – Cart Lift
  • Configure And Use Cart Lift Effectively
  • How To Track Abandoned Carts Automatically
  • How To Set Up Your Abandoned Cart Recovery Campaign
  • How To Use Twilio SMS Service To Recover Abandoned Carts – Cart Lift Pro
  • How To Get Notifications For Abandoned Carts And Recovery
  • Get Full Analytics Report On Recovery Campaign
  • Shortcodes for Email Fields in Cart Lift
  • How To Upgrade To Pro – Cart Lift
  • Troubleshooting For Common Issues – Cart Lift

Produkt-Feed-Manager

  • Product Feed Manager – Documentation
Getting Started
  • Introduction To Product Feed Manager For WooCommerce
  • Getting Started With Product Feed Manager For WooCommerce
  • How To Install And Activate PFM
  • How To Generate Product Feed For The First Time
  • Basic Plugin Overview – Product Feed Manager Pro WooCommerce
  • How To Generate A Custom Product Feed Easily
Upgrade To PFM Pro
  • How to Upgrade to Pro – PFM
Auto-Sync To Google Shopping
  • How To Auto-sync Product Feed To Google Merchant Center
  • Upload your WooComerce product feed directly to the Google Merchant Center – (No Need For Authorization)
Kategorie-Zuordnung
  • How To Use Category Mapping For Product Feed
  • How To Use Category Mapping For Google Product Category
  • How To Configure Category Mapping For Facebook Product Category
Feed Generation Instructions
  • How to generate WooCommerce Product Feed for Google
  • How to generate WooCommerce Product Feed for Facebook
  • How to Upload your WooCommerce Products on the Facebook Store
  • How to create a feed for eBay MIP
  • How to create a Target Product feed for Target Marketplace
  • How to create a WooCommerce product feed for Wish.com
  • How to create a WooCommerce product feed for Sears Marketplace
  • How to create a WooCommerce product feed for NewEgg Marketplace
  • How to create a WooCommerce product feed for Walmart
  • How to create a WooCommerce product feed for Instagram Catalog
  • How to upload products on Instagram Shop
Understanding Basic Feed Configuration For Required Attributes
  • Product Feed Optimization with Yoast SEO Product Title, Meta Description and Primary Category
  • How To Add A Static Prefix or Suffix To An Attribute In The Feed
  • How To Add A Custom Attribute To The Feed
  • How To Add Or Remove An Additional Product Attribute In The Feed
  • Learning About Feed File Types And How To Download Or View Feed
  • Optimize Product Feed Data With Effective Output Filters
  • Understanding And Configuring Feed Attributes and their values
  • How To Remove HTML Tags Or Shortcodes From A Feed
  • How To Use UTF-8 Encode To Convert HTMLEntities To Symbols In A Feed Attribute Value
  • How To Convert Symbols To HTMLEntities In A Feed Attribute Value
  • How To Include CDATA In An XML Feed Attribute Tag
  • How To Remove Decimal From Price For Marktplaats Feed
  • How To Replace Space With Hyphen In A Feed Attribute Data
  • How To Use A Custom Field Value In The Product Feed
  • How To Add Currency To Your Product Price
  • How To Use Yoast Primary Category In The Feed
  • How To Use RankMath Primary Category In The Feed
  • Useful Options On The Controls Tab
  • Understanding The Use of Different Price Attributes
Useful Control Options
  • Useful Options On Settings Tab
  • Produkte pro Charge bei der Chargenverarbeitung kontrollieren
  • Verbinden Sie Facebook-Pixel mit WooCommerce für dynamische Anzeigen
  • Add Extensive Custom Fields Of Unique Identifiers For WooCommerce Products
  • Add Custom Fields For Important Product Attributes
  • How To Add Extensive Custom Fields To WooCommerce Products
  • How To Exclude Tax From Structured Data Prices
Useful Features For Feed Generation
  • How To Exclude Invisible Products / Hidden Products From Product Feed
  • How To Use Custom Filter When Generating Product Feed
  • How To Use Category Filter When Generating Product Feed
  • How To Use Tag Filter When Generating Product Feed
  • How To Use Feed Filter Options When Generating Feed
  • How To Schedule Auto-update of Feed On Set Intervals
  • How To Include Variable Products To The Feed
  • How To Include Private Products In Product Feed
  • How To Include Product Variation Term To The Product Name
  • How To Add UTM Parameters To Product URLs
  • How to use the Feed Rule feature to manipulate attribute values
  • How to use the dynamic pricing feature to manipulate your product price
  • How to combine multiple attributes values together with the Combined Attributes feature
  • How to use the Product Filter option to include/ exclude specific products
  • How To Set Custom Time Intervals For Auto-Feed Update
Fix JSON-LD Structured Data For Variable Products
  • Fix WooCommerce (JSON-LD) Structured Data For Approval In Google Shopping
Others
  • How To Include Brand Name In The Feed Using Perfect Brands For WooCommerce And PFM
  • Enable Error Log for Product Feed Manager For WooCommerce
  • How To Generate Product Feed In Multiple Languages With WPML
  • How to schedule custom feed refresh interval with Product Feed Manager using WP Crontrol
  • How to include Shipping values into WooCommerce product feed (Google & Facebook)
  • How to include Tax values into your WooCommerce Product Feed (Google & Facebook)
  • How to generate a WooCommerce product feed with the top sold products to sell more
  • Update your feed only if any changes were made to any of your products
  • How to include WooCommerce Shipping values into your feed (Except Google & Facebook)
  • How to convert product feed price with WPML / WCML
  • How to generate product feed in multiple languages with Polylang
Troubleshoot
  • Troubleshooting Common Issues – Product Feed Manager For WooCommerce
  • Product Missing On Facebook Commerce Manager – Facebook & Instagram
  • Product Missing on Google Merchant Center/ Product Not uploaded
  • Google Shopping Product Feed Specification – Attributes List
Etsy Addon
  • Product Feed Manager for WooCommerce Etsy Integration – How to guide
All Google Feeds
  • How to create a WooCommerce product feed for Google Review
  • How to create a WooCommerce product feed for Google Remarketing (DRM)
  • How to create a WooCommerce product feed for Google Local Products
  • How to create a WooCommerce product feed for Google Local Products Inventory
  • How to create a WooCommerce product feed for Google Manufacturer Center
  • How to create a WooCommerce product feed for Google Merchant Center Promotion
  • How to create a WooCommerce product feed for Google Shopping Actions
  • How to create a WooCommerce product feed for Google Dynamic Display Ads (Google Ads)
  • How to create a WooCommerce product feed for Google Express (Former Google Shopping Actions Program)
  • How to create a WooCommerce product feed for Google Local Inventory Ads
  • How to create a WooCommerce product feed for Google Custom Search Ads
  • How to create a WooCommerce product feed for Google Dynamic Search Ads

VR Places Theme

  • How To Install And Activate VR Places Theme
  • How To Customize Global Settings for VR Places Theme

WP VR

  • Erste Schritte mit WP VR
Getting Started
  • Introduction To WP VR
  • Getting Started With WP VR
  • How To Install And Activate WP VR
  • How To Create A Simple Virtual Tour In 5 Minutes – WP VR
  • How to Embed A Virtual Tour And Customize It – WP VR
  • WP VR Basic Plugin Overview
Upgrade To WPVR Pro
  • How To Upgrade To Pro – WPVR
Using WPVR Premium Add-ons
  • How To Integrate Fluent Forms On A Virtual Tour
  • How To Integrate WooCommerce To A Virtual Tour
  • How To Embed Virtual Tours On Non-WordPress Websites
How To - Basic Settings
  • How To Use Exclusive Features On General Settings To Customize A Virtual Tour
  • How To Add A Preview Image To Your Virtual Tour – WPVR
  • How to Enable Auto Rotation For Your 360 Virtual Tour – WP VR
Using Advanced Settings
  • How To Enable Gyroscope Sensor On 360 Virtual Tours
  • How To Set Up A Scene Gallery On Virtual Tours
  • How To Add Background Music To Virtual Tours
  • How To Limit Keyboard Controls For Navigation And Zoom
  • How To Limit The Use Of Mouse Scroll To Zoom Or Drag To Move A Tour
  • How to Add A Virtual Tour Icon or Your Company Logo in 360 Degree Tours – WPVR
  • How To Set YouTube Explainer Videos Inside Virtual Tours 
  • How To Enable The Support for VR Headset for Phones
  • How To Set Individual Hotspot Icon Color and Animation In Panorama Images
  • How To Set Virtual Floor Plans Inside Your Tours – WPVR
Setting Up Control Buttons
  • Using Custom Icons For Navigation And Control Buttons In A Virtual Tour
  • How To Add A Home Button To Your Virtual Tour
Turn Panorama Images Into Live Scenes
  • How To Add A Scene To Your Virtual Tour
  • How To Use Scene Settings To Customize A Scene
  • Festlegen des Standard-Szenengesichts auf einer virtuellen Tour
  • How To Set Custom Zoom Settings On A Scene In Your Virtual Tour – WPVR
  • How to Set 360 Image Grab Limit On A Scene in Your Virtual Tour – WPVR
Use Hotspots for Navigation & Information
  • How To Add Hotspots To A Scene In Your Virtual Tour
  • How To Use Hotspots To Show Information, Images Or Videos
  • How To Use Hotspots To Go From One Scene To Another
  • How To Customize Hotspot Icons And Color
  • Embed A Self Hosted Video on WPVR Hotspots
  • How To Embed Youtube Videos Inside Virtual Tours Using WPVR
  • How To Set Hotspot Content Easily Inside Virtual Tour – Using WYSIWYG HTML Editor
Create 360 Degree Video Tours
  • How To Embed A Youtube 360 Video On Your Website Using WPVR
  • How To Create A Virtual Tour Using Self Hosted 360 Degree Interactive Video with WPVR
Embed Google Street Views
  • How To Embed A Google Street View Tour On Your Website Using WPVR
Partial Panorama & Full View Virtual Tours
  • How To Create A Virtual Tour With Partial Panoramas or iPhone Panoramas
  • How To Create A Virtual Tour With Mobile Phone Panorama Images
  • How To Create Full Screen Virtual Tours – WPVR
  • How To Set A 360 Panorama Background Virtual Tour
Publish Virtual Tours on Your Website
  • How To Embed A Virtual Tour Using WPVR Gutenberg Block
  • How To Embed A Virtual Tour Using WPVR Elementor Widget
  • How To Use WP VR Oxygen Element To Embed A Virtual Tour
  • How To use a WPVR Shortcode to Embed a Virtual Tour
  • How To Embed WPVR Virtual Tours Using Visual Composer Element
  • How To Publish A Virtual Tour Using WPVR Panorama Module for Divi
Import, Export, & Duplicate Virtual Tours
  • How To Export And Import Virtual Tours
  • How To Duplicate A Virtual Tour
Troubleshooting - Solve Common Issues
  • Wie man WPVR von der automatischen Optimierung ausschließt
  • Troubleshooting Common Issues – WPVR
  • How To Solve Virtual Tour Not Showing Up – WPVR
  • How To Exclude Assets of WPVR From Autoptimize
  • How To Manage Your WPVR User Account Settings & Subscription Plan
Optimize Virtual Tour for Mobile Devices
  • How To Set A Dynamic Front End Notice On Virtual Tours For Mobile Phone Viewers
  • How To Auto Resize Images On Mobile Devices for Virtual Tours
  • How To Set Custom Height for Mobile Devices to Your Virtual Tours
Demo Virtuelle Touren
  • Demo Virtuelle Touren
  • Einfache virtuelle Tour
  • Virtueller Rundgang - WPVR Pro
  • Demo-Tour - WPVR (kostenlos)
  • Galerie für benutzerdefinierte Szenen - WPVR
  • Benutzerdefinierte Steuerungssymbole - WPVR
  • Google Street View-Tour - WPVR Pro
  • Video-Anleitungen - WPVR
  • Demo Virtueller Rundgang mit Teil-Panorama - WPVR Pro
  • Bar/Pub Showcase
Advanced Settings for Virtual Tours
  • How To Set Up WPVR Exclusive Settings
  • Kontroll-Skript und das Laden von Stilen für die virtuellen Touren
  • How To Disable WordPress Large Image Handler For Virtual Tours
  • How to Control Video.js Loading for Virtual Tour Pages – WPVR

Deprecated Plugins

Medienspeicherung in der Wolke
  • Speicherung von WP-Medien in der Wolke
  • Erste Schritte - Medienspeicher in die Wolke
  • Installation und Aktivierung von Medien für Cloud Storage
  • Überblick über die Speicherung von WP-Medien im Cloud-Dashboard
  • Wie man Amazon S3 Bucket verbindet
  • Wie Sie Google Cloud Storage anschließen
  • Wie richte ich IAM-Benutzer für Amazon S3 Bucket ein?
  • Einrichten des Google Cloud Storage Bucket zur Bereitstellung von Mediendateien
  • Wie man DigitalOcean-Räume verbindet
  • How To Create An Amazon CloudFront Distribution
  • How To Create An Amazon CloudFront Origin Access Identity
  • Troubleshooting For Common Issues – Media Storage To Cloud
  • How To Create Free HTTPS Certificate On Amazon S3
Variation Farbfelder
  • Variation Swatches for WooCommerce – Getting Started
  • Variation Swatches For WooCommerce – Dashboard Overview
  • Variation Swatches For WooCommerce – Install And Activate
  • Change Dropdown to Button Swatches for WooCommerce Variations
  • How To Set Up WooCommerce Color Swatches For Color Variation
  • How To Set Up WooCommerce Image Swatches For Image Variation
  • How To Set Up Label Swatches For WooCommerce Product Variations
  • How To Customize Variation Swatch Hover Style
  • How To Customize Variation Swatches Global Style
  • How To Customize Variation Swatches Selected Style
  • Startseite
  • Dokumente
  • WP VR
  • Partial Panorama & Full View Virtual Tours

How To Create A Virtual Tour With Mobile Phone Panorama Images

Table of Contents
  • Step 1 - Capture Panoramas With Your Mobile Phone
  • Step 2 - Install And Activate WPVR
  • Step 3 - Go To WPVR To Create A Virtual Tour
  • Step 4 -Upload Your Panorama To Create A Scene
  • Step 4: Use Proper Angle View For Partial Panorama Effect

You require 360 panoramic images to create virtual tours. But to take a professional 360 panoramic image, you require expensive tools such as DSLR, or digital 360 cameras, tripods, and so on.

These are not always possible to purchase.

Again, a panoramic image taken by a smartphone is not usable. Or is it?

What if you could rather take panoramic images using your smartphone and create a virtual tour out of them?

Well, yes. That’s exactly what you can do using WPVR.

You can now create virtual tours for your website, using panoramas taken with your mobile phone, with WPVR.

WPVR comes with a special feature called “Partial panorama” that makes it easy for you to upload and turn normal panoramas into stunning virtual tours.

This could be really handy for important cases such as, if you are trying to quickly create a virtual tour of your property for sale, or your hotel for rent, or simply creating a virtual tour of your personal office.

Today I will show you how you can easily create beautiful virtual tours simply using panoramas taken using your smartphone.

Fangen wir also an.

Step 1 – Capture Panoramas With Your Mobile Phone #

Nowadays, even the most basic smartphones have a panorama option and you can easily use it.

Suppose you are taking a panorama of your office room. Find a suitable spot from where you can get a good view of your office in all directions.

Then turn on the Panorama mode on your mobile camera and take a couple of panoramas. You can do the same from more spots in your office room if you want to add multiple scenes in your tour.

**It will be even better and stable if you have a monopod.

Choose the best image from each spot for your virtual tour and transfer them to your PC. (Or, if you want to access your website from mobile, then you can keep it in your phone gallery.)

Here’s a guide you can follow to capture 360-degree photos with your smartphone.

Step 2 – Install And Activate WPVR #

You need to have both the free version and the paid version of WPVR to do this.

If you already have both of the plugins installed and activated on your site, you can directly go to step 3.

Here are instructions for installing WPVR:

  • Install and activate the free version of WPVR.
  • Install and activate WPVR Pro.

Step 3 – Go To WPVR To Create A Virtual Tour #

Once you have successfully installed and activated both the plugins, go to your WordPress Dashboard > WPVR > Add New Tour.

Here, first, give a name to the tour.

Create Virtual Tour

Then on the left, you can see several sections. Initially, you will be in the General Section.

Step 4 -Upload Your Panorama To Create A Scene #

Just below General Tab, you can see the Scenes tab. Click on it.

Here, assign a Scene ID and choose Yes for the option Set as Default.

Scene Settings

Then, click on the Upload button and upload your desired panorama.

For this guide, I will create a simple virtual tour with only one scene. You can add multiple scenes if you want to.

Szenen-Upload

Once the image is uploaded, now it’s time to set the Partial panorama effect on the image you uploaded to turn it into a virtual tour.

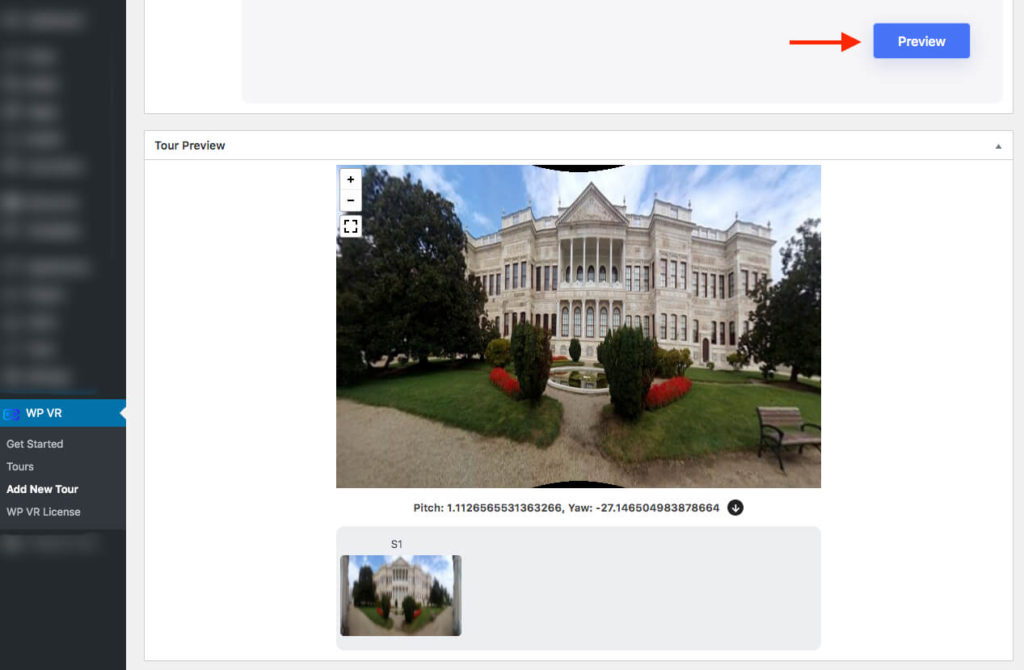
Now, if you click on the Preview button, a messed up preview of the tour will show up.

But don’t worry, follow the next step to fix it.

Step 4: Use Proper Angle View For Partial Panorama Effect #

On the right side, look for the following two options:

  • Vertical Angle of View
  • Horizontal Angle of View

Turn On the Vertical Angle of View option. This controls how much of your image will be visible on tour vertically.

By default, it’s set at 180, change it to 90.

Now, turn On the Horizontal Angle of View option. This controls how much of your image will be visible on tour horizontally.

By default, it’s set at 360, change it to 180.

On the Scenes section and go to Limit Vertical Scene Grab and Limit Horizontal Scene Grab options.

Turn the Limit Vertical Scene Grab option On.

Der Standardwert für das Feld Max Pitch ist 90. Stellen Sie ihn auf 45 ein.

The default value on the Min Pitch field is -90. Set it to -45.

Scene Grab Virtual Tour

Now, Turn the Limit Horizontal Scene Grab option On.

Der Standardwert für das Feld Max Yaw ist 180. Setzen Sie ihn auf 90.

Der Standardwert im Feld Min Yaw ist -180. Setzen Sie ihn auf -90.

That’s it. You’ve just created a virtual tour using a panorama image that was captured by a mobile phone.

You can now click on the Preview button to have a live preview of your tour.

Virtual Tour Preview

**Remember to click on the Publish button on the upper right corner of your WordPress dashboard to save the tour.

Once you’ve saved the tour, you can publish it on your website.

You can use the WPVR Gutenberg block, WPVR Elementor Widget, or shortcode to publish the tour.

Follow this documentation to publish and customize your virtual tour.

To learn more about WPVR and its amazing features, click here.

Share This Article :
  • Facebook
  • Twitter
  • LinkedIn
  • Interesse
Updated on September 7, 2021
How To Create A Virtual Tour With Partial Panoramas or iPhone PanoramasHow To Create Full Screen Virtual Tours – WPVR
Table of Contents
  • Step 1 - Capture Panoramas With Your Mobile Phone
  • Step 2 - Install And Activate WPVR
  • Step 3 - Go To WPVR To Create A Virtual Tour
  • Step 4 -Upload Your Panorama To Create A Scene
  • Step 4: Use Proper Angle View For Partial Panorama Effect
Unsere Plugins
  • WP VR
  • Produkt-Feed-Manager
  • Wagenheber
Ressourcen
  • Datenschutzerklärung
  • Nutzungsbedingungen
  • Partnerprogramm
  • Kontakt
Bezahlmethoden
Bezahlmethoden

© . Alle Rechte sind RexTheme vorbehalten.