Note: Google Express is now Google Shopping Actions.
To use the Google Shopping Actions Feed, you need to join the Google Shopping Action Once you’ve joined the Google Shopping Actions program and completed the final validation.
Once you do this, you will have to create a regular Google Shopping Feed in your Google Merchant Account.
However, If you’ve already created a feed on the Google Merchant Center, you can keep using the feed as you will be able to see that existing feed in the Google Shopping Actions dashboard by default.
In this doc, I will show you how you can easily create your WooCommerce product feed for Google Shopping.
Follow these easy steps to generate a WooCommerce Product Feed for Google Shopping
Schritt 1: Neuen Feed erstellen & Produktattribute zuordnen #
Gehen Sie zu Ihrem Produkt-Feed-Dashboard.
Klicken Sie auf die Schaltfläche Neuen Feed hinzufügen.
Sie gelangen dann zur Seite für die Erstellung des Feeds.
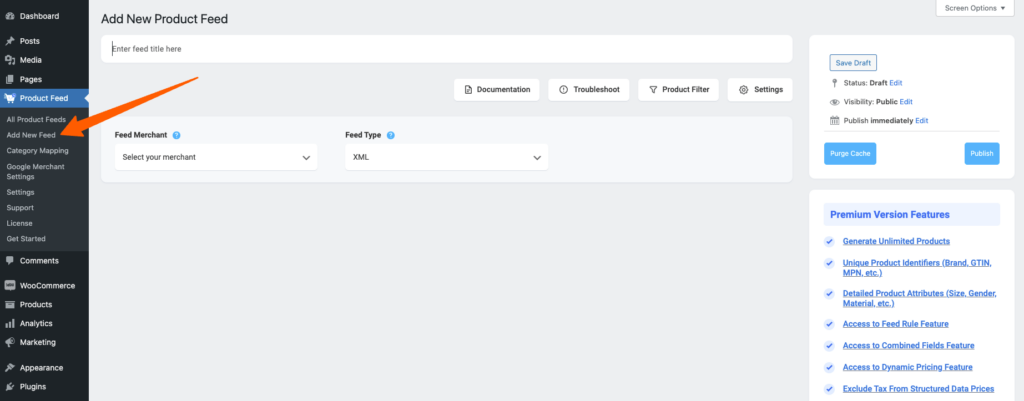
Also, hier,
1. Oben haben Sie die Möglichkeit, dem Feed einen Titel zu geben. Geben Sie Ihrem Feed einen Namen.

2. Direkt unter dem Titel sehen Sie eine Option zur Auswahl Ihres bevorzugten Händlers. Klicken Sie einfach auf die Dropdown-Schaltfläche Händler füttern und wählen Sie Ihren bevorzugten Händler aus der Dropdown-Liste aus oder suchen Sie in der Dropdown-Box.

Wählen Sie Ihren bevorzugten Händler aus und alle erforderlichen Attribute werden unten geladen.
Wählen wir Google Shopping für diesen Feed aus.

3. In most cases, this template is already configured and values are assigned properly, so you won’t have to do much work with this.
However, depending on the merchant you are generating a feed for, there may be some attributes for which you need to assign values manually.
For example, when you select Google, you will see two Attributes that don’t have the values assigned.

- Google Product Category —
Category Mapping is merging your WooCommerce product categories with the Google product categories.
You can see that a default value is already assigned to this Category Mapping attribute – Google Product Category. Click on the Configure Category Mapping button which you will find under the Category Mapping value, and a new tab will be opened with the default category mapper – Google Product Category.
You can create a new Category Mapper too. You need to click on the Category Mapping button and there you will get the option to create a new Category Mapper, and you can configure the mapper too.
You can follow this doc to learn how to create a new Category Mapper for your feed.
Now, once your mapping is completed, click on the Update and Close button, and the Category Mapping tab will be closed and you will back to the feed creation page.
- Manufacturer —
This should be the Brand name of the product you are selling. If you are the manufacturer, you can set the type as Static and input your company name here.
If you have different brand names for different products, you will have to save the value in a custom field or product attribute and then use that value here.
**You may also use Perfect Brands for WooCommerce, which will make it easier to assign and use brand names.
- MPN —
This value should be unique to each product. So you have to save this value in a custom field within each product and use that value here.
4. Also, if you want to add new attributes, you can click on the Add New Attribute button, and you will get the list of the optional Attributes of Google Shopping.
Or you can add a custom attribute by clicking on the Add New Custom Attribute button.
1. Product Brand is a required field for Google Merchant.
2. You need to insert either Product Brand + MPN or Product Brand + GTIN info. Any of them will do.
3. You can use the SKU value for the MPN attribute.
3. Google Product Category Mapping used to be required, now it is optional but recommended.
4. If you don’t have the values for the GTIN, MPN, or Brand, you can use the Identifier Exists attribute, it will list your product in the Google Merchant even if your product is missing a required field. This attribute is included at the bottom of your Google Shopping attributes list.
Schritt 2: Futtermittelkonfiguration #
1. Scroll up to the top and here, you will see that there are four options, Product Filter and Product Settings.
- Settings
- Produkt-Filter
- Fehlerbehebung
- Dokumentation
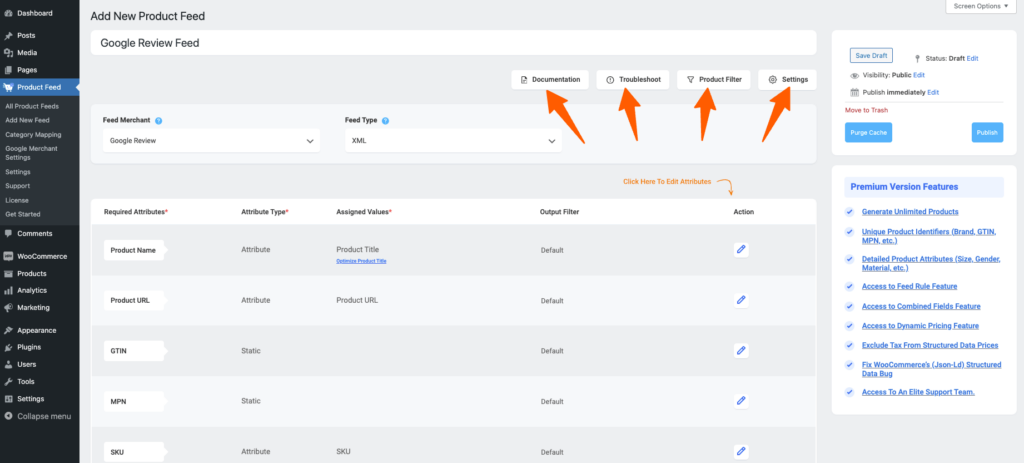
2. Lassen Sie uns zunächst die Funktionen in den Produkteinstellungen konfigurieren. Klicken Sie auf die Schaltfläche Produkteinstellungen, woraufhin sich auf der rechten Seite des Bildschirms eine Schublade öffnet.
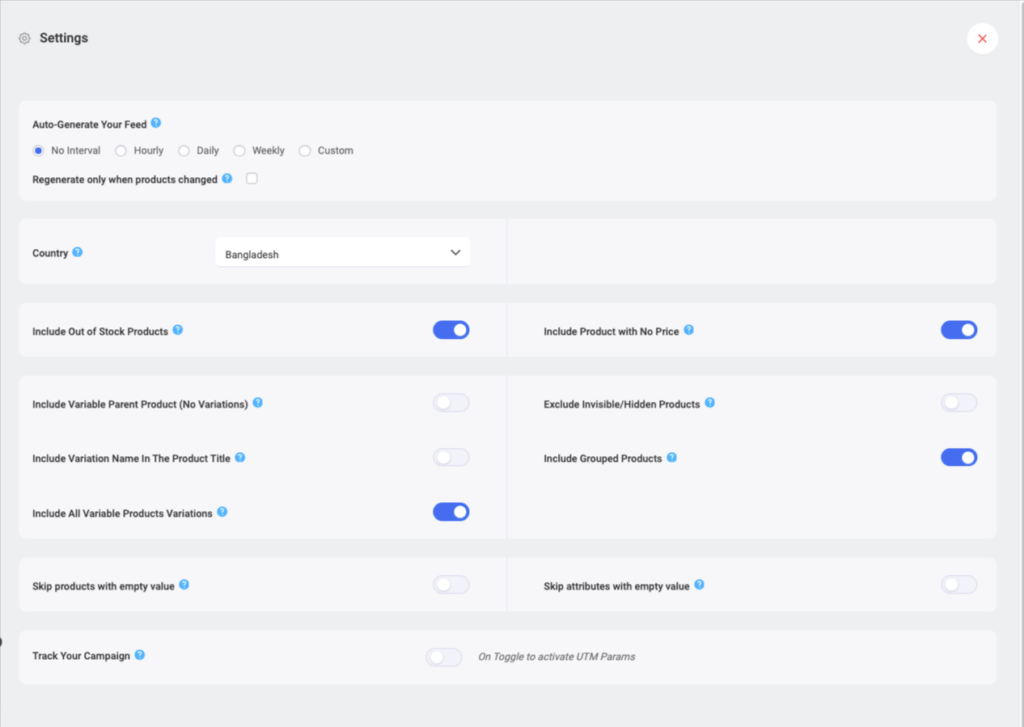
3. Die erste Option, die Sie sehen, ist Auto-Generate Your Feed.
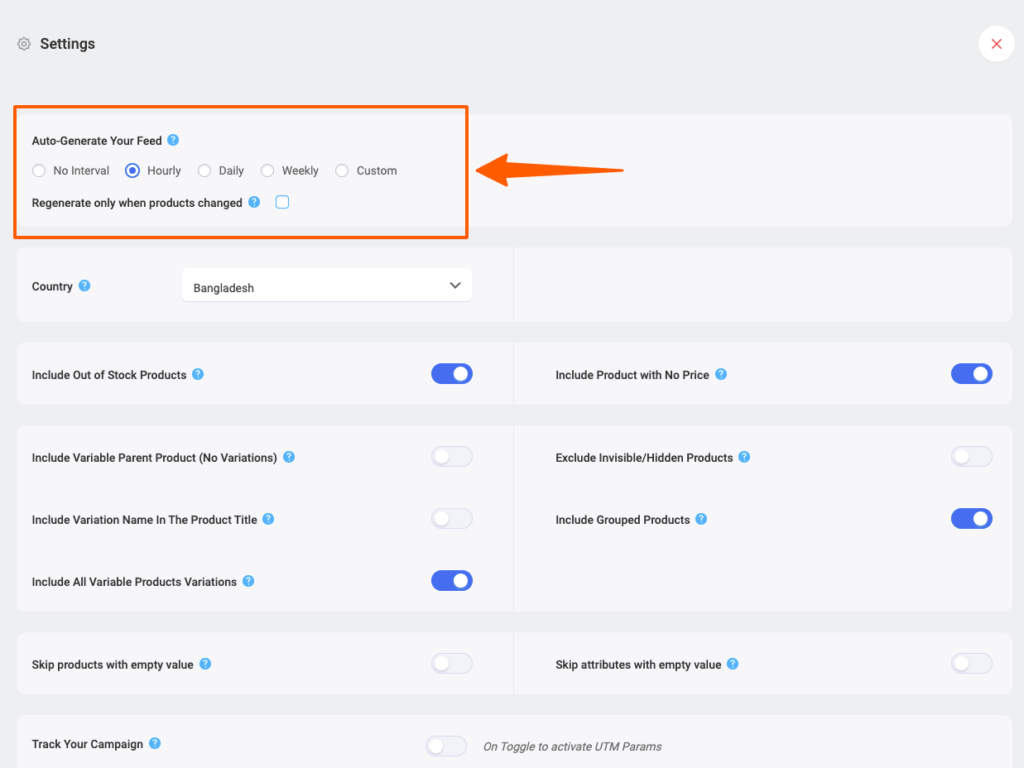
Mit dieser Option können Sie eine automatische Aktualisierung des Feeds in bestimmten Abständen planen. Wählen Sie eine Option, um eine automatische Aktualisierung einzustellen, oder belassen Sie es bei "Kein Intervall", wenn Sie keine automatische Aktualisierung des Feeds einstellen möchten.
4. Verwenden Sie dann je nach Bedarf die folgenden Optionen.
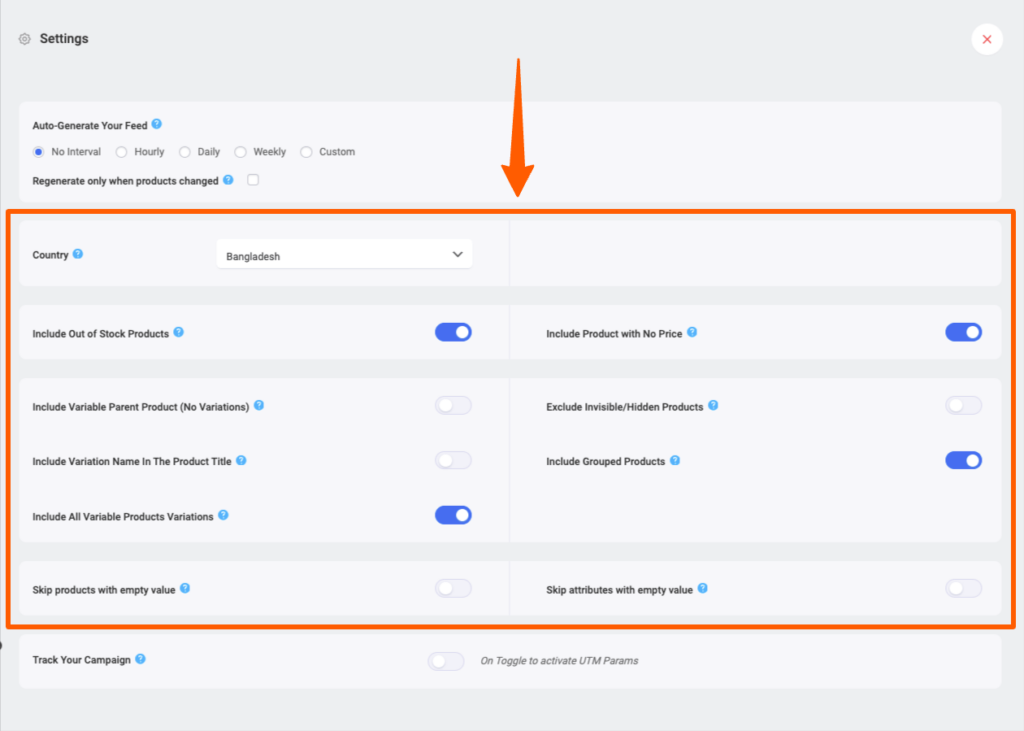
- Land/Region auswählen
- Wählen Sie eine Region aus diesem Dropdown-Menü, wenn Sie die Versandinformationen in Ihren Feed aufnehmen möchten. Sobald Sie die Region ausgewählt haben, müssen Sie das Attribut Versand in Ihren Feed einfügen, um die Versandwerte zu erhalten.
- In diesem Dokument erfahren Sie, wie Sie die Versandinformationen in Ihren Feed aufnehmen können.
- Nicht vorrätige Produkte einbeziehen
- Wenn Sie nicht vorrätige Produkte einbeziehen möchten, können Sie die Option aktivieren.
- Für diesen Feed sollten wir diese Option nicht verwenden und den Wert auf "Nein" belassen. - Include Variable Parent Product (Without Variations)
-If you want to include the parent feed for variable products, then you can enable the option.
-Few merchants such as Google Shopping or Facebook don’t require you to submit parent products, however, there are many other merchants such as eBay MIP, that require you to submit product products in the feed.
-For this feed, let’s not use this option and keep its value as “No“. - Include All Variable Products Variations -
-Wenn Sie nur einfache Produkte in den Feed aufnehmen möchten und keine variablen Produkte, dann belassen Sie den Wert auf "Nein".
-Wenn Sie sowohl einfache Produkte als auch variable Produkte an Google Shopping übermitteln möchten, dann wählen Sie den Wert "Ja".
-Lassen Sie uns diese Funktion nutzen und markieren Sie sie als "Ja" für diesen Feed. - Include Variation Name In The Product Title
-Few merchants such as Google Shopping, suggest you add the variation term to the Product name in case you are uploading variable products, however, it is completely optional.
-So if you want to include the variant terms to the variable product names, then you can set its value as “Yes“.
-Let’s use this feature, and mark it as “Yes“, for this feed. - Gruppierte Produkte einbeziehen
- Wenn Sie gruppierte Produkte haben, ist es am besten, das übergeordnete Produkt des von Ihnen erstellten gruppierten Produkts einzureichen.
- Markieren Sie daher diese Option als "Ja". - Exclude Invisible/Hidden Products
-You might have certain products on your store that are marked as hidden or invisible on WooCommerce.
-If you want to generate feed for Simple products only, then you can mark this option as “Yes” to exclude invisible products from the feed.
-However, product variants are by default marked as Invisible on WooCommerce. So if you include variable products to the feed, then you should mark this as “No“.
-Since in this feed we are including product variants, we will not use this feature and keep it as “No“. - Jedes Attribut überspringen, wenn der Wert leer ist
- Wenn Sie diese Funktion aktivieren, werden alle Attribute eines Produkts ausgeschlossen, wenn der Attributwert fehlt.
- Für diesen Feed wollen wir diese Option nicht verwenden und den Wert auf "Nein" belassen.
5. You can then find an option to add Track Your Campaign (Analytics parameters).

Use this option if you wish to add analytics parameters to product links on your product feed so that you can keep track of the products’ performance on Google Shopping.
6. Now, close the drawer and click on the Product Filter option. A new drawer will open from the right. Click on the dropdown, and You will get the following options:

Choose the Products you want to include in the feed.
You may choose to include All Published Products in your store, or you may use one of the three filter options, Custom Filter, Category Filter, and Tag Filter, to include the products you require (or exclude the ones you do not want to include).
For a basic feed, you can keep it the same.
Step 3: Publish WooCommerce Product Feed For Google Shopping #
Nachdem Sie Ihren Feed konfiguriert haben, ist es nun an der Zeit, den Feed zu veröffentlichen.
Scrollen Sie zurück nach oben, und Sie finden auf der rechten Seite eine Schaltfläche Veröffentlichen.

Klicken Sie auf die Schaltfläche Veröffentlichen, und Ihr Feed wird erstellt.
Sobald die Erstellung des Feeds abgeschlossen ist, können Sie den Feed anzeigen oder herunterladen.
That’s it. Your WooCommerce XML product feed for Google Shopping is generated.
You can now send this feed to Google Merchant Center through the Content API method, which is a bit complicated process. Or, you can download and upload this file to your merchant account manually and list your products on Google Shopping.
Learn how to upload your feed to Google Merchant Center through the direct upload method.
Learn how to send your feed to Google Merchant through the Content API method.
Also, you can have a look at the following docs to learn how to include Shipping and Tax information to your feed items:
How to include Shipping values into WooCommerce product feed
How to include Tax values into your WooCommerce Product Feed