The eBay MIP is the Merchant Integration Platform (MIP) is a feed-based selling platform for small businesses and enterprise merchants.
If you own a small business or if you are an enterprise seller, you can start selling on eBay MIP now.
For WooCommerce shop owners, you just need to submit the WooCommerce product feed to MIP to create or maintain listings on eBay.
In this doc, I will show you how you can easily create your WooCommerce product feed for eBay MIP.
Follow these easy steps to generate a WooCommerce Product Feed for eBay MIP.
Before we start, I should let you know that it is a Pro feature of the Product Feed Manager for WooCommerce plugin, so you will require the Product Feed Manager Pro version to use this.
Schritt 1: Neuen Feed erstellen & Produktattribute zuordnen #
Gehen Sie zu Ihrem Produkt-Feed-Dashboard.
Klicken Sie auf die Schaltfläche Neuen Feed hinzufügen.
Sie gelangen dann zur Seite für die Erstellung des Feeds.
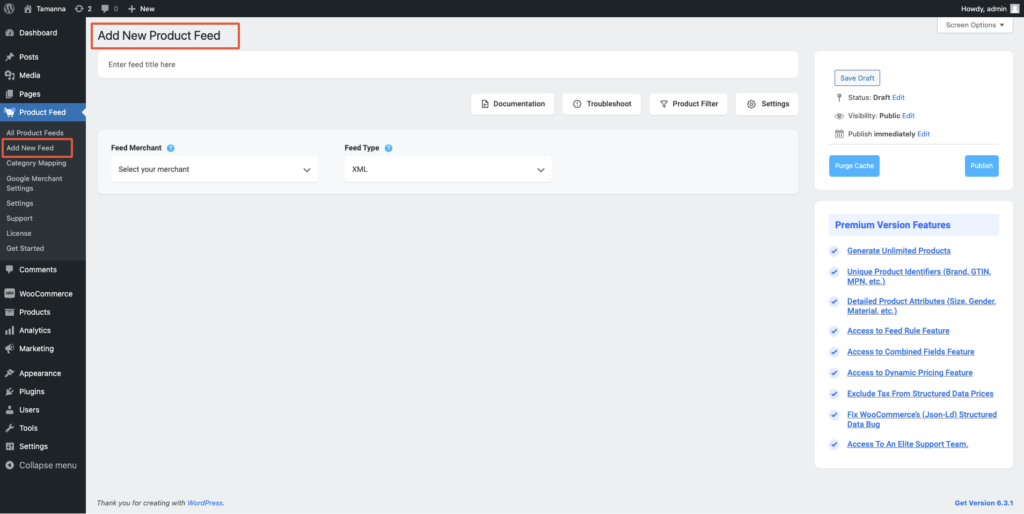
Also, hier,
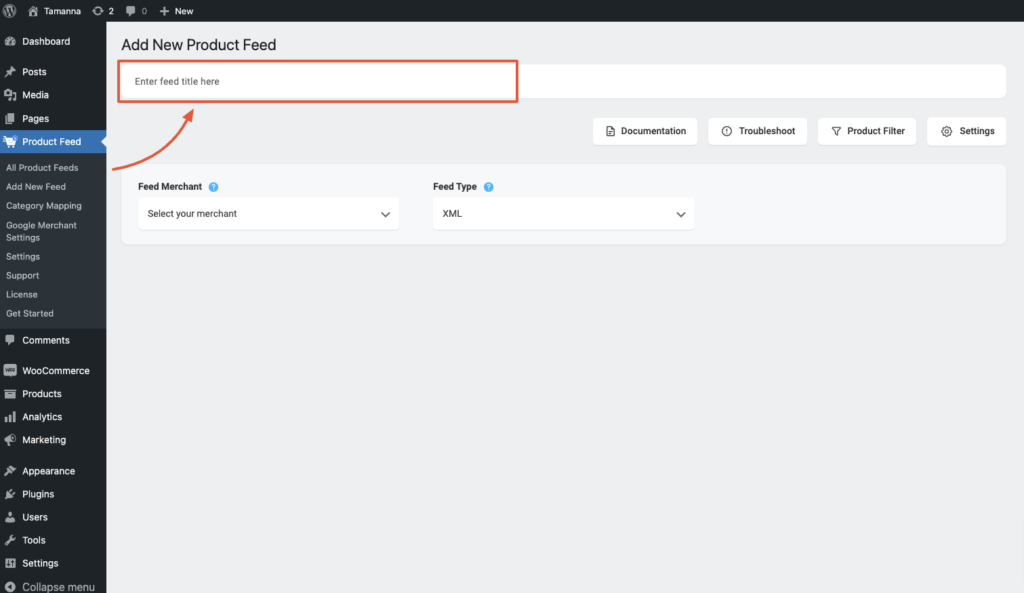
1. Oben haben Sie die Möglichkeit, dem Feed einen Titel zu geben. Geben Sie Ihrem Feed einen Namen.
2. Direkt unter dem Titel sehen Sie eine Option zur Auswahl Ihres bevorzugten Händlers. Klicken Sie einfach auf die Dropdown-Schaltfläche Händler füttern und wählen Sie Ihren bevorzugten Händler aus der Dropdown-Liste aus oder suchen Sie in der Dropdown-Box.
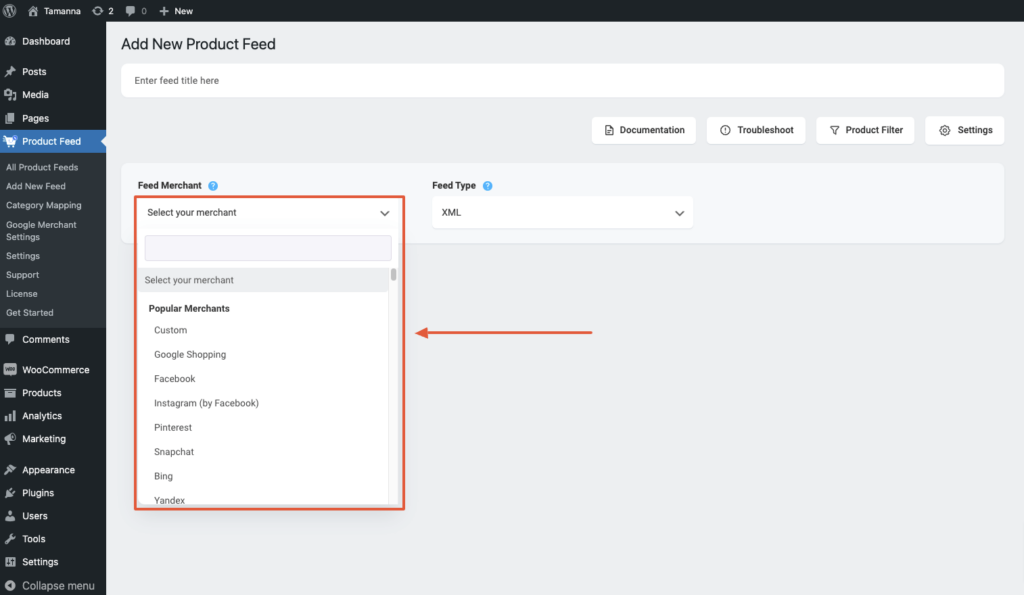
Wählen Sie Ihren bevorzugten Händler aus, und alle erforderlichen Attribute werden unten geladen.
Select eBay MIP from the dropdown list.
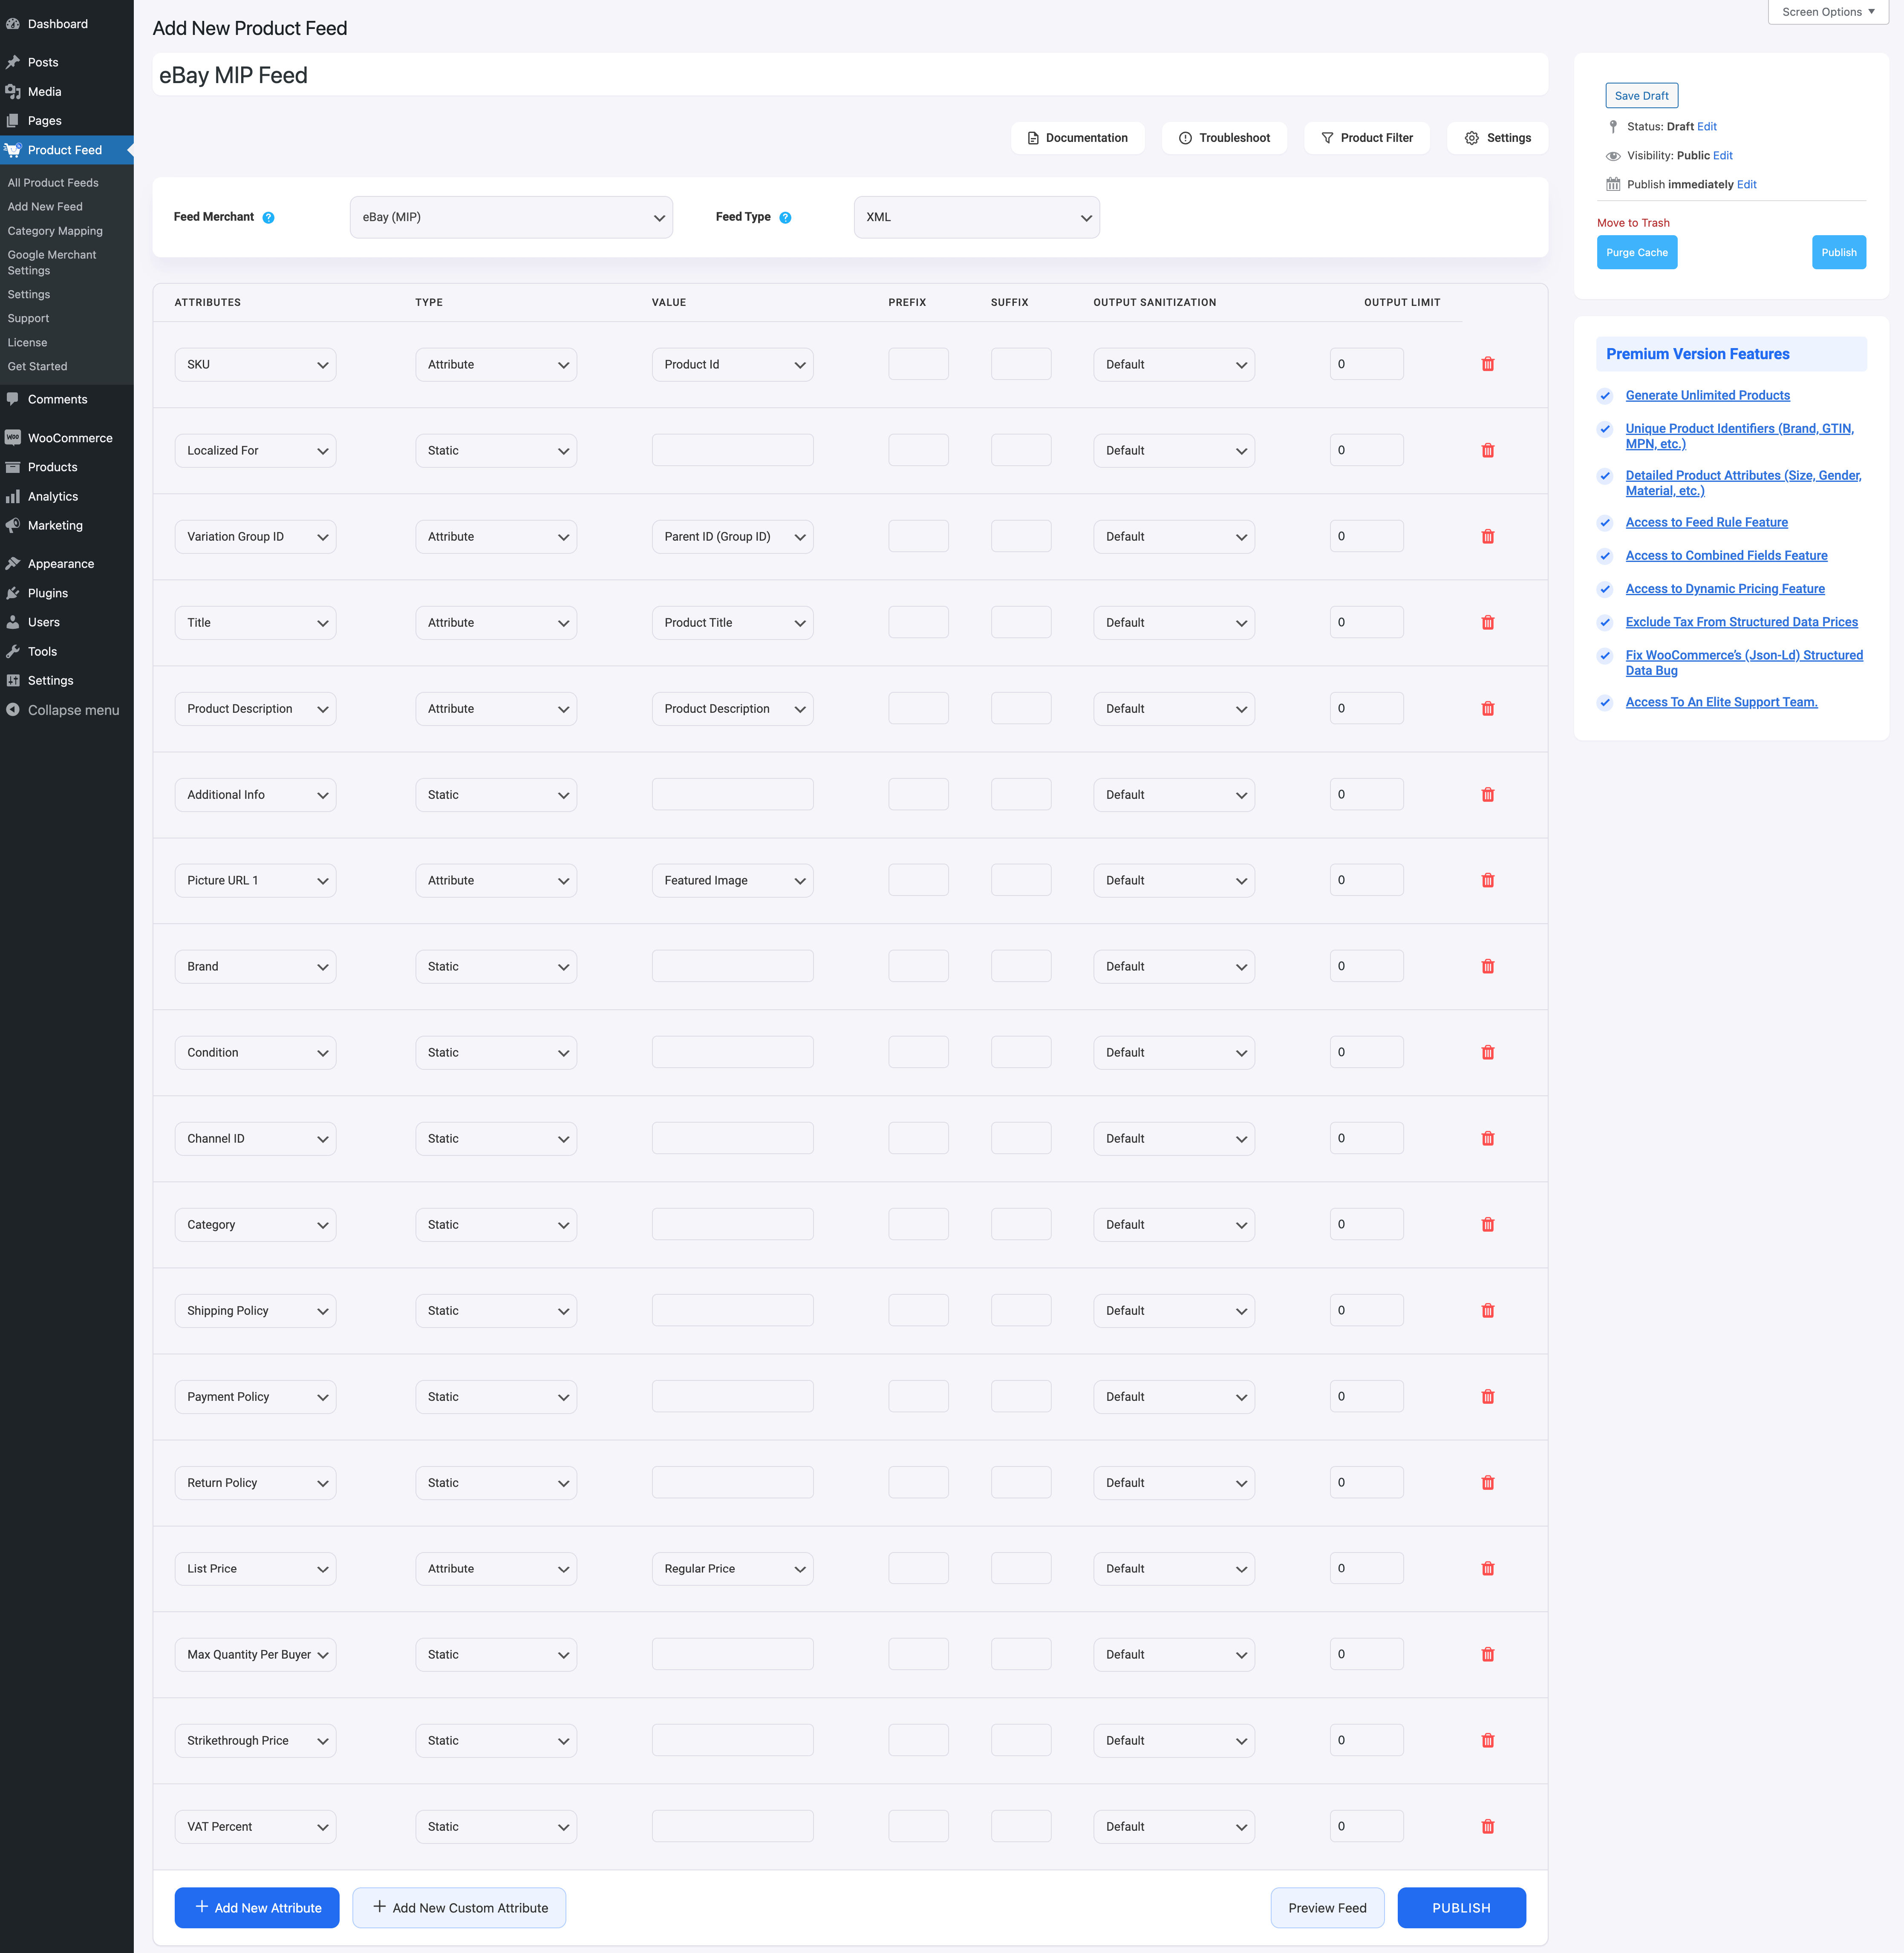
**Please note that eBay MIP only accepts XML and CSV feed file submission. However, the recommended format is CSV.
3. You can see that some of the attributes are already configured – their values are assigned properly, you can change the assigned values as per your need or you can keep them as it is.
Die übrigen Attributwerte müssen Sie jedoch manuell zuweisen.
For eBay MIP, you need to assign values for the following attributes:
- Localized For –
This attribute indicates the language your feed is presented in, and the country it will be sold on.
Since eBay MIP are in limited countries, here are the accepted values:
- en_US
- en_GB
- de_DE
- fr_FR
- es_ES
- en_CA
- en_AU
- de_AT
- it_IT
- ru_RU
- en_IN
- Additional Info –
- Brand –
This should be the Brand name of the product you are selling. If you are the manufacturer, you can set the type as Static and input your company name here.
If you have different brand names for different products, you will have to save the value in a custom field or product attribute and then use that value here.
**You may also use Perfect Brands for WooCommerce, which will make it easier to assign and use brand names.
- Condition –
Use this attribute to indicate the current condition of the product.
These are the accepted values for the condition:
- NEW
- NEW_OTHER
- NEW_WITH_DEFECTS
- MANUFACTURER_REFURBISHED
- SELLER_REFURBISHED
- USED_EXCELLENT
- USED_VERY_GOOD
- USED_GOOD
- USED_ACCEPTABLE
- FOR_PARTS_OR_NOT_WORKING
- Channel ID –
eBay lists products based on several channels it has for different countries.
The Channel ID is a unique identifier of the eBay MIP channel where you wish your products to appear on.
If you wish to sell on only one channel, then you may leave this column blank.
For multiple channels, you need to add a product multiple times and set the Channel IDs for your desired channels.
For example, if you sell in both USA and UK, then you will need to add the same products twice in two rows. For one, assign the Channel ID value as EBAY_US, and assign the Channel ID value as EBAY_UK for the other.
Then eBay will display the products on your desired eBay MIP channels.
Here is a list of the accepted Channel IDs for eBay MIP:
- EBAY_US
- EBAY_UK
- EBAY_DE
- EBAY_FR
- EBAY_ES
- EBAY_CA
- EBAY_AU
- EBAY_AT
- EBAY_IT
- EBAY_RU
- EBAY_IN
- EBAY_Motors
- Category –
eBay MIP has a category list of its own which you need to use to categorize your products on eBay. You must set this attribute according to their required taxonomy in order to get your submitted product feed approved.
They have a Category Lookup Tool where you can search for relevant category thread and collect the Category ID which you have to provide as the value.
For example, if you are selling a book in UK, which is an educational language coursebook, then on eBay Mip, it will fall under category – GBooks, Comics & Magazines > Textbooks Education & Reference > Language Courses.
You can collect its ID from the eBay Category Lookup Tool. In this case, the Product Category value is 11442.
- Shipping Policy –
Use the Shipping Policy to specify your product handling time, the shipping services you offer, and the shipping costs.
- Payment Policy –
Use the Payment Policy to specify how buyers can pay you, for example, through PayPal or credit cards.
- Return Policy –
Use Return Policies to specify whether you accept returns or not. If you accept returns, include your return conditions (such as the buyer will pay for the return shipping), etc.
These business policies have to be created by you on eBay. There you will be able to collect the respective policy IDs from your eBay account preferences and use them as the values when creating the product feed.
- Max Quantity Per Buyer –
You might wish to restrict the number of a certain product that a prospect can order. In that case, you may use this attribute so that a prospect won’t be able to order more than this many of the products within 10-days.
Here’s an example.
Let’s say you sell Hand-made Fancy Gift Cards. Now, let’s assume you have a rule of investing around 3 hours per day for a single customer and can create a maximum of 20 cards in 10 days for a particular customer.
Then you may add an attribute column ‘Max Quantity Per Buyer’ and assign the value ‘20’ so that a customer cannot order more than 20 cards within a span of 10 days.
- Strikethrough Price –
This attribute is there to help you create more attraction to prospects by adding a price that will be stricken through, to indicate that the current price is a discounted price.
Let’s say you are running a promotion to sell a Purse at $20, whereas the original price was $25.
Then you can set this attribute value as 25 to display that the old price was $25.
**You may use this feature even when you are not running a promotion. You can post the original price as the List Price, and then assign a higher value as a strikethrough price. But we strongly advise to use it only when you really run a promotion.
- VAT Percent –
This attribute is used to state the Value Added Tax percentage of the sale price. This is only necessary for the EU countries, though not mandatory.
Schritt 2: Futtermittelkonfiguration #
1. Scrollen Sie nach oben und Sie werden sehen, dass es zwei Optionen gibt: Produktfilter und Produkteinstellungen.
- Produkte Einstellungen
- Produkt-Filter
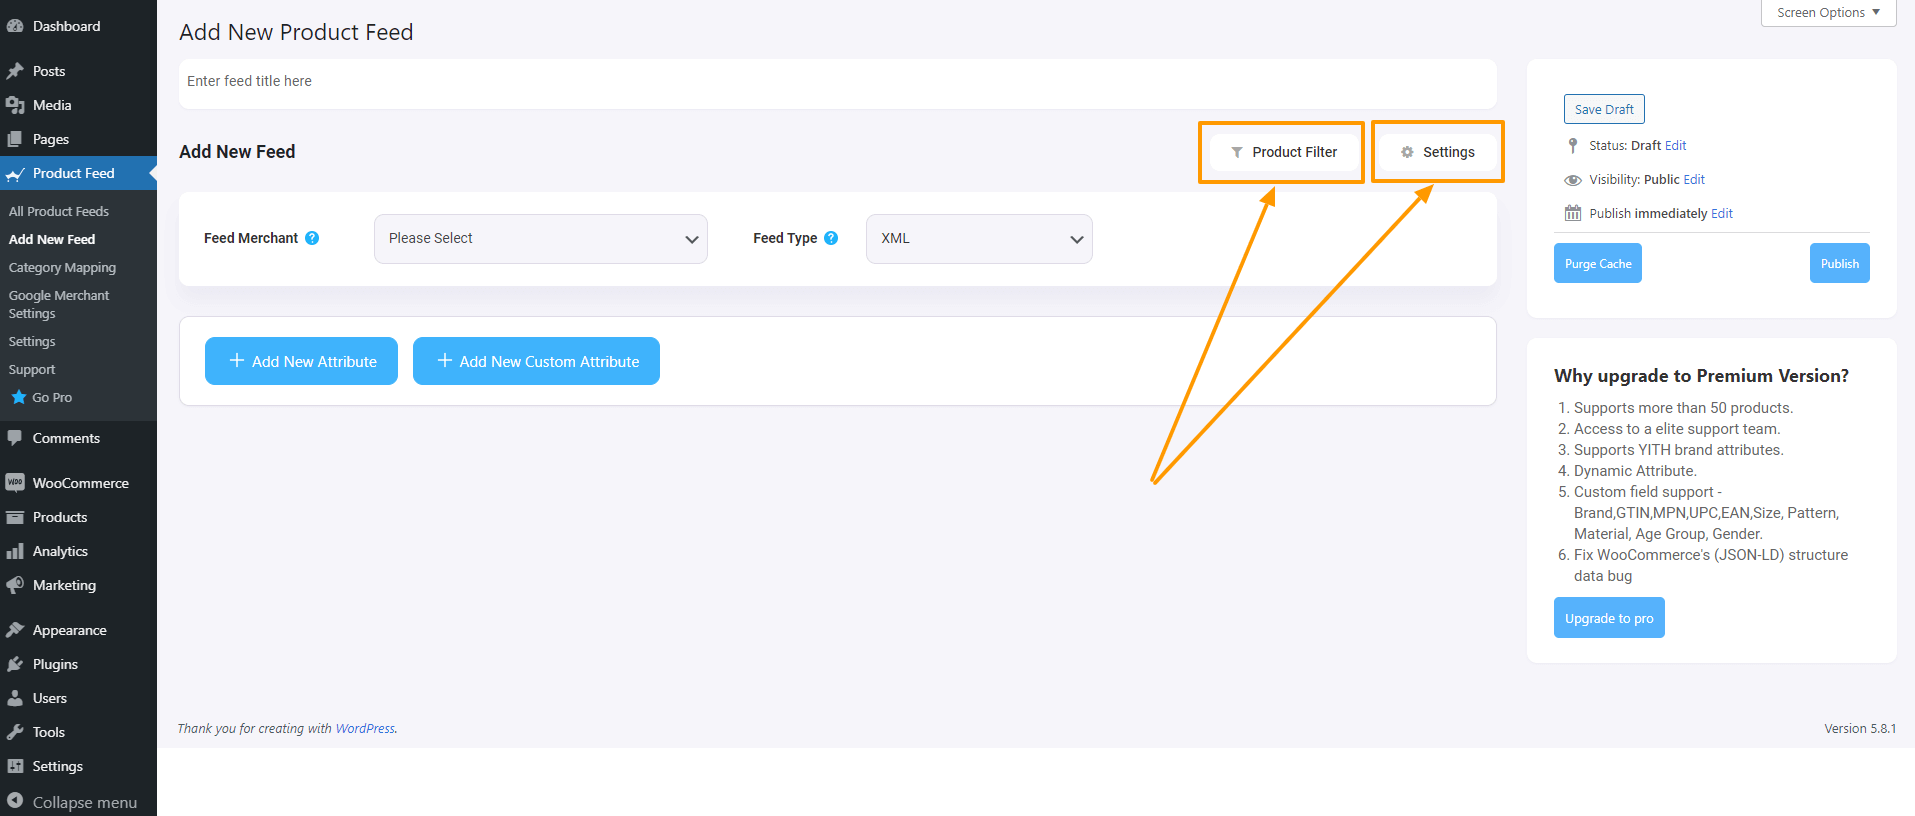
2. Lassen Sie uns zunächst die Funktionen in den Produkteinstellungen konfigurieren. Klicken Sie auf die Schaltfläche Produkteinstellungen, woraufhin sich auf der rechten Seite des Bildschirms eine Schublade öffnet.
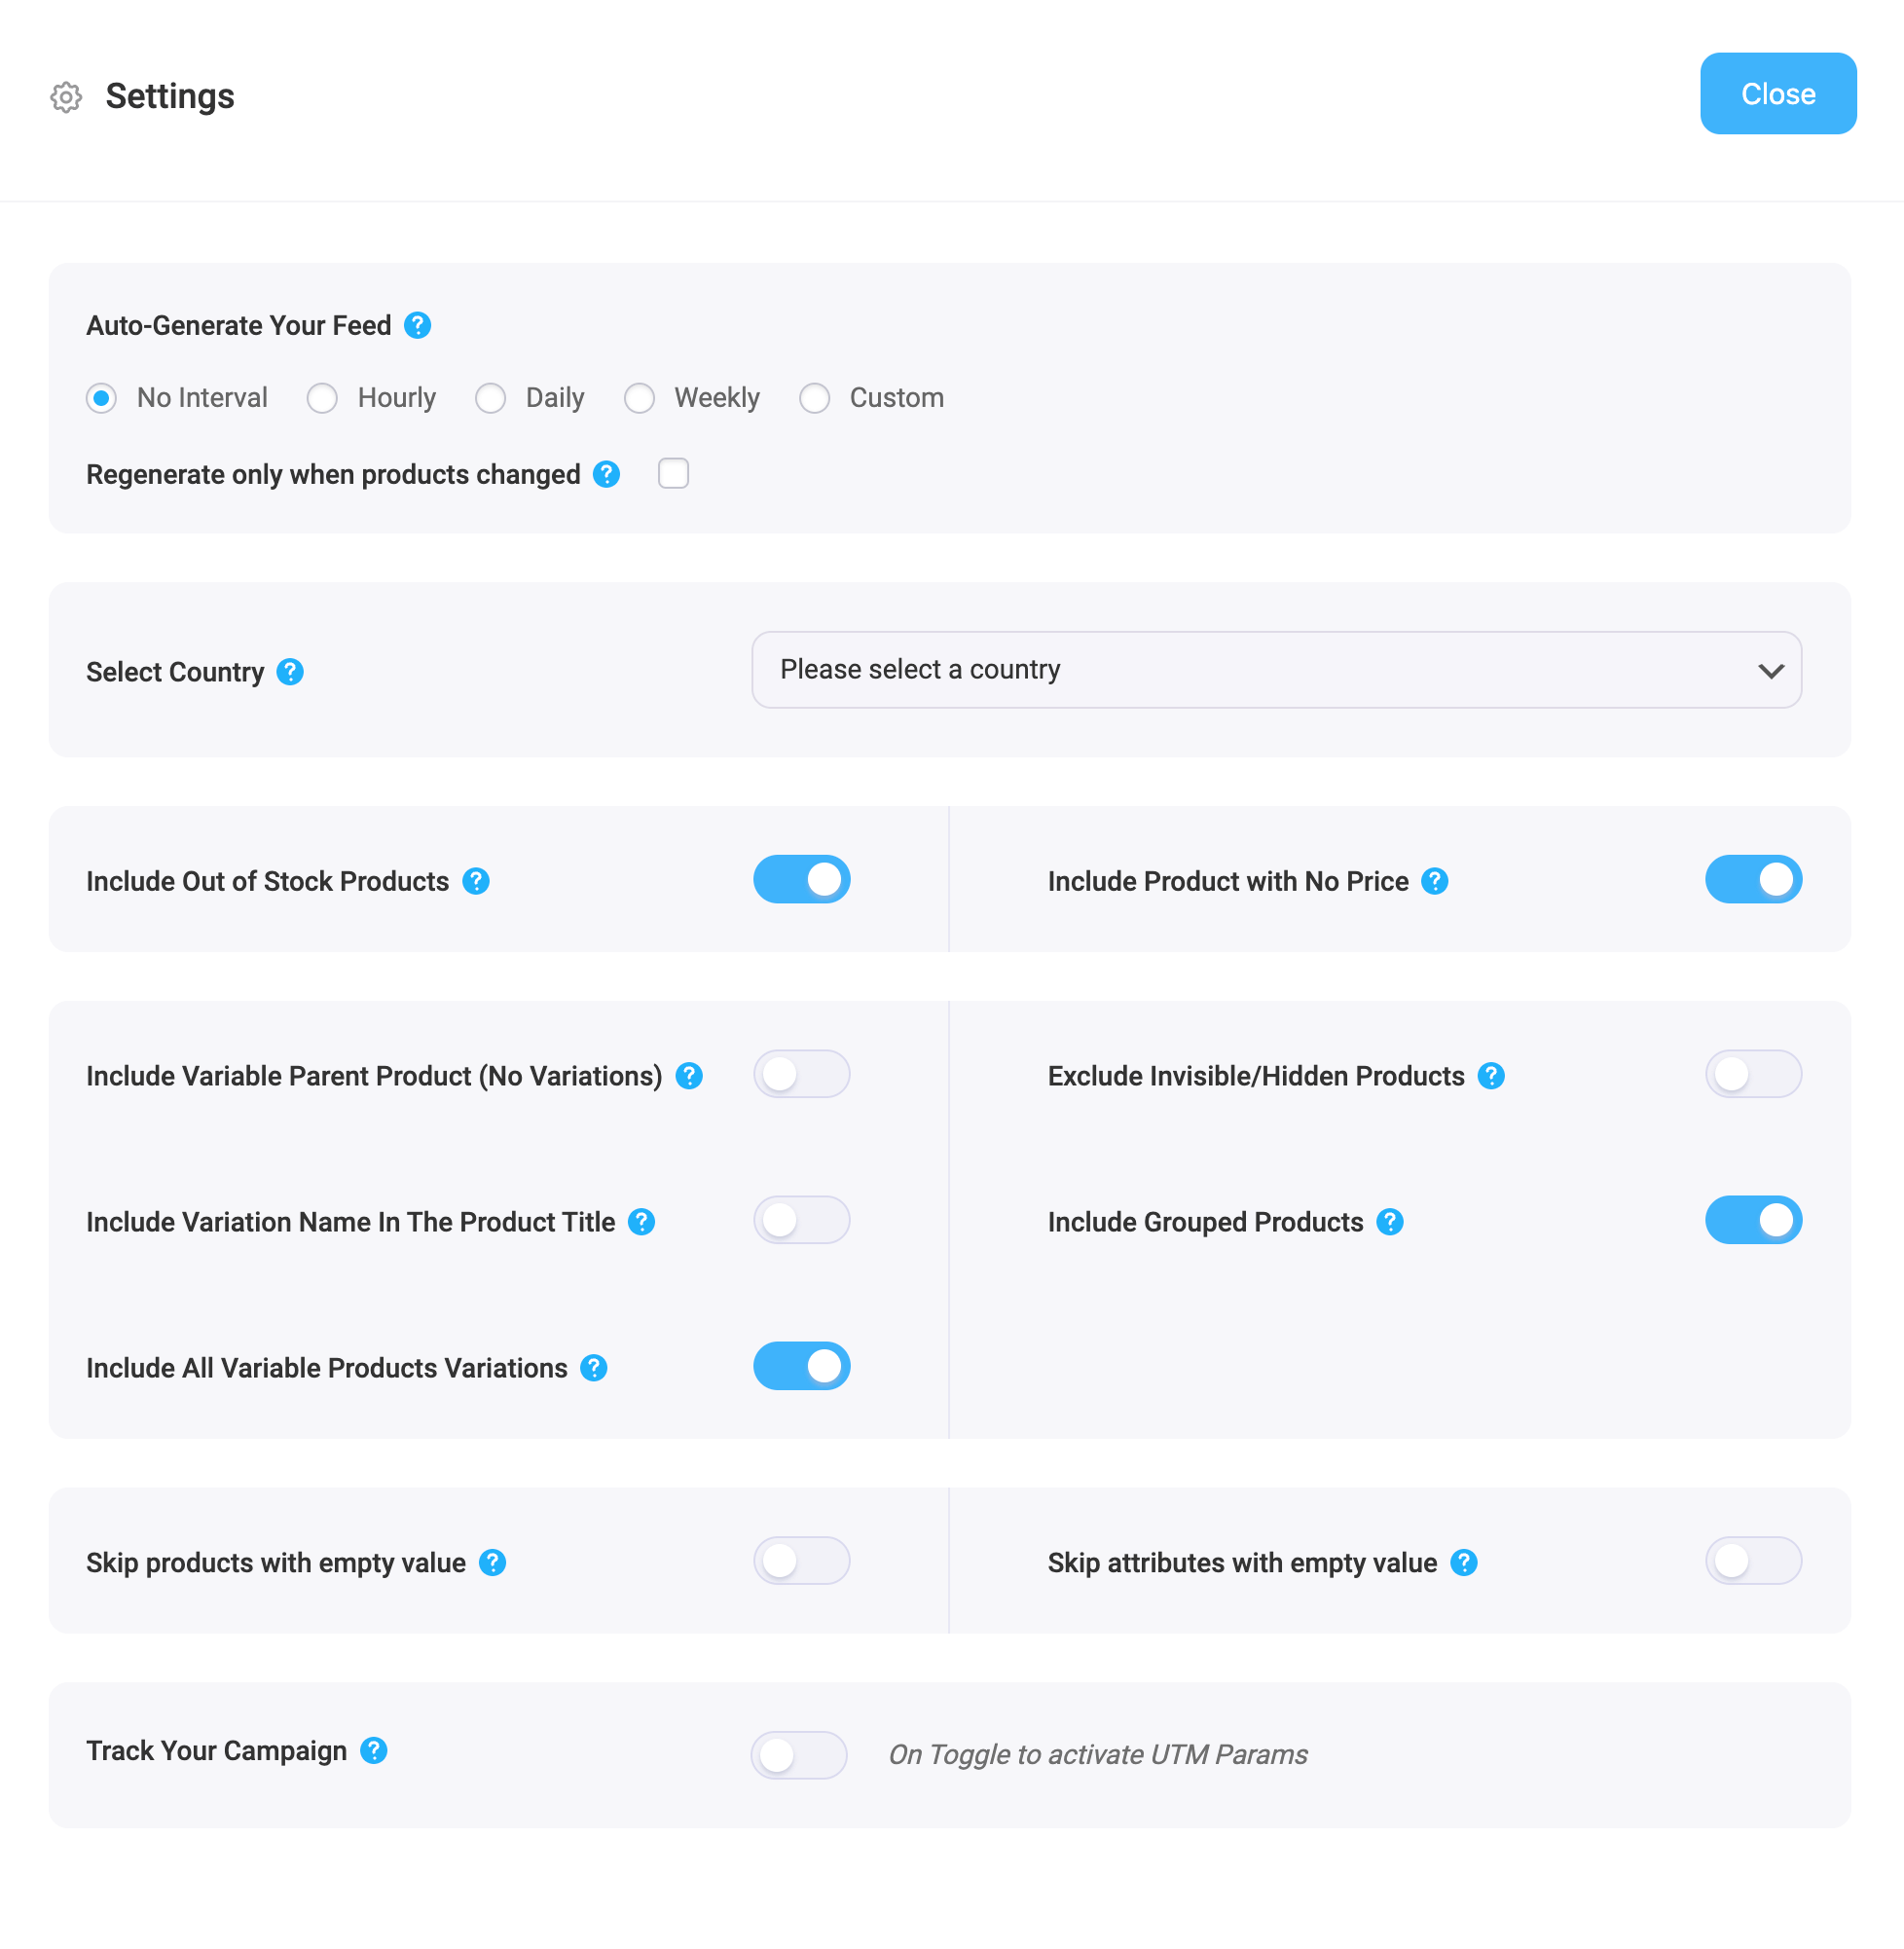
3. Die erste Option, die Sie sehen, ist Auto-Generate Your Feed.
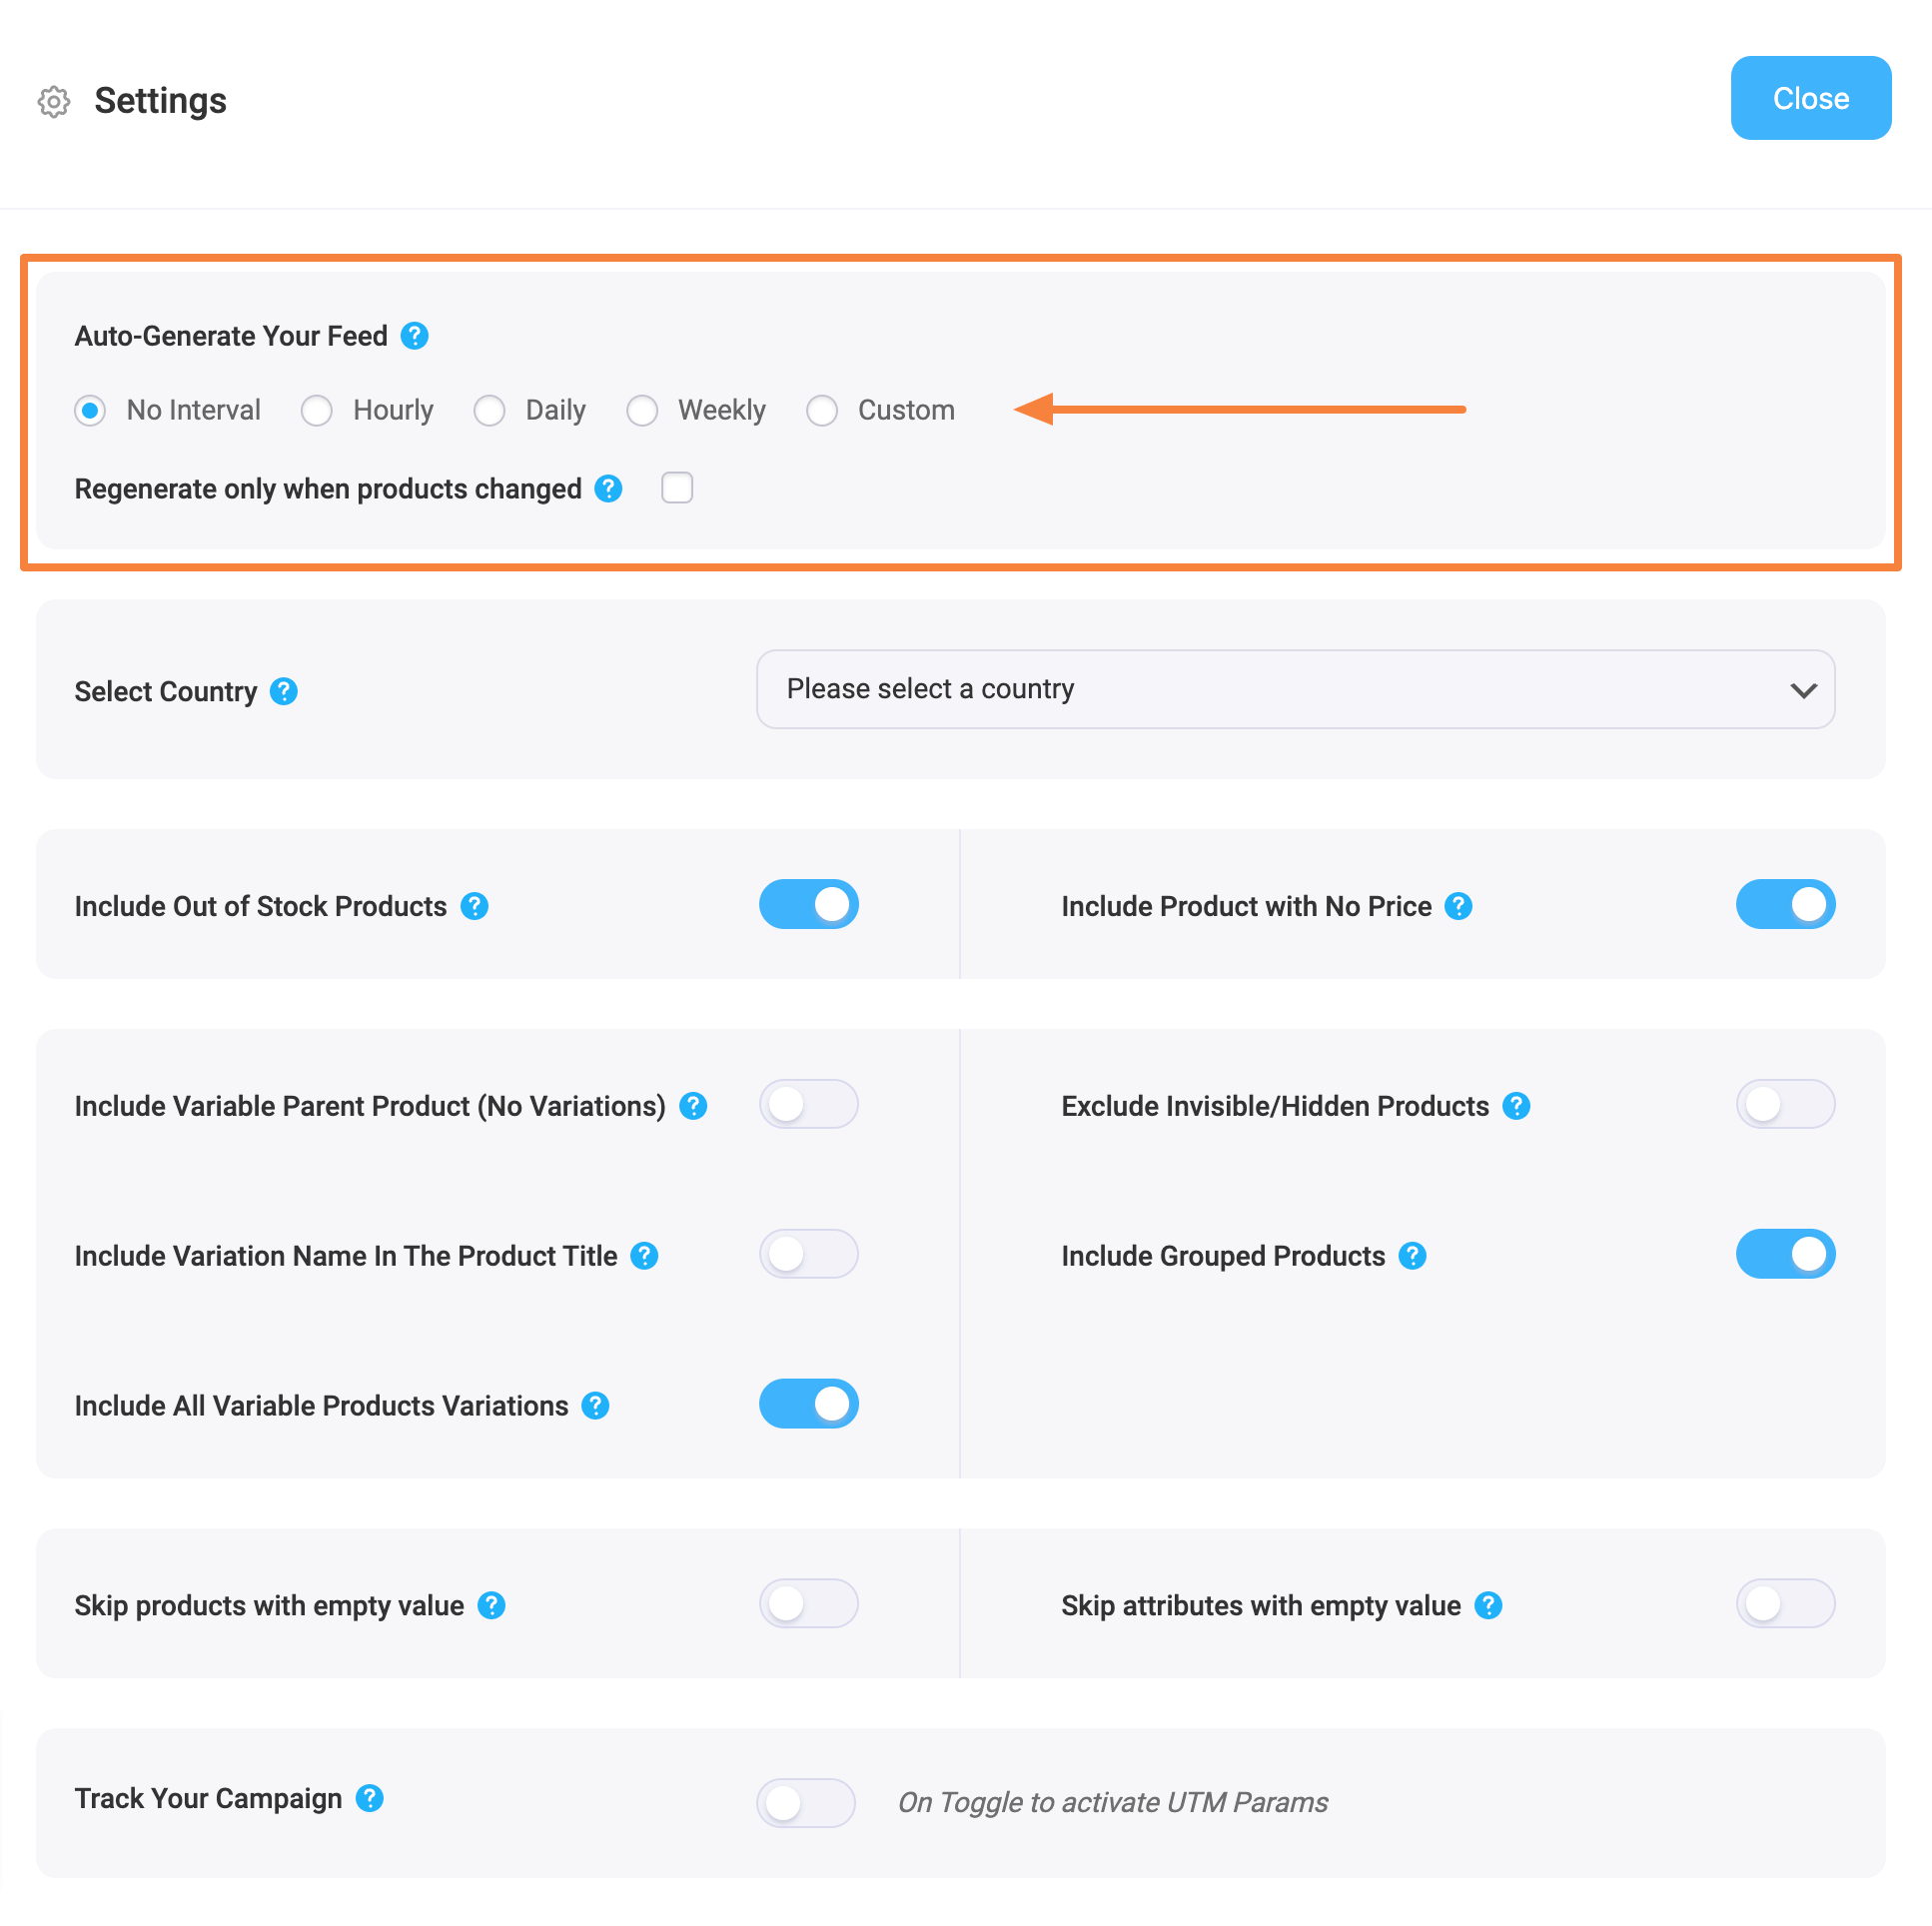
Mit dieser Option können Sie eine automatische Aktualisierung des Feeds in bestimmten Abständen planen. Wählen Sie eine Option, um eine automatische Aktualisierung einzustellen, oder belassen Sie es bei "Kein Intervall", wenn Sie keine automatische Aktualisierung des Feeds einstellen möchten.
4. Verwenden Sie dann je nach Bedarf die folgenden Optionen.
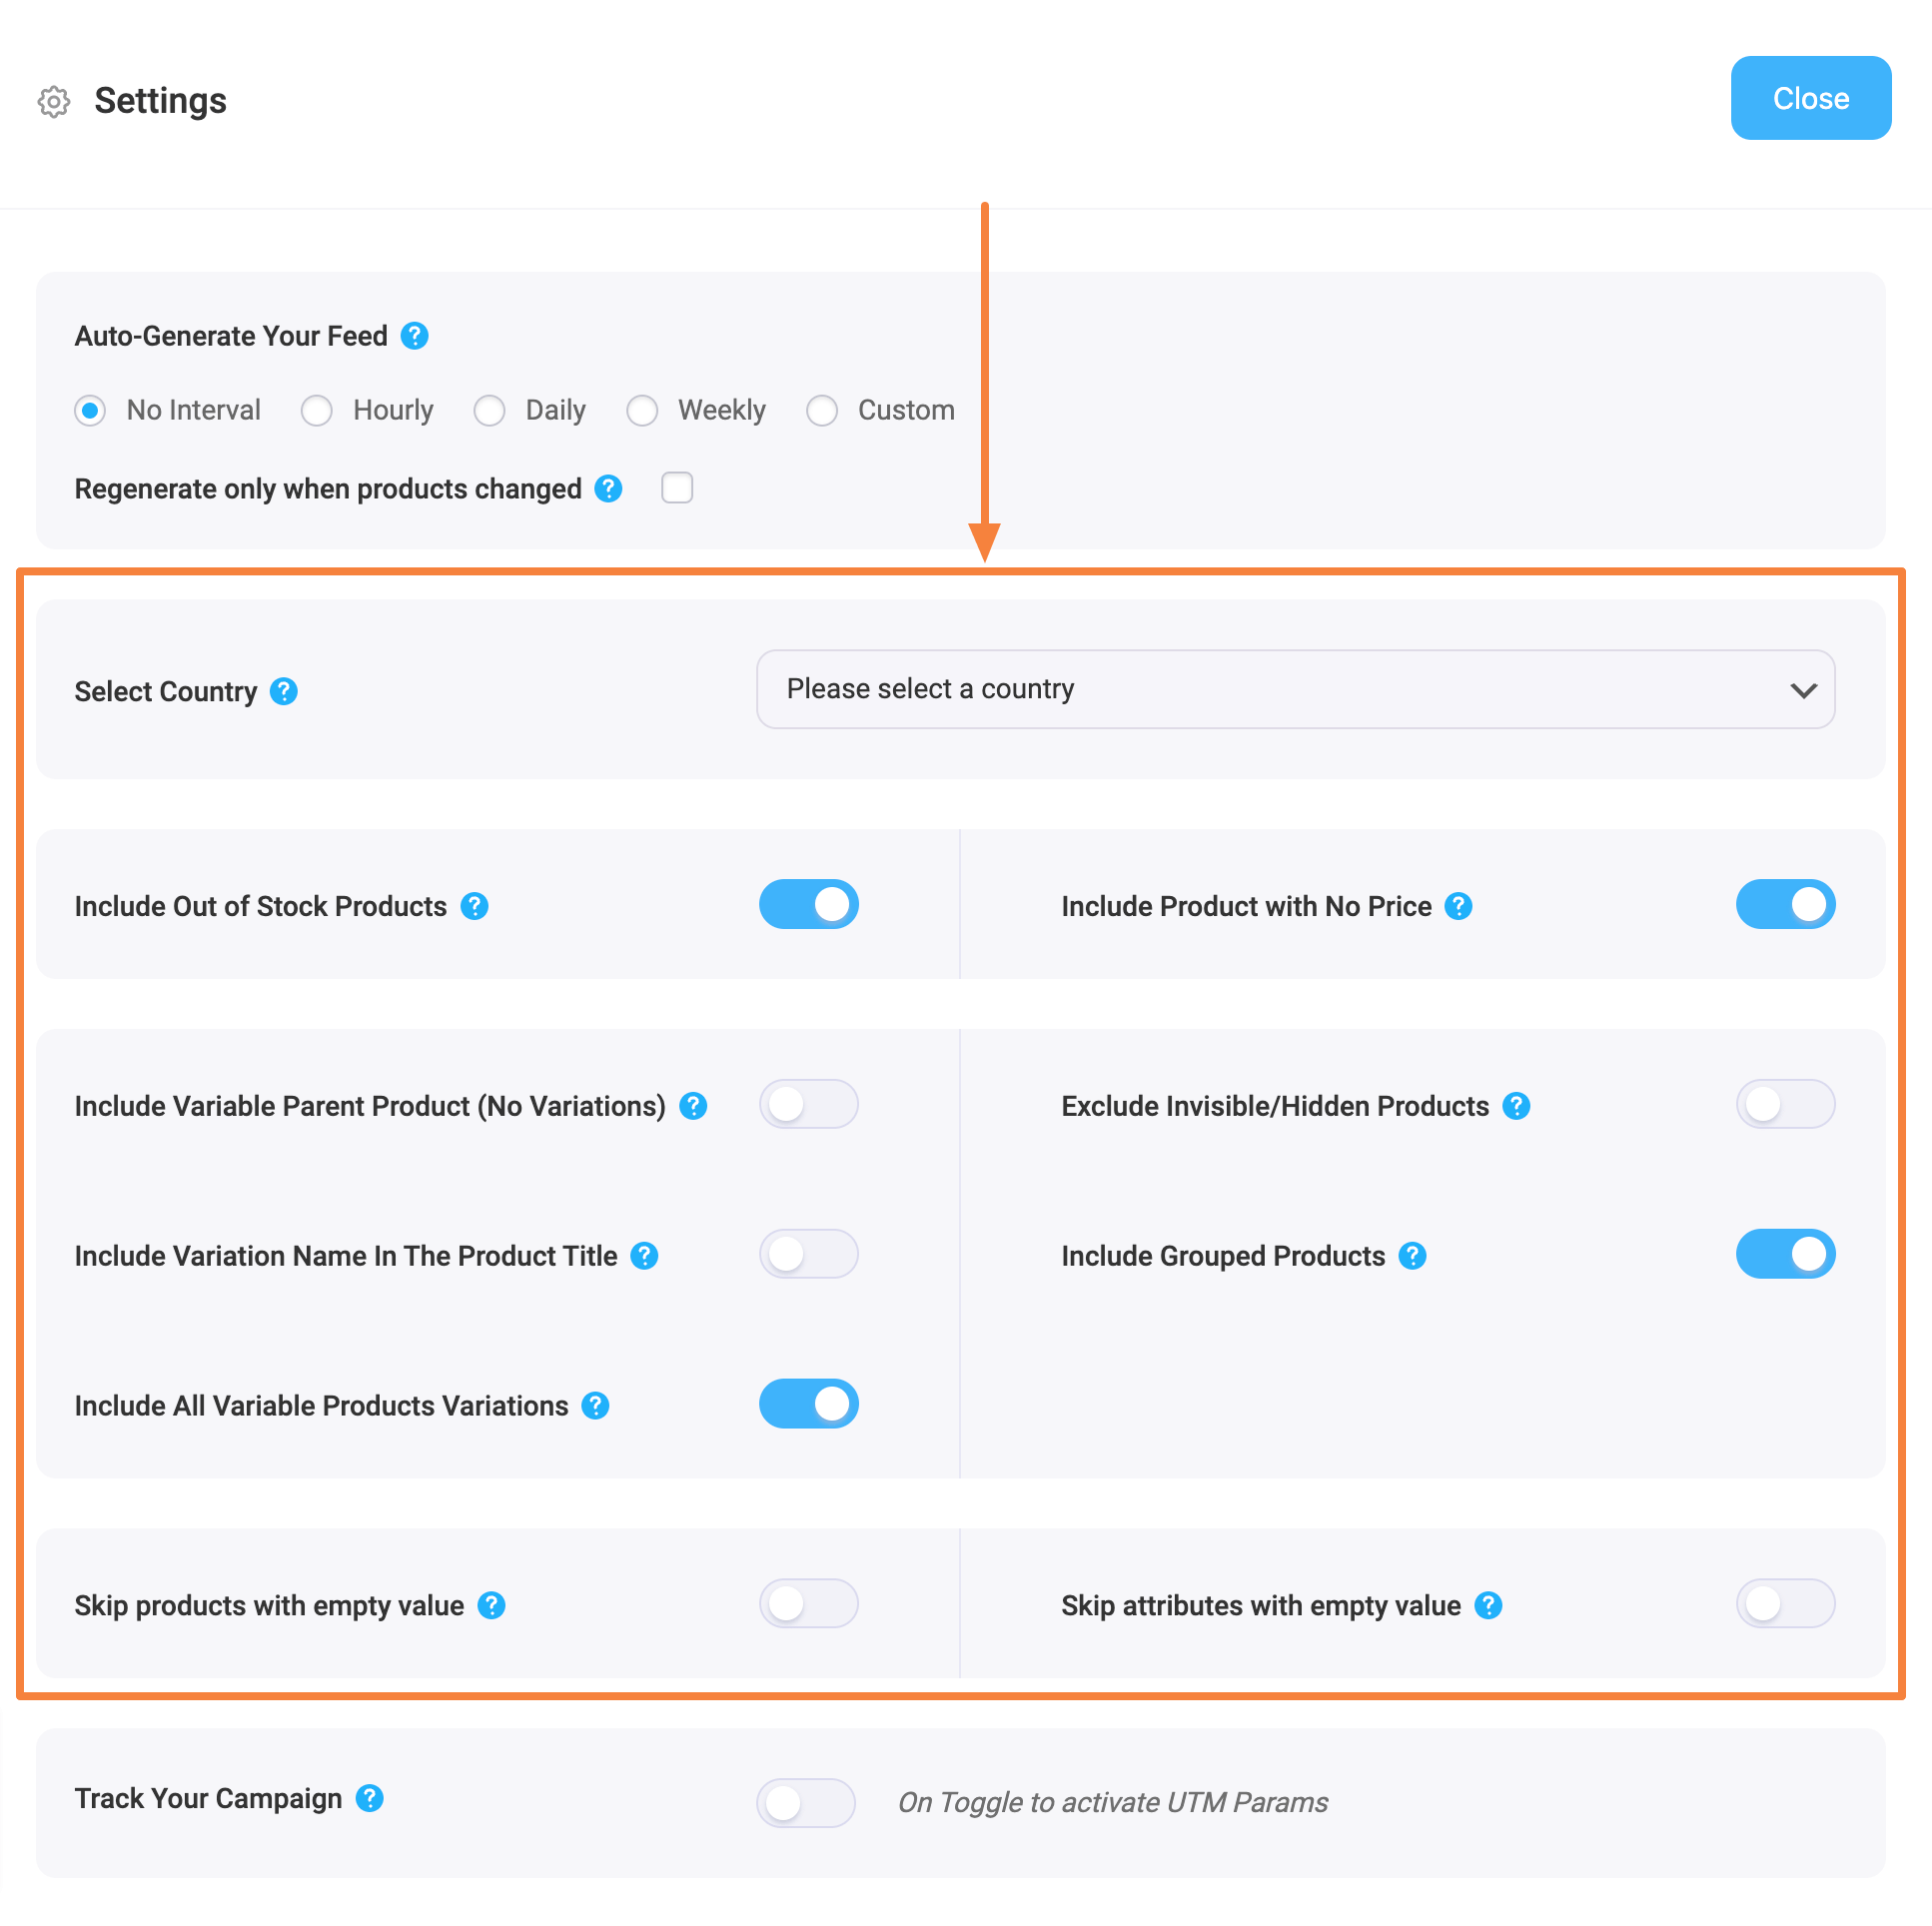
- Land/Region auswählen
- Wählen Sie eine Region aus diesem Dropdown-Menü, wenn Sie die Versandinformationen in Ihren Feed aufnehmen möchten. Sobald Sie die Region ausgewählt haben, müssen Sie das Attribut Versand in Ihren Feed einfügen, um die Versandwerte zu erhalten.
- In diesem Dokument erfahren Sie, wie Sie die Versandinformationen in Ihren Feed aufnehmen können.
- Nicht vorrätige Produkte einbeziehen
- Wenn Sie nicht vorrätige Produkte einbeziehen möchten, können Sie die Option aktivieren.
- Für diesen Feed sollten wir diese Option nicht verwenden und den Wert auf "Nein" belassen. - Include Variable Parent Product (Without Variations)
-Wenn Sie den Parent-Feed für variable Produkte einschließen möchten, können Sie die Option aktivieren.
- Wenige Händler wie Google Shopping oder Facebook verlangen nicht, dass Sie Parent-Produkte übermitteln, jedoch gibt es viele andere Händler wie eBay MIP, die verlangen, dass Sie Produktprodukte im Feed übermitteln.
- Für diesen Feed sollten wir diese Option nicht verwenden und den Wert auf "Nein" belassen. - Include All Variable Products Variations -
-Wenn Sie nur einfache Produkte in den Feed aufnehmen möchten und keine variablen Produkte, dann belassen Sie den Wert auf "Nein".
-Wenn Sie sowohl einfache Produkte als auch variable Produkte an Google Shopping übermitteln möchten, dann wählen Sie den Wert "Ja".
-Lassen Sie uns diese Funktion nutzen und markieren Sie sie als "Ja" für diesen Feed. - Include Variation Name In The Product Title
- Wenige Händler, wie z.B. Google Shopping, schlagen Ihnen vor, den Variationsbegriff zum Produktnamen hinzuzufügen, wenn Sie variable Produkte hochladen.
- Wenn Sie also die Variationsbegriffe zu den variablen Produktnamen hinzufügen möchten, können Sie den Wert auf "Ja" setzen.
- Nutzen wir diese Funktion und markieren sie als "Ja" für diesen Feed. - Gruppierte Produkte einbeziehen
- Wenn Sie gruppierte Produkte haben, ist es am besten, das übergeordnete Produkt des von Ihnen erstellten gruppierten Produkts einzureichen.
- Markieren Sie daher diese Option als "Ja". - Unsichtbare/versteckte Produkte ausschließen
- Möglicherweise haben Sie bestimmte Produkte in Ihrem Shop, die in WooCommerce als versteckt oder unsichtbar gekennzeichnet sind.
- Wenn Sie nur einen Feed für einfache Produkte erstellen möchten, können Sie diese Option als "Ja" markieren, um unsichtbare Produkte aus dem Feed auszuschließen.
- Produktvarianten sind in WooCommerce jedoch standardmäßig als unsichtbar gekennzeichnet. Wenn Sie also variable Produkte in den Feed aufnehmen, sollten Sie diese Option als "Nein" markieren.
- Da wir in diesem Feed Produktvarianten einbeziehen, werden wir diese Funktion nicht verwenden und sie auf "Nein" belassen. - Jedes Attribut überspringen, wenn der Wert leer ist
- Wenn Sie diese Funktion aktivieren, werden alle Attribute eines Produkts ausgeschlossen, wenn der Attributwert fehlt.
- Für diesen Feed wollen wir diese Option nicht verwenden und den Wert auf "Nein" belassen.
5. At the bottom, you will find an option to Track Your Campaign (Analytics parameters).
Use this option if you wish to add analytics parameters to product links on your product feed so that you can keep track of the products’ performance on Google Shopping.
6. Schließen Sie nun die Schublade und klicken Sie auf die Option Produktfilter. Es öffnet sich eine neue Schublade auf der rechten Seite.
Oben haben Sie die Möglichkeit, den benutzerdefinierten Filter oder die Funktion Feed-Regeln (PRO) zu verwenden.
Über das Dropdown-Menü Filter erhalten Sie die Feed-Filteroptionen.
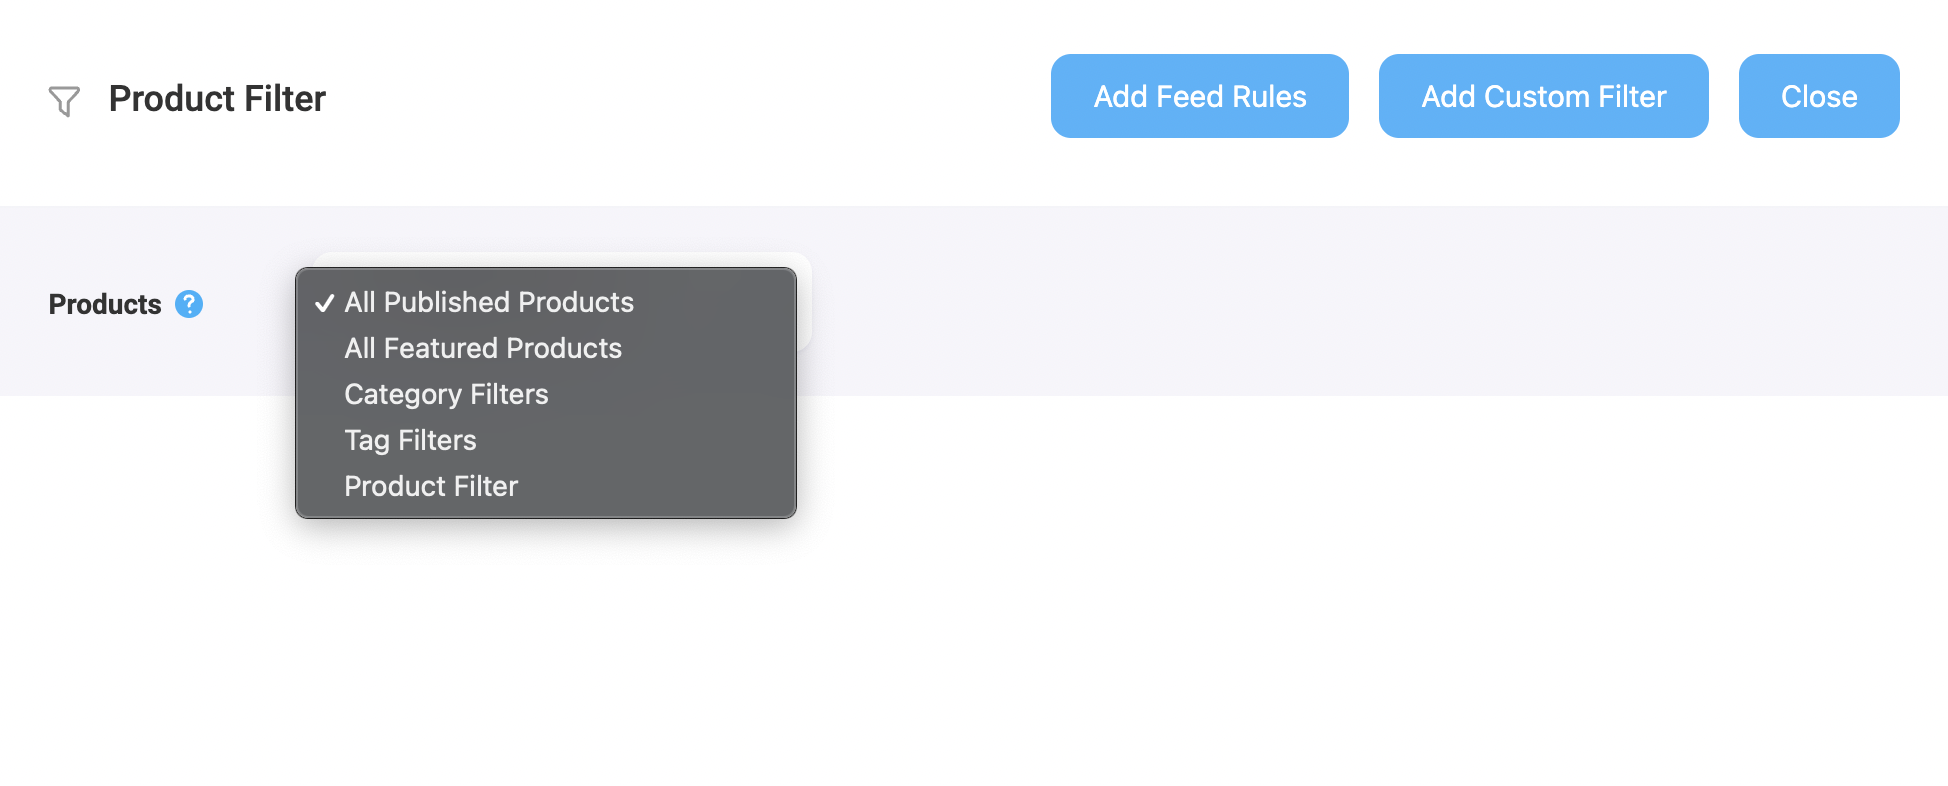
Wählen Sie die Produkte, die Sie in den Feed aufnehmen möchten, mit einem beliebigen Filter aus. Standardmäßig ist "Alle veröffentlichten Produkte" ausgewählt.
Sie können alle anderen Filteroptionen, wie z. B. den benutzerdefinierten Filter, den Kategoriefilter und den Tag-Filter, verwenden, um die gewünschten Produkte einzuschließen (oder die Produkte auszuschließen, die Sie nicht einschließen möchten).
Für ein Basisfutter können Sie es so lassen, wie es ist.
Step 3: Publish WooCommerce Product Feed For Google Shopping #
Nachdem Sie Ihren Feed konfiguriert haben, ist es nun an der Zeit, den Feed zu veröffentlichen.
Scrollen Sie zurück nach oben, und Sie finden auf der rechten Seite eine Schaltfläche Veröffentlichen.
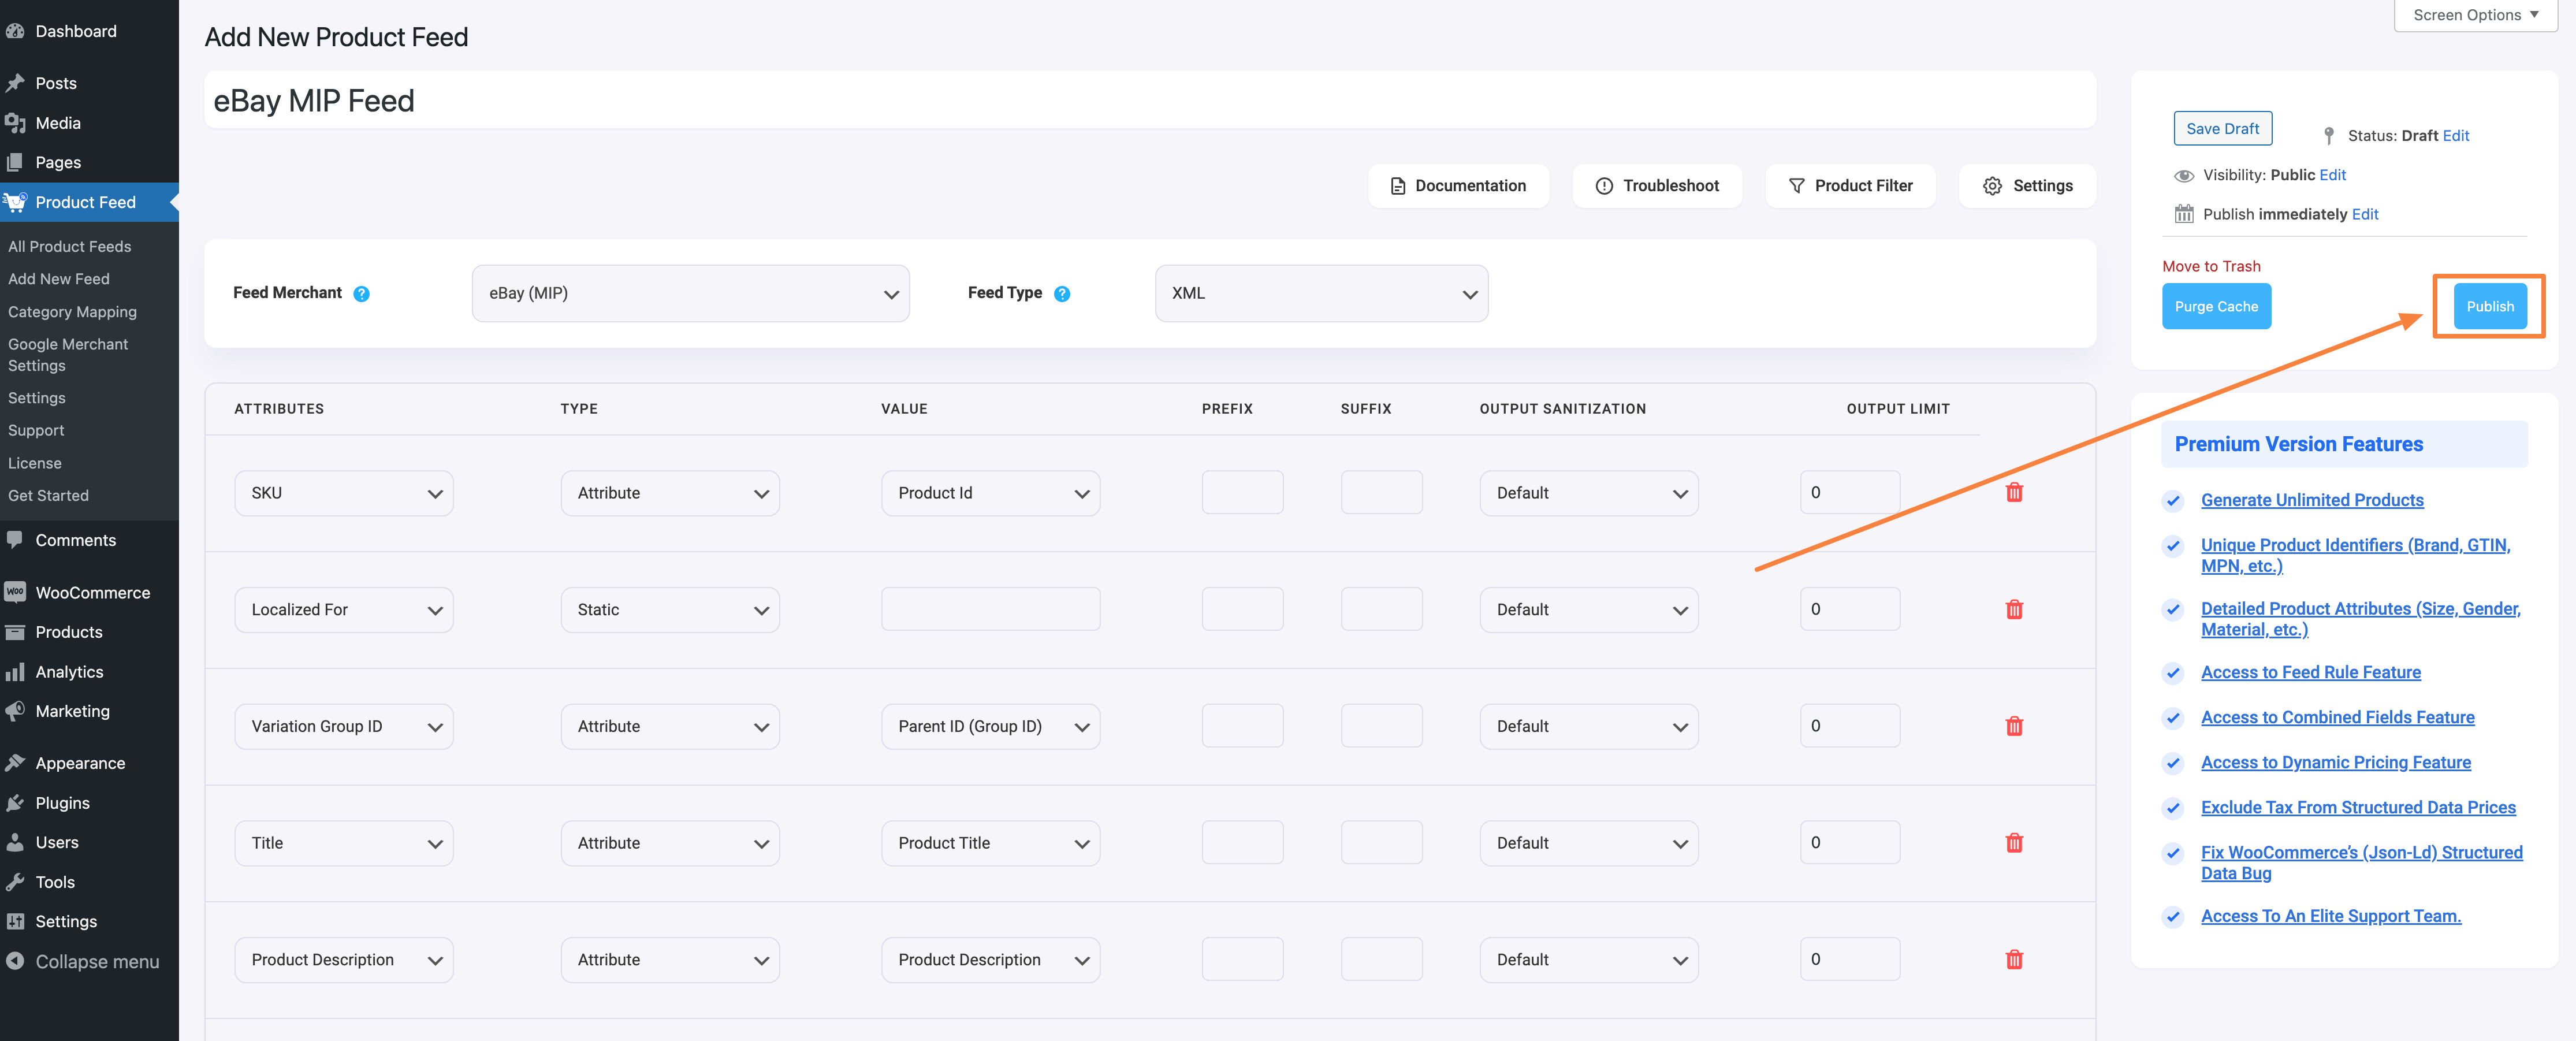
Klicken Sie auf die Schaltfläche Veröffentlichen, und Ihr Feed wird erstellt.
Sobald die Erstellung des Feeds abgeschlossen ist, können Sie den Feed anzeigen oder herunterladen.
That’s it. Your WooCommerce XML product feed for eBay MIP is generated.


