In this doc, I will show you how you can easily create your WooCommerce product feed for Skroutz Merchant.
Step 1: Create a New Feed and Map Your Product Attributes #
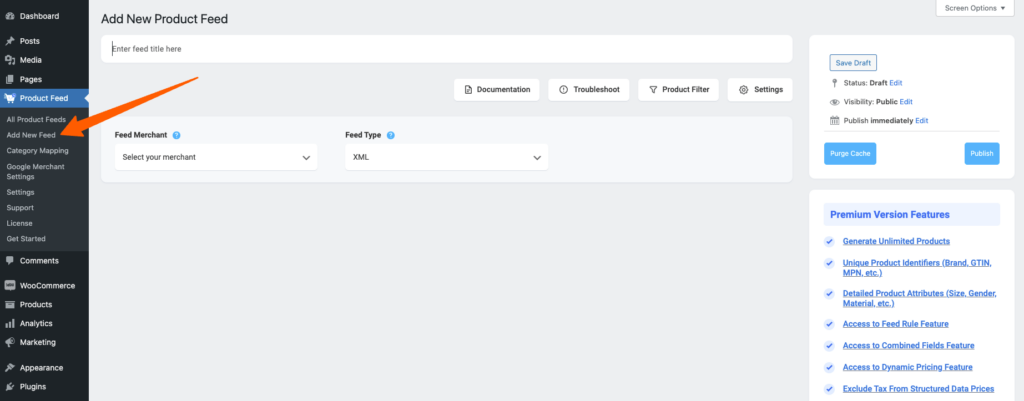
Gehen Sie zu Ihrem Produkt-Feed-Dashboard.
Klicken Sie auf die Schaltfläche Neuen Feed hinzufügen.
Sie gelangen dann zur Seite für die Erstellung des Feeds.

Also, hier,
1. Oben haben Sie die Möglichkeit, dem Feed einen Titel zu geben. Geben Sie Ihrem Feed einen Namen.

2. Direkt unter dem Titel sehen Sie eine Option zur Auswahl Ihres bevorzugten Händlers. Klicken Sie einfach auf die Dropdown-Schaltfläche Händler füttern und wählen Sie Ihren bevorzugten Händler aus der Dropdown-Liste aus oder suchen Sie in der Dropdown-Box.

Select Skroutz merchant and all the required attributes will be loaded below.

3. Here, you will see that some of the values are assigned already, you need to assign values to the rest of the attributes.
For example, when you select Google Review, you will see there are three Attributes that don’t have the values assigned.
- Manufacturer/ Brand —
This should be the Brand name of the product you are selling. If you are the manufacturer, you can set the type as Static and input your company name here.
If you have different brand names for different products, you will have to save the value in a custom field or product attribute and then use that value here.
**You may also use Perfect Brands for WooCommerce, which will make it easier to assign and use brand names.
- MPN —
This value should be unique to each product. So you have to save this value in a custom field within each product and use that value here.
4. Also, if you want to add new attributes, you can click on the Add New Attribute button, and you will get the list of the optional Attributes of Google Review.
Or you can add a custom attribute by clicking on the Add New Custom Attribute button.
Step 2: How to add the variations to the feed #
1. Scroll up to the top and here, you will see the option Settings. Click on the Product Settings button, and a drawer will open from the right side of the screen.

2. Now Enable the option Include Variable Parent Product (Without Variations) and Include All Variable Products Variations which will include the Variable parent and variations to the feed. As required by Skroutz Merchant policy to add variations to the feed you’ll need to add the Variable Parent Product in the feed.
Step 3: Publish WooCommerce Product Feed For Skroutz #
Nachdem Sie Ihren Feed konfiguriert haben, ist es nun an der Zeit, den Feed zu veröffentlichen.
Click on the Publish button and your feed will start generating.
Sobald die Erstellung des Feeds abgeschlossen ist, können Sie den Feed anzeigen oder herunterladen.
That’s it. Your WooCommerce Product Feed for Skroutz Merchant is generated.