Limited Time Offer

Special Sale - 25% Off

12DAY
12HR
45MIN
30SEC
Get 25% OFF
Zum Inhalt springen
RexThema
  • Plugins
    • WP VR
      WP VR – Quality WP Virtual Tour CreatorCreate stunning virtual tours easily, on your own, using 360 Panoramas.
    • Produkt-Feed-Manager
      Product Feed Manager For WooCommerceMaximize Sales With The Largest Marketplaces.
    • Wagenheber
      Cart Lift To Recover Abandoned CartsRecover abandoned carts for your WooCommerce Store easily.
    • Checkoutify
      Checkoutify Checkout Field Manager for WooCommerceThe Ultimate WooCommerce Checkout Customizer.
    • Catalog Mode for WooCommerce
      Catalog Mode For WooCommerceTurn your WooCommerce store into a product showcase catalog.
    • Dynamic Discount
      Dynamic Discount for WooCommerceBoost your AOV significantly with custom dynamic discount offers.
    • Advanced Shipping Logo
      Advanced Shipping for WooCommerceSet conditional shipping and boost customer satisfaction.
    • Marketplace Auto-sync for WooCommerce
      Marketplace Auto Sync for WooCommerce – Automate Your Business GrowthAuto-sync products with leading marketplaces.
    • Alle Plugins anzeigen
  • Sell Kit Bundle
  • Blog
  • Ressourcen
    • Dokumente
    • Unterstützung
    • Brand Assets
  • My Account
    • Anmelden
  • EN
  • NL

How can we help you?

Dokumentation

Wagenheber

18
  • Getting started
    • Einführung in Cart Lift
    • Wagenheber installieren und aktivieren
    • Eine grundlegende Plugin-Übersicht - Cart Lift
    • Cart Lift effektiv konfigurieren und nutzen
  • Troubleshooting Common Issues
    • Fehlersuche bei allgemeinen Problemen - Cart Lift
  • Upgrade To Cart Lift Pro
    • Upgrade auf Pro - Cart Lift
    • License Plan Upgrade Guide for Cart Lift Pro
  • Abandoned Cart Recovery Conditions
    • Wie man abgebrochene Warenkörbe automatisch verfolgt
    • Wie Sie Ihre Kampagne zur Wiederherstellung abgebrochener Warenkörbe einrichten
    • So verwenden Sie den Twilio SMS-Service, um verlassene Warenkörbe wiederherzustellen - Cart Lift Pro
    • Wie man Benachrichtigungen für verlassene Warenkörbe und Wiederherstellung erhält
    • Vollständiger Analysebericht zur Wiederherstellungskampagne
    • Shortcodes für E-Mail-Felder in Cart Lift
    • How to Pause / Resume Individual Abandoned Cart Recovery
    • How To Set Condition To Automatically Delete Abandoned Orders After A Particular Number Of Days
    • How To Set Conditions To Exclude Carts From Abandoned Cart Recovery Campaigns
    • How To Configure Popup Editor
    • How To Configure reCAPTCHA V3 Settings in Cart Lift

Produkt-Feed-Manager

114
  • Erste Schritte
    • Einführung in den Product Feed Manager für WooCommerce
    • Erste Schritte mit Product Feed Manager für WooCommerce
    • How To Install And Activate Product Feed Manager
    • Wie man zum ersten Mal einen Produkt-Feed erzeugt
    • Product Feed Manager – Basic Plugin Overview
    • All Supported Plugins & Integrations With Product Feed Manager For WooCommerce
  • Upgrade auf PFM Pro
    • License Renewal for Product Feed Manager Pro
    • Product Feed Manager VAT/TAX Policy
    • License Plan Upgrade Guide for Product Feed Manager Pro
  • Upload Feed To Merchants
    • How to Upload your Product Feed on the Facebook Store
    • Upload your WooComerce Product Feed directly to the Google Merchant Center – (No Need For Authorization)
    • How To Auto-sync Your Store’s Products To Google Merchant Center Using Content API
    • Automatische Synchronisierung des Produkt-Feeds mit Google Merchant Center
  • Anweisungen zur Futtermittelerzeugung
    • How To Generate A Google Shopping Feed With Product Feed Manager
    • How to Generate A WooCommerce Product Feed For Facebook
    • Wie man einen benutzerdefinierten Produkt-Feed einfach erstellt
    • How To Create A Feed For eBay MIP
    • So erstellen Sie einen Target Product Feed für Target Marketplace
    • Wie man einen WooCommerce Produkt-Feed für Wish.com erstellt
    • Wie man einen WooCommerce-Produkt-Feed für Sears Marketplace erstellt
    • Wie man einen WooCommerce-Produkt-Feed für NewEgg Marketplace erstellt
    • Wie man einen WooCommerce Produkt-Feed für Walmart erstellt
    • Wie man einen WooCommerce Produkt-Feed für den Instagram-Katalog erstellt
    • Wie man Produkte auf Instagram Shop hochlädt
    • How to generate WooCommerce Product Feed for Amazon
    • How to generate WooCommerce Product Feed for Zbozi
    • How to Generate WooCommerce Product Feed for Skroutz
    • How To Create A Feed For eBay Seller Center
    • How to generate WooCommerce Product Feed for Rozekta
    • How to generate WooCommerce Product Feed for Pinterest
    • How to generate WooCommerce Product Feed for TikTok Ads Catalog
    • How to generate WooCommerce Product Feed for OpenAI Commerce
  • Alle Google Feeds
    • So erstellen Sie einen WooCommerce-Produkt-Feed für Google Remarketing (DRM)
    • Wie man einen WooCommerce-Produkt-Feed für Google Local Products erstellt
    • So erstellen Sie einen WooCommerce-Produkt-Feed für Google Local Products Inventory
    • So erstellen Sie einen WooCommerce-Produkt-Feed für Google Manufacturer Center
    • How to create a WooCommerce feed for Google Merchant Center Promotion Using Product Feed Manager
    • Wie man einen WooCommerce-Produkt-Feed für Google Shopping-Aktionen erstellt
    • So erstellen Sie einen WooCommerce-Produkt-Feed für Google Dynamic Display Ads (Google Ads)
    • So erstellen Sie einen WooCommerce-Produkt-Feed für Google Express (ehemaliges Google Shopping Actions-Programm)
    • Wie man einen WooCommerce-Produkt-Feed für Google Local Inventory Ads erstellt
    • Wie man einen WooCommerce Produkt-Feed für Google Custom Search Ads erstellt
    • Wie man einen WooCommerce Produkt-Feed für Google Dynamic Search Ads erstellt
    • Wie man einen WooCommerce-Produkt-Feed für Google Review erstellt
  • Kategorie-Zuordnung
    • Verwendung der Kategoriezuordnung für den Produkt-Feed
    • So verwenden Sie die Kategoriezuordnung für Google Produktkategorien
    • So konfigurieren Sie die Kategoriezuordnung für Facebook-Produktkategorien
  • Understanding Feed Attributes
    • Benutzerdefinierte Felder für wichtige Produktattribute hinzufügen
    • Hinzufügen eines statischen Präfixes oder Suffixes zu einem Attribut im Feed
    • So fügen Sie dem Feed ein benutzerdefiniertes Attribut hinzu
    • Wie man ein zusätzliches Produktattribut im Feed hinzufügt oder entfernt
    • Wie Sie die Versandwerte von WooCommerce in Ihren Feed aufnehmen (außer Google und Facebook)
    • Price Attributes Mapping and Understanding The Different Use Cases
    • Understanding And Configuring Feed Attributes and Their Values
    • So fügen Sie Ihrem Produktpreis eine Währung hinzu
    • How to Combine Multiple Attribute Values Using the Combined Attributes Feature
  • Understanding Basic Feed Configuration
    • Produkt-Feed-Optimierung mit Yoast SEO Produkttitel, Meta-Beschreibung und Hauptkategorie
    • So planen Sie die automatische Aktualisierung von Feeds in bestimmten Intervallen
    • Lernen über Feed-Dateitypen und wie man Feeds herunterlädt oder anzeigt
    • So fügen Sie UTM-Parameter zu Produkt-URLs hinzu
    • Optimieren Sie Produktzuführungsdaten mit effektiven Ausgabefiltern
    • So verwenden Sie die RankMath-Primärkategorie im Feed
    • Einfügen von Versandwerten in den WooCommerce-Produkt-Feed (Google & Facebook)
    • Einfügen von Steuerwerten in Ihr WooCommerce-Produkt-Feed (Google & Facebook)
    • Entfernen von HTML-Tags oder Shortcodes aus einem Feed
    • UTF-8-Codierung zum Konvertieren von HTMLEntities in Symbole in einem Feed-Attributwert verwenden
    • Umwandlung von Symbolen in HTMLEntities in einem Feed-Attributwert
    • Einfügen von CDATA in ein XML-Feed-Attribut-Tag
    • Entfernen des Dezimals aus dem Preis für Marktplaats Feed
    • Ersetzen von Leerzeichen durch Bindestriche in einem Feed-Attributdaten
    • Wie man einen benutzerdefinierten Feldwert im Produkt-Feed verwendet
    • So verwenden Sie die Yoast-Primärkategorie im Feed
    • How To Exclude Draft Products From The Feed
    • How to Add WooCommerce’s GTIN, UPC, EAN, or ISBN to Product Feed
    • Understanding The Basics Of Feed Settings
  • Feed Filters: Help Customize Feed
    • Wie man unsichtbare Produkte / versteckte Produkte aus dem Produkt-Feed ausschließt
    • Verwendung des Kategoriefilters bei der Erzeugung von Produkt-Feed
    • Verwendung des Tag-Filters beim Erzeugen von Produkt-Feed
    • Verwendung von Feed-Filteroptionen bei der Erzeugung von Feeds
    • Wie man variable Produkte in den Feed einfügt
    • Wie man private Produkte in den Produkt-Feed einbindet
    • So fügen Sie den Begriff der Produktvariation in den Produktnamen ein
    • So verwenden Sie benutzerdefinierte Filter beim Erzeugen von Produkt-Feed
    • How To Use The Product Filter Option To Include/ Exclude Specific Products
    • How To Use Brands Filter When Generating Product Feed
    • Best-Selling Products: Generate a WooCommerce Product Feed to Boost Sales
  • Feed Rules: Help Modify Product Data
    • Verwendung der Funktion "Feed Rule" zur Bearbeitung von Attributwerten
    • How to use the Feed Rules feature to manipulate your product price
  • Feed Validation
    • Feed Validator for Google Shopping
    • Feed Validator for Facebook Catalog
  • Nützliche Steuerungsoptionen
    • Umfangreiche benutzerdefinierte Felder mit eindeutigen Bezeichnern für WooCommerce-Produkte hinzufügen
    • Wie man umfangreiche benutzerdefinierte Felder zu WooCommerce-Produkten hinzufügt
    • Wie man die Steuer aus den Preisen für strukturierte Daten ausschließt
    • How to Schedule Feed Updates Based on Product Data Changes
    • So legen Sie benutzerdefinierte Zeitintervalle für die automatische Aktualisierung fest
    • Nützliche Optionen auf der Registerkarte Einstellungen
    • Produkte pro Charge bei der Chargenverarbeitung kontrollieren
    • Verbinden Sie Facebook-Pixel mit WooCommerce für dynamische Anzeigen
    • How to set 5-Minutes Time Interval for Updating Feed
  • PFM Plugin Integrations
    • How To Include Brand Value From Perfect Brands For WooCommerce In The Feed
    • Aktivieren Sie das Fehlerprotokoll für Product Feed Manager für WooCommerce
    • Wie man mit WPML / WCML den Preis des Produktfeeds konvertiert
    • Wie man mit Polylang Produkt-Feed in mehreren Sprachen erzeugt
    • Wie man mit WPML Produkt-Feed in mehreren Sprachen generiert
    • How To Include Discount Rules In The Feed Using Discount Rules For WooCommerce And PFM
    • How To Generate Product Feed In Multiple Languages | PFM + TranslatePress
  • Fix JSON-LD strukturierte Daten für variable Produkte
    • Fix WooCommerce (JSON-LD) strukturierte Daten für die Genehmigung in Google Shopping
  • Fehlerbehebung
    • Fehlendes Produkt im Facebook Commerce Manager - Facebook & Instagram
    • Google Shopping Produkt-Feed Spezifikation - Liste der Attribute
    • Fehlerbehebung bei allgemeinen Problemen - Product Feed Manager für WooCommerce
    • How to Troubleshoot Feed Errors in Product Feed Manager

WP VR

84
  • Erste Schritte
    • Erste Schritte mit WP VR
    • Wie man WP VR installiert und aktiviert
    • How To Create A Simple Virtual Tour In 2 Minutes – WP VR
    • WP VR Basic Plugin Übersicht
  • Upgrade auf WPVR Pro
    • How To Upgrade To Pro – WP VR
    • License Renewal Guide for WP VR Pro
    • WP VR VAT/TAX Policy
    • License Plan Upgrade Guide for WP VR Pro
  • WPVR Premium Add-ons
    • Wie man Fluent Forms in eine virtuelle Tour einbindet
    • Wie man WooCommerce in eine virtuelle Tour integriert
    • Wie man virtuelle Touren auf Nicht-WordPress-Websites einbettet
    • WP VR Embed Addon – Features Overview
  • Anleitung - Grundeinstellungen
    • How To Use Exclusive Features On Settings Tab To Customize A Virtual Tour
    • So fügen Sie ein Vorschaubild zu Ihrer virtuellen Tour hinzu - WPVR
    • Wie man die automatische Drehung für die virtuelle 360°-Tour aktiviert - WP VR
    • How to Customize the Tour Layout
  • Einrichten von Steuerschaltflächen
    • Verwendung von benutzerdefinierten Symbolen für Navigations- und Steuerungsschaltflächen in einer virtuellen Tour
    • How to Share Virtual Tours on Social Media
    • How To Configure A Call To Action (CTA) Button in Virtual Tour
  • Panoramabilder in Live-Szenen verwandeln
    • So fügen Sie Ihrer virtuellen Tour eine Szene hinzu
    • Festlegen des Standard-Szenengesichts auf einer virtuellen Tour
    • So legen Sie das Limit für die Aufnahme von 360-Bildern für eine Szene in Ihrer virtuellen Tour fest - WPVR
    • Verwenden der Szeneneinstellungen zum Anpassen einer Szene
  • Hotspots für Navigation und Informationen verwenden
    • Hinzufügen von Hotspots zu einer Szene in Ihrer virtuellen Tour
    • So verwenden Sie Hotspots, um Informationen, Bilder oder Videos anzuzeigen
    • Hotspots verwenden, um von einer Szene zur nächsten zu wechseln
    • Anpassen von Hotspot-Symbolen und Farbe
    • Ein selbst gehostetes Video auf WPVR-Hotspots einbetten
    • Wie man Youtube-Videos in virtuelle Touren mit WPVR einbettet
    • Wie man Hotspot-Inhalte leicht innerhalb der virtuellen Tour einrichtet - mit dem WYSIWYG HTML Editor
    • How to use the Custom Icon Class
  • 360-Grad-Videotouren erstellen
    • Ein Youtube 360 Video mit WPVR auf Ihrer Website einbetten
    • Wie man eine virtuelle Tour mit selbst gehosteten interaktiven 360-Grad-Videos mit WPVR erstellt
  • Google Street Views einbetten
    • So betten Sie eine Google Street View-Tour mit WPVR in Ihre Website ein
  • Virtuelle Rundgänge mit Teilpanorama und Vollansicht
    • So erstellen Sie eine virtuelle Tour mit Teilpanoramen oder iPhone-Panoramen
    • Wie man eine virtuelle Tour mit Handy-Panoramabildern erstellt
    • Wie man virtuelle Touren im Vollbildmodus erstellt - WPVR
    • Einrichten eines virtuellen Rundgangs mit 360-Panorama-Hintergrund
  • Veröffentlichen Sie virtuelle Rundgänge auf Ihrer Website
    • Wie man einen WPVR Shortcode zum Einbetten einer virtuellen Tour verwendet
    • How to Set Up Password Protection For Your 360 Virtual Tour – WP VR
    • How to Publish Virtual Tours Using QR Code
  • Importieren, Exportieren und Duplizieren von virtuellen Touren
    • Wie man eine virtuelle Tour dupliziert
    • Virtuelle Touren exportieren und importieren
  • Fehlerbehebung - Lösen Sie häufige Probleme
    • Fehlersuche bei allgemeinen Problemen - WPVR
    • So lösen Sie das Problem, dass die virtuelle Tour nicht angezeigt wird - WPVR
    • Wie man Assets von WPVR von der automatischen Optimierung ausschließt
    • Wie Sie die Einstellungen Ihres WPVR-Benutzerkontos und den Abonnementplan verwalten
    • WP VR Tour Not Displaying on Review and On the Published Webpage
    • WP VR Troubleshooting Guide: Embedding 360 Tours on External Platforms
  • Optimierung der virtuellen Tour für mobile Geräte
    • Einrichten eines dynamischen Front-End-Hinweises für virtuelle Rundgänge für Betrachter von Mobiltelefonen
    • Automatische Größenanpassung von Bildern auf mobilen Geräten für virtuelle Touren
    • So legen Sie für Ihre virtuellen Rundgänge eine individuelle Höhe für mobile Geräte fest
  • Demo Virtuelle Touren
    • Einfache virtuelle Tour
    • Google Street View-Tour - WPVR Pro
    • Video-Anleitungen - WPVR
    • Demo Virtueller Rundgang mit Teil-Panorama - WPVR Pro
    • Bar/Pub Showcase
  • Erweiterte Einstellungen für virtuelle Rundgänge
    • So richten Sie die exklusiven WPVR-Einstellungen ein
    • Kontroll-Skript und das Laden von Stilen für die virtuellen Touren
    • Deaktivieren von WordPress Large Image Handler für virtuelle Touren
    • Aktivieren des Gyroskop-Sensors bei virtuellen 360°-Touren
    • Hinzufügen von Hintergrundmusik zu virtuellen Touren
    • Tastatursteuerungen für Navigation und Zoom einschränken
    • So schränken Sie die Verwendung des Mausbildlaufs zum Zoomen oder Ziehen zum Verschieben einer Tour ein
    • Hinzufügen eines virtuellen Tour-Symbols oder Ihres Firmenlogos in 360-Grad-Touren - WPVR
    • Wie man YouTube-Erklärvideos in virtuelle Touren einbaut 
    • So aktivieren Sie die Unterstützung für VR-Headsets für Handys
    • Individuelle Hotspot-Symbolfarbe und -Animation in Panoramabildern einstellen
    • Wie Sie virtuelle Grundrisse in Ihre Touren einfügen - WPVR
    • How to do SEO optimization for Embeded tour
    • How To Set Scene Transition (Scene Entrance Animation)
    • How to Set Custom Zoom Settings in WPVR
    • WP VR Analytics: How to Track and Analyze Your Virtual Tours
    • Einrichten einer Szenengalerie auf virtuellen Touren
  • WP VR Plugin Integrations
    • Wie man eine virtuelle Tour mit WPVR Gutenberg Block einbettet
    • Wie man eine virtuelle Tour mit WPVR Elementor Widget einbettet
    • So verwenden Sie WP VR Oxygen Element zum Einbetten einer virtuellen Tour
    • WP VR & Dokan Integration: Empower Vendors to Create 360° Virtual Tours
    • How To Embed A Virtual Tour Using WPBakery Element
    • Wie man eine virtuelle Tour mit WPVR Panorama Modul für Divi veröffentlicht
    • Wie WPVR virtuelle Touren mit Visual Composer Element einbetten

Dynamic Discounts for WooCommerce

18
  • Erste Schritte
    • How To Install & Activate the Dynamic Discounts for WooCommerce
    • How To Create A Discount Rule For The First Time
    • Basic Plugin Overview – Dynamic Discounts for WooCommerce
  • Discount Conditions
    • How To Set Product Based Discount
    • How To Set Cart Based Discount
    • How to Set Discount Conditions for Bulk Purchases in WooCommerce
    • How To Set Discount Conditions Based on Customer Purchase History
    • How To Set Discount Conditions For Product Variations
    • How To Apply discount To The cheapest product In The Cart
    • How to Set Discount Based On Category and Tag
    • How To Set Buy X Get Y Discount
    • How To Set Stock-Based Discount
    • How To Set A Bundle Discount
    • How To Set Buy X Get X Discount
    • How To Apply Discount To Nth Quantity
    • How To Set The Cheapest Product On Cart Discount
    • How To Set “Offer One Or More Free Products” Discount
    • How to Set Attribute Specific Discount For Product Variants

Checkoutify

5
  • Erste Schritte
    • How To Install & Activate Checkoutify Pro – Checkout Customizer
    • How to Replace Your WooCommerce Checkout Using Checkoutify – Checkout Customizer
    • How To Create and Customise an Order Bump
    • How to Create a Custom Field in Checkoutify
  • Customizing Checkout
    • Creating a Multi-Step Checkout Using Checkoutify – Checkout Customizer

Advanced Shipping for WooCommerce

18
  • Erste Schritte
    • How To Install & Activate The Advanced Shipping For WooCommerce
    • Basic Plugin Overview – Advanced Shipping For WooCommerce
    • How To Add Advanced Shipping To An Existing Shipping Zone
    • How to Set Shipping Conditions For The First Time Using Advanced Shipping
  • Shipping Conditions
    • How To Set Product-Specific Shipping Conditions
    • How To Set Category-Based Shipping Conditions
    • How To Set Shipping Conditions Based On WooCommerce Product Tag
    • How To Set Shipping Conditions Based On WooCommerce User Role
    • How To Set Shipping Conditions Based on Product’s Weight, Volume, Length, Height, and Width
    • How to Add Price Based Shipping Conditions in Advanced Shipping
    • How to Add Weight Based Shipping Conditions in Advanced Shipping
    • Quantity Based Shipping Conditions: Easy Steps to Set Them Up in WooCommerce
    • How to Set Time and Day Based Shipping Conditions in Advanced Shipping
    • How to Set Country Based Shipping Conditions in Advanced Shipping
    • How to Set City Based Shipping Conditions in Advanced Shipping
    • How to Set State Based Shipping Conditions in Advanced Shipping
    • How to Set ZIP Code Based Shipping Conditions in Advanced Shipping
    • How to Set Zone Based Shipping Conditions in Advanced Shipping

Catalog Mode for WooCommerce

7
  • Erste Schritte
    • How To Install & Activate the Catalog Mode for WooCommerce
    • Basic Plugin Overview – Catalog Mode For WooCommerce
  • Settings
    • How To Set Users Rules For Catalog Mode
    • How To Configure Catalog Mode Options
    • How to Manage the Exclusion List in Catalog Mode
    • How To Configure the Inquiry Form in Catalog Mode
    • How to Create and Manage Custom Buttons and Labels

Marketplace Auto-Sync for WooCommerce

4
  • Erste Schritte
    • How To Install & Activate Marketplace Auto Sync
    • Basic Plugin Overview – Marketplace Auto Sync
    • How To Set Up an Auto Sync For The First Time
    • How To Auto-sync with Google Merchant Center
  • Startseite
  • Dokumente
  • Produkt-Feed-Manager
  • Anweisungen zur Futtermittelerzeugung
View Categories

How To Create A Feed For eBay MIP

The eBay MIP is the Merchant Integration Platform (MIP) is a feed-based selling platform for small businesses and enterprise merchants. 

If you own a small business or if you are an enterprise seller, you can start selling on eBay MIP now.

For WooCommerce shop owners, you just need to submit the WooCommerce product feed to MIP to create or maintain listings on eBay.

In this doc, I will show you how you can easily create your WooCommerce product feed for eBay MIP.

Follow these easy steps to generate a WooCommerce Product Feed for eBay MIP.

Before we start, I should let you know that it is a Pro feature of the Product Feed Manager for WooCommerce plugin, so you will require the Product Feed Manager Pro version to use this.

Schritt 1: Neuen Feed erstellen & Produktattribute zuordnen #

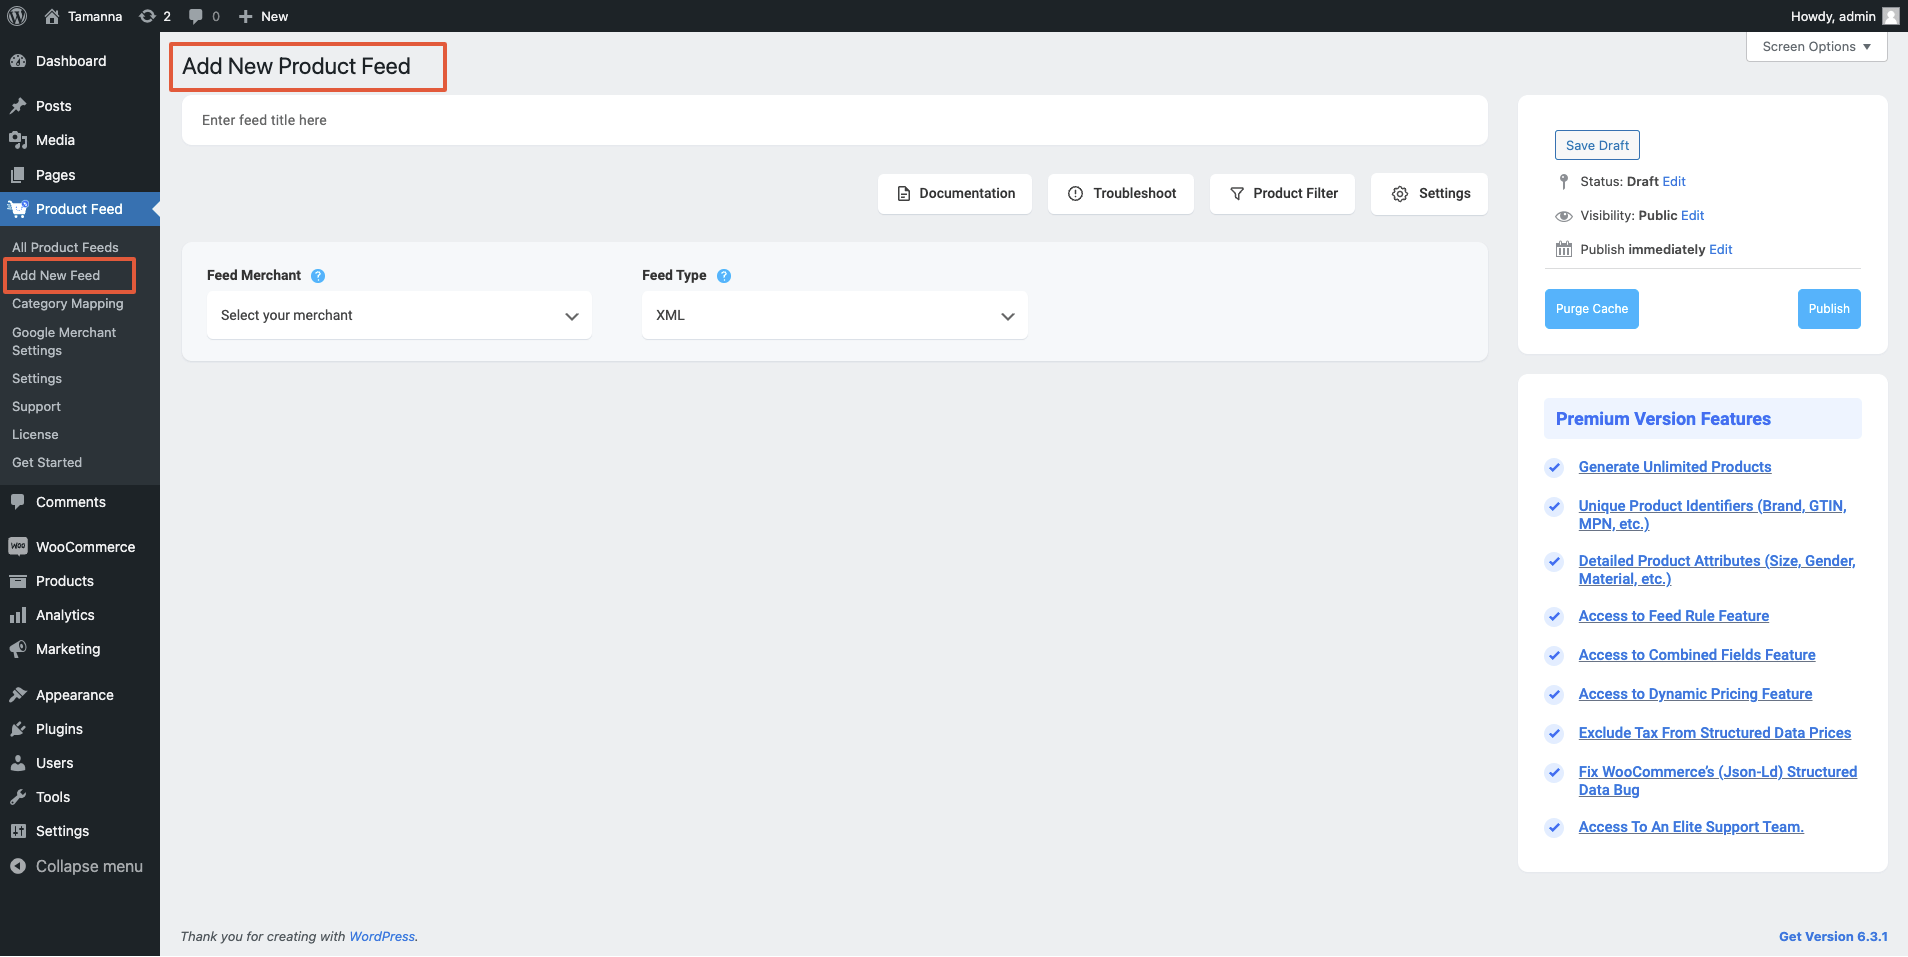
Gehen Sie zu Ihrem Produkt-Feed-Dashboard.

Klicken Sie auf die Schaltfläche Neuen Feed hinzufügen.

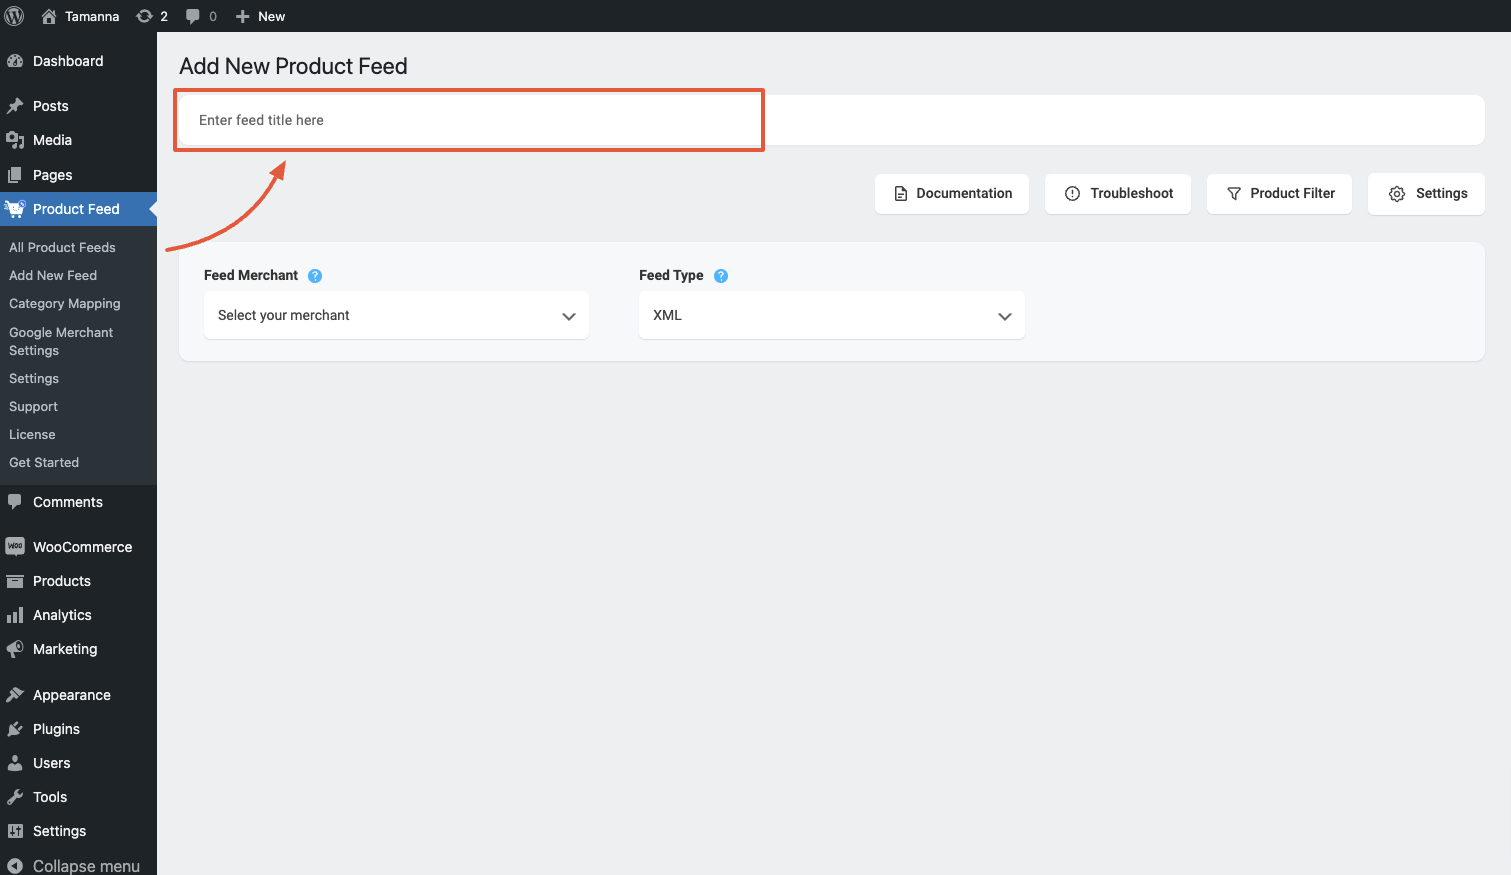
Sie gelangen dann zur Seite für die Erstellung des Feeds.

Neuen Feed hinzufügen

Also, hier,

1. Oben haben Sie die Möglichkeit, dem Feed einen Titel zu geben. Geben Sie Ihrem Feed einen Namen.

Enter Feed Title

2. Direkt unter dem Titel sehen Sie eine Option zur Auswahl Ihres bevorzugten Händlers. Klicken Sie einfach auf die Dropdown-Schaltfläche Händler füttern und wählen Sie Ihren bevorzugten Händler aus der Dropdown-Liste aus oder suchen Sie in der Dropdown-Box.

select preferred merchant

Wählen Sie Ihren bevorzugten Händler aus, und alle erforderlichen Attribute werden unten geladen.

Select eBay MIP from the dropdown list.

eBay MIP feed

**Please note that eBay MIP only accepts XML and CSV feed file submission. However, the recommended format is CSV.

3. You can see that some of the attributes are already configured – their values are assigned properly, you can change the assigned values as per your need or you can keep them as it is.

Die übrigen Attributwerte müssen Sie jedoch manuell zuweisen.

For eBay MIP, you need to assign values for the following attributes:

  • Localized For –

This attribute indicates the language your feed is presented in, and the country it will be sold on.

Since eBay MIP are in limited countries, here are the accepted values:

  • en_US
  • en_GB
  • de_DE
  • fr_FR
  • es_ES
  • en_CA
  • en_AU
  • de_AT
  • it_IT
  • ru_RU
  • en_IN
  • Additional Info –
  • Brand –

This should be the Brand name of the product you are selling. If you are the manufacturer, you can set the type as Static and input your company name here.
If you have different brand names for different products, you will have to save the value in a custom field or product attribute and then use that value here.
**You may also use Perfect Brands for WooCommerce, which will make it easier to assign and use brand names.

  • Condition –

Use this attribute to indicate the current condition of the product.

These are the accepted values for the condition:

  • NEW
  • NEW_OTHER
  • NEW_WITH_DEFECTS
  • MANUFACTURER_REFURBISHED
  • SELLER_REFURBISHED
  • USED_EXCELLENT
  • USED_VERY_GOOD
  • USED_GOOD
  • USED_ACCEPTABLE
  • FOR_PARTS_OR_NOT_WORKING
  • Channel ID –

eBay lists products based on several channels it has for different countries.

The Channel ID is a unique identifier of the eBay MIP channel where you wish your products to appear on.

If you wish to sell on only one channel, then you may leave this column blank.

For multiple channels, you need to add a product multiple times and set the Channel IDs for your desired channels.

For example, if you sell in both USA and UK, then you will need to add the same products twice in two rows. For one, assign the Channel ID value as EBAY_US, and assign the Channel ID value as  EBAY_UK for the other.

Then eBay will display the products on your desired eBay MIP channels.

Here is a list of the accepted Channel IDs for eBay MIP:

  • EBAY_US
  • EBAY_UK
  • EBAY_DE
  • EBAY_FR
  • EBAY_ES
  • EBAY_CA
  • EBAY_AU
  • EBAY_AT
  • EBAY_IT
  • EBAY_RU
  • EBAY_IN
  • EBAY_Motors
  • Category –

eBay MIP has a category list of its own which you need to use to categorize your products on eBay. You must set this attribute according to their required taxonomy in order to get your submitted product feed approved.

They have a Category Lookup Tool where you can search for relevant category thread and collect the Category ID which you have to provide as the value.

For example, if you are selling a book in UK, which is an educational language coursebook, then on eBay Mip, it will fall under category – GBooks, Comics & Magazines > Textbooks Education & Reference > Language Courses.

You can collect its ID from the eBay Category Lookup Tool. In this case, the Product Category value is 11442.

  • Shipping Policy –

Use the Shipping Policy to specify your product handling time, the shipping services you offer, and the shipping costs.

  • Payment Policy –

Use the Payment Policy to specify how buyers can pay you, for example, through PayPal or credit cards.

  • Return Policy –

Use Return Policies to specify whether you accept returns or not. If you accept returns, include your return conditions (such as the buyer will pay for the return shipping), etc.

These business policies have to be created by you on eBay. There you will be able to collect the respective policy IDs from your eBay account preferences and use them as the values when creating the product feed.

  • Max Quantity Per Buyer –

You might wish to restrict the number of a certain product that a prospect can order. In that case, you may use this attribute so that a prospect won’t be able to order more than this many of the products within 10-days.

Here’s an example.

Let’s say you sell Hand-made Fancy Gift Cards. Now, let’s assume you have a rule of investing around 3 hours per day for a single customer and can create a maximum of 20 cards in 10 days for a particular customer.

Then you may add an attribute column ‘Max Quantity Per Buyer’ and assign the value ‘20’ so that a customer cannot order more than 20 cards within a span of 10 days.

  • Strikethrough Price –

This attribute is there to help you create more attraction to prospects by adding a price that will be stricken through, to indicate that the current price is a discounted price.

Let’s say you are running a promotion to sell a Purse at $20, whereas the original price was $25.

Then you can set this attribute value as 25 to display that the old price was $25.

**You may use this feature even when you are not running a promotion. You can post the original price as the List Price, and then assign a higher value as a strikethrough price. But we strongly advise to use it only when you really run a promotion.

  • VAT Percent –

This attribute is used to state the Value Added Tax percentage of the sale price. This is only necessary for the EU countries, though not mandatory.

Schritt 2: Futtermittelkonfiguration #

1. Scrollen Sie nach oben und Sie werden sehen, dass es zwei Optionen gibt: Produktfilter und Produkteinstellungen.

  • Produkte Einstellungen
  • Produkt-Filter
Produkt-Feed-Manager Feed-Optionen

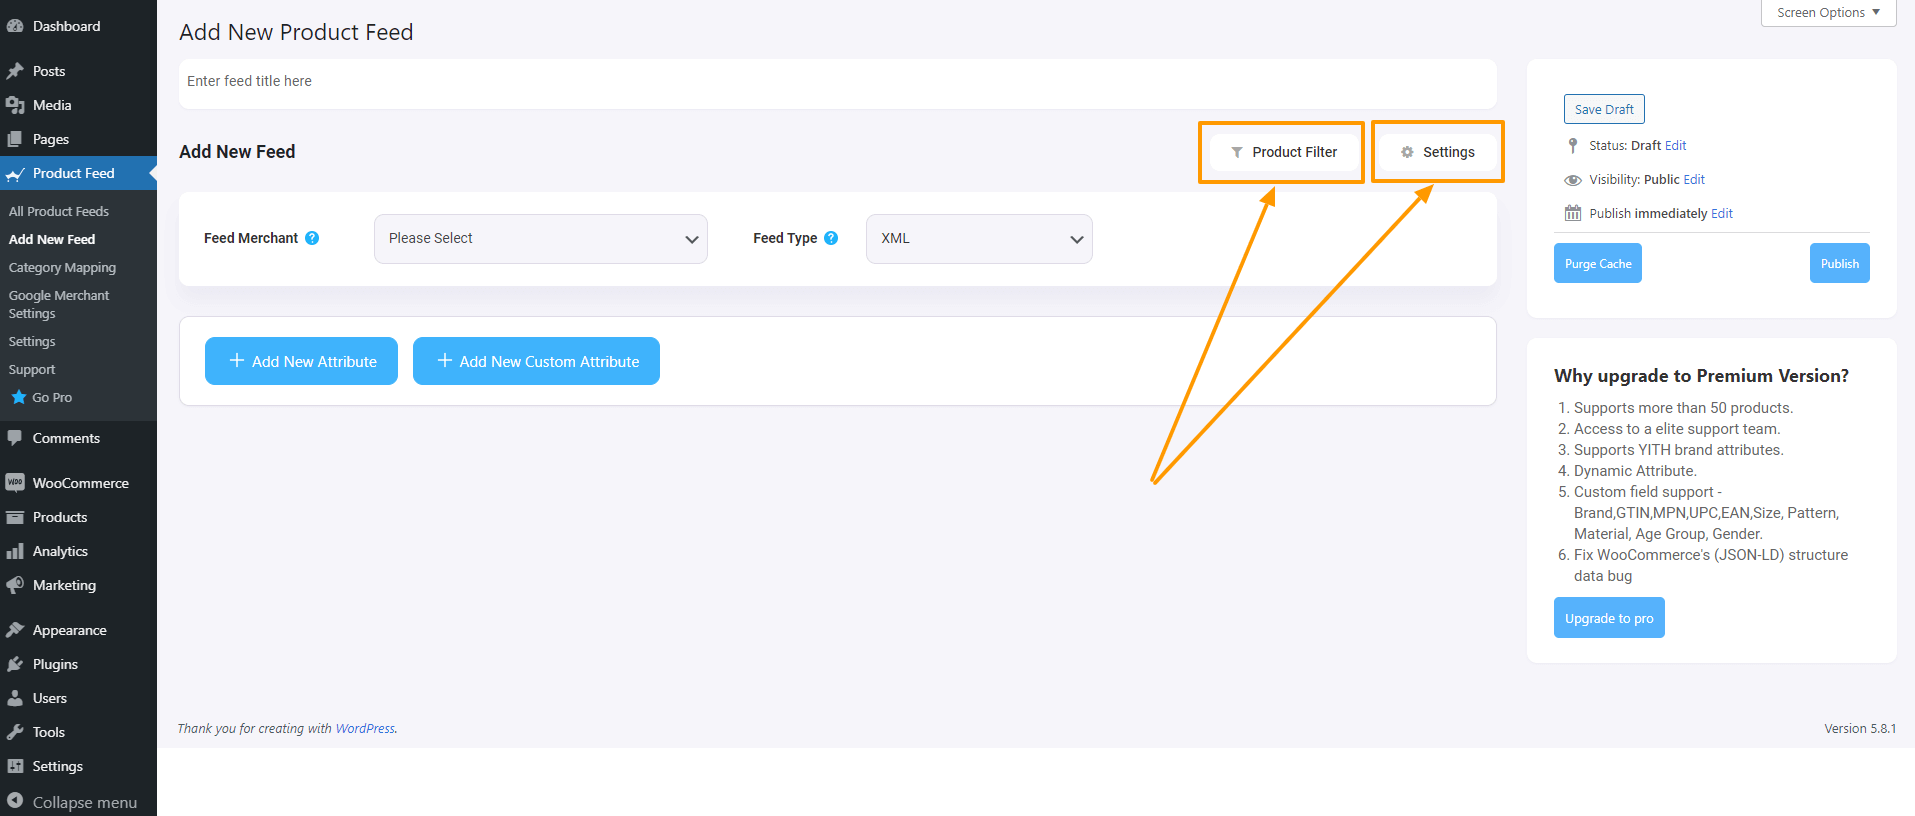
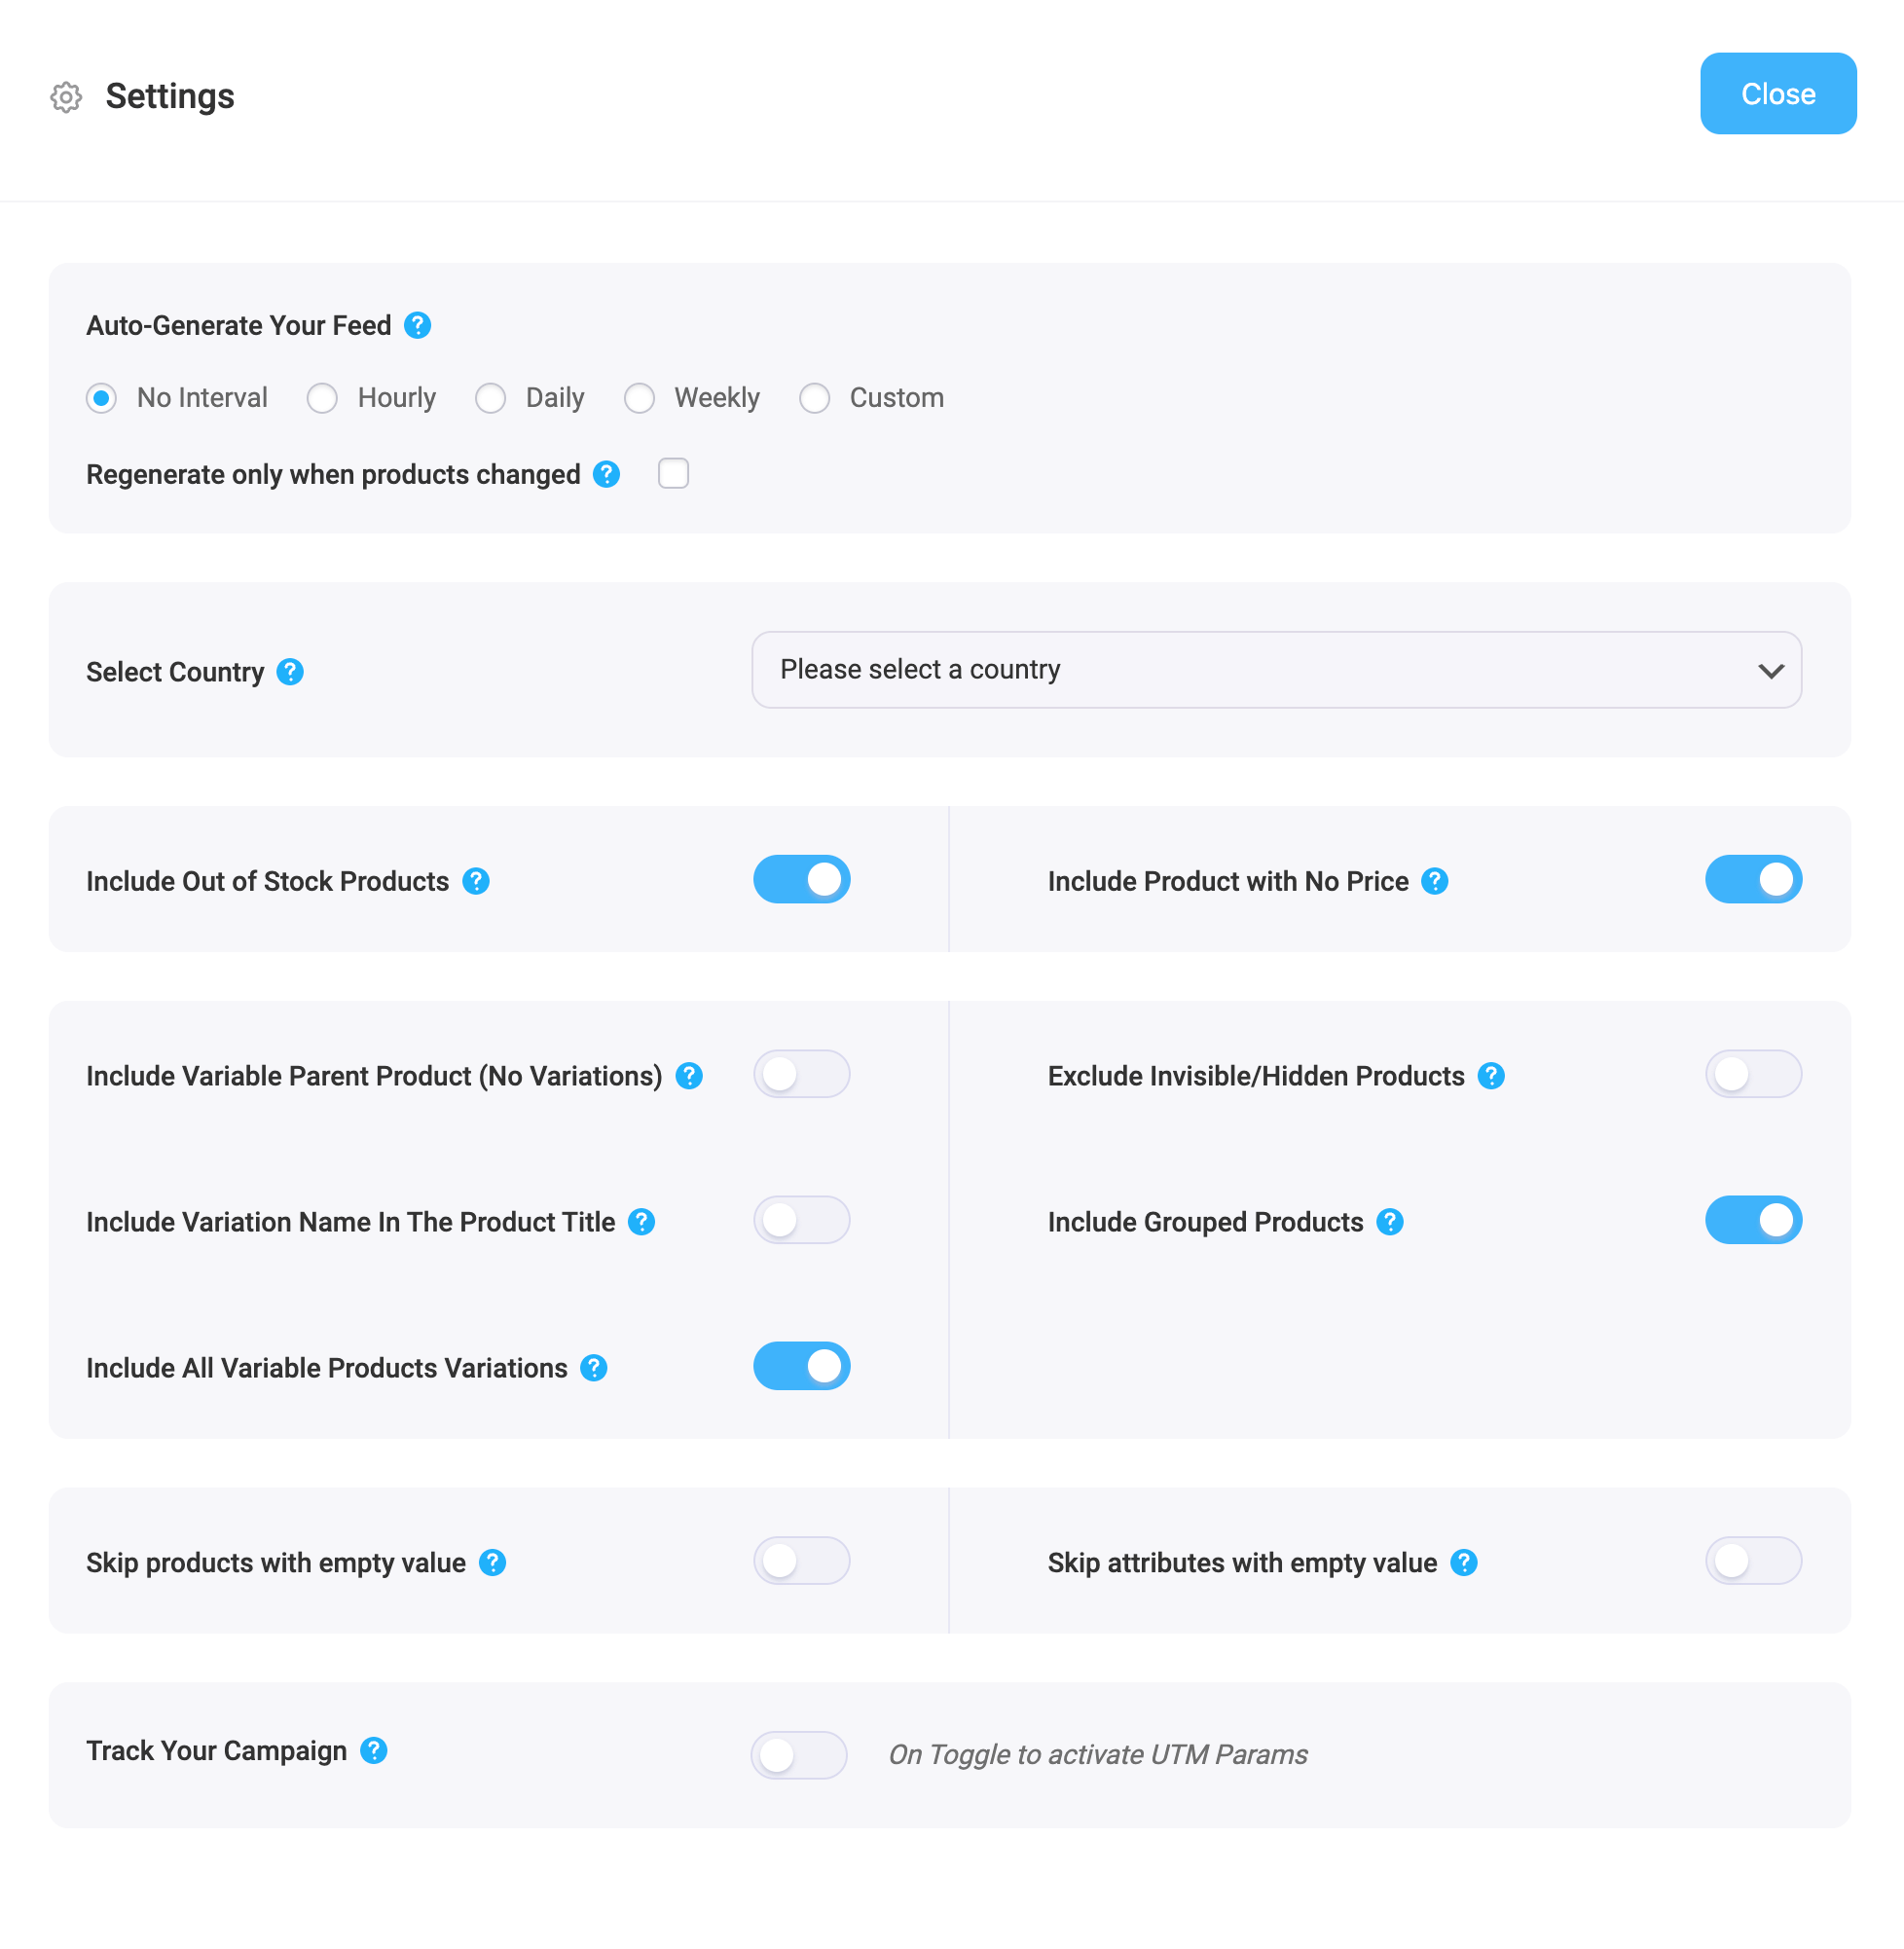
2. First, let us configure the features in the Feed Settings. Click on the Settings button, and a drawer will open from the right side of the screen.

For more in depth knowledge about the setting refer to this doc: Understanding The Basics Of Feed Settings

Product Feed Manager Feed Settings Options

3. Now, close the drawer and click on the Product Filter option. A new drawer will open from the right.

Oben haben Sie die Möglichkeit, den benutzerdefinierten Filter oder die Funktion Feed-Regeln (PRO) zu verwenden.

Über das Dropdown-Menü Filter erhalten Sie die Feed-Filteroptionen.

Product Feed Manager Feed Filter Section

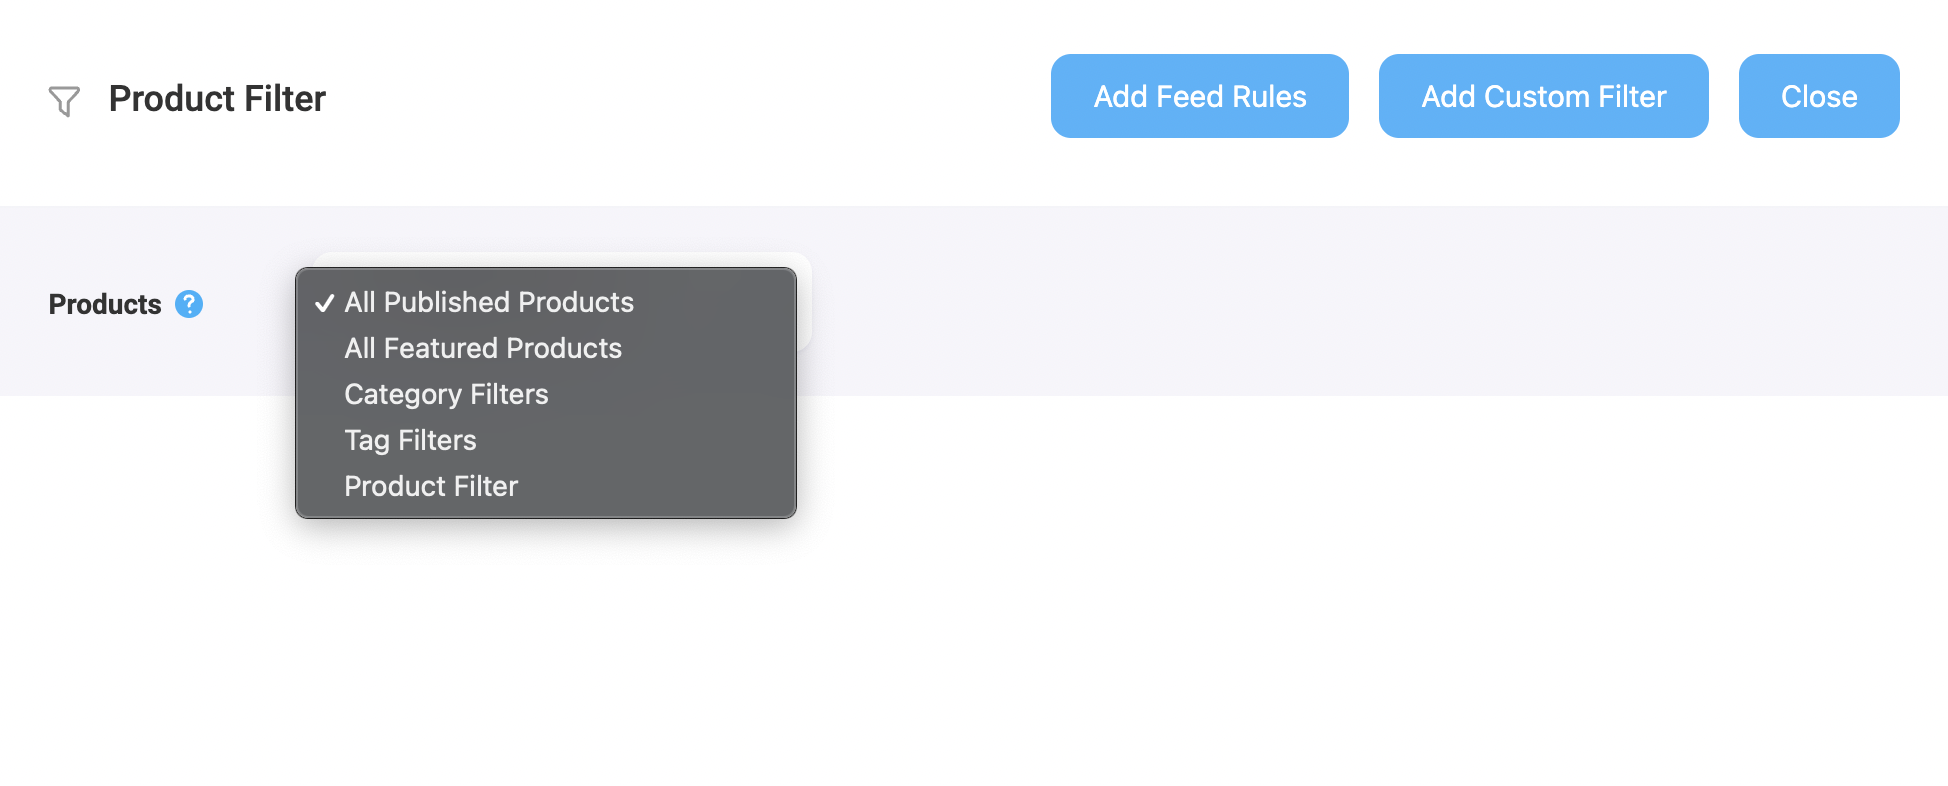
Wählen Sie die Produkte, die Sie in den Feed aufnehmen möchten, mit einem beliebigen Filter aus. Standardmäßig ist "Alle veröffentlichten Produkte" ausgewählt.

Sie können alle anderen Filteroptionen, wie z. B. den benutzerdefinierten Filter, den Kategoriefilter und den Tag-Filter, verwenden, um die gewünschten Produkte einzuschließen (oder die Produkte auszuschließen, die Sie nicht einschließen möchten).

Für ein Basisfutter können Sie es so lassen, wie es ist.

Step 3: Publish WooCommerce Product Feed For eBay MIP #

Nachdem Sie Ihren Feed konfiguriert haben, ist es nun an der Zeit, den Feed zu veröffentlichen.

Scrollen Sie zurück nach oben, und Sie finden auf der rechten Seite eine Schaltfläche Veröffentlichen.

eBay MIP feed publish

Klicken Sie auf die Schaltfläche Veröffentlichen, und Ihr Feed wird erstellt.

Sobald die Erstellung des Feeds abgeschlossen ist, können Sie den Feed anzeigen oder herunterladen.

That’s it. Your WooCommerce XML product feed for eBay MIP is generated.

Still stuck? How can we help?

How can we help?

Updated on September 19, 2025
Inhaltsübersicht
  • Schritt 1: Erstellen eines neuen Feeds und Zuordnen Ihrer Produktattribute
  • Schritt 2: Futtermittelkonfiguration
  • Step 3: Publish WooCommerce Product Feed For eBay MIP
RexThema

Stay updated with our latest releases and useful guides.

By subscribing RexTheme you agree to Privacy Policy.

Produkte

  • WP VR
  • Produkt-Feed-Manager
  • Wagenheber
  • Checkoutify
  • Dynamic Discount
  • Advanced Shipping
  • Catalog Mode
  • Marketplace Auto-sync

Ressourcen

  • Nutzungsbedingungen
  • Datenschutzerklärung
  • Refund Policy
  • Affiliate Policy
  • Support Policy
  • Bug Bounty Program

Company

  • Blog
  • Dokumentationen
  • Changelog
  • Partnerprogramm
  • Brand Assets
  • Kontakt

Copyright © 2013 - RexTheme