![How to Create a Virtual Apartment Tour for Real Estate [2026]](https://rextheme.com/wp-content/uploads/2024/06/How-to-Create-a-Virtual-Apartment-Tour-for-Real-Estate.png)
You listed your apartment. Shared the photos. Maybe even ran some ads. Dozens of people clicked. A few asked questions. Almost no one showed up.
Sounds familiar?
That’s how most rental listings go. And honestly, it’s frustrating. Because you’re putting in the effort, but attracting the wrong kind of attention.
- People who are just browsing
- People are comparing random options
- People with no real intention of renting anytime soon
And when someone finally books a visit, it turns into another time drain. Scheduling, waiting, showing the space, answering the same questions again and again.
It doesn’t feel efficient. Because it isn’t.
According to statistics, 62% of buyers actively seek virtual tours before making a decision.
That means
Most Serious Renters or Buyers are not starting with in-Person Visits
- They’re on their phones
- They’re scrolling through listings
- They’re exploring properties before they ever step outside
And if your listing doesn’t give them that experience, they move on.
That’s where a virtual apartment tour changes everything.
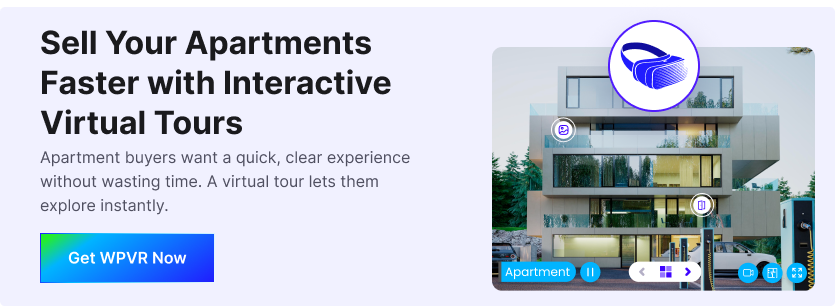
- Instead of forcing people to imagine the space, you let them explore it.
- Instead of random inquiries, you attract people who already understand the layout.
- Instead of wasting time, you focus on serious prospects.
Because the best showing? It’s the one where the renter already feels confident before they ever visit.
- So what if you didn’t have to deal with endless back-and-forth?
- What if only the people who were actually interested reached out?
That’s exactly what a virtual apartment tour helps you do. And in this guide, you’ll see how to make that happen step by step.
So let’s get started,
What an Ideal Apartment Virtual Tour Actually Looks Like
An ideal virtual apartment tour feels like you’re already inside the space. You open the listing and instantly move through a smooth 360-degree view of the living room without waiting or guessing.
You can click hotspots to move from room to room, explore the kitchen, bedroom, and balcony, and see small details like appliances, good water pressure, and noise-proof windows. Everything feels interactive and easy to control.
A floor plan sits in the corner so you can understand the layout clearly. Room measurements give you a real sense of space, not just photos from one angle.
This is what modern buyers expect: full control, much detail, and a complete view of the property. Not a curated snapshot, but the full experience.
And when people can explore like this, they understand the home faster and trust the listing more. You can make it easily with WPVR for your virtual apartment tour.

Do You Really Need to Use Virtual Apartment Tours for Your Real Estate Business?
The answer is Yes. You need to use a virtual apartment tour. But not for the reason most people think.
A virtual apartment tour is not just about showing a space. It’s about filtering who actually reaches out to you. Because without it, you get everyone.
- People casually browsing
- People comparing prices
- People who are not ready to move anytime soon
But when someone goes through a full virtual tour, something changes.
- They’ve already seen the layout
- They’ve already checked the rooms
- They’ve already decided if it fits their needs
Because today, around 92% of buyers start their search online before ever reaching out.
So when they contact you, they’re not starting from zero. They’re already interested.
- That means fewer wasted conversations.
- Fewer unnecessary visits.
- And a much higher chance of closing faster.
Another thing you should know: virtual tours increase time spent on your listing. Instead of scrolling past in seconds, people stay. They click through rooms. They explore details.
And the longer they stay, the more serious they become. But here’s the catch. Not all virtual tours work equally well.
A poor-quality tour with bad lighting, unclear navigation, or missing areas can actually hurt your listing. It creates confusion instead of confidence.
A good virtual tour, on the other hand, feels simple and smooth.
- Clear movement
- Full coverage of the space
- Logical flow from one room to another
It should feel natural, almost like walking through the apartment.
So yes, virtual apartment tours do work well, and you need one for your real estate business. Let’s see how you can create one in the next section.
How to Create a Virtual Apartment Tour in Minutes (Not Hours)
Alright, let’s actually build one. I’ll walk you through it using WPVR on WordPress because it’s the easiest entry point, and you will get all the VR features you’d want without any learning curve.
Step 1 – Install & Activate WPVR Plugin
- Go to your WordPress dashboard and click on the Plugins tab.
- Click on Add New
- In the search bar, type WPVR and choose to Install and then Activate WPVR.
To get all premium features, you need to activate your license key after installing the plugin. Once activated, you’ll get full access to advanced tools to create a complete virtual apartment tour.
- If you need any help, follow this short guide to set up WPVR on your website.
Step 2 – Create A Basic Virtual Apartment Tour
Now, you can create a simple virtual apartment tour in under 5 minutes, even with the free version.
From your WordPress Dashboard,
- Hover on WPVR, and click on the Add New Tour option.

Now, you’re in the tour settings tab.
- Set a Title for your virtual tour.
- Make sure that the Tour Autoload option is enabled.
- This will automatically load your virtual apartment tour.
- Ensure that the Basic Controls option is enabled.
- This will enable the Zoom in, Zoom Out, and Fullscreen control buttons in your apartment virtual tour.
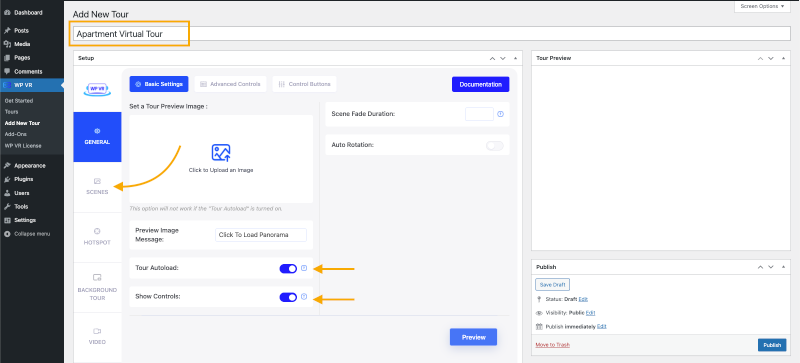
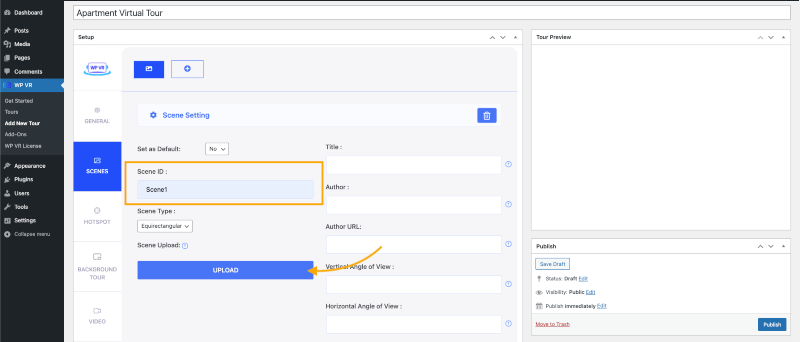
- Click on the Scenes section.
- Set a unique Scene ID (Without any special characters or spaces).
- Click on the Upload button under the Scene Upload field, and choose the first panorama image of your apartment that you want to use.
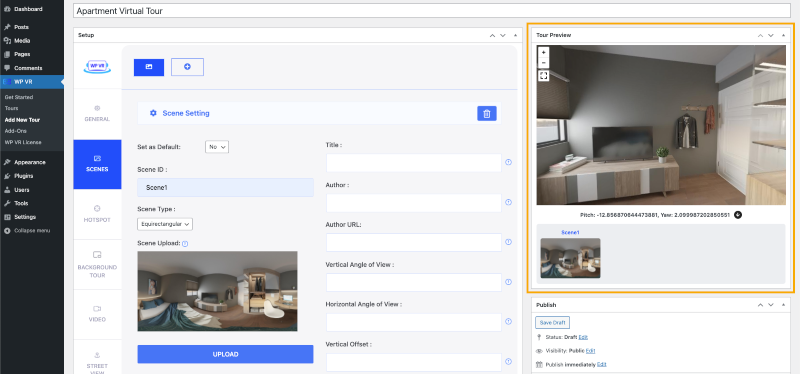
- Scroll down and click on the Preview button.
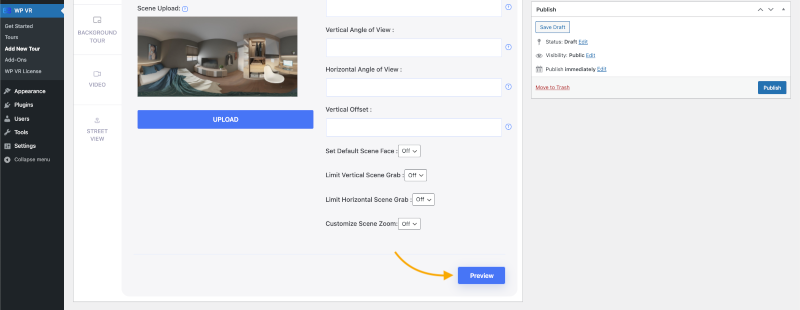
- You’ll see a live preview of the tour in the Tour Preview section. Here, you can move around to see the basic tour and use basic controls.
Dat is het.
As you can see, it was really easy to create a basic virtual tour.
Let’s move on to the next step.
Step 3 – Apply Useful Options to Your Scene
Now, you can use the advanced options of WPVR in the scene you’ve just created to give your viewers better control of the apartment virtual tour.
Let’s keep editing the tour:
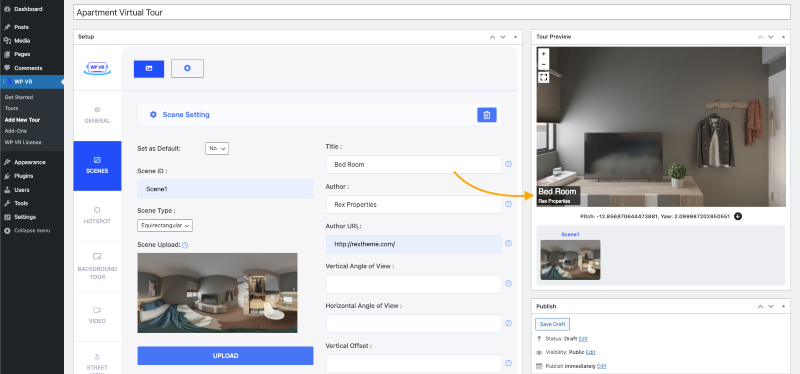
- In the Titel field, set a suitable name for this panorama.
- For example, if the image is of the kitchen, set it as ‘Kitchen’ or ‘Kitchen – 90 SQF’.
Tip: Use this field to give your viewers a heads-up on where they are in the apartment.
- The Author field can take your viewer to any link. You can use this field as you desire.
- You can use terms like ‘Learn more about this Kitchen’ or ‘Made By Rex Properties’.
- In the Author URL, you can set any URL of your company website or page.
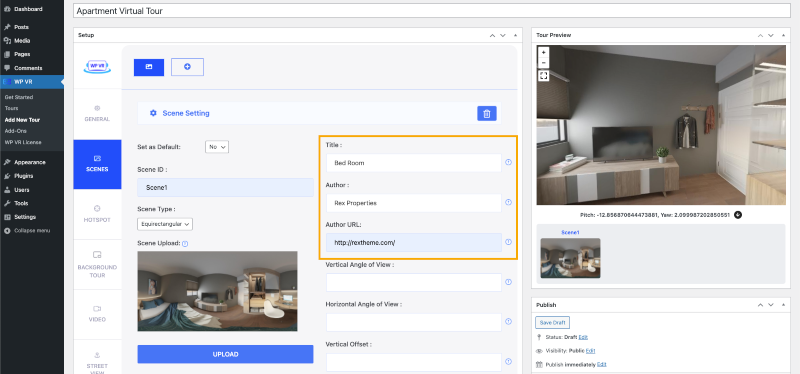
- Remember, this URL will be activated when a viewer clicks on the Author title. So, make it relevant to that field’s text.
- Scroll down and click on the Preview button again.
You’ll see the Title, Author, and Author URL fields working now.
- Now, scroll down and turn on the Customize Scene Zoom option.
You’ll get 3 new options that will allow you to set any zoom settings you want.
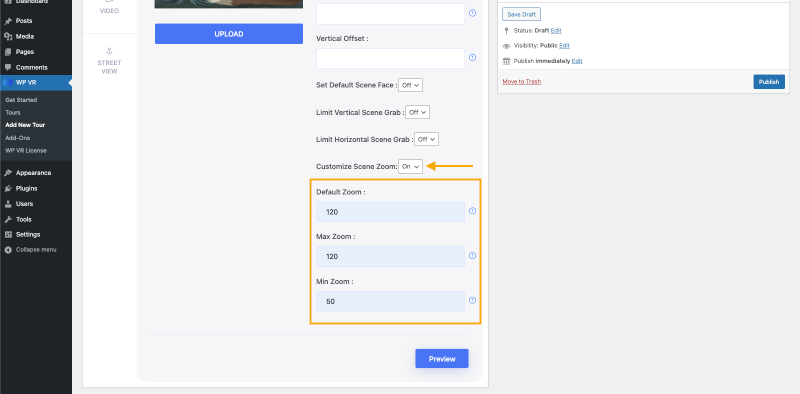
The Zoom values range from 50 to 120. 50 is the most zoomed in, and 120 is the most zoomed out. Default Zoom will be applied every time your viewers load this scene.
The Max Zoom and Min values will define how much your viewer can zoom in or zoom out in the tour.
Apply any zoom setting that you prefer. It’s up to you.
Now, if you preview and look at the live preview, you’ll see that all your advanced scene settings have been applied. You can apply some other options as well:
1. Default Scene Face
Set a point in the panorama image, from which you want it to load.
2. Vertical and Horizontal Angle of View
When you’re using partial panoramas or panoramas taken with your mobile phone, the images are not full 360 degrees. You can use it to adjust those images.
3. Limit Vertical and Horizontal Scene Grab
For partial or mobile panoramas, you can set a custom value within which you want your viewers to explore.
Now, keep adding more panorama images by adding more scenes to this tour. You can use an unlimited number of images until you’ve covered every corner of your apartment.
Apply different settings to each individual Scene or the same settings to all the Scenes. Whichever you prefer.
Now, let’s enable the advanced features and turn it into a professional virtual apartment tour.
Follow the next step.
Step 4 – Use Advanced Features to Turn It into a Professional Virtual Tour
First, click on the Publish button to save your progress.
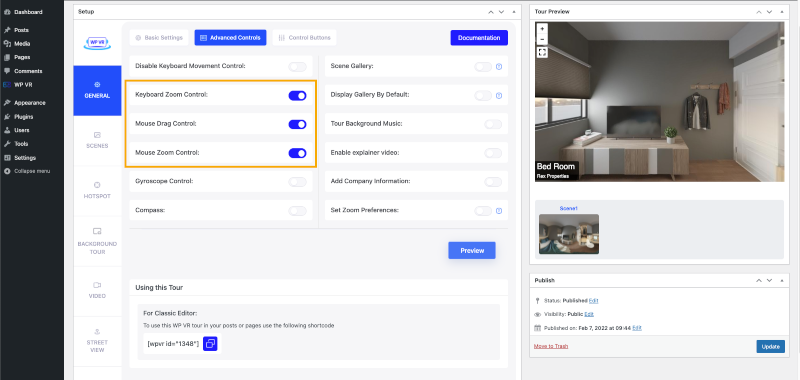
Now, under the General section, click on the Advanced Controls tab.
- Turn on these 3 options:
- Keyboard Zoom Control, Mouse Drag Control, Mouse Zoom Control.
- Keyboard Zoom Control: It allows your viewer to zoom in and out on the virtual tour using the plus(+) and minus(-) buttons of the keyboard.
- Mouse Drag Control: It allows your viewer to drag and move the view of the panorama image.
- Mouse Zoom Control: It lets your viewers zoom in and out on the panorama image using the mouse wheel.
In short, these 3 options enable smooth control on your virtual tour.
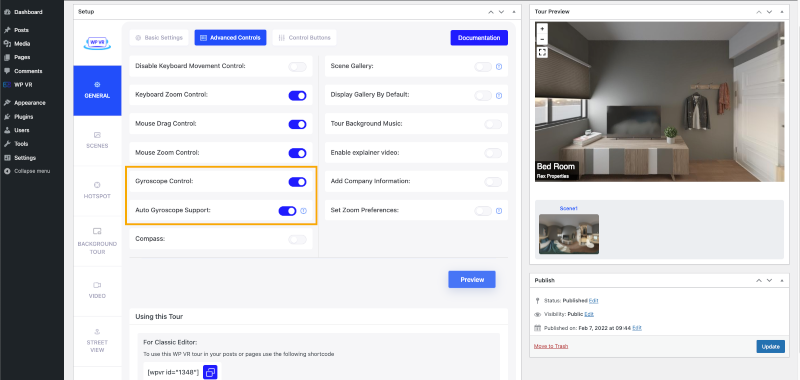
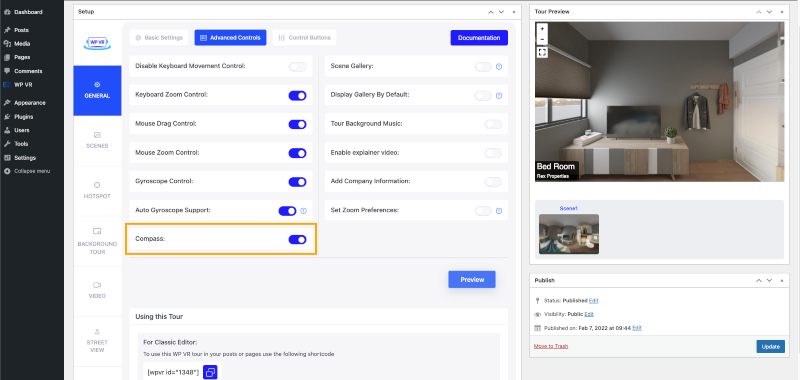
- Turn on the Gyroscope Control option.
- When viewing from a mobile device, the Gyroscope will respond to the movement of the device. It gives great realistic control of the virtual tour to your viewers.
- To make it even better, enable Auto Gyroscope Support.
It will turn on the Gyroscope support on smartphones by default.
- Turn on the Compass feature. It will display a live compass inside the virtual tour and help the viewers understand which directions they’re looking at.
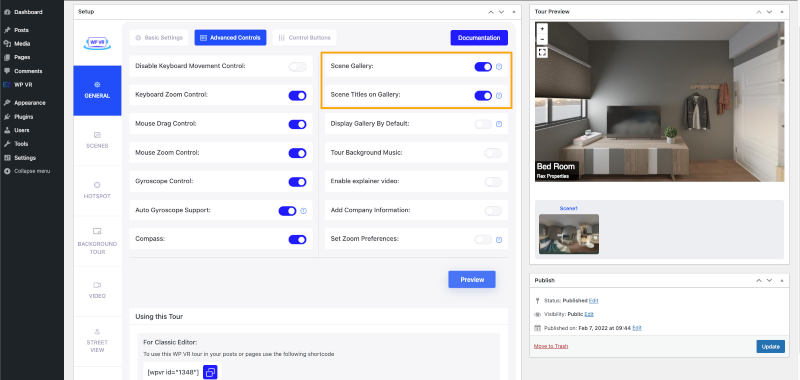
- Turn on the Scene Gallery option.
- When you have multiple panorama images, it will show a slider gallery where your clients can see a preview of every panorama image in your apartment. They can also choose to visit a specific scene directly from the gallery.
- Turn on the Scene Title on Scene Gallery option – to make your clients understand which part of the apartment the scene will take them.
Now, how about adding some interesting features to your apartment virtual tour?
Let’s add them right away.
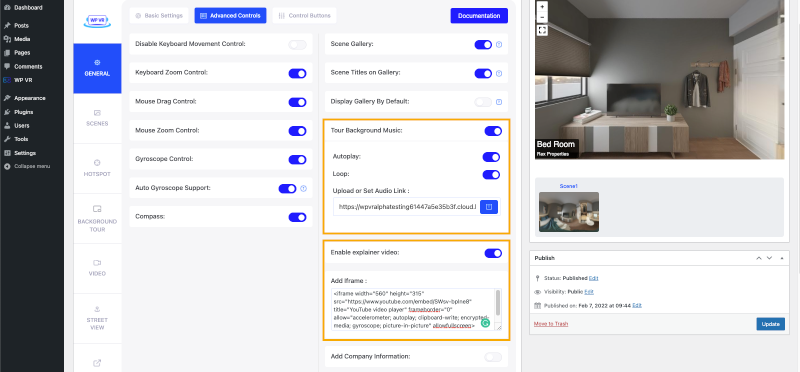
- Set Background music to your virtual tour using the Tour Background Music option.
- Let your clients experience soothing audio the entire time they’re on your tour.
- Set an explainer video using the Enable Explainer Video option.
- Definitely, you want to give your clients more information about the apartment you’re showing them.
- You can record a video explaining details of the apartment and set it here.
Whenever your clients want to explore more, they can click it and learn about the apartment directly from you.
Now, it’s time for your own branding.
Tell them who created this virtual tour by showing your logo and description.
Set your company logo and a description using the Add Company Information option.
Step 5 – Set Control Buttons – Easy Navigation for Your Client
To make the tour easier to navigate, you can turn on the control buttons.
These are the controls you can turn on:
- Move Up.
- Move Down.
- Move Left.
- Move Right.
- Zoom In.
- Zoom Out.
- Full Screen.
- Gyroscope.
- Home Button.
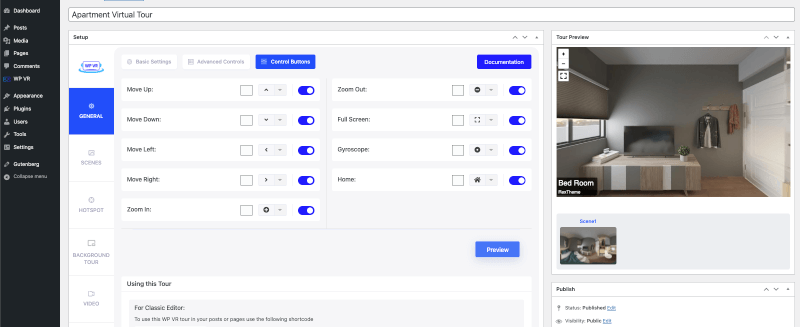
On top of that, you can set a different icon and color for each of these buttons.
Step 6 – Use Hotspots to Connect Panorama Images & Show Additional Info
Once you’ve set up one panorama image, you can now upload more and connect them.
Remember to keep the sequence between your images.
For example, if your tour starts from the entrance of your apartment, the next one should lead to the living room or the bedroom that is right beside the living room.
And if your viewer is leaving that bedroom, it should take them back to the living room.
The sequence of the images must reassablence the apartment in real life.
You have to use the Scene-type hotspots to connect the scenes.
Here is a small guide to connecting panorama images in your virtual apartment tour.
On top of that, you can use the Info-type hotspots to show in-depth details about the apartment.
The content you can set in the hotspots:
- Images.
- Texts.
- Videos (YouTube, Vimeo, & Self-hosted).
- GIFs.
- URLs (Open on a new tab or the same tab).
- Buttons.
- Combination of everything above.
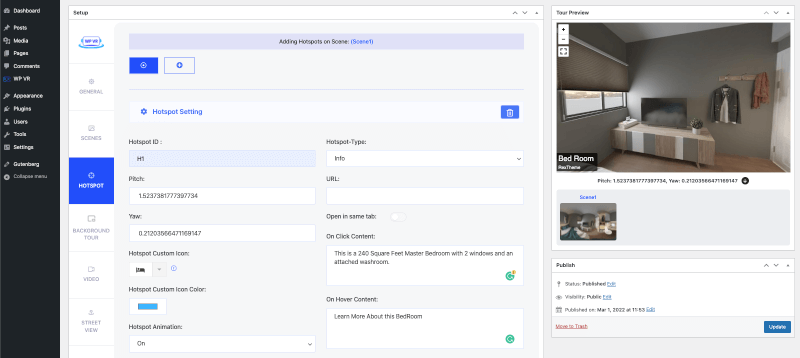
You can set these to both on-hover and on-click actions of the hotspots.
To add more content and customize the hotspots, follow this guide.
Conclusie
Now the era has changed completely. Static photos are no longer enough to hold attention or build trust.
People want a real sense of the space before they ever decide to visit. A virtual apartment tour gives them exactly that.
It creates a smoother experience, saves time, and helps you attract more serious buyers or renters. The result is faster decisions and better leads.
If you’re using WordPress, WPVR is the easiest way to get started. It’s simple, affordable, and built for real estate listings.
** FAQs **
1. How do I create a virtual apartment tour without hiring a photographer?
You can shoot the panoramas yourself with a 360° camera or even a recent smartphone, then upload them to WPVR. The plugin turns your images into a full virtual apartment tour with a complete 360-degree overview in minutes, no editing skills needed.
2. Will a virtual apartment tour actually bring me more leads than Zillow listings alone?
Yes, and the difference is real. Listings on Zillow with virtual tours get 5–10x longer view times, which means more qualified buyers reaching out about your property. Drop a contact form or a FaceTime offer inside the tour itself, and you’ll capture leads while they’re still excited about the house.
3. Can I use a virtual apartment tour for rentals, not just home sales?
Yes, and renters love it even more than buyers. Most apartment search activity happens on mobile late at night, so giving them an immersive tour with measurements and a clear floor plan is a much safer alternative to scheduling in-person viewings. It works for studios, luxury units, and everything in between.
4. What if my apartment is empty or still under construction?
You have two solid options. Either stage it virtually with furniture overlays, or shoot it as-is and use info hotspots to describe the apartment amenities room by room. Buyers appreciate honesty, and an empty home often photographs better than a cluttered one before anyone even thinks about stepping foot inside.
5. How long before my virtual apartment tour starts converting?
You’ll usually see results within the first week of going live, especially once you share the tour across listing sites. The good news is that 3D tours available on your property page tend to outperform standard photo galleries almost immediately. Most real estate agents report their first inquiry within days of publishing.