
![WooCommerce Product Feed for Google Shopping & Facebook – Complete Guide [2026]](https://rextheme.com/wp-content/uploads/2019/05/Guide-to-WooCommerce-Product-Feed.png)
Online winkelen is de afgelopen tien jaar in opkomst. Meer dan 85% van de mensen wereldwijd geeft de voorkeur aan online winkelen boven het bezoeken van fysieke winkels (volgens alphr.com).
And many WooCommerce stores are doing exceptionally well and achieved three times more sales than they used to, about a couple of years back.
Wist u dat u uw winkelverkoop in een mum van tijd ook gemakkelijk kunt verdrievoudigen?
Maar wat is het geheim?
Well, the key is …
If you generate your Product Feed in the right way and promote through Google Shopping Ads and Facebook Dynamic Ads, you may see your sales go up right away.
Laat het me uitleggen.
Google and Facebook hold the largest audience. Promoting on their merchant platforms can boost your sales in no time IF PROPERLY DONE.
Today, you will get a complete step-by-step guide on how to generate your WooCommerce Product Feed in the most optimized way, and skyrocket your store performance.
Aan het einde van deze gids zult u in staat zijn om
- Set up proper WooCommerce product feed in the most optimized way for Google Shopping and Facebook Dynamics
- Genereer nauwkeurige en prestatiegerichte productaanvoer in enkele minuten
- Upload de feed op het door u gewenste platform en zie uw verkoop stijgen.
Laten we er nu in duiken.
TL;DR – WooCommerce Product Feed for Google Shopping & Facebook
- Google Shopping and Facebook Dynamic Ads both need a properly structured feed before your products can show up at all.
- A woocommerce google product feed must include title, price, availability, brand, and GTIN at minimum. miss one, and Google can quietly reject your listing.
- Your woocommerce facebook product feed follows a slightly different rule set (Meta Catalog), but the core fields overlap heavily with Google’s.
- Titles and images matter more than people think – optimized titles alone can lift impressions and click-through rate significantly.
- Manually updating a feed every time you add a product doesn’t scale. Use a plugin that auto-generates and auto-refreshes it.
- Final Tip: For easy and optimized feed generation across Google, Facebook, and more, Rexfeed Product Feed Manager for WooCommerce is a reliable solution.
What is a WooCommerce Product Feed?

A WooCommerce product feed is a file that contains your product data (like title, price, and images) and sends it to platforms like Google Shopping and Facebook so they can display your products.
For example, if you sell running shoes, your feed includes the product name, price, and sizes, which platforms use to create listings and show ads to the right people.
A well-optimized feed helps your products appear and perform better. A poor feed can cause your listings to be hidden or rejected.
- Learn more – What is a Product Feed? Everything You Should Know
How Does Product Feed Attribute Work
Product feed attributes are the details that describe your products—like title, price, color, size, and availability. These attributes help platforms like Google and Facebook understand what you’re selling.
For example, if you sell a shirt, attributes like color and size help show the right product to the right customer when they search.
When your attributes are clear and accurate, your products appear more often in search results and ads. This helps you reach more buyers and increase your sales.
WooCommerce Product Feed for Google Shopping Ads

Google is the most popular and effective platform for promoting your WooCommerce products.
You’ve probably seen Google Shopping Ads, when you search for a product, Google shows a list of products with images, prices, and store names right at the top of the results.

Most buyers discover products through these eye-catching ads— and yours can be one of them. With a WooCommerce product feed URL, you’re already on the right track to reach them.
Start by creating an account on Google Merchant Center. It only takes a few minutes. Then, connect your WooCommerce Google Shopping feed to display your products.
To get listed, you need to upload a product feed that meets Google’s requirements. Make sure your feed is accurate and optimized now, let’s take a closer look at how it works
How to Set Up WooCommerce Google Product Feed (Most Optimized Way)
When you upload your products to Google, it checks for specific product data to understand and display them properly.
Let’s look at the key data you need to include in your WooCommerce Google product feed, along with simple examples so you can create it the right way.
A properly optimized Google product feed (usually in XML format) for a single product looks like this:
<rss xmlns:g="http://base.google.com/ns/1.0" version="2.0" >
    <channel>
    <title> The name of the feed file </title>
    <link> Your website link </link>
    <description> Description of the content </description>
    <item>
        Product data attributes
    </item>
    </channel>
</rss>
**Here the item tag ( <item> </item> ) encapsulates the data of a product. For multiple products, you simply add more item tags and the product data within, and the rest remains the same.
De productgegevens bevatten nu veel informatie die u moet toewijzen aan hun respectievelijke attribuuttags binnen de artikeltag.
Google Shopping Ads vereisen de volgende gegevens voor elk van uw producten:
- Product ID
- Titel van het product
- Productbeschrijving
- Product Link/URL
- Productcategorie
- Google Product Categorie
- Productafbeelding URL
- Voorraadbeschikbaarheid
- Normale prijs
- Productvoorwaarde
- Fabrikant/Merknaam
- GTIN (Global Trade Item Number)
- MPN (Fabrieksonderdeelnummer)
- Identificatiecode
- Inhoud voor volwassenen
- Multipack
- Bundel
- Materiaal
- Leeftijdsgroep
- Kleur
- Geslacht
- Grootte
- Patroon
- Item Groeps-ID
Sommige van deze attributen zijn afhankelijk van het producttype en de varianten ervan. Hieronder vindt u een meer gedetailleerde uitleg met voorbeelden van hoe elk van deze gegevens op uw winkel zou moeten staan voor de maximale output.
Elk attribuut is opgenomen in het volgende formaat op de feed:
<g: Attribute name > Attribute Data </g: Attribute name >
U krijgt later in dit artikel een voorbeeld van een product feed file link nadat ik de gedetailleerde instructies over de attributen en enkele tips heb doorgenomen.
Let’s look into the details to understand how you should include this data, the format of the feed file, and which ones to include/exclude based on the products on your WooCommerce Store.

Product ID
| Attribuut | ID |
| Voorbeeldwaarde | 671 |
| Voerstructuur | <g:id>671</g:id> |
It is a unique identifier for your product in your store.
On WooCommerce, you should see the ID when you browse the product list.
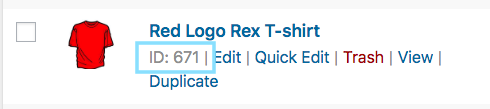
However, you can also use the product SKU as the product ID.
Titel van het product
| Attribuut | Titel |
| Voorbeeldwaarde | Rood Logo Rex T-shirt |
| Voerstructuur | <g:title> <![CDATA[ Red Logo Rex T-shirt ]]> </g:title> |
Het is de naam van het te tonen product.
Op WooCommerce moet u de titel van het product zien wanneer u de productlijst doorbladert.
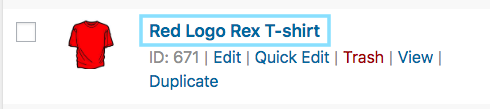
When you set the product title, do specify any special feature, such as its color and the brand name, along with the product. This will create more attraction for buyers.
However, you are not allowed to use any other promotional touch to the tile (for example, adding “free shipping” or “discounted price” or using all caps).
In the case of variable products, include the brand name in the title. Rather than including just ‘any’ feature in the main title, mention the feature that makes it a variant of the product.
For example, if a product is a Logo Rex T-shirt and has variations of Red and Blue, then on your Google Product Feed, one variation should be named “Logo Rex T-shirt – Red” and the other one “Logo Rex T-shirt – Blue”.
So, the feed data view will look like this individually:
<g:title>
    <![CDATA[ Logo Rex T-shirt - Red ]]>
</g:title>
<g:title>
<![CDATA[ Logo Rex T-shirt - Blue ]]>
</g:title>Productbeschrijving
| Attribuut | Beschrijving |
| Voorbeeldwaarde | Dit is een rood T-shirt. Het is alleen gemaakt voor testdoeleinden. |
| Voerstructuur | <g:description> <![CDATA[ This is a Red T-shirt. It was created for testing purposes only. ]]> </g:description> |
Add a proper description of the product you are selling. Make sure to highlight all the major features it may have that will attract buyers.
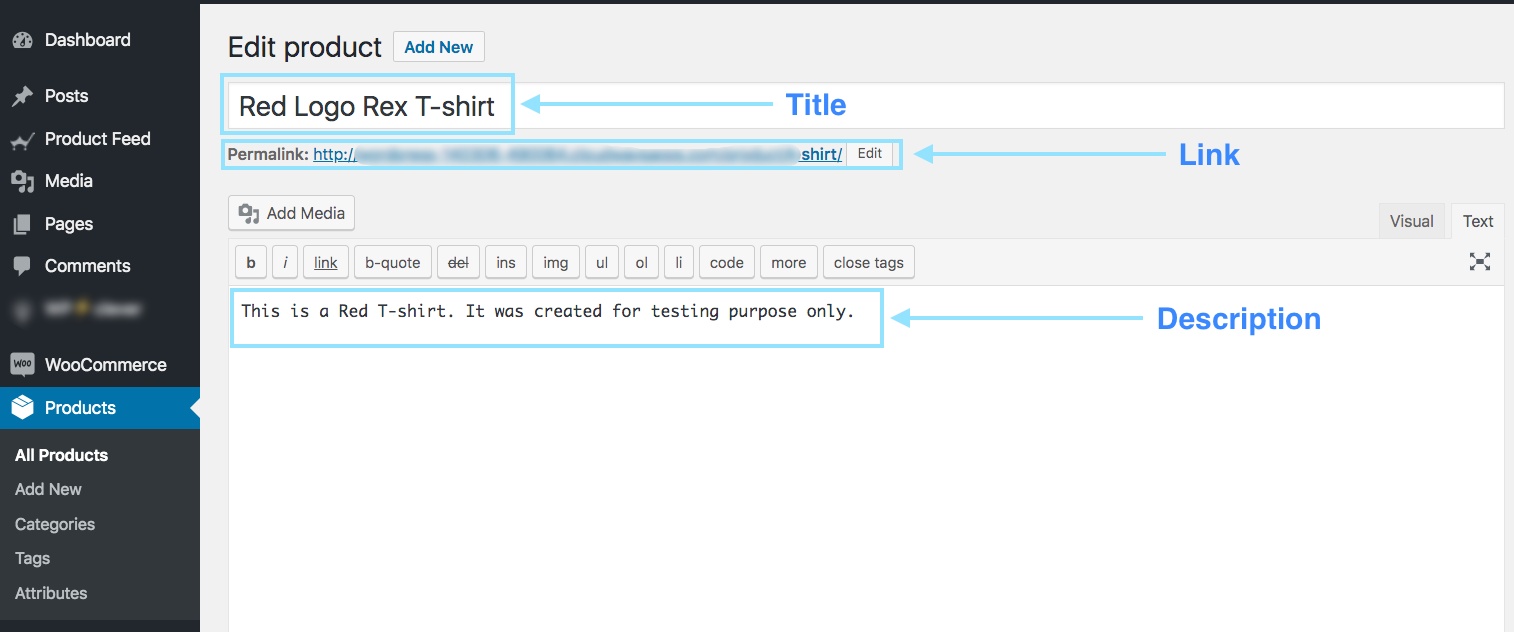
Wanneer u een product bewerkt, kunt u de tegel, de link en de beschrijving ervan instellen zoals in de onderstaande afbeelding:
Even though you should mention the exclusive features and benefits of the description, you are not allowed to use any extensive promotional touch in the description (for example, adding “free shipping” or “discounted price” or using all caps to highlight a certain point).
Ook moet u geen links naar een andere webpagina opnemen of de producten vergelijken met die van concurrenten.
Product Link/URL
| Attribuut | Link |
| Voorbeeldwaarde | https://www.yourwebsite.com/red-logo-rex-t-shirt/ |
| Voerstructuur | <g:link> <![CDATA[ https://www.yourwebsite.com/red-logo-rex-t-shirt/ ]]> </g:link> |
Dit is de link naar uw productpagina.
Bij het bewerken van een product zie je de Permalink net onder het Titelvak. Dat is de URL naar uw product.

When people find your product on Google, clicking on that Ad will take the potential buyer to the link you provide here.
It’s best to include the product title on the link; however, many prefer to use the product Id instead, and some use both.
Ook moet u ervoor zorgen dat uw website-domein wordt geverifieerd en begint met "http" of "https".
Productcategorie
| Attribuut | producttype |
| Voorbeeldwaarde | Kleding |
| Voerstructuur | <g:product_type> <![CDATA[ Clothing ]]> </g:product_type> |
This is the product type or category that you set on your store.
When editing a product on WooCommerce, on the right side, you will have the option to set a Category.
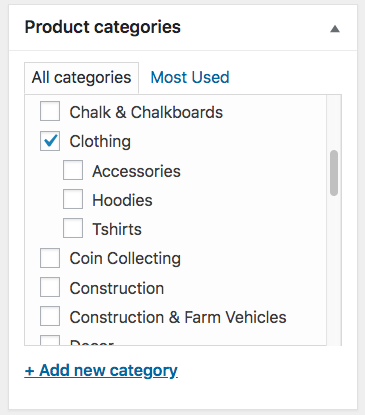
This attribute is optional, but we recommend you use it to create a better visualization for viewers.
Google Product Categorie
| Attribuut | google_product_categorie |
| Voorbeeldwaarde | Kleding & Accessoires > Kleding |
| Voerstructuur | <g:google_product_category> <![CDATA[ Apparel & Accessories > Clothing ]]> </g:google_product_category> |
Google has a category list of its own, which you need to use to categorize your products on Google Shopping. You must set this attribute according to their required taxonomy to get your Google Product Feed approved.
Daarom kun je je WooCommerce-winkelcategorieën dienovereenkomstig instellen of je eigen categorieën laten koppelen aan die van Google met behulp van een plugin bij het genereren van productfeeds.
I’m using the Rexfeed – Product Feed Manager for WooCommerce to apply Category Mapping.


As you can see, on the left is a list of all the categories available in my store. On the right, get the option to map them with Google Categories.
Productafbeelding URL
| Attribuut | image_link |
| Voorbeeldwaarde | https://www.yourwebsite.com/redtee394.png |
| Voerstructuur | <g:image_link> <![CDATA[ https://www.yourwebsite.com/redtee394.png ]]> </g:image_link> |
Dit zal de link zijn naar het hoofdbeeld van uw product.
Wanneer u een product bewerkt, scrollt u aan de rechterkant naar beneden en vindt u de optie om een productafbeelding toe te voegen.
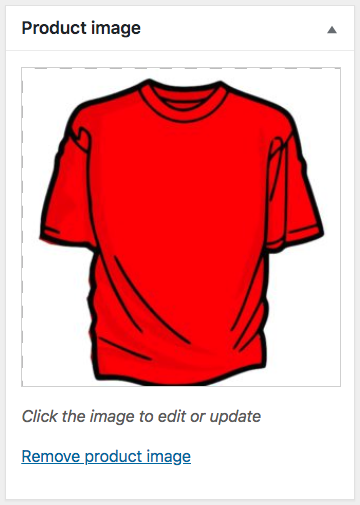
Welke afbeelding u hier ook gebruikt, u moet de URL naar die afbeelding opgeven voor het "image_link"-attribuut.
U moet een overtuigend beeld van het product geven zonder enige promotionele tekst of watermerk. Vermijd ook het gebruik van een plaatshouderafbeelding.
Vergeet niet dat dit beeld de belangrijkste factor is om meer klanten te krijgen. De meeste mensen zullen uw product alleen opmerken als ze het leuk vinden wat ze zien. Zorg dus voor een duidelijk beeld met een hoge kwaliteit.
Voorraadstatus/beschikbaarheid
| Attribuut | beschikbaarheid |
| Voorbeeldwaarde | in_voorraad |
| Voerstructuur | <g:availability>in_stock</g:availability> |
This will signify if the product is still in stock or all sold out.
On the product edit page, scroll down to the product data section. Choose Inventory, and you should get the option to set the Stock Status.

This value will be added under the attribute “availability” when generating a Google product feed. Google accepts the values “in_stock”, “out_of_stock”, or “preorder.”
WooCommerce geeft u standaard de opties "op voorraad" en "niet op voorraad". Voor de "preorder" optie moet u extra codering of een andere plugin gebruiken.
Tip: You might think, Why should you add products that are “out of stock.” Well, sometimes you can use the “out of stock” option as a psychological tactic.
Here’s an example: Let’s say you have a T-shirt with 2 variations, Red and Black, and let’s say the black ones are sold out. Now, when prospects view the products, they will see that there are two similar products, and one variation is sold out.
This could mean that this t-shirt is pretty popular. Hence, it will tempt certain prospects to think about buying the Red one.
Normale prijs
| Attribuut | prijs |
| Voorbeeldwaarde | 26.53 USD |
| Voerstructuur | <g:price>26.53 USD</g:price> |
Dit is de prijs van het product (meestal vóór belastingen).
Blader op de pagina met productbewerking naar beneden naar het gedeelte met productgegevens. Op het tabblad Algemeen krijgt u de mogelijkheid om de Reguliere Prijs in te stellen.
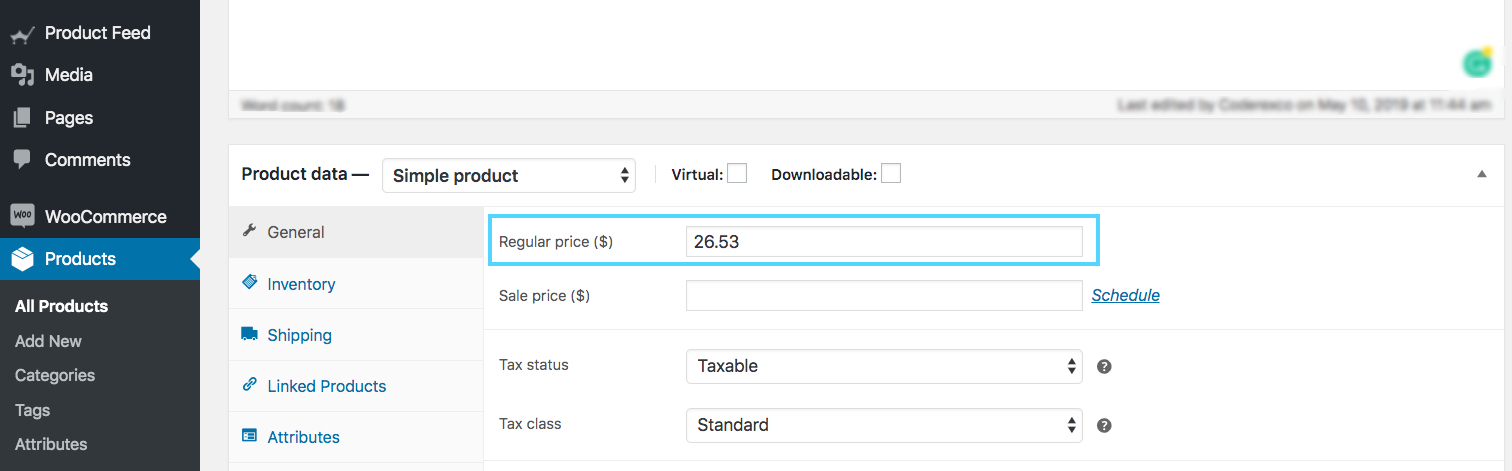
This value will be added under the attribute “price” when generating a WooCommerce Google product feed.
Make sure you are inputting the accurate price, with the ISO currency code as the suffix.
Houd er rekening mee dat de prijs niet "0" kan zijn. (De prijs "0" is alleen aanvaardbaar voor mobiele apparaten die op contractuele basis worden verkocht).
Also, if your products are for the US or Canada, then do not add any tax to the price. For any other country, make sure to add VAT or GST, or whichever regional tax may apply.
Productvoorwaarde
| Attribuut | voorwaarde |
| Voorbeeldwaarde | Nieuw |
| Voerstructuur | <g:condition> <![CDATA[ New ]]> </g:condition> |
Use this attribute to signify whether your product is brand new or refurbished. You can use the values “new”, “refurbished”, or “used” to define the condition.
WooCommerce doesn’t have a field to define the condition of the product; hence, you have to add it on your own to the product feed.
However, Product Feed Manager for WooCommerce will have the option for you to add the product condition field for all products.
Fabrikant/Merknaam
| Attribuut | merk |
| Voorbeeldwaarde | RexTest |
| Voerstructuur | <g:brand> <![CDATA[ RexTest ]]> </g:brand> |
It is mandatory to provide the manufacturer/brand name in order to add a product to Google Shopping. Ideally, you should also mention the brand name on the product tile.
Maar WooCommerce bevat geen "merk"-veld voor uw producten. U kunt dus voor elk product een aangepast veld aanmaken of een plugin gebruiken om het merkveld toe te voegen aan elk product in uw WooCommerce winkel.
However, movies, books, or musical records don’t require you to include a brand name. In that case, you can keep the brand section empty.
GTIN (Global Trade Item Number)
| Attribuut | gtin |
| Voorbeeldwaarde | 123465465464 |
| Voerstructuur | <g:gtin> <![CDATA[ 123465465464 ]]> </g:gtin> |
In order to promote products through Google Shopping Ads, manufacturers from the US or Canada that are GTIN certified must provide the GTIN number for every product on their Google Product Feed.
Voor andere fabrikanten
- In North America, provide UPC
- In Europe, provide EAN
- In Japan, provide JAN
However, for a book, you need to provide an ISBN instead, and for multipacks, you need to provide the ITF-14.
MPN (Fabrieksonderdeelnummer)
| Attribuut | MPN |
| Voorbeeldwaarde | Rex0011Test |
| Voerstructuur | <g: MPN> <![CDATA[ Rex0011Test ]]> </g: MPN> |
Indien een product geen GTIN (of UPC, EAN, JAN) heeft, dan dient u in plaats daarvan de MPN op te geven.
You can also use the product SKU as the value of its MPN when you do not have both GTIN and MPN (provided that you didn’t use the SKU as its product ID).
Now, WooCommerce doesn’t provide fields for Brand, GTIN, or MPN by default. Hence, you need to input custom fields for every product manually.
However, I use the Product Feed Manager For the WooCommerce plugin which includes those fields on every product, as shown below:
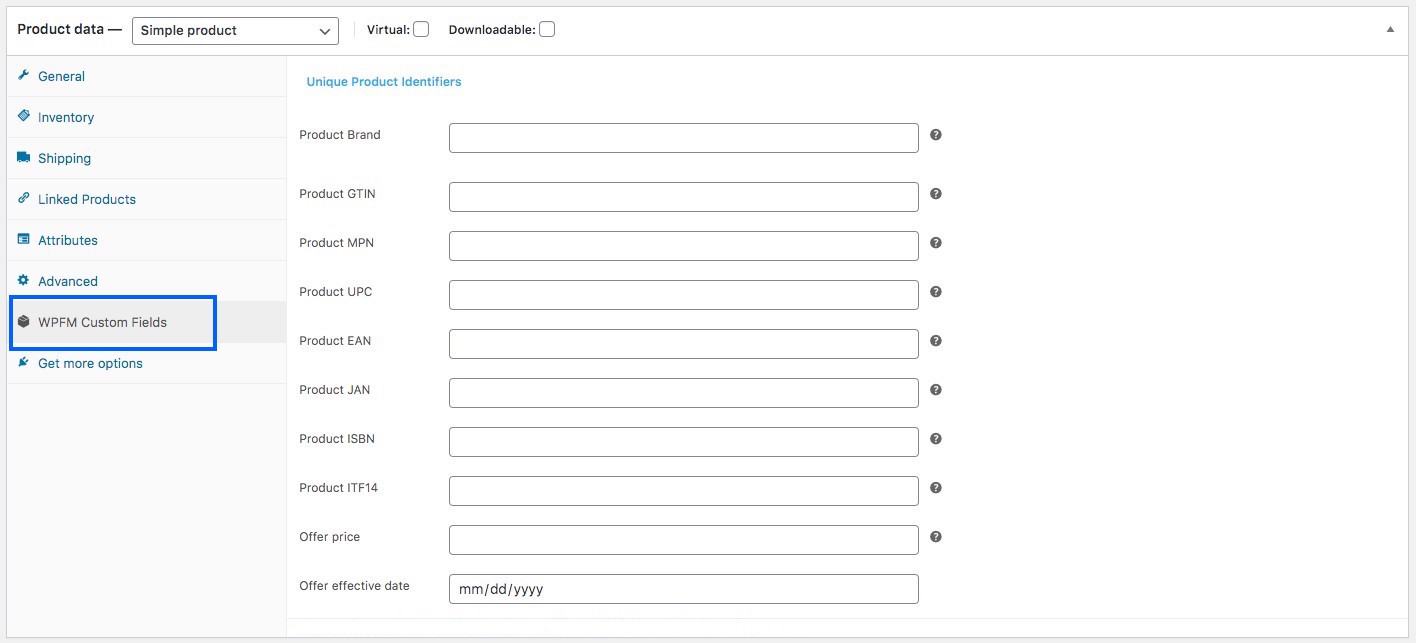
I’ll just have to input the correct data and use it as values of the required attributes when generating my WooCommerce Product feed.
Identifier Bestaat
| Attribuut | identificator_bestaat |
| Voorbeeldwaarde | geen |
| Voerstructuur | <g:identifier_exists>no</g:identifier_exists> |
U hebt al eerder geleerd dat het verplicht is een GTIN of MPN op te geven. Sommige producten hebben echter geen GTIN of MPN.
Sommige producten worden bijvoorbeeld gewoon lokaal geproduceerd en bevatten geen GTIN of MPN.
In dit geval moet u het attribuut "identifier_exists" gebruiken en de waarde "no" toekennen.
Inhoud voor volwassenen
| Attribuut | volwassen |
| Voorbeeldwaarde | ja |
| Voerstructuur | <g:adult>yes</g:adult> |
Je hebt misschien wat erotische of volwassen producten. Het is prima om ze te promoten op Google Shopping, zolang je ze maar als volwassen content bestempelt. Bij het indienen van een product dat in de volwassen industrie zit, moet u het "volwassen" attribuut gebruiken en de waarde "ja" toekennen.
In case you run a business that is completely in the adult industry,
For example, a licensed erotic shop, then you do not need any attributes. You should rather go to your Google Merchant Center settings and select the option that says your business delivers adult products.
Multipack
| Attribuut | multipack |
| Voorbeeldwaarde | 8 |
| Voerstructuur | <g:multipack>8</g:multipack> |
Een multipack is wanneer u een groep van meerdere identieke producten als één geheel verkoopt; bijvoorbeeld 8 pennen bij elkaar.
This attribute is required for promotion in certain locations such as Australia, Brazil, Czechia, France, Germany, Italy, Japan, the Netherlands, Spain, Switzerland, the UK, and the US.
You must include this attribute and assign its value to the number of products you assembled into a multipack.
Als het multipack door de eigenlijke fabrikant wordt geassembleerd, en niet door u, dan hoeft u dit attribuut niet op te nemen.
Tip: Try to include multipacks in your store with a small amount of discount.
For example, if 1 pen costs 10 dollars, and you set a multipack for 8 pens, then rather than charging 80 dollars, try to give a discount and charge 70 or 75 dollars maybe. This little discount will create more attraction
Bundel
| Attribuut | is_bundel |
| Voorbeeld | ja |
| Voergegevens | <g:is_bundle>yes</g:is_bundle> |
Een bundel is wanneer u meerdere producten neemt en deze als één pakket verkoopt. Meestal zijn alle producten in een bundel enigszins verwant en kunnen ze individueel worden verkocht zonder de bundel.
Hier fungeert één product als hoofdproduct en worden de rest in een bundel aangeboden.
U kunt bijvoorbeeld een productbundel maken met een camera, een geheugenkaart en een draagtas. Hier is de camera het hoofdproduct, terwijl de geheugenkaart en de draagtas verwante bijproducten zijn in een bundel.
Voor het promoten van bundels in Australië, Brazilië, Tsjechië, Frankrijk, Duitsland, Italië, Japan, Nederland, Spanje, Zwitserland, het Verenigd Koninkrijk en de VS moet u dit attribuut gebruiken en de waarde ervan als "ja" of "waar" toekennen.
Materiaal
| Attribuut | materiaal |
| Voorbeeld | Leder |
| Voergegevens | <g:material>Leather</g:material> |
In case you wish to upload a product whose material is a notable feature, then you can use this attribute. You need to use valid material names.
In case the product is made using multiple materials, mention all the materials while separating them with “/” between them.
For example, cotton/leather/polyester. For promoting Apparel & Accessories in Brazil, France, Germany, Japan, the UK, and the US, you need to provide more attributes, including age group, color, gender, and size.
For variable products, you must include an extra attribute called item_group_id. So let’s learn more about them.
Leeftijdsgroep
| Attribuut | leeftijdsgroep |
| Voorbeeldwaarde | kinderen |
| Voerstructuur | <g:age_group>kids</g:age_group> |
(Dit veld is alleen verplicht als uw product onder de categorie Kleding & Accessoires of de subcategorie valt)
U moet aangeven voor welke leeftijdsgroep dit product bestemd is.
Google accepteert de volgende waarden:
- pasgeborene
- baby
- peuter
- kinderen
- volwassen
In the case of variable products, assign a separate age group for each variant.
Kleur
| Attribuut | kleur |
| Voorbeeldwaarde | Tango rood |
| Voerstructuur | <g:color>Tango Red</g:color> |
(Dit veld is alleen verplicht als uw product onder de categorie Kleding & Accessoires of de subcategorie valt).
U moet de kleur van het product beschrijven (maar geen kleurcodes of losse letters).
Als er meerdere kleuren zijn, vermeld dan alle kleuren en scheid ze met een "/". Bijvoorbeeld, Rood/Blauw/Groen.
For variable products, assign a separate color for each variant and add it to the product title.
Tip: It is not necessary that you give a generic color. You can rather use catchy color names such as “Tango Red” instead of just “Red”, which is more appealing to buyers.
Geslacht
| Attribuut | geslacht |
| Voorbeeldwaarde | mannetje |
| Voerstructuur | <g:gender>male</g:gender> |
(Dit veld is alleen verplicht als uw product onder de categorie Kleding & Accessoires of de subcategorie valt).
Bij de verkoop van kleding moet u aangeven voor welk geslacht het product bestemd is.
Google accepteert de volgende geslachten:
- mannetje
- vrouwelijk
- uniseks
Grootte
| Attribuut | formaat |
| Voorbeeldwaarde | XL |
| Voerstructuur | <g:size>XL</g:size> |
(Dit veld is alleen verplicht als uw product onder de categorie Kleding & Accessoires of de subcategorie valt).
U moet een geschikte maat voor het product toewijzen.
For example, “XL” to define extra-large, or “15/32 slim” to define a 15-inch neck size, 32-inch sleeves, and a slim fit. For a free-size product, you should assign the value “one size”, “OS”, “one size fits all”, “OSFA”, “one size fits most”, or “OSFM.”
In case of variable products, assign a separate size for each variant, and you can also add it to the title of the product.
Tip: Keep a measurement table on your site to define the sizes you mentioned here.
For example, if you assigned the size as XL, then on the table, explain the height, width, chest size, etc., in inches or cms, to give your customers a way to check if that size is the right fit.
Different countries have different measurements for the same size codes; hence, this will be helpful.
Patroon
| Attribuut | patroon |
| Voorbeeldwaarde | gestreept |
| Voerstructuur | <g:pattern>Striped</g:pattern> |
This field is only applicable to variable products. If you have different pattern designs for the same product, then you need to mention separate patterns for each variant using this attribute.
Item Groeps-ID
| Attribuut | item_groep_id |
| Voorbeeldwaarde | AB12345 |
| Voerstructuur | <g:item_group_id>AB12345</g:item_group_id> |
Voor variabele producten, als de variaties zich voordoen als gevolg van een van de volgende:
- kleur
- formaat
- patroon
- materiaal
- leeftijdsgroep
- geslacht
Then you must use the “item_group_id” attribute.
Alle varianten van hetzelfde variabele product zullen dezelfde Item Group ID hebben. Dit geeft aan dat het om varianten van een enkel product gaat. U moet dus voor elk variabel product een unieke groeps-ID kiezen.
Google Productvoedingsmonsters
Now that you know what details you require to generate your WooCommerce Product Feed for Google, Now let us look at some samples to understand the structure.
Google accepteert verschillende bestandsformaten van de te uploaden productfeed. Het aanbevolen formaat is echter XML.
Here’s a sample of a simple product feed:
Here’s a sample of a variable product feed:
These feeds can easily be generated using the plugin, Product Feed Manager For WooCommerce.
Once you have the product feed file, you can now manually upload it to your Google Shopping Center.
However, the plugin also allows you to auto-sync with Google Shopping directly.
This means the feed can automatically be generated and sent to Google, according to your scheduled time.
I’ll give you a proper tutorial on the plugin at the end of this article.
WooCommerce Productfeed voor Facebook Dynamic Ads

Facebook is the largest social media platform, and currently, a major platform to upload and promote products for your business.
While scrolling on Facebook, you often find sponsored posts, as shown below:
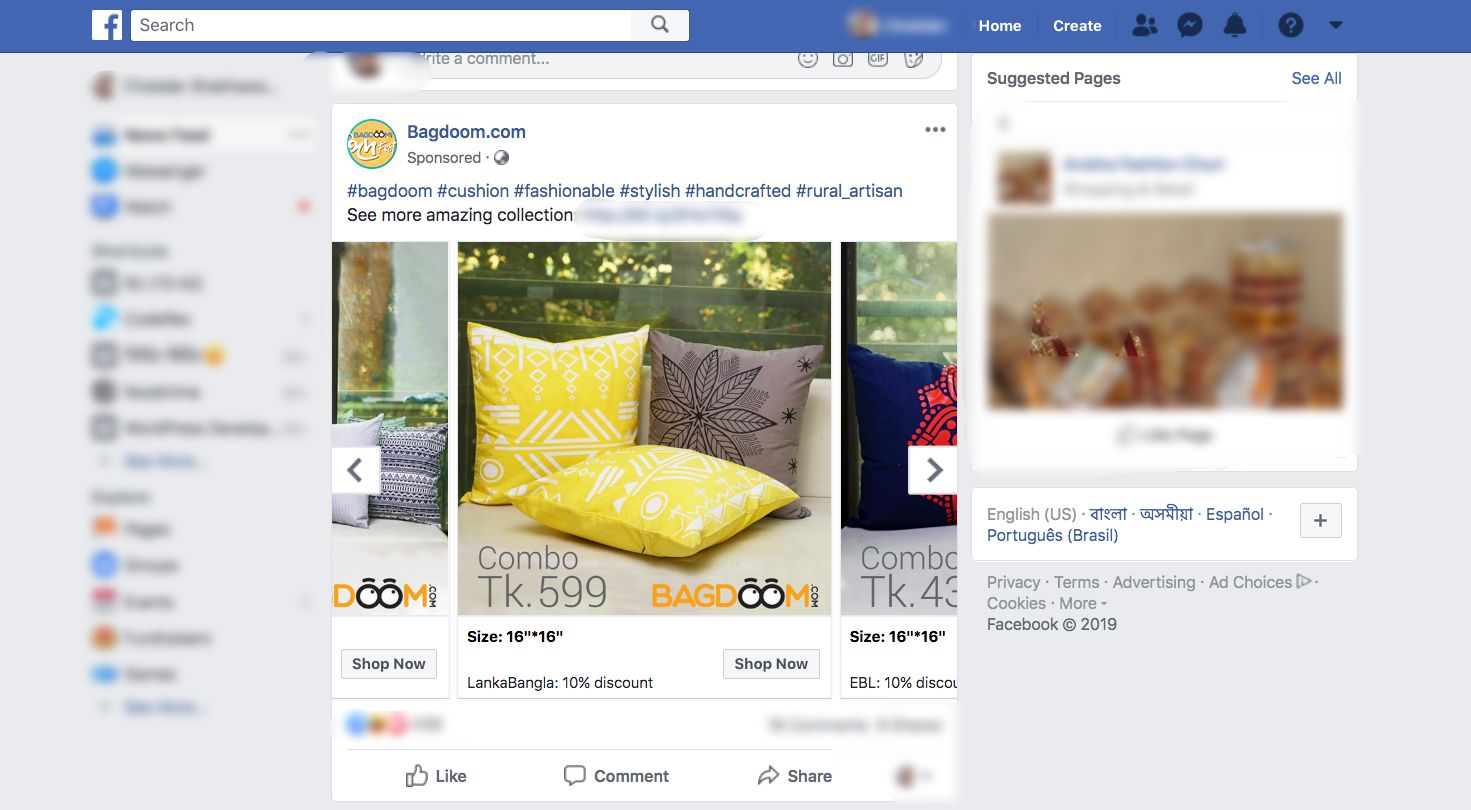
You can see there is the “Shop Now” button, and there are arrows to swipe within a gallery of products for the same company. This is a smart way to promote your products.
Being a WooCommerce store owner, it is ideal to sell your products through Facebook since you get a larger audience.
Als u bepaalde richtlijnen volgt, kunt u ook profiteren van het gebruik van Facebook Dynamic Ads en de ROI van uw winkel verhogen.
How to Set Up WooCommerce Facebook Product Feed in The Most Optimized Way
Facebook heeft enkele richtlijnen voor de productfeedspecificaties die je moet volgen om je producten goedgekeurd te krijgen voor Facebook Dynamic Ads.
Let’s take a look at the necessary data that you must submit for your product to be promoted on Facebook.
I will give you examples for each data so that you know the most optimized way to generate the feed. A product feed (in CSV format) of a single product for Facebook usually looks like this:

Here, the 1st row will be the list of attributes per column. And then from the 2nd row onwards, each row is a product, with values assigned for attributes (or product data).
Nu, Facebook Dynamic Ads vereisen de volgende attribuutwaarden voor elk van uw producten:
● Productidentificatie ●
Producttitel ●
Voorraadbeschikbaarheid ●
Productvoorwaarde ●
Productbeschrijving ●
Productafbeelding-URL ●
Product-URL ●
Normale prijs ●
Fabrikant/Brand
● Google-productcategorie ●
GTIN (Global Trade Item Number) ●
MPN (Fabrikant onderdeelnummer) ●
Grootte ●
Kleur ●
Geslacht ●
Patroon ●
Speciale beperkte aanbieding ●
Speciale beperkte aanbiedingstermijn
Some of these attributes depend on the product type and its variants. Below is a more detailed explanation with examples of how each of these attributes should be assigned to your Facebook product feed for maximum output.
You will get samples of Facebook product feeds later on in this article, after I go over detailed instructions on the attributes and some tips.
Laten we de details bekijken om te begrijpen welke waarden u aan elk attribuut moet toekennen, en welke u moet opnemen/uitschakelen op basis van de producten in uw WooCommerce Store.

Product ID
| Attribuut | id |
| Voorbeeldwaarde | 671 |
Het is een unieke identificatie voor uw product op uw winkel.
Op WooCommerce zou u de ID moeten zien als u door de productlijst bladert.
Het is aan te raden om de bestaande SKU van het product als ID te gebruiken, omdat dat altijd uniek is.
Als meerdere producten dezelfde ID hebben, wordt alleen de eerste op de lijst in aanmerking genomen. De rest wordt genegeerd. Zorg er dus voor dat elk product een uniek ID heeft.
Titel van het product
| Attribuut | titel |
| Voorbeeldwaarde | Rood Logo Rex T-shirt |
Het is de naam van het te tonen product.
Op WooCommerce zou u de producttitel moeten zien wanneer u de productlijst doorbladert.
When you set the product title, specify any special features such as its color and the brand name, along with the product. This will grab the attention of the buyers.
However, you are not allowed to use any other promotional touch to the tile (for example, adding “free shipping” or “discounted price” or using all caps).
In case of a variable product, include the brand name in the title. Rather than including just any feature in the main title, mention the feature that makes it a variant of the product.
For example, if a product is a Logo Rex T-shirt and has variations of Red and Blue, then one variation should be named “Logo Rex T-shirt – Red” and the other one “Logo Rex T-shirt – Blue”.
Dus in het CSV-bestand zullen ze verschillende waarden hebben voor de titel:
| id | titel |
| 872 | Logo Rex T-shirt - Rood |
| 873 | Logo Rex T-shirt - Blauw |
Voorraadbeschikbaarheid
| Attribuut | beschikbaarheid |
| Voorbeeldwaarde | op voorraad |
This will signify if the product is still in stock or all sold out.
On the product edit page, scroll down to the product data section. Choose Inventory, and you should get the option to set the Stock Status.
This value will be added under the attribute “availability” when generating the WooCommerce Facebook product feed for Facebook Dynamic Ads.
Facebook accepts the following values:
- In stock – when the product is ready for immediate shipping
- out of stock – when the product is not available in stock
- voorbestelling - kan vooraf bestellen voor toekomstige herbevoorrading
- available for order – if the product is available, but will require a couple of weeks for shipping
- stopgezet - als het product wordt stopgezet
WooCommerce will give you the options “in stock” and “out of stock” by default.
For the rest of the values, you will need to use extra coding or another plugin.
Tip: Did you know that adding products that are “out of stock” can be a great psychological tactic?
Here’s an example: Let’s say you have a T-shirt with 2 variations, Red and Black, and let’s say the black ones are sold out. Now, when prospects view the products, they will see that there are two similar products, and one variation is sold out.
This could mean that this t-shirt is pretty popular. Hence, it will tempt certain prospects to think about buying the Red one.
Productvoorwaarde
| Attribuut | voorwaarde |
| Voorbeeldwaarde | nieuwe |
Use this attribute to signify whether your product is brand new or refurbished. You can use the values “new”, “refurbished” or “used” to define the condition.
WooCommerce doesn’t have a field to define the condition of the product, hence you have to add it on your own to the product feed.
However, the Product Feed Manager for WooCommerce will have the option for you to add the product condition field for all products.
Productbeschrijving
| Attribuut | beschrijving |
| Voorbeeldwaarde | Dit is een rood T-shirt. Het is alleen gemaakt voor testdoeleinden. |
Add a proper description of the product you are selling. Make sure to highlight all the major features it may have that will attract buyers.
When you edit a product, you get to set its title, link, and description as shown in the picture below:
You should mention the exclusive features and benefits of the description.
However, you are not allowed to use any extensive promotional touch in the description (for example, adding “free shipping” or “discounted price” or using all caps to highlight a certain point).
Ook moet u geen links naar een andere webpagina opnemen of de producten vergelijken met die van concurrenten.
Productafbeelding URL
| Attribuut | image_link |
| Voorbeeldwaarde | https://www.yourwebsite.com/redtee394.png/ |
Dit zal de link zijn naar het hoofdbeeld van uw product.
Wanneer u een product bewerkt, scrollt u aan de rechterkant naar beneden en vindt u de optie om een productafbeelding toe te voegen.
Welke afbeelding u hier ook gebruikt, u moet de URL naar die afbeelding opgeven voor het "image_link"-attribuut.
Vergeet niet dat dit beeld de belangrijkste factor is om meer klanten te krijgen. De meeste mensen zullen uw product alleen opmerken als ze het leuk vinden wat ze zien. Zorg dus voor een duidelijk beeld met een hoge kwaliteit.
It’s best if the image is a clear picture of the product without any promotional text watermark, or any placeholder image (although I am using one just for test purposes).
U moet echter wel de juiste beeldresolutie behouden.
If you use a square image for carousel ads, then the dimensions should be 600×600 px.
For Dynamic Ads with a single image, you need a minimum resolution of 1200×630 px with a minimum aspect ratio of 4 : 5 and a maximum aspect ratio of 1: 91: 1.
Alles wat buiten de genoemde maximale beeldverhoudingen valt zal worden uitgesneden.
Product URL
| Attribuut | link |
| Voorbeeldwaarde | https://www.yourwebsite.com/red-logo-rex-t-shirt/ |
Dit is de link naar uw productpagina.
Bij het bewerken van een product zie je de Permalink net onder het Titelvak. Dat is de URL naar uw product.
Het is het beste om de producttitel op de link te vermelden, maar velen geven de voorkeur aan het product Id in plaats daarvan, en sommigen gebruiken beide.
Also, you must make sure your website domain is verified and starts with http or https.
Normale prijs
| Attribuut | prijs |
| Voorbeeldwaarde | 26.53 USD |
Dit is de prijs van het te tonen product.
Blader op de pagina met productbewerking naar beneden naar het gedeelte met productgegevens. Op het tabblad Algemeen krijgt u de mogelijkheid om de Reguliere Prijs in te stellen.
This value will be added under the attribute “price” when generating a product feed for Facebook.
Houd er rekening mee dat de prijs niet "0" kan zijn en dat elk product met "0" of geen prijswaarde zal resulteren in een afwijzing van Facebook Dynamic Ads.
Make sure you are inputting the accurate price with the ISO currency code as the suffix.
Fabrikant/Merk
| Attribuut | merk |
| Voorbeeldwaarde | RexTest |
In case a product doesn’t have a GTIN, then it is mandatory to provide the manufacturer/brand name to add that product to Facebook.
If the product falls under the Daily Deals Inventory, then you must also include the MPN alongside the brand.
Maar WooCommerce bevat geen "merk"-veld voor uw producten. U kunt dus voor elk product een aangepast veld aanmaken of een plugin gebruiken om het merkveld toe te voegen aan elk product in uw WooCommerce winkel.
Google Product Categorie
| Attribuut | google_product_categorie |
| Voorbeeldwaarde | Kleding & Accessoires > Kleding |
Facebook gebruikt dezelfde taxonomie en categoriespecificaties als Google. Vandaar, om uw producten te categoriseren, moet u dit kenmerk instellen volgens de taxonomie van Google, om uw WooCommerce Facebook Product Feed te kunnen goedkeuren.
You can either set your WooCommerce store categories accordingly or have your own categories mapped to Google’s using a plugin when generating a feed.
I’m using the Rexfeed – Product Feed Manager for WooCommerce to apply Category Mapping:

GTIN (Global Trade Item Number)
| Attribuut | gtin |
| Voorbeeldwaarde | 3234567890126 |
For a manufacturer in the US or Canada that is GTIN certified, it is necessary to provide the GTIN number for every product on your Facebook Product Feed.
Alternatively, you can also use UPC, EAN, JAN, or ISBN in place of GTIN if you are from a different location.
MPN (Fabrieksonderdeelnummer)
| Attribuut | mpn |
| Voorbeeldwaarde | Rex0011Test |
Indien een product geen GTIN (of UPC, EAN, JAN, ISBN) heeft, dan dient u in plaats daarvan het MPN op te geven. Het is een uniek fabrikant-ID voor een product dat geen GTIN heeft.
Voor producten die onder de Daily Deals Inventory vallen, is het, indien u een merknaam opgeeft, ook verplicht om MPN op te nemen.
Now, WooCommerce doesn’t provide fields for Brand, GTIN, or MPN by default. Hence, you need to input custom fields for every product manually.
However, I use the Product Feed Manager for the WooCommerce plugin includes those fields on every product, as shown below:
I’ll just have to input the correct data and use it as values of the required attributes when generating the Facebook Product feed.
Grootte
| Attribuut | formaat |
| Voorbeeldwaarde | Grote |
Dit veld is alleen vereist voor variabele producten met maatvarianten.
You may use words such as Small, Medium, or Large, or you may use numbers such as 20, 25, etc, whichever is appropriate to define the size of a product.
Tips: You should keep a measurement table on your site to define the sizes you mentioned for your products.
Different countries have different measurements for the same size codes; hence, this will be helpful.
For example, if you assigned the size as Large, then on the table, explain the height, width, chest size, etc., in inches or cms, to give your customers a way to check if that size is the right fit.
Kleur
| Attribuut | kleur |
| Voorbeeldwaarde | Tango rood |
Dit veld is alleen verplicht voor variabele producten met kleurvarianten.
U moet de kleur van het product beschrijven (maar geen kleurcodes of losse letters).
If there are multiple colors, mention all the colors while separating them with a “/”.
For example, Red/Blue/Green.
In the case of variable products, assign a separate color for each variant and add it to the product title.
Tip: You can use a creative way to describe the color, rather than simply using generic colors.
For example, you can use catchy color names such as “Tango Red” instead of just “Red”, which is more appealing to buyers.
Geslacht
| Attribuut | geslacht |
| Voorbeeldwaarde | uniseks |
U moet vermelden voor welk geslacht het product bestemd is.
Facebook accepteert de volgende geslachten:
- mannetje
- vrouwelijk
- uniseks
Patroon
| Attribuut | patroon |
| Voorbeeldwaarde | Flannel |
Dit veld is alleen vereist voor variabele producten met patroonvarianten. Gebruik de juiste patroonnamen zoals "Striped", "Flannel", enz.
Speciale Beperkte Aanbieding
| Attribuut | aanbiedingsprijs |
| Voorbeeldwaarde | 9.99 USD |
Dit is een unieke optie die u alleen op Facebook Dynamic Ads krijgt.
You can set a product to be on a special discounted price for certain hours every day (during the offer period), or in other words, the product will be under the Daily Deals Inventory.
Tip: Sometimes, a single-day discount on certain popular products in your store can boost your sales.
For example, if you have a watch in your store that people are buying more of than other products, you can give a surprise single-day special discount offer. This may double your sales on that day and grab more attention from future prospects.
Simply include the “offer_price” attribute in your WooCommerce Facebook product feed and set a discounted price as its value to define the special price offered (including a proper ISO currency code as the suffix). The offer price must be at least 15% less than the regular price, or else Facebook will reject it.
Speciale Beperkte Aanbiedingsduur
| Attribuut | offer_prijs_effectief_datum |
| Voorbeeldwaarde | 2018-06-01T12:00-0300/2018-12-01T00:00-0300 |
If you want to give a special offer for a product under the Daily Deals Inventory on Facebook, then along with “offer_price”, you must also add this attribute to specify the start and end date, with time, for the special offer.
Mention the start date and hours of the offer, then use a slash, and then mention the end date and hours of the offer.
Tip:
Voorafgaand aan grote festivals, internationale gelegenheden of vakanties kan het geven van speciale aanbiedingen op bepaalde relatieve producten uw verkoop een boost geven.
Zo kunt u bijvoorbeeld een week voor kerstmis een speciale kortingsactie op kerstmutsen uitvoeren. Dit zal uw verkoop zeker stimuleren.
Facebook Product Feed voorbeelden
Nu u weet welke details u nodig heeft om uw WooCommerce Product Feed voor Facebook Dynamics te genereren, laten we nu enkele voorbeelden bekijken om de structuur te begrijpen.
Facebook accepts several file formats of product feeds to be uploaded. However, the recommended format is CSV.
Here’s a sample of a simple product feed:
Voorbeeld van een Facebook-productvoer van een eenvoudig product
Here’s a sample of a variable product feed:
These feeds can easily be generated using the plugin, Product Feed Manager For WooCommerce. Once you have the product feed file, you can now manually upload it to your Facebook Business Account.
Check out these 12 Tips For Selling On Facebook Marketplace [2026]
Nu heeft u alles geleerd over WooCommerce Google Product Feed en WooCommerce Facebook Product Feed.
Dus, laat me je een goede gids geven over de tool die ik gebruik om WooCommerce productfeed gemakkelijk te genereren, in een paar seconden.
How to Generate WooCommerce Product Feed Easily Using The Right Tool
Product Feed Manager for WooCommerce lets you create a product feed without coding or technical skills.
Waarom deze plugin gebruiken?
There are several reasons why Product Feed Manager for WooCommerce is an ideal choice to help you generate feed:
- Quick Setup: Create your first product feed in seconds. No manual work or complex setup required.
- Easy to Use: The interface is simple and beginner-friendly. You can generate and manage feeds without any technical skills.
- Handles Large Stores: Works smoothly for both small and large stores. Even thousands of products won’t affect performance.
- Flexible Control: Choose exactly which products to include in your feed. Easily filter by category, tags, or product type.
- Google Category Mapping: Map your store categories to Google’s categories quickly. No need to change anything on your website.
- Auto Sync: Your product feed updates automatically with changes. This keeps your listings accurate at all times.
- Built-in Attributes: Includes all required fields for Google and Facebook. You don’t have to worry about missing important data.
- Custom Fields: Add details like GTIN, MPN, and brand easily. This helps improve product visibility and performance.
- Reliable Support: Get quick help whenever you face issues. The support team ensures your feed runs smoothly.
- All-in-One Solution: Manage everything from one place. It makes product feed marketing simple and efficient.
Now, let’s go through how you can easily generate product feed using Product Feed Manager for WooCommerce.
How to get a Product Feed Manager for WooCommerce?
Product Feed Manager for WooCommerce has a free version that you can use to test out its basic features and understand its interface.
Maar het is aan te raden om de pro-versie te krijgen, omdat deze met meer verfijnde functies wordt geleverd.
Install and activate the plugin on your WordPress dashboard, and you should see something like this:

Nu bent u klaar om productaanvoer te genereren.
Hoe WooCommerce Product Feed genereren met Product Feed Manager?
Product Feed Manager for WooCommerce is so easy to use.
- Simply click on “Add New Feed” and you shall see the Add New Product Feed page:

- On top, you will get the option to add a title to the feed.
Geef eerst een titel aan het feedbestand. Daarna kun je instellen welke producten je in je feed wilt opnemen.

- Just under the title, you will see an option to select your preferred merchant. Simply click on the Feed Merchant dropdown button and select your preferred merchant from the dropdown, or you can search in the dropdown box.
Selecteer de handelaar van uw voorkeur, en alle vereiste attributen worden hieronder geladen.

Product Filter
With the Product Feed Manager for the WooCommerce plugin, you will have the option to choose which products to include in your feed.
Om de opties te zien, klikt u gewoon op de knop Productfilter.

Zodra u op de knop Productfilter klikt, schuift de Productfilterlade aan de rechterkant van het venster naar binnen.
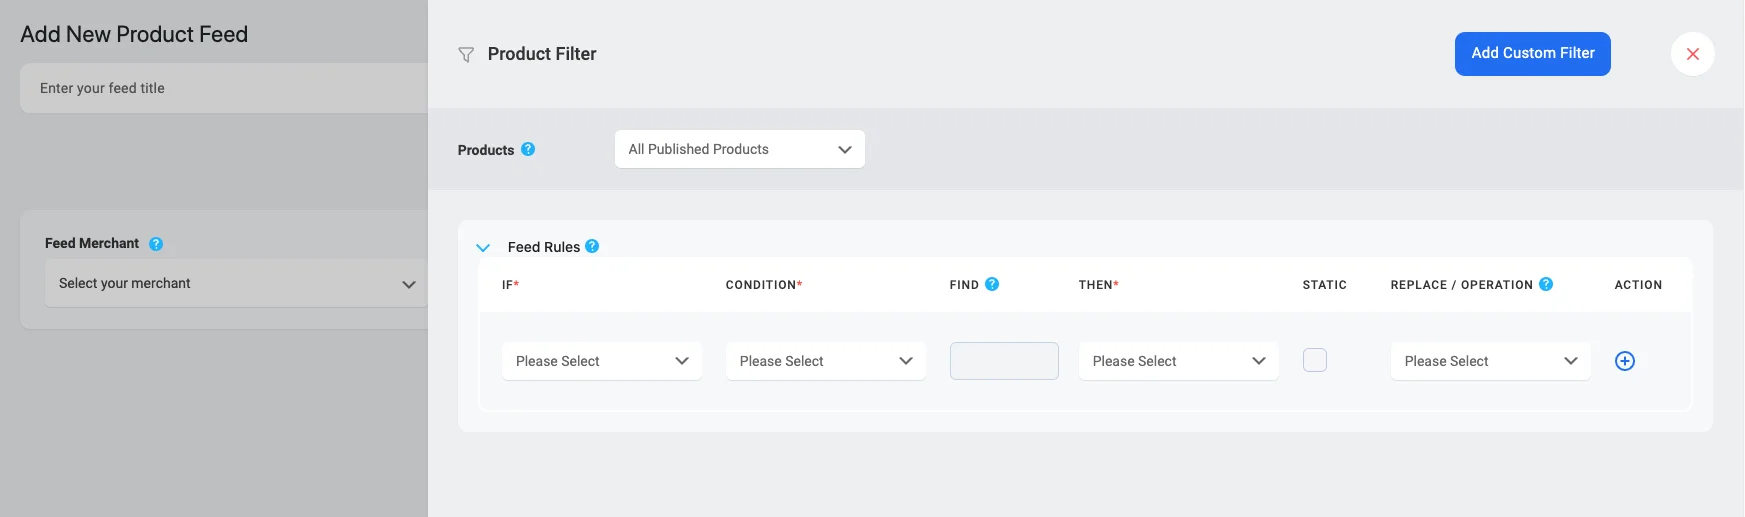
Hier zie je dat de optie "Alle gepubliceerde producten" standaard is geselecteerd - deze optie omvat elk product in je WooCommerce winkel.
Als u wilt, kunt u andere filteropties gebruiken. Klik op de dropdown, en u ziet enkele filteropties in de dropdownlijst:

U kunt kiezen uit
- Alle aanbevolen producten - alleen de aanbevolen producten publiceren
- Categorie Filter - kies producten met behulp van categorieën
- Product Filter – Use this custom filter to set a conditional filter
- Tag Filter – choose a product using tags
Plan Auto-update
Om een ophaaltijd in te stellen, klikt u eerst op de knop Productinstellingen.

Zodra u op de knop Productinstellingen klikt, schuift de lade Productinstellingen in vanaf de rechterkant van het venster
Here, at the top of the Settings options, you will find an option, Auto-Generate Your Feed.
U kunt de geplande update dagelijks, elk uur of wekelijks laten plaatsvinden.
Daarna krijgt u de opties om variatieproducten op te nemen of uit te sluiten, en om ouderproducten op te nemen in het geval van gegroepeerde producten.
WPML-ondersteuning
Als u WPML gebruikt om verschillende taalversies van uw producten in te stellen, vindt u hier een WPML sectie.
You can have a look at this doc for a better understanding of how you can generate a feed with WPML:
Voerconfiguratie
Om een feed te genereren, moet u eerst de handelaar van uw voorkeur selecteren.
Voor Google Product Feed selecteert u Merchant Type "Google Shopping".
Voor Facebook Product Feed selecteert u Merchant Type "Facebook".
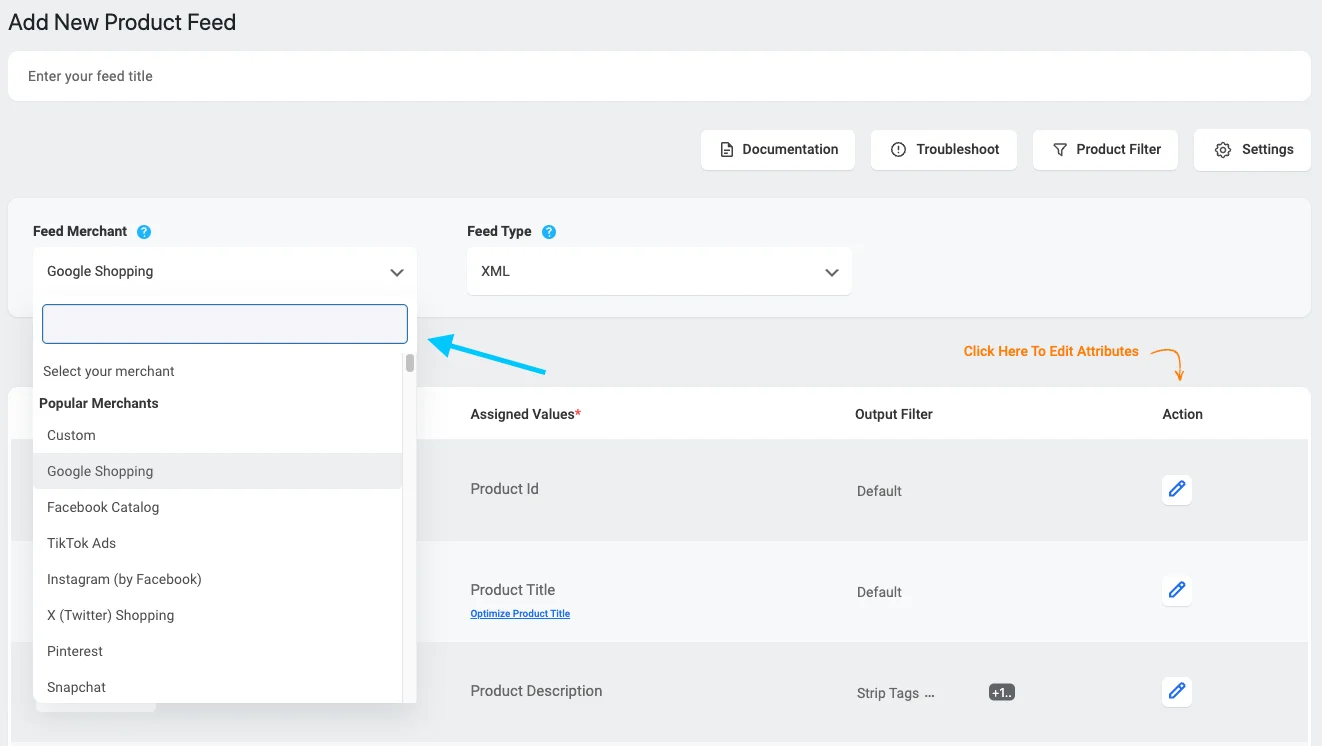
Once you select, you will see the page refresh, and the required attributes will automatically appear.

Here, you’ll see the attributes on the left and their assigned values on the right.
- Select Type as Attribute, then choose the corresponding value from your WooCommerce store.
- If any attribute is missing, simply click on “Add New Attribute” to include it.
You’ll also find language options on this page if you’re using WPML.
For a better understanding of generating feeds with WPML translation, check the related documentation.
Genereer WooCommerce Product Feed
Once the feed is configured, you can now click on “Publish” on the right side, and you will see a loading bar.
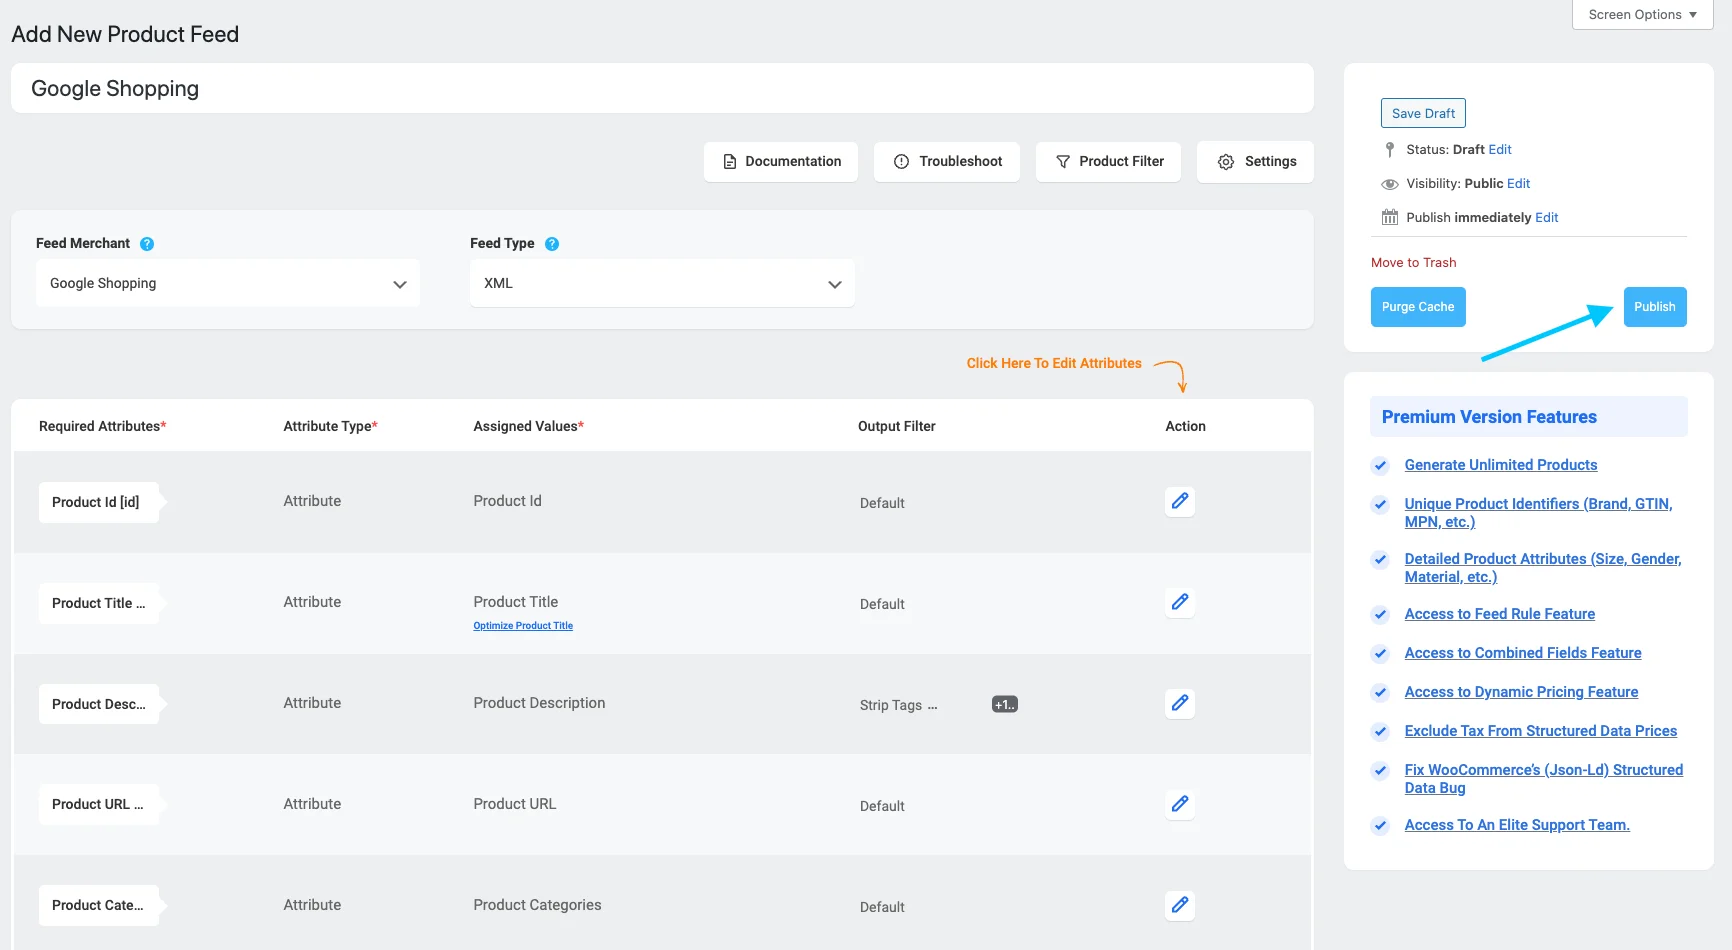
Once this is complete, the “Publish” button will change to an “Update” button, and you will get the feed link or feed download button right below the “Update button.”

Then you can set your product data feed to be updated automatically using the “Auto-Generate Your Feed” feature. So you won’t need to manually update your feed every time you add new products or update any product individually.

Now you can download this feed and upload it to your desired merchant shop and watch your store sales get a boost.
Auto-synchronisatie met Google Shopping Center
Een van de beste functies die Product Feed Manager For WooCommerce biedt, is dat je je WooCommerce-productfeed rechtstreeks kunt synchroniseren met Google Shopping Center.
You can schedule the auto-sync to take place either hourly, weekly, or monthly. This means that every change you make to your products of product feed. They will automatically be updated on your Google Shopping Center. You do not have to download and upload the feed every time.
- Learn more – how to auto-sync WooCommerce products to Google Shopping Center using Product Feed Manager for WooCommerce.
Validate Before You Publish
Before your feed goes live on any platform, do one more last thing:
- Confirm your templates match the latest Google and Meta field requirements, both platforms update their specs periodically, and an outdated mapping is an easy way to get silently rejected.
- Spot-check a handful of products across different categories, not just your bestsellers.
- Make sure variable products (color, size) each have a unique title and a shared
item_group_id.
This five-minute check catches most of the errors that would otherwise show up as a mysterious drop in impressions two weeks later.
But if you use product feed manager feed validator feature you will get all errors and warnings before publishing and it helps you to get rejected from Google or Facebook.
Conclusie
Growing sales on Google Shopping and Facebook isn’t about increasing your budget. It comes down to having clean, accurate product feed data.
When your data is structured properly, your products start showing to the right people. That’s when results begin to improve.
Rexfeed – Product Feed Manager lets you manage feeds for Google, Facebook, and more from one place. No manual uploads or complex setup needed.
Set it up once, and your feeds stay updated automatically. So you can focus on scaling your store.
** FAQs **
01. How should I name my product feed file for Google Shopping?
Keep it clear and specific – something like google_product_feed.xml or facebook_marketing_feed.csv. It sounds minor, but it saves you real time later when you’re managing feeds across multiple platforms and need to troubleshoot fast.
02. Why aren’t all my WooCommerce products showing in Google Shopping?
Usually it’s a missing attribute – title, GTIN, or brand are the most common culprits or a visibility setting that’s excluding the product. If you sell variations like size or color, each variant needs its own feed entry. Check your product pages and attribute completeness before re-uploading.
03. Which attributes should I focus on for a successful woocommerce Google feed?
Title, price, category, availability, and GTIN cover the basics Google requires. Adding brand and a properly mapped Google Product Category on top of that noticeably improves your match rate and, in turn, your visibility.
04. How to write better product titles for Google Shopping feeds
Use clear, descriptive titles that include key details like brand, product type, color, size, and important features. Place the most important keywords at the beginning so Google can quickly understand what you’re selling. Avoid keyword stuffing and keep titles natural, accurate, and aligned with your product data.
05. Why are my products getting disapproved in Merchant Center and how to fix it?
Your products get disapproved when your data is wrong or missing, like price, stock, or required details. You can fix it by checking the Diagnostics tab and correcting your product feed and website data. Once updated, resubmit your feed or request a review to get approved again.

![Show Your WooCommerce Products on ChatGPT & OpenAI Ads with Product Feed [2026] 2](https://rextheme.com/wp-content/uploads/2026/08/Show-Your-WooCommerce-Products-on-ChatGPT-with-OpenAI-Product-Feed-1-407x213.webp)
Itt van egy hasznos cikk a Google Shoppingról.
Bedankt.
Köszönöm.
Bedankt, ik heb lang gezocht naar zulke gedetailleerde informatie en deze is de beste die ik tot nu toe heb ontdekt. Perfect!!!
We zijn blij dat u deze gids nuttig vond.
Heel erg bedankt voor deze gemakkelijke optie voor WooCommerce om te uploaden op Google of Facebook. Kun je me ook laten weten hoe ik een feed voor Pinterest kan genereren?
We zijn blij dat je het nuttig vond.
Als je Product Feed Manager voor WooCommerce gebruikt, dan lees je hier hoe je een feed voor Pinterest kunt genereren.
1. Je kunt gaan naar Dashboard > Productfeed > Instellingen, en ga hier naar het tabblad Handelaren. Zoek daar naar Pinterest en schakel het in.
2. Ga vervolgens naar het tabblad Controls, en klik hier op Purge cache.
3. Nu mag u 'Nieuwe feed toevoegen' en bij het genereren van feed, op de lijst van merchants, vindt u Pinterest.
U kunt bij ons supportteam aankloppen als u in de war raakt.
Bedankt voor de hulp!
Goed om te weten dat je het nuttig vond.
Dat is een bericht waar ik naar op zoek was, bedankt voor de informatie.
Hoi Martin,
Graag gedaan, we zijn blij dat je het nuttig vond.
You can check out another similar guide that you may like: /facebook-for-woocommerce/
Groeten,
Thanks for all your efforts that you have put in this, It’s very interesting Blog…
I believe there are many who feel the same satisfaction as I read this article!
We are grateful that you found this one useful, you can also check this blog you might find it interesting and useful for your niche, /facebook-for-woocommerce/.
Hiii…Thank you so much for sharing such an infromative blog about the easy option for WooCommerce to upload on Google or Facebook. Nice post….Keep moving on….
Can you also let me know how I can generate a feed for Pinterest?
Hi Vivek,
We’re really happy to know that you found this guide informative.
You can check this guide out for generating product feed for Pinterest – /pinterest-for-woocommerce/
Bedankt.
Thanks for the detailed breakdown on Google Shopping feed attributes! Clarifying how to handle variable product titles without promotional fluff was super helpful.