![Virtual Apartment Tour: How Serious Buyers Show Up Ready to Offer [2026]](https://rextheme.com/wp-content/uploads/2026/01/Virtual-Tour-Examples.webp)
Maybe you have tried an open house for your apartment or to sell your house. Let me tell you a scenario of how it goes.
You hosted an open house last weekend. People came, walked through, asked a few questions, and left. No follow-ups. No serious interest.
That’s not a failed open house. That’s exactly how most of them go.
Only about 1% of buyers visit an open house as their very first step, and 96% of all buyers start their search online
The problem isn’t the apartment. It’s the process. Buyers show up because they’re curious, not committed.
They click on a listing, like the photos, and visit in person just to figure out the basics – the layout, the light, the feel of the building.
But That First Step doesn’t Need to Happen at Your Door Anymore.
Today, most buyers experience your apartment for the first time on a screen.
Before they ever schedule a visit, they’ve already decided whether it’s worth their time. And that decision doesn’t come from photos alone.
It comes from how clearly they can understand your property without being there.
That’s where a virtual apartment tour changes everything. Instead of inviting dozens of casual visitors, you let serious buyers pre-qualify themselves.
They walk through your apartment online, explore every room, and only reach out when they’re genuinely interested.
Fewer visitors. Better ones. Faster decisions.
In this article, I am going to tell you how you can create that experience with virtual apartment tour. SO let’s get started.
TL;DR – Virtual Apartment Tour
- A virtual apartment tour pre-qualifies buyers before they visit.
- You don’t need expensive tools – a phone, tripod, and WPVR are enough.
- The process is simple: prepare, capture, build, publish, and follow up.
- Listings with tours get more views and fewer unqualified visitors.
- Apartments have extra details, and tours help answer them early.
- Missing hotspots, poor mobile experience, or no contact option can ruin results.
- Final verdict: If you want fewer time-wasters and more serious buyers, create a virtual apartment tour.
Why a Virtual Apartment Tour Changes Who Shows Up to Your Listing
Every open house brings two types of people: serious buyers and casual browsers. Photos can’t filter them. A virtual apartment tour can.
The difference shows in behavior. Buyers who already explored the layout, checked storage, and saw the building online come in more prepared and more serious.
That’s why listings with virtual tours tend to sell faster and at better prices, not because the tour adds value, but because it attracts better-qualified visitors.
On the other side, skipping a tour quietly removes you from consideration. Many buyers won’t even look at a listing without one, and listings with tours get far more views. Today, most buyers explore apartments online first and decide later if it’s worth visiting.
Apartments also come with more questions than houses. Buyers aren’t just judging the unit – they’re thinking about the building. The lobby, elevator, shared spaces, and overall feel all matter. If your tour only shows the inside of the unit, you’re leaving half their questions unanswered.
What You Need Before You Start
you don’t need Matterport 3D tours or a professional scanning service to make a virtual apartment tour that works. You need a handful of basic tools and a plan for what to capture.
- A 360° camera or a smartphone with a panoramic mode. Either handles a standard apartment unit fine.
- A tripod, ideally set at chest height. This keeps the perspective natural and avoids the warped look you get shooting too low or too high.
- Simple lighting. Natural light does most of the work; a soft lamp fills in darker corners or interior hallways with no windows.
- Tour-building software. WPVR turns panoramic images into a connected, interactive tour with hotspots and a floor plan, without touching code. It’s also available as a free download from this page below.
- Access to the building’s shared spaces, if you’re including them – lobby, elevator, gym, roof deck, courtyard. Check with the building manager or condo association before filming common areas.
Before you film, walk the unit and the building once with fresh eyes. Note which shared spaces are worth including – a great roof deck is a selling point; a dated laundry room in the basement probably isn’t the first thing to feature.
Keep your focus on speed, clarity, and making the virtual tour for the apartment actionable. Every shot should help renters understand the space and take the next step.
Choose units carefully:
- Pick apartments with good natural light
- Rooms should be easy to stage
- The layout should flow logically from room to room
Following these prerequisites will make the filming process faster and your virtual apartment tours more effective.
How to Create a Virtual Apartment Tour – 5 Step by Step Process
Now that your apartment is prepped and ready, it’s time to start creating the actual tour. Following these steps will guide you through filming, building, and publishing a virtual walkthrough that helps renters see the space clearly and take action.
Each step flows from the last, so by the end, you’ll have a complete tour ready to share and promote.
Step 1— Prepare the Apartment for Filming
This is where most people rush, and it’s where you quietly lose your buyers.
Before anyone sees your apartment online, it needs to feel right. Not perfect. Just clean, open, and easy to understand the moment someone looks at it.
i. Start with the basics. Clear out clutter, open the curtains, and make sure nothing blocks the natural path through your property.
ii. Now pause for a second. Stand in the middle of the room and look around like a buyer. If something feels off, cramped, or distracting, fix it now – not later.
iii. Keep your staging simple. You’re not decorating, you’re helping someone picture living there. A clean kitchen, a tidy bed, and a few small touches are enough.
iv. And don’t ignore lighting. Natural light does most of the work, so let it in. If a corner feels dark in real life, it will look worse on screen.
- Before anything, you should also learn what not to fix, so that you won’t overspend.
After doing all the steps right, everything that comes next becomes easier. Because when your property feels clear and inviting, buyers don’t question it – they start imagining themselves in it.
Room-by-Room Prep Checklist:
- Remove personal items like photos, clothes, and personal toiletries
- Clean and tidy all surfaces, including counters, shelves, and tables
- Make beds and arrange pillows neatly
- Highlight key features: appliances, closets, storage spaces, balconies
- Clear pathways: hallways and doorways should be unobstructed
- Add small decorative touches: a plant, a bowl of fruit, minimal art, or a few neatly arranged books
- Ensure lighting looks natural; add soft lamps if needed
- Remove trash bins or cleaning items from view
- Check mirrors and windows for smudges
- Ensure floor space is clean and clear for better camera movement
Step 2— Capture the Apartment
This is the step where your tour either feels real or feels off.
Once the apartment is ready, don’t rush the capture. How you film decides whether buyers can actually understand your space or just scroll past it.
i. Start with your camera position. Place your tripod at chest height in the center of each room. This keeps the perspective natural — the way someone would see it if they were standing there.
ii. Move slowly. Capture a full 360° view of each room so nothing feels hidden. Buyers should be able to look around without feeling like they’re missing something.
iii. Don’t skip transitions. Doorways and hallways matter more than you think. They connect the space and help buyers understand how one room leads to the next.
iv. Add hotspots where it matters. Kitchens, closets, and storage areas always raise questions. If you answer them inside the tour, your buyers don’t have to guess.
Get this right, and your tour starts to feel like a real walkthrough, not just a set of images. And that’s what keeps buyers engaged long enough to take the next step.
Filming Techniques That Convert
- Pan slowly in small increments: avoid fast spins that can make the video disorienting
- Highlight key amenities: kitchen appliances, closet/storage space, built-in shelves, balcony, in-unit laundry, bathroom features, or special finishes
- Capture outdoor areas and community spaces: pool, gym, courtyard, parking, or rooftop decks using wide angles
- Show doorways and hallways: to maintain natural flow from room to room
- Keep video smooth and consistent: walk through rooms at a steady pace
- Include close-ups of unique features: countertops, flooring, light fixtures, or appliances
- Check framing: ensure the camera is level and captures the full room, not just corners
- Optional: record short narration or notes for tricky spots that may need explanation in the virtual tour software
Step 3— Build Your Virtual Tour
Once your footage is ready, it’s time to bring it all together.
There are a few software options you can use: WPVR, Kuula, and Matterport. Kuula is simple and browser-based; Matterport offers advanced 3D features, but for most apartment managers, WPVR is the easiest way to create a fully interactive tour with hotspots, floor plans, and links all in one place.
Here’s how to build your virtual apartment tour step by step using WPVR:
1. Upload Your Panoramic Images
- Add each room’s 360° images to WPVR.
- Make sure the order matches a natural walkthrough, from entrance to living areas, bedrooms, and other spaces.
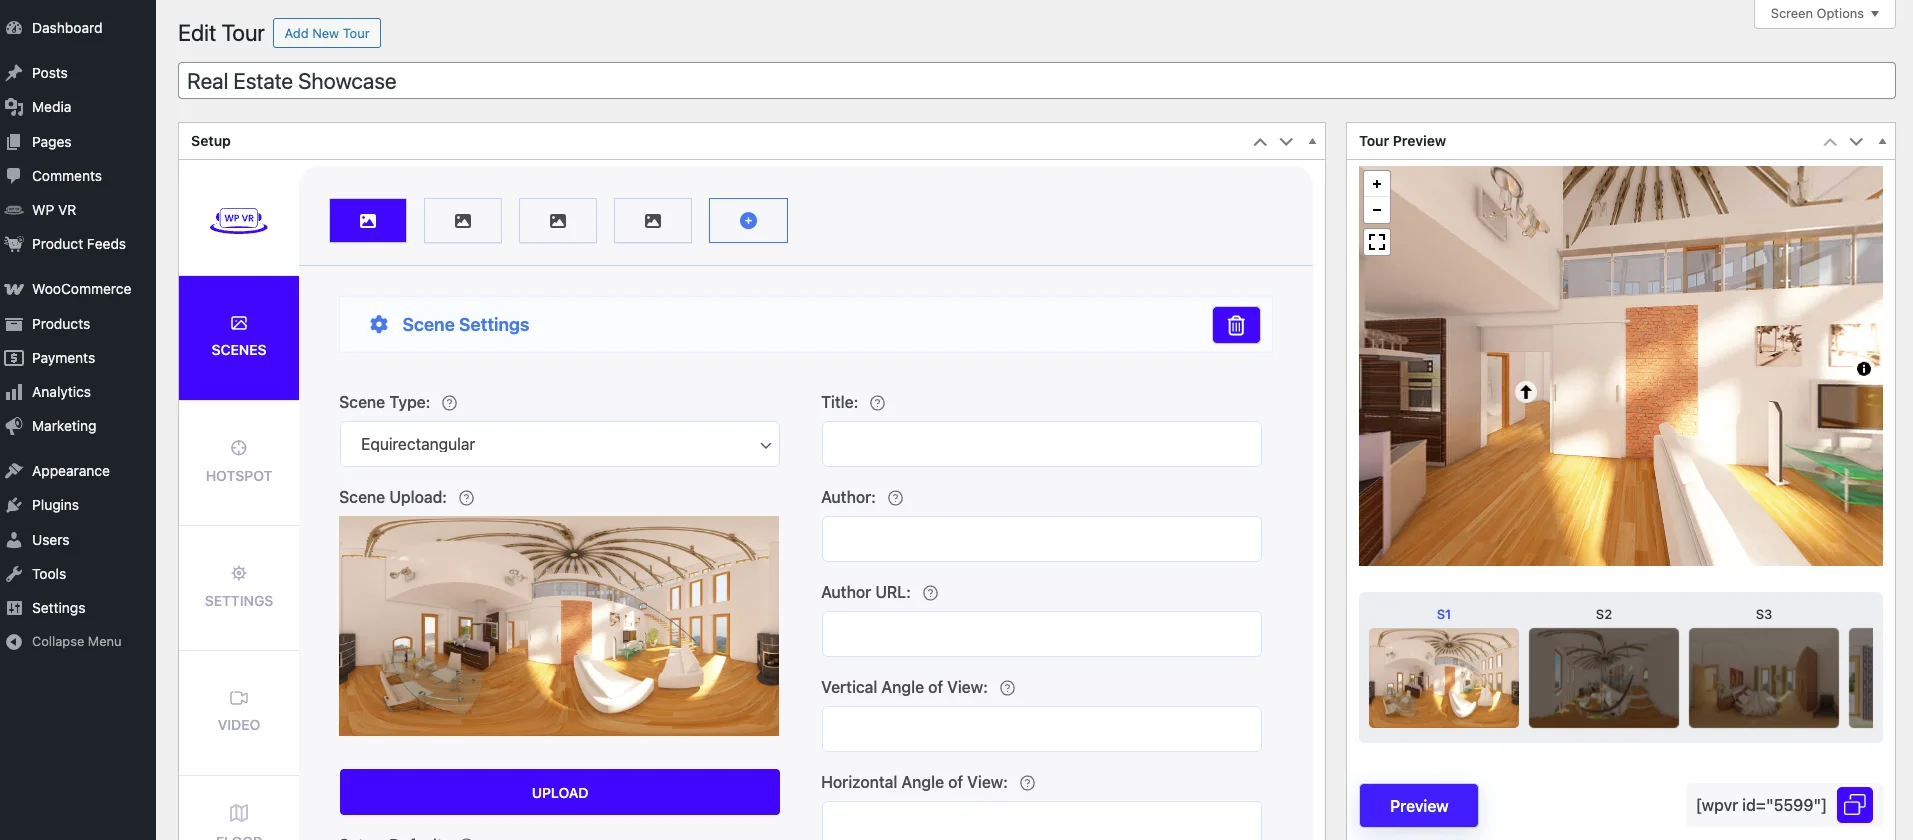
2. Arrange Rooms Logically
- Drag and drop the images so the tour flows like an in-person visit.
- Ensure hallways and doorways connect smoothly for a realistic experience.
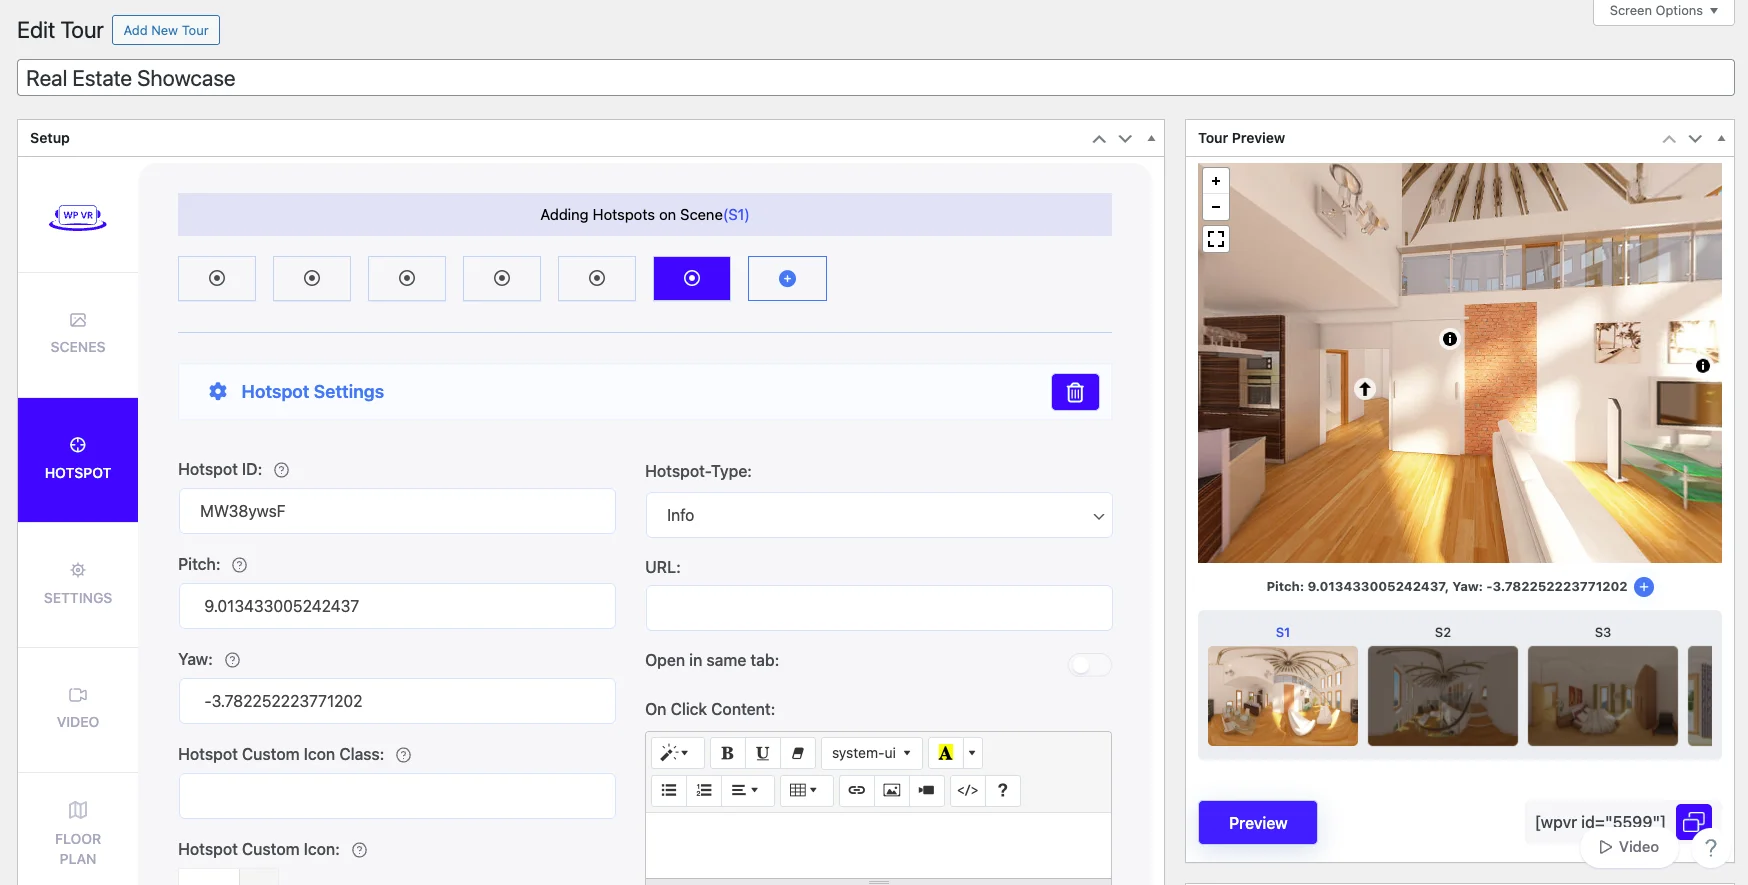
3. Add Hotspots
- Click on areas to highlight key features such as kitchen appliances, closets, storage, balcony, or in-unit laundry.
- Link hotspots to info pop-ups, floor plans, or your “Apply Now” form to make it actionable for renters.
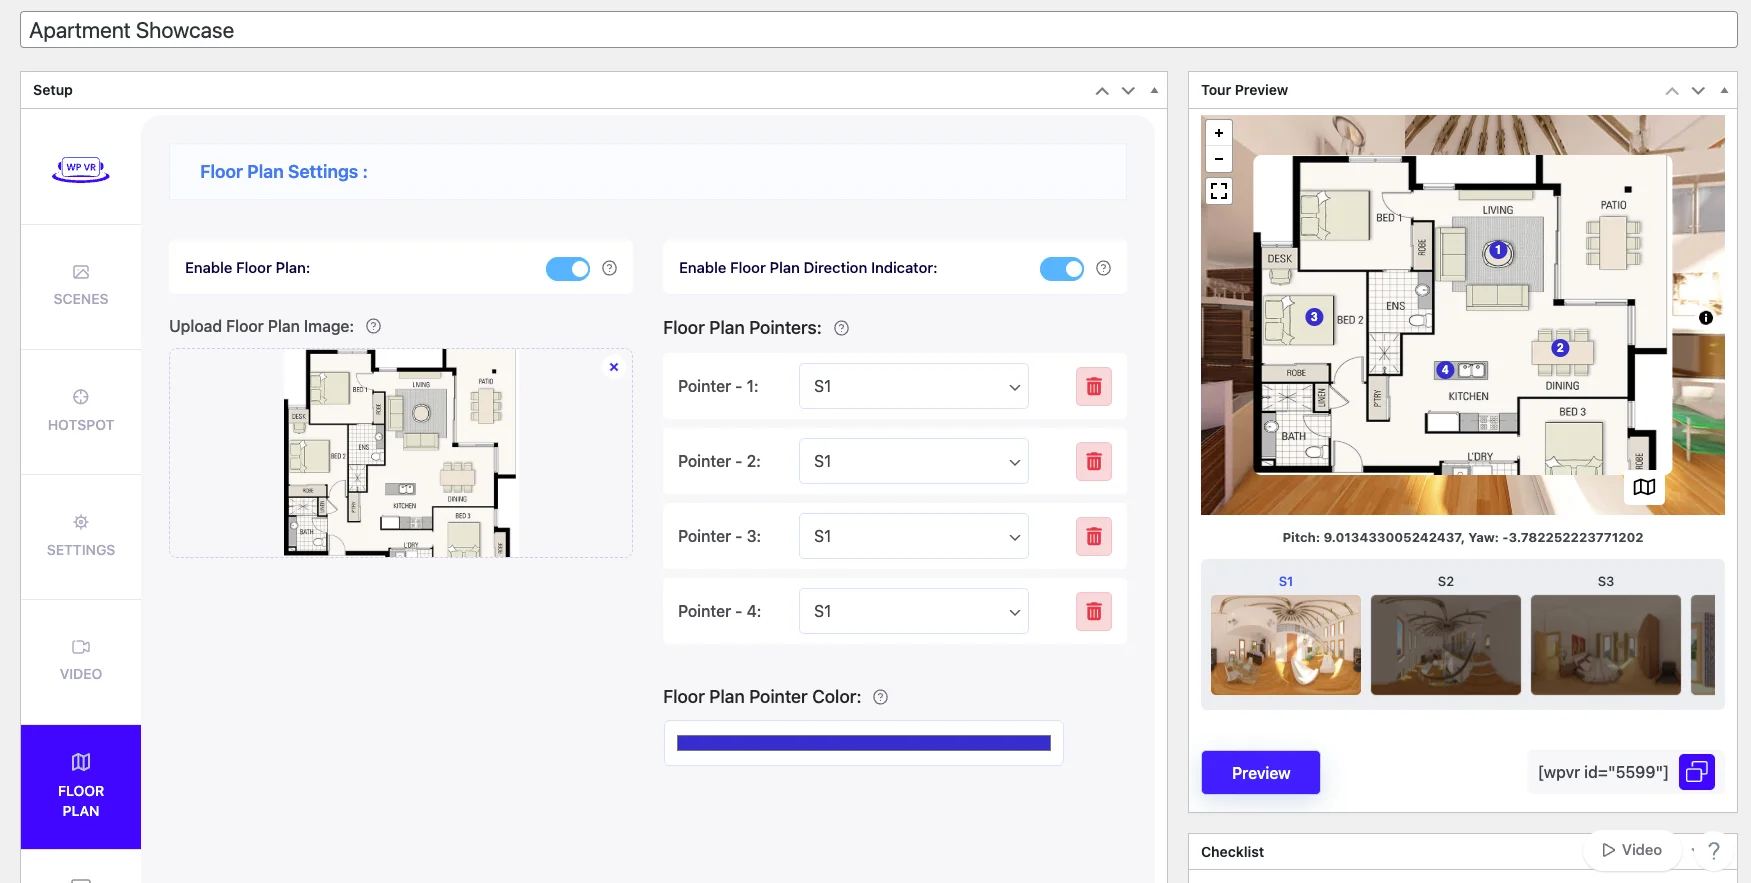
4. Include Interactive Floor Plans
- Upload a floor plan of the unit if available.
- Link each hotspot to the corresponding spot on the floor plan so renters can visualize the layout clearly.
- This helps long-distance renters understand the apartment without stepping inside.
5. Preview and Adjust
- Walk through the tour to check transitions and hotspot links.
- Adjust brightness, contrast, and color balance for consistent lighting.
- Optionally, add audio narration to highlight special features or tricky spots.

Using WPVR, all of this is done in one platform, making it faster and easier than juggling multiple tools.
Step 4 — Publish & Promote Your Virtual Tour
Now that your tour is ready, it’s time to get it in front of renters.
Think of it like this: a prospective renter in your city is scrolling through listings on MLS or Google & they won’t wait for an in-person tour. If your virtual tour is embedded on your listing page, they can explore the apartment instantly, which increases the chances they apply before looking at other units.
Next, share your tour where renters are already active.
For example, post it in local Facebook rental groups or neighborhood community pages. You can also include a QR code on flyers in your leasing office or on email campaigns; someone walking by or reading your email can scan it and instantly take the tour.
Optimizing for local search makes it even easier for renters to find your units.
Here’s what to do:
a. Page title: Include the type of content, unit type, and location. Keep it under 60 characters.
- Guideline: Start with “Virtual Apartment Tour,” add the unit type (e.g., 2-bedroom), and include the city or neighborhood.
- Example: “Virtual Apartment Tour Downtown [City Name]”
b. Meta description: Summarize the tour in 150–160 characters, clearly stating the apartment features and location.
- Guideline: Mention the unit type, location, and that it’s a 360° tour. Make it actionable, like “Explore online” or “See all rooms.”
- Example: “Explore this 2-bedroom apartment in Downtown [City Name] online with our 360° virtual tour.”
c. Alt text for images: Describe what the image is and include the location. Keep it concise but descriptive.
- Guideline: Include “360° virtual tour,” apartment name, and neighborhood/city.
- Example: “360° virtual tour of Maple Apartments, Downtown [City Name]”
Following these guidelines ensures your tour shows up in local searches and helps renters find your units faster.
Marketing Tips to Maximize Reach
- Add the tour to your Google My Business listing so anyone searching your property by name or neighborhood sees it first
- Promote in local rental Facebook groups—for example, “Check out our new 2-bedroom tour in Midtown before it’s gone.”
- Include the tour in email campaigns: imagine a long-distance renter clicking “Start Your Virtual Tour” from their email and immediately applying online
By sharing strategically and adding these local and scenario-based touches, your virtual tour for apartment reaches the right people at the right time, keeps them engaged, and drives more applications faster.
Step 5 — Engage & Convert Prospective Renters
Once renters finish your virtual tour, this is where you turn interest into action.
At this point, they already know the layout, the features, and whether the apartment fits their needs. Your job now is to stay present and make the next step easy.
For example, if a renter reaches out after viewing the tour, invite them to a live chat or a short Q&A session. This works especially well for long-distance renters who want quick confirmation before applying.
A fast response keeps the momentum going and prevents them from moving on to another listing.
You should also pay attention to how renters interact with your tour. If you notice repeated clicks on hotspots in the kitchen, storage areas, or balcony, you know exactly what they care about. Use that insight when you follow up and guide them toward a clear CTA, like starting a lease application or booking a self-guided visit.
When a renter views your tour from another city and asks a follow-up question, responding quickly makes a difference. These renters are often ready to sign as soon as they feel confident, and your responsiveness can be the deciding factor.
Measure Success
- Track tour views and total clicks to see how many renters engage
- Monitor hotspot interactions to learn which features get the most attention
- Review the session duration to understand how long renters stay inside the tour
- Use these insights to improve future virtual home tours and focus on what drives applications
At this stage, your virtual apartment tour stops being just a viewing tool and starts working as a conversion asset that helps you fill units faster.
What Are the Common Mistakes to Avoid While Creating Virtual Apartment Tours
Most of what breaks a virtual apartment tour doesn’t feel like a big deal while you’re building it. But these small gaps are exactly where your buyers lose interest and quietly move on.
- Mobile experience: Most of your buyers are on their phones. If the tour doesn’t work smoothly, they’ll leave before finishing.
- Next step: If your tour ends without a way to request a showing, your buyers stop there. You want to guide them straight into taking action.
- Visual quality: If photos are blurry or dark, your buyers start second-guessing the space. Clear visuals build confidence instantly.
- Building context: Your buyers aren’t just choosing a unit; they’re choosing the building. Show the lobby, elevator, and amenities so nothing feels hidden.
- Feature highlights: If you don’t point out storage, appliances, or upgrades, your buyers may miss them. Make the important details obvious.
- Easy navigation: If moving through the tour feels confusing, your buyers lose patience. Keep it simple so they keep exploring.
Conclusion
A virtual apartment tour isn’t there to replace your showing. It’s there to make sure the people who show up already feel like saying yes.
When you treat it that way, everything else gets easier. You deal with fewer time-wasters, fewer casual visitors, and more buyers who already understand the space before they walk in.
And you don’t need a big setup to make it happen. A phone, a tripod, and good lighting are enough to build a full tour in an afternoon.
If you’re listing apartments regularly, this isn’t an extra step. It’s one of the simplest ways to sell faster and with less friction. Tools like WPVR make the process even easier.
** FAQs **
1. Do I need a professional camera to make a virtual apartment tour?
No. A recent smartphone with panoramic mode and a tripod at chest height is enough for a standard apartment unit. Professional 360° cameras produce slightly sharper results, but for most listings the difference isn’t worth the added cost.
02. How long does it take to create a virtual apartment tour?
For a typical one- or two-bedroom unit plus a few building amenity shots, expect roughly 45–75 minutes to capture everything and another 20–30 minutes to build the tour in software on WPVR – closer to an afternoon total once you include prep and a final preview.
03. Is a free virtual apartment tour good enough, or do I need a paid tool?
WPVR’s free version covers the core things – panoramic uploads, hotspots, and basic navigation for a single listing- unlimited tours. Paid plans add things like floor plan, embed add-on, and VR headset support, which matter more once you’re listing across a larger apartment community or portfolio.
04. Should I include the building’s common spaces in the tour, or just the unit?
Include both wherever possible. Apartment buyers are evaluating the building as much as the unit – lobby, elevator, amenities, and any shared common spaces directly affect how buyers value the HOA fee, so leaving them out means your tour is only answering half the question.
05. What’s the biggest difference between a 3D virtual apartment tour and a video walkthrough?
A 3D or 360° virtual apartment tour lets buyers control their own movement through your property- pausing, spinning, and revisiting rooms at their own pace. A video walkthrough is guided and passive; buyers watch what the camera operator chose to show, in the order they chose to show it.