- Last updated on: 12 mins read
How To Optimize Your Page On Social Media Platforms For Effective Blogging [2024]
Guide To Social Media Marketing — Strategies Part 1
Optimize Your Page On Social Media Platforms For Effective Blogging
Similar to creating a website, you have put in some research and early effort when using a social media page on popular social media platforms.
There are a lot of things you need to consider and it’s best to apply a few smart tactics for the best outcome.
So let us look at a step by step guide on optimizing your social pages for blogging, to get the best results on various social media platforms.
The tactics mentioned in this article are proven to be most effective.
Did you know, on Facebook, having no brand name on the Page Name can be more effective? Find out how as you read the article.
Whether you are creating a new social media page, or you already have one, you should take help from this article to learn what you need to work on.
By the end of this article, you will be able to follow actionable steps in setting up social pages that are optimized for blogging and reaching your goals.
So let’s dive into it.
Step 1 – Decide Your Purpose And Initial Plan

First of all, you have to decide your purpose with a social page on any social network.
So, if you are willing to create/use a Facebook Page, Twitter Profile, LinkedIn Page, or any of the popular social media platforms, for sharing your blogs, then first you must decide what you wish to achieve from there.
For example, when we first decided to open a Facebook page for RexTheme, we wanted to create a social community for our users to communicate with us and discuss our plugins.
The ideal reason for a blogger or content writer to embrace Social Media Marketing is to get more traffic from the right audience.
There could be other goals such as affiliate sales, reaching more people to convey a message, giving updates, brand promotion, product promotion and many more.
Blogging is useful to get authority and audience for most intents and purposes. Any business can benefit from having a blog section on their website (even eCommerce sites or real estate sites). And having a presence in the social media increases the results.
Based on your purpose, make a plan for the 1st two weeks on
- what type of contents to share
- how many contents to share
Let us look at an example. Let’s say, you have a blog about Cars & Driving.
So you may decide that in the 1st two weeks you will share informative articles or infographics on topics such as various parts of a car, ideal safety measures when driving and so on. To refine your content creation strategy, you can take more inspiration from the AI writer by Picsart, exploring creative approaches and innovative styles to enhance your messaging.
And you may decide that you will share 2 contents per week (i.e. 4 articles in the 1st two weeks).
At this point, it is not necessary to select the content topics or which days of the week to share your content.
Step 2 – Set A Keyword Optimized Page Name

Based on your purpose, the next trick is to choose a Page name that will help people find your page more easily.
You might think that you can simply use your business or website name as the Page name, however, that is not always the best thing to do.
On a few popular social platforms such as Facebook, it is best to choose a page name based on your ideal keywords rather than the brand name.
Let me explain why.
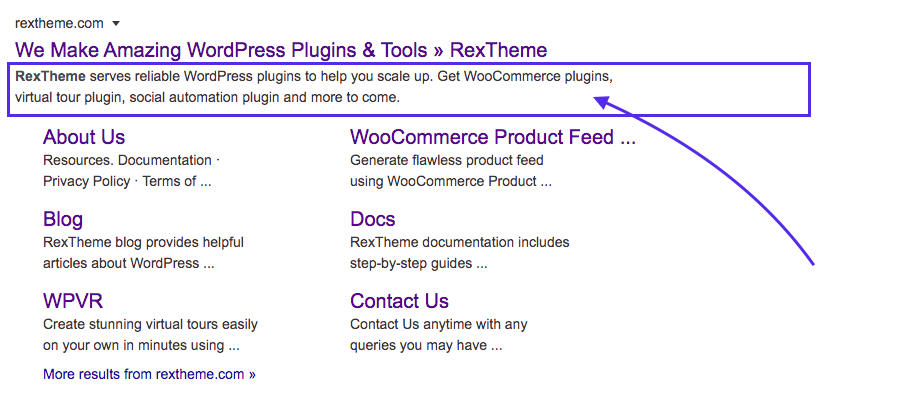
Here’s a fact, when you set up your website, you also add a meta description to it which is displayed on SERPs as the tagline. This helps people to understand what the website is about.

However, there is no such feature on Facebook when you search for a page.
Sure, when setting up a page on Facebook, you will get the option to provide an extra description of the page and a Page story. But no tagline is viewed for the page in the search results of Facebook.

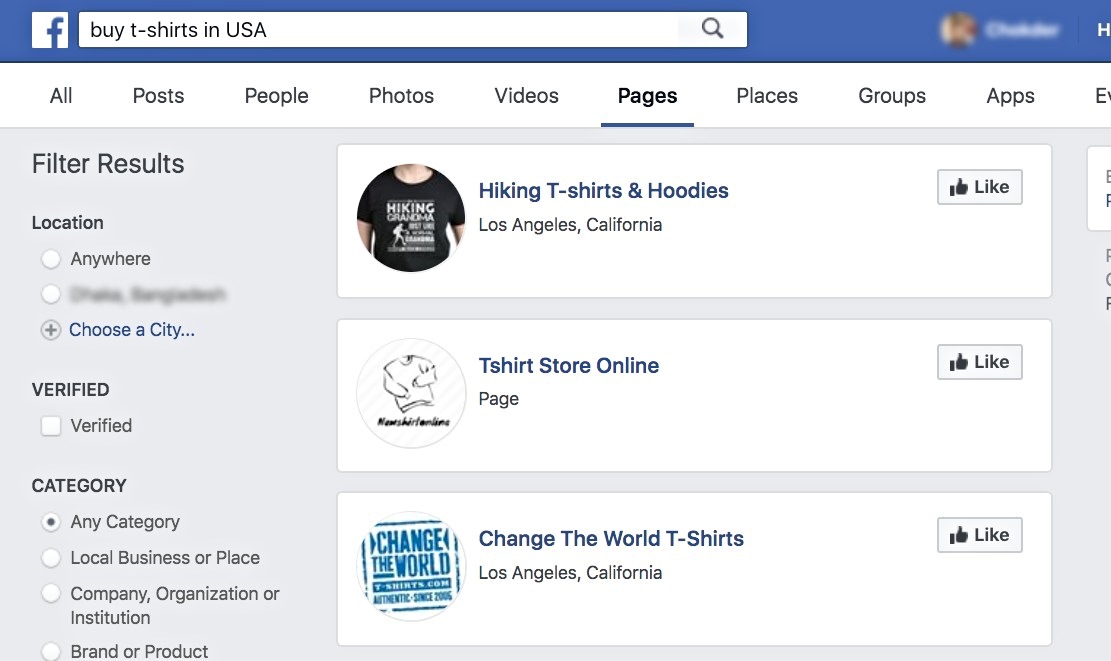
As you can see in the image, the pages’ search results on Facebook will only show the page profile picture and the Page name.
Another fact is, Facebook still ranks pages with keywords in their names, in the search results (unlike SERPs such as Google).
So in this case, you need to take a smart, alternative step.
Rather than directly using your brand name as the page name, use a phrase that lets viewers know what to expect from this page. And then maybe add the brand name at the end.
So basically, the idea is to optimize the page name with keywords for search results.
Let us look at an example.
Let’s say I own a blogging site called Games101Blast and I write about the best games out there. Then I will probably choose a page name as follows:
Top Video Games News – Games101Blast
You can see, the phrase “Top Video Games News” explains what viewers will find on this page, and the brand name is at the end.
Plus, the keywords/search terms for the audience of this blog are probably “Top Video Games” or “Video Games” or “Video Games News”. And the page name has all of them in it, making it more ideal to be found on social search results.
Some pages place the brand name first and then the keyword-optimized phrase, which also works just fine.
Some pages don’t even use the brand name; just a phrase to highlight the page’s expertise, optimzed with keywords, does the trick.
When you research users, you will see that most people use search terms of “what they are looking for” rather than “a company name”.
For example, in most cases, a person looking to buy t-shirts will probably search “Printed t-shirt” or “buy t-shirts in USA” rather than a brand name (unless he is indeed looking for a specific brand).
And naturally, the pages that have relevant keywords in the page names, appear first in the search results.

As you can see in the image, when I searched with the term “buy t-shirts in USA” on the location Los Angeles, California, the following pages came up:
- Hiking T-shirts & Hoodies
- Tshirt Store Online
- Change The Word T-shirts
If you see the second result, the page name is “Tshirt Store Online”. They sell various t-shirts through online orders, as the Page name suggests.
However, the business name of this page is actually “King Shirt Store”.
They simply decided not to include the business name on their Facebook page name at all. And they are getting amazing results on local Facebook search results.
**Social sites such as Twitter, however, has the tagline available in search results, where you will be able to view the account description.

In this case, you may choose to use the company name as the profile name.
Step 3 – Don’t Use A Featured Image Without Proper Intent

Keep in mind, in the social media world, people are more obsessed with visual content.
At first glance, people will judge your social media page on three things:
- Page Name
- Cover/Featured Image
- Profile Picture
We have already discussed the optimization tactics regarding the Page Name.
The next big thing to focus on is the page’s cover photo or featured image.
Use a meaningful cover photo or featured image that is relevant and interesting to your expected audience.
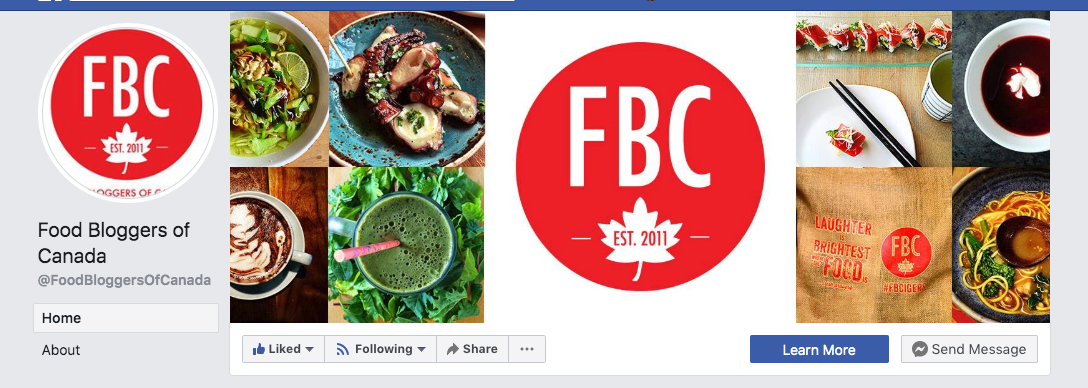
For example, if you run a blog site about food, you should use a featured image that includes images of a few tasty meals and the logo on the middle or right side.
Make sure that you’re keeping the topic intensively relevant while preparing these cover images or logo design.

For the profile picture, you may use your company logo, however, make sure you resize it to the proper image ratio so that your logo will be in the center. Most social sites display a circular center portion of the profile picture (as you can see in the image above).
So, while in the process of logo design for your company, make sure that you have multiple ratios and sizes of the logo.
Step 4 – Highlight Benefits In Page Story, Not Boring History

On all the social media networks, you will find the option to give a short description (About). This paragraph should be small, about 3 sentences, to tell readers what the page does or is specialized in.
However, pages such as Facebook or Tumblr have an added option to create a page story; or on LinkedIn, you have the option to present an overview of the business.
While writing the page story or overview, most people talk about their history — when they started, why they started and so on.
But do you really believe that readers are on your social page to learn about your history? No.
People will go to your social media page only if they think that you have what they are looking for.
They will expect to read your new content or watch your latest videos and other good posts, relevant to their interests.
Likewise, when your ideal audience reads your page description, they should be able to understand that they are in the right place.
You have to make it clear that you understand their requirements and that they will be satisfied with what they find here.
Let me give you an example.
Let’s say I am a blogger who writes about WordPress.
Here are two possible Page stories I may write for my Facebook page.
Example 1:
Since 2000, I have been crazy about WordPress and is learning since. So far I have created over 500 websites and helped to optimize SEO for over 1000 websites.
With all my knowledge and power, I am now writing articles to teach WordPress. Every week I write 2 articles that are helpful to learn WordPress.
Hopefully, I will be able to help people understand WordPress deeply.
Example 2:
WordPress is amazing. You have no idea that you can do so much with WordPress. Well, I am here to help you learn.
You can make a website fully customized while using plugins and themes that make the task easier. Plus the CMS is so easy to use, you will be surprised how fast you can learn.
And guess what, I am here to make it faster. Let me be your guide or buddy, and help you with regular details on WordPress so that you can be an expert in no time.
If you compare the two,
- See that Example 1 is all about me while Example 2 is about what I can do for “You”.
- That particular word “You” is very useful and makes readers feel personalized.
- In Example 2, I am expressing excitement about WordPress which connects with the reader.
- In both examples, I made it clear that my articles are intended to teach people using WordPress, except, Example 1 sounds generic for everyone, while Example 2 sounds personal for the current reader.
So a personalized page story or page overview such as Example 2 will connect with more people and create more authority.
A social wall allows you to display your valuable branded social media content alongside authentic user-generated content. This helps you build a strong and long-lasting impression on your site visitors while keeping them updated.
Once this is done, you are almost ready with your page.
There are still a few more things to do before you start sharing content.
Step 5 – Final Preparations To Get Going

Here’s something new that you can apply.
Once you open a page or have re-designed your page for a new social sharing plan, you can make a short post on your social channels, informing people that something exciting is on the way.
Let’s say, you have plans to share content about VR technology in the near future, and you have decided to write on a few topics explaining different types of VRs, examples of VRs, and the future of VR.
Then you can write create a social post similar to the following:
“Hey everyone, guess what, very soon I will be sharing interesting contents about VR.
I have found some amazing details about different forms of VRs that you might wish to check out.
Plus I will share more articles about VR implementations, examples, and future expectations on a weekly basis. So stay tuned!!”
Now, obviously, you are pretty serious about blogging and so, it is wise to make a bit of early investment through boosting the page.
You may boost your pages on Facebook, Twitter, Instagram, and other social media platforms for a few days (4 days recommended).
Next, you may boost the post you made early, for a couple of days.
While these are happening, you can focus on choosing topics to write one, organizing a content calendar, writing blogs on the new topics, and posting your articles on your website.
And eventually, when ready, it’s time to share your articles on social media.
Final Thoughts
The steps in this article are proven to be effective and we advise you to follow these whether you are opening a new social page, or trying to improve your old social pages for social media marketing.
In the next article, you will learn about tactics to follow when sharing a post on your social media platforms for the best results.
After reading the next article, you will be able to
- share your blogging contents on social media in the most optimized way,
- learn the do’s and don’ts when making a social media post,
- get more people to click on your social posts and visit your blog.
Read the next article now:
![How To Optimize Your Page On Social Media Platforms For Effective Blogging [2024]](https://rextheme.com/wp-content/uploads/2020/02/SMM-S1-Optimize-Page-On-Social-Media-Platforms-Featured_Image.jpg)


Thanks, but this one is only for Facebook. Do you have anything on Twitter pages or Instagram? thank you