Es ist für die meisten WooCommerce-Shop-Besitzer selbstverständlich, dass sie versuchen, ihre Verkäufe durch die Förderung mehrerer verschiedener Händlergeschäfte zu steigern. Fast alle WooCommerce-Shop-Besitzer bewerben ihre WooCommerce-Produkte bei Google Merchant Shop, da es der größte Marktplatz ist, um mehr potenzielle Kunden zu gewinnen.
Product Feed Manager for WooCommerce (PFM) is the best plugin for connecting your store to Google Merchant Center, and it makes it extra easy to promote your valuable products in different merchant shops.
Today, we are happy to inform you about the new update of our plugin Produkt-Feed-Manager für WooCommerce. We recently added a new feature that will give you an extra hand in promoting your products on Google Merchant Shop.
With this latest version, you can simply work in harmony with the best merchant shop out there and potentially increase your revenue with product feed management strategies.
Hauen wir rein!
Hier ist das vollständige Video-Tutorial. Oder Sie lesen die schriftliche Anleitung unten, damit Sie Ihre WooCommerce-Produkte einfach automatisch mit Google synchronisieren können.
Automatische Synchronisierung von WooCommerce-Produkten an Google
You can auto-sync your WooCommerce Products to Google Merchant Shop using our plugin.
This means that with the latest Product Feed Manager For WooCommerce, you can now directly send your WooCommerce products to Google Merchant Shop; you no longer need to download and upload feed on your Google Merchant Center manually.
This feature carries out the task by allowing your Google Merchant Center to fetch the data of your updated Google product feed according to the schedule you decide.
You need to simply set up your Product Feed Manager For WooCommerce to integrate with your Google Merchant Shop.
Once you have set the required credentials to auto-sync the plugin with your Google merchant account, you can then choose your desired schedule, when you want your updated product feed to be collected by your Google Merchant Shop. It’s as simple as that.
Dadurch sparen Sie so viel Zeit. Sie können sich auf die Verbesserung Ihres WooCommerce-Shops konzentrieren, während Ihr aktualisierter Produkt-Feed automatisch an Ihren Google Merchant Shop gesendet wird.
So funktioniert es
Synchronizing your WooCommerce Products to Google Merchant Shop is an easy procedure. Just follow these steps and you are good to know how to generate A WooCommerce Google feed with auto sync featurs.
Sie benötigen 3 spezifische Informationen, um die Synchronisation einzurichten:
- Kunden-ID
- Kundengeheimnis
- Google-Händler-ID
Sie können Ihre Client-ID und das Client-Secret in Ihrer Google Developers Console und Ihre Google Merchant ID in Ihrem Google Merchant Shop erfassen.
Falls Sie nicht wissen, wie Sie sie finden können, lesen Sie weiter, wir haben eine Anleitung zum Sammeln der Daten bereitgestellt.
Beginnen wir jetzt mit den Schritten.
Schritte zur automatischen Synchronisierung von WooCommerce-Produkten mit Google Merchant Shop
Sie müssen ein paar spezifische Schritte befolgen, um es einzurichten.
- Schritt 1 - Sammeln Sie die Kunden-ID und das Kundengeheimnis
- Schritt 2 - Holen Sie sich Ihre Google-Händler-ID
- Step 3 – Sync Product Feed Manager For WooCommerce With Google Merchant Shop
- Schritt 4 - Planen Sie die automatische Synchronisierung
Gehen wir also jeden Schritt nacheinander durch.
Schritt 1 - Sammeln Sie die Kunden-ID und das Kundengeheimnis
i. Ein Projekt anlegen
Gehen Sie zunächst zur Google Developers Console und melden Sie sich mit Ihrem Google-Konto an. Sie sehen dann ein Dashboard wie dieses:
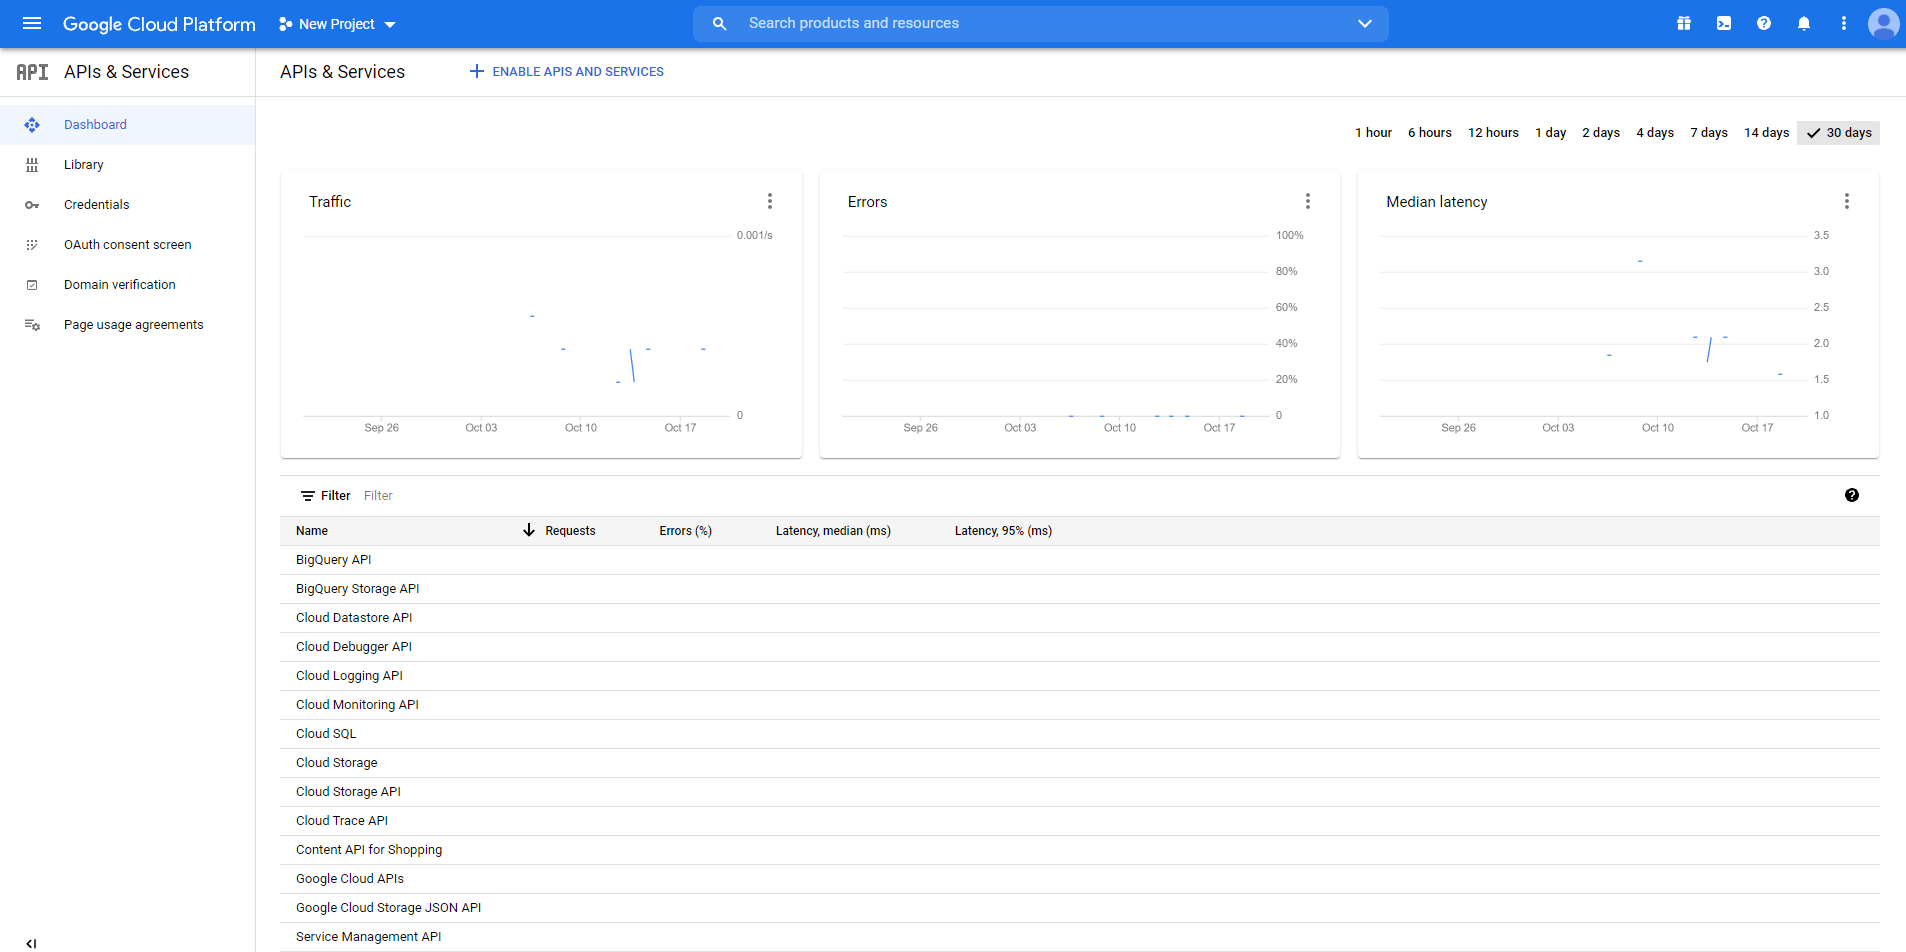
Wenn Sie bereits ein Projekt für Ihre Produkte erstellt haben, können Sie dasselbe verwenden, oder Sie können ein neues Projekt erstellen, wenn Sie noch kein Projekt haben.
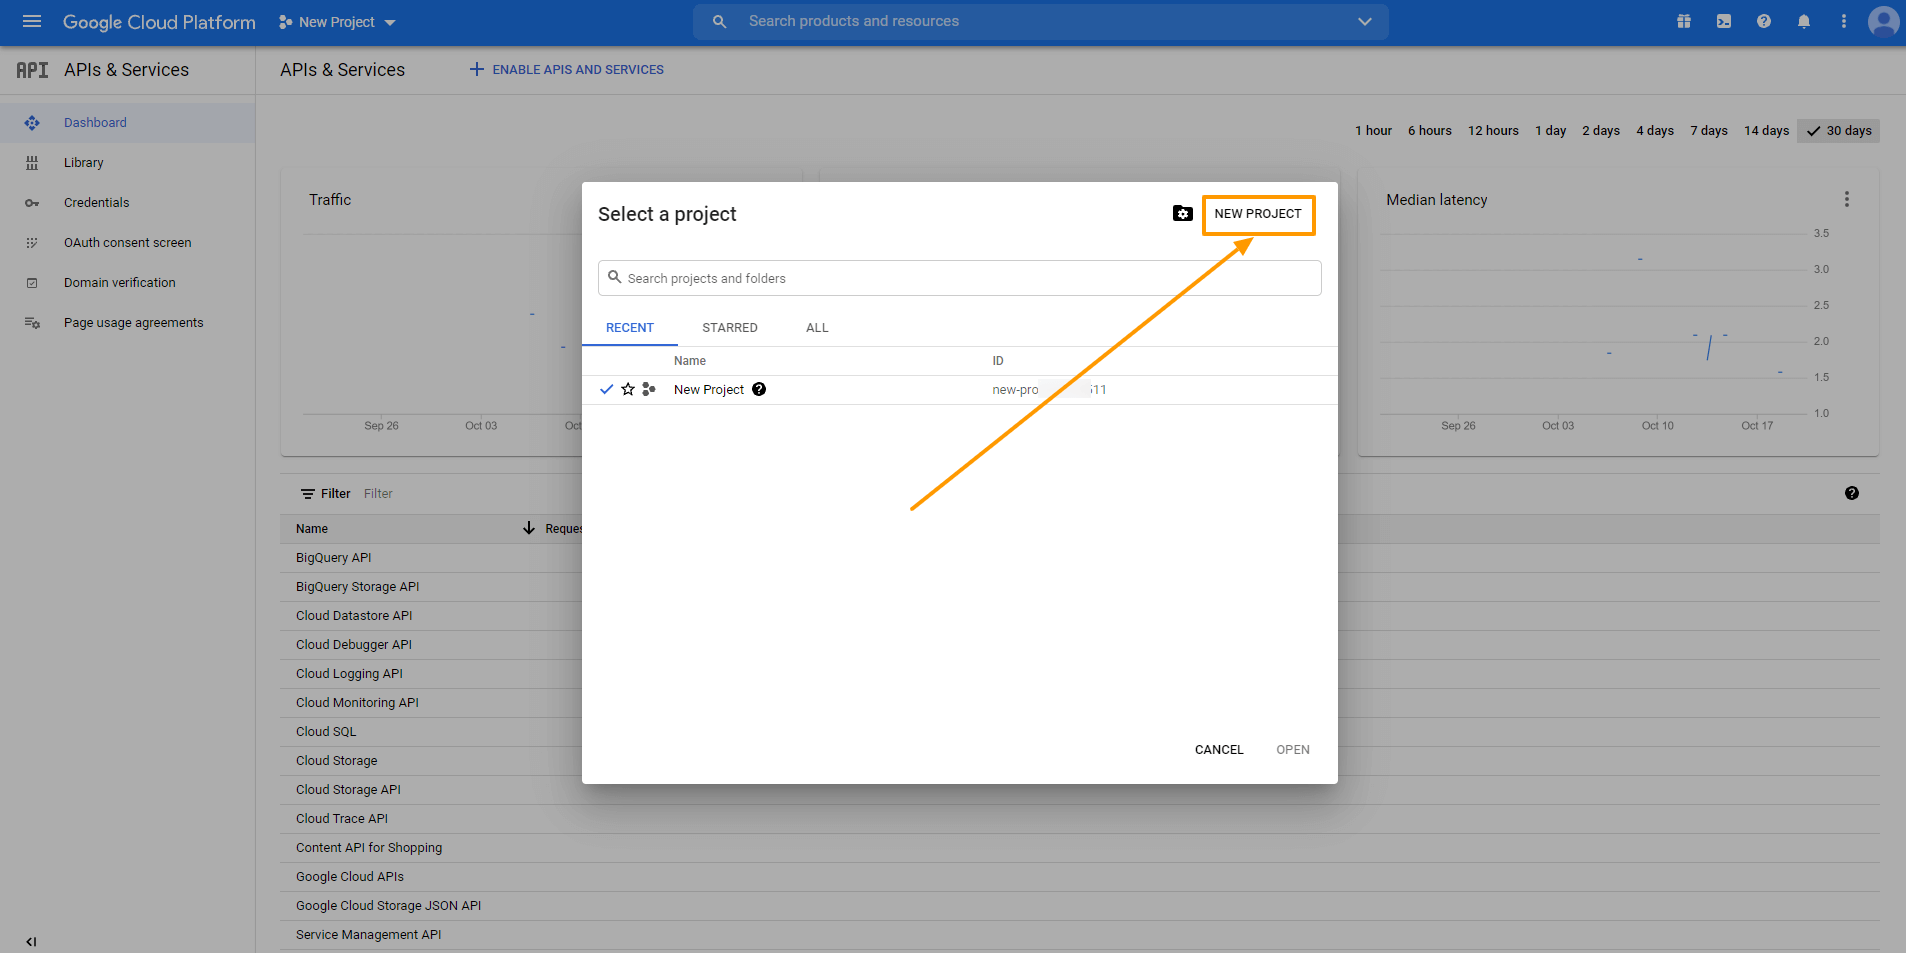
To do this, you need to click on New Project. Here you will be given a list of projects that you have created so far.
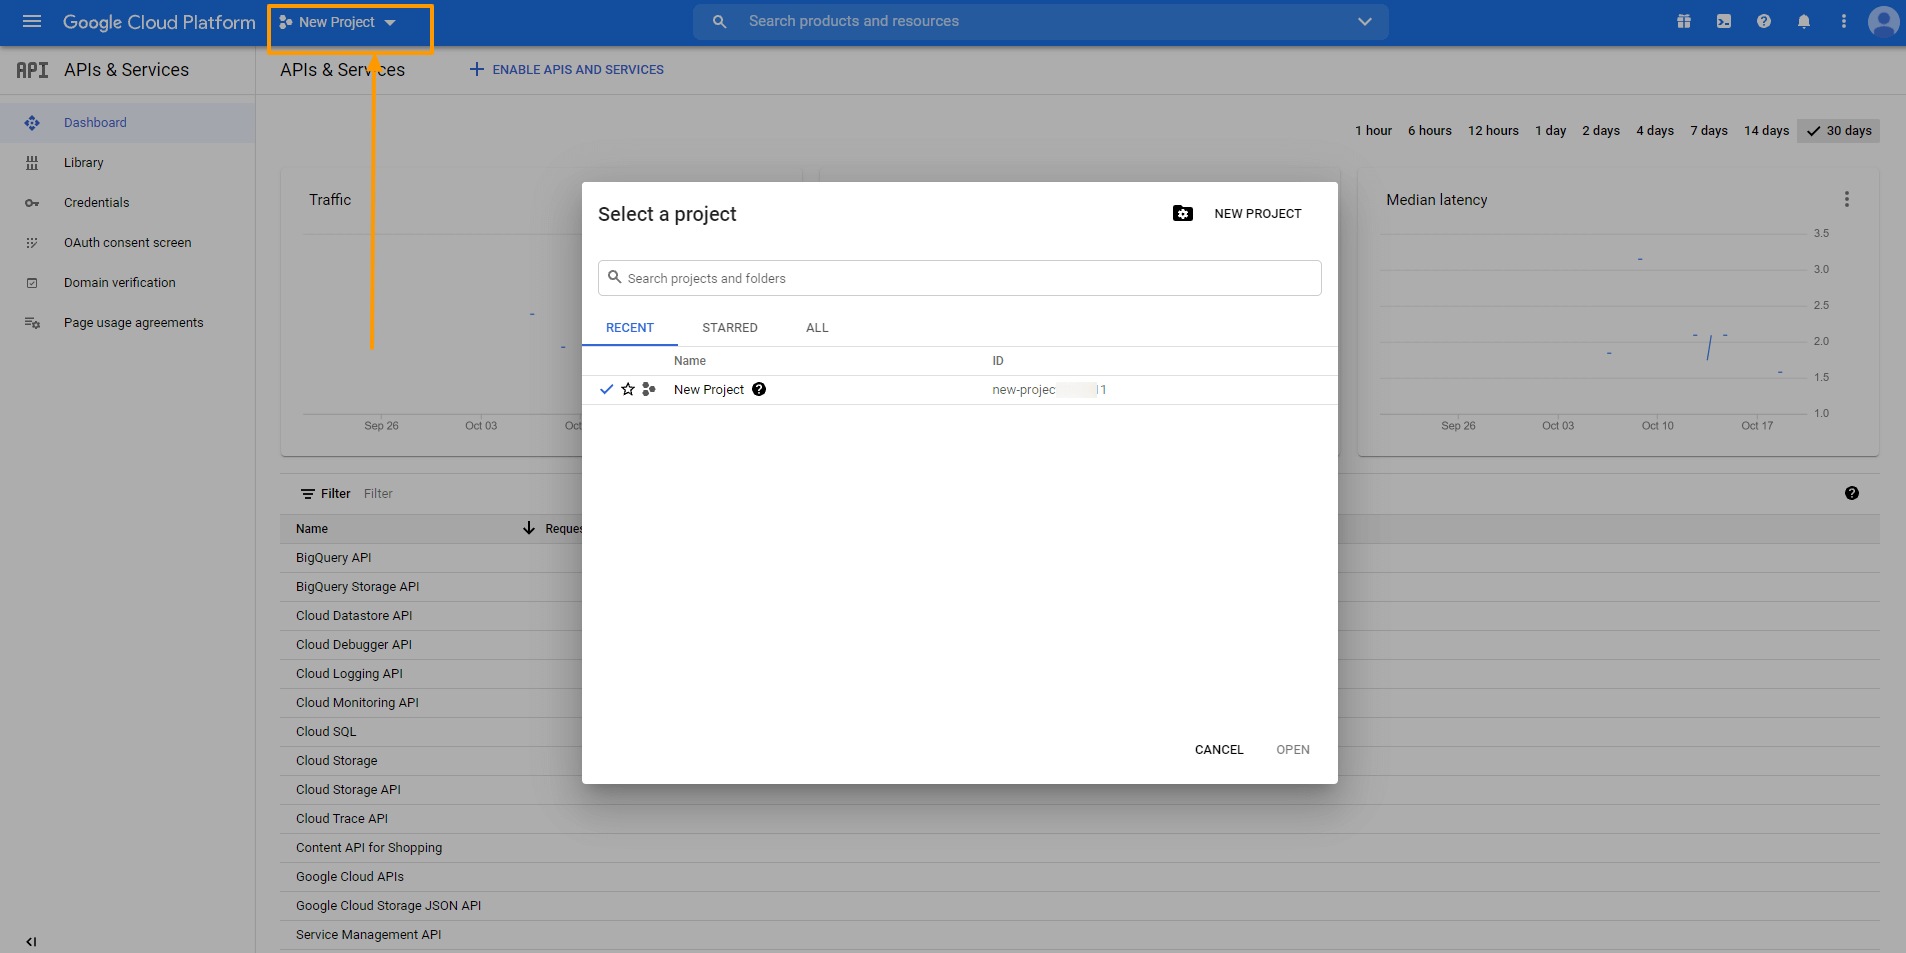
Click on New Project to set up a new project.
Now provide the required information.

Here, you can change the Project Name/ Project ID if you want.
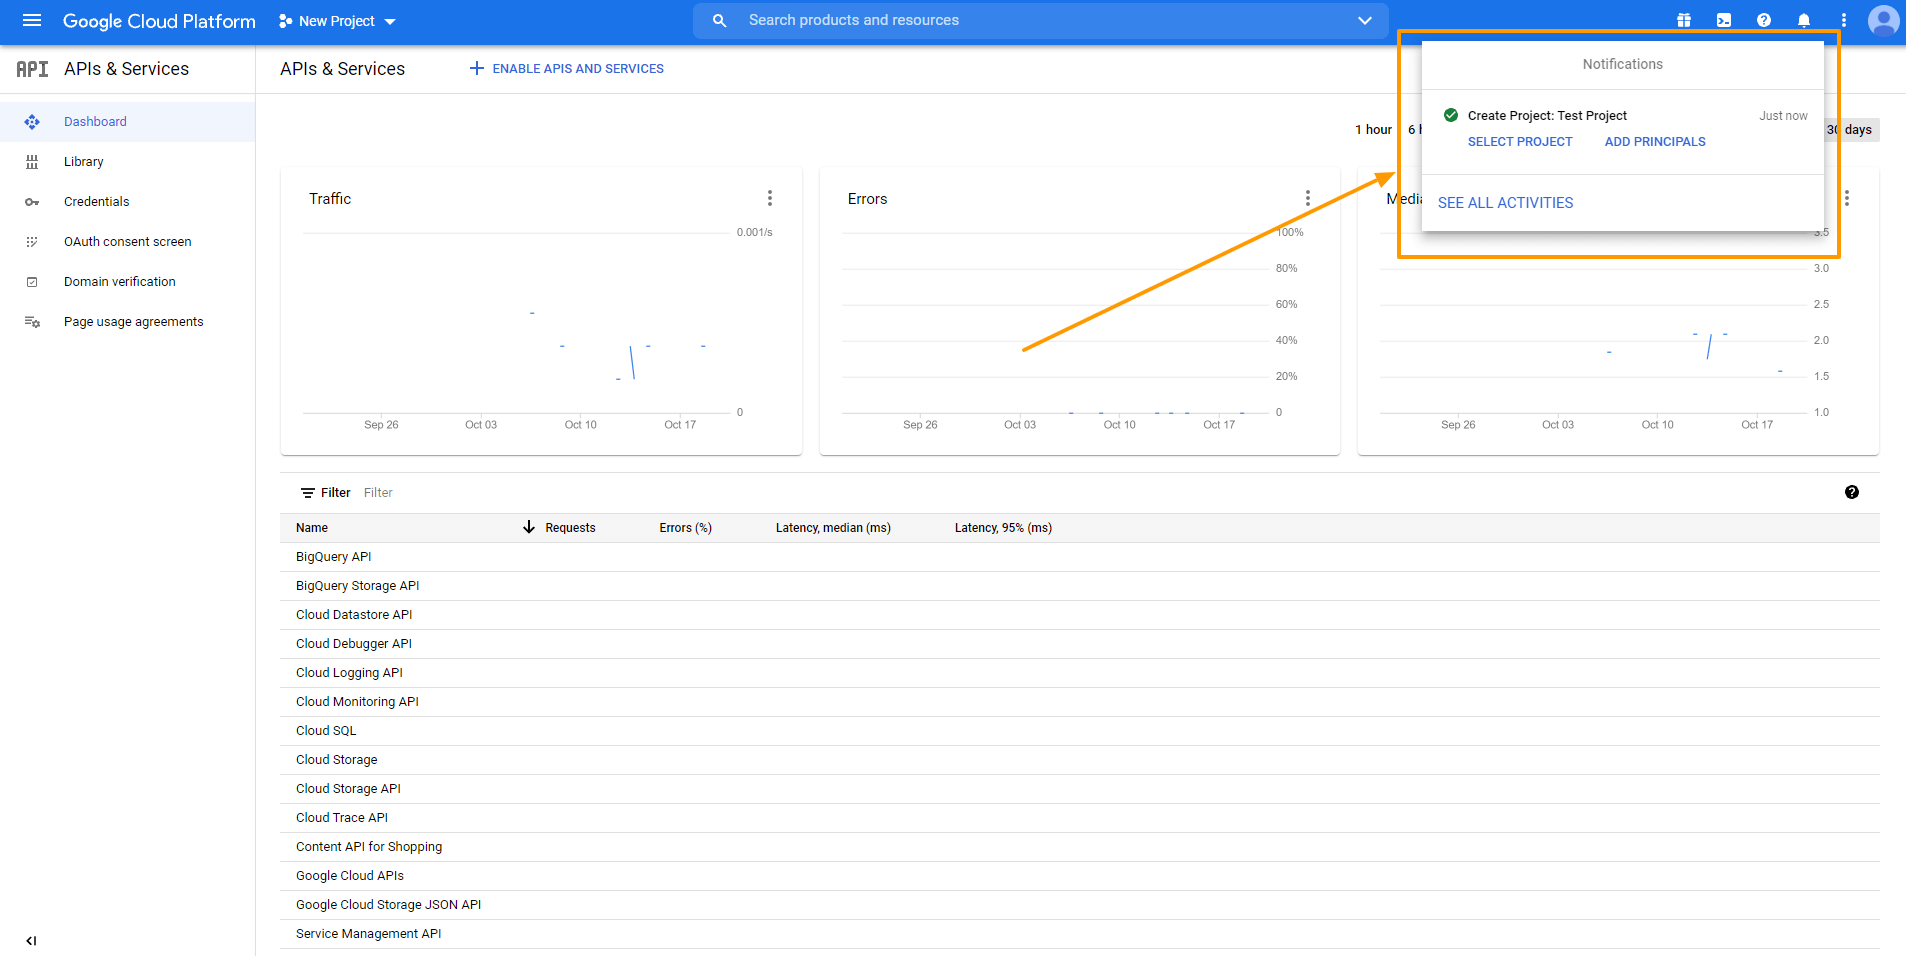
Once the project is ready, you will get a notification on the top right corner. You can select your new project from the New Project option or from the Notification dropdown.
ii. Content-API für den Einkauf aktivieren
Content API for Shopping is an interface that allows you to interact with the merchant center platform directly. This helps you to increase the efficiency of your shop with proper data management in a more organized way.
To activate it for your current project, Go to the Dashboard. Select ENABLE APIS AND SERVICES.
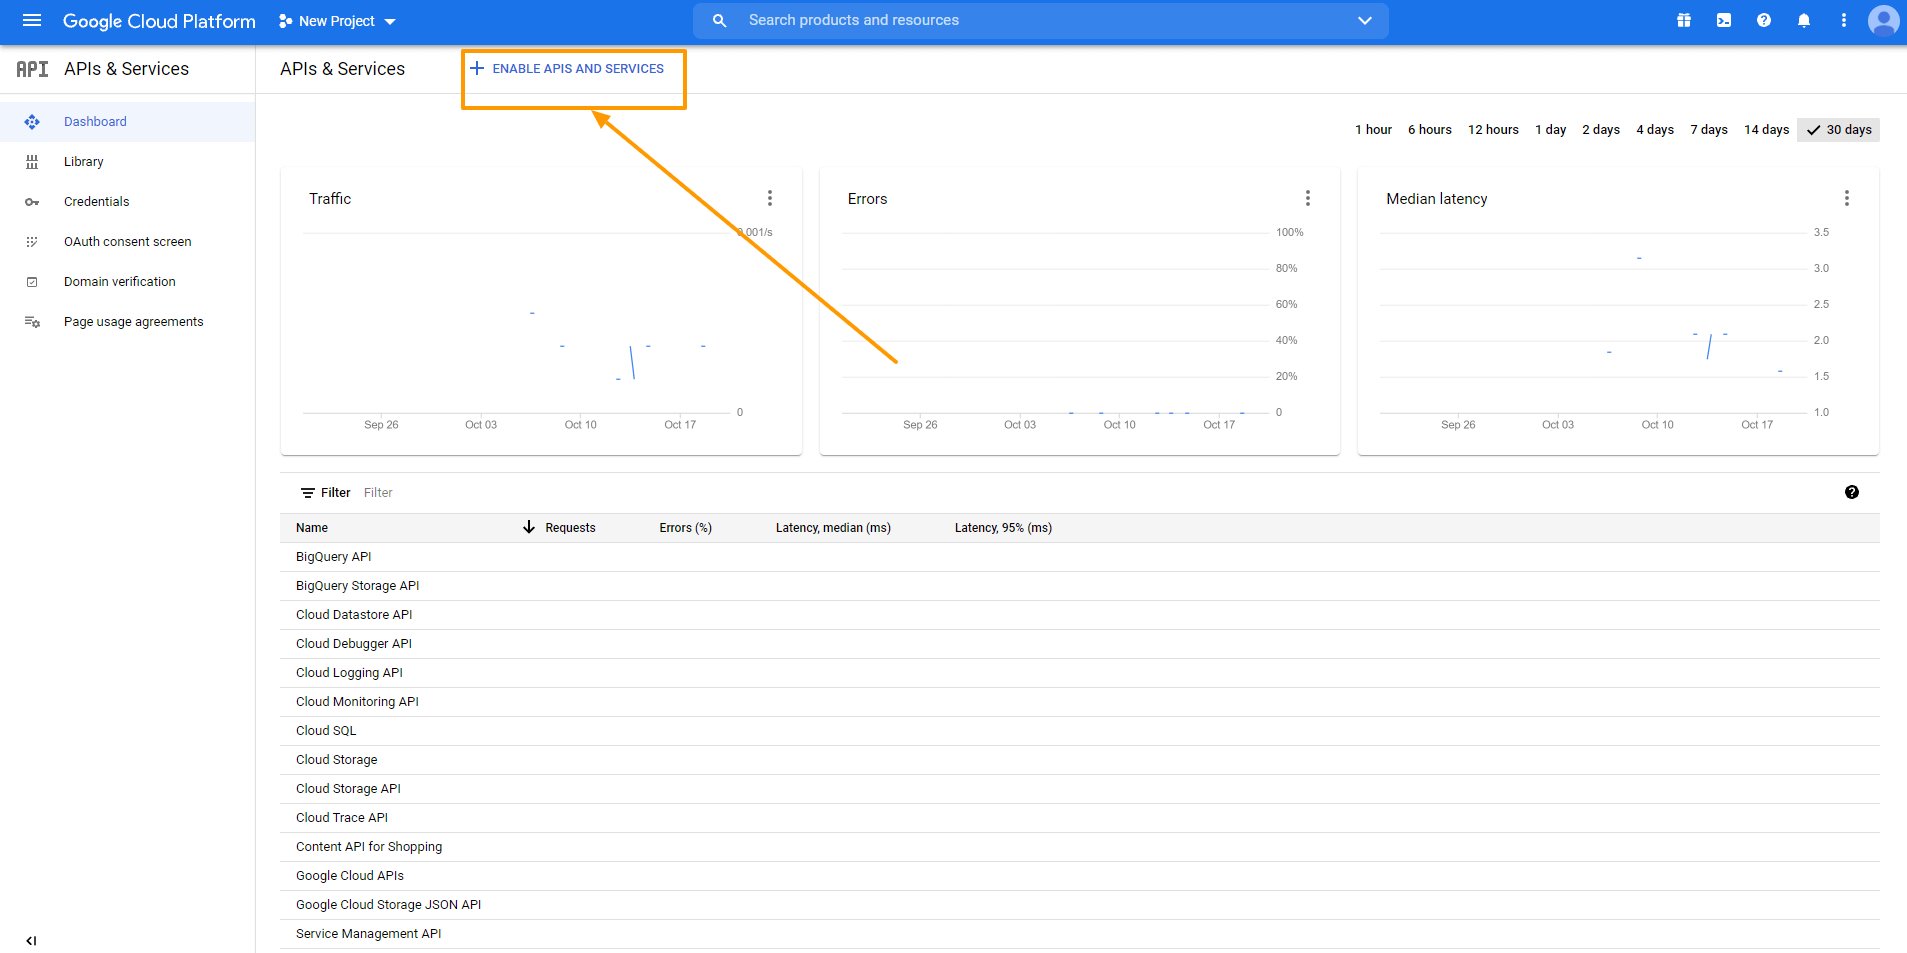
It will take you to the API Library Dashboard.
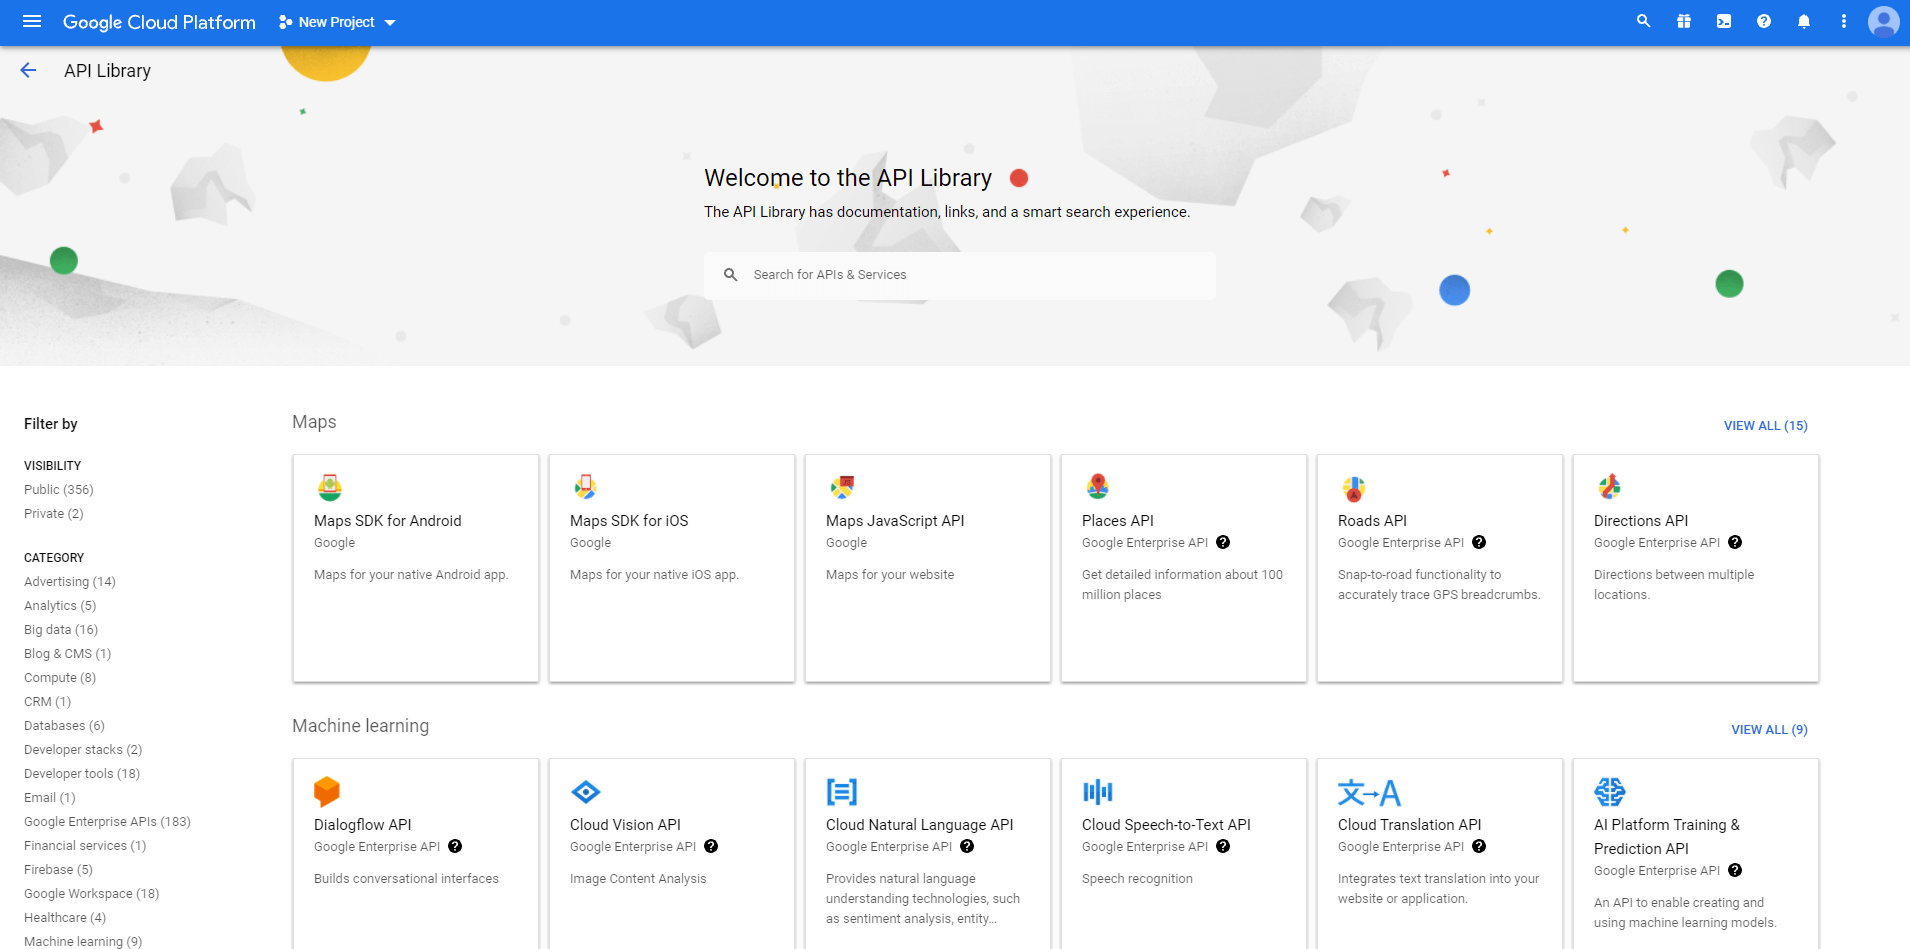
Search for Content API for Google Shopping and select the Content API for Shopping option
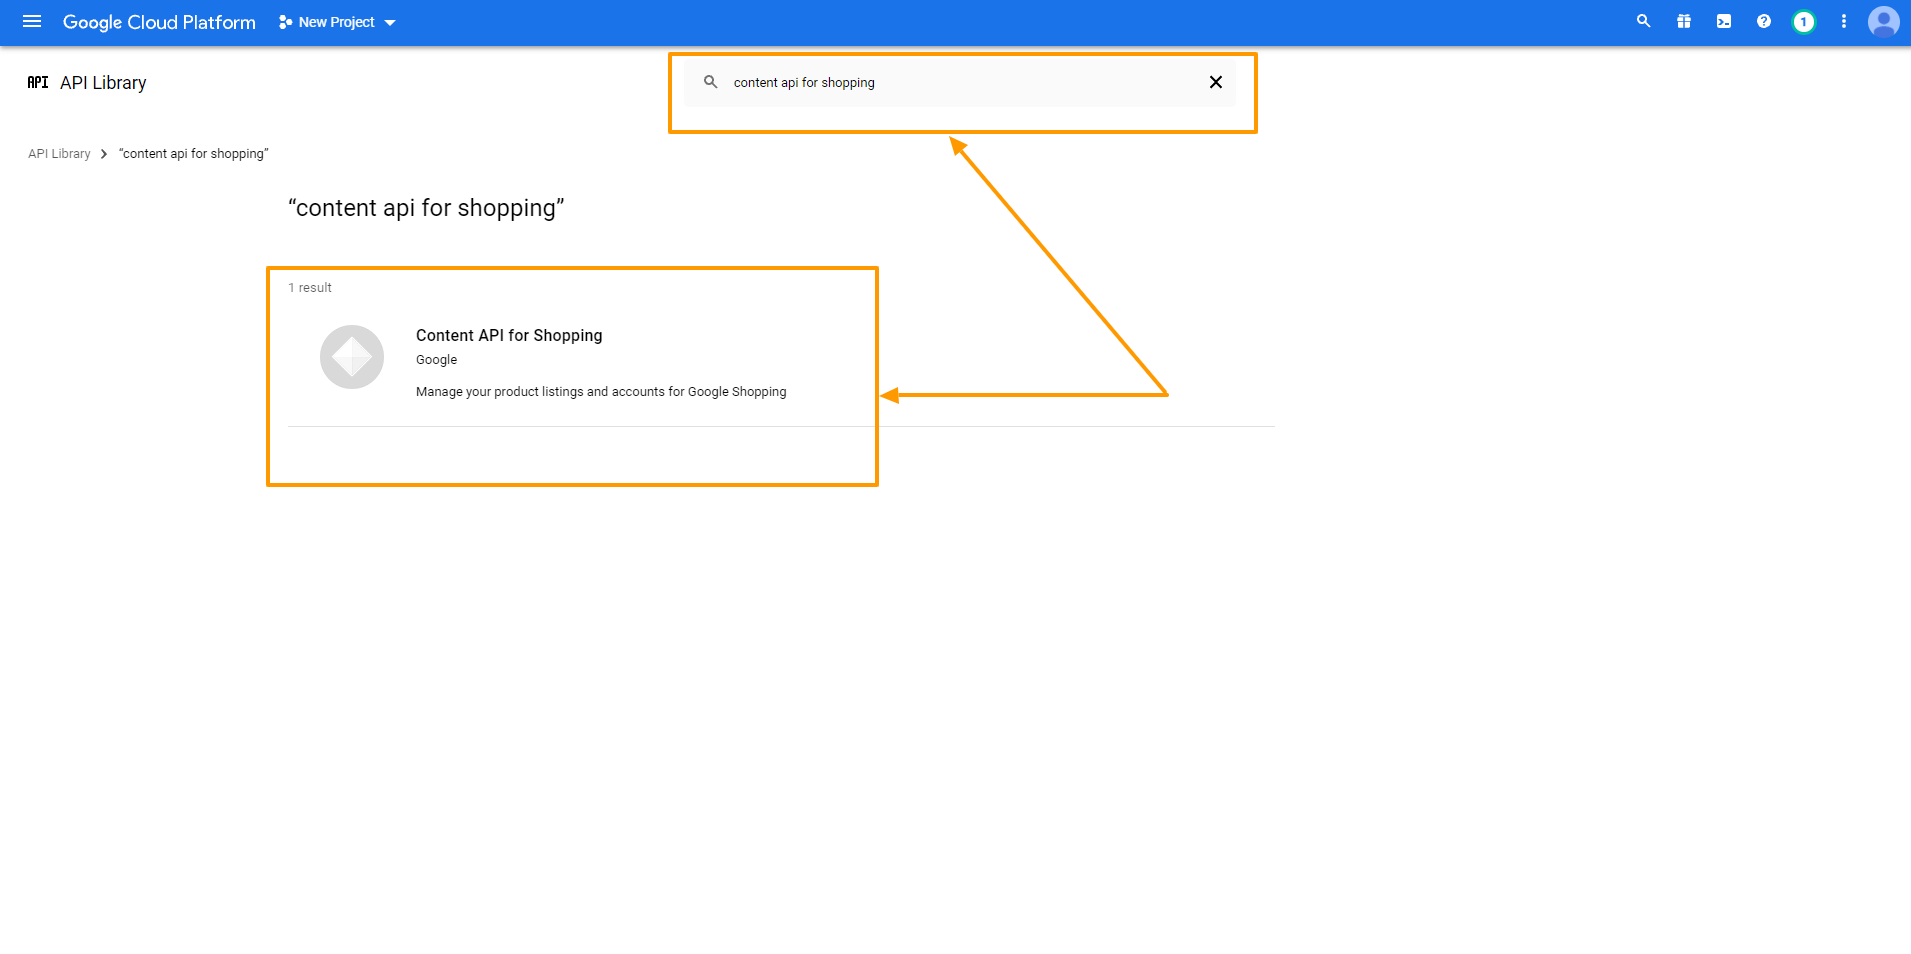
Click on the Enable button to enable the Content API for the Shopping option
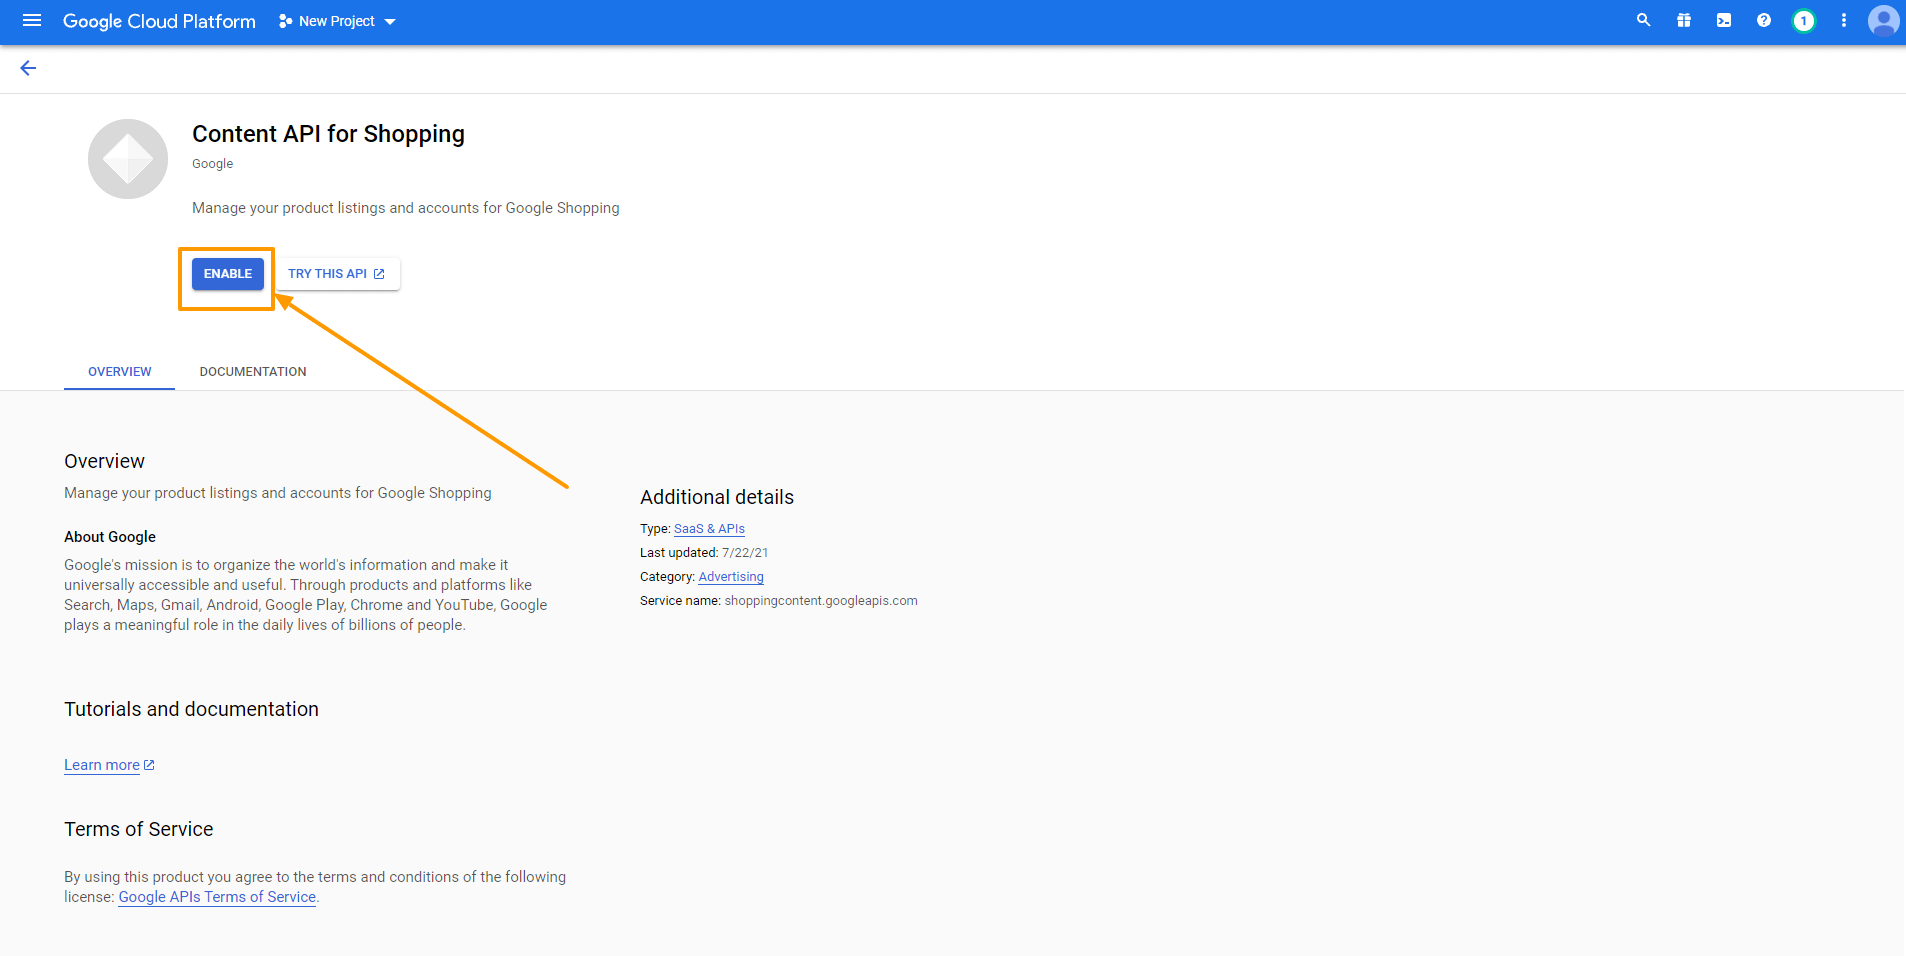
However, you don’t need to enable this Content API for Shopping if you see that it is enabled in the first place.
iii. Berechtigungsnachweise erstellen
Dies ist der wichtigste Teil, in dem Sie die Anmeldeinformationen einrichten müssen, damit die API richtig funktioniert. Lassen Sie uns anfangen.
a. Bildschirm OAuth-Zustimmung
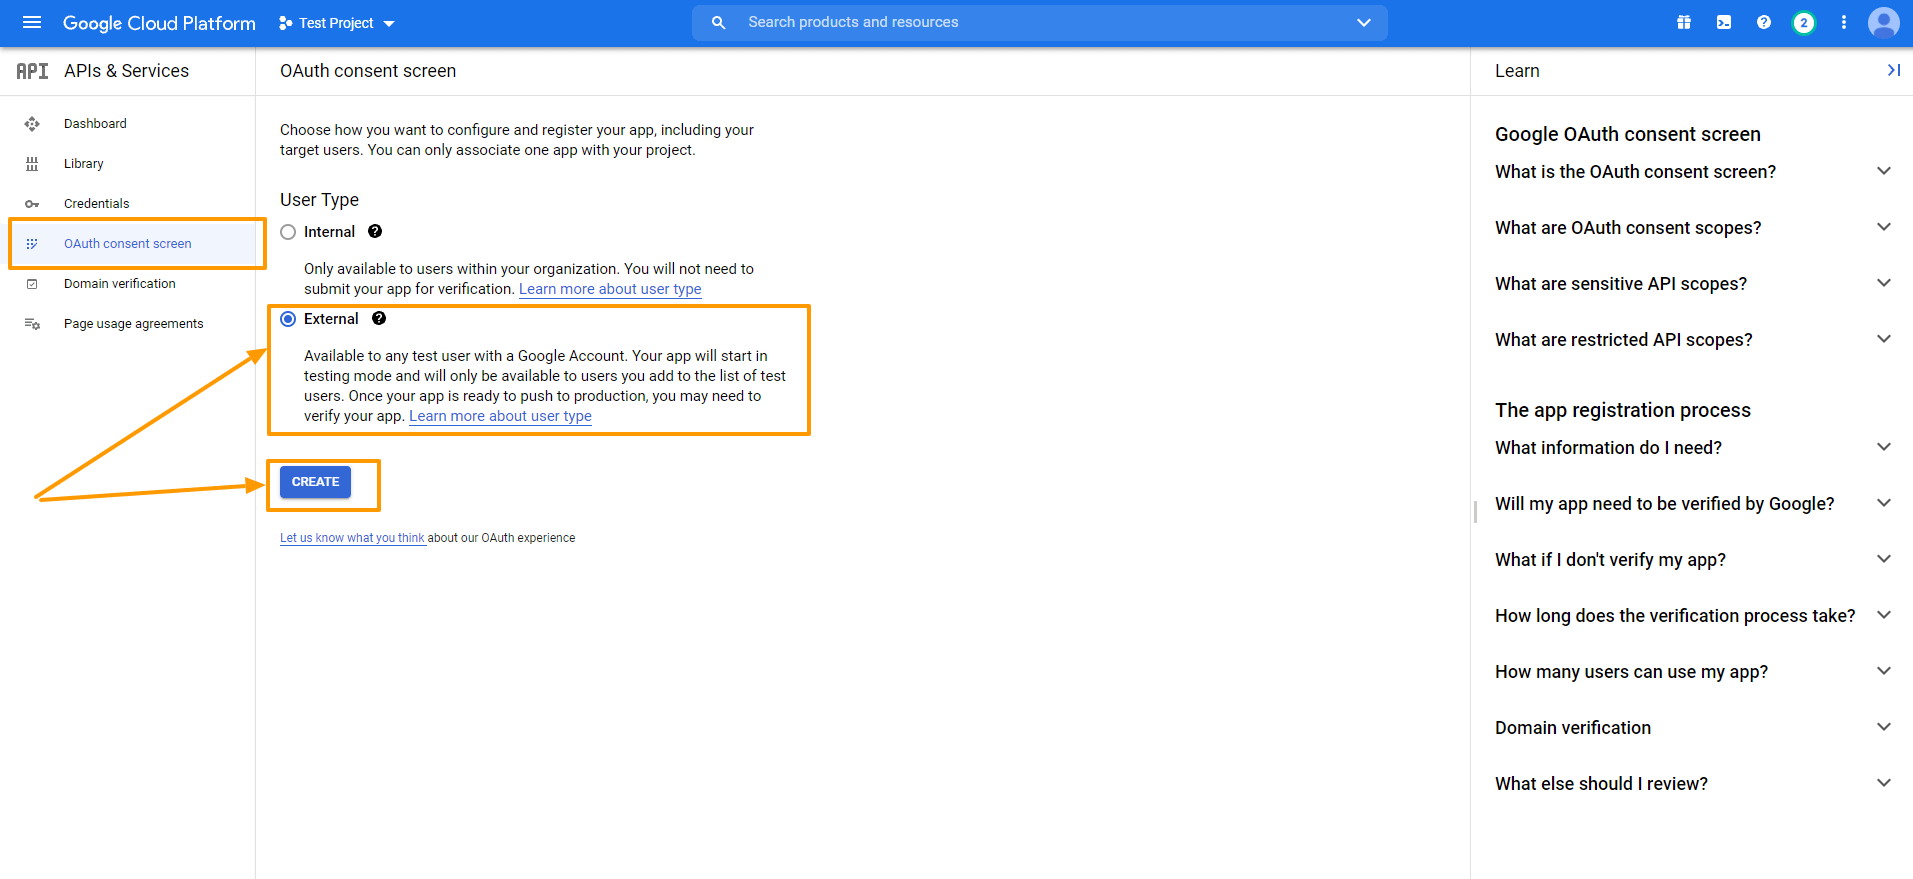
Click on the OAuth Consent Screen option on the left, and It will take you to the OAuth Consent Screen.
Select External as the User Type and click on the Create button.
Now fill up the forms and click on the SAVE AND CONTINUE button.
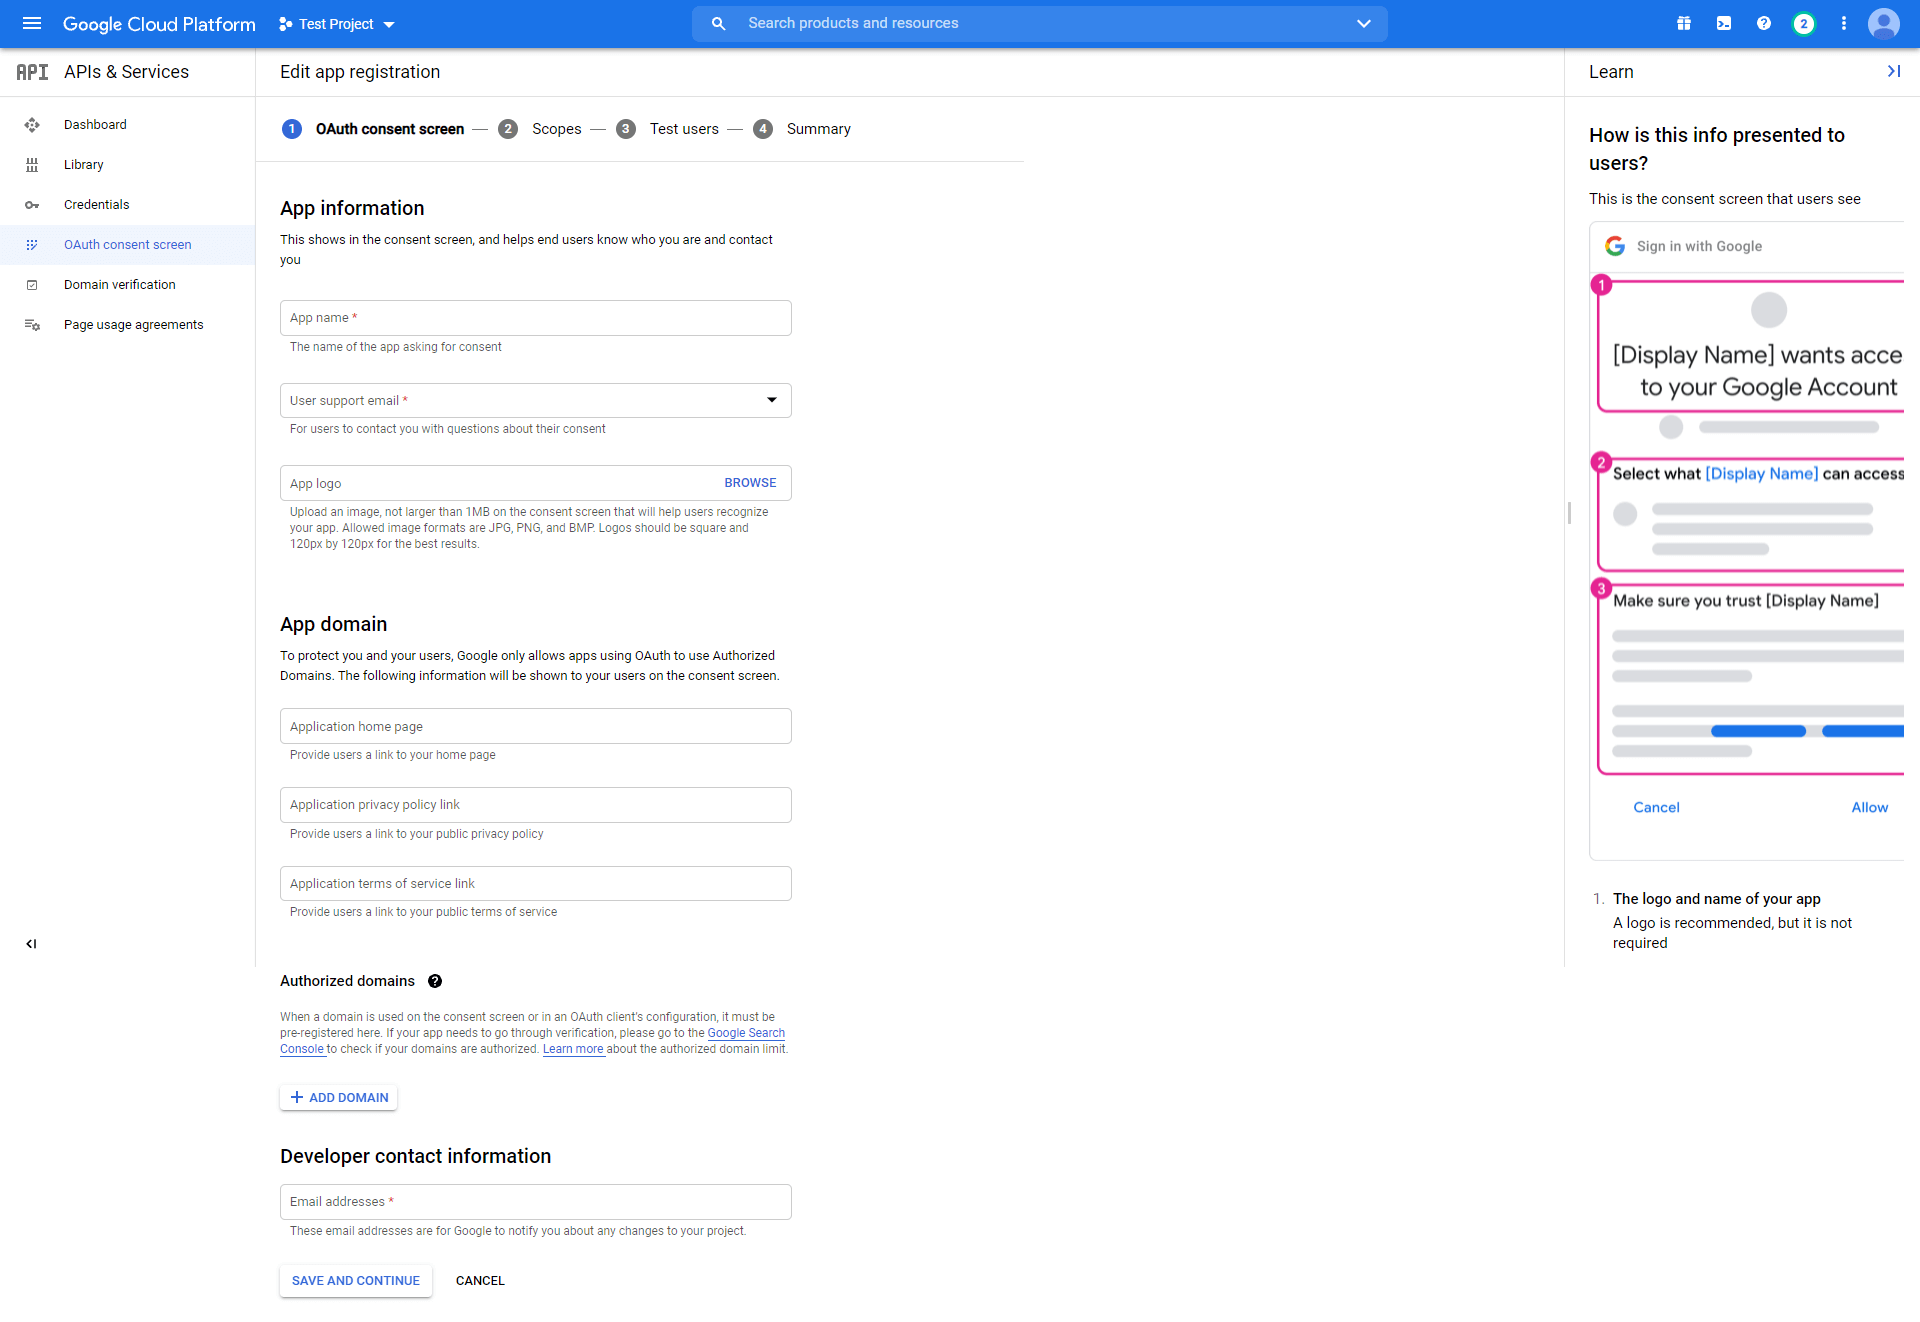
The terms you will face here are
Bildschirm "OAuth-Zustimmung
- Name der Anwendung
Der Name der App, für die Sie um Zustimmung bitten. Diesen müssen Sie angeben, sonst können Sie sich nicht mit Ihrem Schritt nähern.
- Anwendungs-Logo
Das identische Bild Ihrer App, um genau zu sein, ein Logo Ihrer App. Kunden werden Ihre App anhand dieses Bildes erkennen.
- E-Mail-Unterstützung
Diese E-Mail-ID hilft Ihren Kunden, Sie zu erreichen, wenn Sie Benutzerunterstützung benötigen. Die Google-ID, die Sie zum Einloggen in Ihre Google-Konsole verwendet haben, wird standardmäßig hier platziert.
- Autorisierter Bereich
Sie müssen hier die URL der Anwendung eingeben. Andernfalls wird Google Ihre Domain nicht als autorisiert markieren. Wie Sie auf dem Bild unten sehen können, habe ich meine Domain cloudwaysapps.com bereitgestellt.
Ihre Domäne ist wahrscheinlich bereits standardmäßig vorhanden, aber falls Sie sehen, dass es keine Domäne gibt, sollten Sie hier die autorisierte Domäne Ihres Geschäfts angeben.
- Anwendungs-Homepage/Datenschutzpolitik/ TOS-Link
Dies sind die jeweiligen Links zur Homepage und zu den Datenschutzbestimmungen und -bedingungen Ihres Antrags, und sie werden auf Ihrem Einverständnis-Bildschirm angezeigt. Sie müssen jedoch auf Ihrer autorisierten Domain gehostet werden - sonst brauchen Sie das Feld nicht auszufüllen.
Provide the Application Name and Authorized Domain(s) to start the process. You can add the rest of the options later.
Click on SAVE AND CONTINUE.
Scopes
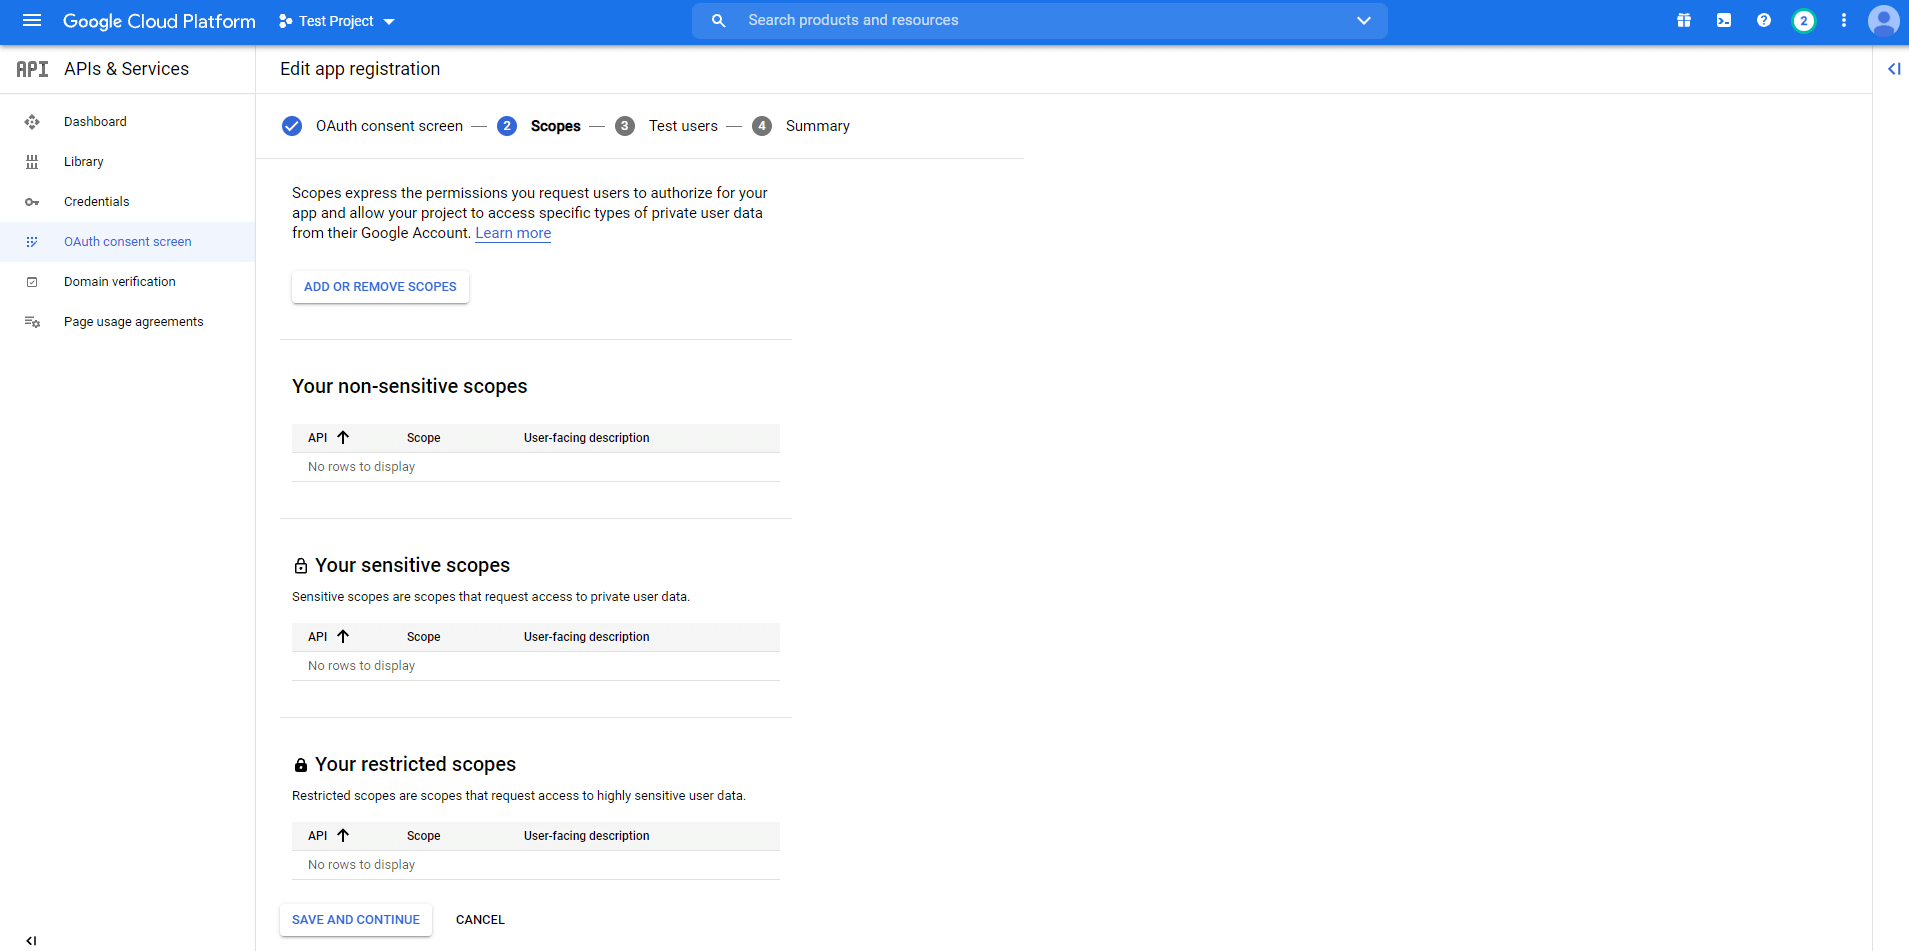
- Bereiche für Google-APIs
You are provided with a list of scopes here. You can also add your own. The level of scopes you choose here (such as email/profile/OpenID/custom), your application can access only that part of your user’s data.
Click on SAVE AND CONTINUE.
Test Users
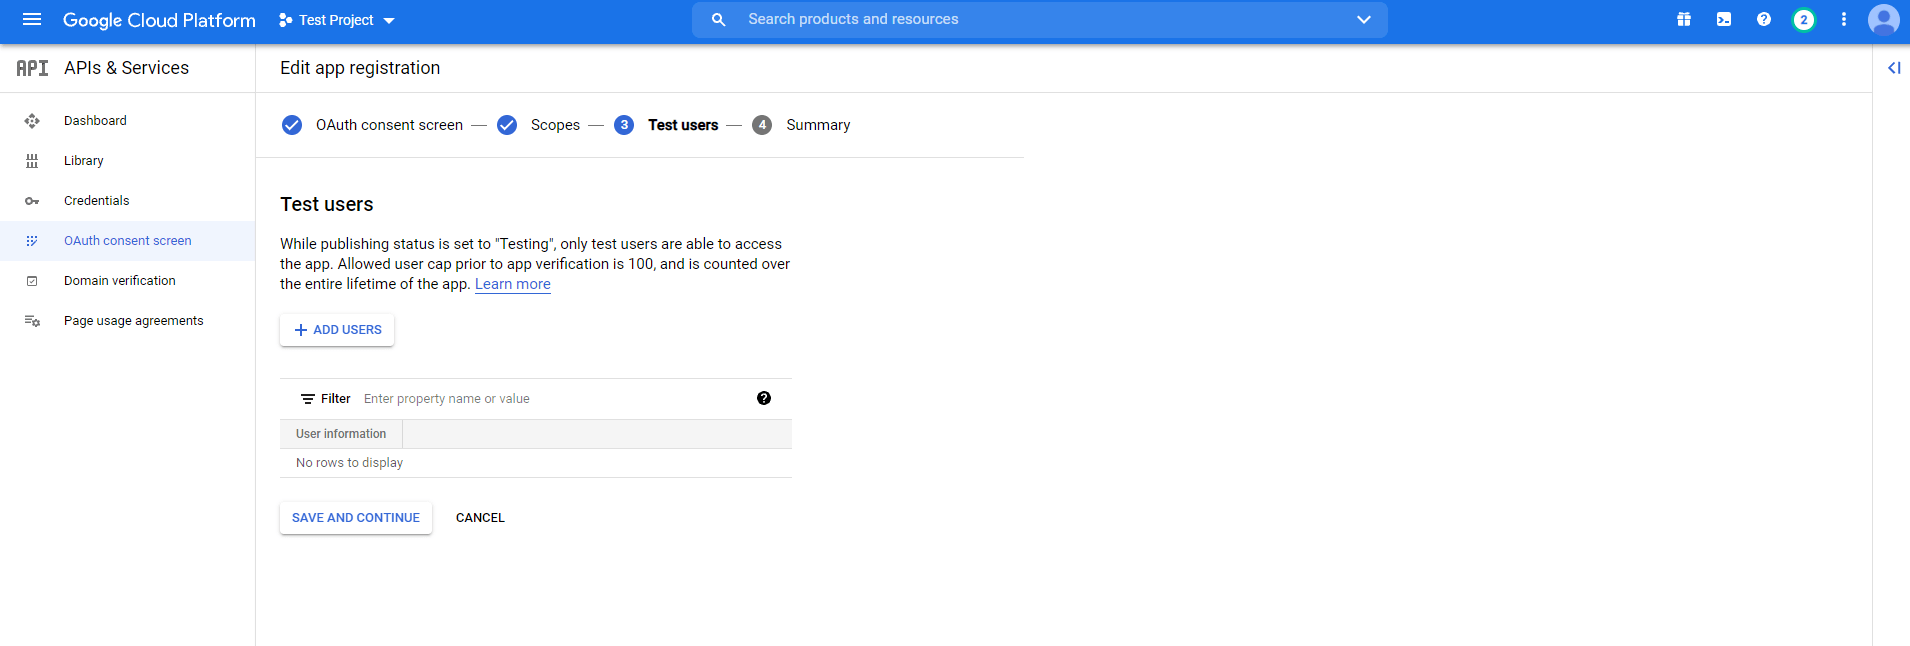
Assign Test Users
While the publishing status is set to “Testing”, only test users are able to access the app. Allowed user cap prior to app verification is 100, and is counted over the entire lifetime of the app.
You can provide access to the test users from here.
Click on SAVE AND CONTINUE.
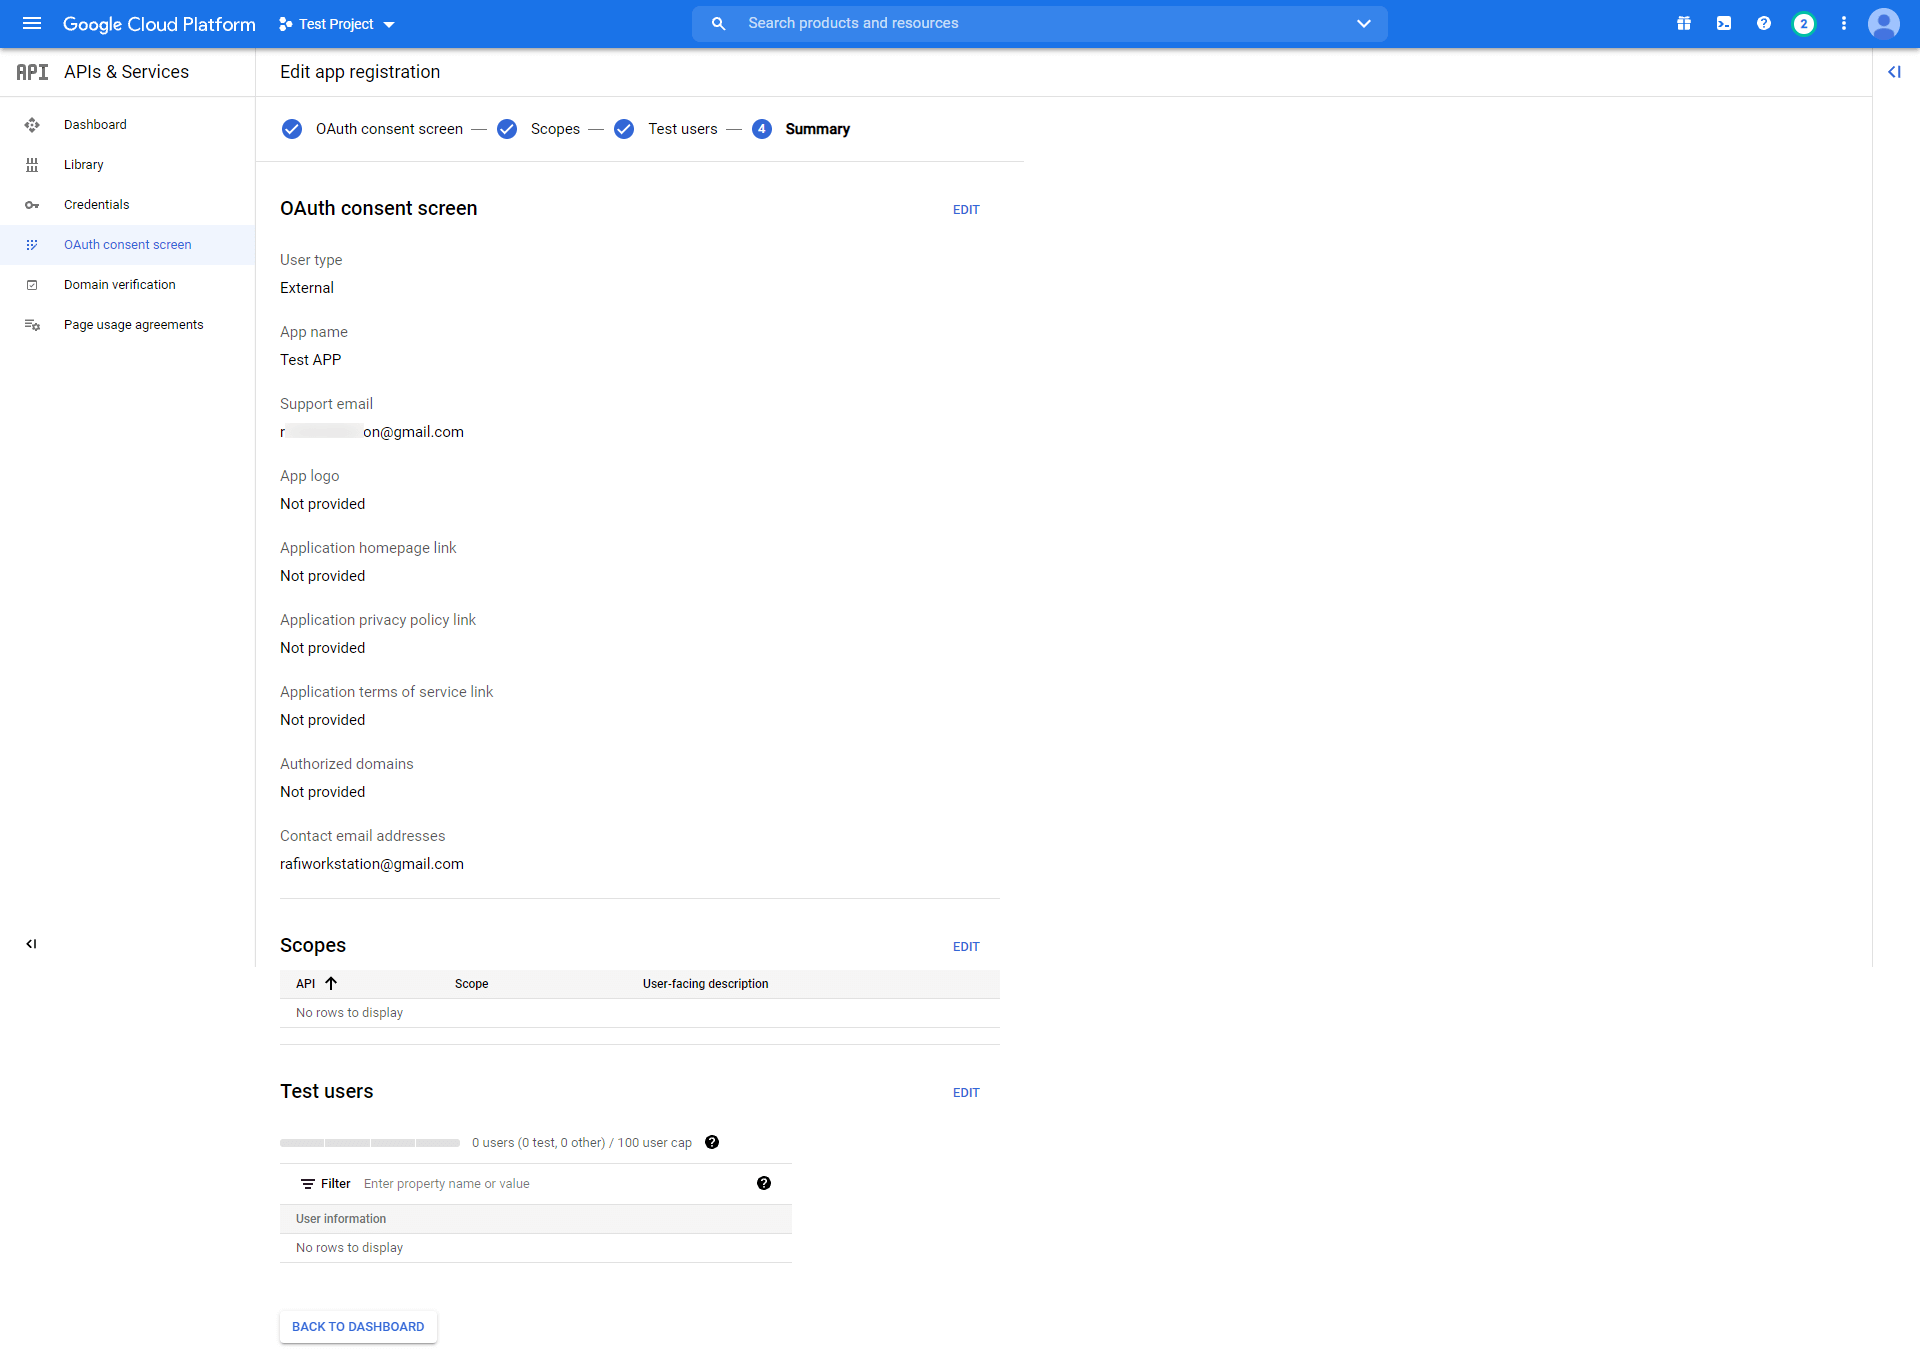
It will show you a summary and your registration is now complete.
b. OAuth Kunden-ID
Gehen Sie zurück zu Referenzen. Klicken Sie auf die blaue Schaltfläche Create credentials und wählen Sie OAuth Client ID aus dem Dropdown-Menü.

At first, select Web Application as the Application Type.

You will see the following info:
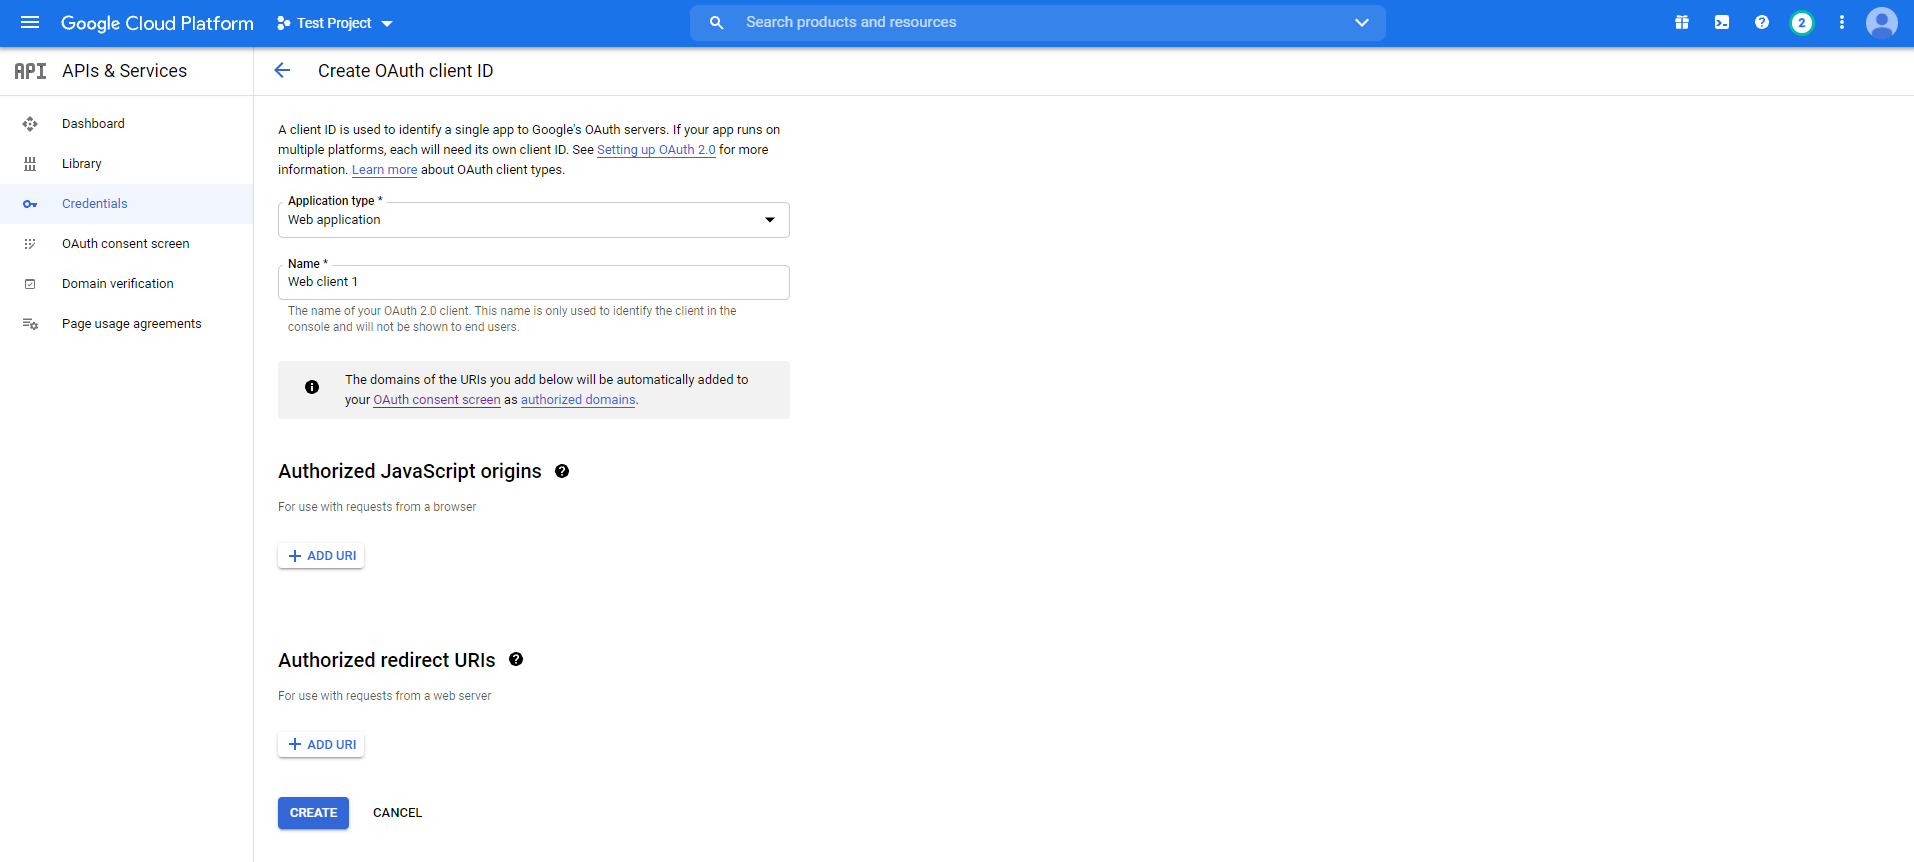
The terms you will face here are
- Name
Sie müssen hier einen Namen angeben, um sich zu nähern. Es ist der Name Ihrer OAuth(Open Authorization)-Client-ID. Wie Sie sehen können, habe ich den Namen als Test Guide Web App1 festgelegt.
- Autorisierte JavaScript-Ursprünge
Sie ist die Ursprungs-URI der Client-Anwendung. Ihre Verwendung ist nicht immer obligatorisch. Wenn Sie jedoch einen Nicht-Standard-Port verwenden, sollten Sie ihn hier angeben.
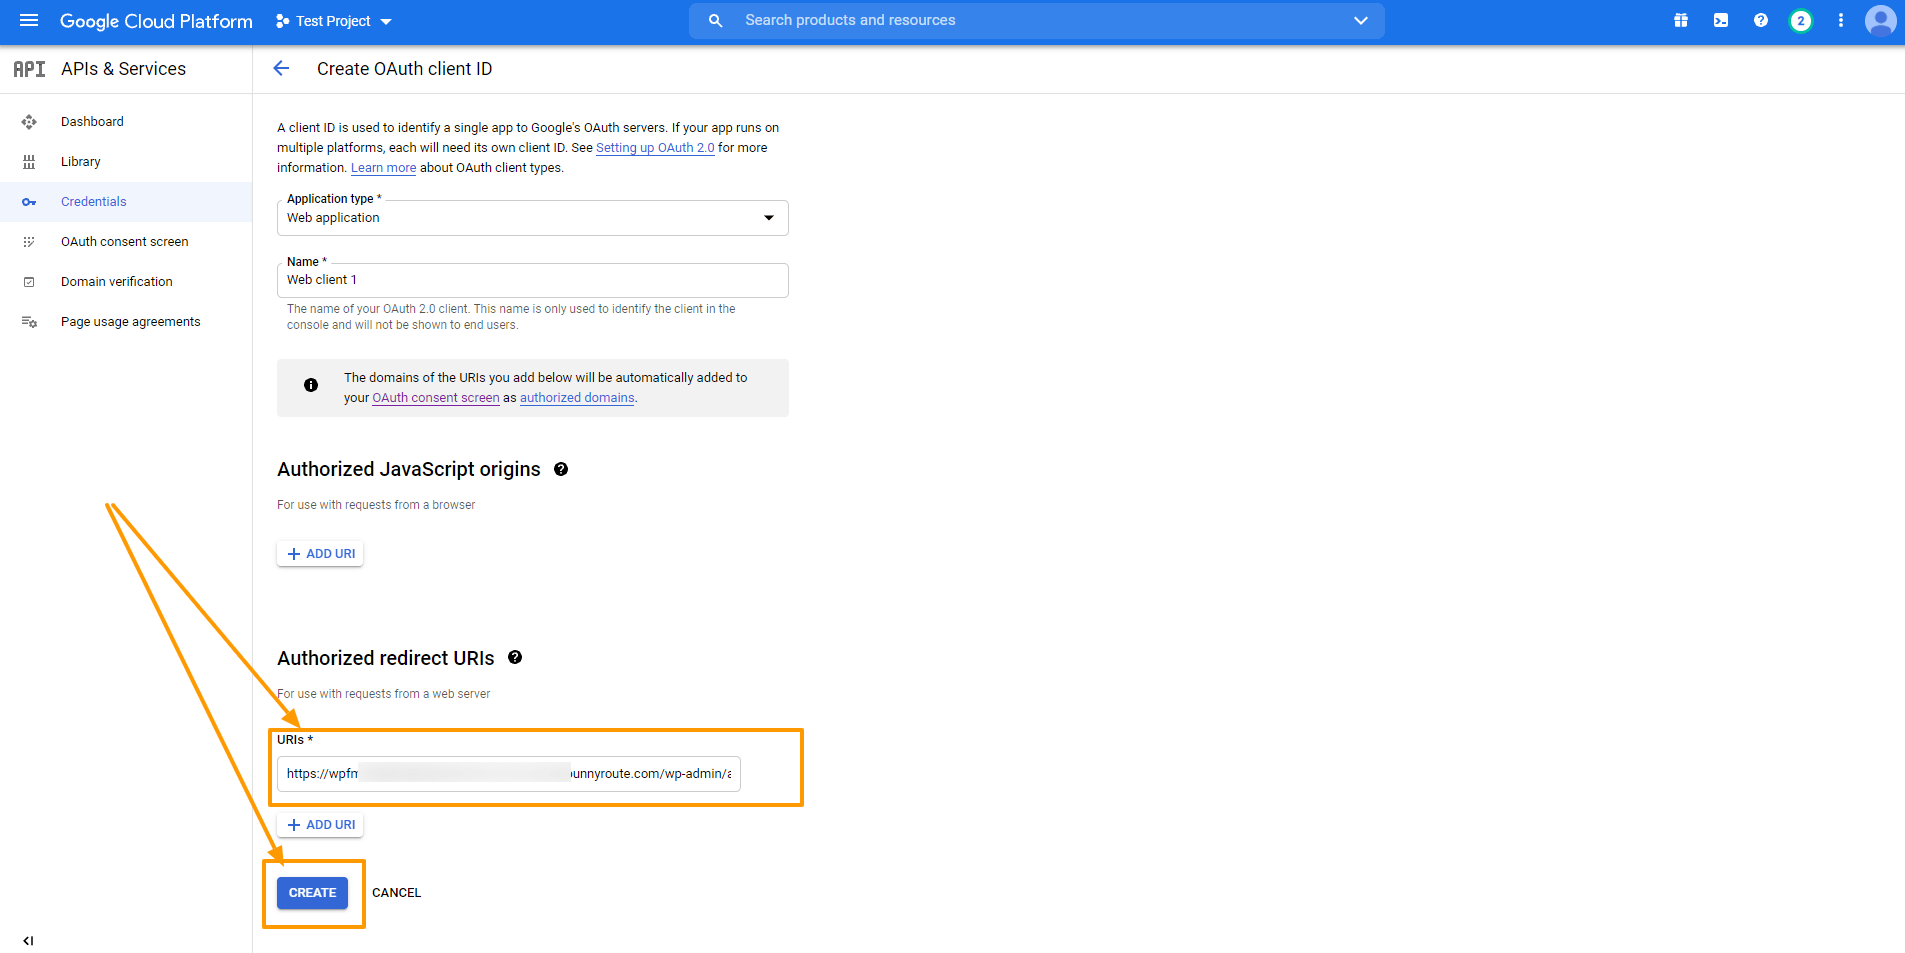
- Autorisierte Umleitung von URIs
Nach der Authentifizierung bei Google ist dies der Pfad, den Sie benötigen, um Ihre Nutzer auf Ihre Anwendung umzuleiten. Es darf keine öffentliche IP-Adresse sein und es muss die passende Redirect-URL aus Ihrem Plugin-Dashboard sein.
You will get the Redirect URL from your Product Feed Manager For WooCommerce dashboard. Go to Product Feed> Google Merchant Settings and you can see the redirect URL marked in the picture below.
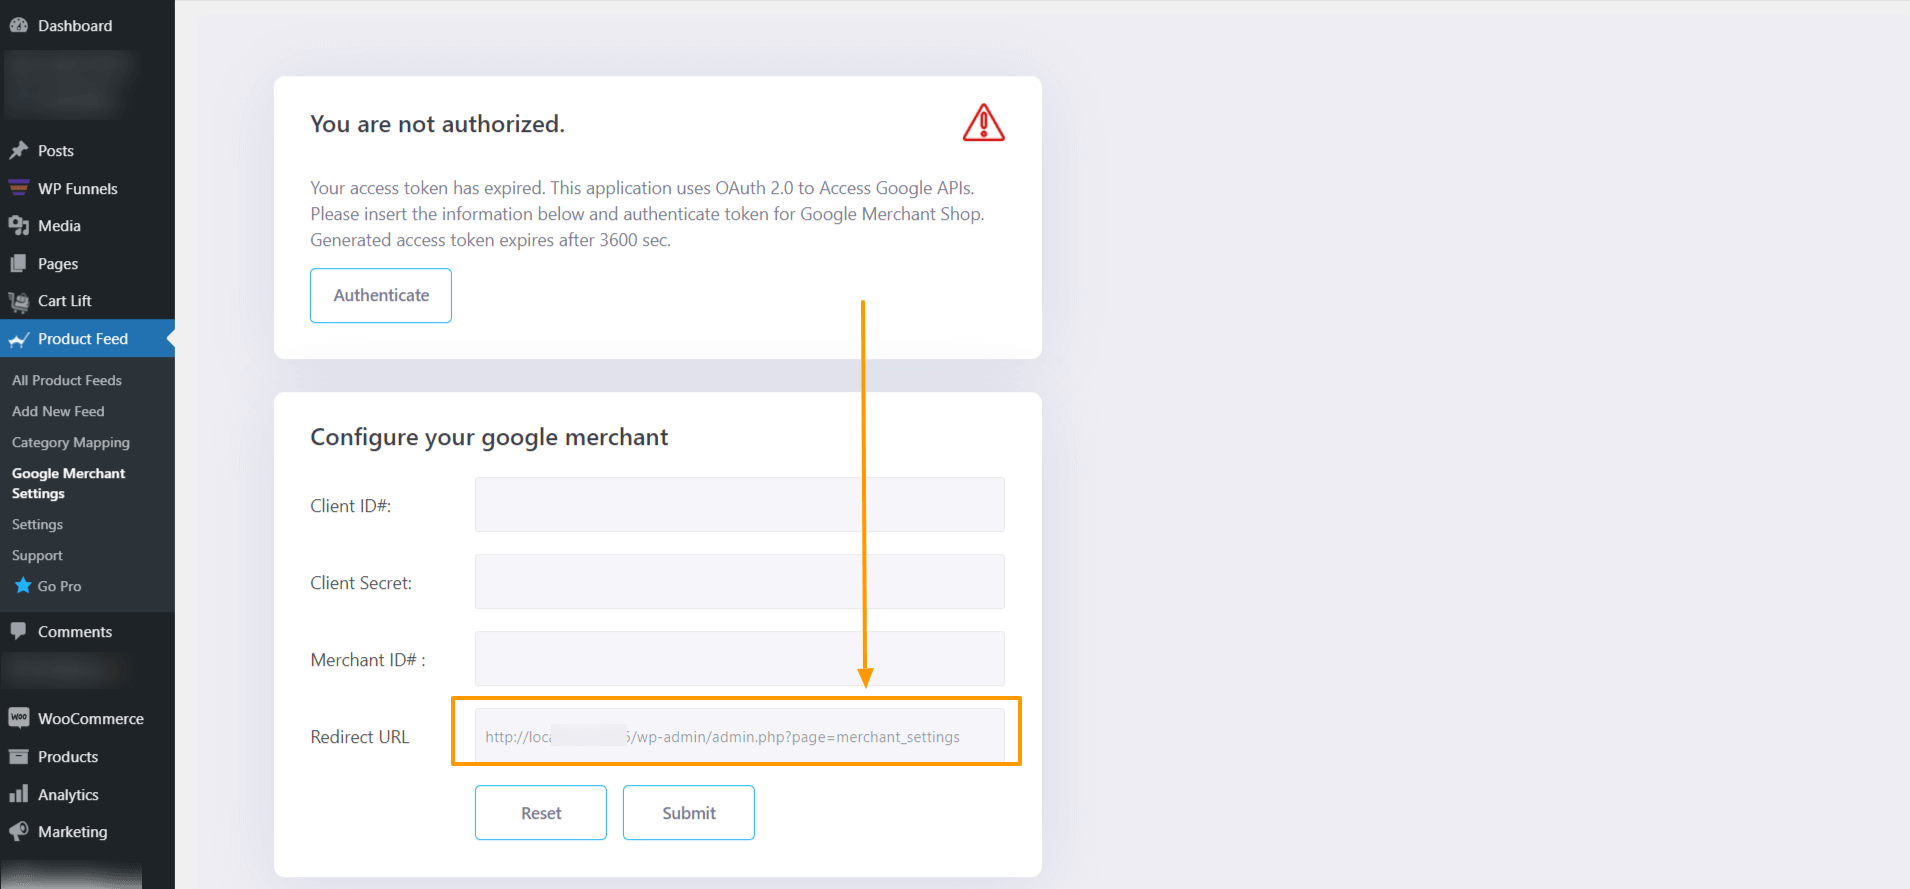
Kopieren Sie die Adresse und fügen Sie sie unter Autorisierte Umleitungs-URIs ein und klicken Sie auf Erstellen.
You will see that under Credentials, you have an OAuth 2.0 Client ID created, and you will get the OAuth Client ID credentials.
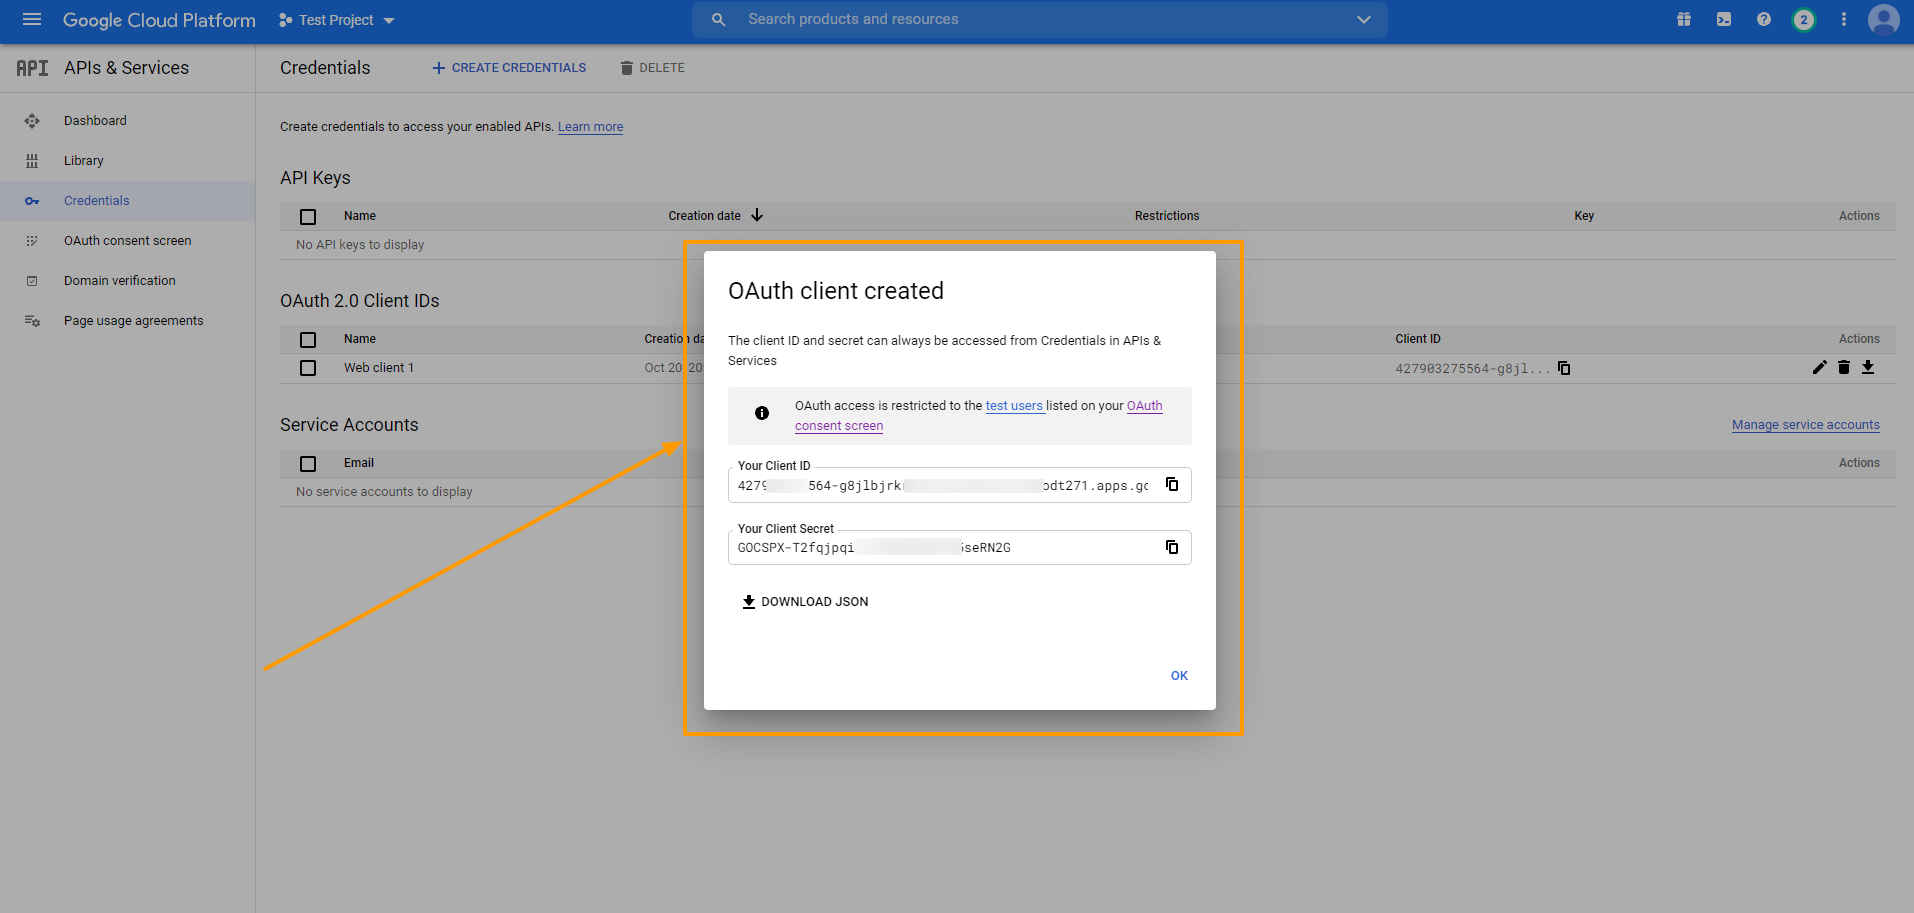
Copy the Client ID and Secret and you can also download the credentials in JSON format for later use by clicking on the DOWNLOAD JSON button.
Close the box and you will see that a new OAuth 2.0 Client ID is added.

You can click on the ID to view and edit information.
Schritt 2 - Holen Sie sich Ihre Google-Händler-ID
To get started with Google Merchants, follow this link. You will be taken to your merchant dashboard. From here you can monitor your feeds, product list, and some more options.
So when you send your WooCommerce Products to Google, they will be listed here.
Von hier aus ist es einfach, Ihre Händler-ID zu finden. Sie ist direkt neben unserem Profilbild angegeben, wie auf dem Bild unten gezeigt:

Kopieren Sie die Händler-ID und speichern Sie sie.
Step 3 – Sync Product Feed Manager For WooCommerce With Google Merchant Shop
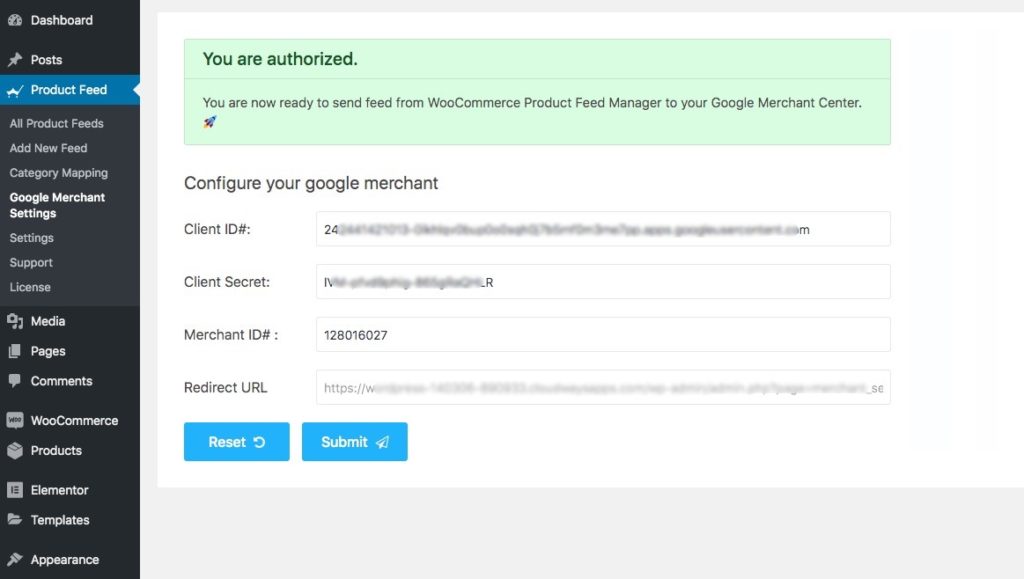
Finally, when you have your Client ID, Client Secret, and Merchant ID, Go to Your Dashboard> Product Feed> Google Merchant Settings.
Geben Sie alle Informationen entsprechend ein, wie unten gezeigt:

Sobald Sie alles eingerichtet haben, klicken Sie auf "Submit". Klicken Sie nach dem Absenden auf Authentifizieren.
It will redirect you to the permission page of Google. Allow your Google account to approve access to your authorized domain. Then you will get a message that ‘You are authorized’.
Und Sie sind bereit! Jetzt ist es an der Zeit, die Auto-Synchronisationsfunktion zu nutzen, um Ihre WooCommerce-Produkte an Google Merchant Shop zu senden.
Schritt 4 - Planen Sie die automatische Synchronisierung
Now that the setup is complete, you can go to your product feed, and on the right side of the page, you will see that there is the new feature, Send to Google Merchant.
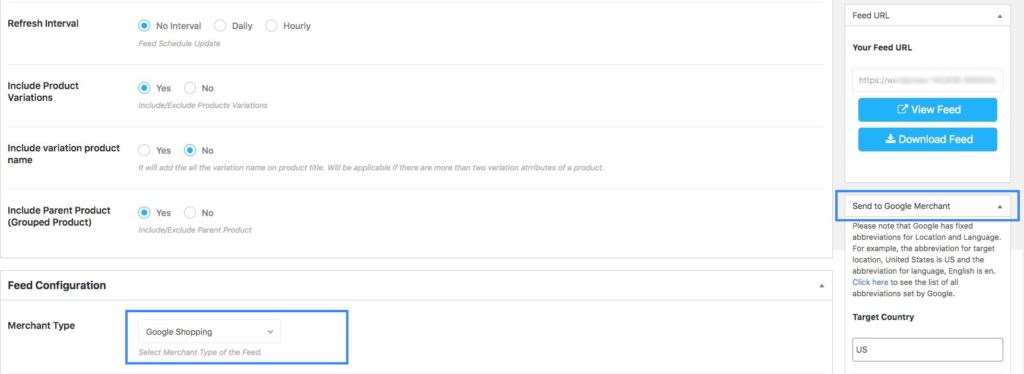
Unter diesem Abschnitt haben Sie die Optionen:
- Zielland
- Zielsprache
- Zeitplan
- Stunde auswählen
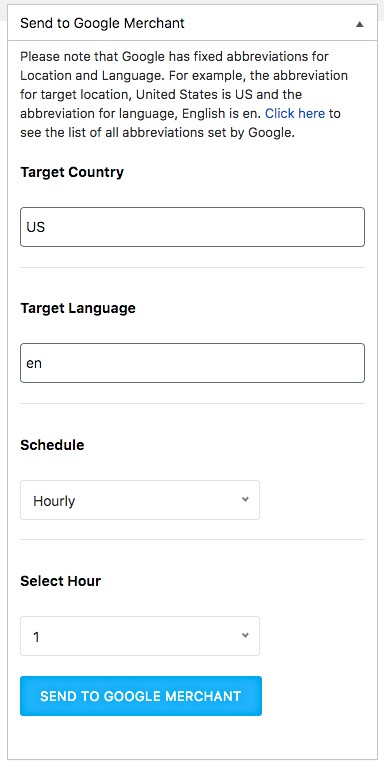
Wählen Sie zunächst das Zielland und die Sprache.
FYI:
You have to input a short form, and it has to match Google’s format. At first, you can see a small paragraph with a ‘Click here’ link. Go there and check the short forms of your desired target country and language to be accurate.
Als nächstes können Sie Ihren Zeitplan nach Ihrem eigenen Willen festlegen.
Choose between Weekly, Monthly, or Hourly basis.
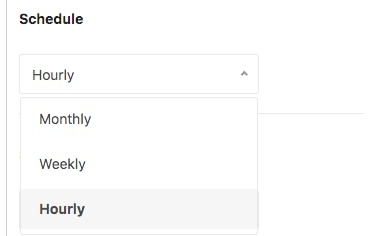
Wenn Sie "Stündlich" wählen:
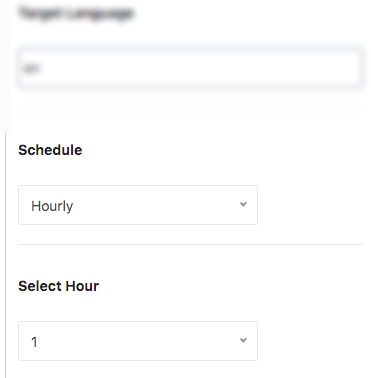
Then select the number of hours after which the schedule will be triggered.
Wenn Sie Wöchentlich wählen:
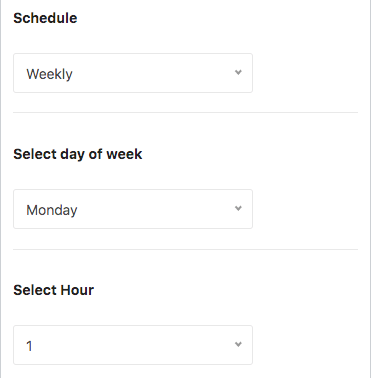
Then choose a day of the week and the hour of that day when this schedule will be triggered.
Wenn Sie Monatlich wählen:

Wählen Sie dann das Datum eines Monats und die Stunde des Tages, an dem dieser Zeitplan ausgelöst wird.
Sie können zu Ihrem Google Merchant Center > Feed gehen und den gesendeten Feed überprüfen.
Since the schedule is set, this feed will be updated automatically according to the schedule, regularly.
Jetzt sind Ihre Feeds ordnungsgemäß mit dem Google Merchant Center synchronisiert, und Sie müssen nicht mehr bei jeder Aktualisierung Ihrer Produkt-Feeds auf Ihre Konten zugreifen. Daher müssen Sie keine WooCommerce-Produkte mehr manuell auf Google hochladen.
Nehmen Sie einfach Änderungen an Ihrem Feed vor, und Ihr Google Merchant Shop erhält die Aktualisierung automatisch.
Schlussfolgerung
Product Feed Manager For WooCommerce has been under constant improvement to help you promote your products easily.
If you find any Google feed errors, our support team is always there to give you instant support when you need it.
Update your Product Feed Manager For WooCommerce on a regular basis and benefit from all the new features we add on a regular basis.
Wir hoffen, dass dieser Artikel für Sie nützlich war, und wünschen Ihnen eine angenehme Reise mit Ihrem WooCommerce-Shop, indem Sie Ihre WooCommerce-Produkte automatisch mit Google synchronisieren.
Sell Jewelry on Top Marketplaces with Ease
Get your jewelry listed on Amazon, Etsy, eBay, and 180+ platforms in just a few clicks using Product Feed Manager.


Nice post.
is there a free way.
I have more than 500 products but I see only 200 products on google merchandise center !
do you know what happened to my products?
How can i fix it?
Hi, the plugin Product Feed Manager for WooCommerce allows up to 200 products per feed in the free version. For more, you may have to upgrade to Pro.
I would suggest you give the Pro plugin a try. It has a reasonable price, and you may use it for more online marketplaces than just Google Shopping. Thanks.