Het is natuurlijk voor de meeste WooCommerce Winkeliers om te proberen hun verkoop te verhogen door het promoten van verschillende winkels. Bijna alle WooCommerce winkeliers promoten hun WooCommerce Producten naar Google Merchant Shop omdat het de grootste marktplaats is om meer potentiële klanten te krijgen.
Product Feed Manager for WooCommerce (PFM) is the best plugin for connecting your store to Google Merchant Center, and it makes it extra easy to promote your valuable products in different merchant shops.
Today, we are happy to inform you about the new update of our plugin Product Feed Manager For WooCommerce. We recently added a new feature that will give you an extra hand in promoting your products on Google Merchant Shop.
With this latest version, you can simply work in harmony with the best merchant shop out there and potentially increase your revenue with product feed management strategies.
Laten we ons ingraven!
Hier is de complete video tutorial. Of u kunt de schriftelijke handleiding hieronder lezen, zodat u uw WooCommerce producten gemakkelijk kunt synchroniseren met Google.
Auto-sync WooCommerce producten naar Google
You can auto-sync your WooCommerce Products to Google Merchant Shop using our plugin.
This means that with the latest Product Feed Manager For WooCommerce, you can now directly send your WooCommerce products to Google Merchant Shop; you no longer need to download and upload feed on your Google Merchant Center manually.
This feature carries out the task by allowing your Google Merchant Center to fetch the data of your updated Google product feed according to the schedule you decide.
You need to simply set up your Product Feed Manager For WooCommerce to integrate with your Google Merchant Shop.
Once you have set the required credentials to auto-sync the plugin with your Google merchant account, you can then choose your desired schedule, when you want your updated product feed to be collected by your Google Merchant Shop. It’s as simple as that.
Dit zal je zoveel tijd besparen. U kunt zich richten op het verbeteren van uw WooCommerce Shop terwijl uw bijgewerkte productfeed automatisch naar uw Google Merchant Shop wordt gestuurd.
Hier is hoe het werkt
Synchronizing your WooCommerce Products to Google Merchant Shop is an easy procedure. Just follow these steps and you are good to know how to generate A WooCommerce Google feed with auto sync featurs.
U heeft 3 specifieke informatie nodig om de synchronisatie in te stellen:
- Klant ID
- Klantengeheim
- Google Merchant ID
U kunt uw Client ID en Client Secret ophalen bij uw Google Developers Console en u kunt uw Google Merchant ID ophalen bij uw Google Merchant Shop.
Als u niet weet hoe u ze kunt vinden, lees dan verder, we hebben instructies gegeven over hoe u ze kunt ophalen.
Laten we nu beginnen met de stappen.
Stappen naar Auto-Sync WooCommerce Producten naar Google Merchant Shop
U moet een paar specifieke stappen volgen om het op te zetten.
- Stap 1 - Verzamel klant-ID en klantgeheim
- Stap 2 - Verkrijg uw Google Merchant ID
- Step 3 – Sync Product Feed Manager For WooCommerce With Google Merchant Shop
- Stap 4 - Plannen van de Auto-Sync
Dus laten we elke stap een voor een doornemen.
Stap 1 - Verzamel klant-ID en klantgeheim
i. Creëer een project
Ga eerst naar Google Developers Console en log in met uw Google-account. U ziet dan zo'n dashboard:
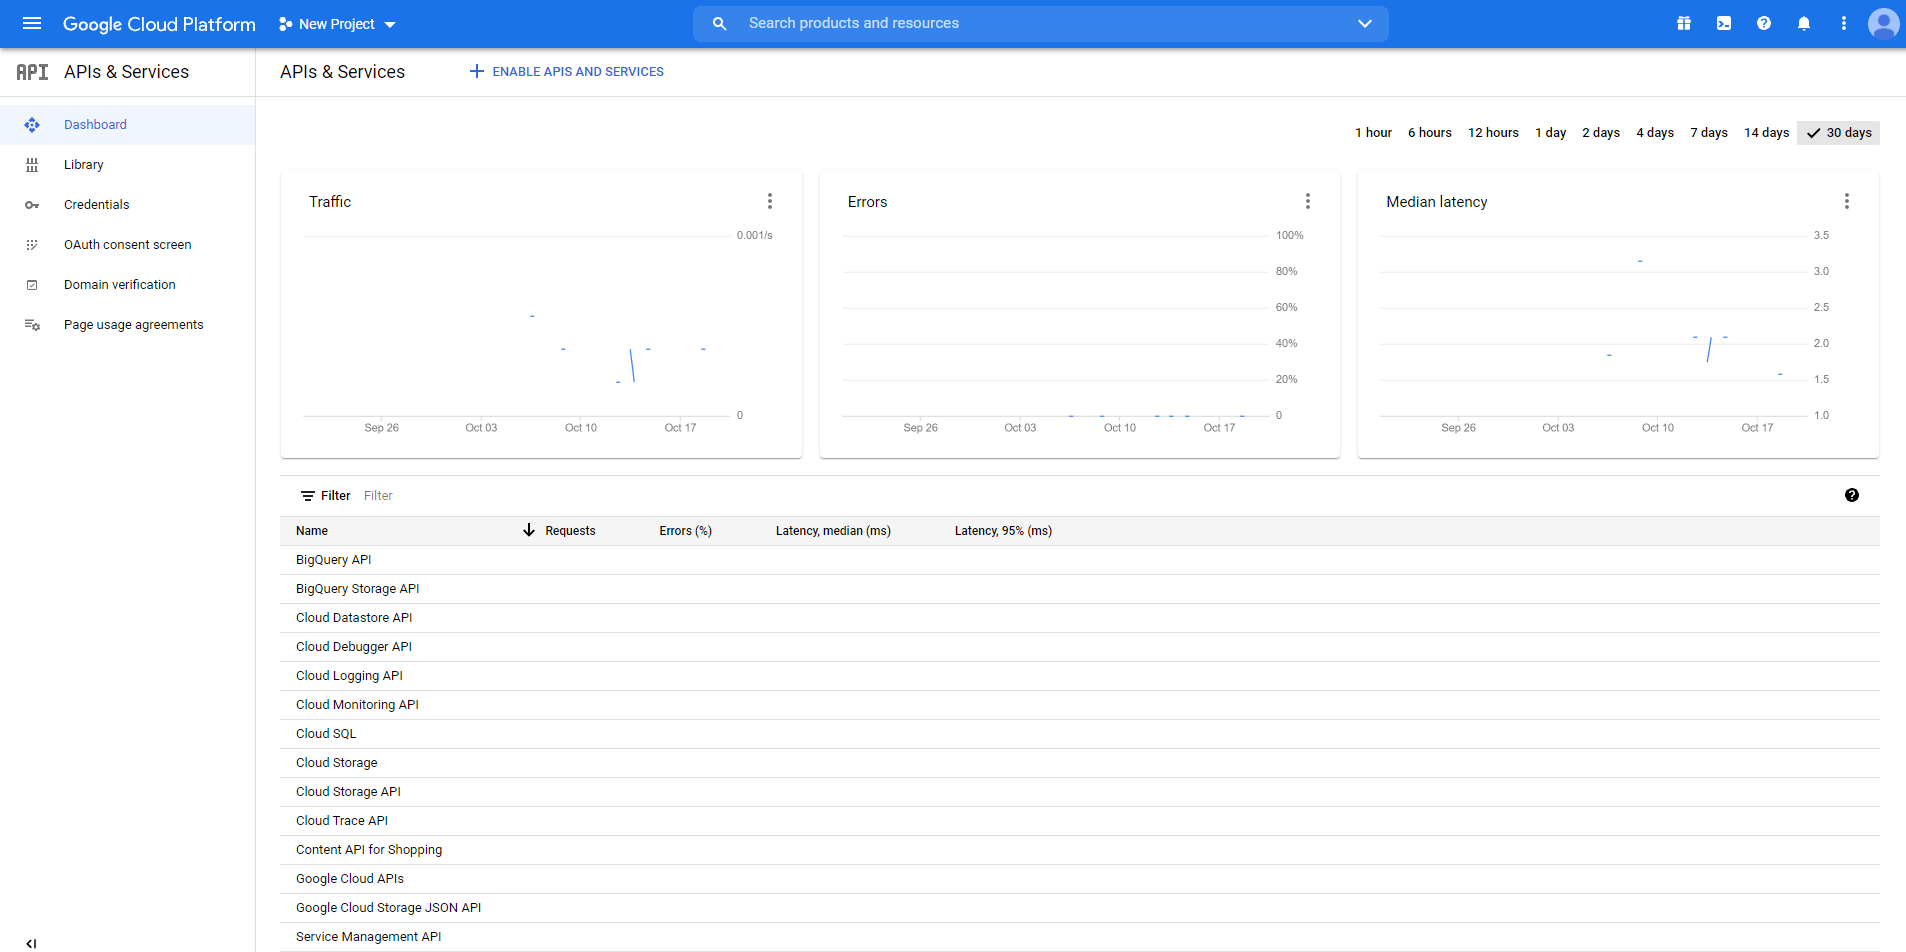
Als u al een project hebt gemaakt voor uw producten, kunt u hetzelfde gebruiken, of u kunt een nieuw project maken als u dat nog niet hebt.
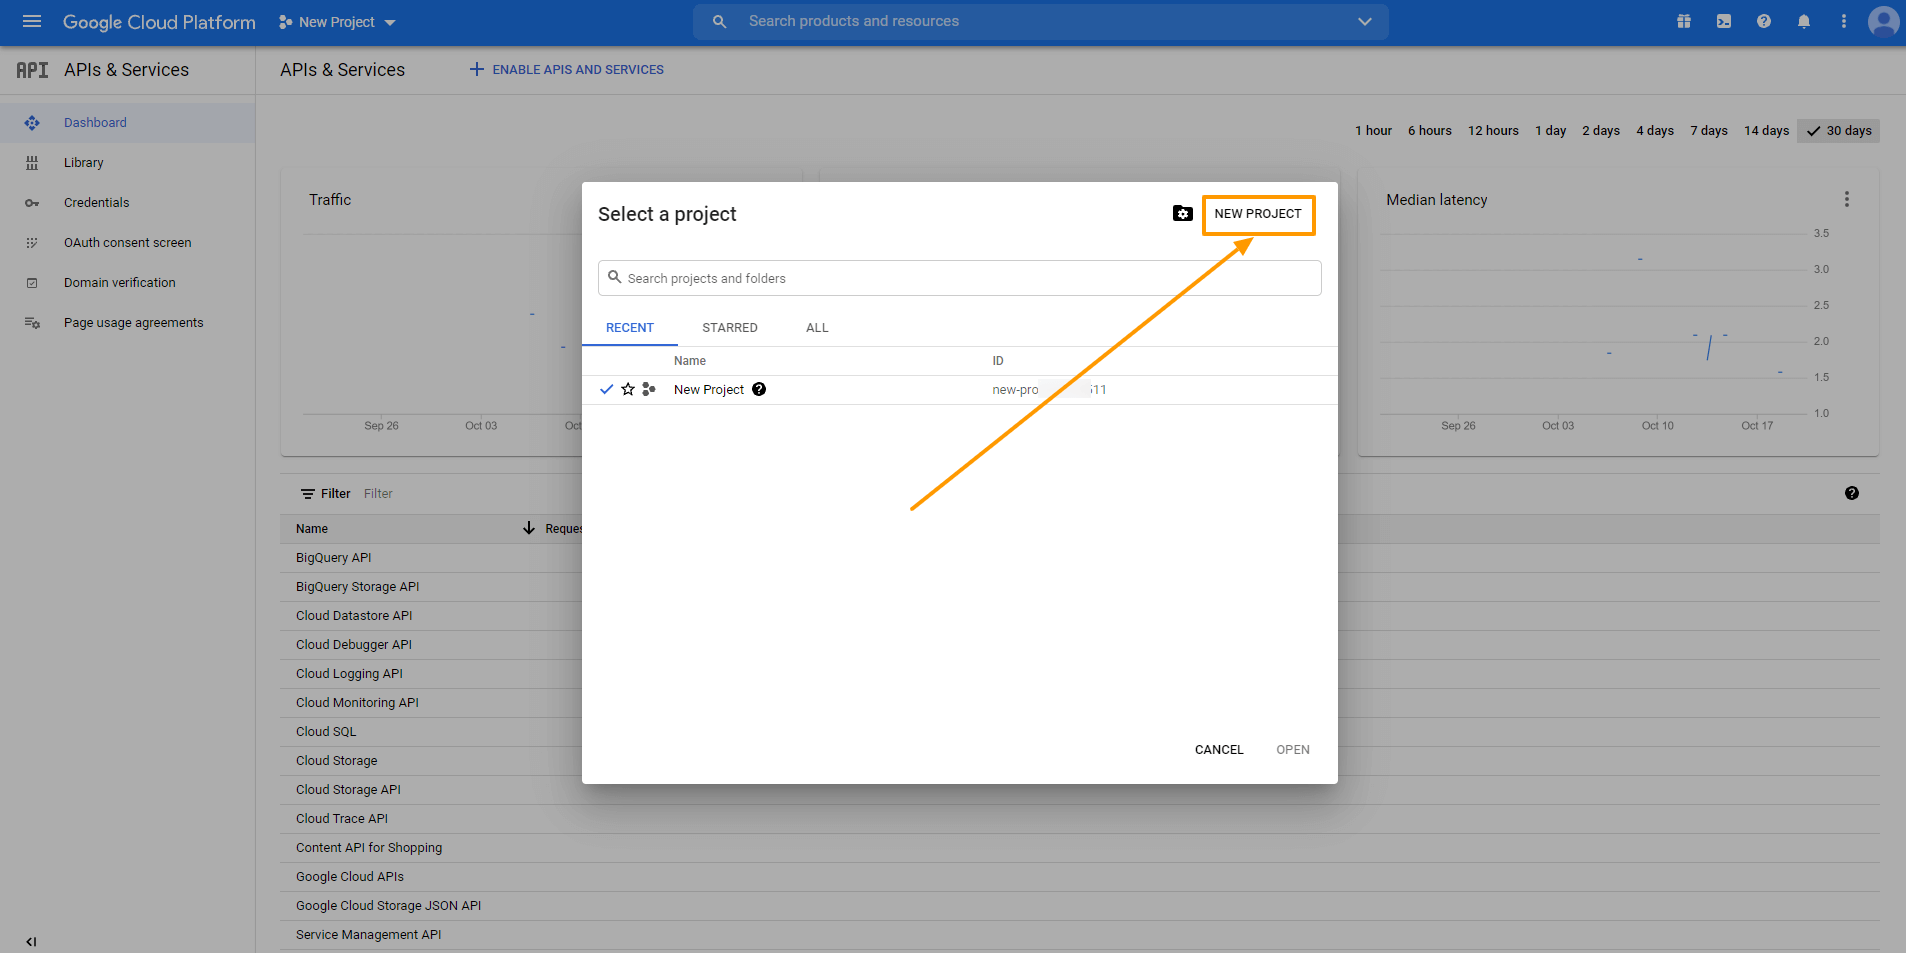
To do this, you need to click on New Project. Here you will be given a list of projects that you have created so far.
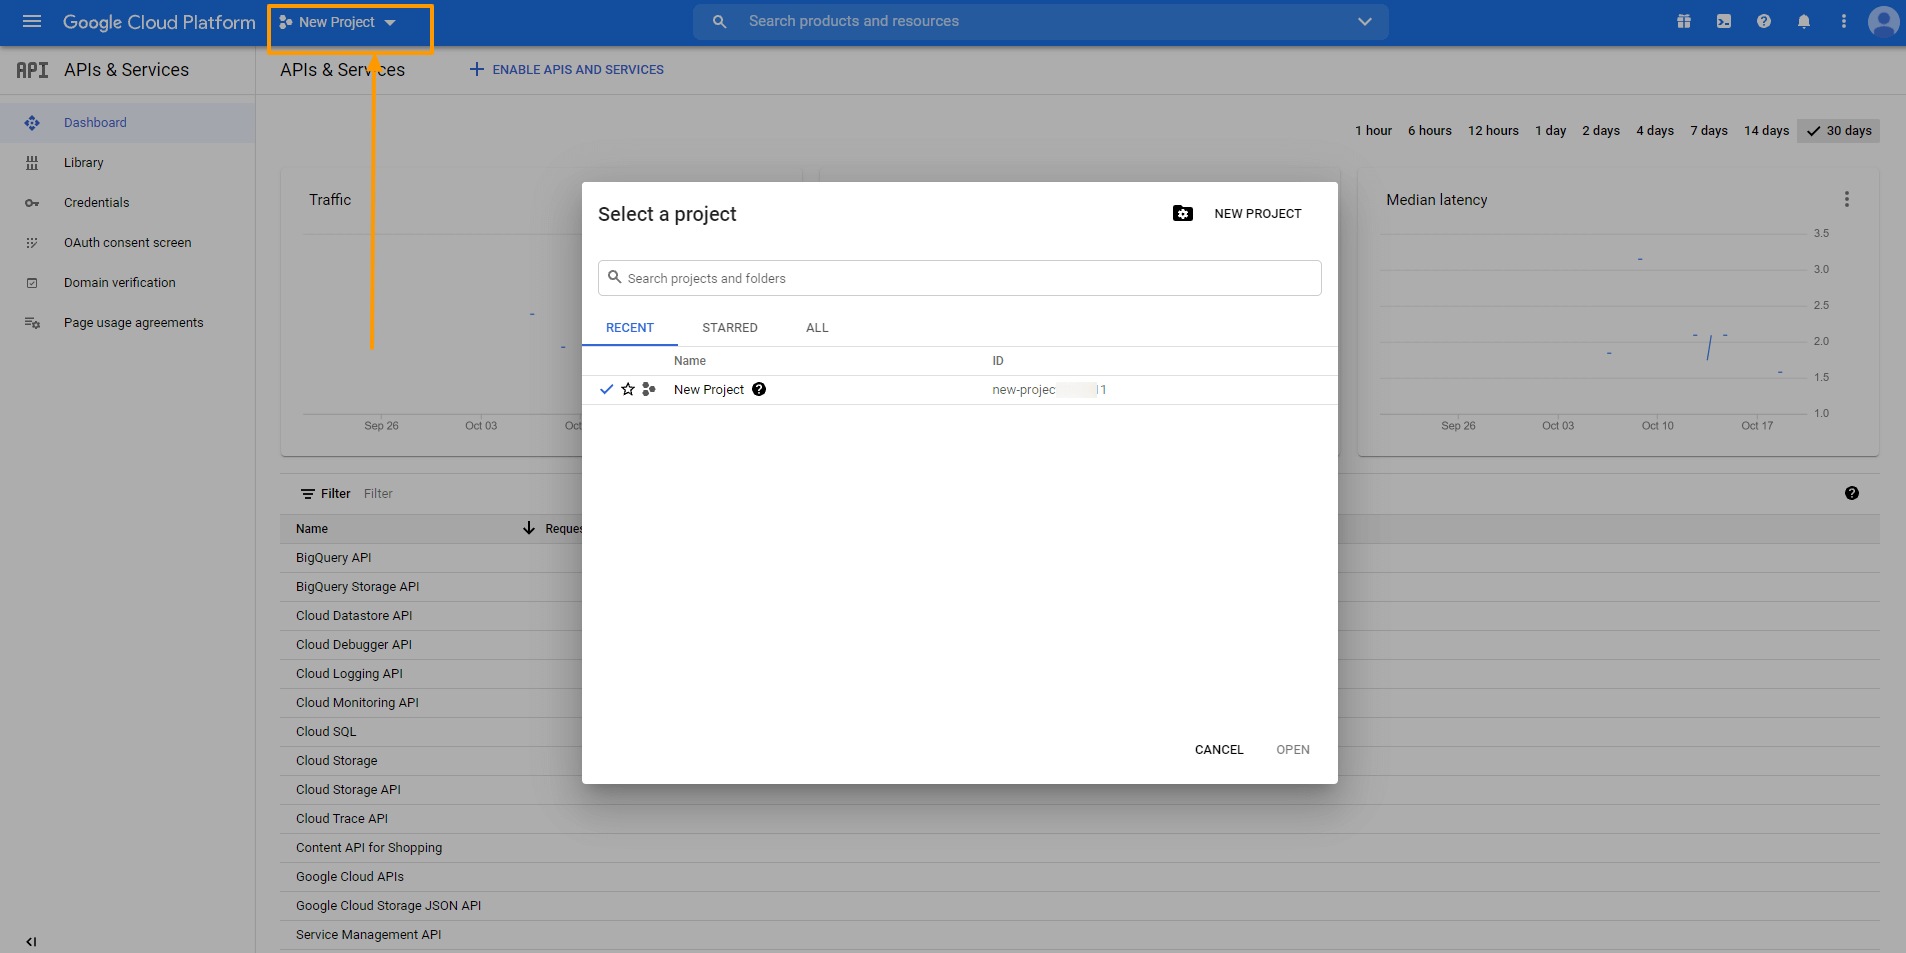
Click on New Project to set up a new project.
Now provide the required information.

Here, you can change the Project Name/ Project ID if you want.
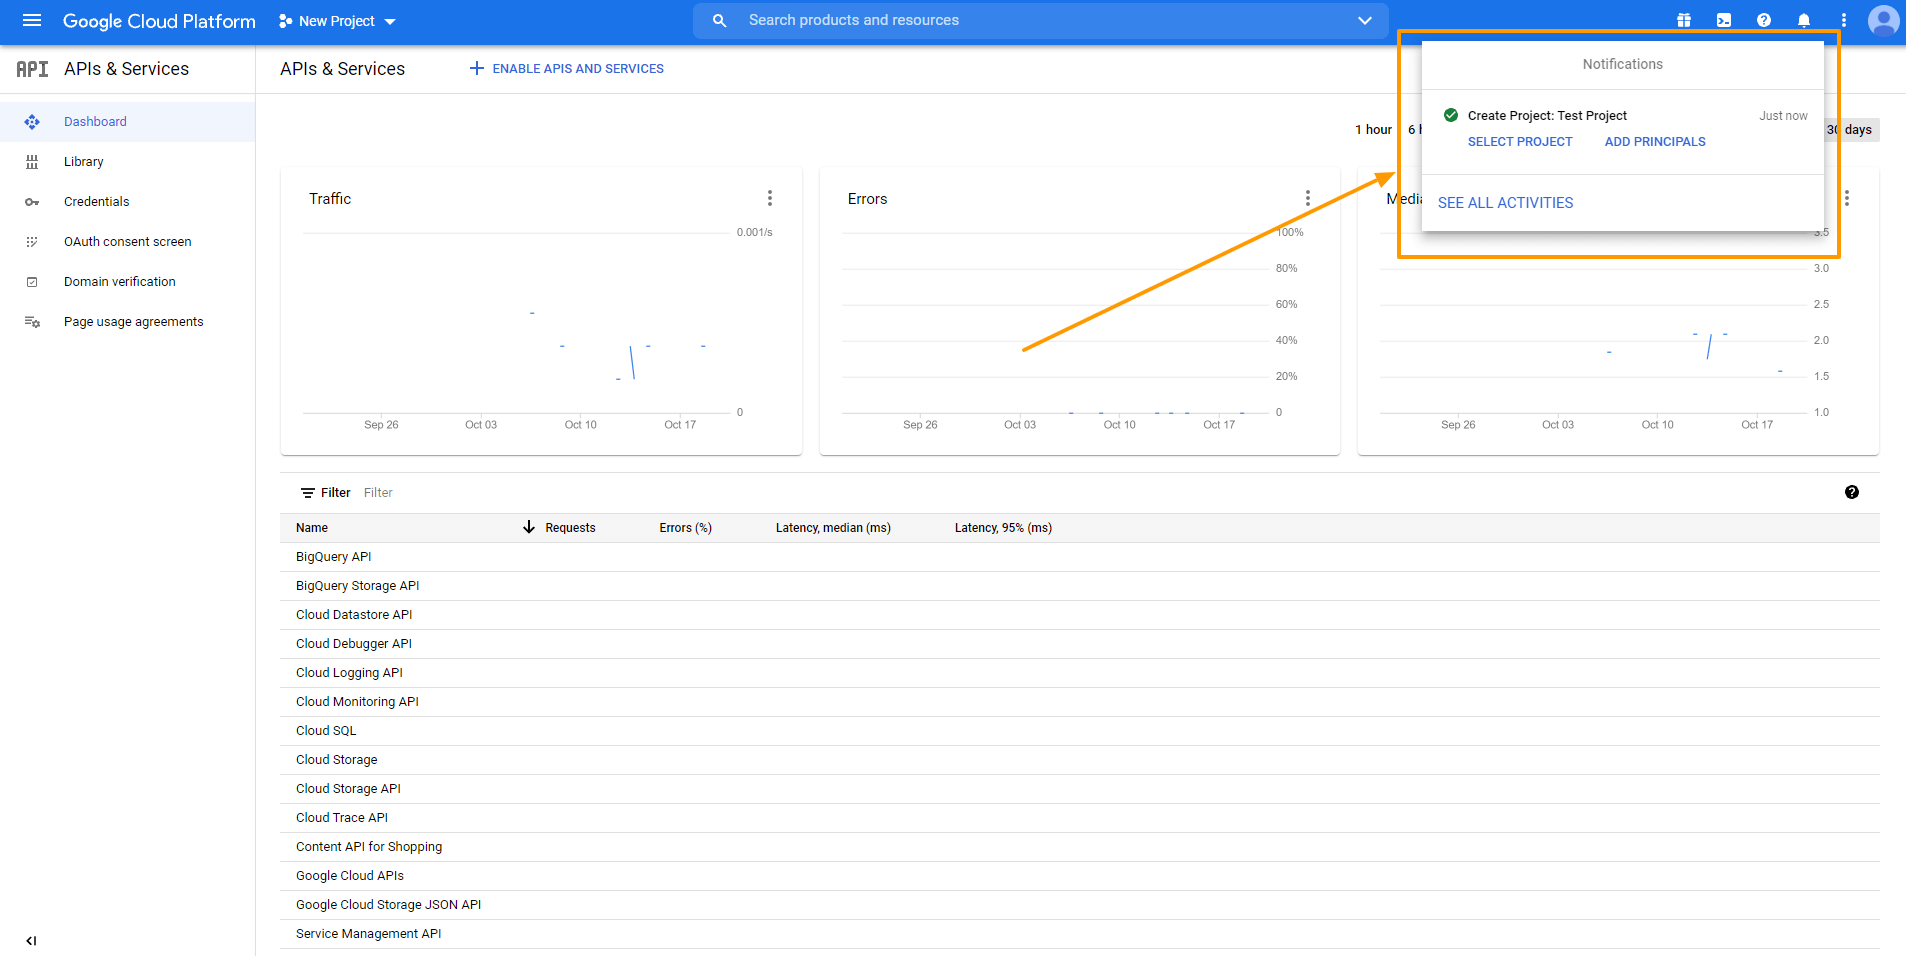
Once the project is ready, you will get a notification on the top right corner. You can select your new project from the New Project option or from the Notification dropdown.
ii. Activeer de Content API voor winkelen
Content API for Shopping is an interface that allows you to interact with the merchant center platform directly. This helps you to increase the efficiency of your shop with proper data management in a more organized way.
To activate it for your current project, Go to the Dashboard. Select ENABLE APIS AND SERVICES.
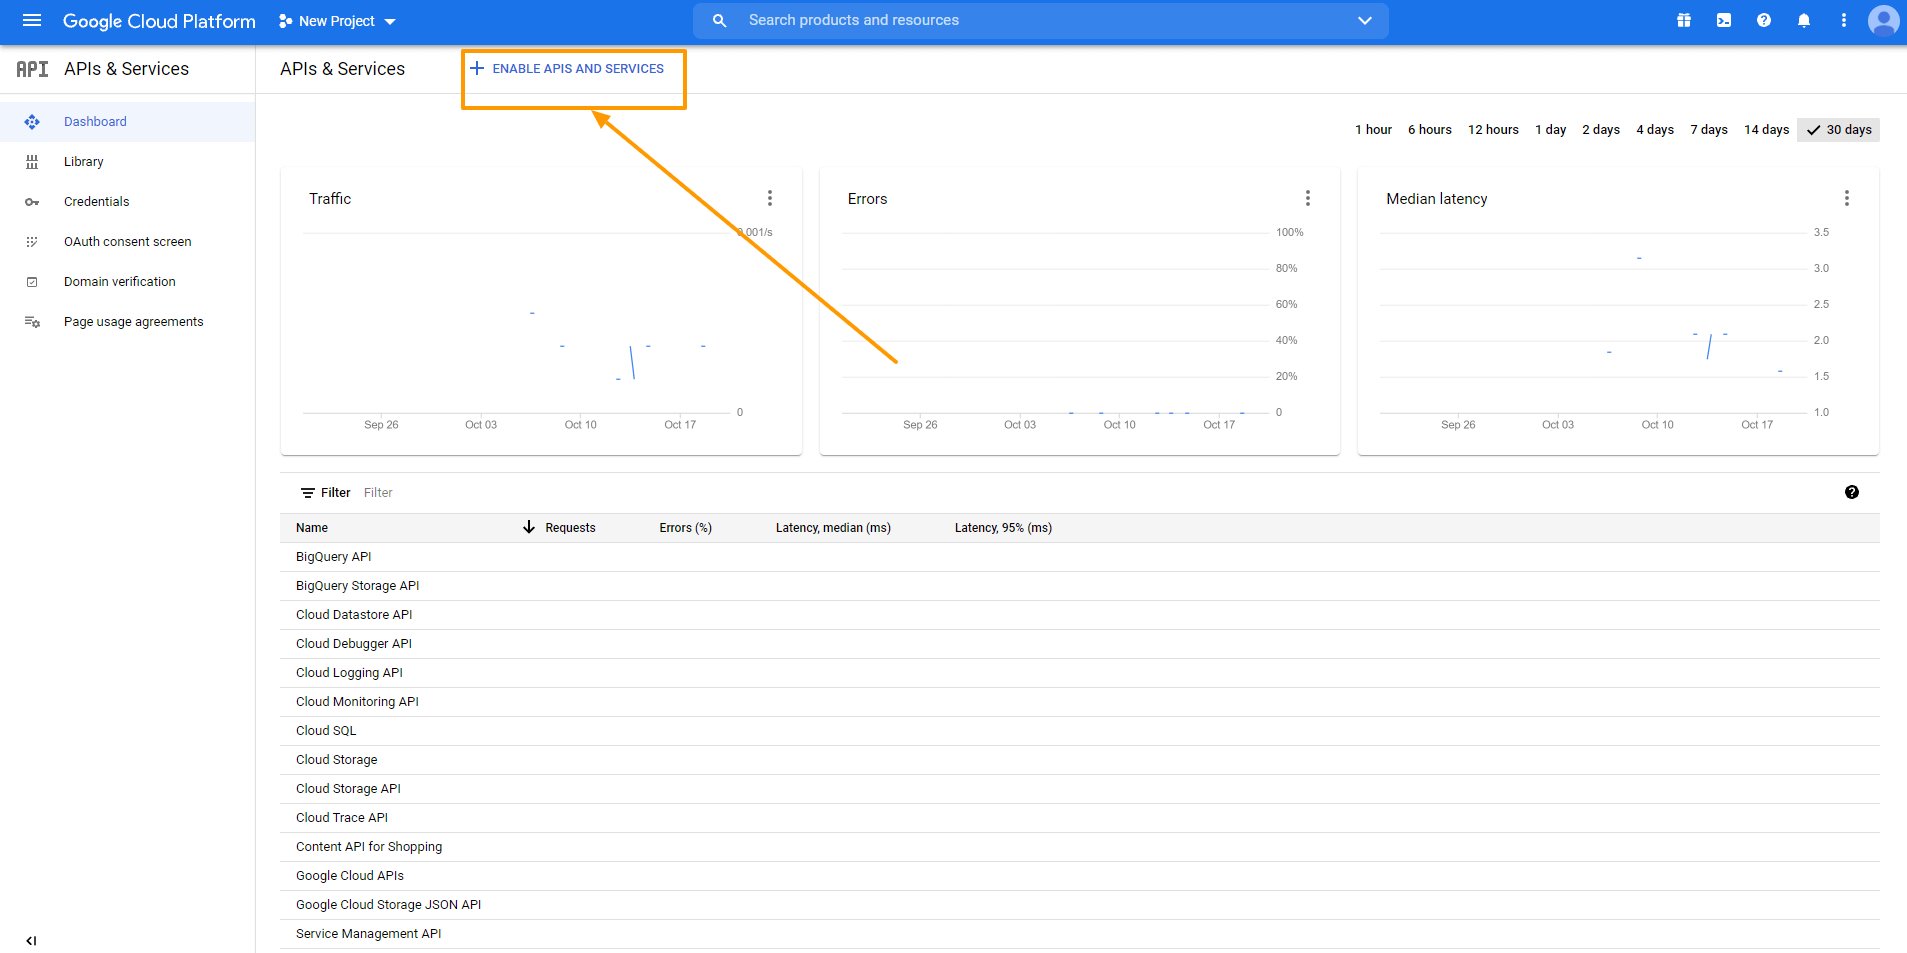
It will take you to the API Library Dashboard.
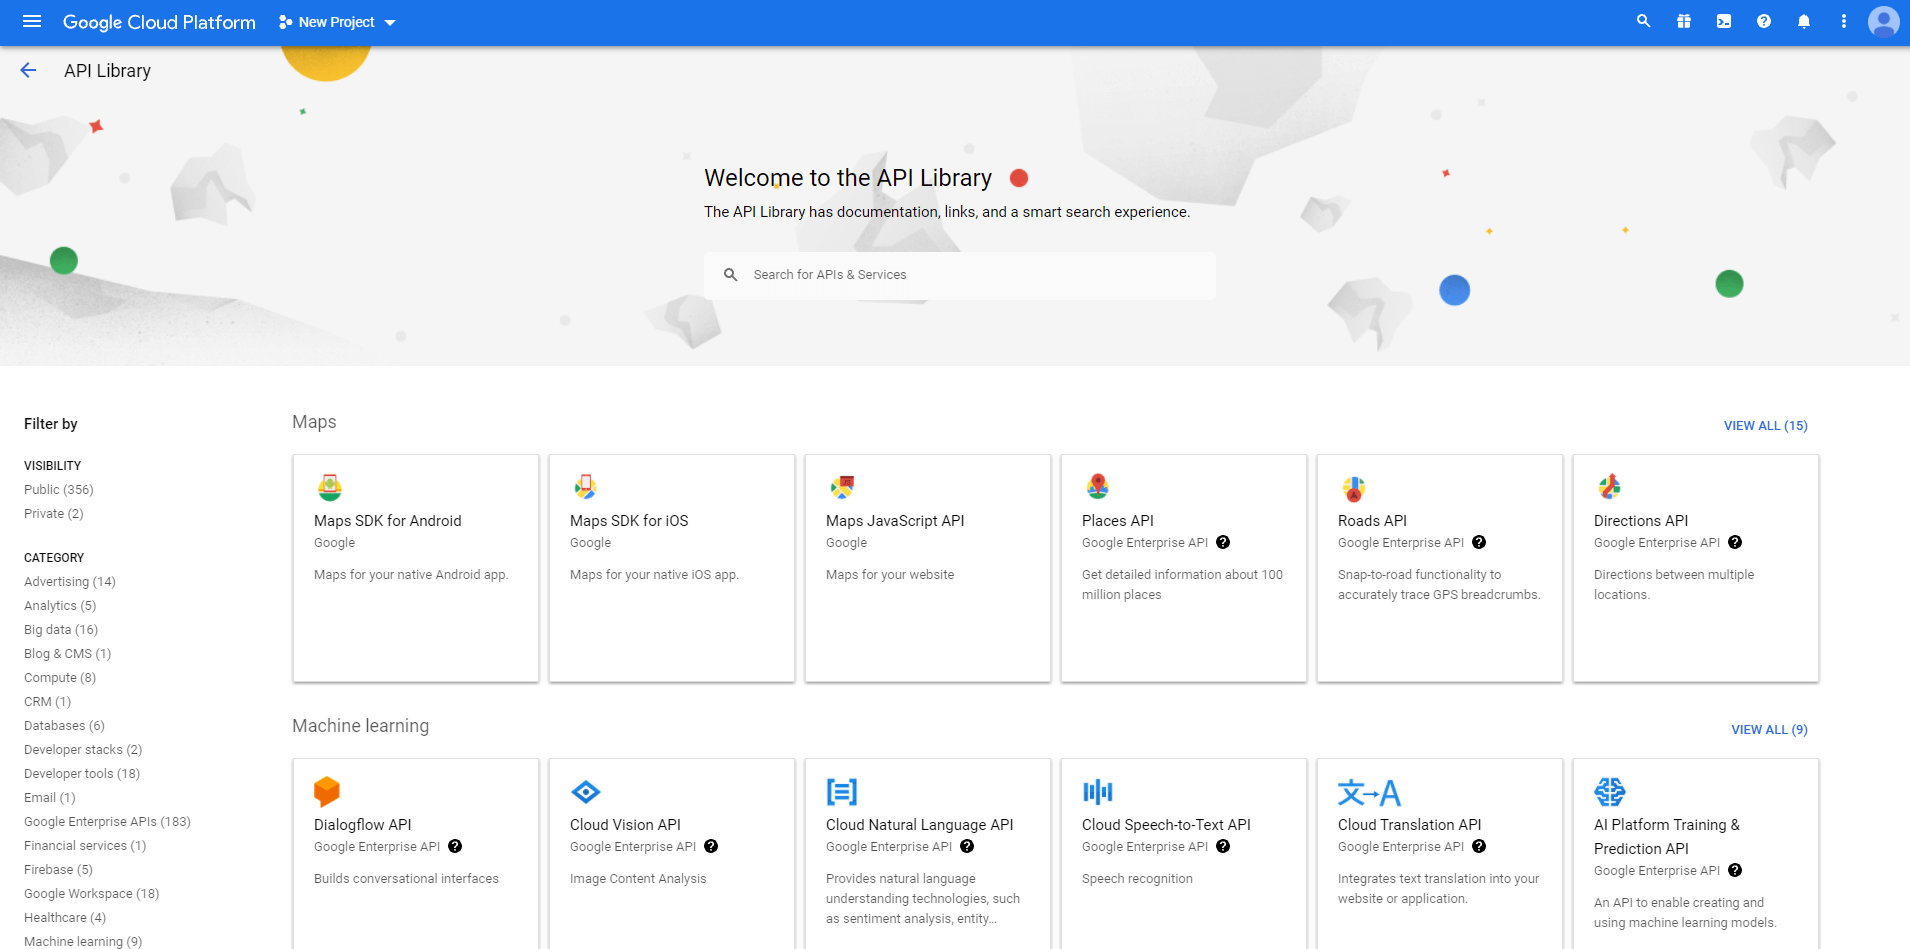
Search for Content API for Google Shopping and select the Content API for Shopping option
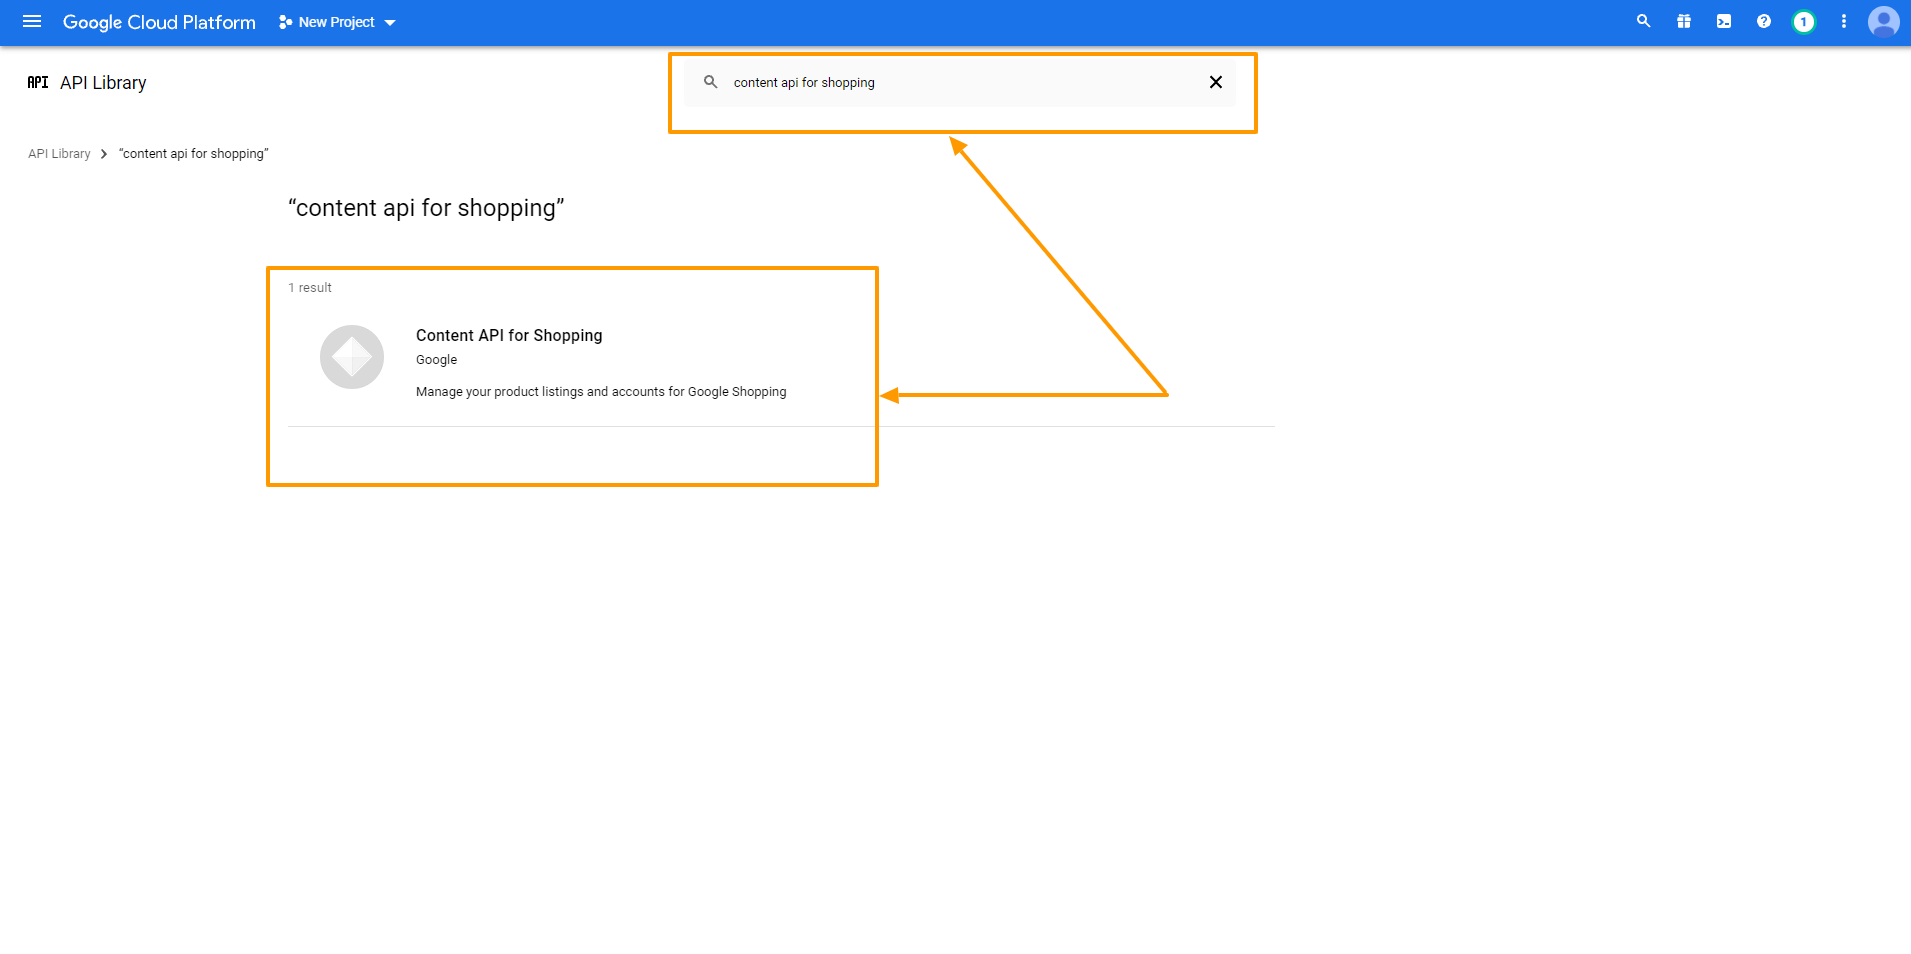
Click on the Enable button to enable the Content API for the Shopping option
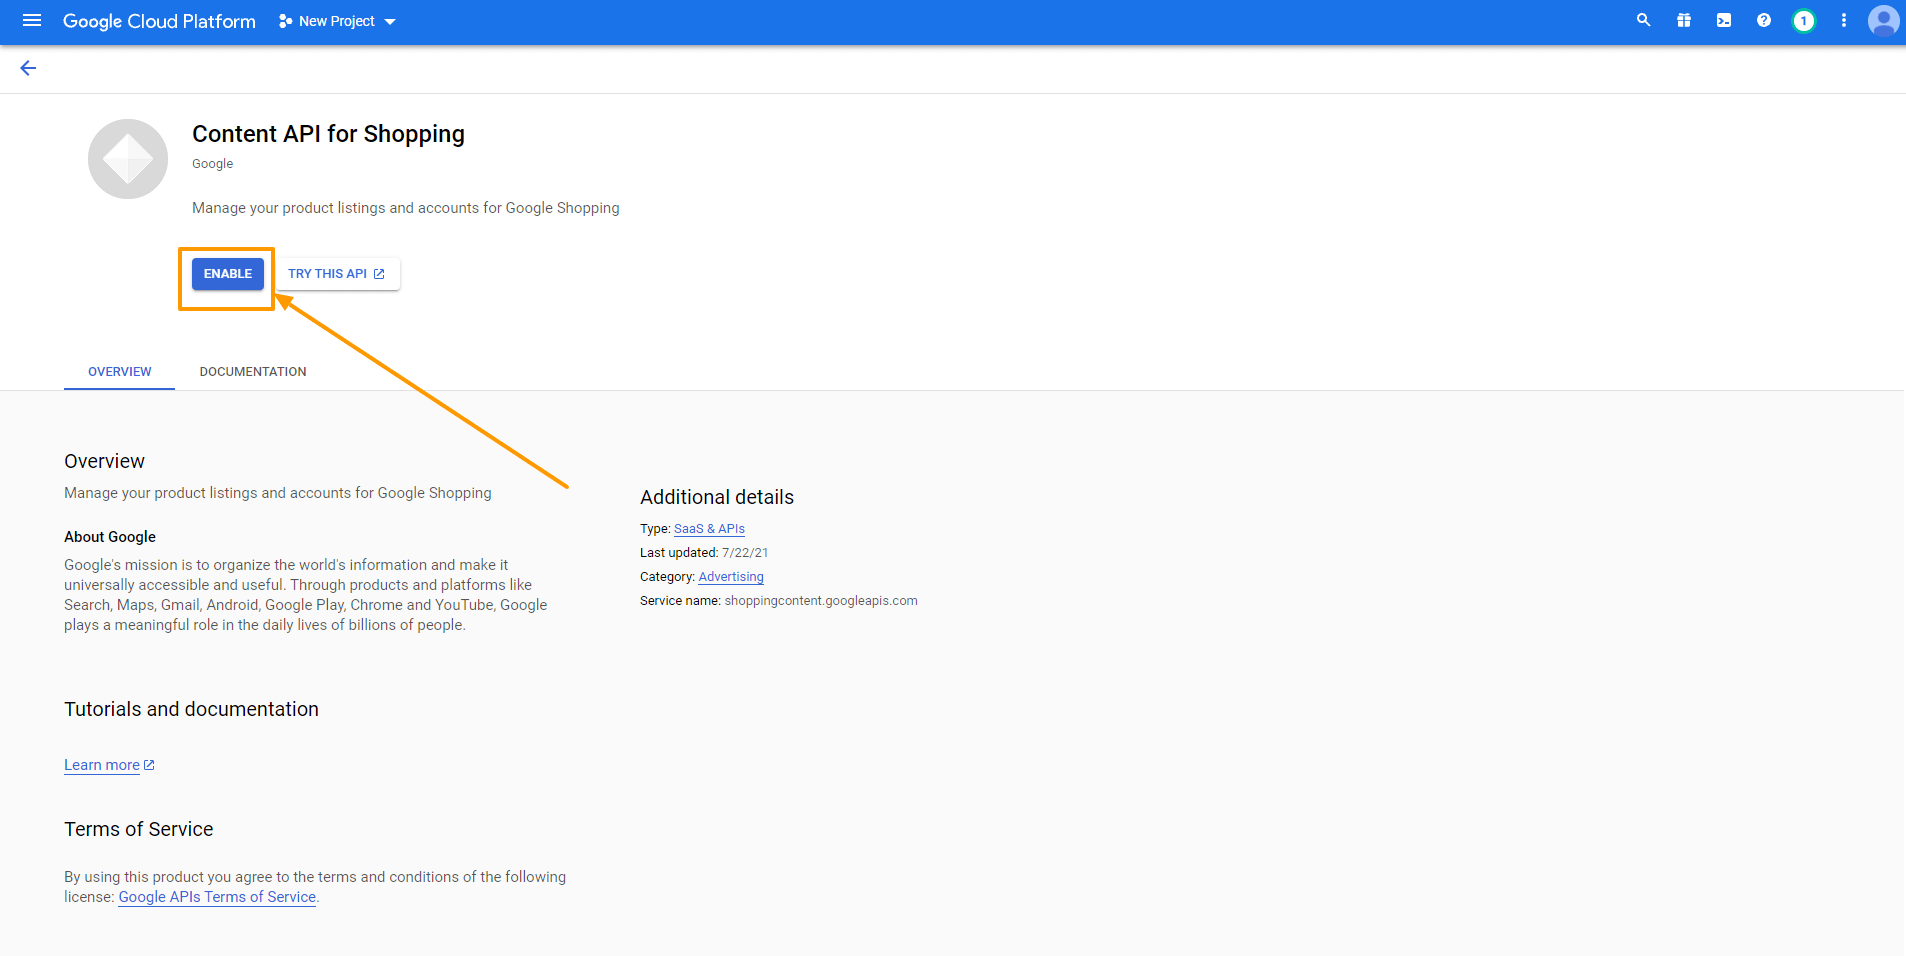
However, you don’t need to enable this Content API for Shopping if you see that it is enabled in the first place.
iii. Geloofsbrieven aanmaken
Dit is het belangrijkste onderdeel waar u uw referenties moet instellen om de API goed te laten werken. Laten we beginnen.
a. Toestemmingsscherm van OAuth
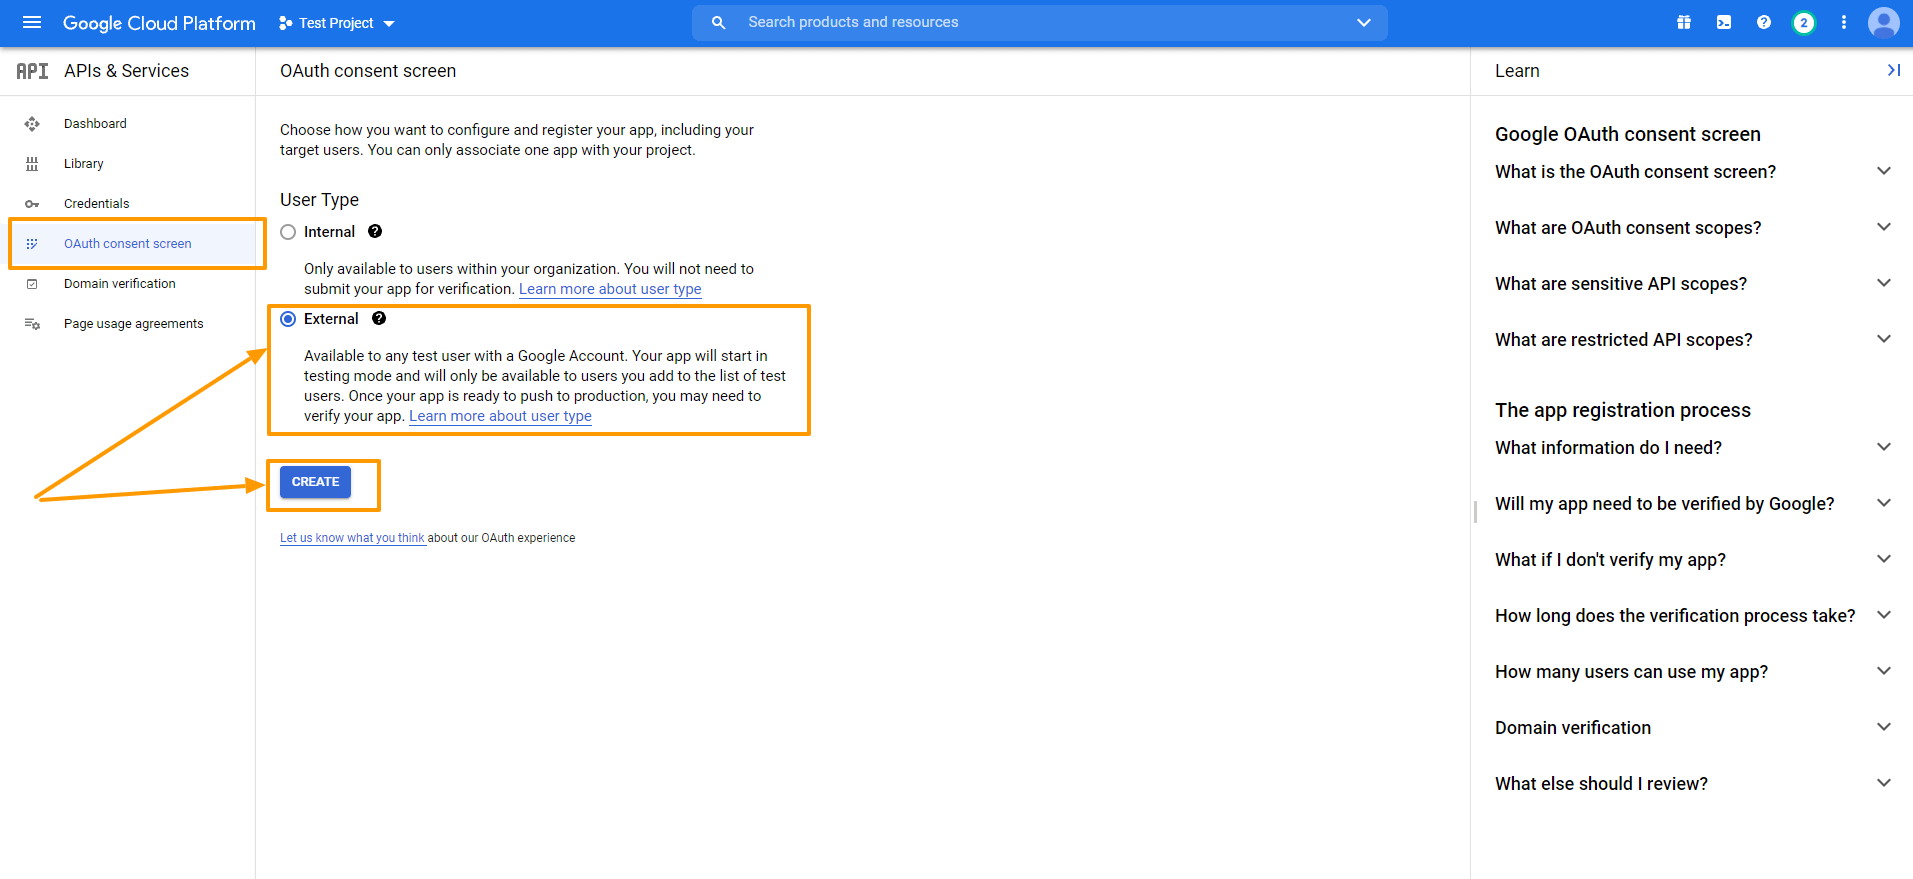
Click on the OAuth Consent Screen option on the left, and It will take you to the OAuth Consent Screen.
Select External as the User Type and click on the Create button.
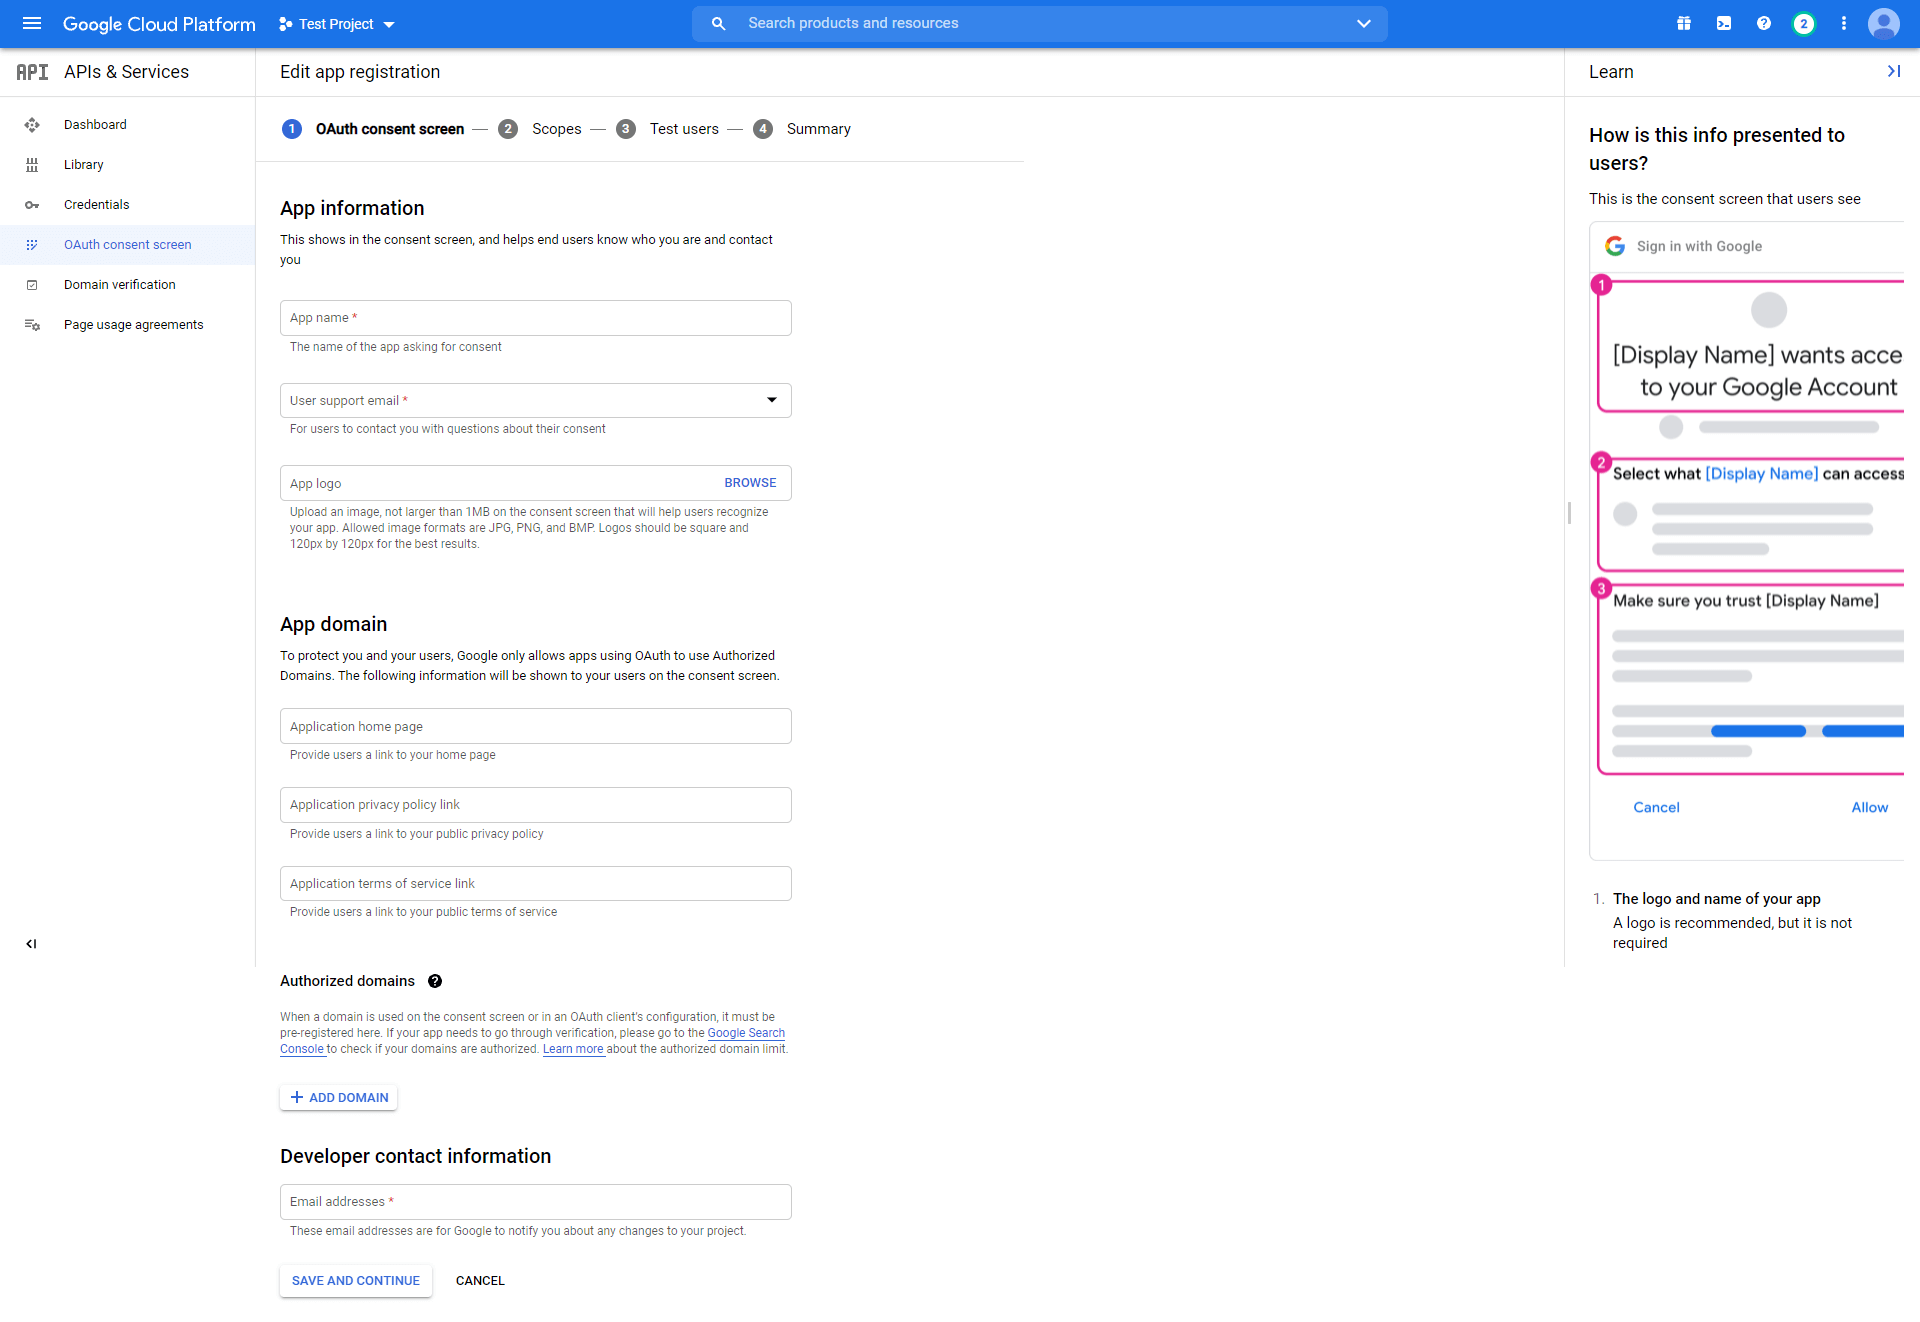
Now fill up the forms and click on the SAVE AND CONTINUE button.
The terms you will face here are
OAuth Toestemmingsscherm
- Toepassing Naam
De naam van de App die u vraagt om toestemming. U moet dit aangeven, anders kunt u niet bij uw stap komen.
- Toepassingslogo
De identieke afbeelding van uw app om specifiek te zijn, een logo van uw app. Klanten zullen uw app herkennen aan de hand van dit beeld.
- Ondersteunende e-mail
Deze e-mail-ID zal uw klanten helpen om u te bereiken als ze gebruikersondersteuning nodig hebben. De google-id die u gebruikt heeft om in te loggen op uw google-console wordt hier standaard geplaatst.
- Geautoriseerd Domein
U moet hier de applicatie-URL invoeren. Anders zal Google uw domein niet als geautoriseerd markeren. Zoals u kunt zien in de afbeelding hieronder, heb ik mijn domein, cloudwaysapps.com, opgegeven.
Uw domein zal er waarschijnlijk al standaard zijn, maar als u ziet dat er geen domein is, moet u hier het geautoriseerde domein van uw winkel opgeven.
- Voorpagina/Privacy-beleid/ TOS-link
Dit zijn de respectievelijke homepage en het privacybeleid/voorwaarden en servicelinks van uw toepassing en deze zullen op uw toestemmingsformulier worden getoond. Maar het moet worden gehost op uw geautoriseerde domein - anders hoeft u het vakje niet in te vullen.
Provide the Application Name and Authorized Domain(s) to start the process. You can add the rest of the options later.
Click on SAVE AND CONTINUE.
Scopes
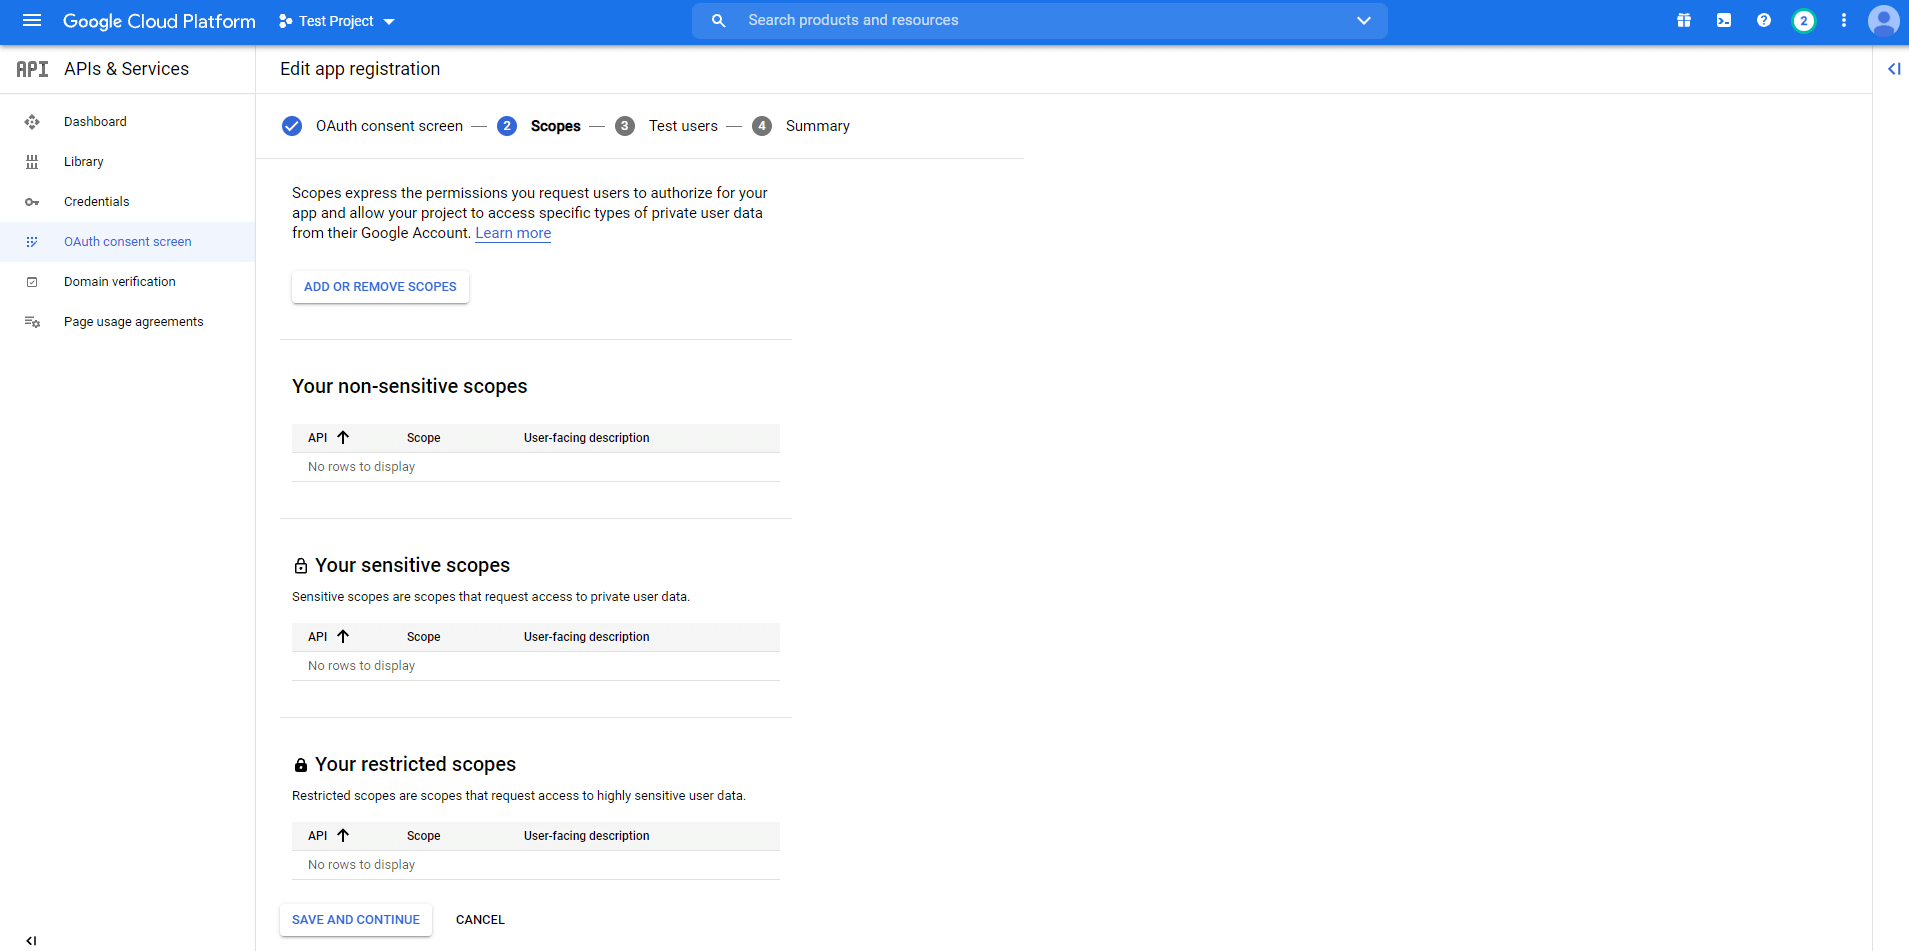
- Toepassingsgebieden voor Google-API's
You are provided with a list of scopes here. You can also add your own. The level of scopes you choose here (such as email/profile/OpenID/custom), your application can access only that part of your user’s data.
Click on SAVE AND CONTINUE.
Test Users
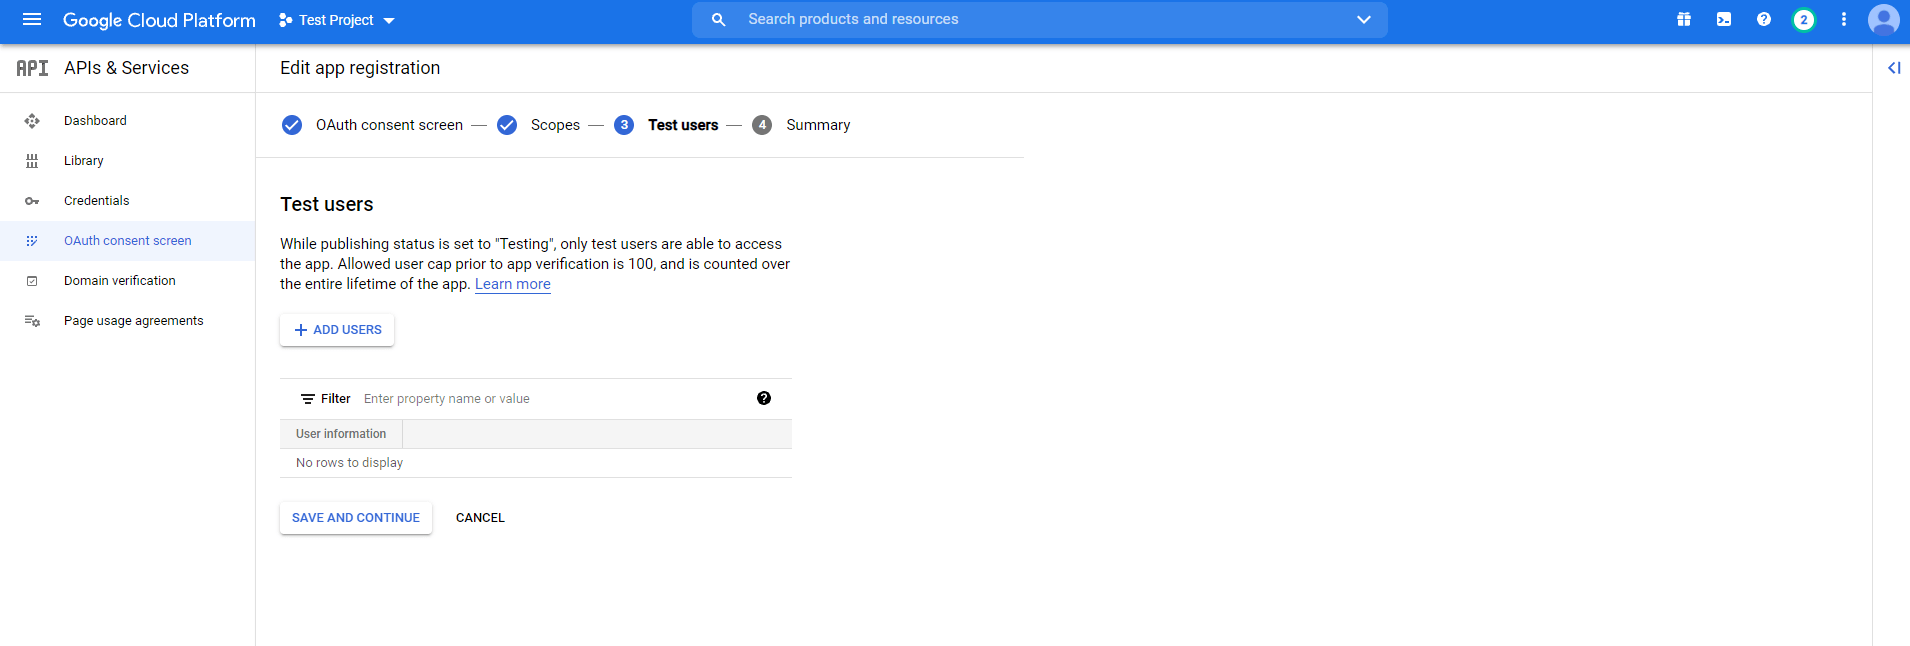
Assign Test Users
While the publishing status is set to “Testing”, only test users are able to access the app. Allowed user cap prior to app verification is 100, and is counted over the entire lifetime of the app.
You can provide access to the test users from here.
Click on SAVE AND CONTINUE.
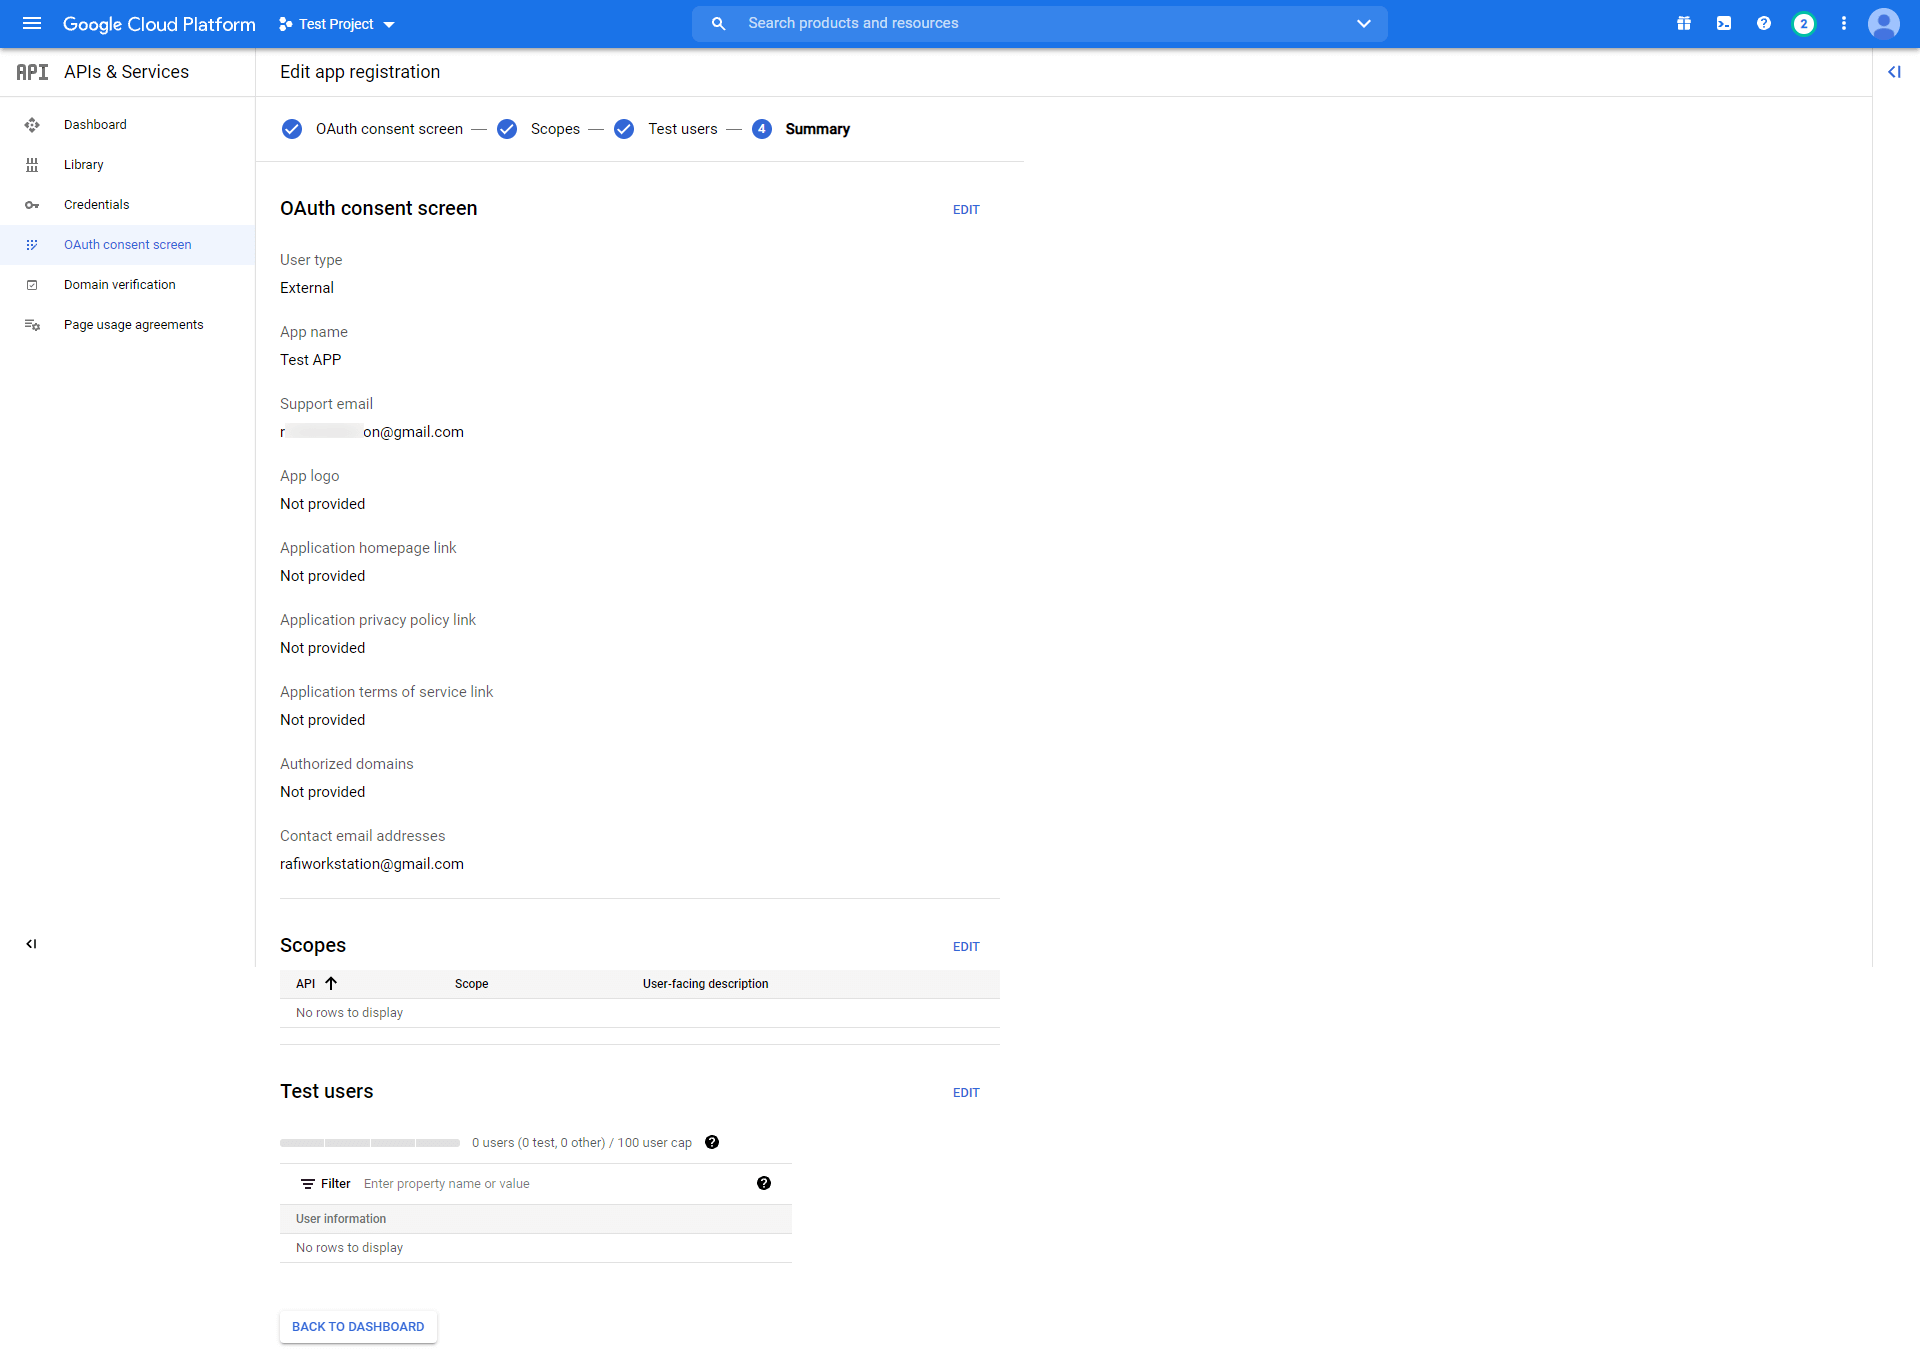
It will show you a summary and your registration is now complete.
b. OAuth Klant ID
Ga terug naar Credentials. Klik op de blauwe knop Creëer referenties en kies OAuth Client ID in het uitklapmenu.

At first, select Web Application as the Application Type.

You will see the following info:
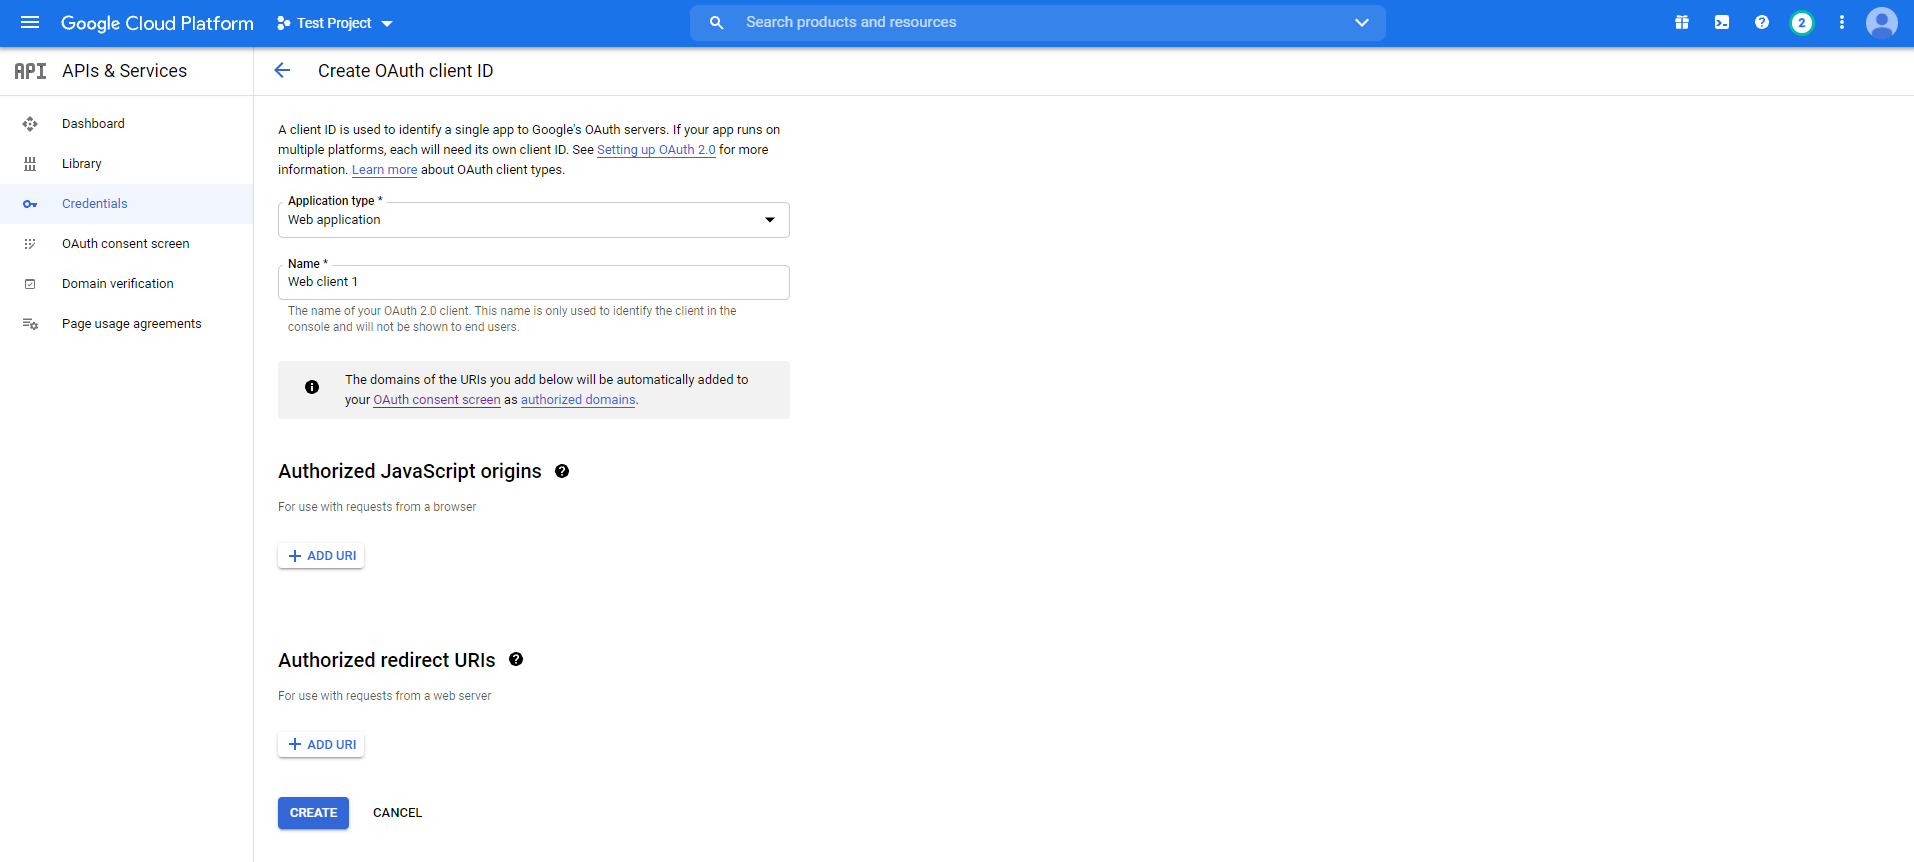
The terms you will face here are
- Naam
U moet hier een naam opgeven om te benaderen. Het is de naam van uw OAuth (Open Authorization) Client ID. Zoals u kunt zien, heb ik de naam ingesteld als Test Guide Web App1.
- Geautoriseerde JavaScript-oorsprong
Het is de oorsprong URI van de klantapplicatie. Het is niet altijd verplicht om te gebruiken. Als u echter een niet-standaard poort gebruikt, moet u deze hier opnemen.
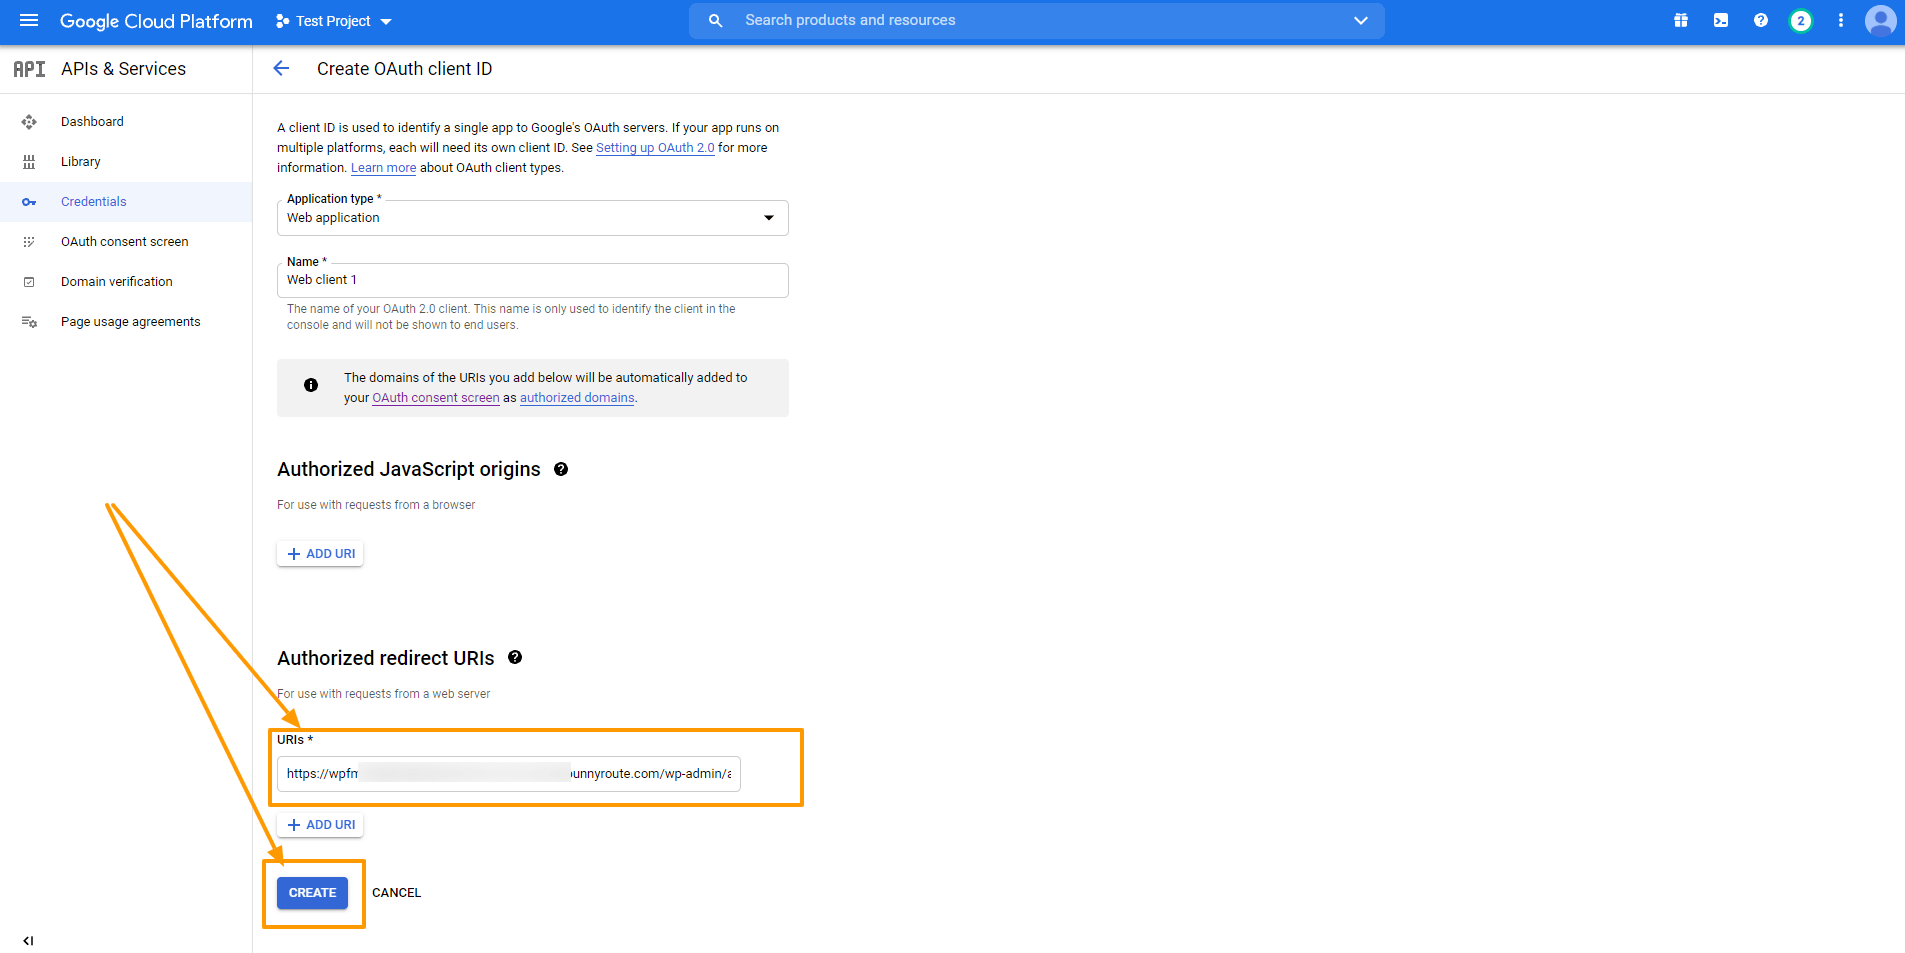
- Geautoriseerde Redirect URI's
Na de authenticatie met Google is dit het pad dat u nodig heeft om uw gebruikers om te leiden naar uw applicatie. Het kan geen openbaar IP-adres zijn en het moet de bijpassende Redirect URL van uw plugin-dashboard zijn.
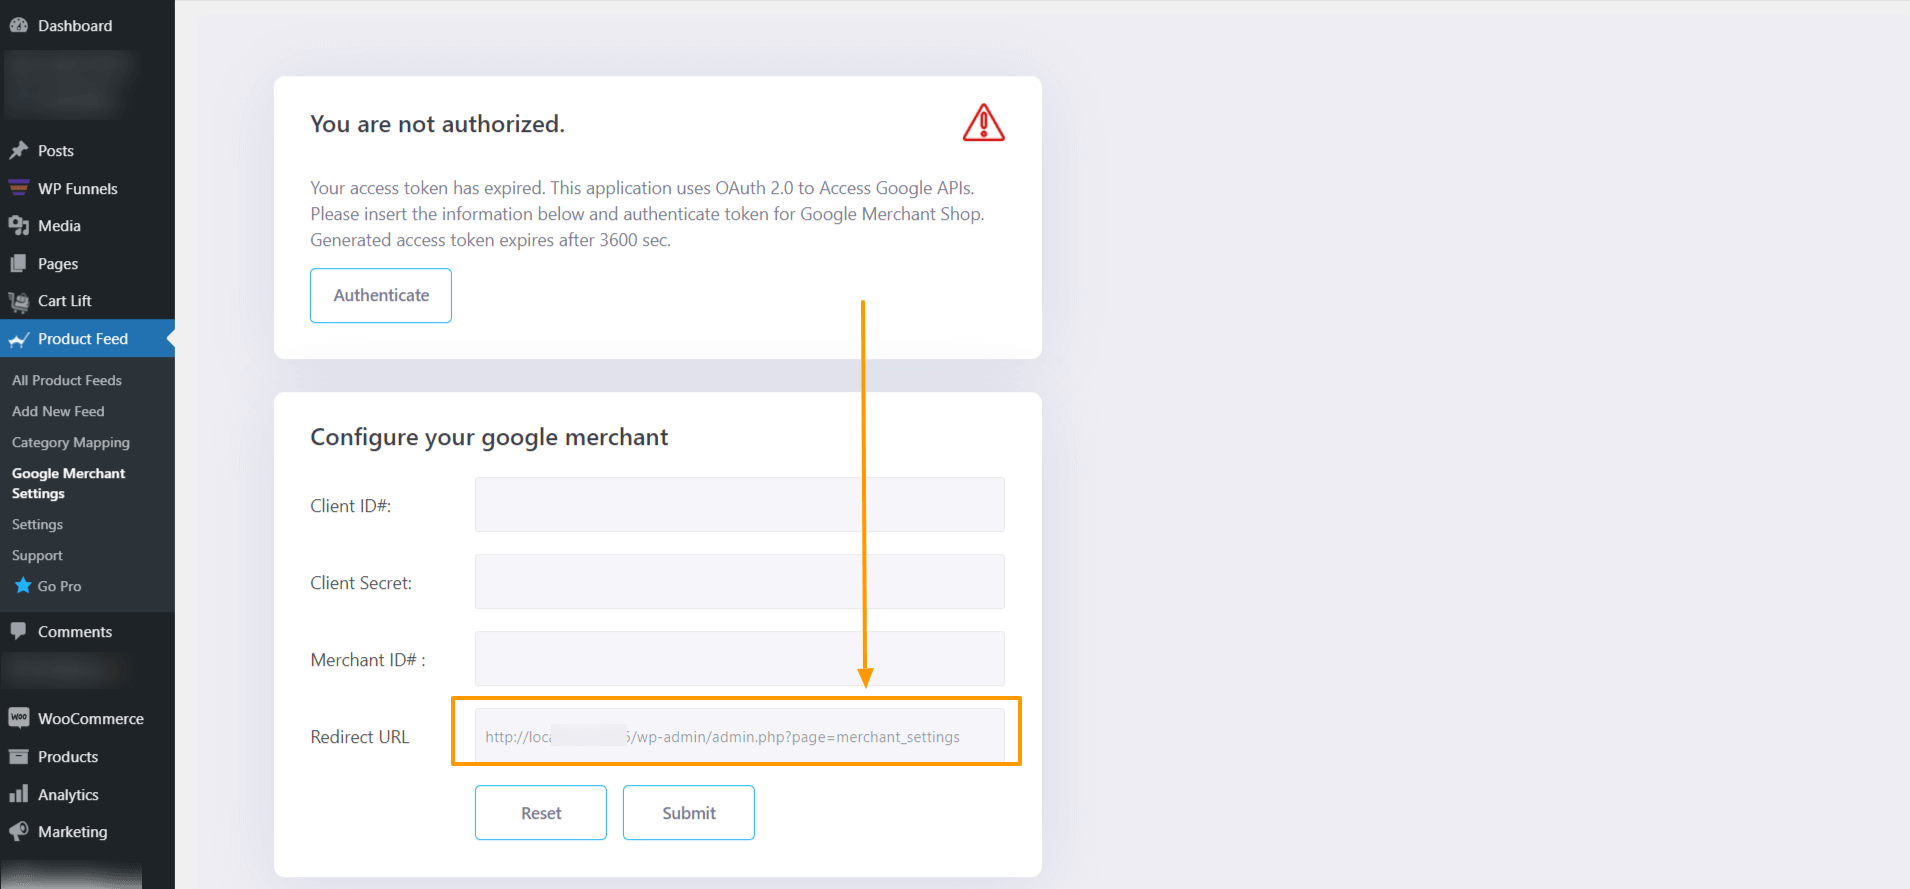
You will get the Redirect URL from your Product Feed Manager For WooCommerce dashboard. Go to Product Feed> Google Merchant Settings and you can see the redirect URL marked in the picture below.
Kopieer het adres en plak het onder Authorized redirect URI's en klik op Create.
You will see that under Credentials, you have an OAuth 2.0 Client ID created, and you will get the OAuth Client ID credentials.
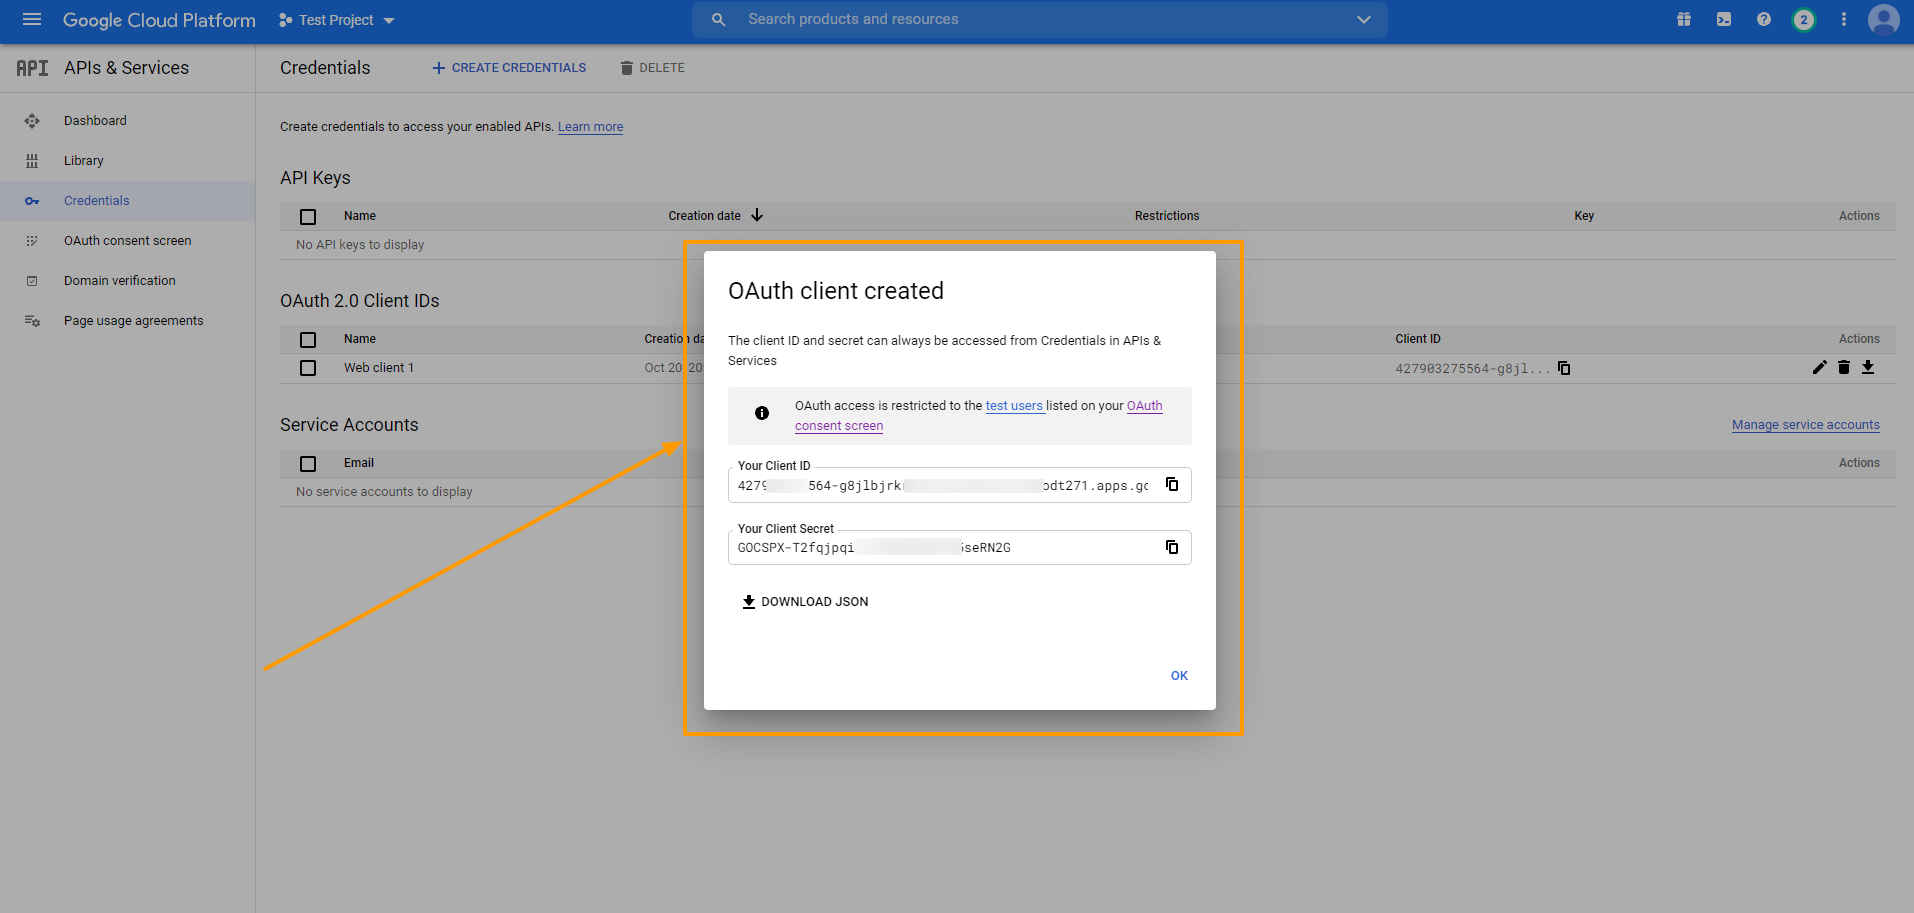
Copy the Client ID and Secret and you can also download the credentials in JSON format for later use by clicking on the DOWNLOAD JSON button.
Close the box and you will see that a new OAuth 2.0 Client ID is added.

You can click on the ID to view and edit information.
Stap 2 - Verkrijg uw Google Merchant ID
To get started with Google Merchants, follow this link. You will be taken to your merchant dashboard. From here you can monitor your feeds, product list, and some more options.
So when you send your WooCommerce Products to Google, they will be listed here.
Het vinden van uw merchant ID vanaf hier is eenvoudig. Het is gegeven net naast onze Profiel afbeelding zoals in de afbeelding hieronder:

Kopieer de Merchant ID en sla het op.
Step 3 – Sync Product Feed Manager For WooCommerce With Google Merchant Shop
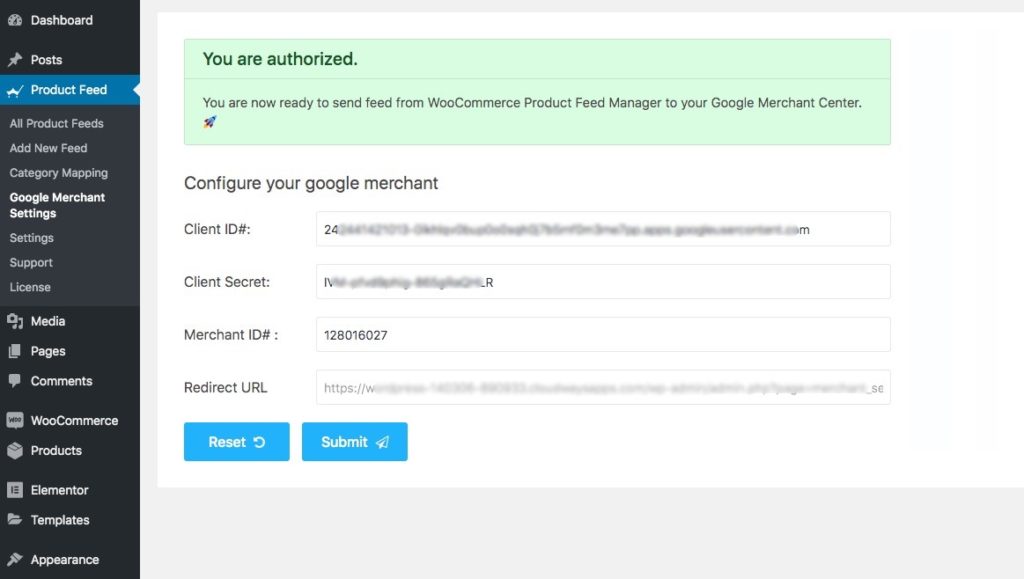
Finally, when you have your Client ID, Client Secret, and Merchant ID, Go to Your Dashboard> Product Feed> Google Merchant Settings.
Zet alle informatie op de juiste manier in zoals hieronder aangegeven:

Als je alles op zijn plaats hebt, klik je op Verzenden. Klik na het indienen op Authenticeren.
It will redirect you to the permission page of Google. Allow your Google account to approve access to your authorized domain. Then you will get a message that ‘You are authorized’.
En je bent helemaal klaar! Nu is het tijd om de auto-synchronisatie functie te gebruiken om uw WooCommerce Producten naar Google Merchant Shop te sturen.
Stap 4 - Plannen van de Auto-Sync
Now that the setup is complete, you can go to your product feed, and on the right side of the page, you will see that there is the new feature, Send to Google Merchant.
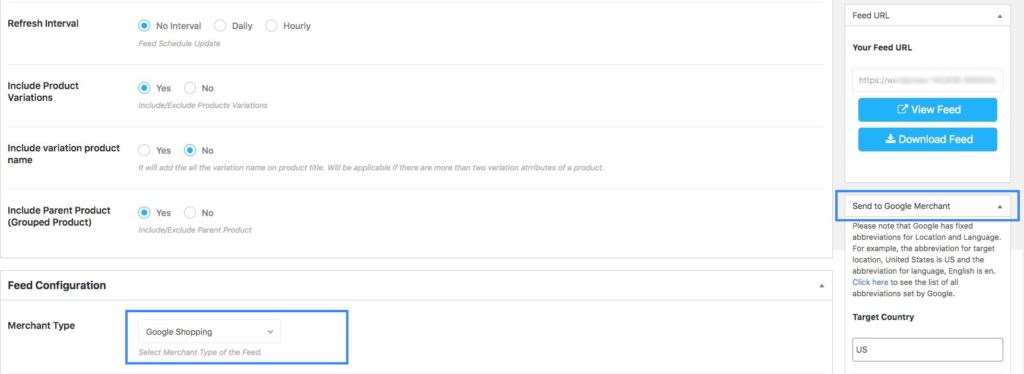
Onder deze rubriek vindt u de opties:
- Doelland
- Doeltaal
- Plan
- Selecteer Uur
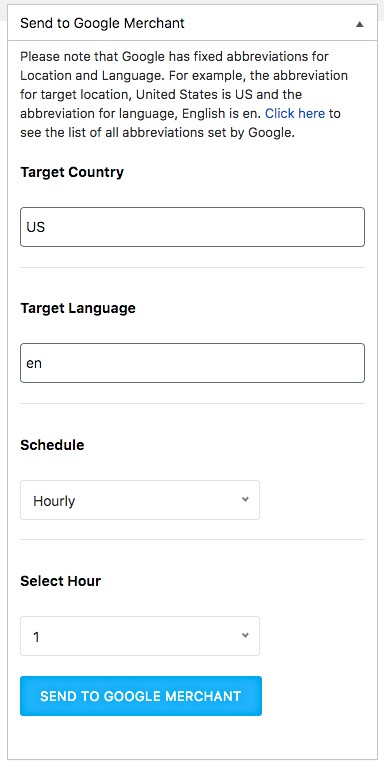
Kies eerst het doelland en de taal.
FYI:
You have to input a short form, and it has to match Google’s format. At first, you can see a small paragraph with a ‘Click here’ link. Go there and check the short forms of your desired target country and language to be accurate.
Vervolgens kunt u uw agenda naar eigen inzicht instellen.
Choose between Weekly, Monthly, or Hourly basis.
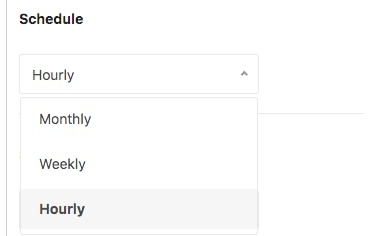
Als je kiest voor Hourly:
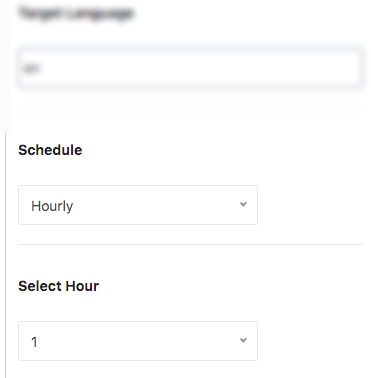
Then select the number of hours after which the schedule will be triggered.
Als je kiest voor Weekly:
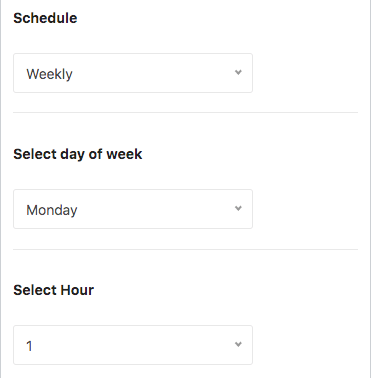
Then choose a day of the week and the hour of that day when this schedule will be triggered.
Als je kiest voor Maandelijks:

Kies vervolgens de datum van een maand en het uur van die dag waarop dit schema in werking treedt.
U kunt naar uw Google Merchant Center > Feed gaan en de verzonden feed controleren.
Since the schedule is set, this feed will be updated automatically according to the schedule, regularly.
Nu zijn uw feeds goed gesynchroniseerd met Google Merchant Center en hoeft u niet elke keer dat u uw productfeeds bijwerkt toegang te hebben tot uw accounts. U hoeft dus geen WooCommerce-producten meer handmatig te uploaden naar Google.
U hoeft alleen maar wijzigingen aan te brengen in uw feed, en uw Google Merchant Shop krijgt de update automatisch.
Conclusie
Product Feed Manager For WooCommerce has been under constant improvement to help you promote your products easily.
If you find any Google feed errors, our support team is always there to give you instant support when you need it.
Update your Product Feed Manager For WooCommerce on a regular basis and benefit from all the new features we add on a regular basis.
We hopen dat dit artikel nuttig voor u was en we wensen u een heerlijke reis met uw WooCommerce Store door uw WooCommerce Producten automatisch te synchroniseren met Google.
Sell Jewelry on Top Marketplaces with Ease
Get your jewelry listed on Amazon, Etsy, eBay, and 180+ platforms in just a few clicks using Product Feed Manager.


Mooi bericht.
is there a free way.
I have more than 500 products but I see only 200 products on google merchandise center !
do you know what happened to my products?
How can i fix it?
Hi, the plugin Product Feed Manager for WooCommerce allows up to 200 products per feed in the free version. For more, you may have to upgrade to Pro.
I would suggest you give the Pro plugin a try. It has a reasonable price, and you may use it for more online marketplaces than just Google Shopping. Thanks.