If you want to run a successful eCommerce business, WooCommerce is the best option you can consider.
WooCommerce comes with some amazing plugins and extensions that make it easy for you to manage products, orders, payments, and everything needed to run an eCommerce business.
Once you do the basic configuration, the next crucial step is to add your products to WooCommerce.
Today, you’ll get a complete guide on how to add products to WooCommerce to start selling effectively.
How To Add Products In WooCommerce – Step-by-step
WooCommerce has different configurations for different product types. So, you need to know each configuration type for adding them to your store.
Understanding The Default WooCommerce Product Types
WooCommerce has 4 default product types. They are simple, variable, grouped & external/affiliate product.
Before showing you how to add them, let’s quickly go through each of them.
Simple Products
Simple products are basically stand-alone products that you can directly sell in your WooCommerce store. These types of products are unique and have only one version.
For example, a pen can be a simple product if it doesn’t have any variation. Users can view it on the site and when clicking it, it will forward them to the cart page directly.
How To Add A Simple Product In WooCommerce
For adding a simple product, follow the navigation –
WooCommerce> Products> Add new
It will take you to the product adding page.
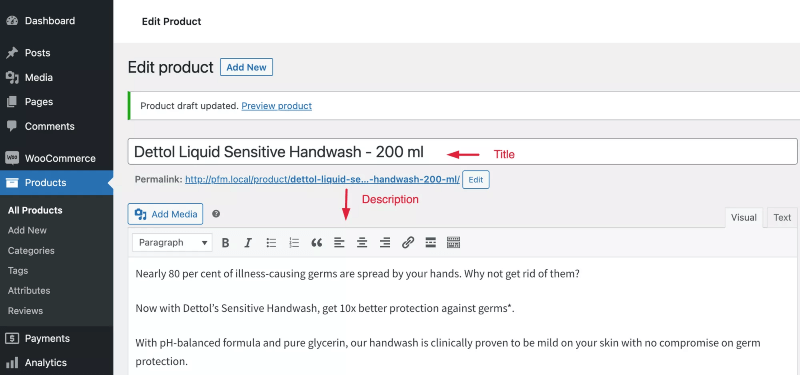
Step -1: Add product title and description
At first, you need to add your product name. The more engaging title you put, the more it is likely to be clicked by a potential searcher.
For the description, add a detailed overview of what your product is. It should highlight the key features of your product. Users should get the idea right.
Step 2: Configure Product Data
Below you will see separate sections for updating your product information.
- General
In this option, you set the price of your product. There can be two prices Regular & Sale. While setting the sale price, you can schedule the dates of the discount.

- Inventory
This is the option where you manage your product inventory settings.
- SKU: SKU is the stock-keeping unit. You can track and manage your inventory levels with the SKU.
- Manage stock? Here you can decide on the stock levels.
If you choose to manage stock, you’ll get the following options.
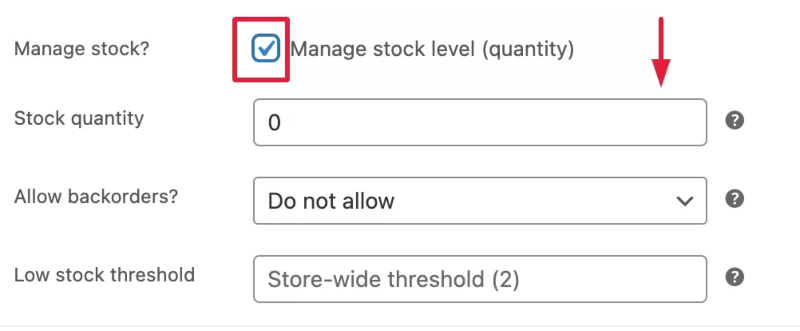
Here you can –
- provide the stock quantity.
- choose if you are going to allow backorder or not.
- set the low stock threshold. This means at which point do you want to receive notification that you’re running low on this product.
- limit purchase to one item per order. This depends on you. You might have some rich customers who will want to purchase on a larger level. So, it’s better to leave the box unchecked.
Let’s move on to the next option which is Shipping.
- Shipping
Here, you’ll add the weight and dimensions of the product. If you have some shipping classes and want to assign a specific shipping class to the product, you’ll select it from the drop-down.

In the next sections, you’ll see Linked Products and Attributes, I’m gonna explain them in the next section.
- Advanced
In the advanced option, you can
- enable reviews.
- add a purchase note; for example, you want to give your users a special thank you note.
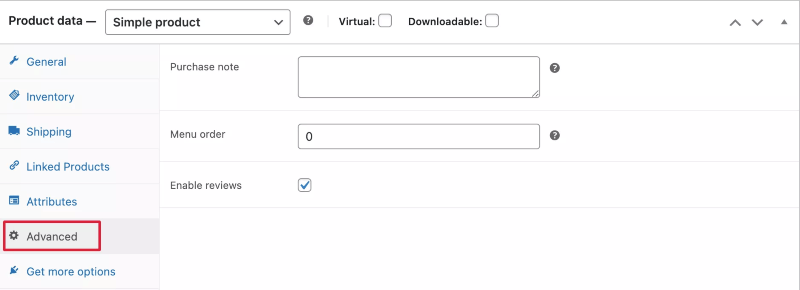
And, the last tab is – get more options. This is required if you want additional options. As you’re just adding products, you should focus on the previous sections. We’re skipping this option for now.
Step -3: Add Category, Image, Tags
On the right, you’ll find some more options.
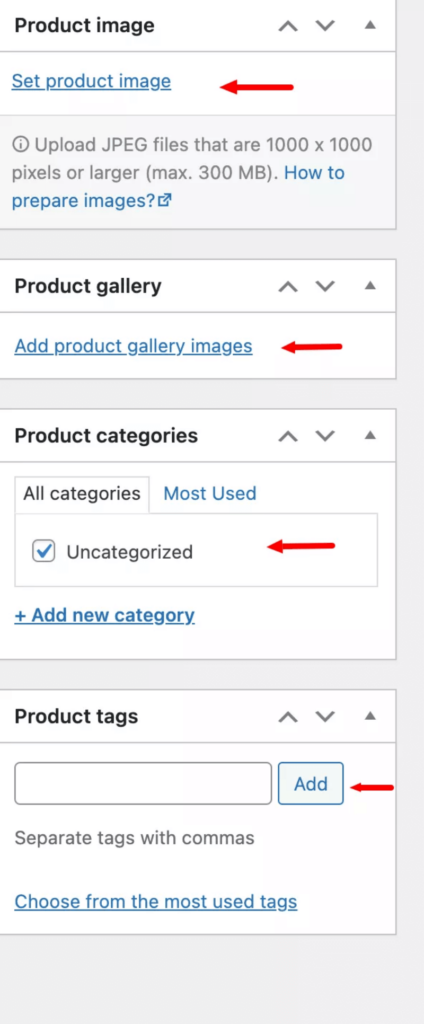
- Add category – you can assign your product to a particular category or sub-categories.
- Product tags – here you can add certain tags to your products.
- Add product image – You must include an image of your product. It should be appealing enough so that customers will click on it.
- Product Gallery images – Sometimes, only one picture is not convincing enough to attract customers. You can add those additional images from product gallery. And, try to provide every angle images to create a better impact on your potential buyers.
Step -4: Add Product Short Description
You can also add a short description of your products if you want.

Variable Products
Variable products are products with different variations that you can’t sell directly. Visitors need to see the variations before clicking on the purchase button.
Let’s say, you want to buy a T-Shirt. You can’t randomly select a T-shirt to purchase. You can have your size, color, design, material, etc preferences. So, there can be variations based on the attributes I just mentioned.
You need to add those variations to your WooCommerce store. A user will select a specific variation to purchase.
How To Add Variable Products In WooCommerce
To add a variable product, firstly you’ll add the title and description like before.
Then in the product data, select the variable product. Once you select it, you’ll see a new section will be added called Variations.
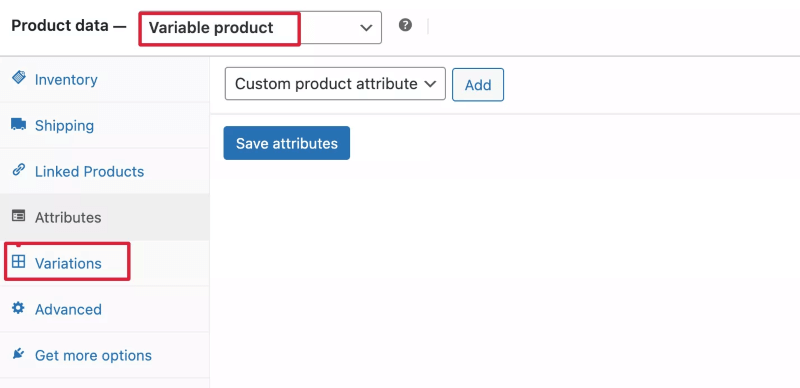
Now, a variable product will have different variations based on the attributes.
You’ll have to create the attribute first and then add those variations.
For example, your product has different colors.
Firstly, you’ll add the color attribute.
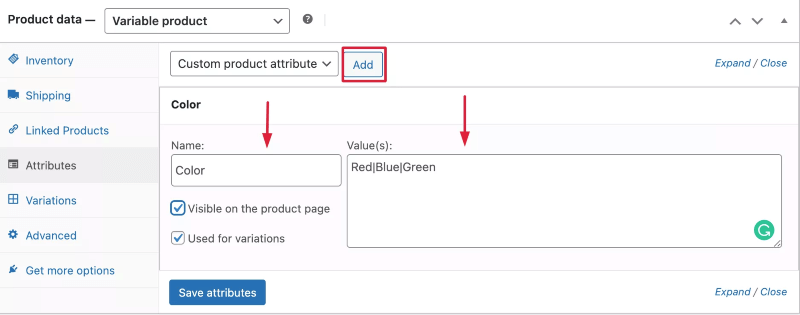
- Give a name
- Add the value.
- Enable the visibility option on the product page.
- Enable the variations.
Once you do that, click on the save attributes.
Now, go to the variations and add them.
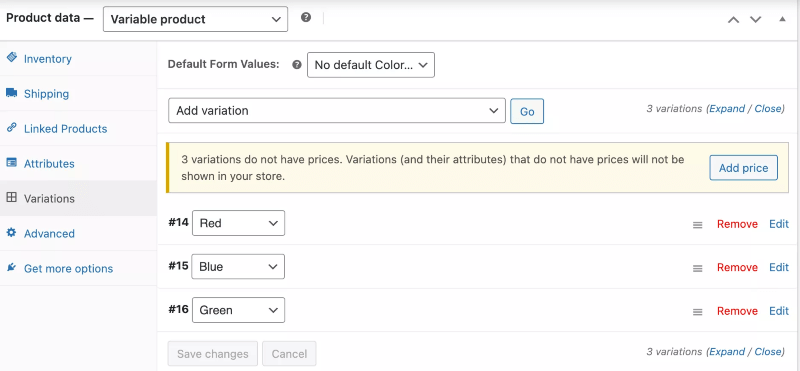
When a user clicks on the variable product, he will be able to view the variations. And send to the cart his preferable variation for purchasing.
Click to find out a detailed guide.
Understanding Virtual & Downloadable Products
When you add a simple product, you’ll see two options – Virtual & Downloadable.
A virtual product on WooCommerce is a product that does not require any shipping like a downloadable file or service you’re providing.
If a virtual product is also a downloadable product like a file a customer can access those files from My Account > Downloads when logged into your WordPress installation.
So, if you’re product is virtual and downloadable you’ll enable the options.
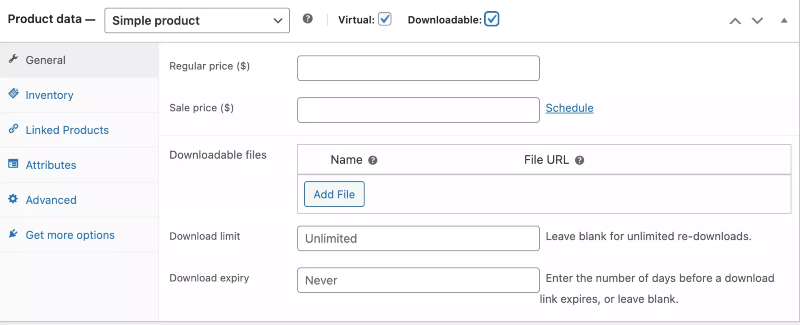
Now, for the downloadable products, you’ll need to add additional information like downloadable files, limit and expiry.
Grouped Products
From the name you can guess that grouped products are composed of multiple products. Normally, several products together create a grouped product.
Let’s say, you sell sweatshirts in your WooCommerce store. And you want to show all types of sweatshirts in a product.
So, when a user will click on the product sweatshirt, he will see the products under it.
He then can view a particular product and add it to the cart.
How To Add Grouped Products In WooCommerce
To add grouped products, first select Grouped products in the product data.

Then go to the Linked Products section. Here, in the grouped products option you have to add the products in a particular group.

That’s it! These products will be displayed now as a group in your store.
How To Add External/Affiliate Product
These products are external products that you do not sell on your site.
Basically, you promote them on your site but they are sold on an external site.

So, in the external/affiliate section, you have to provide the URL. It will direct users to the page where they can purchase. You need to add a button text as well.
How To Import Products In WooCommerce Via CSV
So far I’ve shown the process of manually adding products to your WooCommerce store.
But, if you want you can bulk upload WooCommerce products.
You just need to create a CSV file where you will add the product details and then import the file on WooCommerce.
For importing,
- Go to the Products Page and click on Import.

2. Choose the CSV file where you listed the product information.
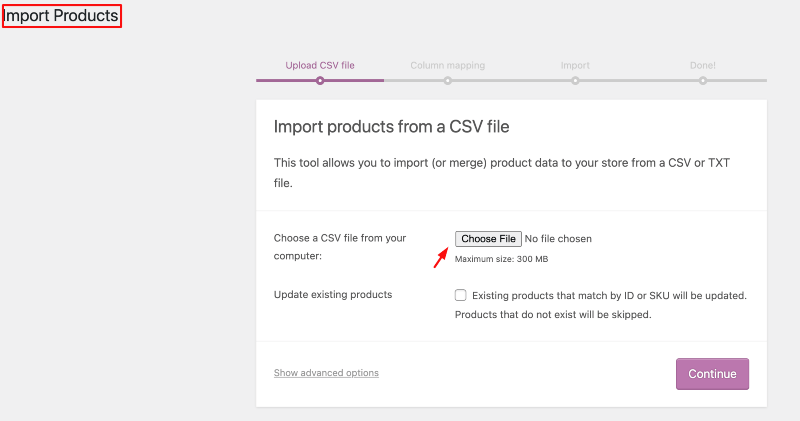
3. Check if the column mapping is okay.

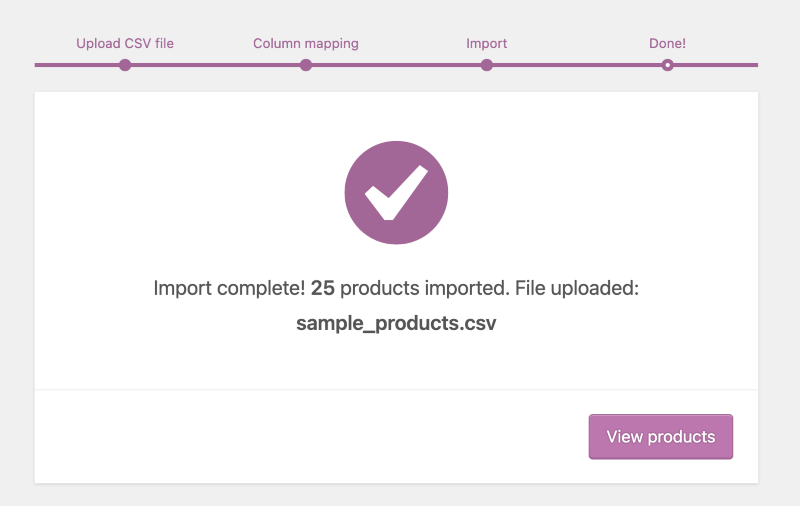
4. Now, Run the importer.

5. That’s it! Once the loading is done, your products will be imported successfully.
More WooCommerce Product Types
Now, there are more WooCommerce product types than the default WooCommerce product types. They are:
1. Bundled Product
From the name you can guess, A bundled product is a combination of other products. In a bundled product, you can add simple, variable or subscription products and assign a new price for the bundle.
2. Subscription Product
When a customer subscribes to a product and receives recurring invoices, that is a subscription product. It applies to any kind of product that uses the typical subscription model to collect payments from customers.
3. Composite Product
Composite products are a type of customized product that your clients create from various other products.
4. External/Affilaite Product
External or Affiliate products are products that you do not sell on your website. People will click on the link and it will redirect to the external site where it is sold.
5. Donation Product
In WooCommerce, you can accept donations up to a customer-specified sum.
Donation For WooCommerce is a powerful WooCommerce extension that allows you to take donations without charging your customers any transaction costs.
6. Bookable Product
A bookable product allows users to book a reservation, rental, or appointment without making a phone contact.
You need a subscription or additional plugin to add these products to your WooCommerce store.
Author’s Note
So, you have seen how easy it is to add WooCommerce products.
What are you waiting for?
Start adding products to your WooCommerce store and start driving sales.
If you want to read an article on WooCommerce SEO optimization, click here.
Let us know in the comment if you want any specific WooCommmerce guide.
Cheers.


![How To Add Products In WooCommerce – Complete Guide [2024]](https://rextheme.com/wp-content/uploads/2023/02/Add-Products-In-WooCommerce-Complete-Guide.png)
