To increase sales in your online store, the first step is to impress your potential customers visually. And to do so, you must optimize your product pages.
The easier you make for buyers to choose their products, the higher the conversion.
If you have variable products in your store, you want to display all the variations of a product in a user-friendly way.
One of the latest trends that have seen great results is the use of swatches to present variations, rather than drop-down menus.
Hence, use WooCommerce variation swatches to present product variants in a more engaging and appealing way.
Create greater buyers’ intent because:
- Buyers will get a preview of the variants rather than text. For example, they will see the color red visually, rather than selecting a text ‘Red’, hence helping to take a practical decision.
- It’s easier to browse through variants by clicking on swatch buttons, rather than drop-down menus.
- The swathes will attract the buyers to check through the variants, and possibly create a buyer’s intent. As they say, the more you spend time on a product, the more you wish to buy it.
Today we will discuss how you can use variation swatches on your WooCommerce store in the most result-driven way.
You will learn how to apply the right type of variations swatches depending on your product variants to enhance the buyers’ intent.
After reading this guide, you’ll be able to:
- Understand how each variation swatch type is important
- Set up color, image or label swatches for variants on your own
- Examples of great use of variation swatches
- Enhance buyers’ intent and increase your sales
So let’s dive into it.
Table of contents
When And Why Use Different Variation Swatches?

Your variable products may have different types of variations. You can’t set up unique variation swatches for different variants to create maximum engagements.
Color Variation Swatches
A product may be available in various colors.For example, let’s say you are selling a t-shirt that has three colors, Red, Blue, and Yellow.
Then you can use color variation swatches to let your customers choose from the variants.
By default, WooCommerce lets people choose through a boring drop-down menu. But you can make it more engaging with colored swatch buttons.
See the difference yourself:
Default
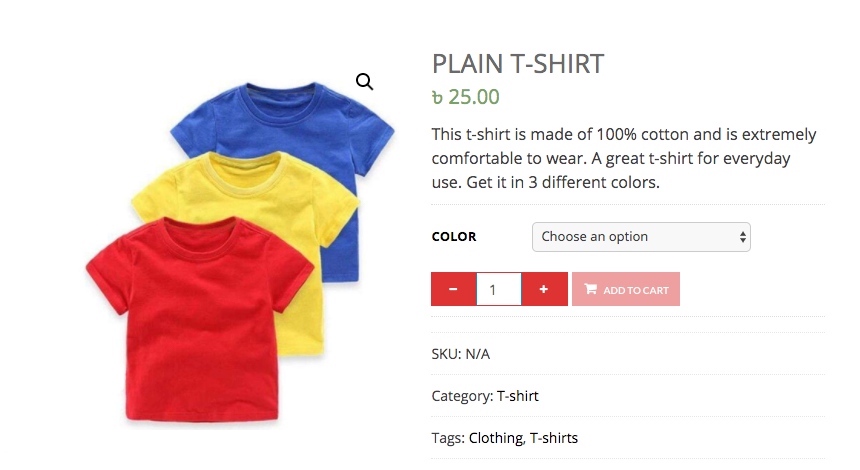
Using Color Variation Swatches
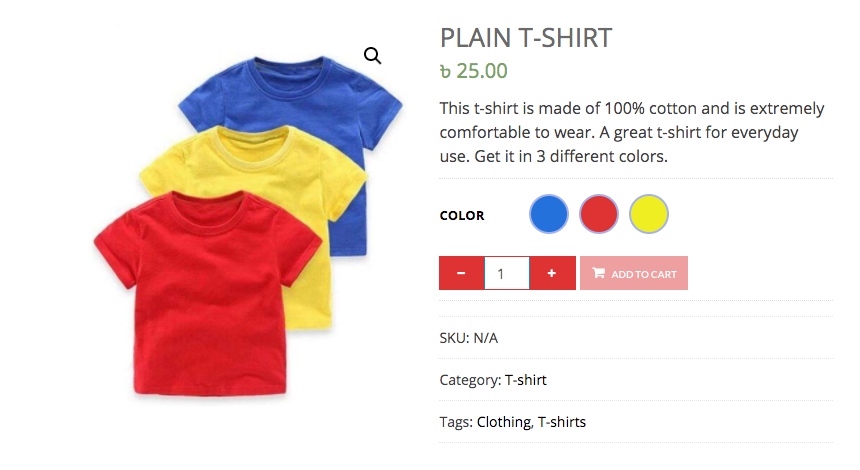
As you see, the colors are clearly visible. So a person will find the selection easier and more practical.
Image Variation Swatches
Certain products are more versatile and you may present the variants using image variation swatches.
For example, let’s say you sell gift boxes with different shapes. So rather than presenting the drop-down selections, you may display variants with image swatches.
Here’s how amazing it becomes:
Default
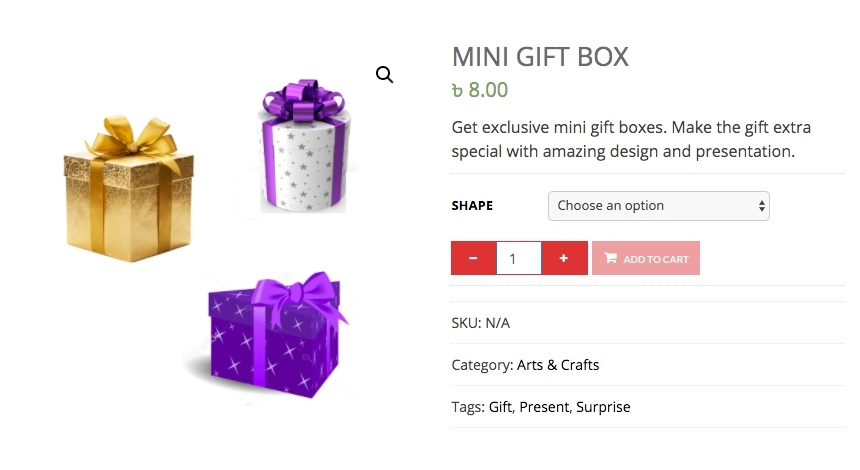
Using Image Variation Swatches
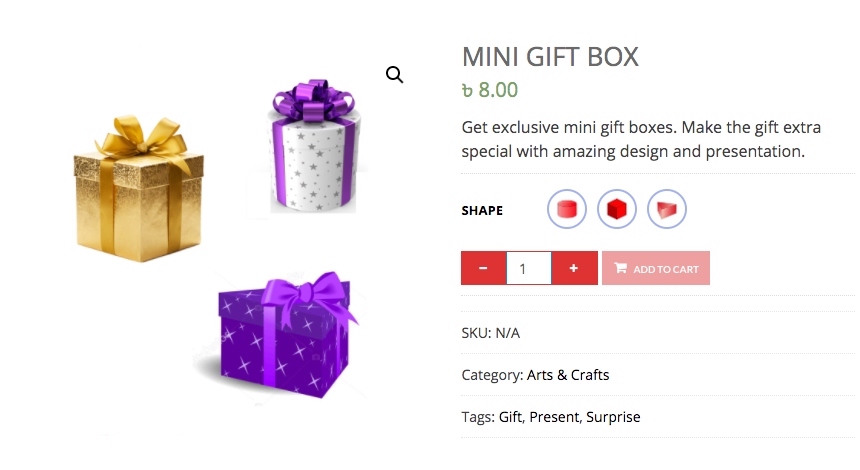
As you can see, the variants are presented in small swatches for the shapes thus making it more attractive.
Tip:
It is always ideal to have an image with all variants together as the featured image for the product. In case you don’t have any, then use the image of the most popular variant as the featured image.
Label Variation Swatches
Certain factors such as Size or Length are difficult to portray visually.
For example, if you are selling a t-shirt with sizes, L (for large), M (for Medium), and S (for Small), then you have no way to visually show the actual sizes.
In that case, you can still make it attractive by presenting the variants using label variation swatch buttons.
Here’s how it will still make a difference:
Default

Using Label Variation Swatches
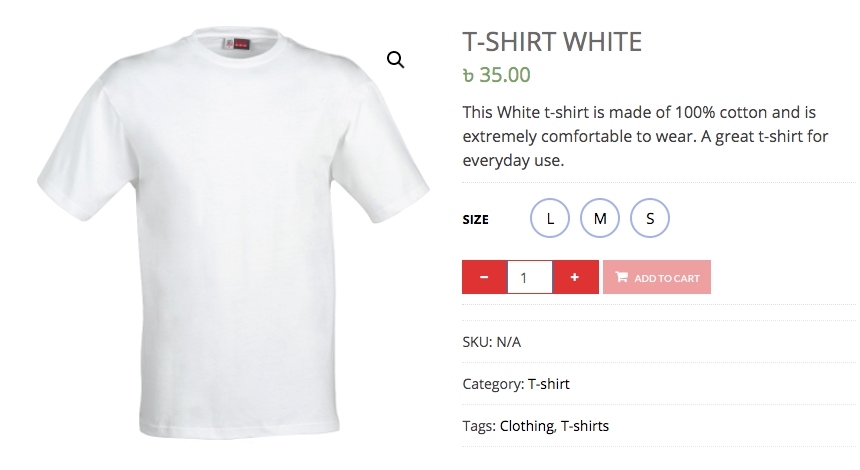
Despite no size visualization, the swatches make the selection more appealing. People will often click on the swatches just out of curiosity.
Text Variation Swatches
Similar to sizes, few other variation factors such as material or age-group related variations, etc, can not portrayed visually, nor they can be portrayed as labels.
For example, let’s say you are selling a hat in the Kids size, Teen size and Grow-up size.
In that case, you can turn them in to attractive buttoned text swatches.
The advantage here is that all the variations available will be listed in front of the buyer and he/she can make the selection simply by clicking on the button(s).
Here’s a preview:
Default
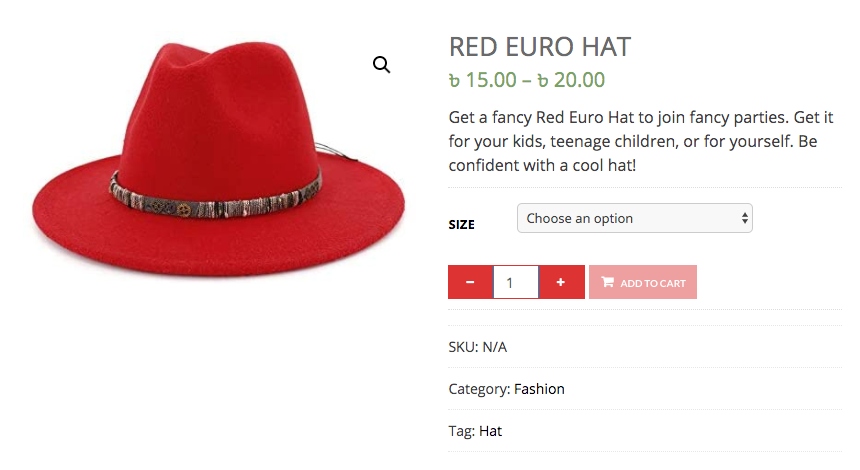
Using Text Variation Swatches

Tip:
If you have size labels other than numbered values, then keep a chart in your site to find the exact values of the sizes. Stores often lose sales due to the lack of this chart. Customers are not patient enough to knock you on customer care to find out the exact size.
As you saw, changing variation menus to swatches make it so much more attractive and engaging.
Now, if you want to implement these attractions, then you can easily do so using the plugin Variation Swatches For WooCommerce.
Variation Swatches For WooCommerce
Variation Swatches for WooCommerce is a simple plugin with which you can change the basic dropdown selection of variants to button swatches easily. It takes only a few clicks.
Let me give you a step by step guide on how you can easily set up variation swatches on your online shop using Variation Swatches for WooCommerce.
How To change dropdown to button swatches for WooCommerce variations?
As discussed earlier, WooCommerce displays variations as dropdown options on the product page.
However, you can easily convert the variation options from dropdown to button swatches in just a few clicks, using the plugin.
Here’s how you can do it step by step.
1. First, install and activate Variation Swatches for WooCommerce.
On your admin dashboard, you will get a new menu called Swatches. Click on it.
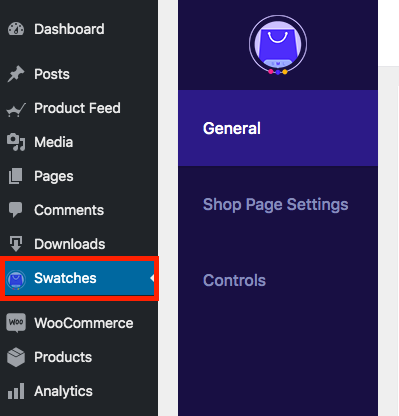
It will take you to the plugin dashboard.
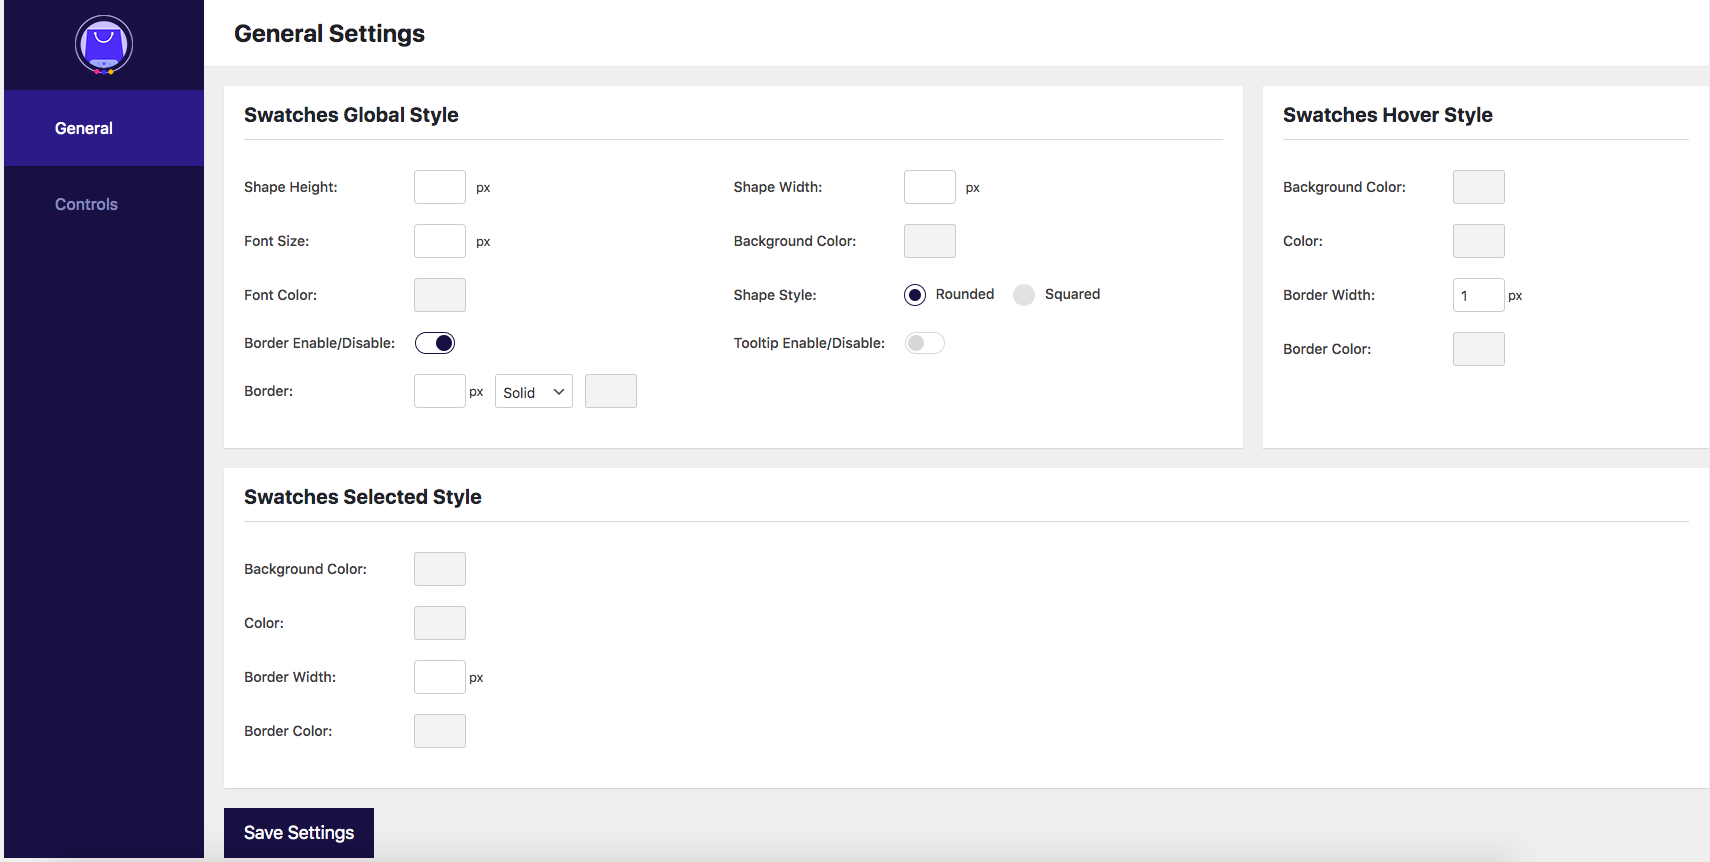
2. Set basic swatch style and design
On General Settings, you will find the options to set color and border of swatches as normally displayed, when hovered, or when selected.
Plus you will be able to set the font size.
Configure these settings as you like.
3. Go To Controls Tab
Click on the Controls tab on the left.
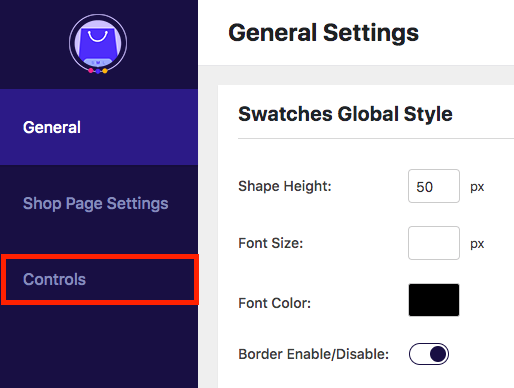
The Controls tab will have many options.
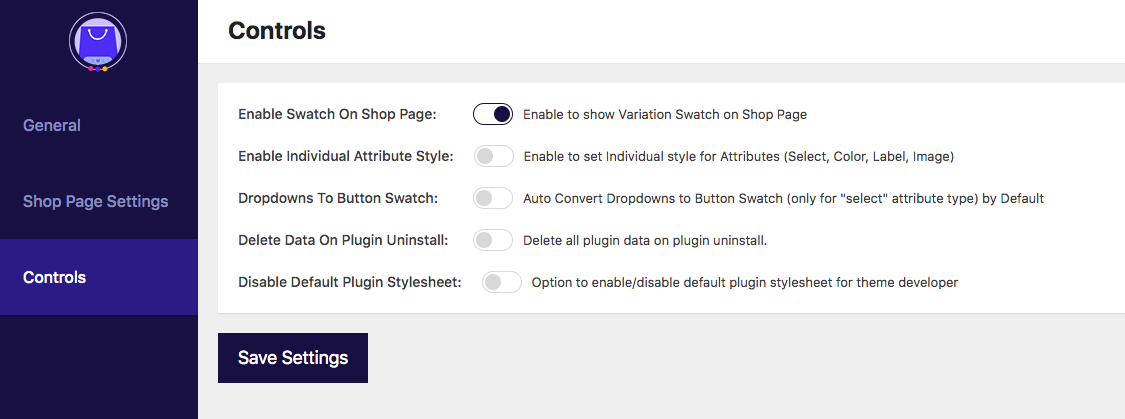
4. Enable Dropdown To Button Swatches
Here, turn On the Dropdown To Button Swatches option.
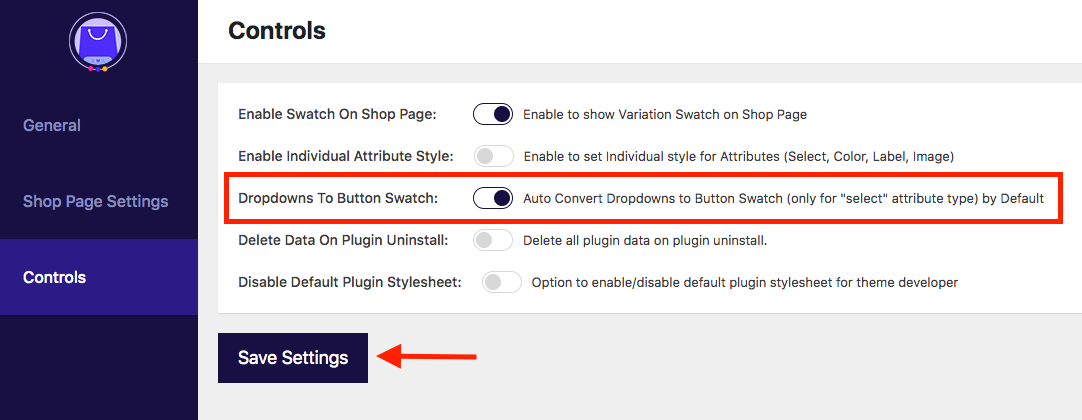
Then save settings. Now you will see that the variations on product pages will be displayed in the form of button swatches.
Default Dropdown Selection
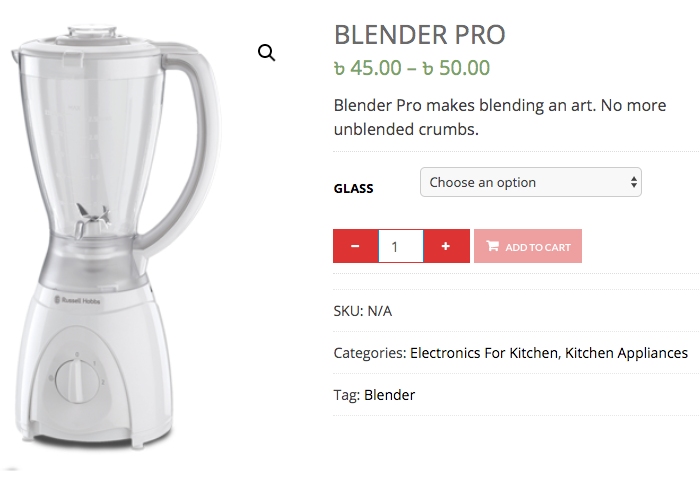
Button Swatches For Variations
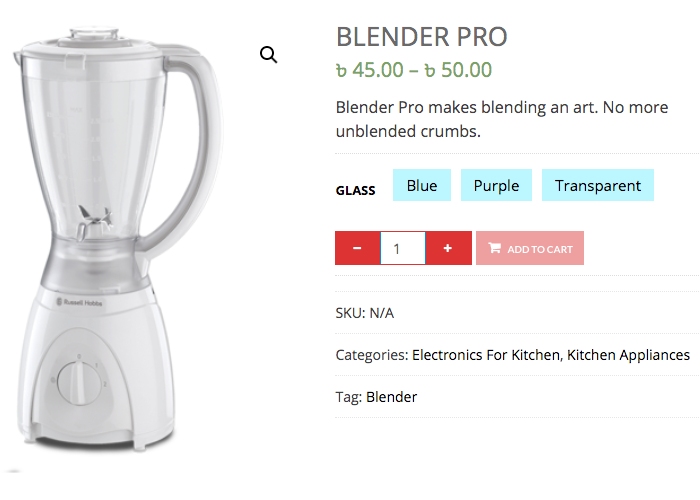
Once you have enabled the dropdown to button swatches for your store, now you can customize the swatches into color, image or label swatches easily, in few simple steps.
How to Set Up WooCommerce Color Swatches for Color Variations
By using Color swatches, you can give a visual idea of the color the buyer will be choosing. So the there will be no hesitation.
And as you saw earlier, color swatches are very attractive compared to the ordinary dropdown selection.
To to set set up color swatches, follow the steps below.
1. Enable Dropdown To Button Swatches
First follow the steps to enable dropdown to button swathes as explained earlier.
(Click here to read how to enable dropdown to button swatches.)
2. Go To Your Created Attributes
The variation terms are usually grouped in to attributes.
Go to Dashboard > Products > Attributes and you will find the list of attributes you have already created in your store, and the option to add new attributes.
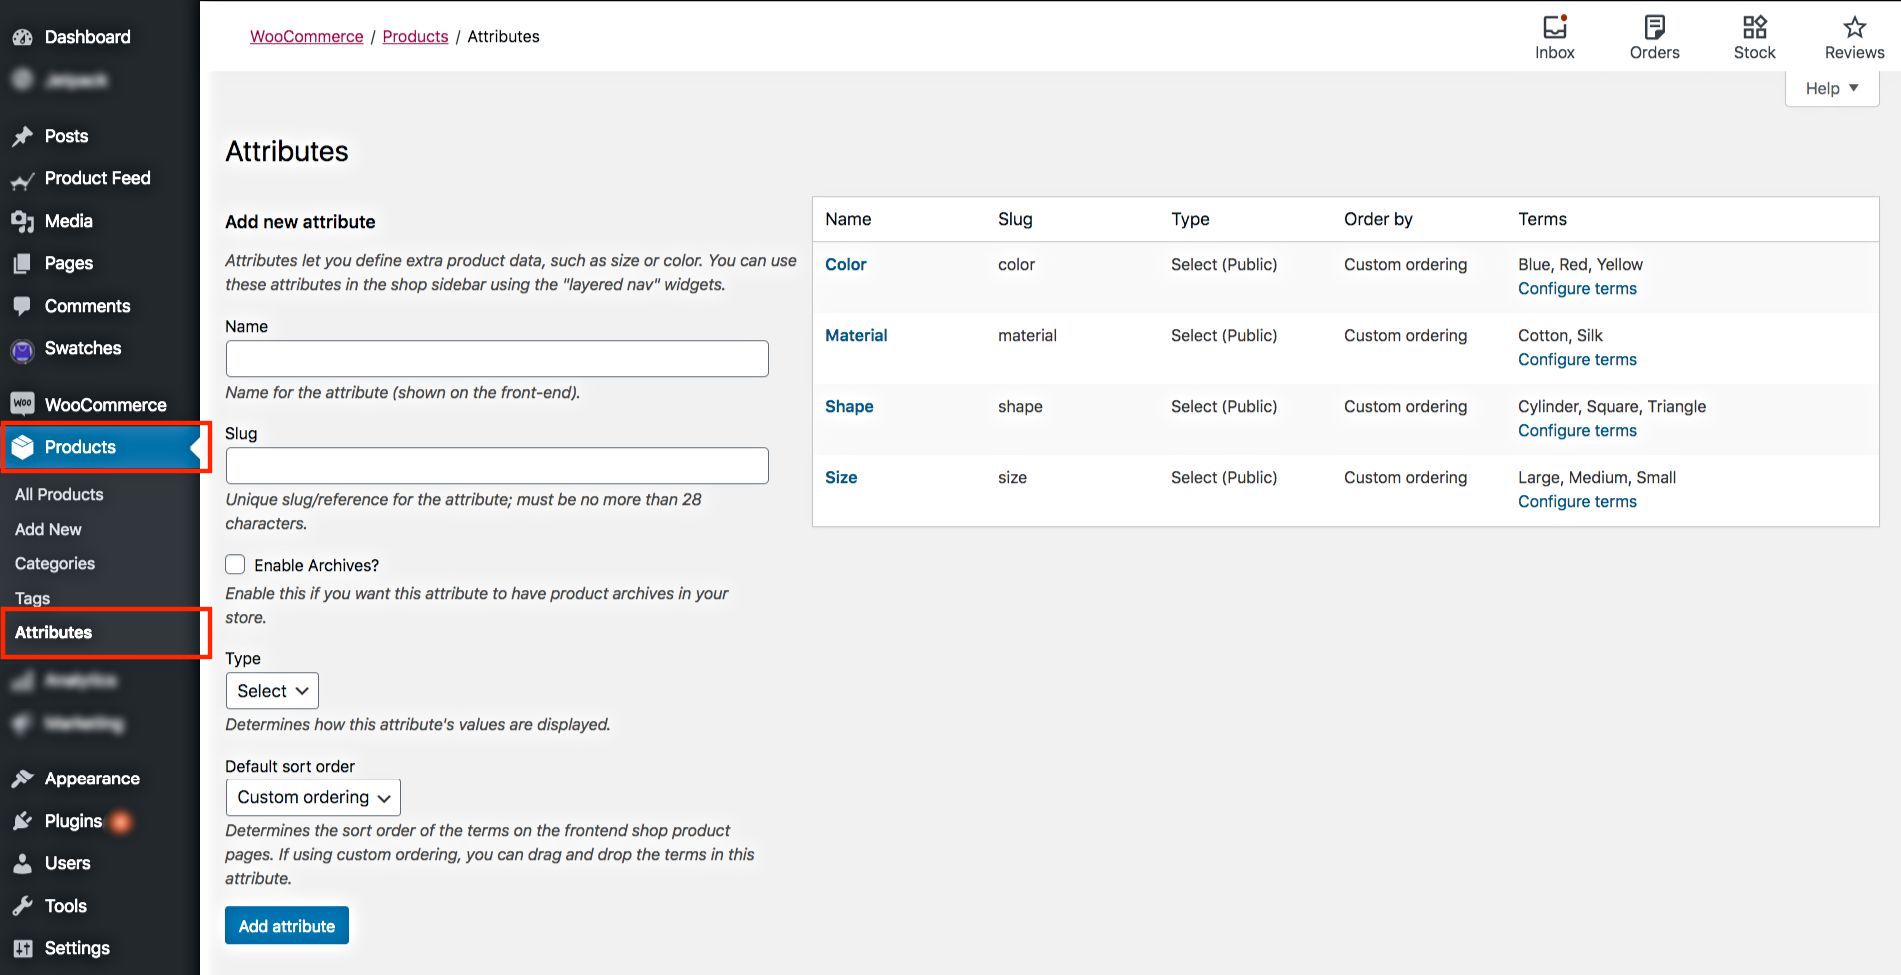
On the right side, you can see the list of created attributes you have.

3. Change Your Desired Attribute As Color Type
Hover your mouse on the attribute name for which you want to use color swatches.

You will get the options to Edit or Delete. Click on Edit and it will take you to the Edit attribute page.
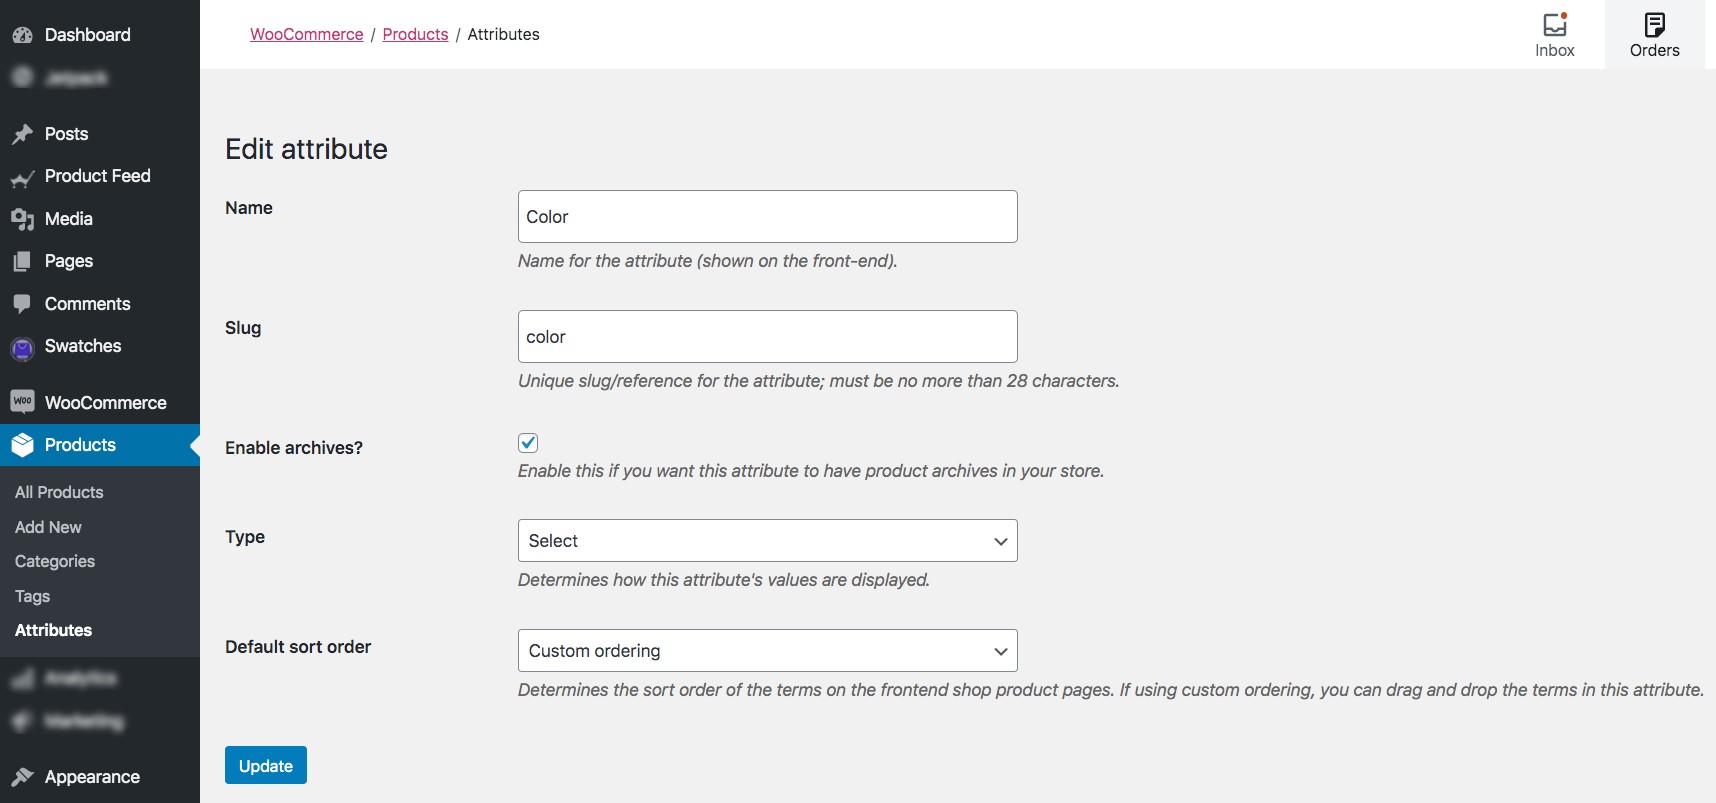
Once you are on the Edit Attribute page, you will see you have a field for Type.
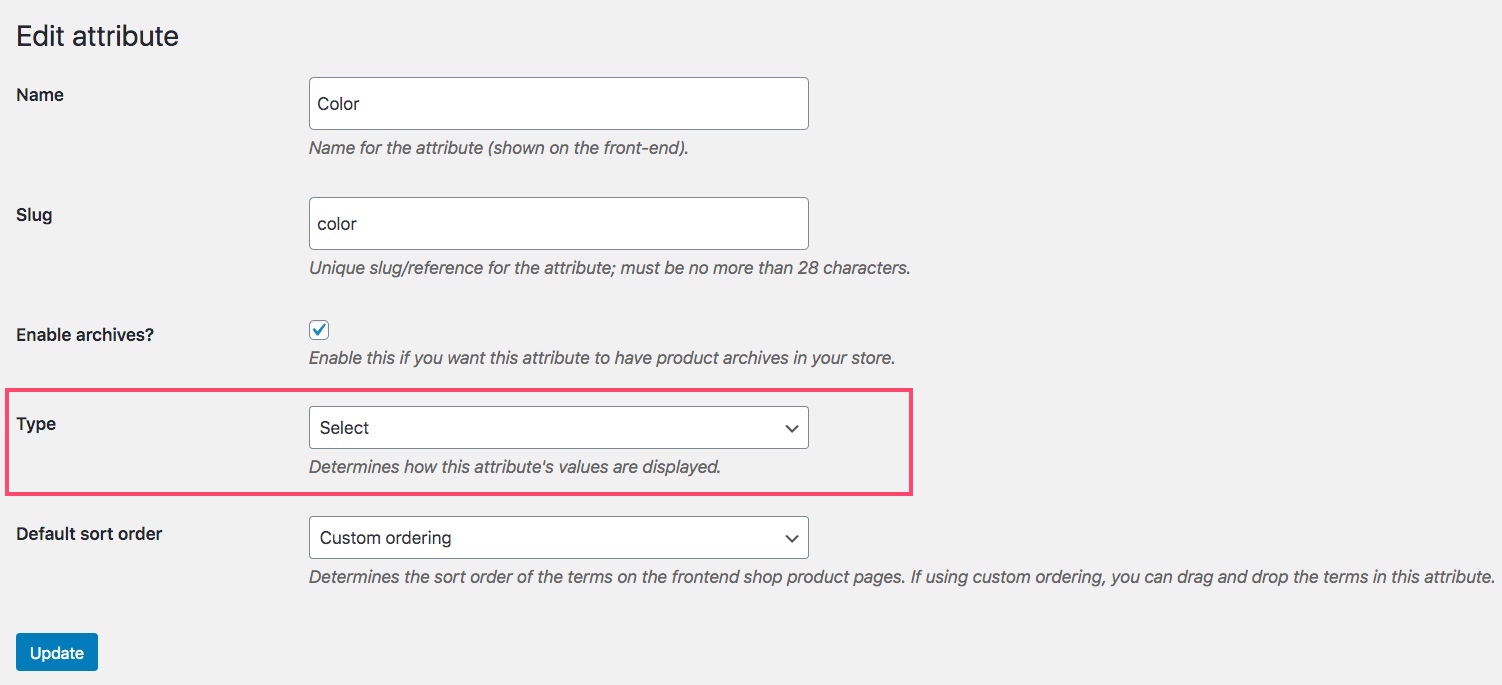
Click on it and choose the option “Color”.

Then click on the Update button below.
4. Set Color Swatches For Variation Terms
Once you have set the attribute type to “Color”, now you can assign color swatches to the variant terms under this attribute.
Go back to Dashboard > Products > Attributes and on the right side of the attribute (you just set as Color type), you will get the option to “Configure terms”.

Click on Configure terms and it will take you to the the following page:
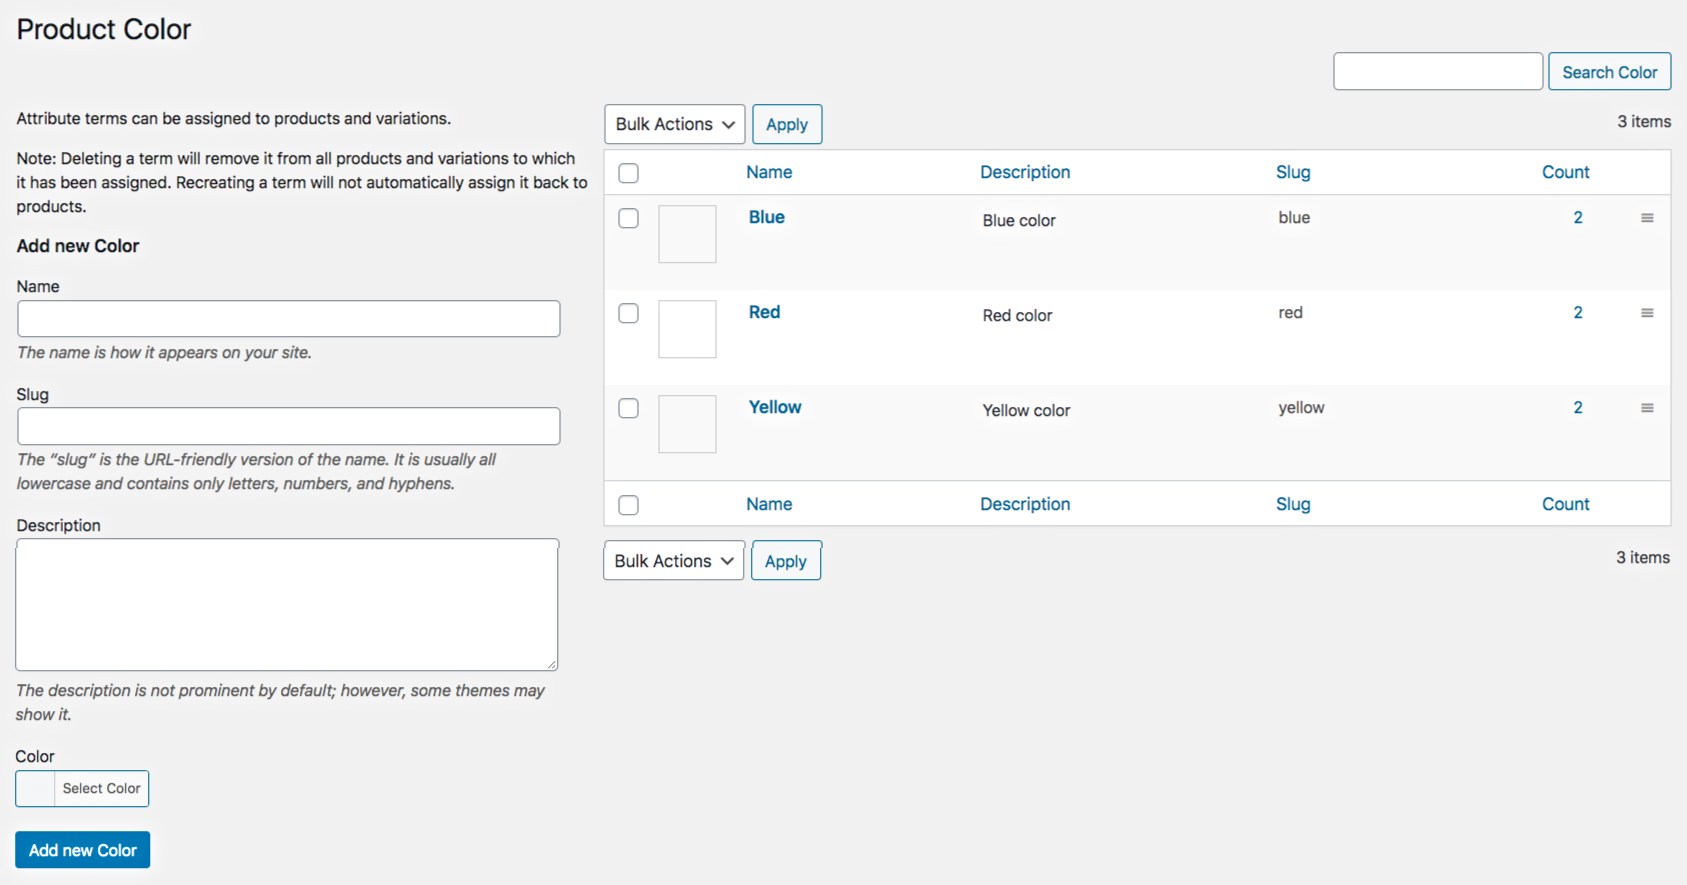
Here, you can either add terms for color variations or, on the right side you can see the variant terms that you all ready have for colors on your store.
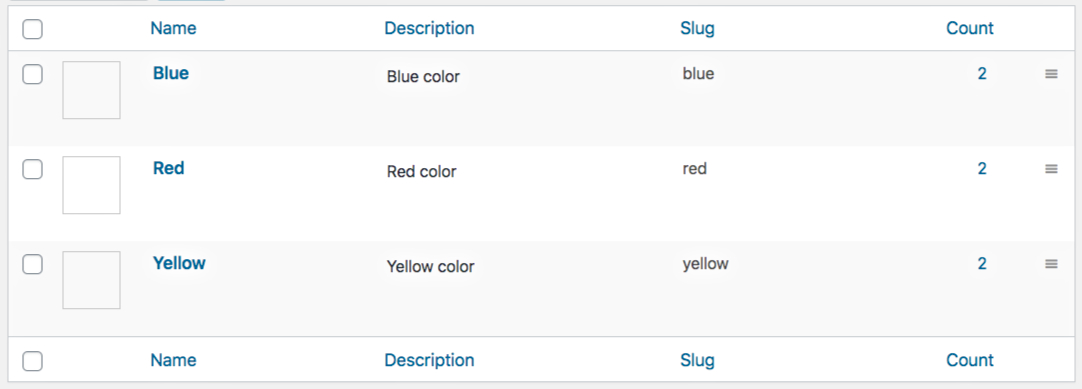
Hover your mouse on one color term and you will find the option to Edit.

Click on edit and it will take you to the edit page. Here, below you will see that you have the option to choose a color.
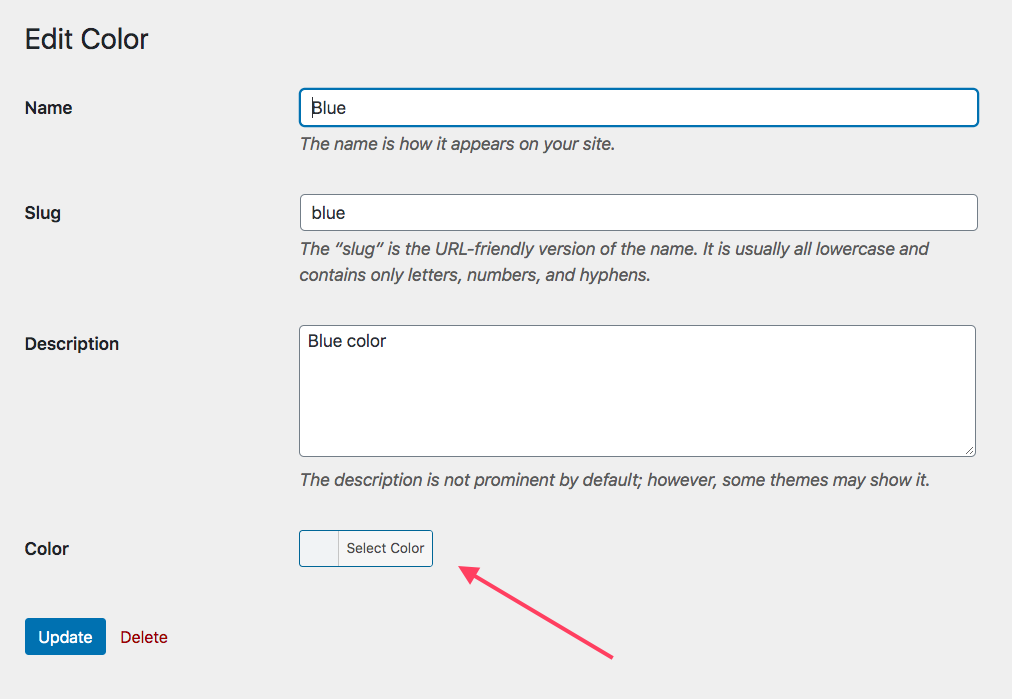
Click on “Select Color” and you will get the option to assign a color.

Choose an appropriate color and click on Select Color again.
Then click on the Update button below.
Once updated, go back and you will see that a preview of the color is there just beside the name of the respective color variant term.
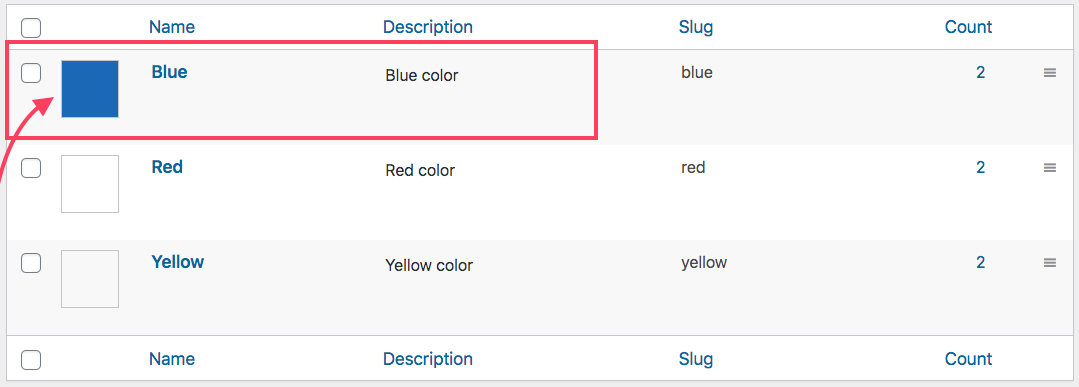
Do the same for the rest of the color variations and that’s it. Now your products will have color variation swatches instead of dropdown selection for color variants.
Using Color Variation Swatches

How to set up image swatches for WooCommerce product variations?
By using Image swatches, you can display certain variants as attractive swatches when viewing product(s).
And as you saw earlier, image swatches are very engaging, compared to the ordinary dropdown selection.
To to set set up images swatches, follow the steps below.
1. Enable Dropdown To Button Swatches
First follow the steps to enable dropdown to button swathes as explained earlier.
(Click here to read how to enable dropdown to button swatches.)
2. Go To Your Created Attributes
The variation terms are usually grouped in to attributes.
Go to Dashboard > Products > Attributes and you will find the list of attributes you have already created in your store, and the option to add new attributes.

On the right side, you can see the list of created attributes you have.

3. Assign Your Desired Attribute As Image Type
Hover your mouse on the attribute name for which you want to use image swatches.

You will get the options to Edit or Delete. Click on Edit and it will take you to the Edit attribute page.
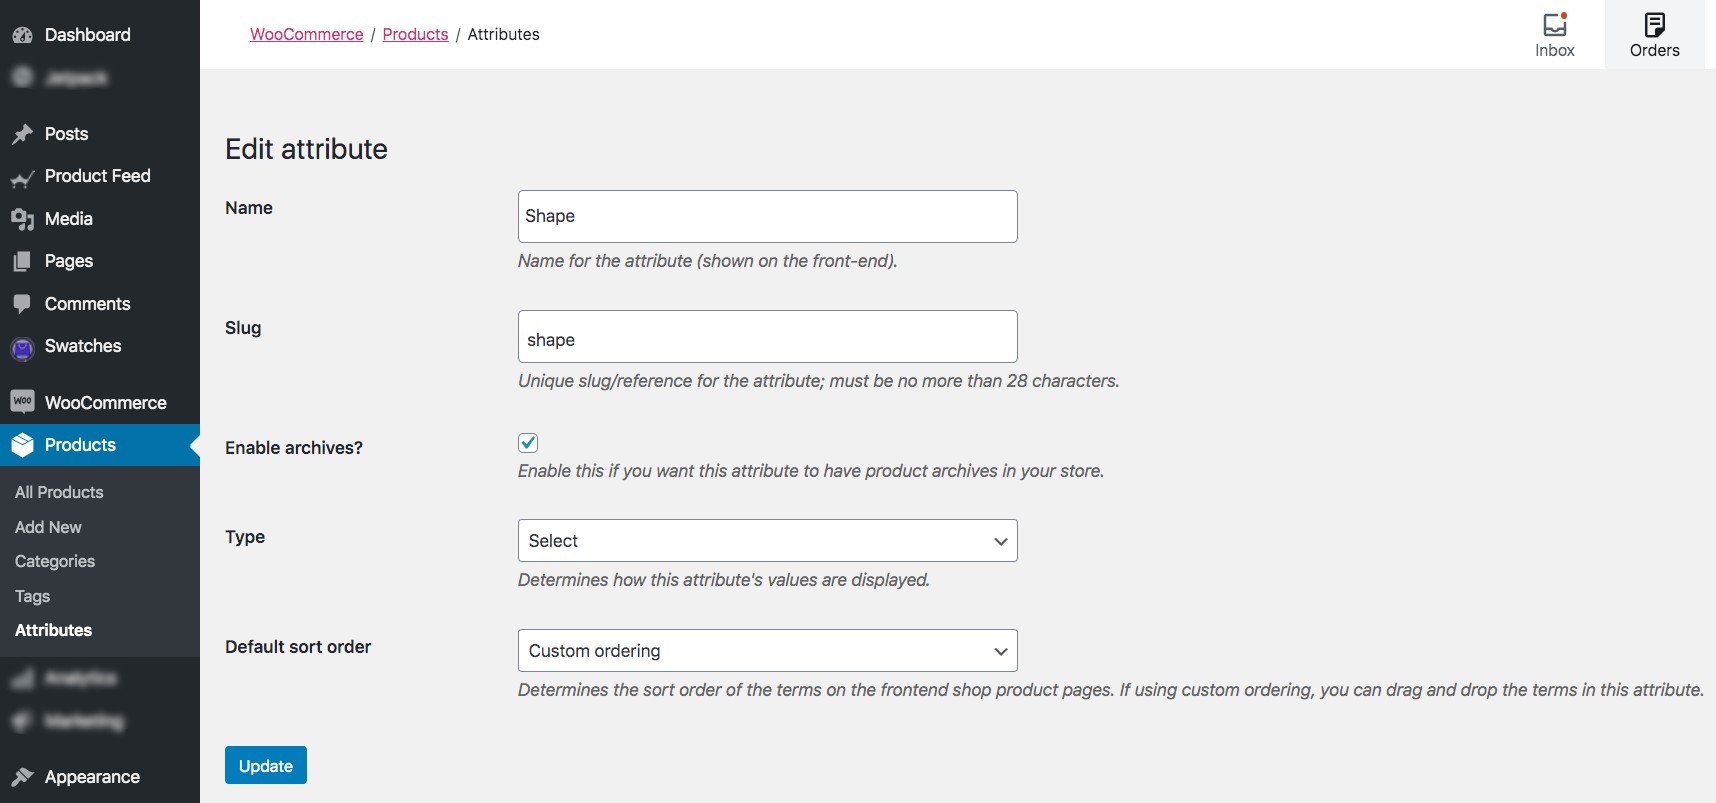
Once you are on the Edit Attribute page, you will see you have a field for Type.
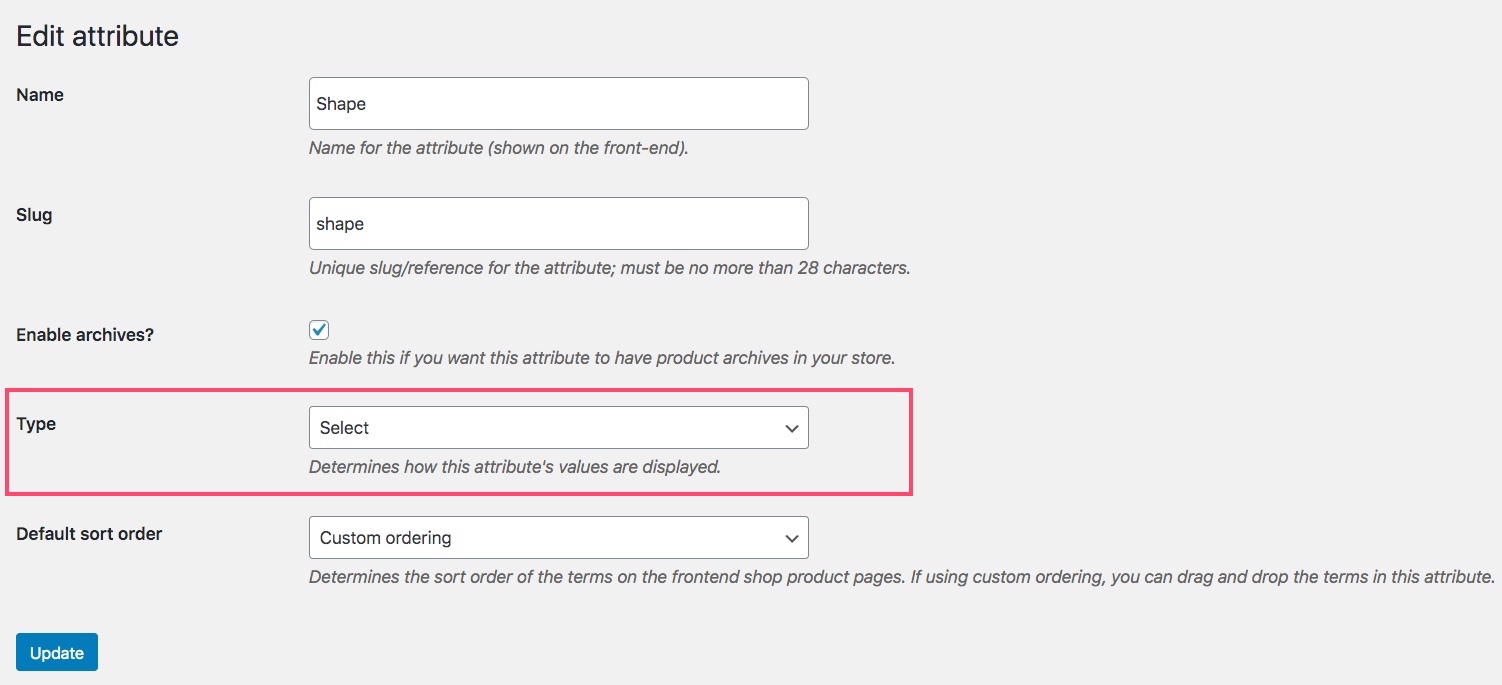
Click on it and choose the option “Image”.

Then click on the Update button below.
4. Set Color Swatches For Variation Terms
Once you have set the attribute type to “Image”, now you can assign image swatches to the variant terms under this attribute.
Go back to Dashboard > Products > Attributes and on the right side of the attribute (you just set as Image type), you will get the option to “Configure terms”.

Click on Configure terms and it will take you to the the following page:
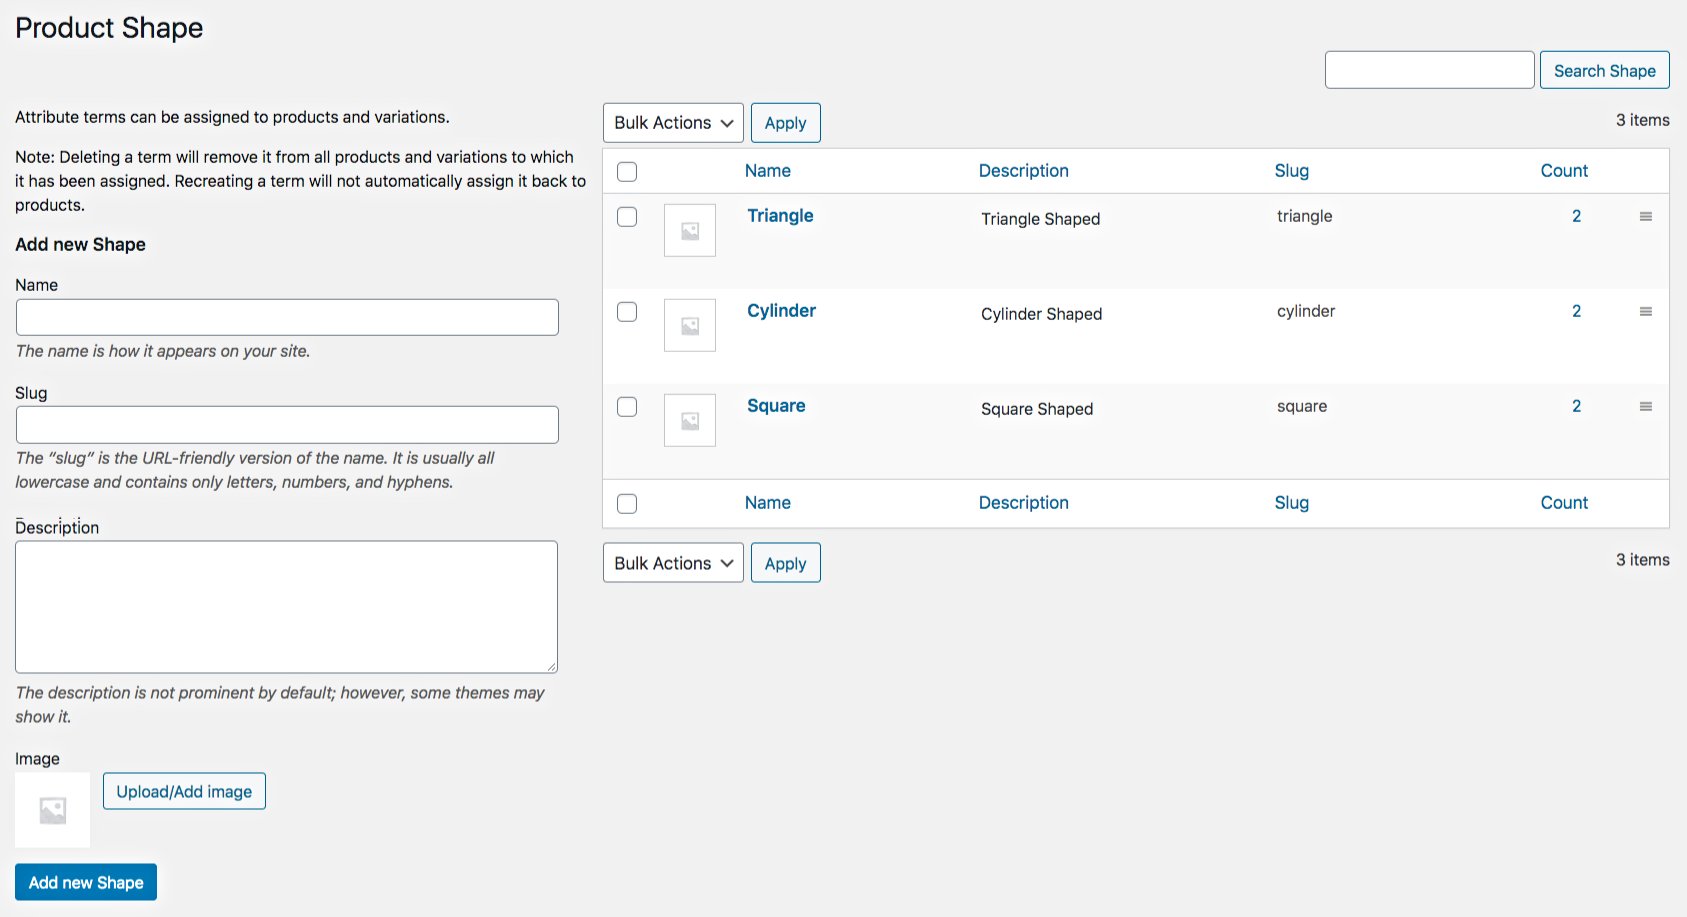
Here, you can either add terms for variations or, on the right side you can see the variant terms that you already have (under this attribute).
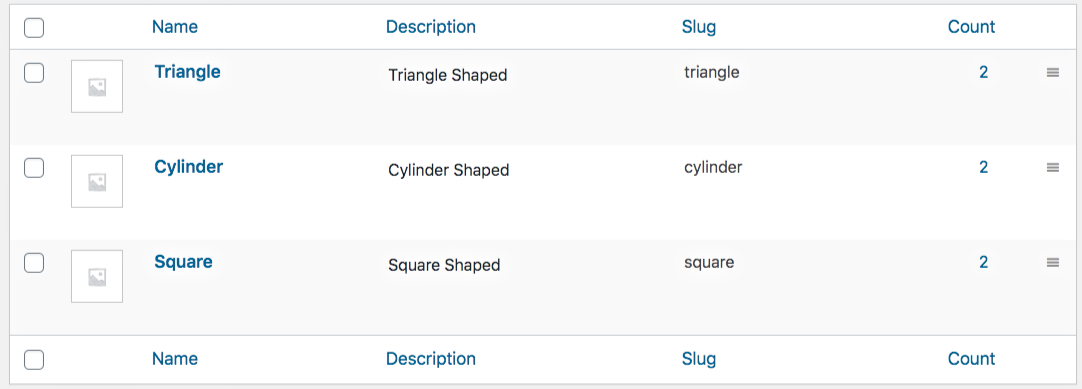
Hover your mouse on one term and you will find the option to Edit the term.

Click on edit and it will take you to the edit page. Here, below you will see that you have the option to upload or add an image.

Click on “Upload/Add Image” and you can either upload an image or choose an image from your media library.

Choose an appropriate image then click on the Update button below.
Once updated, go back and you will see that a preview of the image is there just beside the name of the variant term.
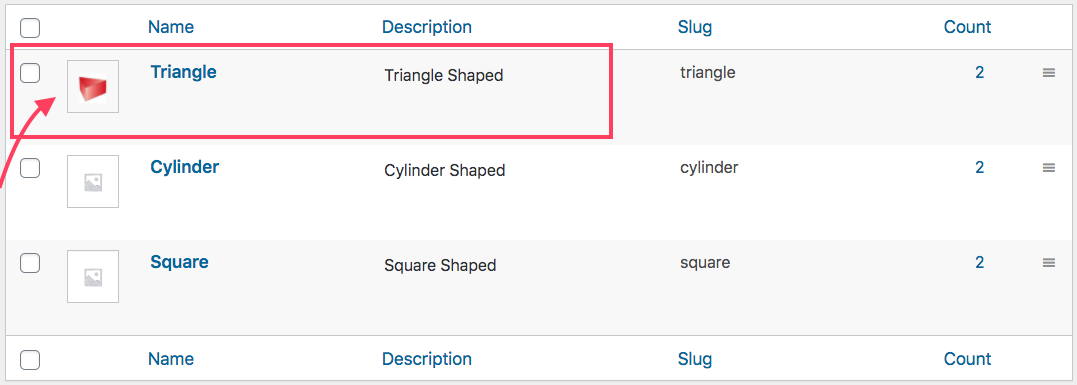
Do the same for the rest of the variants and that’s it. Now your products will have image variation swatches instead of dropdown selection for these variants.
Using Image Variation Swatches

How to set up a label variation swatches for variable products?
By using Label swatches, you can display certain variants that can be recognized with single letters or numbers.
And as you saw earlier, Label swatches are more catchy, compared to the ordinary dropdown selection.
To to set set up label swatches, follow the steps below.
1. Enable Dropdown To Button Swatches
First follow the steps to enable dropdown to button swathes as explained earlier.
(Click here to read how to enable dropdown to button swatches.)
2. Go To Your Created Attributes
The variation terms are usually grouped in to attributes.
Go to Dashboard > Products > Attributes and you will find the list of attributes you have already created in your store, and the option to add new attributes.

On the right side, you can see the list of created attributes you have.

3. Assign Your Desired Attribute As Label Type
Hover your mouse on the attribute name for which you want to use label swatches.

You will get the options to Edit or Delete. Click on Edit and it will take you to the Edit attribute page.
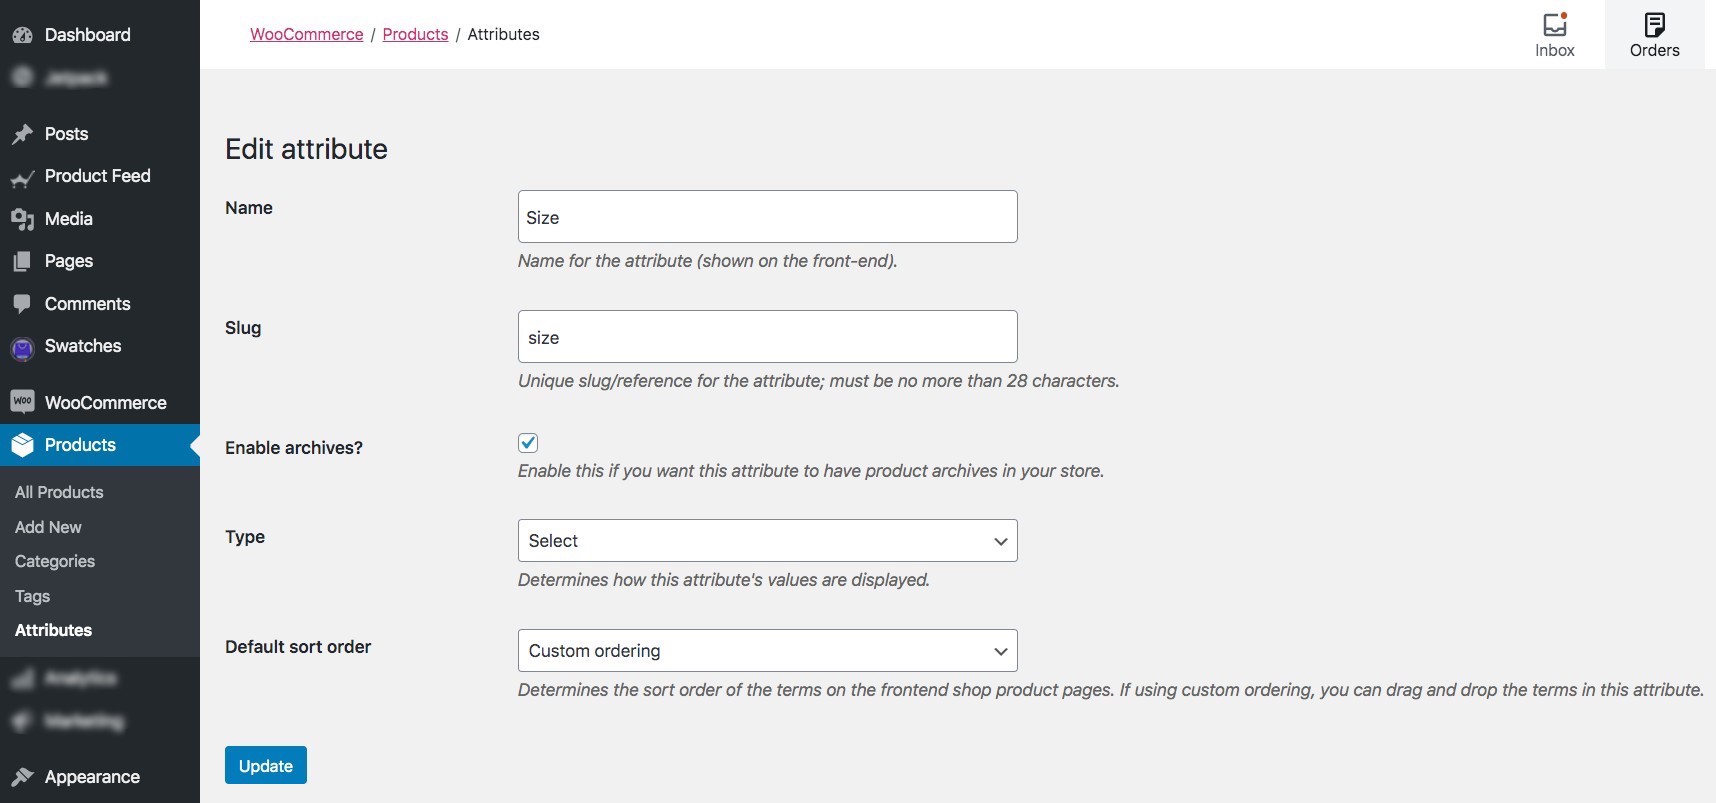
Once you are on the Edit Attribute page, you will see you have a field for Type.
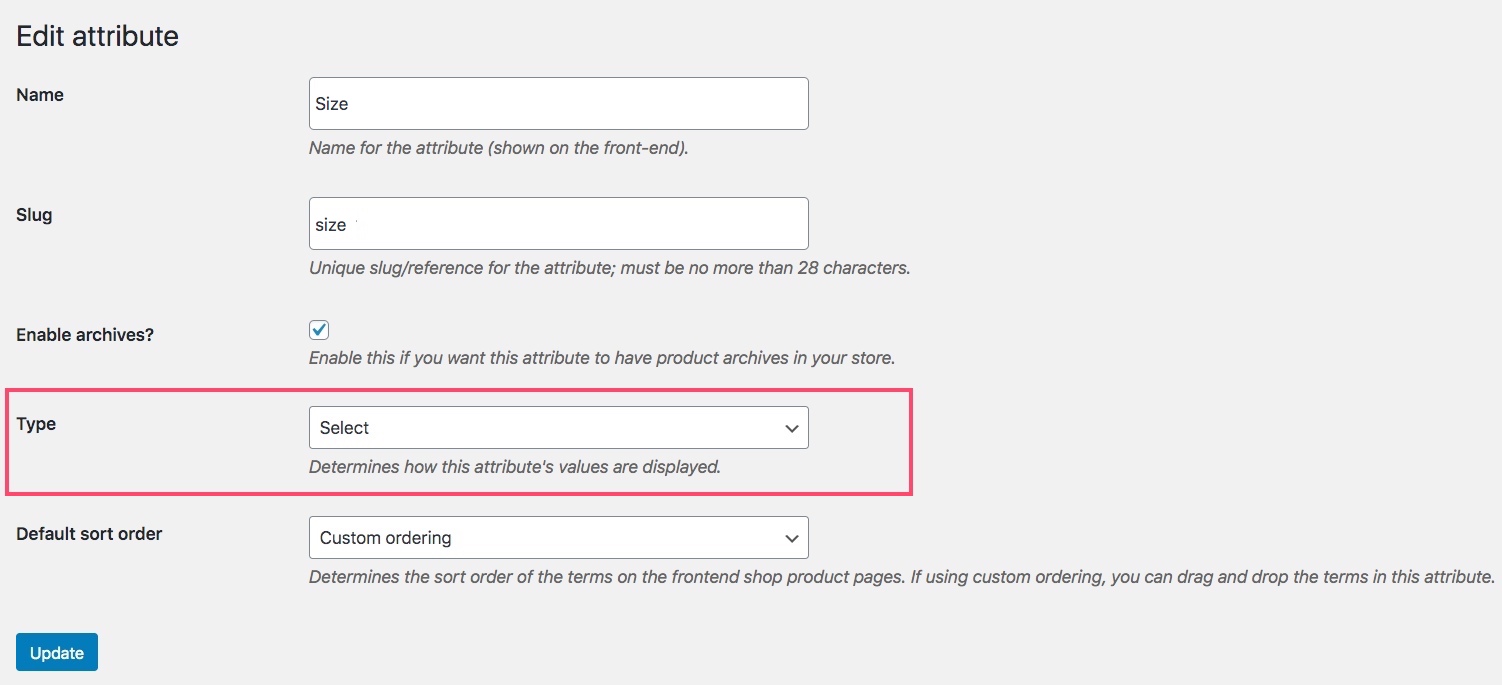
Click on it and choose the option “Label”.

Then click on the Update button below.
4. Set Label Swatches For Variation Terms
Once you have set the attribute type to “Label”, now you can assign label swatches to the variant terms under this attribute.
Go back to Dashboard > Products > Attributes and on the right side of the attribute (you just set as Label type), you will get the option to “Configure terms”.

Click on Configure terms and it will take you to the following page:

Here, you can either add terms for variations or, on the right side you can see the variant terms that you already have (under this attribute).
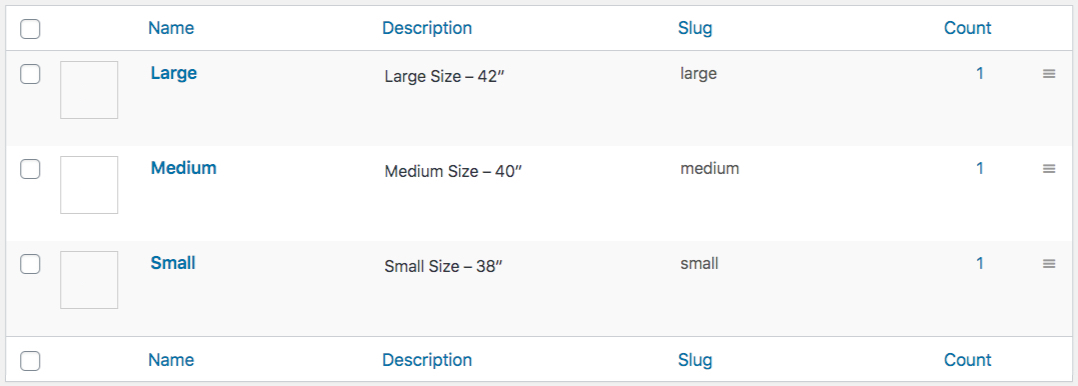
Hover your mouse on one term and you will find the option to Edit the term.

Click on edit and it will take you to the edit page. Here, below you will see that there is a field for you to enter a Label character.

Input the Label you want to display.

Then click on the Update button below.
Once updated, go back and you will see that a preview of the label is there just beside the name of the variant term.
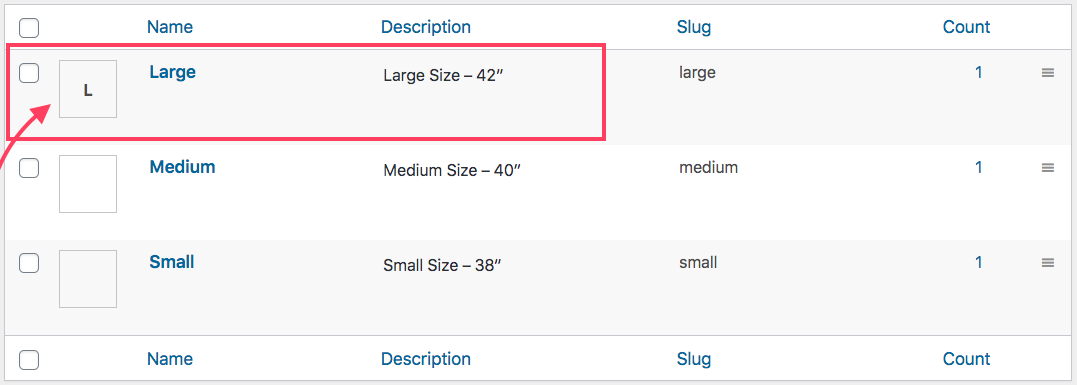
Do the same for the rest of the variants and that’s it. Now your products will have label variation swatches instead of dropdown selection for these variants.
Using Label Variation Swatches

Conclusion
It is clear that dropdown selection for variable products is no longer preferred. The best way to offer variations is by using swatches.
And the best part is, it’s super easy to implement and can be done in just a few clicks using the plugin Variation Swatches for WooCommerce.
So I suggest you try out the plugin and leverage the benefit of WooCommerce variation swatches. Take advantage of attracting buyers easily without much effort.
If you want to learn how to create a variable product, you can follow this guide:
![Complete Guide On Using WooCommerce Variation Swatches Smartly [2022]](https://rextheme.com/wp-content/uploads/2020/05/Feature_Image.jpg)
