Wine sales worldwide are expected to grow by $41.3 billion (12.22%) from 2024 to 2029.
If your target customers are new wine buyers and you are promoting in a marketplace that targets years-old wine buyers, chances are you will get low sales.
To attract new wine buyers you should promote your wines in a popular online wine marketplace called Vivino.
With over 5 million visits per month(mostly new buyers) in 2024 – Vivino is definitely a marketplace that will help you generate a huge amount of profit by selling wine.
If you run a WooCommerce store to sell wine online, then you can easily generate a Vivino product feed in just a few clicks, using the right tool.
I’ve explained how you can generate a Vivino XML feed in just a few clicks with details so that you can understand and implement better.
So let’s get started.
Guide To Generate Vivino Product Feed
Let us look at all the required data and the process to generate the Vivino product feed, real quick, using the right tool.
Instructions Feed Specification For Vivino Product Data
When creating a new feed for Vivino, you will need to include a few specific data in the right format.
Normally, the feed structure is as follows:
<vivino-product-list>
	<product>
		---PRODUCT ATTRIBUTES AND DATA HERE---
	</product>
</vivino-product-list>
Now, let us look at a list of the required product attributes that you should include on your product feed, and I will provide an example for each attribute so you understand how to include the product data.
Later, I will show you an example of the complete structure of the XML feed and guide you on how you can generate the feed fast.
Required Product Attributes To Submit to Vivino
The following are mandatory attributes that you must submit for every wine you want to list on Vivino.
| Attribute | Instructions | Example |
|---|---|---|
| Product Name Format: <product-name>…</product-name> | This field is required. Use the product name in the format: [Producer] + [Wine name and appellation] + [Vintage] + [Wine Color] **If it’s not White or Rosé wines, then you can avoid including the wine color. **If it’s a non-vintage wine, then use NV in place of Vintage. | <product-name>Famille Perrin Côtes du Rhône 2014 Rosé</product-name> |
| Price Format: <price>…</price> | This field is required. This should be the final price of the wine after all discounts. **For non-US/Candian sellers, you must include taxes in the price. **Do not include the currency. | <price>12.50</price> |
| Quantity is Minimum Format: <quantity-is-minimum>…</quantity-is-minimum> | This field is required. Accepted values for this attribute are ‘True’ and ‘False’. **True indicates that the discount will be applicable only if a certain quantity is purchased. **False indicates that the discount is applicable for all bottles. | <quantity-is-minimum>False</quantity-is-minimum> |
| Bottle Size Format: <bottle_size>…</bottle_size> | This field is required. The bottle size indicates the size or volume of the wine bottles you are selling. **Vivino only accepts the following bottle volumes: – 375ml – 500ml (for fortified and dessert wines) – 750ml – 1000ml – 1500ml | <bottle_size>750ml</bottle_size> |
| Bottle Quantity Format: <bottle_quantity>…</bottle_quantity> | This field is required. This is the number of bottles you are offering at the given price. | <bottle_quantity>1</bottle_quantity> |
| Link Format: <link>…</link> | This field is required. This is the URL of the product on your website. | <link>http://www.yourwebsite.com/category/wine-12345/</link> |
| Inventory Count Format: <inventory-count>…</inventory-count> | This field is required. This is the number of bottles you have available in stock. | <inventory-count>35</inventory-count> |
| Product ID Format: <product-id>…</product-id> | This field is required. This is a unique identifier for each wine. You can either use the Product ID from your WooCommerce store or use the product SKU as the value for this attribute. | <product-id>2714</product-id> |
Extra Attributes You Might Want To Submit To Vivino
Apart from the required attributes above, there are several other attributes that you might want to submit to optimize the feed for maximum outcome.
The most notable extra attributes you can include are as follows:
| Attribute | Instructions | Example |
|---|---|---|
| Producer Format: <producer>…</producer> | You can submit the name of the producer using this attribute. | <producer>Arimia</producer> |
| Wine Name Format: <wine-name>…</wine-name> | The name of the wine can be submitted besides including it in the Product name. | <wine-name>Verdelho</wine-name> |
| Appellation Format: <appellation>…</appellation> | This attribute refers to the region where this wine was produced. | <appellation>Margaret River</appellation> |
| Vintage Format: <vintage>…</vintage> | This refers to the vintage year for this wine. **For non-vintage wines, submit the value as NV. | <vintage>2014</vintage> |
| Country Format: <country>…</country> | You may submit the country of origin for a wine using this attribute. | <country>Australia</country> |
| Color Format: <color>…</color> | This is to indicate the color of the wine. | <color>White Wine</color> |
| GTIN Format could be one of the following depending on your location: <ean>…</ean> <upc>..</upc> <jan>…</jan> | This is a unique identification number that all products have. Submitting a GTIN value will indicate the authority of selling a genuine product. | <ean>9334612000037</ean> |
| Varietal Format: <varietal>…</varietal> | You can use this attribute to define the percentages of different grape varieties. | <varietal>100% Verdelho</varietal> |
| Alcohol Format: <alcohol>…</alcohol> | Use this attribute to indicate the alcohol percentage of the wine. | <alcohol>13.4%</alcohol> |
| Description Format: <description>…</description> | You may describe the taste and quality of the wine to attract wine tasters or buyers. | <description>The soothing taste of this wine will make you feel the vintage Australian tradition</description> |
| Ageing Format: <ageing>…</ageing> | Describe the ageing process of the wine using this attribute. | <ageing>12 months in oak and 12 months in bottle</ageing> |
| Image Format: <image>…</image> | You may include an image of the wine. | <image>http://www.yourwebsite.com/wp-content/uploads/img/wine-image.jpg</image> |
Apart from these, there are several other extra attributes that you may include to optimize the feed.
To submit the extra attributes, you normally need to submit them by cascading them within the Extra tags.
Take a look at the example feed structure below to see what a Vivino XML feed looks like with all the mandatory attributes and a few recommended extra attributes.
Example Feed Structure For Vivino
Here’s a sample Vivino feed structure that you can follow to create a Vivino feed:
<vivino-product-list>
	<product>
		<product-name>Apothic Winemaker's Blend Red California 2013</product-name>
		<price>7.45</price>
		<quantity-is-minimum>false</quantity-is-minimum>
		<bottle_size>750 ml</bottle_size>
		<bottle_quantity>1</bottle_quantity>
		<link>http://www.wayback-wines.com/california/wine-12345.html</link>
		<inventory-count>20</inventory-count>
		<product-id>1125</product-id>
		<extras>
			<producer>Apothic</producer>
			<wine-name>Winemaker's Blend Red</wine-name>
			<appellation>California</appellation>
			<vintage>2013</vintage>
			<country>United States</country>
			<color>Red</color>
			<upc>0123456789001</upc>
			<varietal>70% Merlot, 25% Cabernet Sauvignon, 5% Malbec</varietal>
			<alcohol>13.4%</alcohol>
			<description>This is a great wine from Apothic with good value.</description>
			<ageing>12 months in oak and 12 months in bottle</ageing>
			<image>http://www.wayback-wines.com/wp-content/uploads/img/2535550.jpg</image>
		</extras>
	</product>
</vivino-product-list>
Now that you know the attributes to include in the feed, let us look at how you can generate Vivino XML feed easily using a WordPress plugin.
7 Steps To Generate Vivino Product Feed In Your WooCommerce Wineshop
Creating an XML feed manually for all of your products is no longer required as there are several tools out there that you can use to easily generate a product feed for Vivino.
In this guide, I will show you how you can generate a product feed for Vivino wine selling using Product Feed Manager for WooCommerce which is one of the easiest plugins to use and has a pre-built template to help you generate Vivino XML feed in just a few clicks.
Follow these 7 quick steps below to use the plugin easily and generate Vivino product feed real accurately.
Step 1 – Install And Activate Product Feed Manager For WooCommerce
1. Go to Dashboard > Plugins > Add New

2. On the Search bar, search for Product Feed Manager for WooCommerce, and you will see the plugin logo.

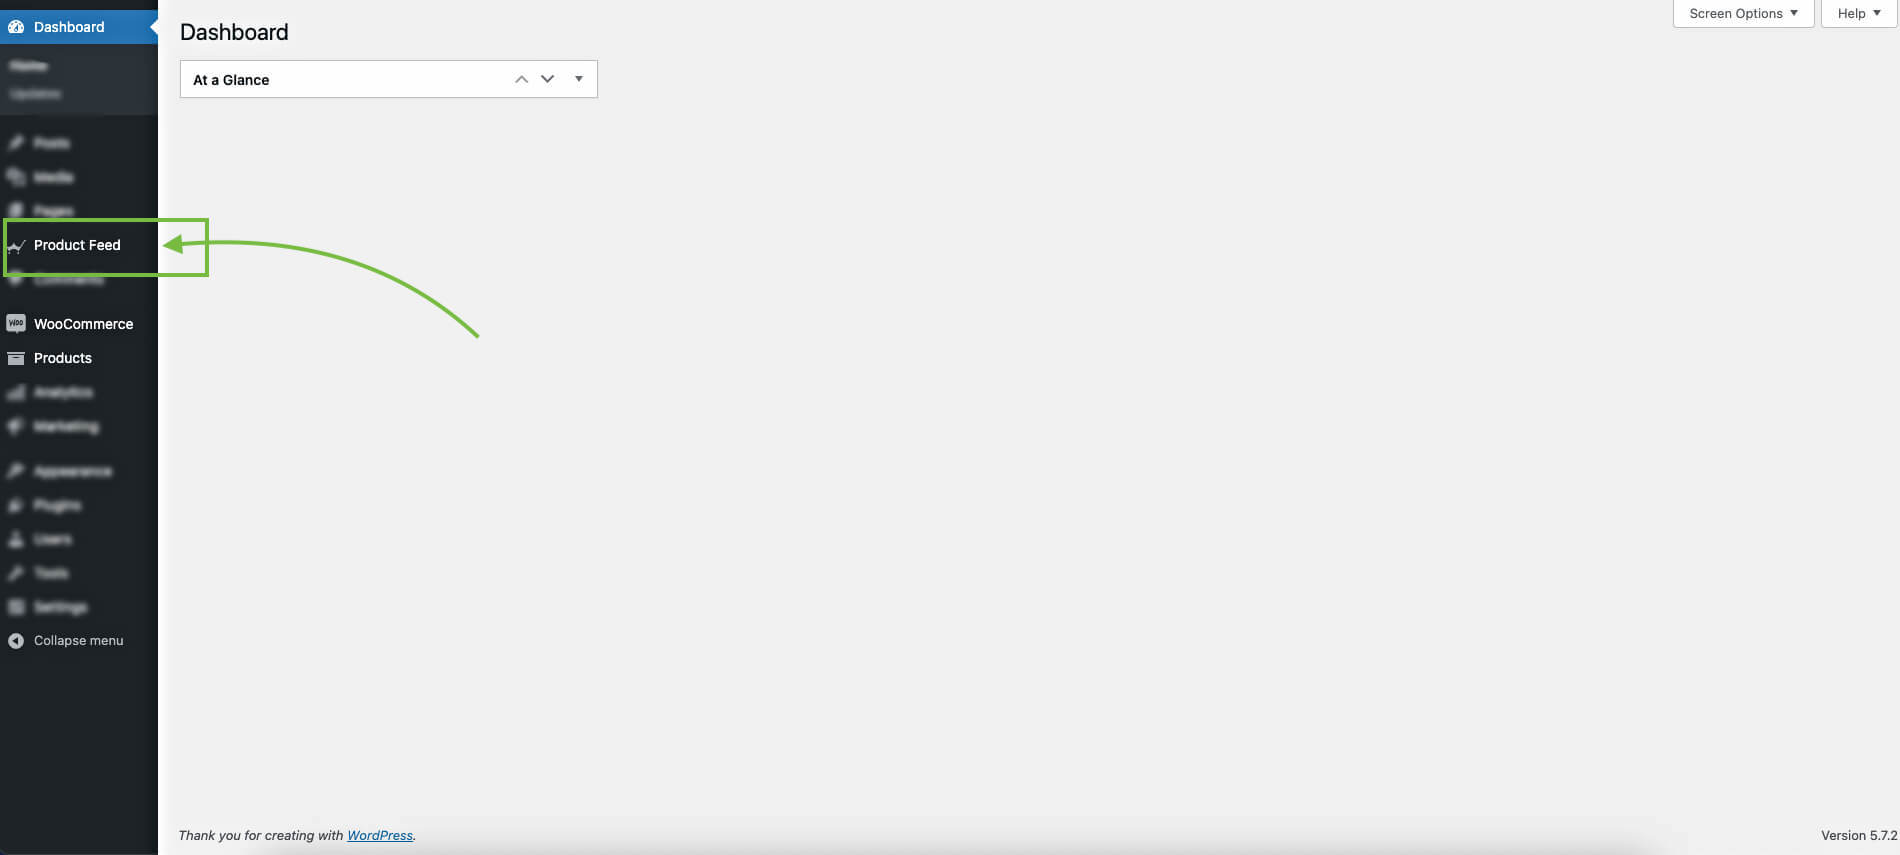
3. Install and Activate it. Once activated, you will find the menu Product feed on your dashboard.
Step 2 – Import Vivno Template For Feed Generation
1. On your dashboard, click on Product Feed and then click on Add New Feed option.
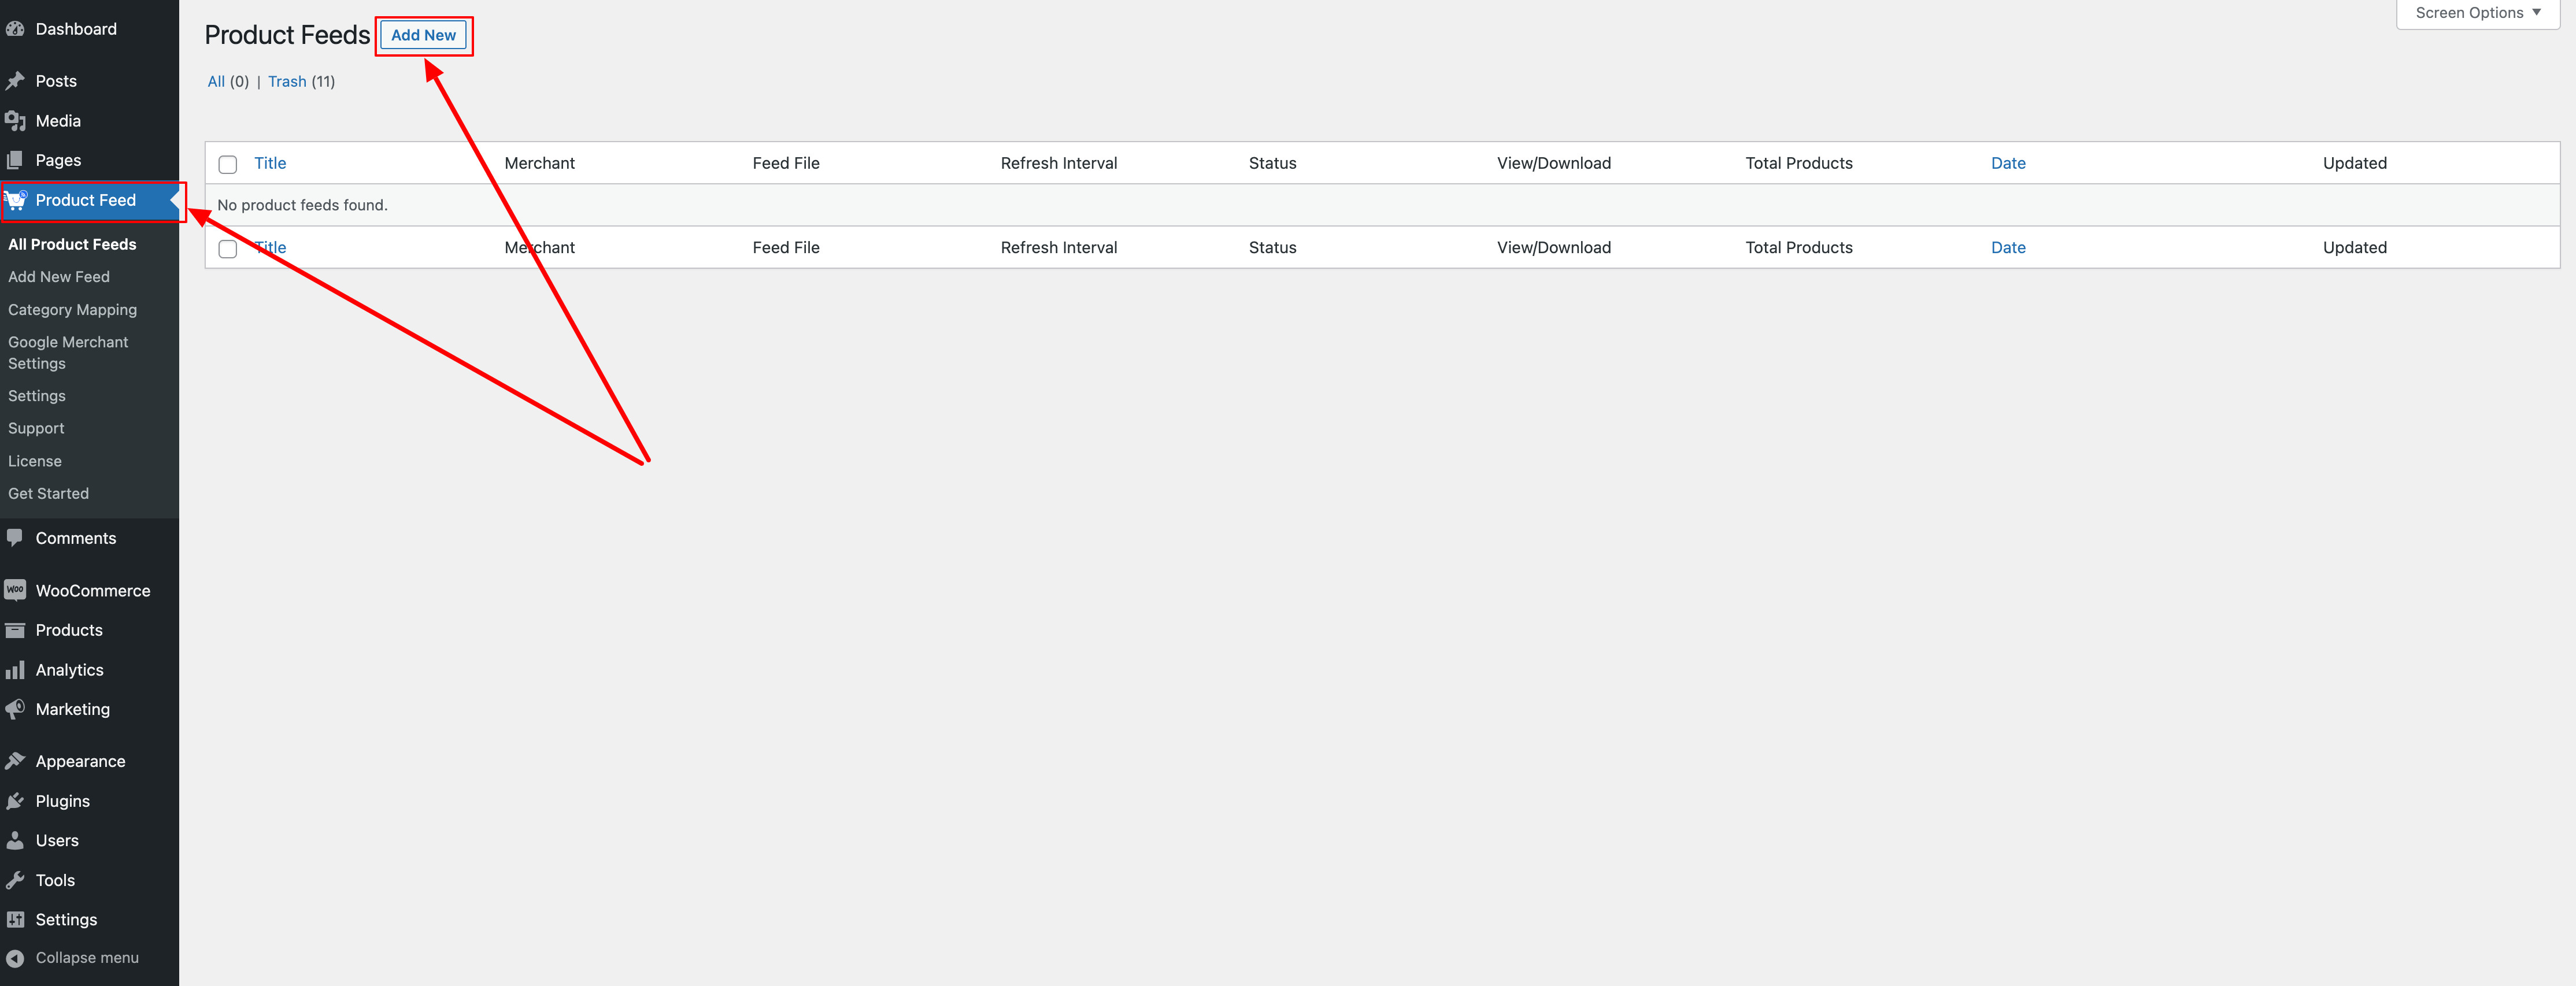
It will take you to the feed creation page.
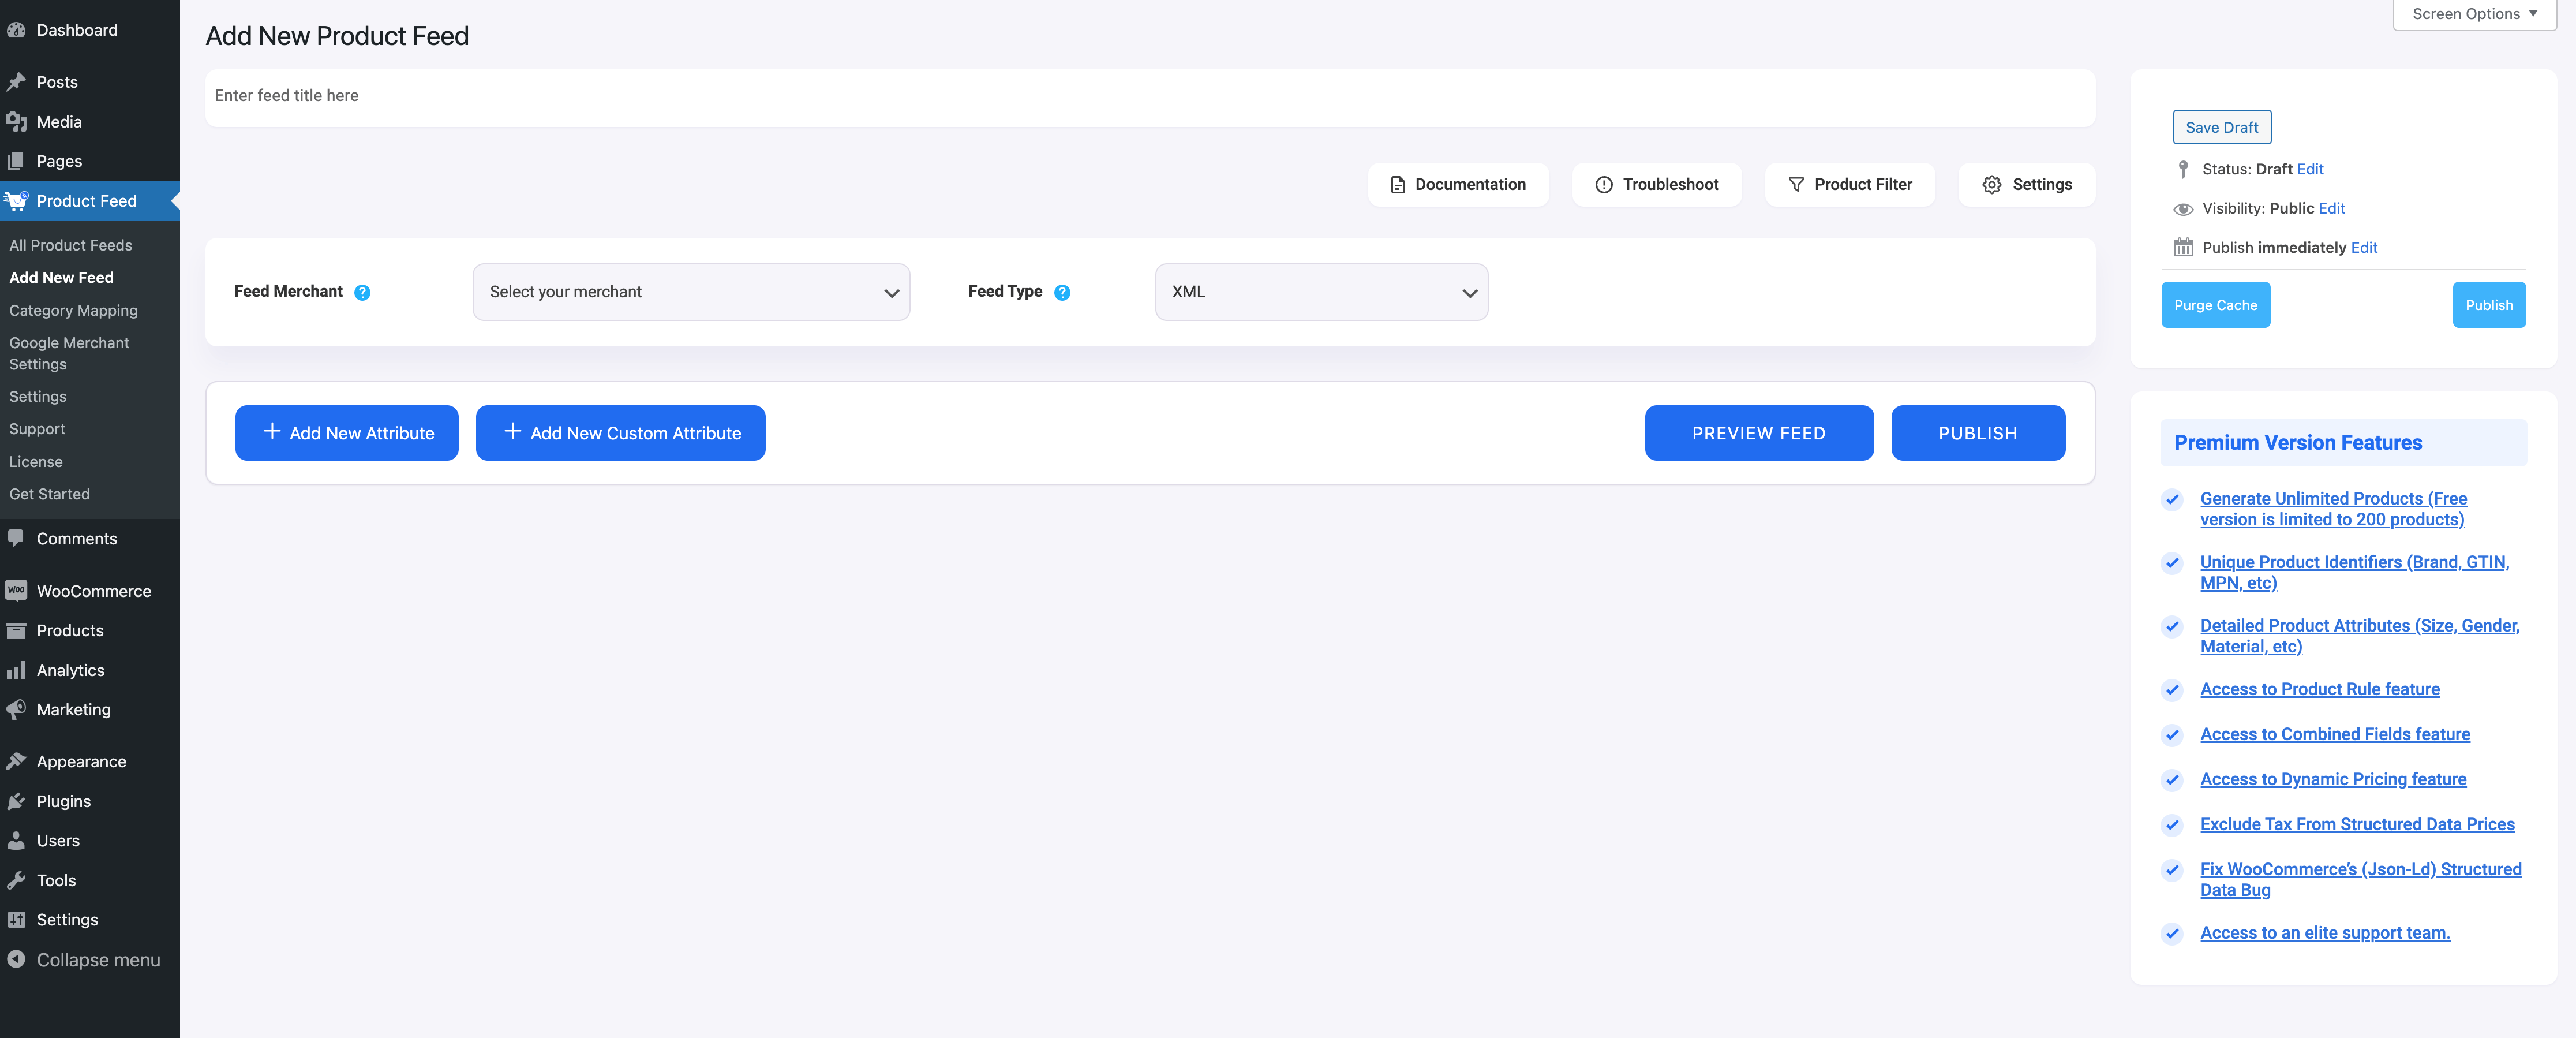
Here, on the top you will get an option to give a name to your feed, you can skip giving your feed a name if you want.
Click on the Feed Merchant Dropdown and you will get the list of all the supported merchants.
2. You can scroll down this merchant dropdown list or you can type Vivino in the search box, and you will get the Vivino option in the list.
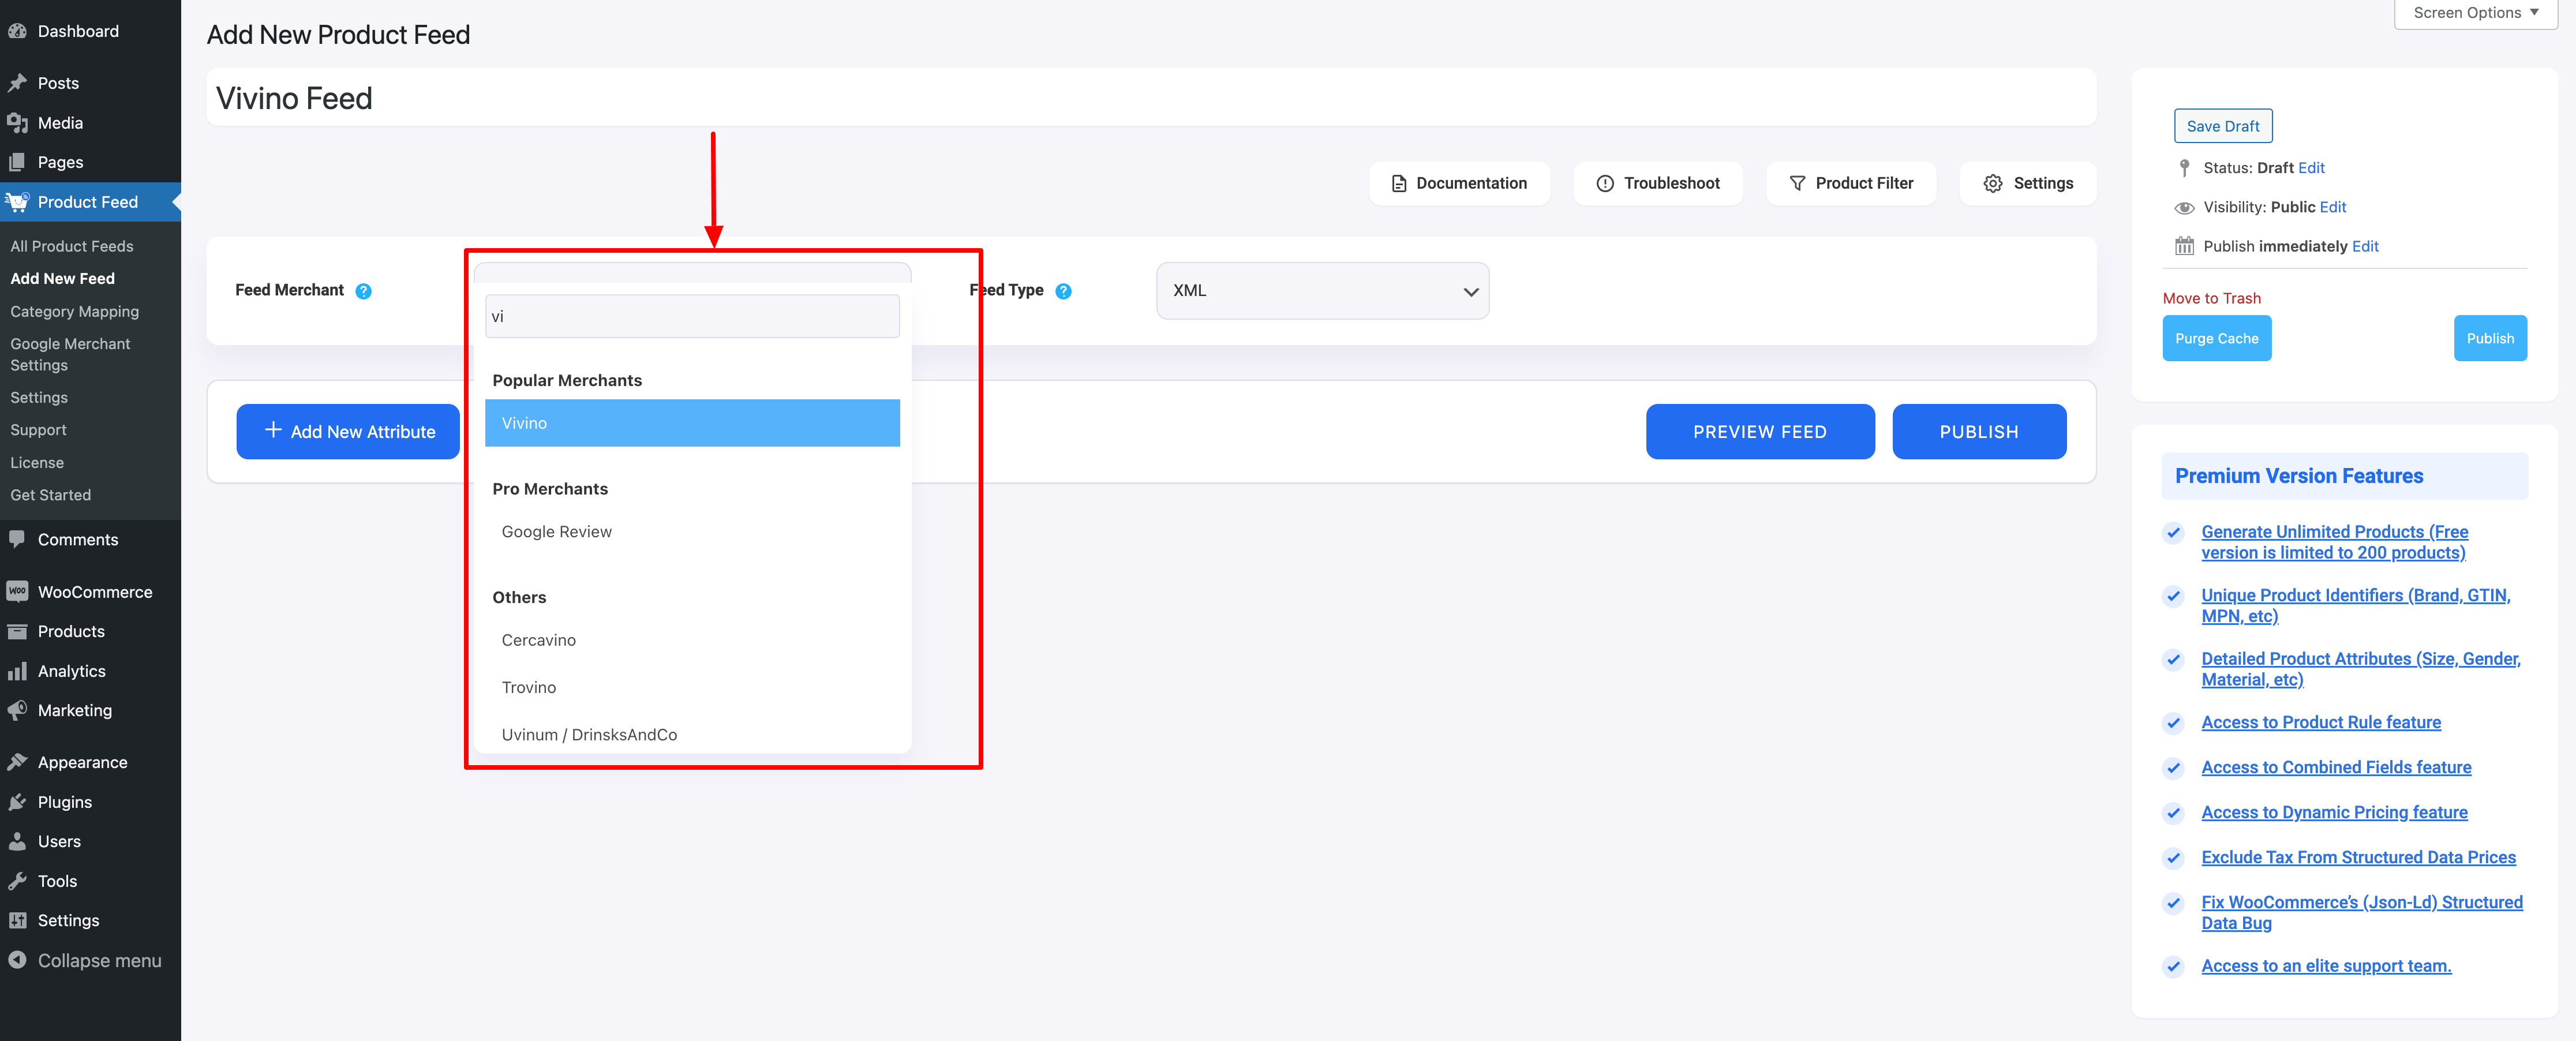
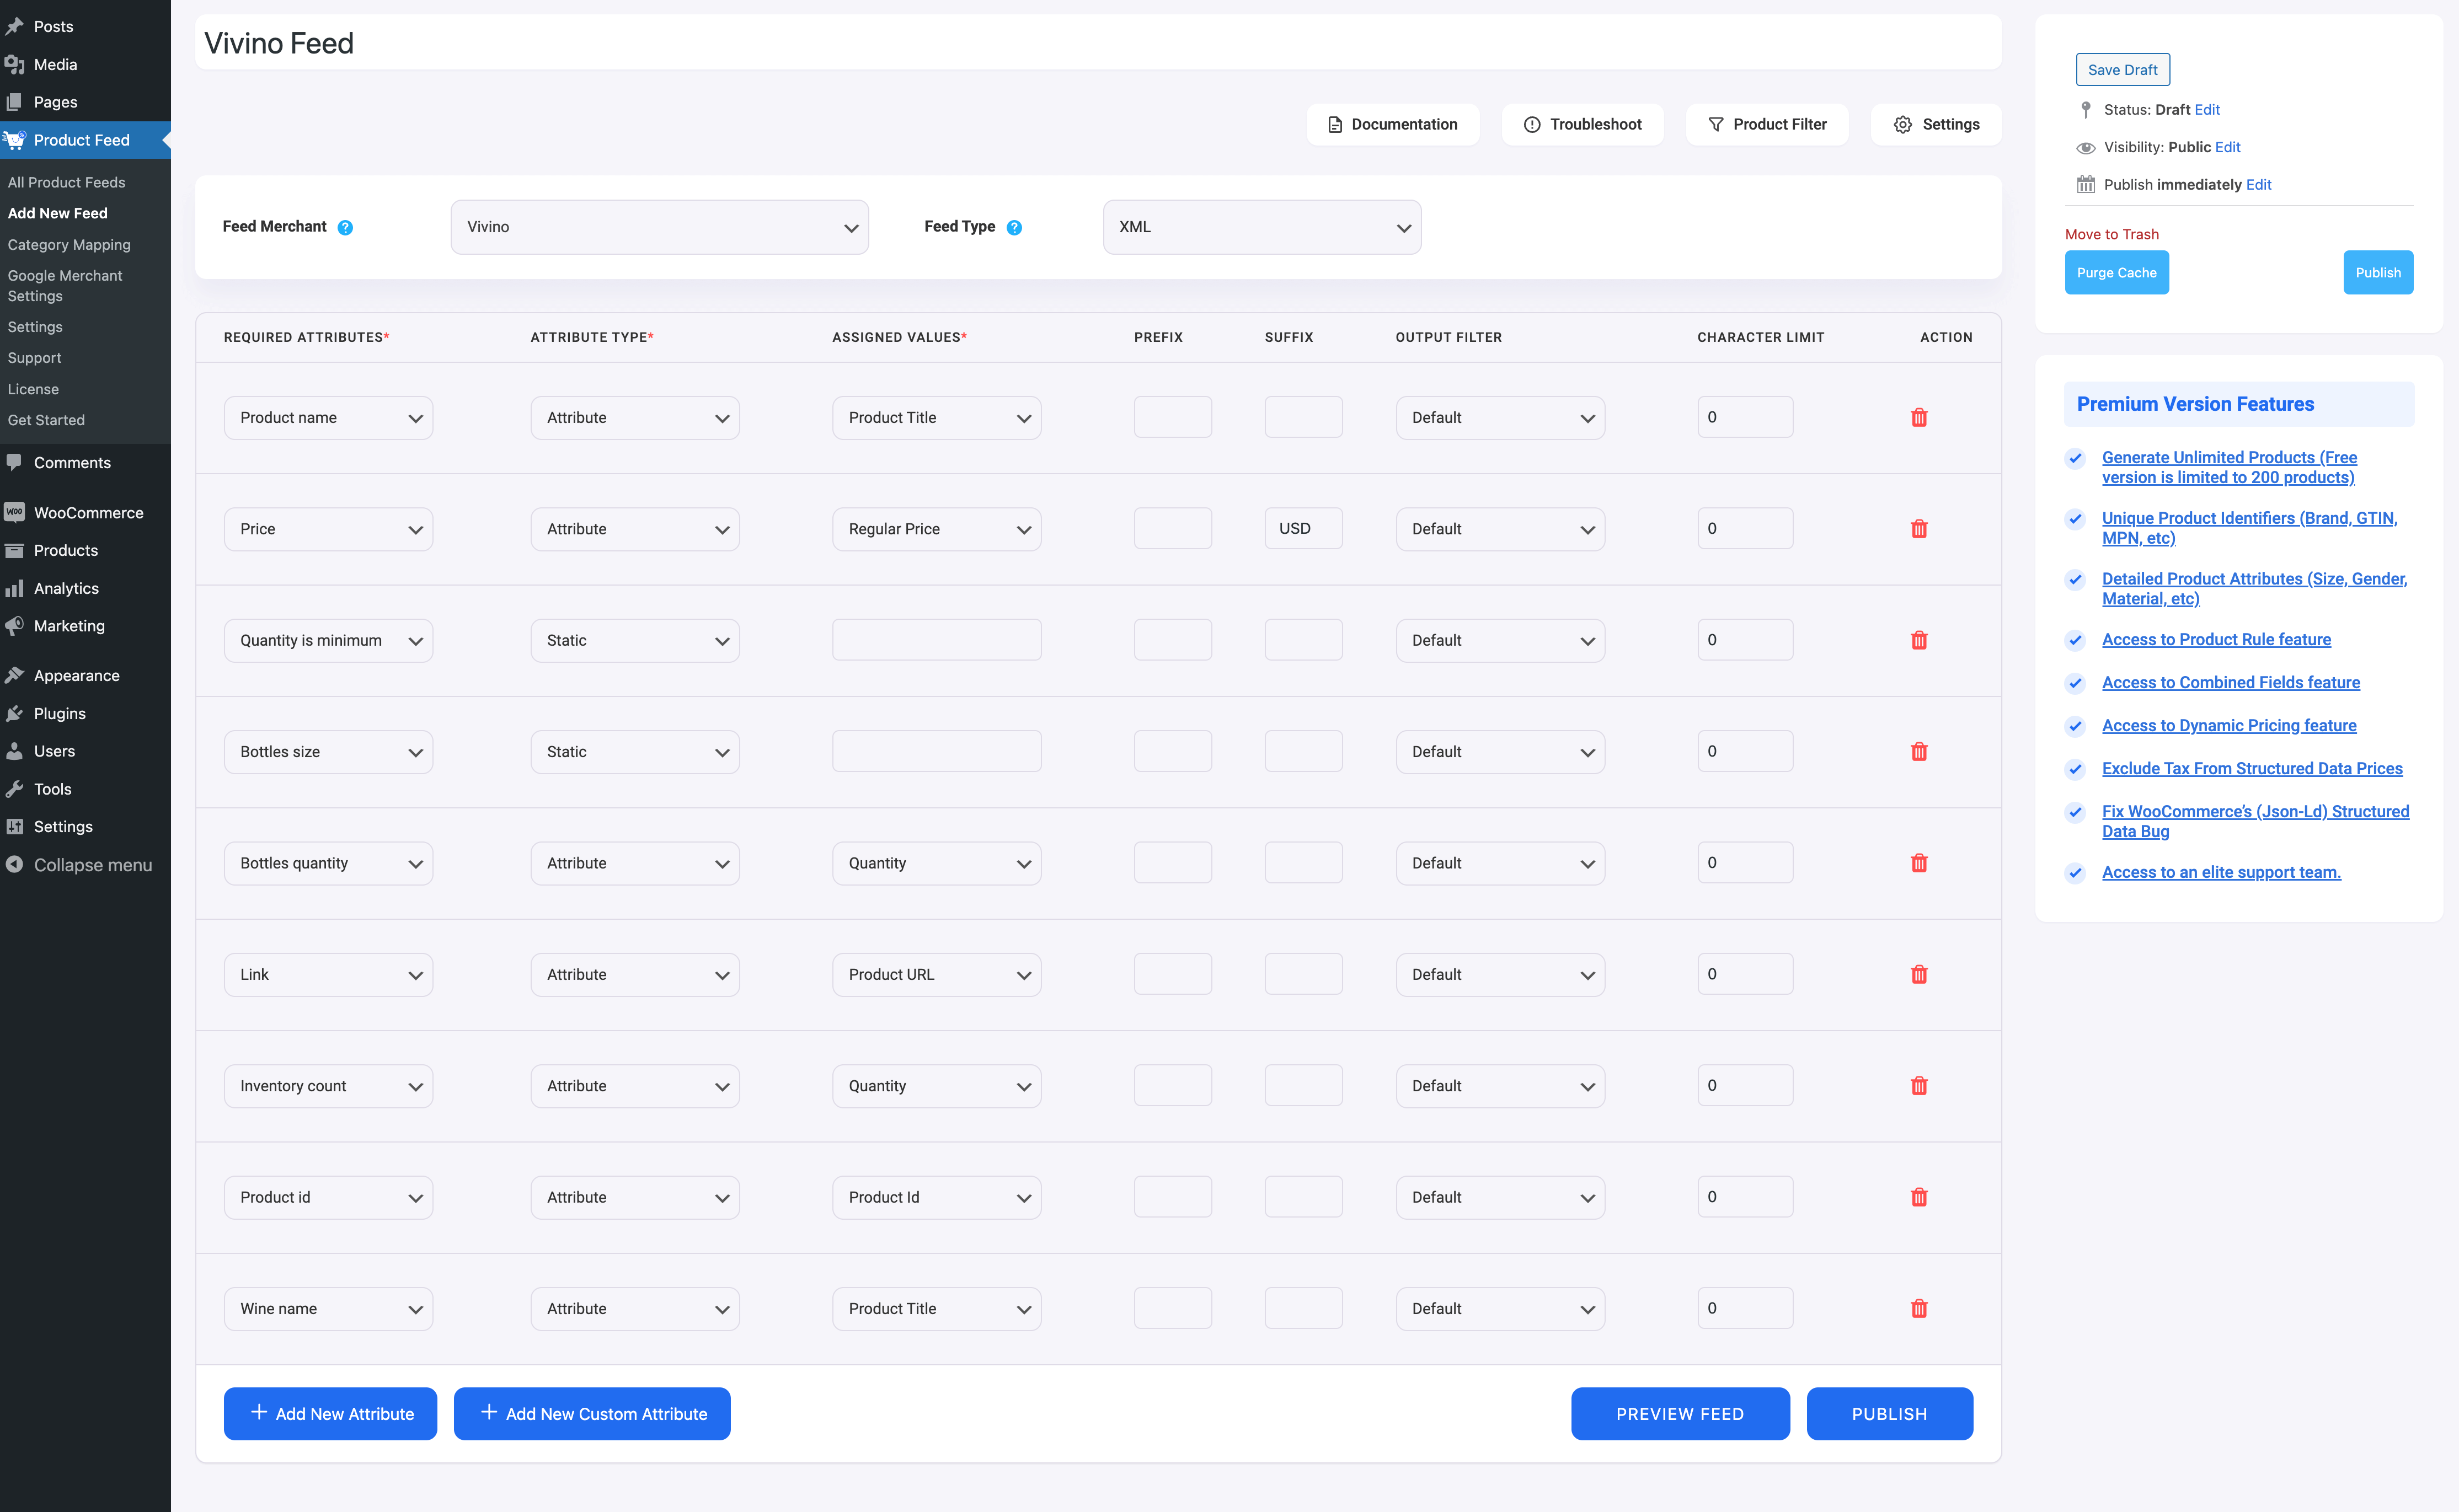
Select Vivino, and all the required attributes of Vivino will be loaded below.
Step 3 – Feed Configuration Options
Now, you can see four buttons under the Feed Title text box, Documentation, Troubleshoot, Product Filter, and Settings.

1. Clicking on the Documentation button will take you to the Product Feed Manager documentation section. Here you will get all the necessary docs that you can use to create a feed successfully.
2. If you are having any issues generating feed, click on this Troubleshoot button, it will take you to the Troubleshoot page, it could be helpful for you.
3. If you want to use any filter or condition, you can click on the Product Filter option, and a drawer will slide in from the right side of the window, and there you will get the following filters:
- All Featured Items
- Custom Filter
- Category Filter
- Tag Filter
- Product Filter (Pro)
- Product Rule Feature (Pro)
You can select any filter option and use them as per your need and click on the Close button when done.
4. Now, to schedule your feed or to choose which type of products will be included in your feed, click on the Settings button, and you will get a list of options to exclude or include products.
Step 4 – Use The Vivino XML Feed Template
1. If you look at the Feed Merchant dropdown button, there you will get another dropdown Feed Type, you can click here to set the type of this feed. You can set different types of feeds depending on what types of feeds this merchant supports or what types of feeds this Product Feed Manager has the support for.
For Vivino, keep the Feed Type as XML.
2. Now, in the attributes section, you will see that all the attributes are under the Required Attributes column, and their values are set according to the attributes under the Assigned Values column.
You can change any values to any attributes, simply click on the value dropdown, and select your preferred value.
All the required attributes will appear below. Now, most of the attributes will already be configured but notice that some of these attributes are unassigned.
Step 5 – Assign The Right Values To Unassigned Attributes
You will need to assign values for the following:
- Quantity is minimum
- Bottles size
- Bottles quantity
1. Quantity is minimum
- Assign the value as True if the price you submitted is a discounted price and will be applicable only if a certain quantity is purchased.
- Assign the value as False if the price you submitted is applicable for any number of bottles purchased.

2. Bottles size
Input an accepted bootle size for each product.

3. Bottles quantity
The bottles quantity mainly indicates the number of bottles you are offering at the given price. So assign a value to it.

Step 6 – Publish & View Your Vivino XML Feed
1. Once you are done with the attribute, click on the Publish button on the bottom or Scroll to the top and click on Publish button.
![Quick Guide To Generate Vivino Product Feed - WooCommerce [2024] 1](https://rextheme.com/wp-content/uploads/2022/06/Publish-Vivino-Feed-1024x429.png)
A progress bar will appear to show that the feed is being generated.
2. Once updated, you will get a notification saying Product Feed Updated, and you will get the option to view or download the feed.
Step 6 – Submit Your Feed On Vivino And Boost Your Wine Sales
Now that you have the feed ready, you can log in to your Vivino merchant account and submit your product feed. Once listed, you will start getting more traction soon.
Conclusion
As you saw above, this is how easily you can generate a product feed for Vivino using Product Feed Manager for WooCommerce.

Initially, test out the free version of the plugin or take a live preview.
Once you are sure the plugin does what is claimed, you can go ahead and think about upgrading to Pro.
Promoting via Vivino is the best decision most wine shops have ever taken. It’s about time you should also sell wine online through this trusted marketplace, and boost your revenue.


![Quick Guide To Generate Vivino Product Feed – WooCommerce [2024]](https://rextheme.com/wp-content/uploads/2021/05/How-to-Generate-WooCommerce-Product-Feed-For-Vivino.jpg)
