![Complete Guide To Offload WordPress Media Files Using Cloud Storage And Reduce Hosting Cost [2023]](https://rextheme.com/wp-content/uploads/2020/09/Offload-WP-media-files-using-cloud-storage-Featured-image.png)
Your website performance depends a lot on your hosting plan and the number of media files you load on your site.
If you run a WordPress site that has a lot of media files and assets, then chances are, over time, your site will get slower and there will be more server requests when hosting your files.
This will have a great impact on your ROI as people will tend to leave your site if it’s too slow. Plus, if the server requests exceed your hosting provider’s limit, then your website server may even crash, thus losing more business.
Did you know
– 53% of users leave a site that takes longer than three seconds to load
– a faster web page results in a 16.5% increase in conversion rate?
One of the best solution to this is to host and serve your website media files from cloud storage.
Offloading your website media files to cloud storage can help you avoid exceeding your hosting storage limits. And if you serve these media files from cloud to your website, then it will significantly speed up the loading time of your website media.
In the long run, you will save more on hosting costs.
Today, I will give you a step-by-step guide on how you can offload your WordPress media files to your preferred cloud storage easily.
After reading this guide, you will be able to –
- Learn how you are losing money through your hosting provider
- Understand how cloud storages is a better solution
- Learn about the most reliable cloud storage services
- Easily offload your WordPress media files to cloud storage
Once you learn all that, eventually, you will be able to get a faster website, with no server overload, and reduced hosting costs.
So let’s gets started.
Inhoudstafel
1. Why Use Cloud Storage Service To Serve Website Media Files
2. Best Cloud Storage Services To Offload And Serve WordPress Media Files
3. How To Offload Media Files From WordPress To Cloud Storage?
Why Use Cloud Storage Service To Serve Website Media Files
The first question in your mind is probably that why you should rely on a cloud service to serve media files, rather than your trusted hosting provider.
There could be many reasons, but let me give you the most significant ones.
- Stop Wasting Tons Of Money On Hosting Cost
- Avoid Server Failure During Traffic Surge
- To Get Better Website Performance At All Times
So let’s learn exactly how these are possible.
1. Stop Wasting Tons Of Money On Hosting Cost
If you are using a dedicated server from providers such as WP Engine, or GoDaddy, you probably know that you have a limited Storage per plan. The moment you exceed that limit, you need to jump to the next plan to get more storage which may be an extra $10 to $15 per month.
In such situations, cloud storages are much more convenient. For example, Amazon S3 has a standard plan where you only pay a low amount such as 0.023 per GB which amounts to USD = 1.15 USD per month for up to 50 GB data space. That’s a big saver per, totaling over $90 per year.
2. Avoid Server Failure During Traffic Surge
For the above-mentioned hosting providers, one big issue they face is the ability to handle huge concurrent traffic. If you get a sudden surge in concurrent traffic, let’s say about 1000 visitors to your site at a time, chances are your server will crash.
This is something that cloud storages excel at since they have tons of more data centers than a hosting provider. So, even if tons of people are viewing the same media file at the same time, there will be no chance of server failure.
3. Get High Website Performance At All Times
Now, you might come across shared hosting providers such as Bluehost or Dreamhost who is running a crazy marketing scheme, claiming that you will get unlimited bandwidth and 50 GB data space for less than $5 a month.
Wow, that’s a great offer, right? But there are a few catches.
- First, even if they claim that you will get unlimited bandwidth, once you reach a certain limit, you will face hosting throttle, i.e., your server loading time will be significantly slowed down on purpose.
This is a common practice for most shared hosting providers to avoid over-usage of the server that is shared among many other users.
- Second, such shared hosting providers assume that you will not exceed your limit.
The moment you do, they will inform you that they are unable to provide you high performance at a shared hosting environment and will suggest you use their dedicated hosting server.
However, even if you go with their dedicated servers, it will still have the same issue with handling concurrent traffic.
- Finally, another significant thing to look at is the ability to choose a data center to serve media from, in cloud storage.
Suppose most of your ideal prospects are from Germany. Then you can choose a nearby data center for your cloud storage to serve media from. In the case of an ordinary hosting provider, you do not have the option to do such.
This is has a good effect on the site’s loading speed, especially when you have large media files, or when you have many media files on a single web page.
Now that you understand how a hosting provider is not always the best to rely on when serving huge website media files, let’s look at the most reliable Cloud Storages out there.
Best Cloud Storage Services To Offload And Serve WordPress Media Files
There are many cloud storage services available, but let us look at the best cloud storage services that we recommend for your WordPress site.
1. Amazon S3 (AWS)

Amazon S3 is a core part of Amazon Web Services through which you can store and retrieve any amount of data, at any time, from anywhere on the web.
It has a proven track record of being very fast, reliable, and offers you comparatively very low storage costs.
Netflix, Airbnb, SmugMug, Nasdaq, etc. are some of the prominent users of Amazon S3. For building or migrating applications to AWS, certain AWS application development services can be useful. However, organizations may choose to migrate to alternate cloud platforms like Microsoft Azure for various reasons. In such cases, enlisting AWS to Azure Migration Services can greatly facilitate the transition.
Some notable perks of Amazon S3 –
- Highly secured
- Easy to manage & migration
- Comprehensive documentation
- Developers friendly
- Multiple regions
- Server-side encryption
2. Google Cloud Storage
Google Cloud Storage is a part of the Google Cloud Platform, which helps you with your business meet online storage requirements.
The cloud platform itself can help you host software or even websites; however, it is more popular for its cloud storage service.
Google Cloud offers you the performance and scalability of Google’s advanced security and sharing capabilities.
It also offers you three types of storage services:
- Persistent Disks for block storage
- Filestore for network file storage
- Cloud Storage for object storage
These services are the core of the platform and are used by the majority of the Google Cloud service users.
Some notable perks of Google Cloud service-
- Improved Performance
- Better Pricing Plans
- Redundant Backups
- Easy integration
- Extensive documentation
- Many regions available to store your data
3. DigitalOcean
DigitalOcean is well-known for providing high-performance servers. Nowadays, it is definitely one of the top choices to host your website assets and data.
It mainly focuses on three key selling points — simplicity, pricing, and high-performance virtual servers.
Even though their main focus is on cloud computing, many rather prefer using their DigitalOcean Spaces service, which includes 250 GB of storage and 1 TB of outbound bandwidth at only $5 per month.
If you exceed this allocated space and bandwidth, you will be charged $0.01 per additional GB transferred and $0.02 per additional GB stored. This is a great deal if you have tons of media files to offload.
Some notable perks of DigitalOcean-
- Reduced physical distance
- Load static content from the cloud
- Reduced file size to increase site speed
- Software Development friendly
- Excellent documentation.
- User-friendly UI
How To Offload Media Files From WordPress To Cloud Storage?
There could be multiple ways to offload media files to cloud storage from your WordPress site.
But, if you choose one of the three cloud storage services that I mentioned earlier, then the best option is to use a reliable plugin that will let you handle this matter easily.
One such plugin is called Media Storage to Cloud.
Media Storage To cloud
Media Storage to Cloud s a WordPress plugin that will help offload your WordPress media files to your desired cloud storage easily, which includes Amazon S3, Google Cloud Service, and DigitalOcean. Plus, you can serve your WordPress website media files directly from your cloud storage via this plugin.
Best features of Media Storage To Cloud (M2C)
- Easy to offload WordPress media files to cloud storage
-You can easily offload all of your WordPress media files to cloud storage in just a few clicks.
- Serve your website media and content directly from cloud storage
-Once you offload media files to cloud storage, you can then serve WP media files directly from your cloud storage server in a single click. No manual hassle and no time wasted.
- Auto-sync with cloud storage for changes in your media and files
-You can auto-sync your WordPress media library. When you upload images to your media library, they will be automatically offloaded to your cloud storage.
So, if you are looking for a plugin to connect your WordPress site with a cloud storage service, you should definitely use Media Storage to Cloud.
Now, let us look at how you can offload your WordPress media files to each of these cloud storage using Media Storage To Cloud.
- How to offload WordPress media files to Amazon S3
- How to offload WordPress media files to Google Cloud Storage
- How to offload WordPress media files to Digital Ocean Spaces
How To Offload WordPress Media Files To Amazon S3
Follow the steps below to connect and offload your WordPress media files to Amazon S3 cloud storage.
**Make sure you have Media Storage To Cloud installed and activated.
To connect your site with Amazon S3 bucket, make sure you already have an IAM user account on AWS.
Step 1 – Connect Your WordPress To Amazon S3
1. On your Dashboard, look for the menu WP Cloud. Click on it.
It will take you to the plugin interface, and initially, you will be in the Storages tab.
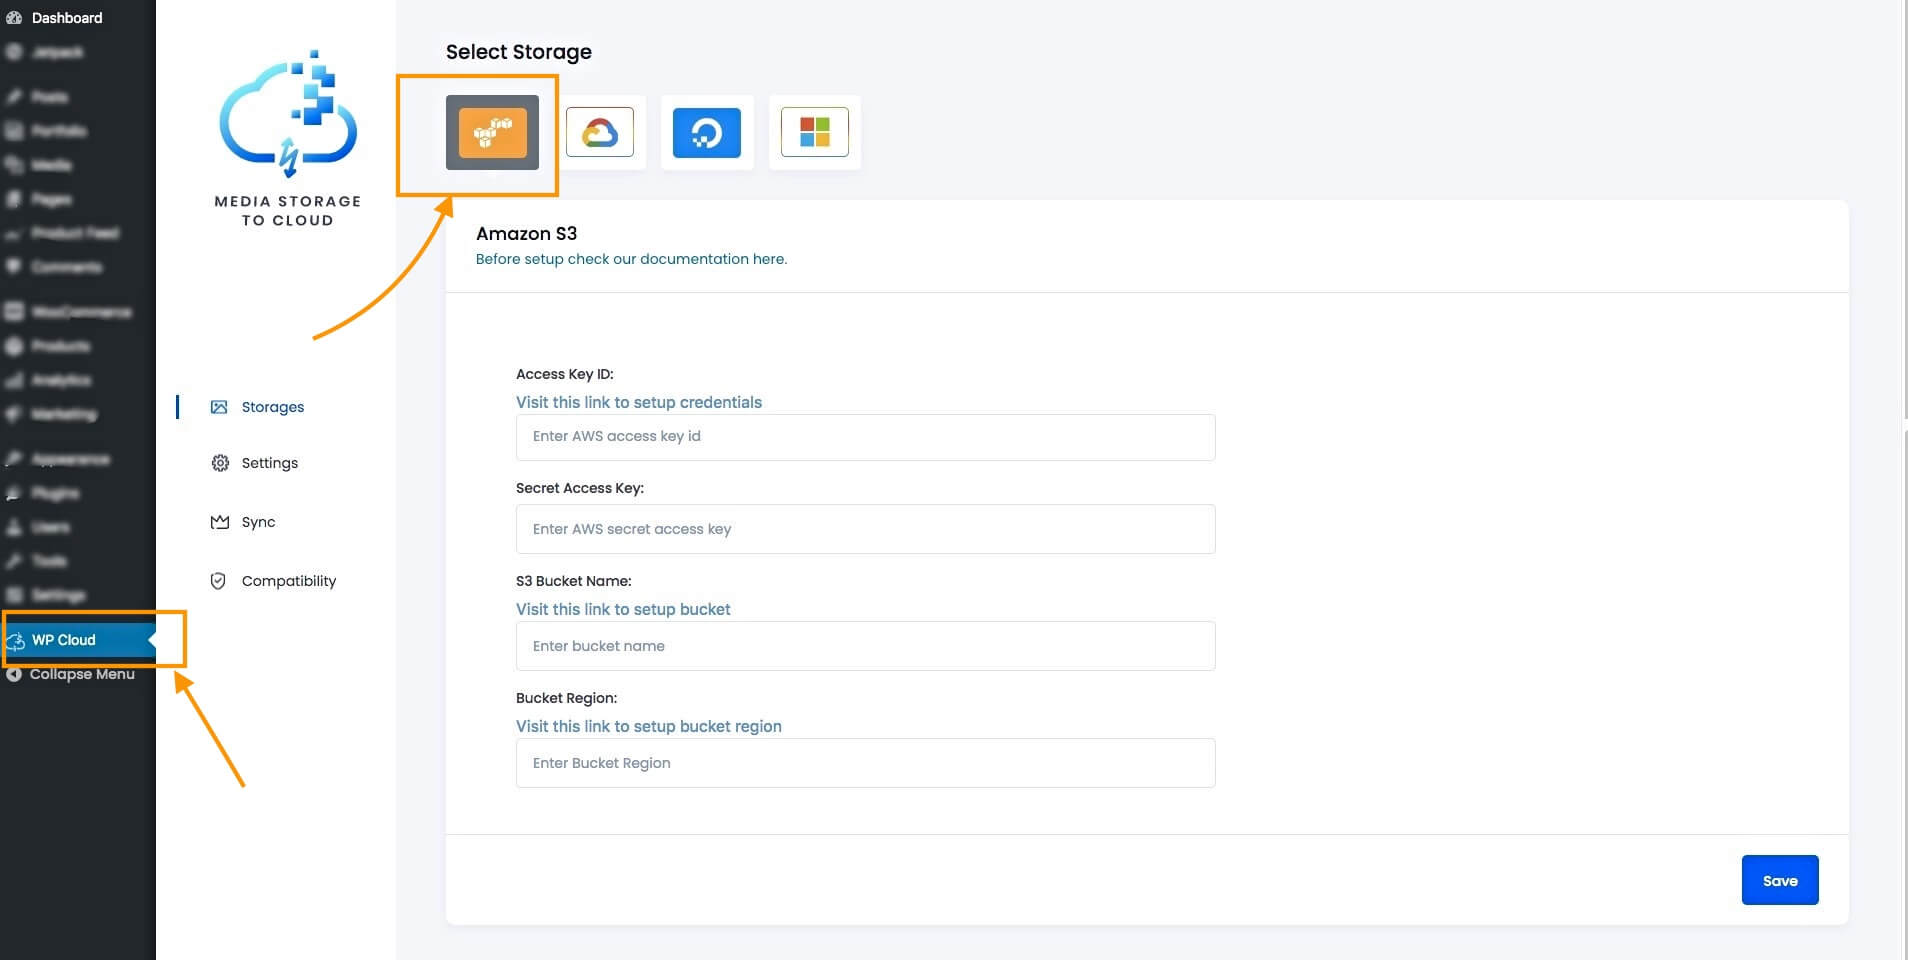
Here, Amazon S3 will be selected by default.
2. Input the required data to connect Amazon S3
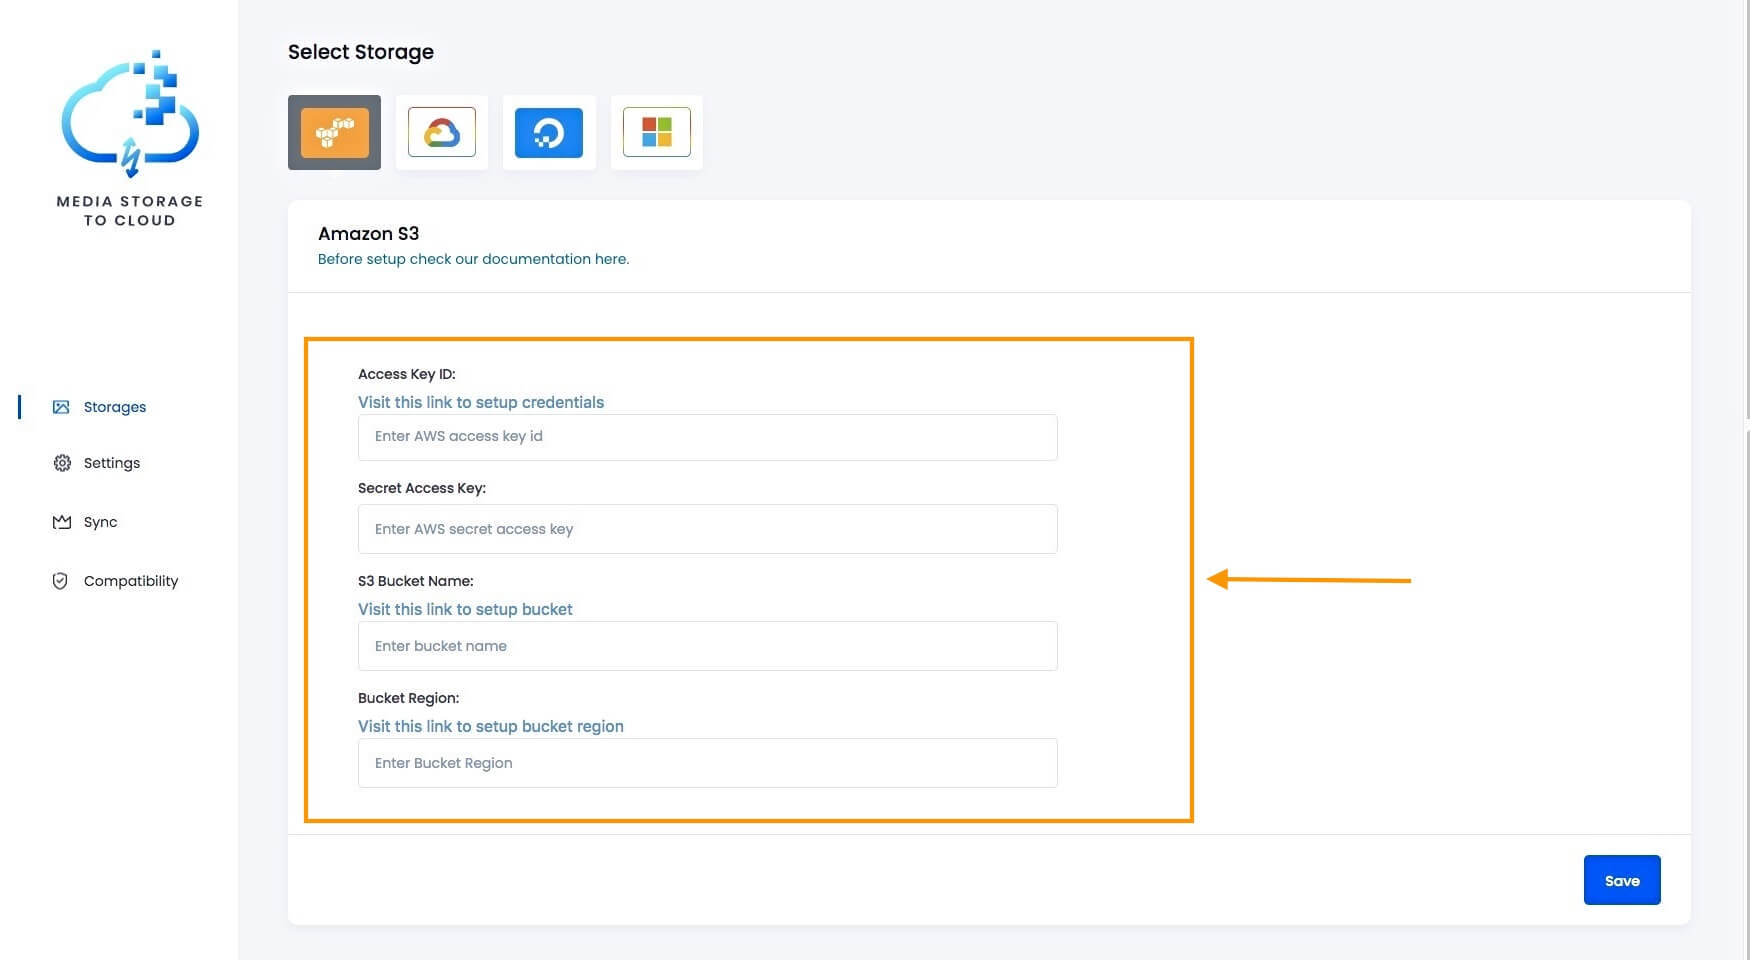
Here, you need to provide the following Amazon S3 credentials:
- Access Key ID
-Insert the Access Key ID of the IAM user account you’ll be using.
(You can collect the Access Key ID here.)
- Secret Access Key
-Insert the secret access key of the same IAM user.
(You can collect the Secret Access Key here.)
- S3 Bucket Name
-Input the name of the AWS bucket you want to authorize
(You check your bucket list or create a new one here)
- Bucket Region
-Enter the region name of your bucket.
(You can collect the Region name here)
3. Now, click on the Save button, and you will get a confirmation message on the top right corner.
This means that now you have successfully connected Media Storage To Cloud with Amazon S3.
Step 2 – Offload Media Files To Amazon S3
1. Now, go to the Sync tab and choose Amazon S3.
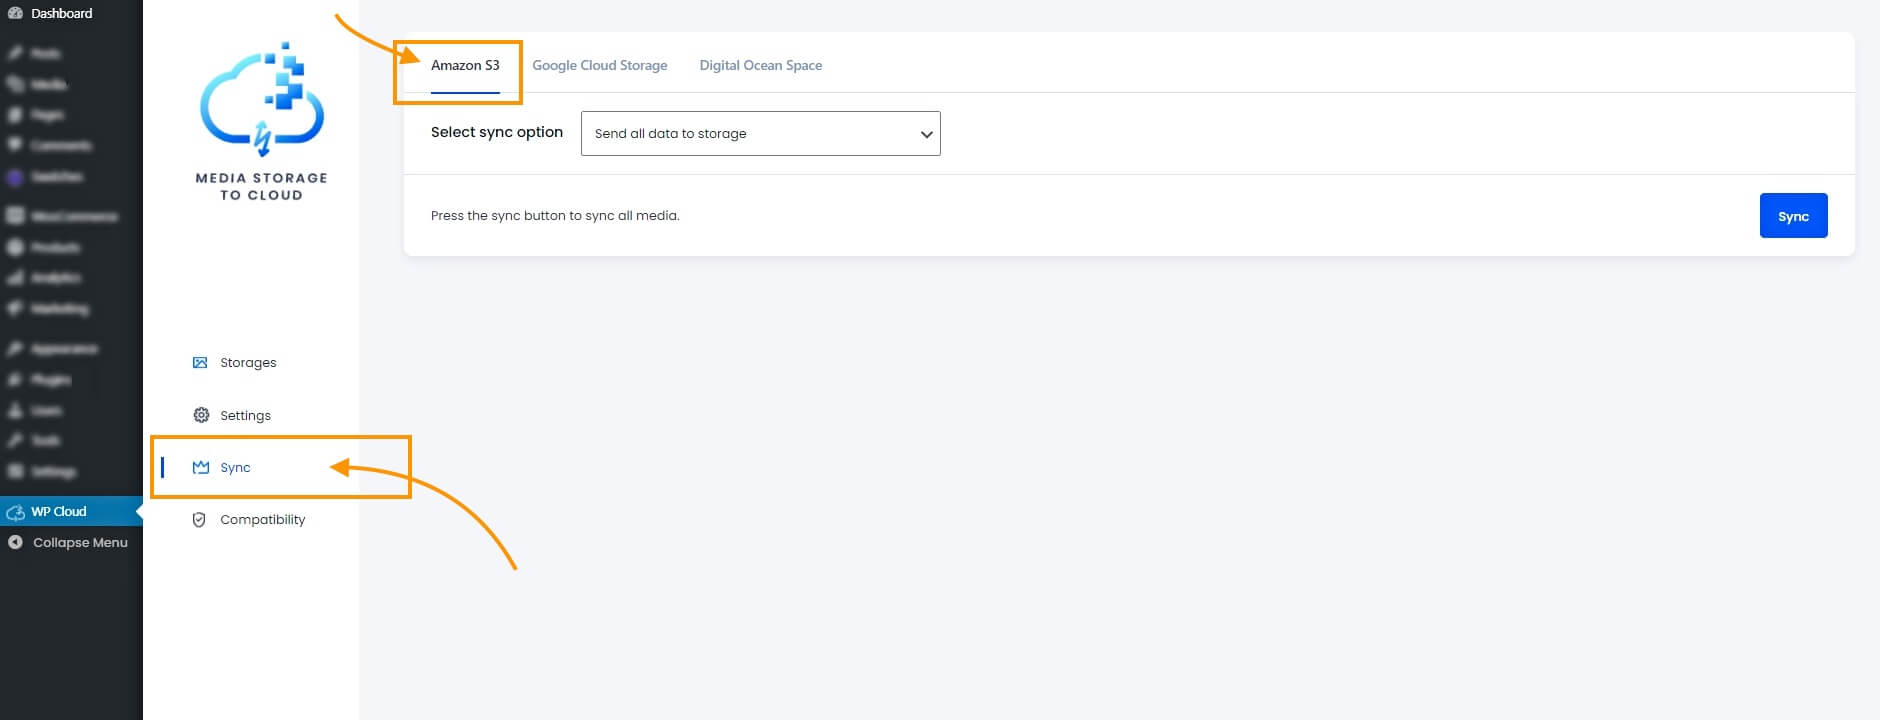
You can see there is an option called Select sync option.
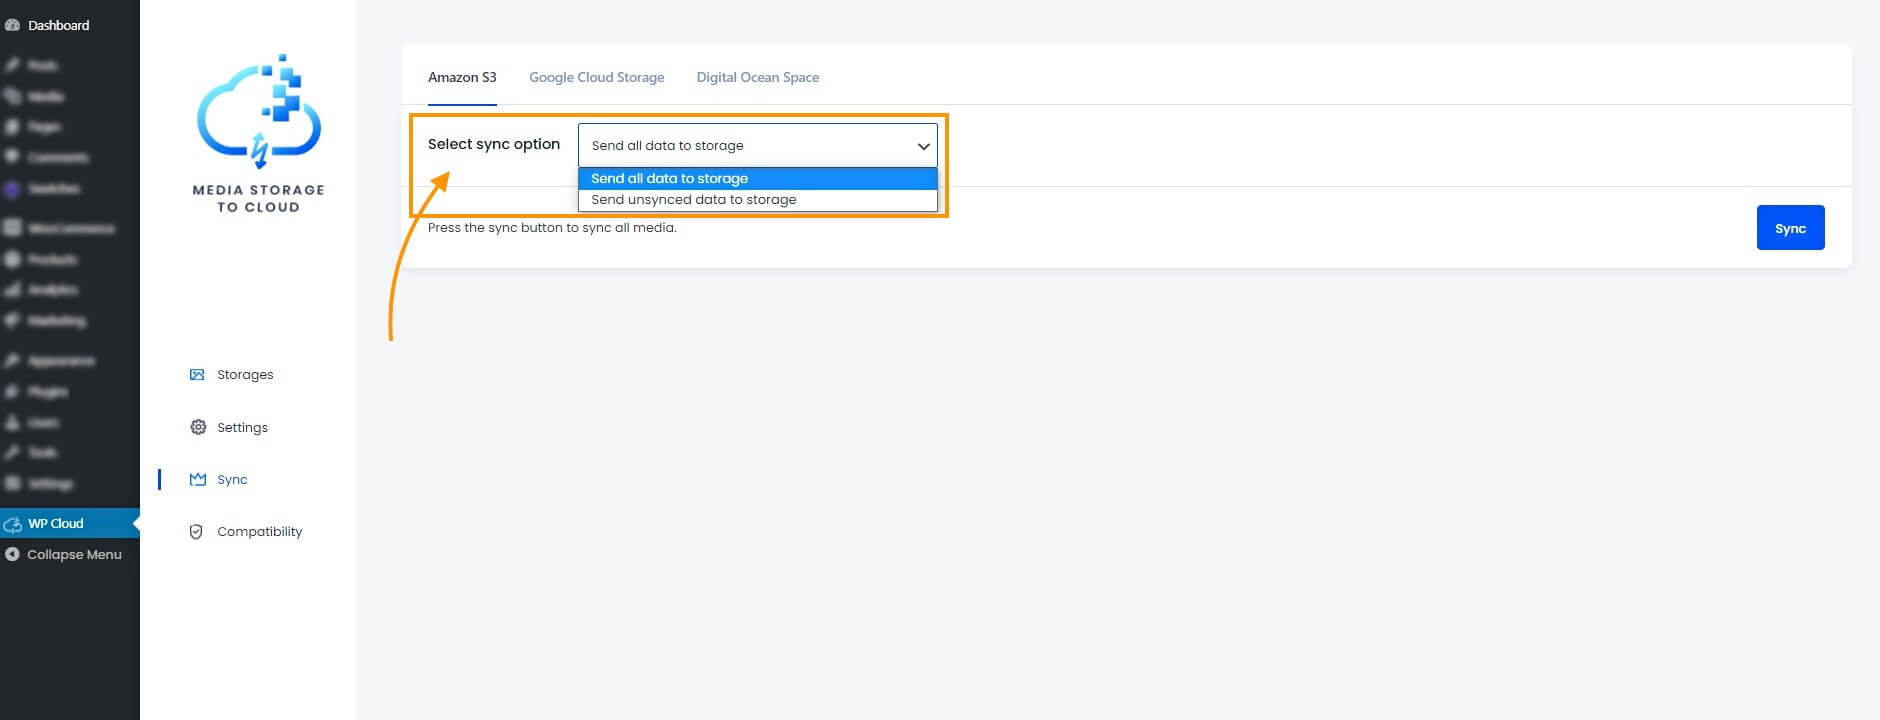
Here you can choose to offload media in two ways.
- Send all data to storage
-Select this option if you want to offload all of your media files to Amazon S3.
- Send unsynced data to storage
-Select this option if you wish to offload new media to Amazon S3, and not the ones you have already offloaded earlier.
If you are a first time user, then select Send all data to storage.
2. Next, click on the Sync button.
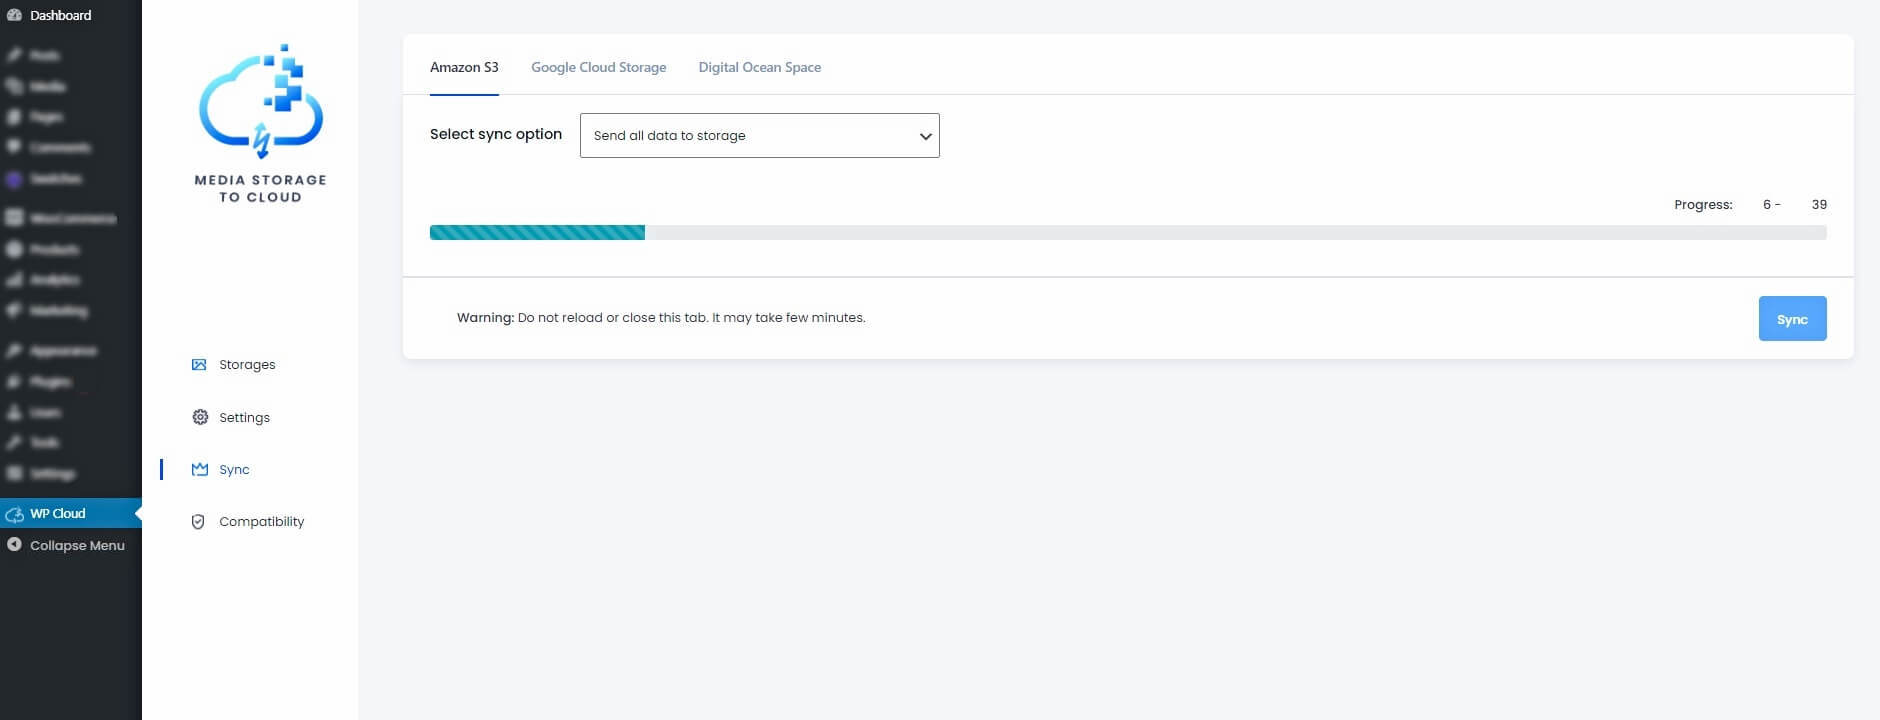
A progress bar will appear while offloading media files to Amazon S3 bucket.
It may take some time to offload all the media files, but do not change the tab as it may hamper the syncing process.
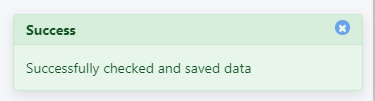
After syncing is complete, a success message will appear on the top right corner.
That’s it. You can then check your Amazon S3 bucket. You will see that all your WordPress media files have been copied to Amazon S3 bucket.
How To Offload WordPress Media Files To Google Cloud Storage
Follow the steps below to connect and offload your WordPress media files to Google Cloud Storage.
**Make sure you have Media Storage To Cloud installed and activated.
To connect your site with Google Cloud Storage, make sure that you already have a Google Service Account and a Google Cloud Storage Bucket.
Step 1 – Connect Your WordPress To Google Cloud Storage
1. On your Dashboard, look for the menu WP Cloud. Click on it.
It will take you to the plugin interface, and initially, you will be in the Storages tab.
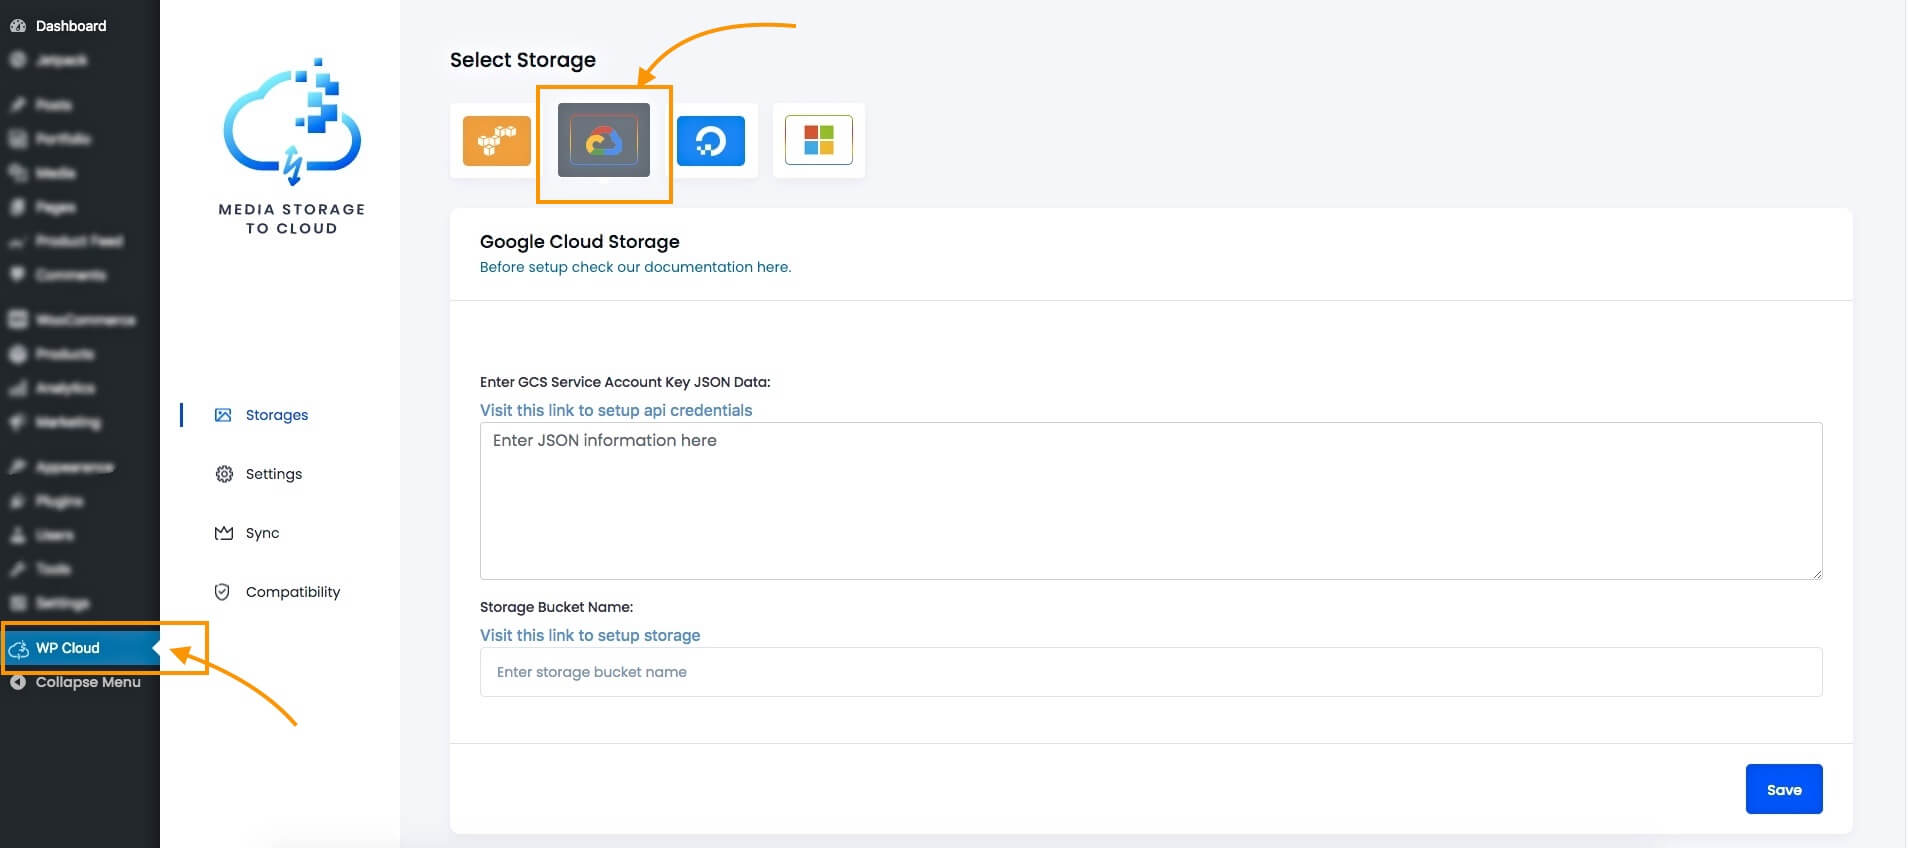
Here, choose Google Cloud Storage.
2. Input the required data to connect Google Cloud Storage.
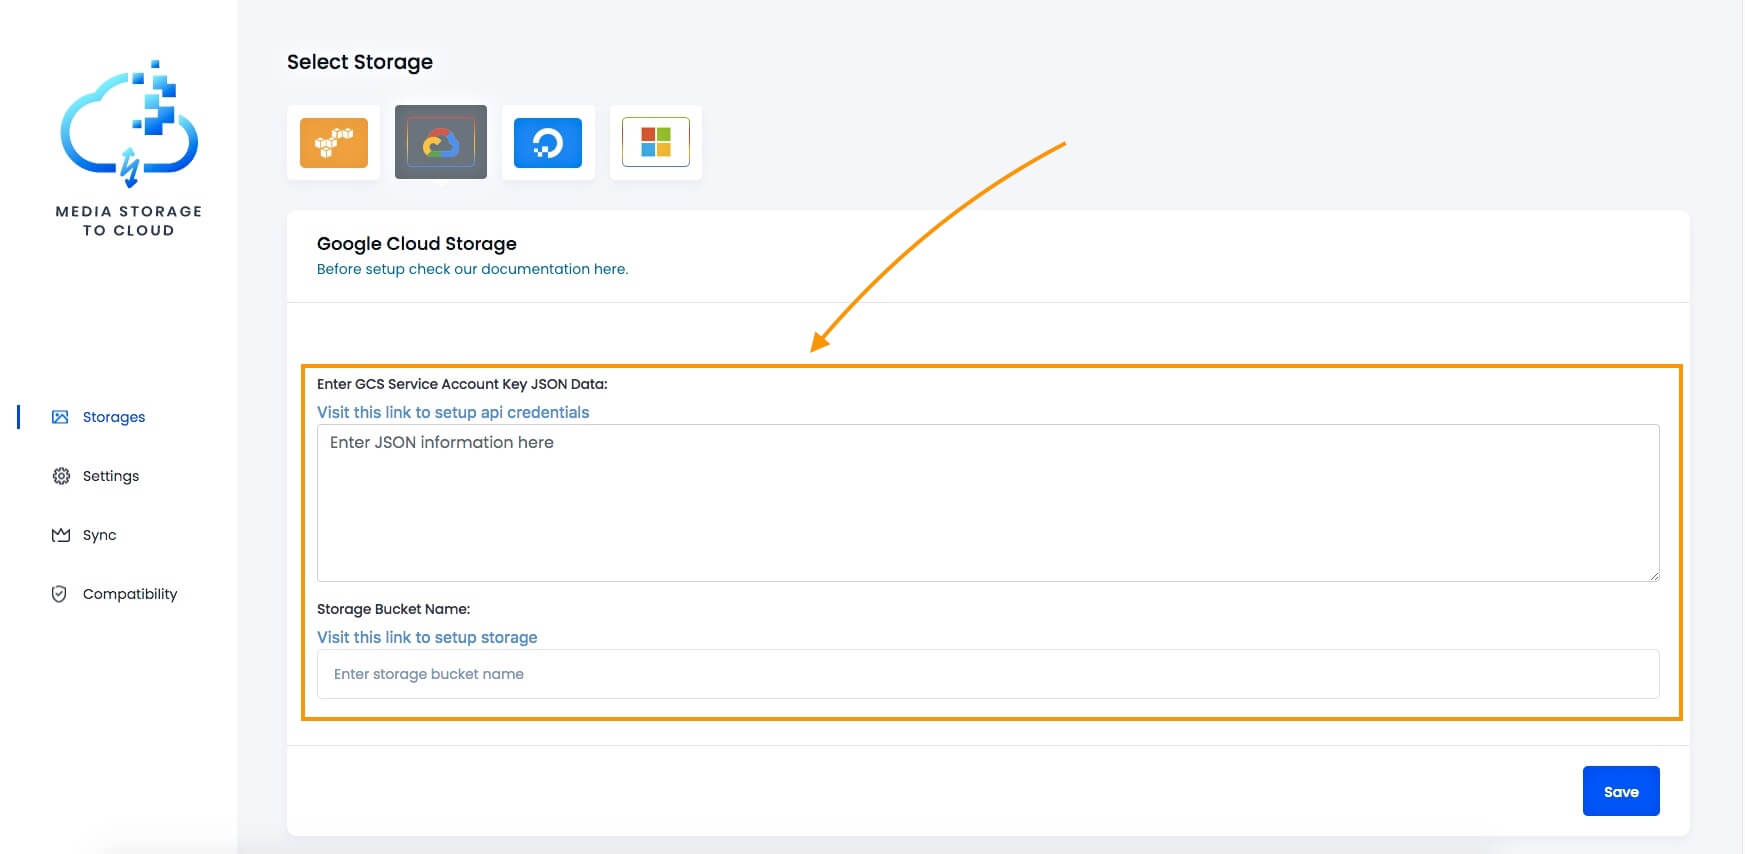
Here, you need to provide the following Google Cloud Storage credentials:
- GCS Service Account Key JSON Data
-You need to collect the Service Account Key JSON Data from your Google Cloud Storage account. (You can collect it from here.)
- Storage Bucket Name
-Input the name of the GCS bucket you want to authorize
(You check your bucket list or create a new one here)
3. Now, click on the Save button, and you will get a confirmation message on the top right corner.
This means that now you have successfully connected Media Storage To Cloud with Google Cloud Storage.
Step 2 – Offload Media Files To Google Cloud Storage
1. Now, go to the Sync tab and choose Google Cloud Storage.
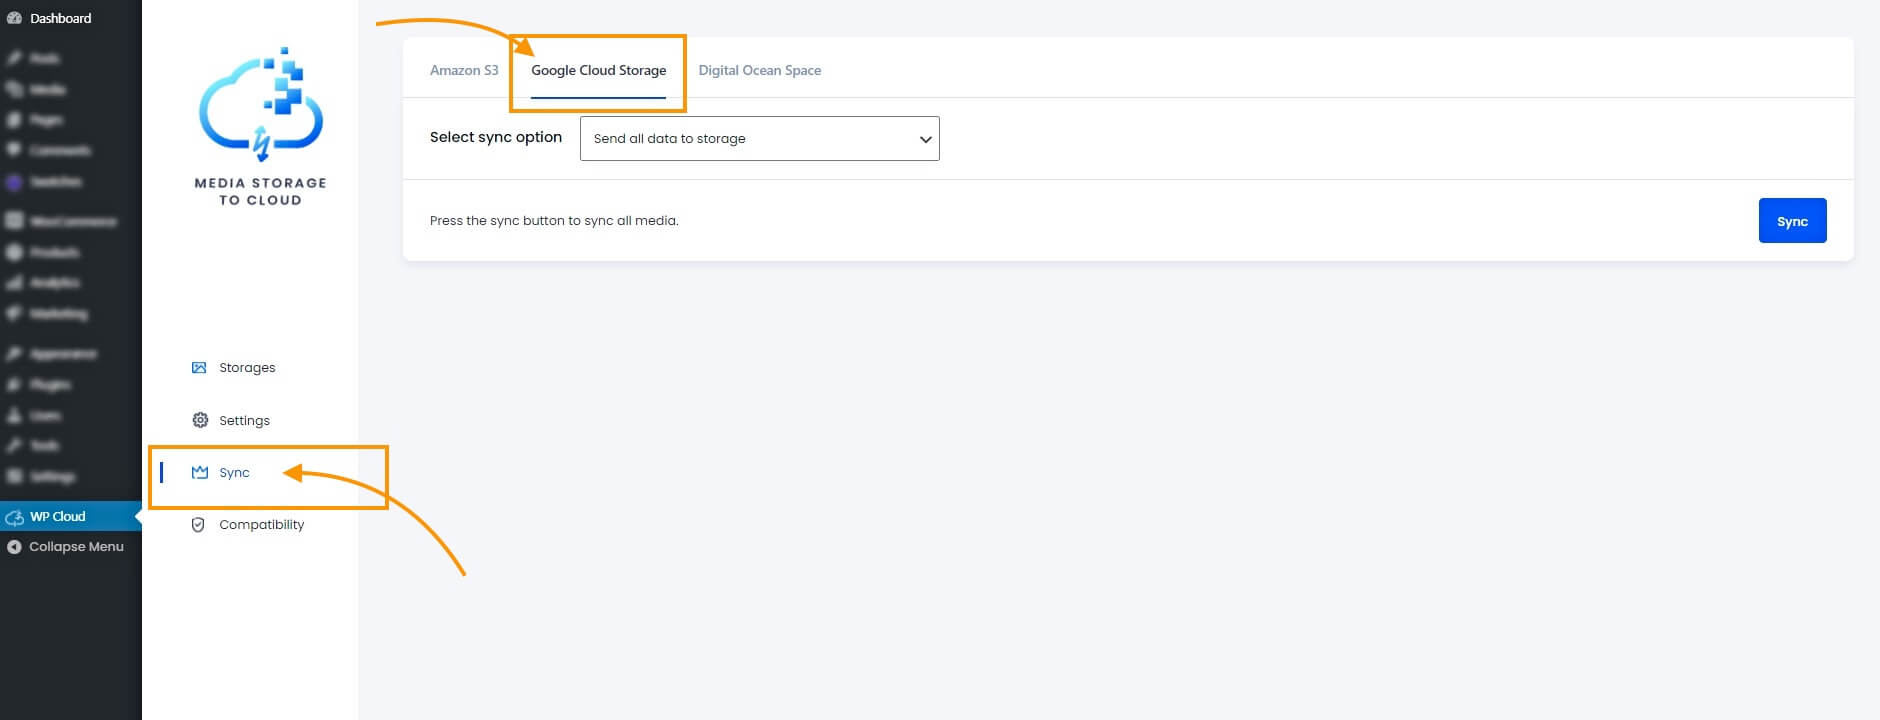
You can see there is an option called Select sync option.

Here you can choose to offload media in two ways.
- Send all data to storage
-Select this option if you wish to offload all of your media files to Google Cloud Storage. - Send unsynced data to storage
-Select this option if you want to offload new media to Google Cloud Storage, and not the ones you have already offloaded earlier.
If you are a first time user, then select Send all data to storage.
2. Next, click on the Sync button.
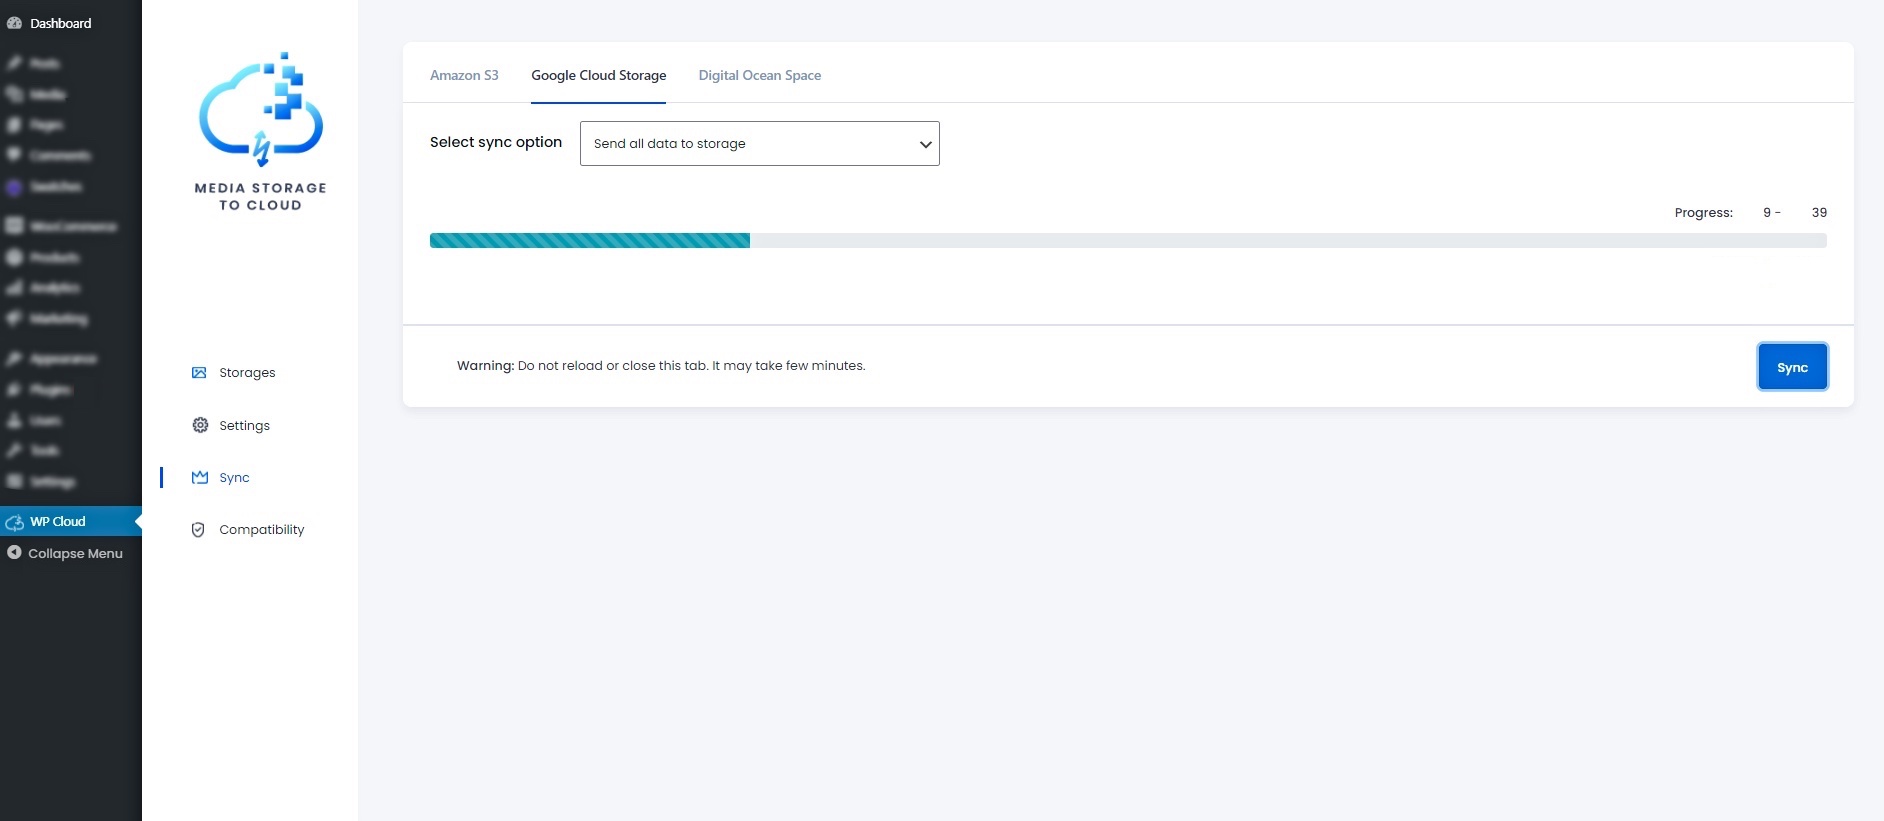
A progress bar will appear while offloading media files to Google Cloud Storage.
It may take some time to offload all the media files, but do not change the tab as it may hamper the syncing process.
After syncing is complete, a success message will appear on the top right corner.
That’s it. You can then check your Google Cloud Storage folders. You will see that all your WordPress media files have been copied to Google Cloud Storage.
How To Offload WordPress Media Files To DigitalOcean Spaces
Follow the steps below to connect and offload your WordPress media files to DigitalOcean Spaces.
**Make sure you have Media Storage To Cloud installed and activated.
To connect your site with DigitalOcean, make sure you already have a DigitalOcean account and a DigitalOcean Space created.
- If you do not have a DigitalOcean account, follow this guide to create one.
- If you need help to create a DigitalOcean Space, follow this guide.
Step 1 – Connect Your WordPress To DigitalOcean
1. On your Dashboard, look for the menu WP Cloud. Click on it.
It will take you to the plugin interface, and initially, you will be in the Storages tab.
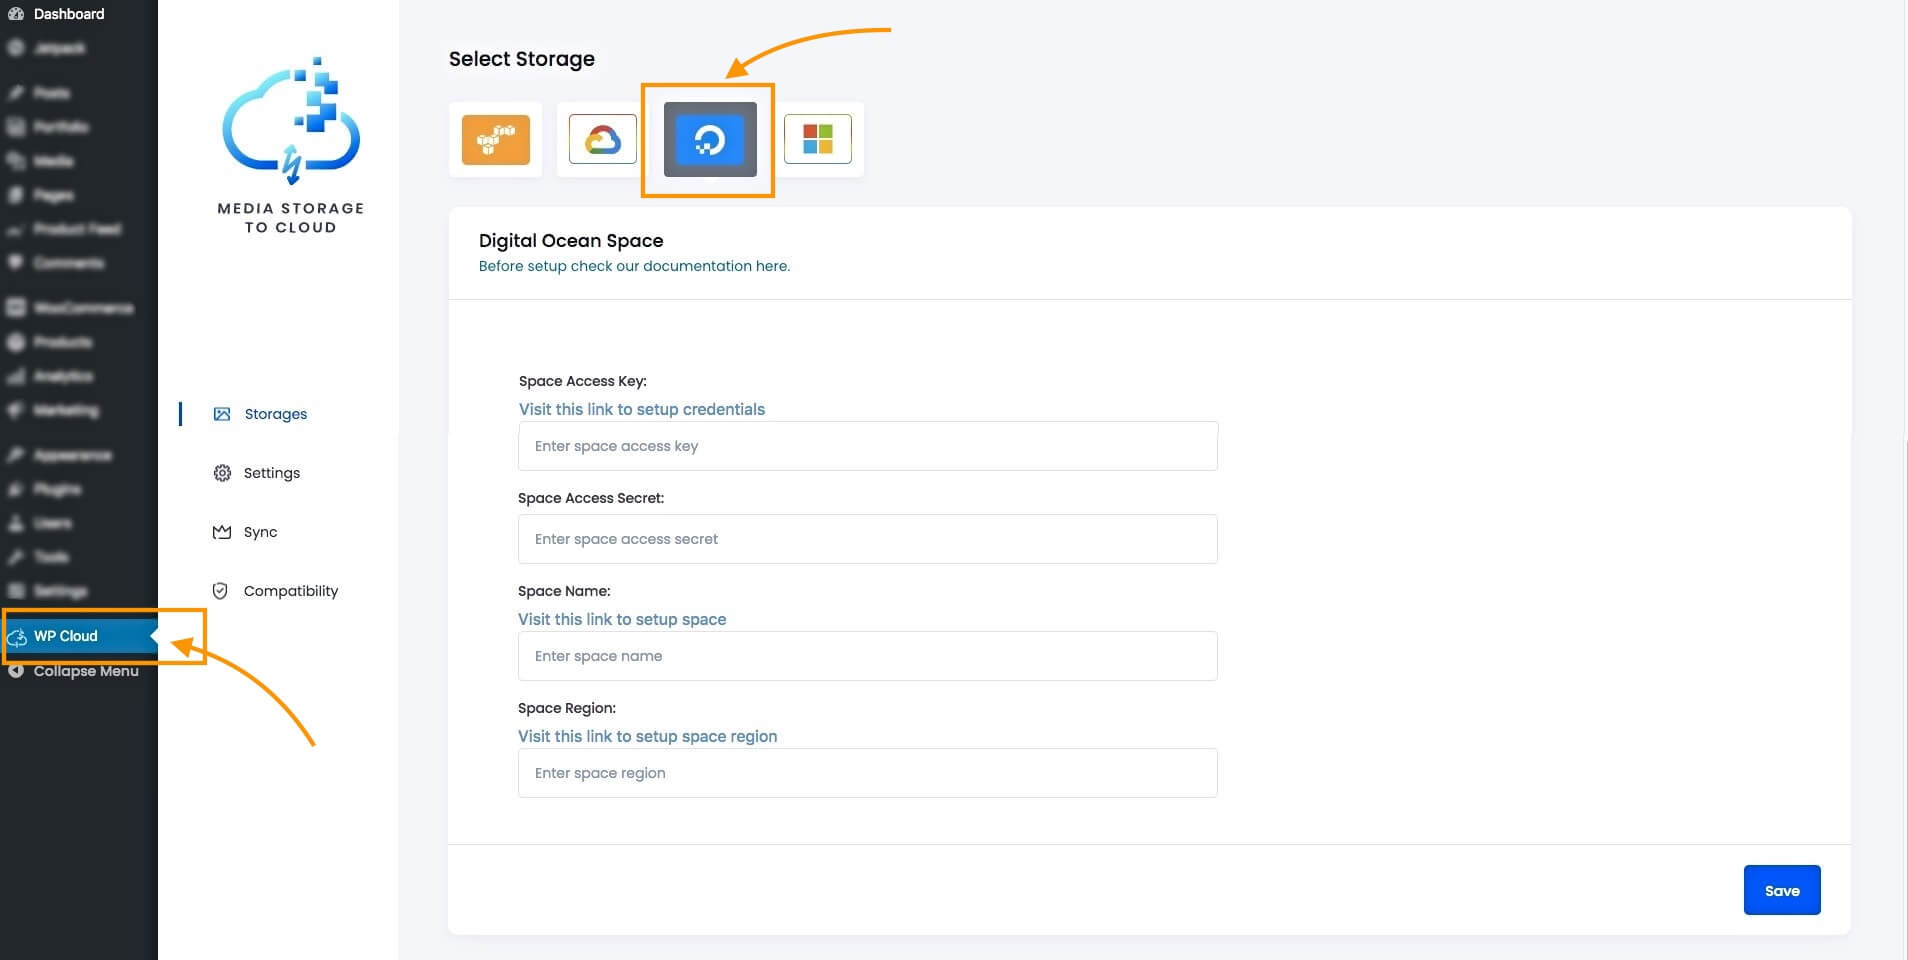
Here, choose DigitalOcean.
2. Input the required data to connect DigitalOcean.
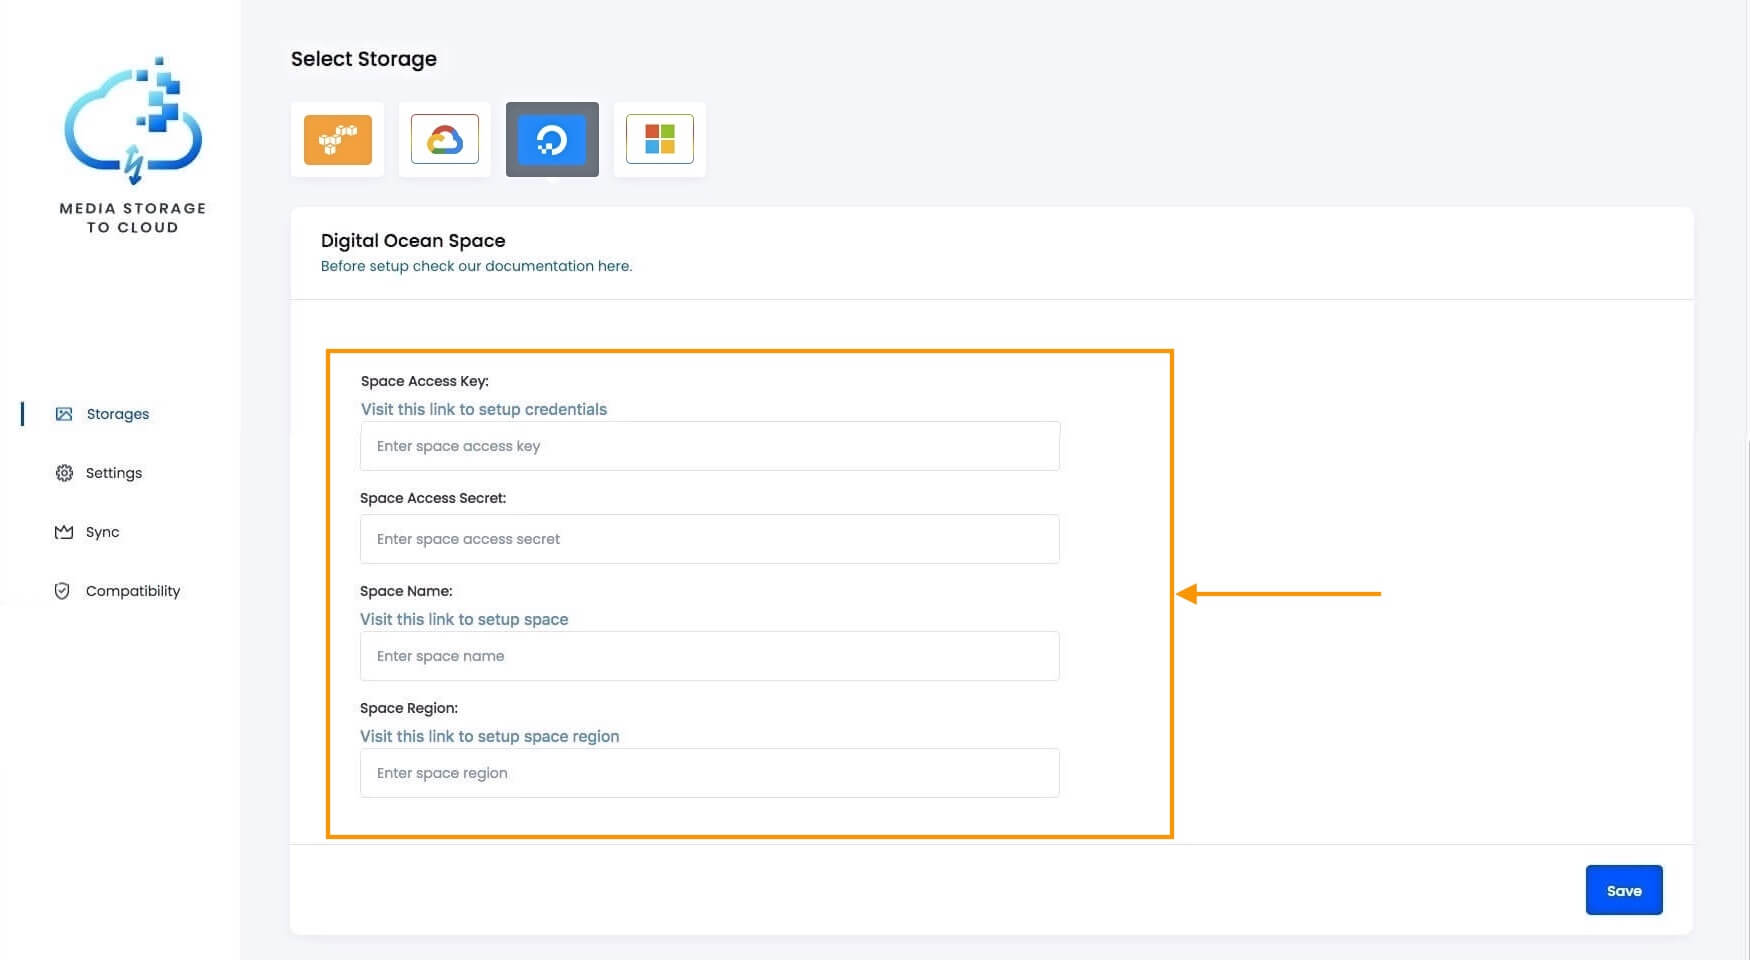
Here, you need to provide the following DigitalOcean credentials:
- Space Access Key
-Input the Space Access Key from the Space you will be using.
(You can collect the Space Access Key here.)
- Space Access Secret
-Input the Space Access Secret from the same Space.
(You can collect the Space Access Secret here.)
- Space Name
-Enter the Space name where you want to store your files.
(Create a new space or collect the name of an existing Space here.)
- Space Region
-Enter the Space Region that you used when setting up your Space.
(Edit or setup your Space to collect Space Region here.)
3. Now, click on the Save button, and you will get a confirmation message on the top right corner.
This means that now you have successfully connected Media Storage To Cloud with DigitalOcean.
Step 2 – Offload Media Files To DigitalOcean Spaces
1. Now, go to the Sync tab and choose DigitalOcean.
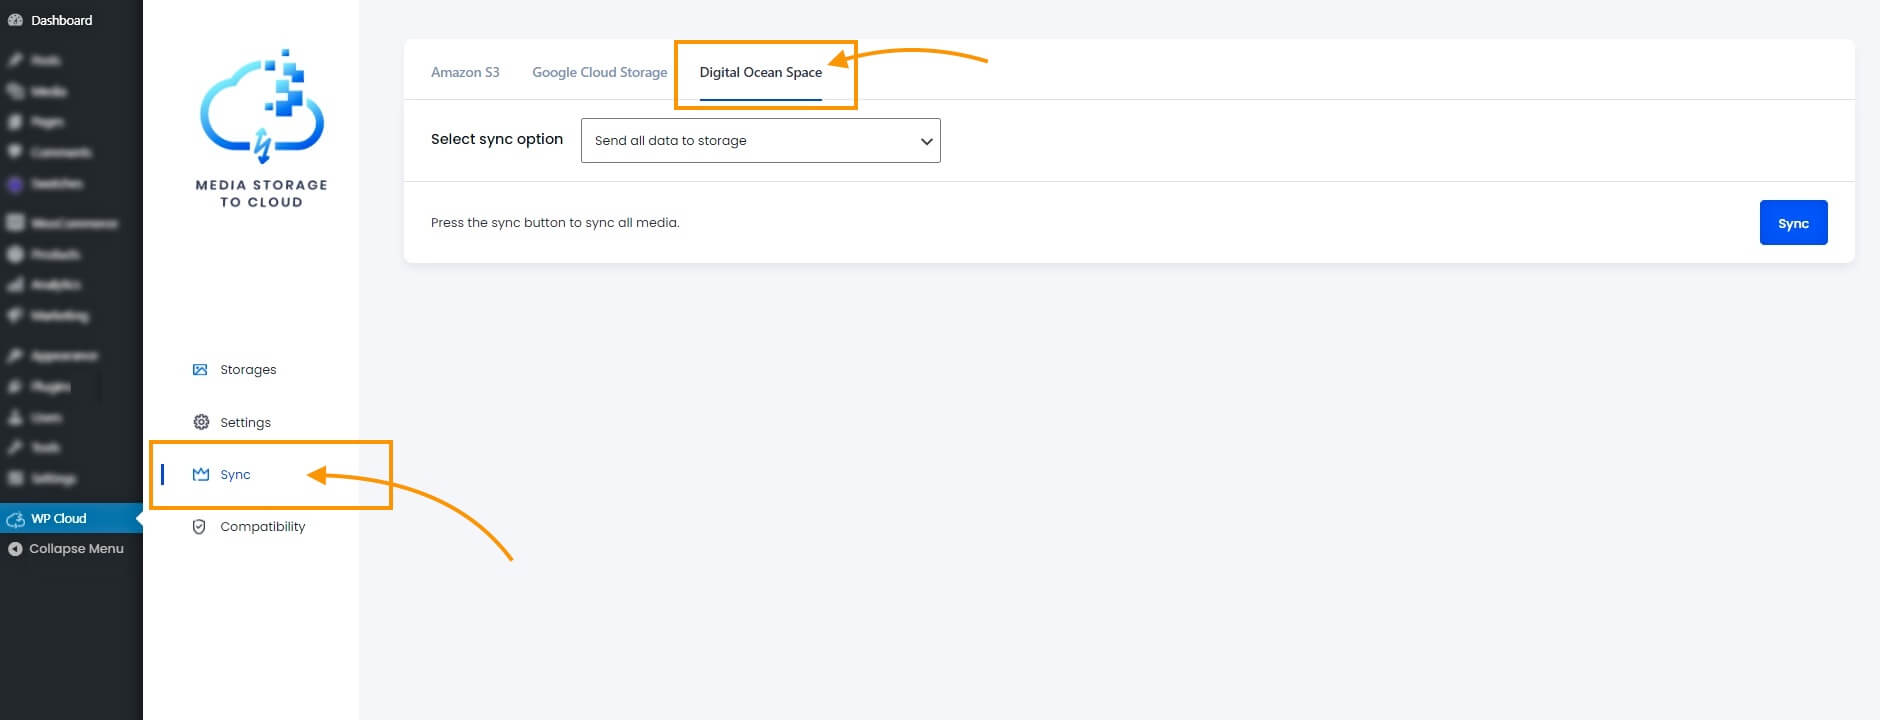
You can see there is an option called Select sync option.
Here you can choose to offload media in two ways.
- Send all data to storage
-Select this option if you wish to offload all of your media files to Google Cloud Storage. - Send unsynced data to storage
-Select this option if you want to offload new media to Google Cloud Storage, and not the ones you have already offloaded earlier.
If you are a first time user, then select Send all data to storage.
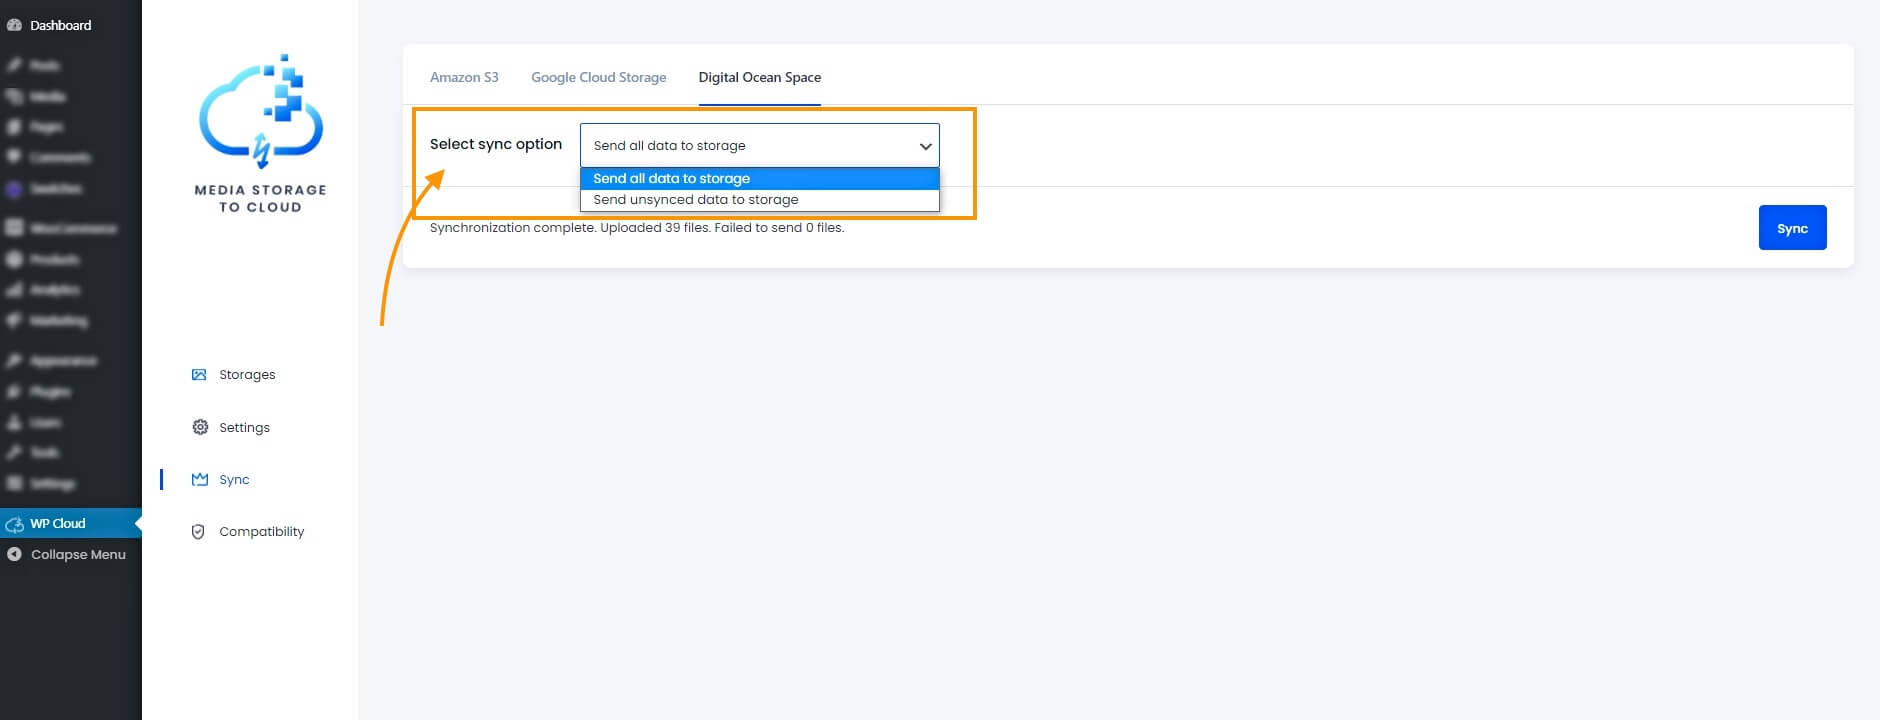
2. Next, click on the Sync button.

A progress bar will appear while offloading media files to DigitalOcean Spaces.
It may take some time to offload all the media files, but do not change the tab as it may hamper the syncing process.
After syncing is complete a success message will appear on the top right corner.
That’s it. You can then check your DigitalOcean Spaces. You will see that all your WordPress media files have been copied to DigitalOcean.
How To Serve WordPress Media Files From Cloud Servers
Once you offload your WordPress media files to your preferred cloud storage, you may choose to serve your website media directly from the cloud storage.
For example, if you offloaded your media files to Amazon S3, you can set it up so that your website media files are hosted and served from Amazon S3.
Follow the simple steps below to do so.
1. Click on the Settings and choose the cloud storage where you offloaded your media files.
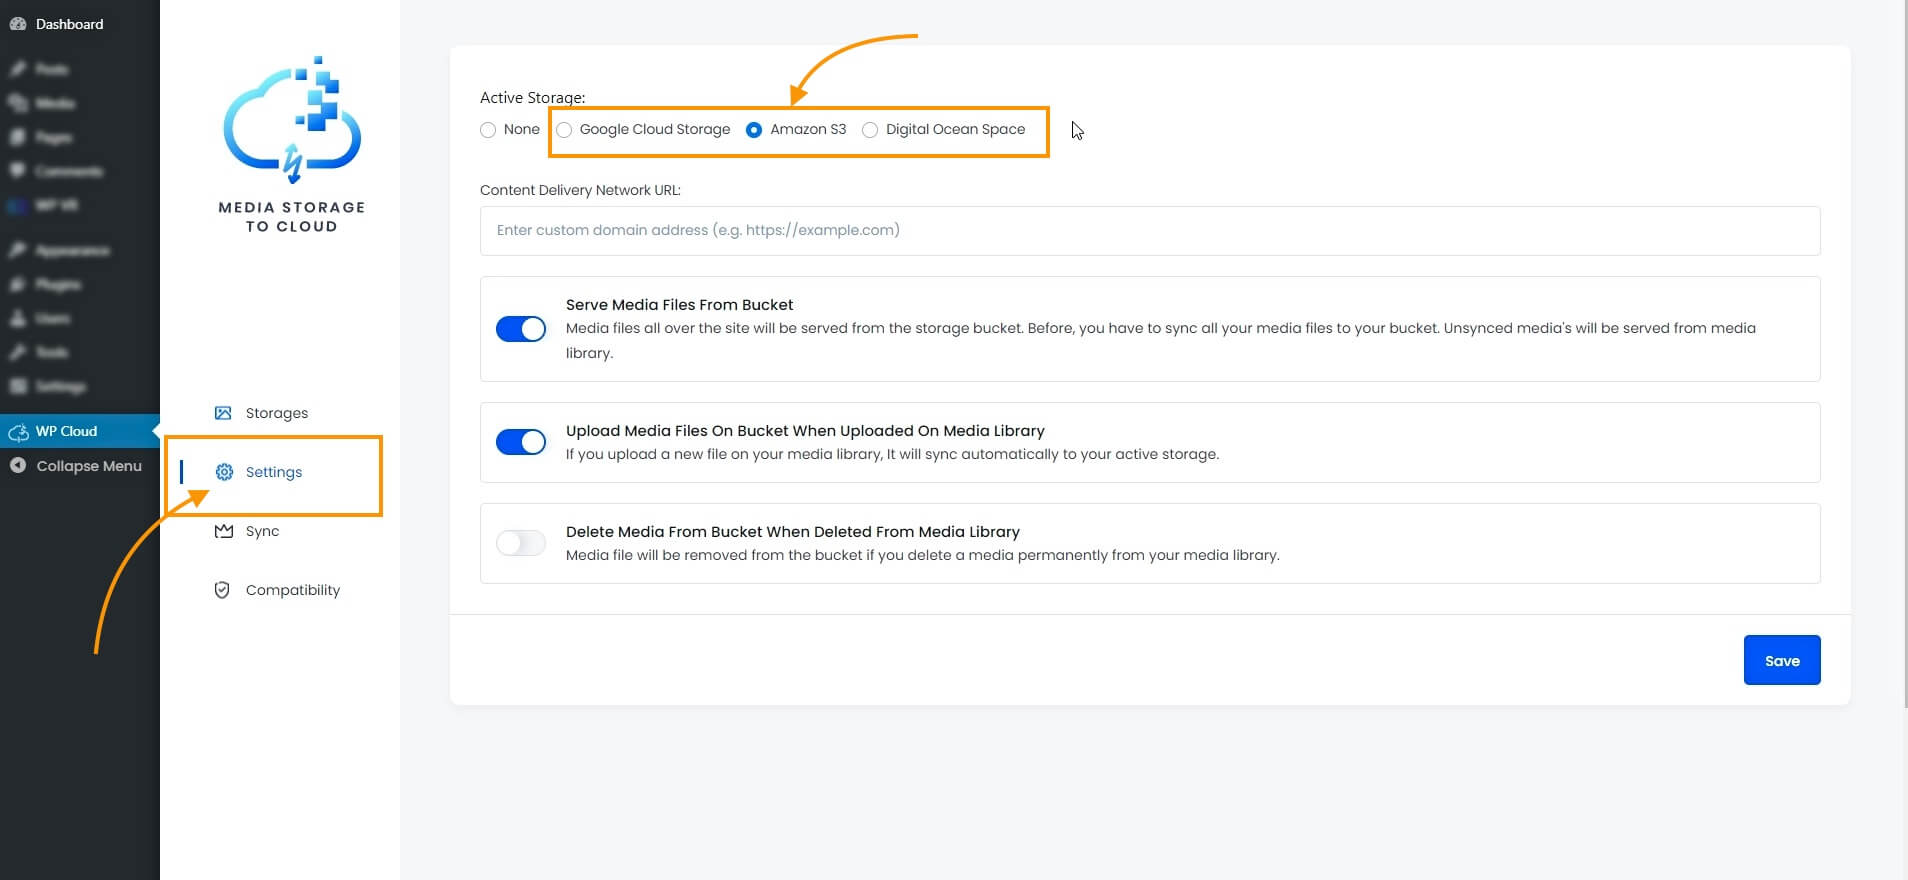
Here you will find the following three options:
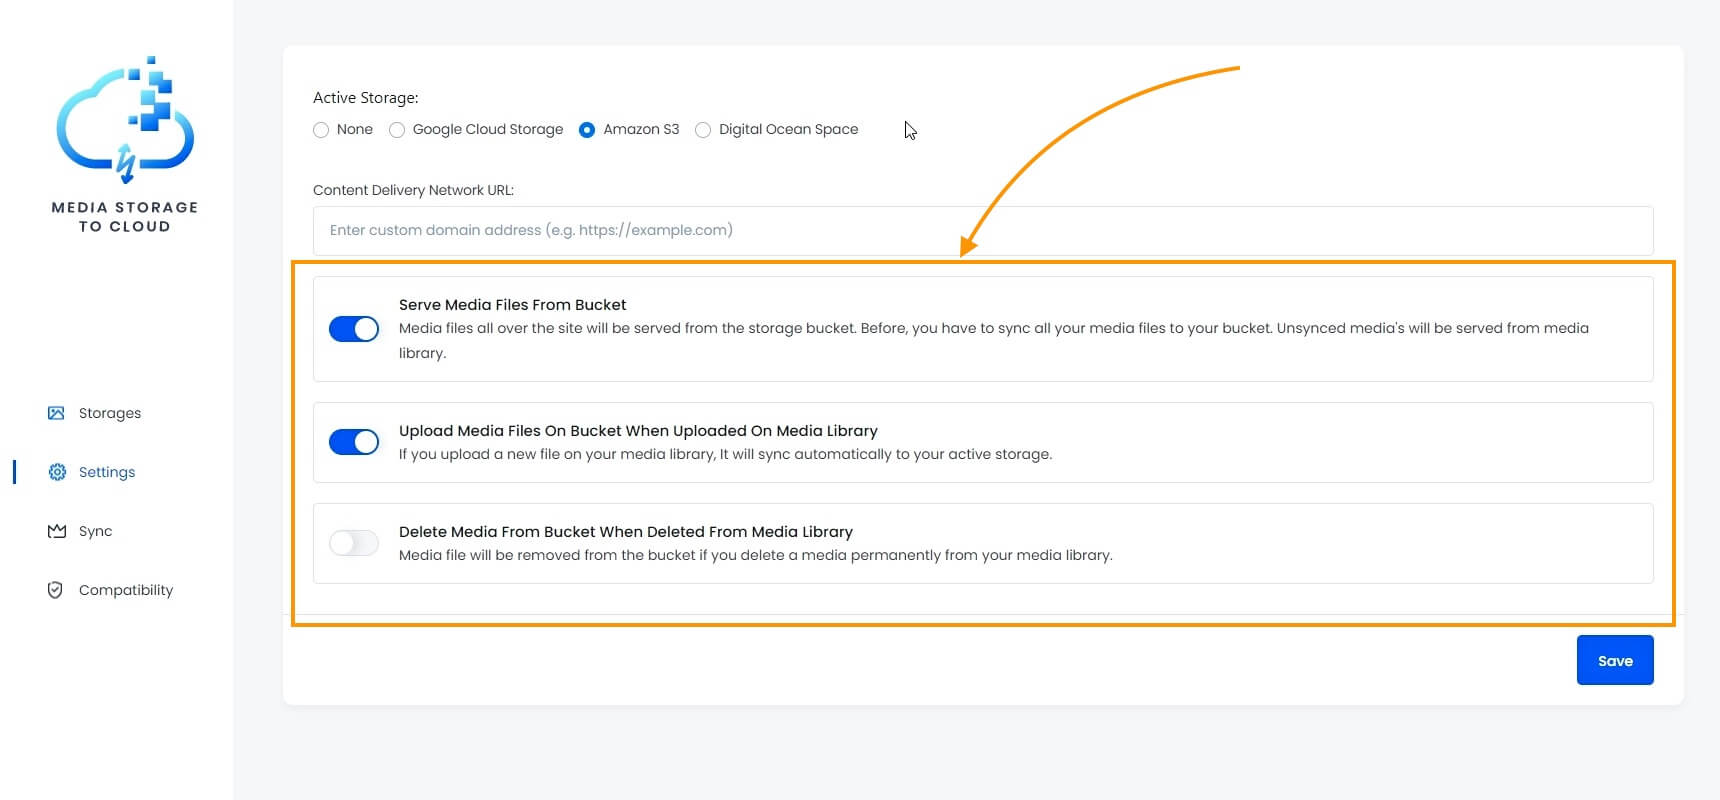
- Serve Media File From Bucket
-Enable this option to Serve your website media files from the selected cloud storage.
- Upload Media Files On Bucket When Uploaded On Media Library
-If you enable this option, it will create a full auto-sync when uploading new files to your media library. This means, whenever you upload a new media file to WordPress, it will automatically be copied to your synced cloud storage.
- Delete Media From Bucket When Deleted From The Media Library
-If you enable this option, it will create a full auto-sync when deleting files from your media library. This means, whenever you delete a media file from WordPress, it will also automatically be removed from your cloud storage.
2. Enable the first option to start serving website media from cloud storage, and you may enable the other two if you wish to apply auto-sync. Then click on Save.
3. Now, you can check in your WordPress media library that the links of the media files have been changed.
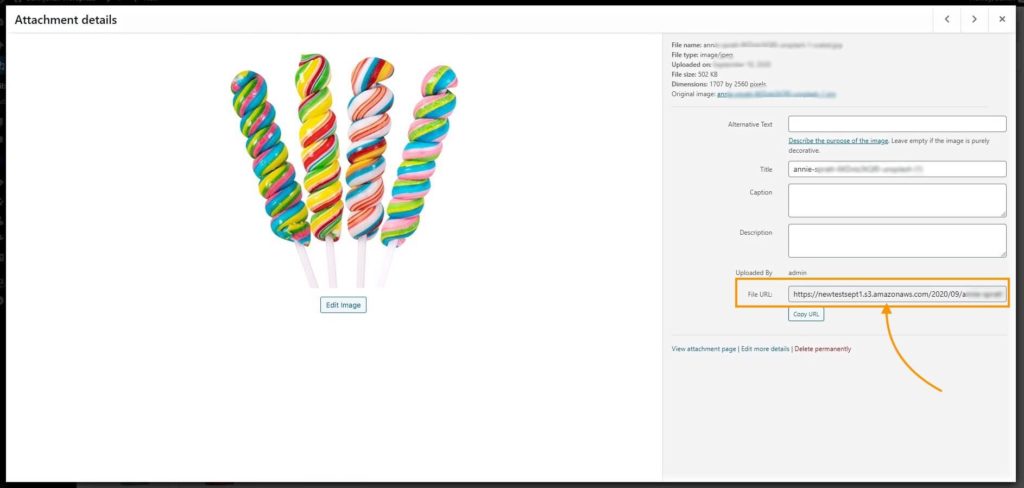
The media files are now being served from your cloud storage.
That’s it. It’s this simple to offload and serve your website media from Amazon S3, Google Cloud Storage, or DigitalOcean.
Noot van de auteur
As you can see, it is really easy to connect your cloud storage to WordPress using Media Storage to Cloud.
Sure, you might have the question that, what if you use some other cloud storage. My advice would be to use one of the three I mentioned here because they are reliable. Other clouds are good, but these three are renounced for security and performance and will give better output any day.
In this guide, I was more focused on offloading media files. In my next guide, I will give you a detailed insight into serving website media files through the three cloud storage that we mentioned here.


Nice post Rafi!
Thank you for sharing these great plugins.
It looks like the plugin you recommend here is no more 🙁
This plugin is actually discontinued in 2022.
Hi Andres,
Yes, we had to shut down this plugin.
We’re really sorry about it.
However, you can get an alternative to that plugin here: https://wordpress.org/plugins/amazon-s3-and-cloudfront/
It should do the job for you.
Groeten,