![How to Generate Glami XML Feed to Sell Fashion Products for WooCommerce [2024]](https://rextheme.com/wp-content/uploads/2021/08/Generate-Glami-XML-Feed-To-Sell-Fashion-Products-WC.jpg)
If you own an online store in Europe to sell fashion products, then you can easily boost your sales by promoting on a popular online marketplace – Glami.
With over 47 million monthly visitors, and 450,000+ orders generated per month, the Glami marketplace is surely a platform you can rely on.
Now, to promote your products on Glami, it is crucial to submit your product data in the right format. Glami has its own format for XML feed to upload your products to their marketplace.
The good news is, if you run a WooCommerce store, then you can generate this product feed in just a few clicks.
In this guide, you will learn about the required product data you need to include in the Glami XML feed, and about a reliable plugin that will help you generate the product feed in a matter of minutes.
So, let’s begin.
What is Glami XML Feed?
An XML feed is a structured data format that allows you to share information between different systems. It uses tags to define data elements, making it easy for computers to understand and process.
In e-commerce, XML feeds are used to share product details like descriptions, prices, and images with various platforms.
![How to Generate Glami XML Feed to Sell Fashion Products for WooCommerce [2024] 1](https://rextheme.com/wp-content/uploads/2024/06/01.-Glami-XML-Feed.webp)
A Glami XML Feed, also known as a Glami product feed, is designed specifically for the Glami fashion search engine. It includes your product titles, descriptions, prices, categories, images, and availability.
By using an XML feed generator or a tool for WooCommerce product feed, you can easily create a Glami feed. This also ensures your products are accurately represented and easily found by shoppers.
Requirements to Join Glami to Promote WooCommerce Products
To start selling on Glami, you must meet the following requirements:
- Ensure that you have a valid e-commerce store that is SSL-certified.
- Prepare a proper XML Feed in the format that they accept (explained later in this article).
- Implement Glami Pixel on your products manually or using Google Tag Manager.
- Fill out the registration form and submit your product feed.
And that’s it. After that, you will be notified in two business days if your products were uploaded successfully or if there is an error.
Once your products are approved and published, you will start getting more traffic in no time.
FYI: Glami has a flexible CPC module. It ensures that the products with higher costs have higher CPC, whereas products with lower costs will have less CPC charged.
Also, certain product categories can have seasonal changes in CPC; for example, Summer products will have a lower CPC during the winter and a higher CPC in the summer.
Now that you know the requirements, let me guide you on generating its product XML feed.
XML Feed Structure to Upload Products on Glami
Normally, the feed structure is as follows:
<?xml version="1.0" encoding="utf-8"?>
<SHOP>
	<SHOPITEM>
            ---PRODUCT ATTRIBUTES AND DATA HERE---
	</SHOPITEM>
	<SHOPITEM>
            ---PRODUCT ATTRIBUTES AND DATA HERE---
	</SHOPITEM>
</SHOP>
**Each product is considered a SHOPITEM in the feed.
If you have a WooCommerce store, you do not need to worry about creating this format on your own. You can simply use the plugin, Product Feed Manager for WooCommerce, to generate this feed in just a few clicks.
Now, let us look at a list of the required product attributes that you must include for every product. Later, I will show you an example XML feed with product data and guide you on how you can generate this feed real quickly.
Required Product Attributes for Glami Feed
![How to Generate Glami XML Feed to Sell Fashion Products for WooCommerce [2024] 2](https://rextheme.com/wp-content/uploads/2024/06/01.-Glami-XML-Feeds.webp)
The following are the mandatory attributes you need to submit for each product.
- ITEM_ID
- PRODUCTNAME
- DESCRIPTION
- URL
- IMGURL
- PRICE_VAT
- MANUFACTURER
- CATEGORYTEXT
- SIZE
- DELIVERY_DATE
- ITEMGROUP_ID
Read details about each of these attributes below
| Attribute | Format With Example |
|---|---|
| ITEM_ID This is the unique ID of a product. In WooCommerce, you may use the Product ID or the SKU as the value for this attribute. | <ITEM_ID>1031</ITEM_ID> |
| PRODUCTNAME This is the title of the product. You may use your product title from WooCommerce as its value. It is recommended to add features to the title such as gender, material, color, or other notable features that may define your product (except the size). *This will also help to rank products in your own store. Do not add any promotional terms to the product name, such as ‘free delivery’ or ‘discount,’ etc. | <PRODUCTNAME>Pullover Hoodie For Men – Red</PRODUCTNAME> |
| DESCRIPTION You may include a short product description explaining more about the product features. Do not provide any false information about the product. Submit the description in the correct language of your local Glami marketplace. For example, if you are selling in Czechia, then the description must be in the Czech language. | <DESCRIPTION><![CDATA[ This hoodie has a branded logo on front and a half-zip closure ]]></DESCRIPTION> |
| URL This is the link to the product page on your website. *Make sure it is SSL certified. | <URL>https://www.yourdomain.cz/products/pullover-hoodie-1</URL> |
| IMGURL This is the link to the main image of the product. You must submit a real image of the product. It should not have any graphics, enhancements, watermarks, or promotional texts. Also, there should not be any other objects visible in the image – it should just be the product with a light background. The image must be at least 500 px in width. If it’s a product variant, then the image should match the exact variant. For example, if a t-shirt varies in colors, Red and Blue, then the Red variant should include the image of the Red t-shirt, and the Blue variant should include the image of the Blue t-shirt. | <IMGURL>https://www.yourdomain.cz/pullover-hoodie-1-img1.png</IMGURL> |
| PRICE_VAT This is the net price of the product. No need to include the currency as that is decided based on the location you are promoting on. Do not use any thousand separators. You may only use a decimal(.) or comma(,) to indicate a factional amount. | <PRICE_VAT>29.99</PRICE_VAT> |
| MANUFACTURER This is the brand name of the product. Submit this attribute only when the product falls under a brand listed in Glami. So before adding this attribute, browse through Glami’s brand list to find out if you have products that fall under them. | <MANUFACTURER>Adidas</MANUFACTURER> |
| CATEGORYTEXT Glami has its own category list, and you need to indicate which category each of your products may fall under. You may view all categories here: Glami.cz – – XML view – PDF view Glami.eco – – XML view – PDF view **You will find category lists in your required language on the knowledge page for your respective country. P.S. You may use category mapping in our suggested plugin to submit the right category as per Glami’s requirements without changing the actual categories in your WooCommerce store. **I’ll explain how later in this guide. | <CATEGORYTEXT>Glami.eco | Men’s sustainable clothing and shoes | Men’s sustainable clothing</CATEGORYTEXT> |
| SIZE For every product, you need to submit the size parameter. By default, the value is considered as EU or INT size system. If you follow any other size system, then also include the attribute “SIZE_SYSTEM”, to indicate the system you follow. | <PARAM> <PARAM_NAME>size</PARAM_NAME> <VAL>41</VAL> </PARAM> |
| DELIVERY_DATE This attribute actually indicates how soon the product is available for shipping, i.e., if it is in stock. If you have the product in stock, then use the value as 0. Else, mention the number of days after which the product will be in stock. *Do not submit any product that is only available on request. | <DELIVERY_DATE>0</DELIVERY_DATE> |
| ITEMGROUP_ID For a variable product, every variant should be submitted as a separate shop item, but they all should have a common item group ID to indicate that they are variants of the same product. | <ITEMGROUP_ID>1030</ITEMGROUP_ID> |
Optional Product Attributes You Can Include in The Feed
You can also submit a few additional attributes for better performance.
- URL_SIZE: If you have a variable product that varies with size, then you can include this attribute and submit the product link with the size selected by default.
Format:

<URL_SIZE>https://www.yourdomain.cz/products/pullover-hoodie-1?size=41</URL_SIZE>- IMGURL_ALTERNATIVE: You can submit additional images of your product using this attribute. Submit this attribute multiple times to include multiple additional images.
Format:

<IMGURL_ALTERNATIVE>https://www.yourdomain.cz/pullover-hoodie-1-img2.png</IMGURL_ALTERNATIVE>
<IMGURL_ALTERNATIVE>https://www.yourdomain.cz/pullover-hoodie-1-img3.png</IMGURL_ALTERNATIVE>- PARAM: You can submit extra parameters or features of the product using these attributes (same as the size attribute).
Format:

<PARAM>
    <PARAM_NAME>colour</PARAM_NAME>
    <VAL>green</VAL>
</PARAM>- MATERIAL: You have the option to submit the material and the percentage of material used in the product. Its format is similar to the Size and the Param attribute but has an additional Percentage tag.
Format:

<PARAM>
    <PARAM_NAME>material lining</PARAM_NAME>
    <VAL>cotton</VAL>
    <PERCENTAGE>50%</PERCENTAGE>
</PARAM>- SIZE_SYSTEM: If you use a size system other than EU or International, you can submit this attribute to indicate which size system you use. – Supported size systems.
Format:

<PARAM>
    <PARAM_NAME>size_system</PARAM_NAME>
    <VAL>US</VAL>
</PARAM>- DELIVERY: You can add additional delivery information for a product if you deliver that particular product using a postal service other than your default delivery method. You need to include the delivery ID, the delivery price, and the delivery price COD.
Format:

<DELIVERY>
    <DELIVERY_ID>PPL</DELIVERY_ID>
    <DELIVERY_PRICE>45</DELIVERY_PRICE>
    <DELIVERY_PRICE_COD>90</DELIVERY_PRICE_COD>
</DELIVERY>- EAN: If you have the product EAN, you can submit it via this attribute.
Format:

<EAN>1234567890123</EAN>- More Relevant Parameters: You can also submit additional parameters or features of your products to make them more relevant. For example, if you have a costume for Halloween, you can submit a parameter for ‘occasion’ with the value ‘Halloween.’ Each parameter you submit will be a separate product feature it will rank for in the marketplace. Here are a few more examples:
<PARAM>
    <PARAM_NAME>occasion</PARAM_NAME>
    <VAL>halloween</VAL>
</PARAM>
<PARAM>
    <PARAM_NAME>pattern</PARAM_NAME>
    <VAL>checkered</VAL>
</PARAM>
<PARAM>
    <PARAM_NAME>season</PARAM_NAME>
    <VAL>winter</VAL>
</PARAM>
Example Feed for Glami in The Right Format
Here’s a sample feed structure with the mandatory attributes and example data.
<?xml version="1.0" encoding="utf-8"?>
<SHOP>
	<SHOPITEM>
		<ITEM_ID>1031</ITEM_ID>
		<PRODUCTNAME>Pullover Hoodie For Men - Red</PRODUCTNAME>
		<DESCRIPTION><![CDATA[ This hoodie has a branded logo on front and a half-zip closure ]]></DESCRIPTION>
		<URL>https://www.yourdomain.cz/products/pullover-hoodie-1</URL>
		<IMGURL>http://images.example.com/adidas-superstar-ii-2015.jpg</IMGURL>
		<PRICE_VAT>29.99</PRICE_VAT>
		<MANUFACTURER>Adidas</MANUFACTURER>
		<CATEGORYTEXT>Glami.eco | Men's sustainable clothing and shoes | Men's sustainable clothing</CATEGORYTEXT>
		<PARAM>
		<PARAM_NAME>size</PARAM_NAME>
		<VAL>41</VAL>
		</PARAM>
		<DELIVERY_DATE>0</DELIVERY_DATE>
		<PARAM_NAME>colour</PARAM_NAME>
		<VAL>blue</VAL>
		</PARAM>
		<PARAM_NAME>style</PARAM_NAME>
		<VAL>lifestyle</VAL>
		</PARAM>
		<ITEMGROUP_ID>1030</ITEMGROUP_ID>
	</SHOPITEM>
</SHOP>
Now that you have a good idea of the required product data you need to submit on Glami let us look at how you can generate an XML feed of your WooCommerce products in just a few clicks.
7 Steps to Generate Glami Product Feed in Your WooCommerce Store
In WooCommerce, you will find an efficient tool, Product Feed Manager for WooCommerce, to generate an XML feed for all of your products in just a few clicks.
The plugin has a pre-built template with the required product data for Glami in the right format.
This guide will give you step-by-step instructions on using the plugin and generating the required feed real quickly.
Step 1 – Install & Activate Product Feed Manager
1. Go to your Dashboard. Here, go to Plugins and click on the Add New button
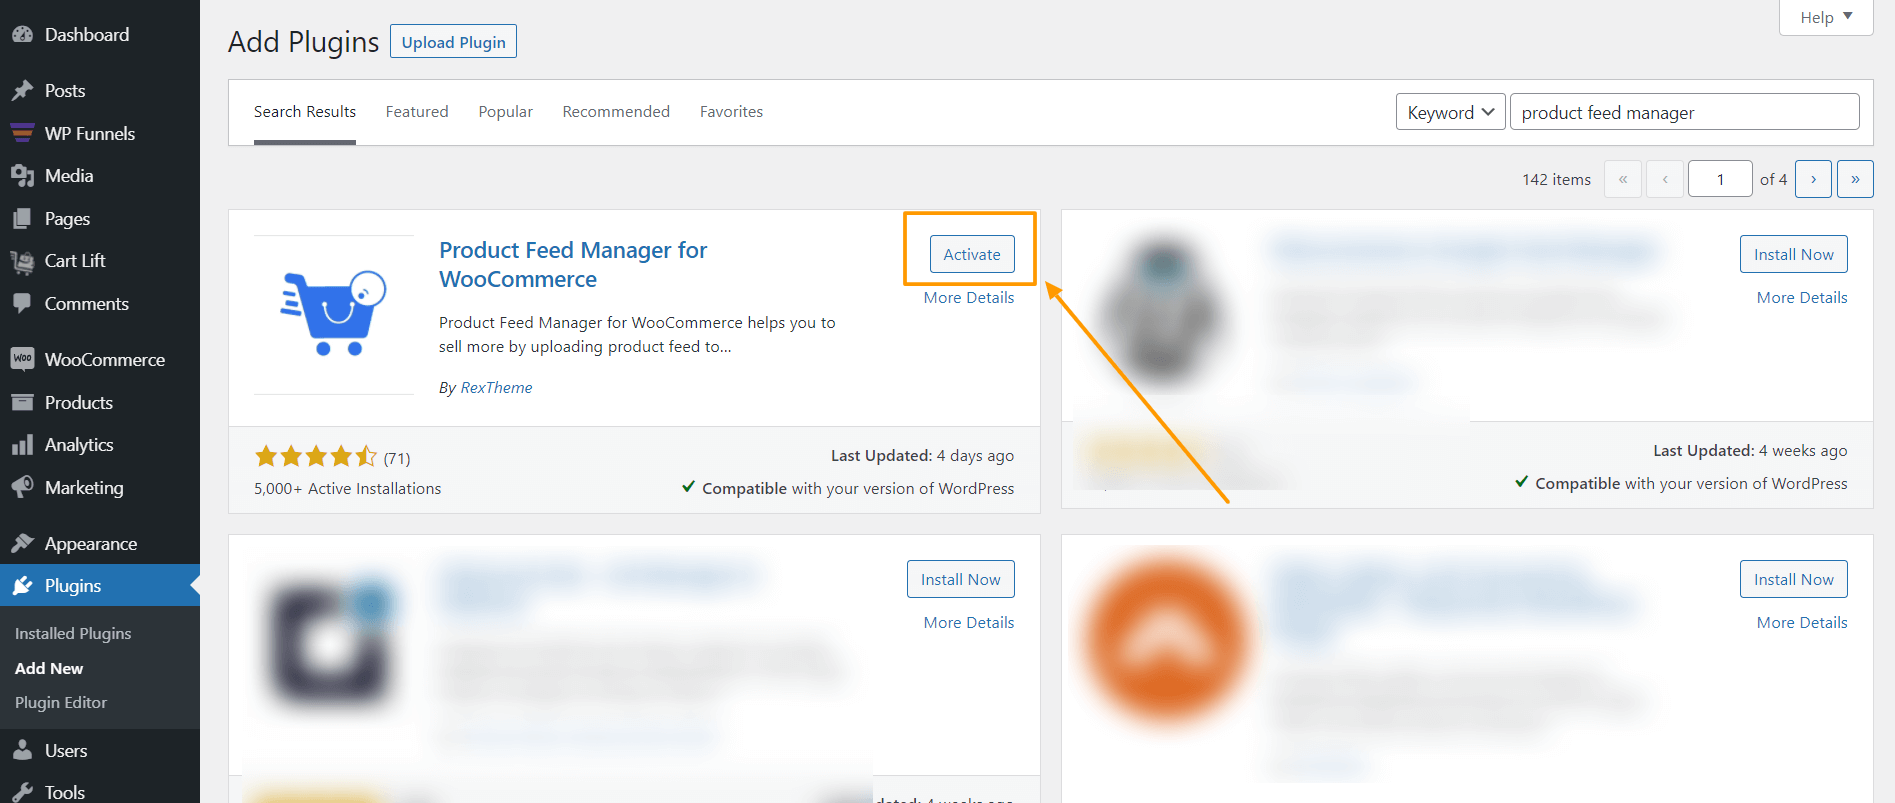
2. Type “Product Feed Manager” in the search box, and you will find the plugin Product Feed Manager for WooCommerce.
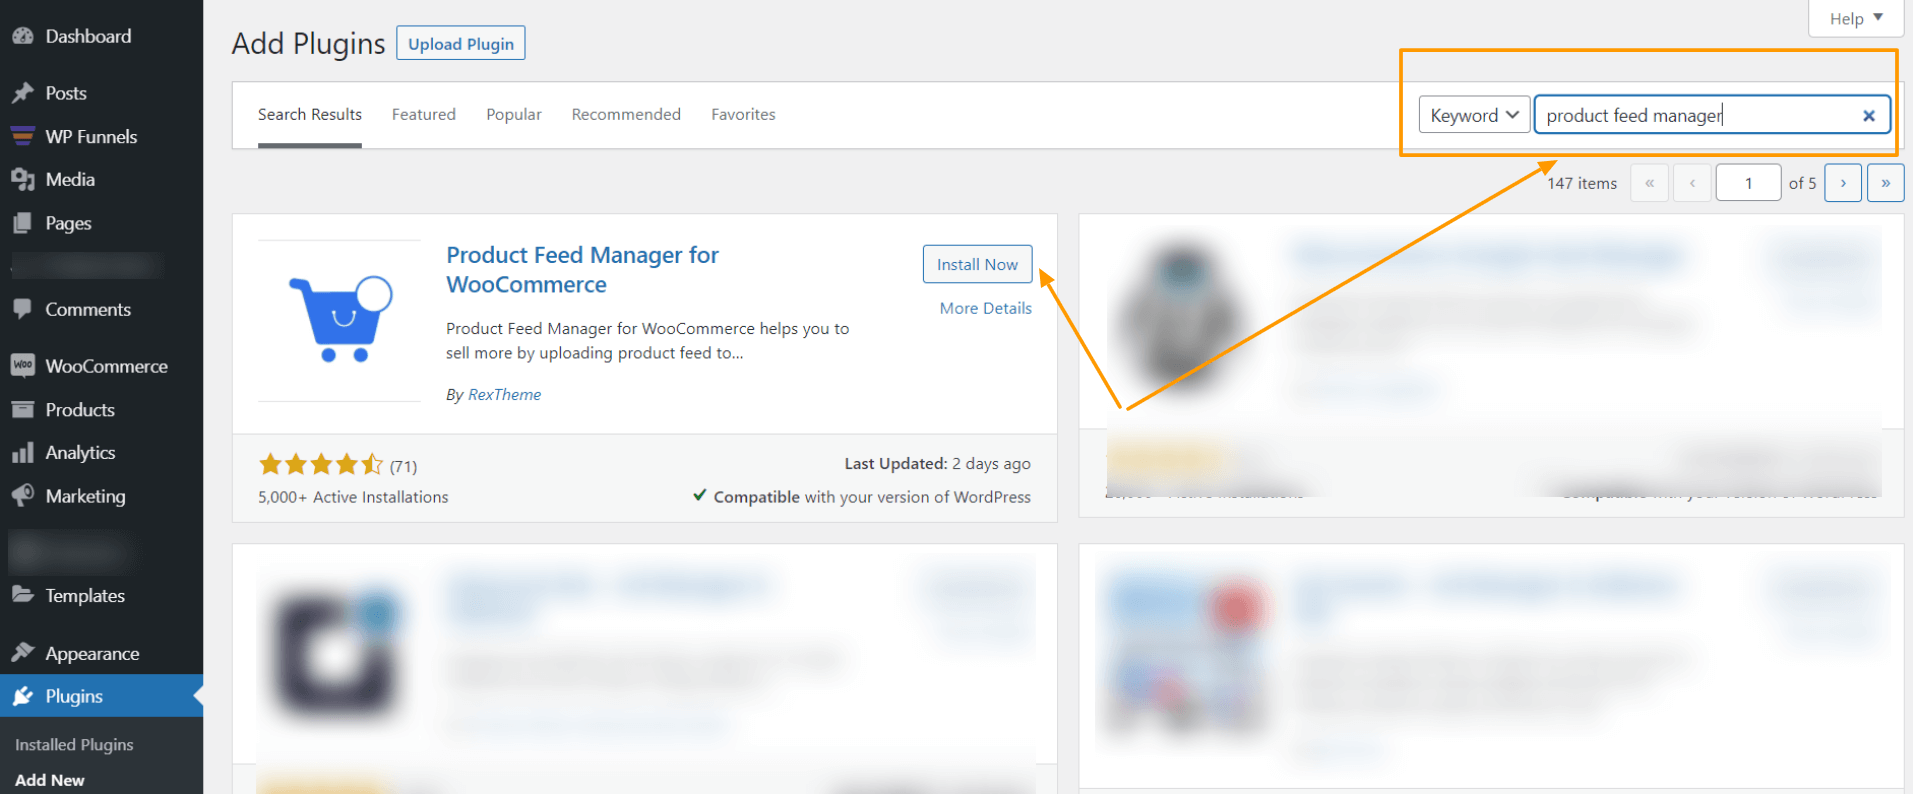
3. Click on the Install Now button and then Activate the plugin.
Once you activate the plugin, you will find the Product feed menu on your dashboard menus.
Step 2 – Import Glami Template for Feed Generation
1. On your dashboard, click on Product Feed and then click on Add New Feed option.
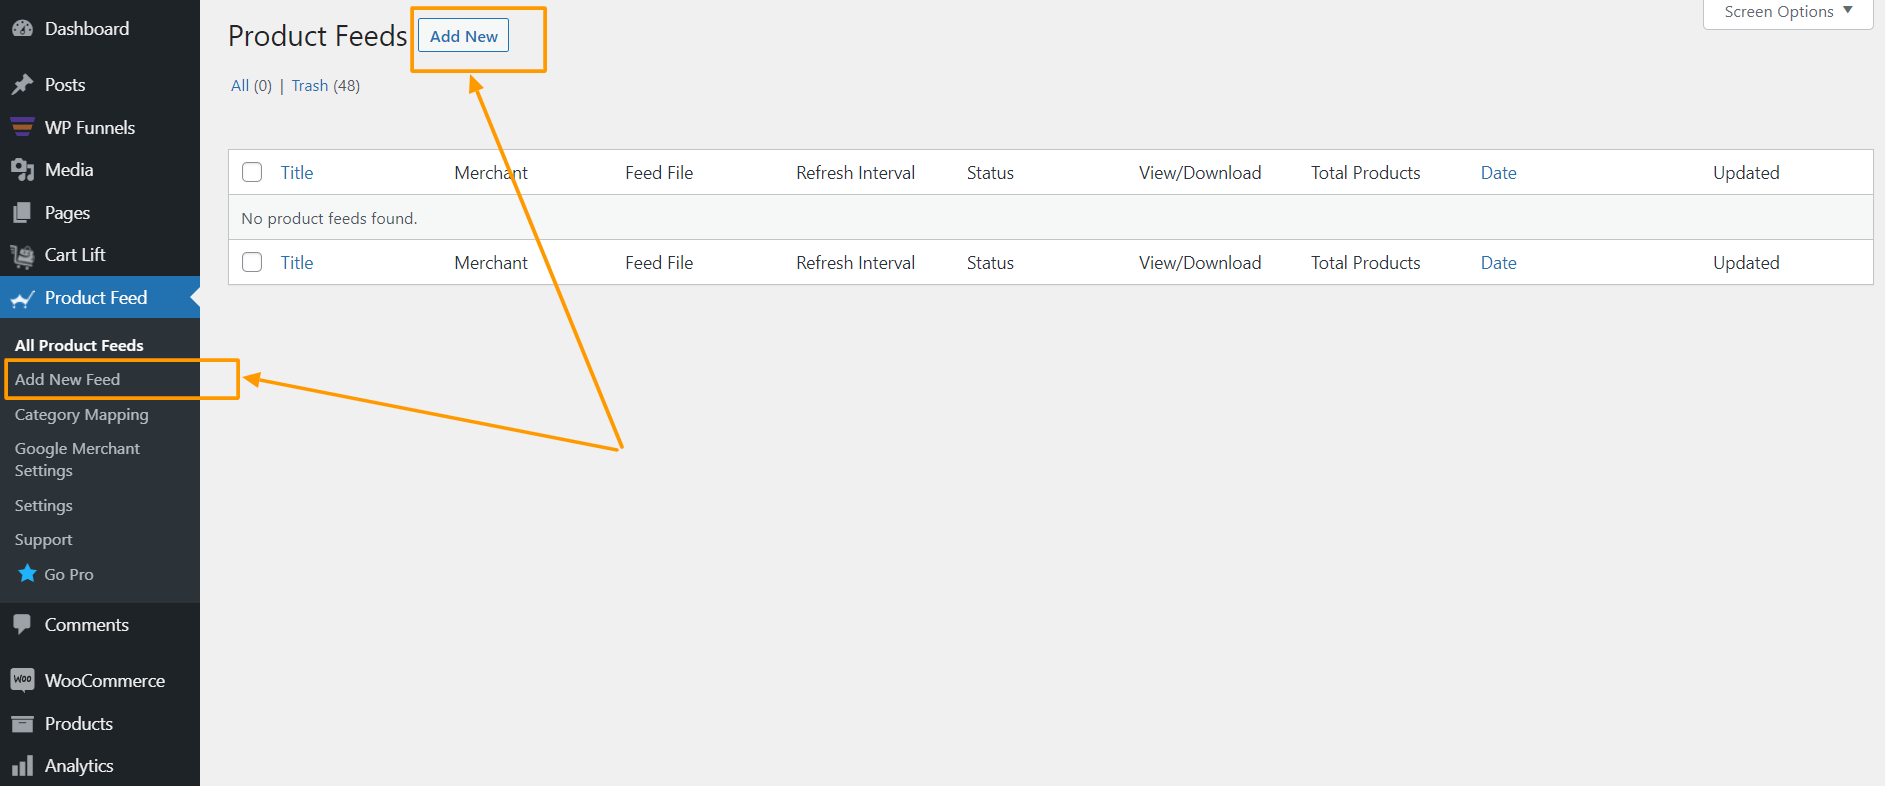
It will take you to the feed creation page

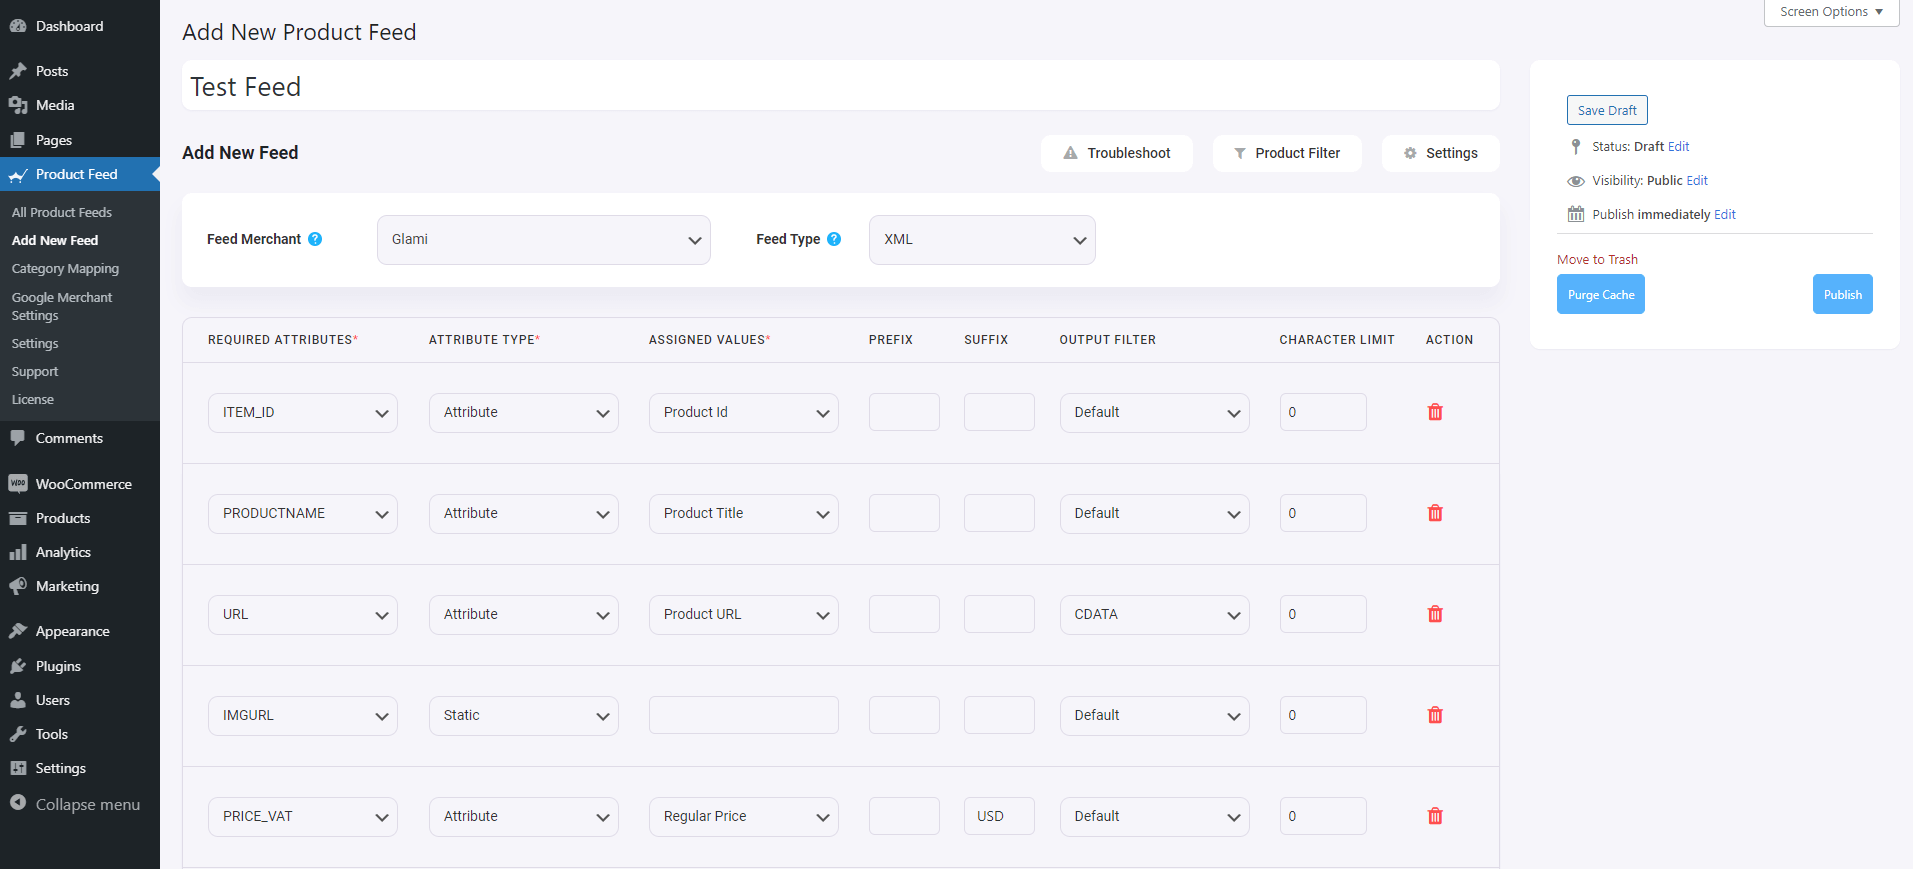
Here, on the top, you will get an option to give a name to your feed, you can skip it too.
2. Click on the Feed Merchant Dropdown and you will get the list of all the supported merchants.
You can scroll down this merchant dropdown list or you can type Glami in the search box, and you will get the Glami option in the list.

Select Glami and all the required attributes of Glami will be loaded below.
Step 3 – Create A New Product Feed
Now, you can see three buttons under the Feed Title text box, Troubleshoot, Product Filter, and Settings.
1. If you are having any issues generating feed, click on this Troubleshoot button, it will take you to the Troubleshoot page, which could be helpful for you.
2. If you want to use any filter or condition, you can click on the Product Filter option, and a drawer will slide in from the right side of the window, and there you will get the following filters:
- All Featured Items
- Custom Filter
- Category Filter
- Tag Filter
- Product Filter (Pro)
You can select any filter option and use them as per your need and click on the Close button when done.
3. Now, to schedule your feed or to choose which type of products will be included in your feed, click on the Settings button, and you will get a list of options to exclude or include products.
Change the options as per your need and click on the Close button when done.
Step 4 – Use The Glami XML Feed Template
1. If you look at the Feed Merchant dropdown button, there you will get another dropdown “Feed Type”, you can click here to set the type of this feed. You can set different types of feeds depending on what types of feeds this merchant supports or what types of feeds this Product Feed Manager has the support for.
For Favi, XML will be selected by default.
2. Now, in the attributes section, you will see that all the attributes are under the Required Attributes column, and their values are set according to the attributes under the Assigned Values column.
You can change any values to any attributes, simply click on the value dropdown, and select your preferred value.
All the required attributes will appear below. Now, most of the attributes will already be configured but notice that some of these attributes are unassigned.
Step 5 – Assign The Right Values To Unassigned Attributes.
1. You will simply need to assign values for the following:
- Manufacturer: If you are the sole manufacturer of all of your products, you can set the type as Static and input your company name as the value. If you have different brand names for different products, you will have to save the value in a custom field or product attribute and then use that value here. **You can try using Perfect Brands for WooCommerce to assign the brand names more easily.
- Category Text: To assign the category text, you will need to use category mapping, which will be done in the next step. For now, leave it as it is.
- Size value: You can see the attribute ‘size’ is added as a parameter. For the value, you have to assign the field name or the attribute name in which you saved the size.
2. Next, scroll up and Publish the feed.
Once the feed is published, it’s time to use Category Mapping.
Step 6 – Use Category Mapping Using The Accepted Glami Category List
To use category mapping, first, you will need the category list supported by Glami.
Follow the instructions below.
1. On your Dashboard menus, under Product Feed, click on Category Mapping. You will be taken to the category mapping page.
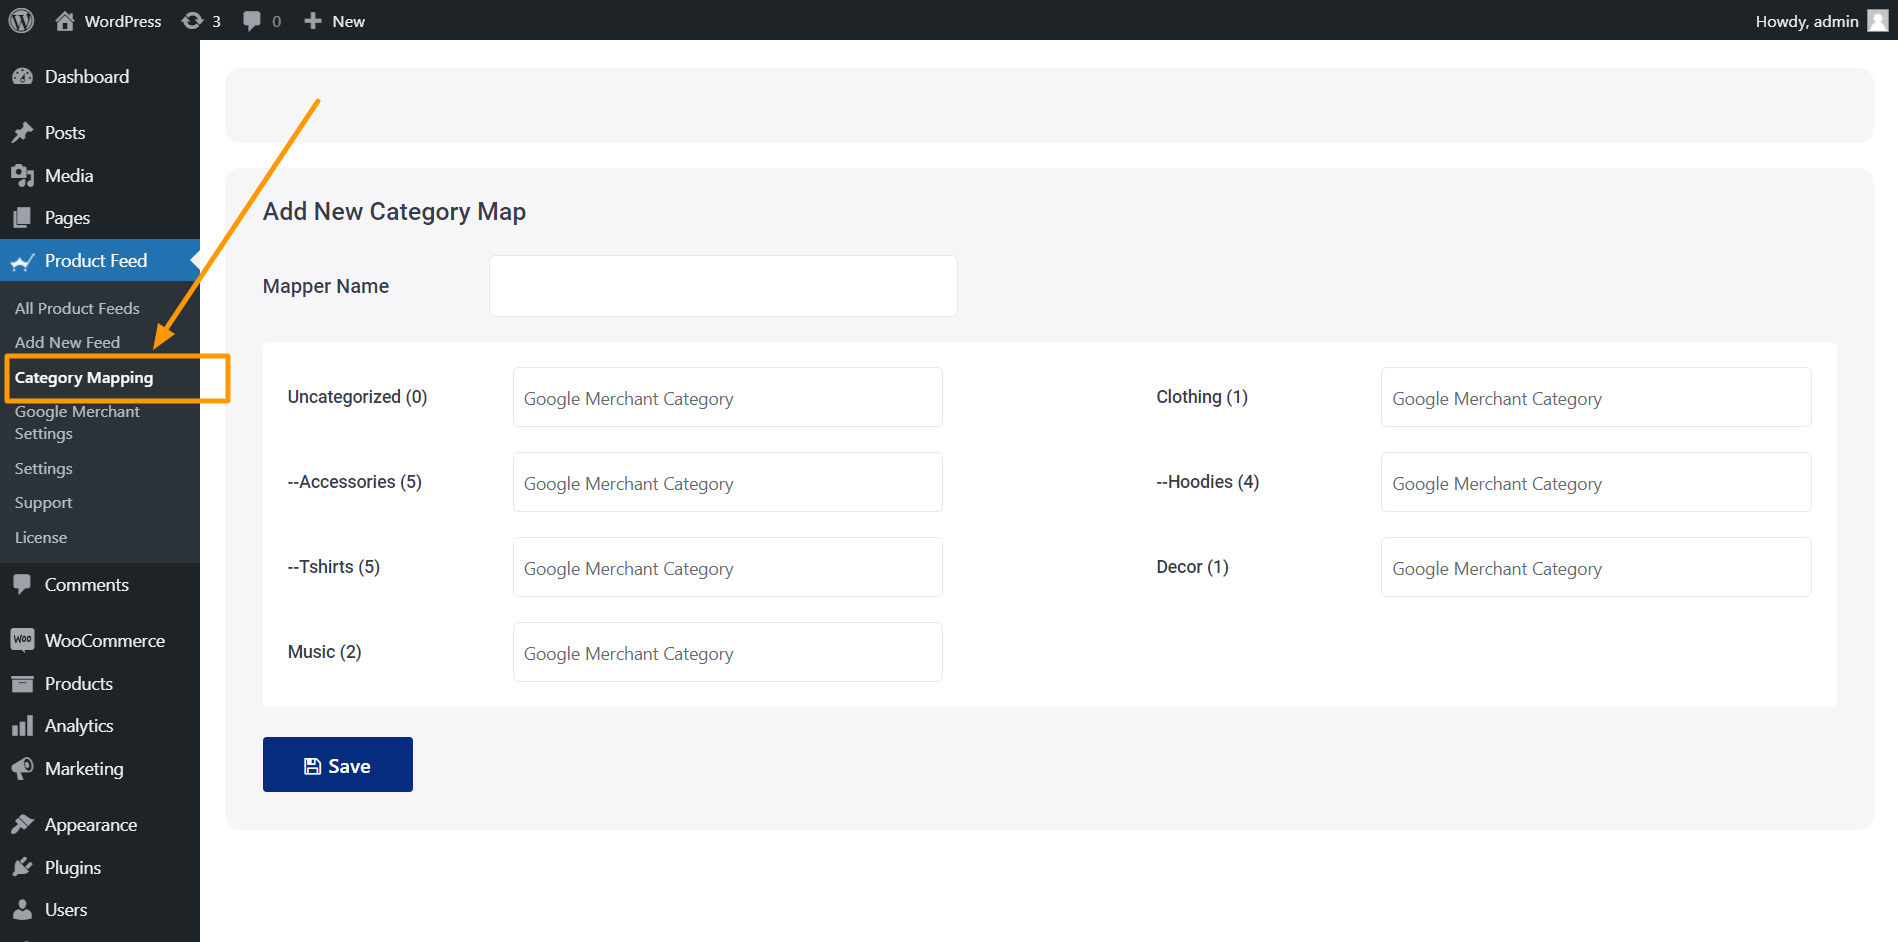
Here, all the categories in your store will be listed.
2. Give a name on the Mapper Name field.
3. Next, for every category listed here, find a relevant/appropriate category from Glami’s category list. Then copy the category’s full name and paste it in the field beside the respective category.
4. Scroll down and click on the Save button, and your mapper will be saved.
Step 7 – Update & Generate Your Accurate XML Feed
1. Go to Dashboard > Product Feed > All Product Feeds, and edit the feed you were creating.
2. Once it loads, on the right side, click on the Purge Cache button.
3. Then, scroll down to the Feed Configuration section and click on the value field for the Category Text attribute.
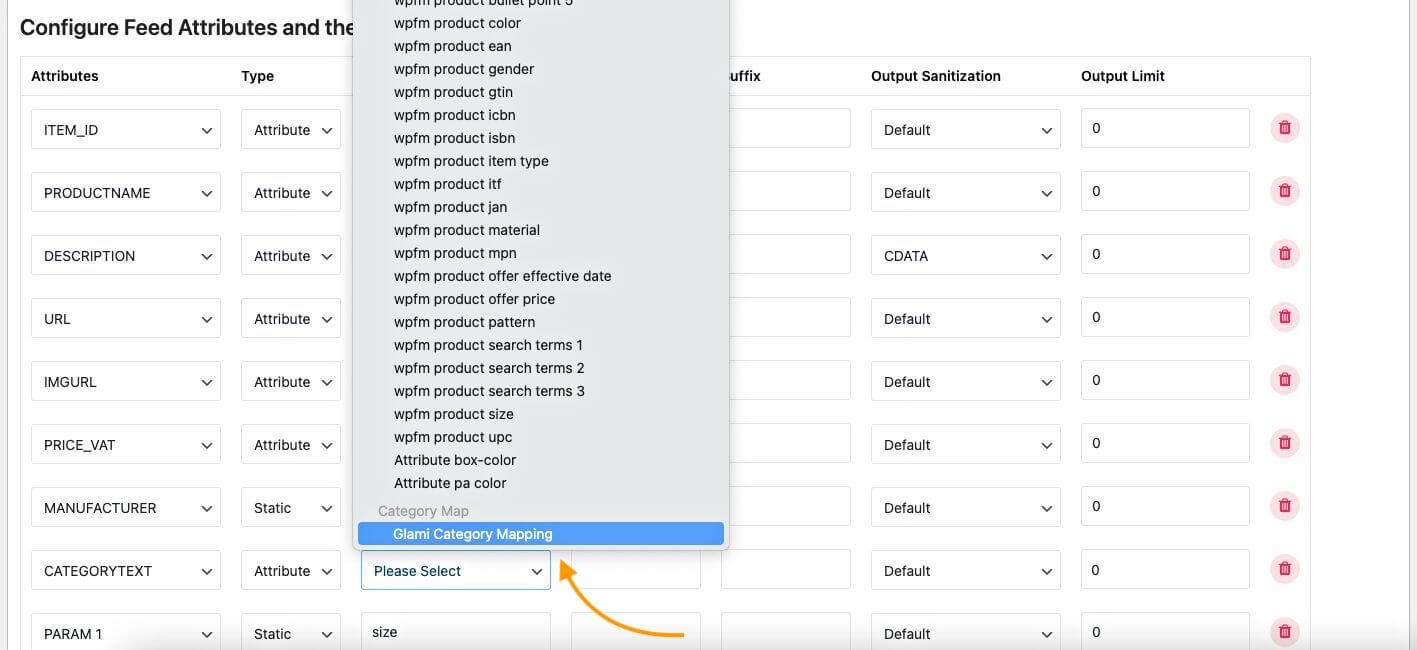
4. At the very bottom of the value list, you will find the category map you created. Select it.
5. Now, scroll up and click on Update.
That’s it. You have created your required product feed. The next thing to do is implement Glami Pixel and upload your fashion products to the Glami marketplace.
Simply check the requirements to promote on Glami and get your products uploaded on their huge marketplace to start getting more sales.
Conclusion
Generating a Glami XML feed for WooCommerce is important for effectively selling your fashion products on the Glami platform.
By ensuring your product titles, descriptions, prices, categories, images, and availability are accurately represented, you can significantly boost your visibility and sales.
Using an XML feed generator for WordPress simplifies this process, making it easy to create and manage your Glami product feed.
So, optimizing your WooCommerce store with a well-structured Glami XML feed can enhance your presence on the Glami fashion search engine, attracting more customers and driving sales. You can easily generate your Glami XML feed with a product feed manager.
** FAQs **
How do I create a Glami product feed for my WooCommerce store?
- To create a Glami product feed for your WooCommerce store, use an XML feed generator plugin like PFM. It simplifies the process by automatically generating the required Glami XML feed with your product details, including titles, descriptions, prices, and images.
Why should I use a Glami XML feed?
- Using a Glami XML feed helps you showcase your fashion products on the Glami platform, increasing your visibility and attracting more customers. It ensures your listings are accurate and up-to-date, improving your chances of making sales.
What information should I include in my Glami feed?
- Your Glami feed should include product titles, descriptions, prices, categories, images, and availability. This ensures that your listings are comprehensive and attractive to potential buyers on the Glami platform.
Can I update my Glami XML feed automatically?
- Yes, you can set up automatic updates for your Glami XML feed using an XML feed generator plugin for WordPress. This ensures your product information is always current, helping you maintain accurate listings and avoid any potential issues with outdated data.
How do I optimize my Glami product feed?
- To optimize your Glami product feed, make sure your product titles are clear and include relevant keywords. Use high-quality images and provide detailed descriptions. Regularly update your Glami feed to keep your listings fresh and competitive. By doing so, you increase your chances of attracting more customers and boosting sales.