In WooCommerce, it can be quite confusing when it comes to setting the tax rates for your products.
You might feel overwhelmed and frustrated while setting your wooCommerce tax rates
This article is a clear and simple walk-through on how you can handle our wooCommerce tax rates in the best way possible.
Keep reading to get a clear idea of:
- how to manually add WooCommerce tax rates,
- how to configure all the tax options in WooCommerce,
- how to automate your tax rates,
and eventually, have a running WooCommerce store with the right taxations.
So, Let’s begin.
Complete Guide To Handle WooCommerce Tax Rates Easily
When you add a product to your WooCommerce store, you can choose whether to include the applicable tax with the price.
Let’s say, you’re selling a T-shirt for 80$. And, the tax rate for your country is 10%.
You need to add an additional 8$ to the original price of the t-shirt. So, the total price of the T-shirt will be $88.
If you include the applicable tax, it will show $88 on the product page.
But, if you don’t include the applicable tax on the product page, customers will see 80$ on the product page and 88$ on the cart page.
WooCommerce automatically calculates the tax rate and shows the total price correctly.
But you need to add your own tax rates so that WooCommerce can configure them.
Now, there are two ways to manage your tax rates in WooCommerce:
- Manually configure the WooCommerce Tax settings.
- Use plugins to configure WooCommerce Tax rates.
Let’s see how you can do both configurations one by one.
How To Manually Configure WooCommerce Tax Rates Settings
Setting up taxes in Woocommerce manually is often complicated, especially if you operate from multiple countries.
You initially need to enable “WooCommerce tax rates” from the settings and then add the rates for each country. If you only sell locally, then you need to add a single tax rate only.
Follow the steps below to configure your WooCommerce tax rates in the right way.
Step 1 – Enable WooCommerce Tax Rates
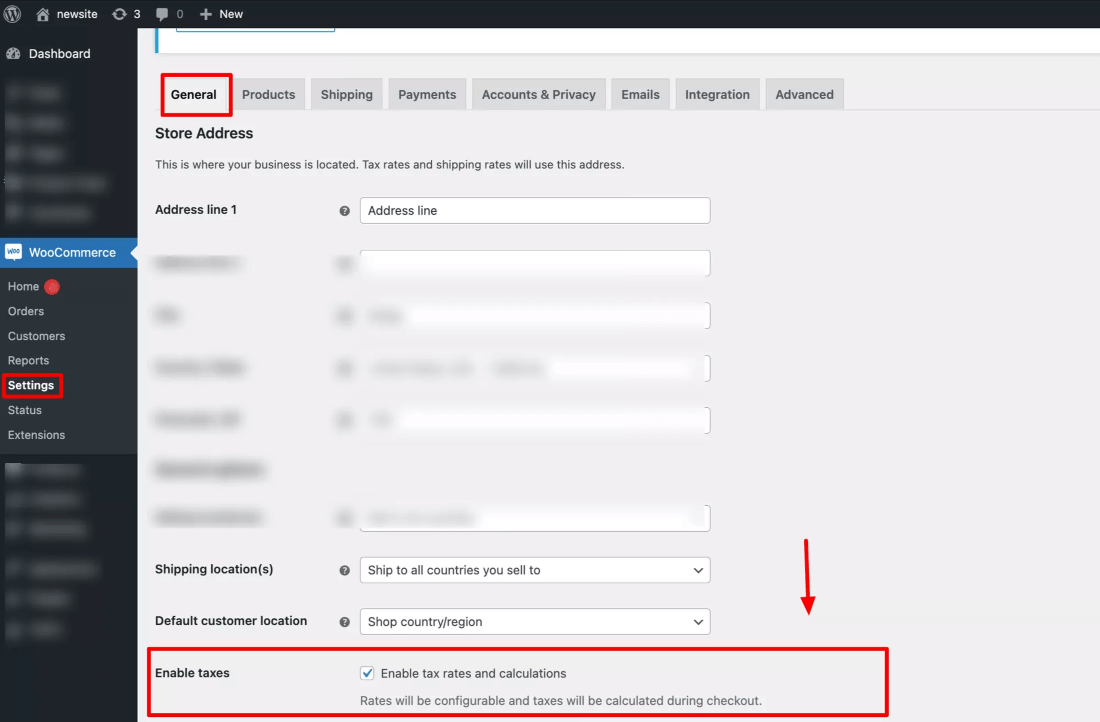
To enable WooCommerce tax rates,
- Login to your WordPress dashboard.
- Go to WooCommerce > Settings
- On the General tab, tick the Enable taxes and tax calculations checkbox.
Step 2 – Setting up the Tax Rates for your store
Once you enable the tax option, you’ll see a new tab in WooCommerce > Settings called Tax. Go to the “Tax” tab.
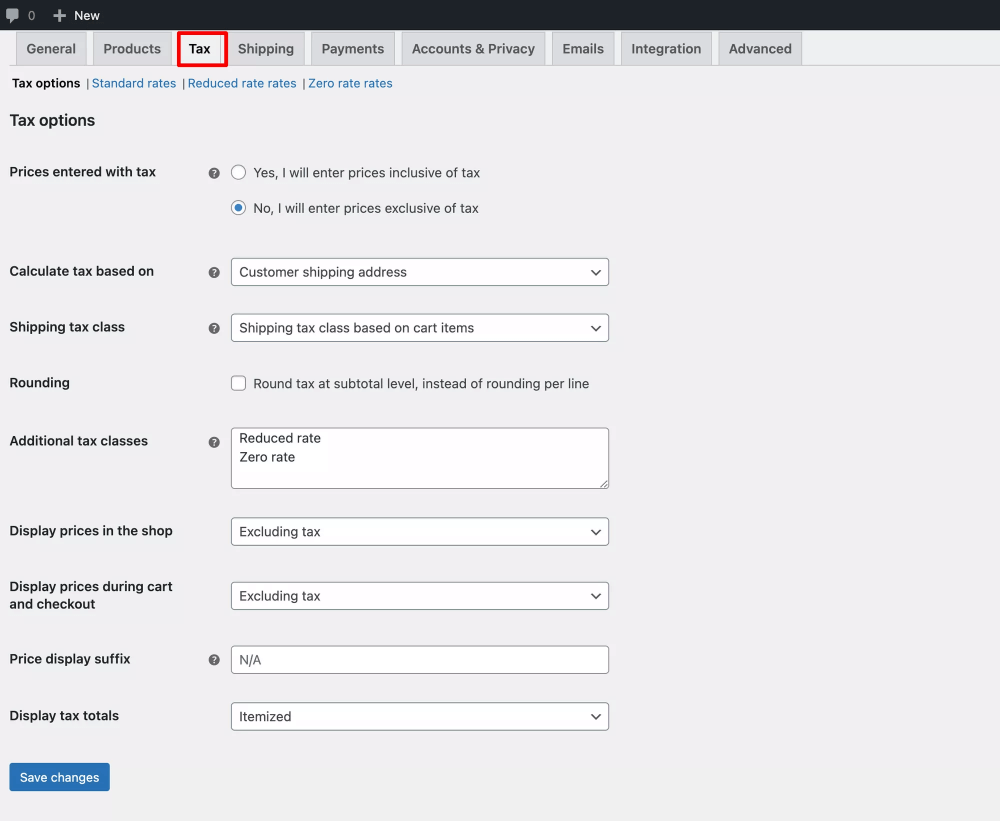
Here, you will get several options that you need to configure according to your business needs.
2.1 Prices Entered With Tax

You may choose if you want to add products with prices inclusive or exclusive of taxes. Hence you will get the following two options:
- Yes, I will enter prices inclusive of tax
If you choose this, then when adding products, you need to enter a price that has the tax amount added to it. - No, I will enter prices exclusive of tax
Choose this if you want to add products with their original prices and want WooCommerce to calculate taxes based on the tax rates you provide. (You will learn how to provide tax rates later on in this article.)
2.2 Calculate Tax Based On
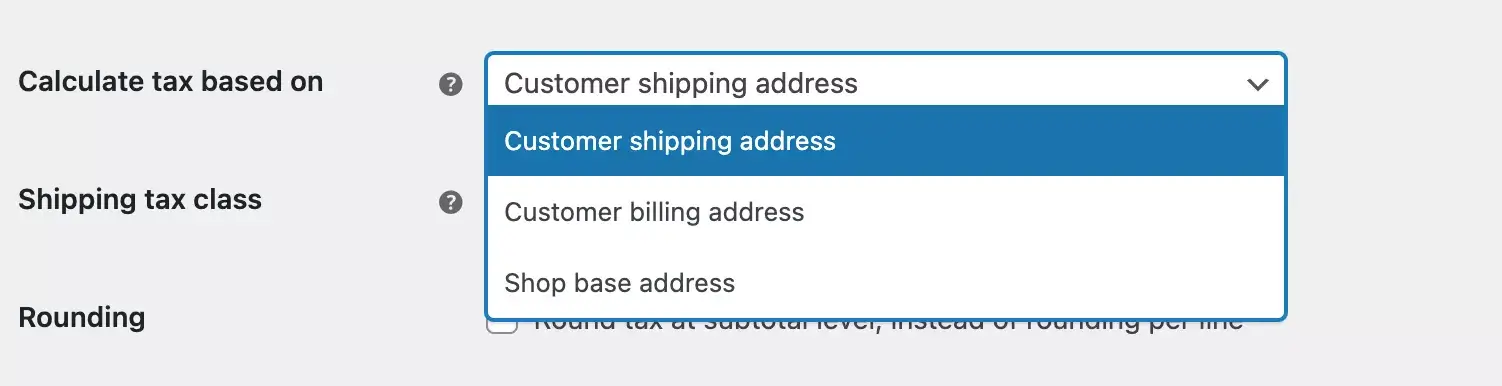
Regardless of how choose to input prices, WooCommerce will still calculate the taxes during checkout. Here you will get to choose which location WooCommerce will consider when calculating the tax amount.
So you will get the following options:
- Customer shipping address
Taxes will be calculated based on the shipping country of the customers. - Customer billing address
Taxes will be calculated based on the billing country of the customers. - Shop base address
Taxes will be calculated based on your business location.
2.3 Shipping Tax Class

This is where you’ll select the shipping tax class.
- In the first option, the shipping tax is calculated based on the items in the cart. That means, when a customer adds a product with a different tax rate, the shipping tax will also be charged at that rate.
- The other three options are the default tax classes of WooCommerce. In these tax classes, you can specify different tax rates.
Choose your preferred tax option from the drop-down.
Let’s say, you’ve applied a 5% standard tax rate.
Now, when you choose the Standard option, 5% will be applied to your shipping fees.
2.4 Rounding Tax At Subtotal

When you enable this – for having more than one tax for a single order, the value will be rounded at the checkout page rather than showing different taxes in different lines.
So, I’ll recommend you leave this unchecked.
2.5 Additional Tax Classes
The standard tax rate is the default tax rate for most products.
Let’s say, you want to add different tax rates for the products that qualify for a certain condition.
In this case, you’ll need to use the additional tax class
Using this field, you can insert the additional tax classes of your site.

You see, here we have added the Reduced rate and zero rate in the Additional tax classes.
You can also create a new tax class and assign different tax rates there.
2.6 Display Prices in the Shop
This means when you enter the price of your products, it will include the tax or exclude the tax.

2.7 Price Display Suffix
In this field, you’ll put the text that you want to display as a suffix to your tax value

For example, you can add a suffix incl of tax.
2.8 Display Tax Totals
Here, you’ll select how you want to display tax totals at the checkout.
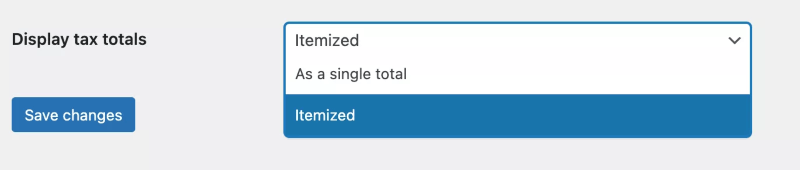
- Itemized – If you have more than one product on the cart, then each product will show its own tax separately.
- As a single total – If you have 6 products in the cart, then WooCommerce will calculate the total tax of each of the products and the tax value will be displayed as a single value.
Step 3 – Create Tax Classes and Insert WooCommerce Tax Rates
Now, let’s specify tax rates in each tax class.
a. Standard rates
Here, you’ll set different tax prices.
You know different states or countries have different taxes.
In WooCommerce, you can add standard tax rates based on the location.
Follow the steps below to add standard tax rates:
- First, click on Insert row. When you do that, a new row will be inserted.

- In the first column, you see the Country code. Here you’ll select the country code. If you don’t know the country code, you can click on the Country code and get the Wikipedia page where all the country codes are listed.
- In the State code column, you can add a tax rate for a specific state of the country you selected.
- For the Post code, if all the postcodes are applicable to the same tax rate then put a * on the column. You can also add multiple postcodes in different ranges and separate them with a semicolon.
- In the City, insert the cities where the tax applies.
- You’ll apply the tax percentage in the Rate column.
- Next, enter the Tax name that you want to display at the checkout or cart page.
- Assign Priority to each tax rate.
- The Compound option specifies whether the additional charge is based solely on product prices or on product prices plus regular sales tax.
- If you enable the Shipping option, then the selected tax percentage will be applied to the shipping fees.
Now, it’s time to test if the tax rates are properly working.
Here, you can see I’ve added different tax rates for California state in the US.

Let’s check on the cart page if the tax is applied or not.
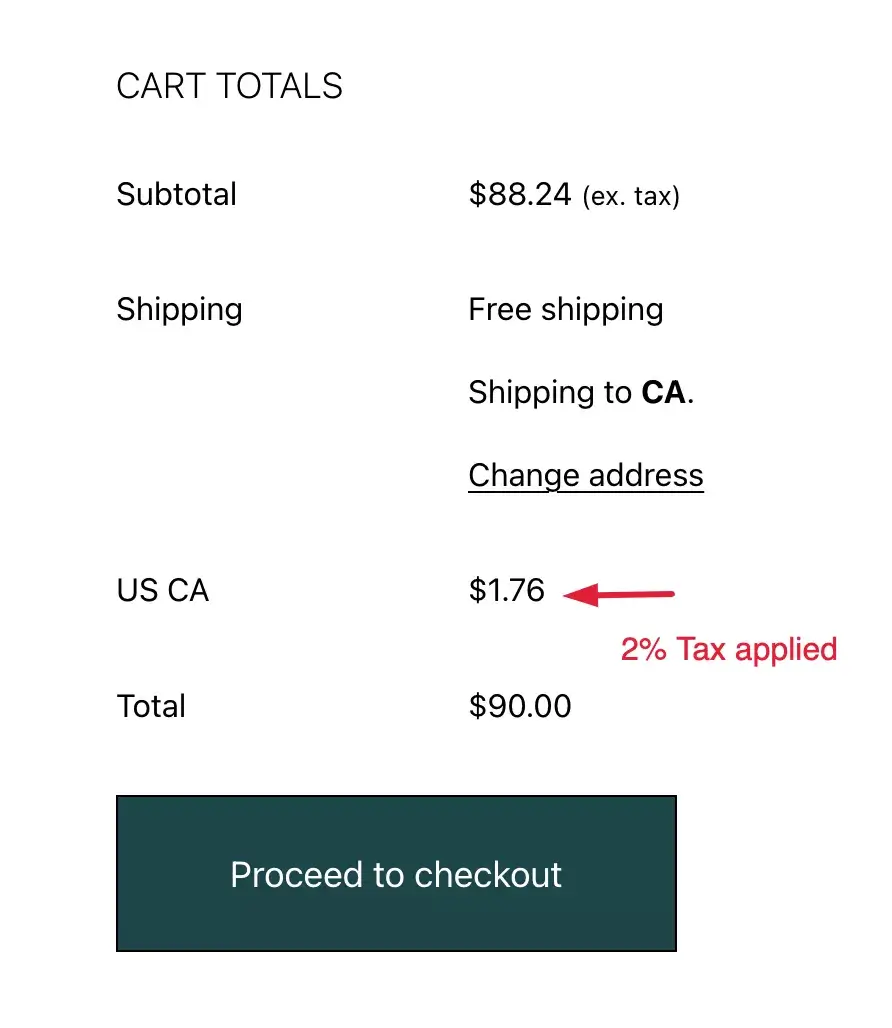
Here, for the shipping address CA, a 2% tax rate is applied.
Now, if we don’t select the state, the tax selected for the US will be applied.
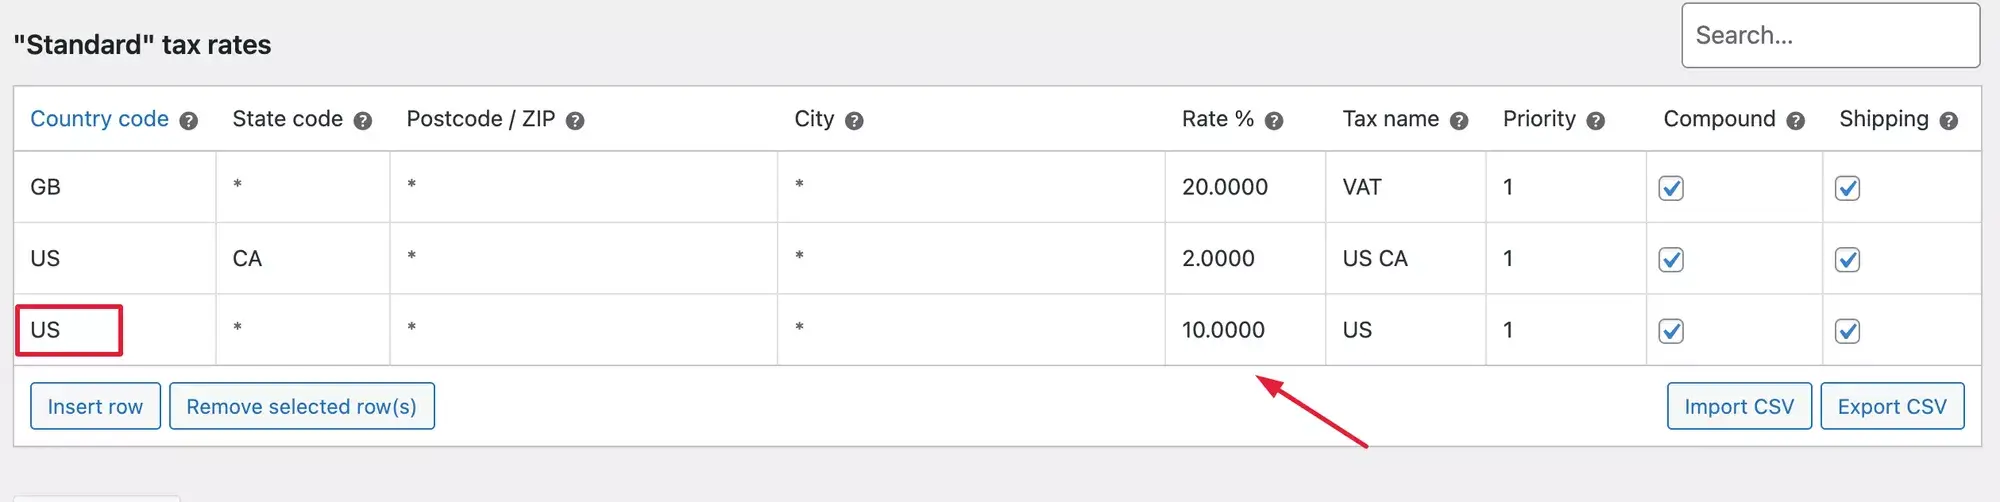
Let’s check that on the cart page –

Here, for a different state in the United States, a 10% tax is applied.
Similarly, you can add the other tax classes.
b. Reduced Rate

c. Zero Rate

Delete Tax Rates
To delete individual tax rules:
- Navigate to the tax settings by going to WooCommerce > Settings > Tax sections (Standard, Reduced Rate, Zero Rate).
- Identify the incorrect tax rule lines and click on them to select and highlight them in yellow.
- Choose the “Remove Selected Rows” option to delete the highlighted tax rules.
- Don’t forget to save the changes after making deletions.
To delete all tax rates at once:
- Go to the System Status section by navigating to WooCommerce > System Status > Tools.
- Look for the option labeled “Delete all WooCommerce tax rates” and select it.
- This will remove all tax rates configured in your WooCommerce store simultaneously.
- Remember to save the changes after using this bulk deletion option.
How To Manage WooCommerce Tax Rates Using Plugins
As you saw, setting up your WooCommerce Tax Rates is actually not as complicated as it seems. However, there is a better way to make it even easier.
There are several amazing plugins out there that you may use to manage WooCommerce tax rates efficiently. Let us look at a few plugins that can make your life easier when managing taxes:
1. TaxJar
TaxJar is specialized in automatic sales tax calculations. This plugin not only helps you calculate what taxes to collect from different users, but it also helps you automatically file sales tax in states where you owe taxes, which is extremely useful if your store is located in the United States.

With TaxJar you don’t need to manually upload tax rates. Tax rates are already calculated and organized with its’ AI-driven tax categorization, that can help you to managing the taxes of your store.
First, it connects to your shopping cart or marketplace and collects data from there.
Next, it gathers and downloads that information.
Lastly, it compiles it into reports easy to file sales tax in the state in you have your sales tax.
Features of TaxJar –
- Seamless integration with e-commerce & ERP platforms.
- Real-time sales tax calculation
- Monitor the economic link between states.
- Access detailed sales tax reports
Click here to find out the basics of Taxjar.
2. Quaderno WooCommerce tax automation plugin
This plugin performs real-time tax calculations regardless of where your customers are located.
Quaderno transactions and invoices are compliant with ever-changing local tax rules for WooCommerce sellers, including US sales tax, EU VAT, and Canadian GST.
Quaderno also enables you to send tax-compliant documents.
It also facilitates advance tax filing. Quaderno sends email notifications automatically by attaching invoices.
Its super easy dashboard helps you manage all the revenue sources efficiently.
Features of Quaderno WooCommerce tax automation plugin –
- Track tax policies worldwide.
- Access to instant tax reports.
- Sales tax process automation.
- Tax-compliant receipts in different languages.
Find out how to automate your tax using Quaderno plugin.
3. Tax Exempt for WooCommerce
Tax Exempt for WooCommerce allows you to exempt certain customers from paying taxes on your store.
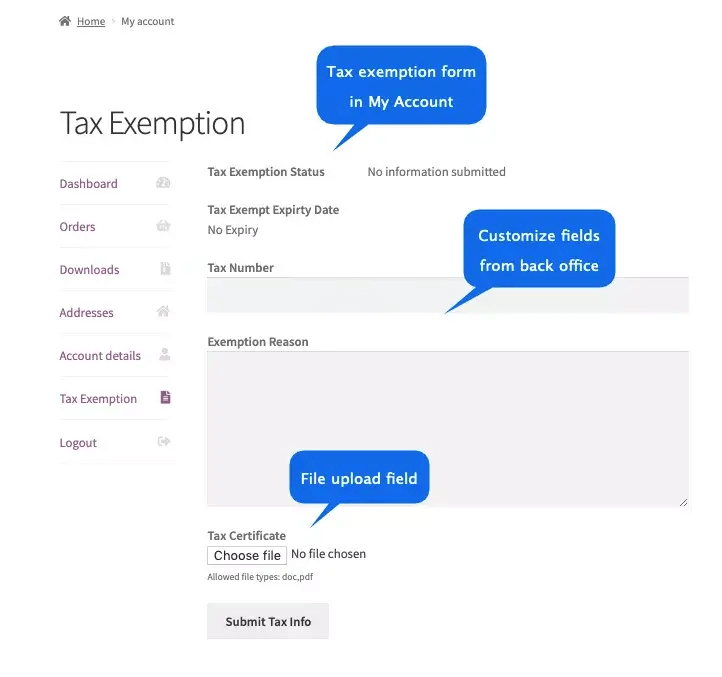
You can automatically exempt certain WordPress user roles from paying tax.
On the checkout page, you can give users the option to claim tax-exempt status. Users can then be required to upload supporting documentation.
It offers you customized form fields and notification messages to run your tax exemption smoothly.
You can set a time limit for the tax exemption. You can provide tax exemption even for the guest users of your store.
Features of Tax Exempt for WooCommerce plugin –
- Allow all or a subset of user roles to get tax exemptions.
- Display tax exemption form.
- Form field customization.
- Exclusive email notification options.
Click here to learn more about Tax Exempt for WooCommerce.
Schlussfolgerung
Now that you know how you can configure your WooCommerce tax rates, go ahead and set up taxes in your WooCommerce store. Whether you do it manually or use a tax plugin, it is important to ensure you are adding the tax rates and inputting product prices accurately.
If you need help with any other aspects of WooCommerce, you may find a suitable guide here:
In addition to setting up WooCommerce tax rates, businesses should also consider other tax regulations, such as BIK on company cars, to ensure comprehensive tax compliance and effective financial management.
If you faced any difficulties when managing taxes or if you have used any tax plugins, share your experience with us in the comments below.
Zum Wohl.