![Simple Guide To Generate Rakuten Product Feed – WooCommerce [2025]](https://rextheme.com/wp-content/uploads/2021/07/Rakuten-simple.jpg)
Running an eCommerce business can be difficult. However, one of the best ways to increase your sales fast is by promoting your products on large marketplaces.
Rakuten is one such marketplace that you can rely on. With more than a billion active users across 30 countries, Rakuten is one of the top merchants that can help you boost your sales without much effort.
And if you use WooCommerce, then it’s super easy to list your products on Rakuten marketplace.
All you need is to create a Rakuten product feed with the right attributes and upload your products to the marketplace. And soon enough, you will start to get more potential buyers visiting your site.
In this guide, you will get step-by-step instructions on creating a product feed accurately for the Rakuten marketplace.
After reading this guide, you will learn,
- The required attributes to include on the product feed
- Examples of product data to submit for each attribute.
- How to generate Rakuten product feed in just a few clicks.
Fangen wir also an.
Inhaltsverzeichnis
Guide To Generate Rakuten Product Feed
First, let us learn about all the required data for each product that you need to include in the product feed. Then we will look at how you can generate this product feed in the right format.
Product Data Specification For Rakuten Product Feed
A product feed for Rakuten is usually generated in CSV format. But you can also use TXT or TSV formats to submit your product data.
Required Product Attributes To Submit to Rakuten
The following are the mandatory attributes for each product:
| Attribute Header | Instructions | Beispiel |
|---|---|---|
| id | This acts as a unique identifier for a product. You may use your WooCommerce product ID or product SKU as the value for this attribute. | 102 |
| Titel | Include the name of the product (no more than 70 characters). | Pullover Hoodie with Logo |
| Marke | Assign a brand name to the product you want to list on the Rakuten marketplace. If you are the manufacturer, then you can assign your own company name as the brand name. | Lacoste |
| Beschreibung | Include a short description of your product with details of its use and benefits. | This pullover hoodie is made from 100% organic cotton for extreme comfort. With the latest generation style and mesh lining, this hoodie is will make you feel special, while still maintaining comfort. |
| google_produkt_kategorie | You also need to submit a category from Google’s taxonomy list, to which this product is relevant. | Clothing & Accessories |
| Link | This should be the link to your product | http://yourwebsite.com/product/pullover-hoodie-with-logo |
| Image_link | You need to submit at least one image for every product. *The image size should be at least 600×600 in size. | http://yourwebsite.com/wp-content/uploads/2022/04/pullover-hoodie-with-logo-1.jpg |
| Preis | Submit the actual price of the product. If you have a discount running, then submit the regular price for this attribute, and use the sale_price attribute to submit the discounted price. Include the currency as the suffix. | 45.00 EUR |
| Verfügbarkeit | Include the stock availability, i.e., if the product is still in stock for purchase. *Accepted values: – in stock – out of stock – preorder – backorder | vorrätig |
| gtin | GTIN is a unique product identifier that you must include in the feed. This represents all other forms of identifiers as well, such as UPC, EAN, JAN, and all forms of GTIN. | 401234512343 |
| mpn | Also, submit the MPN, which uniquely identifies a specific product among all products from the same manufacturer. | HSC0424PP |
| Bedingung | Mention the condition of the product you are selling. *Accepted values: – New – Refurbished – Used | Neu |
| Geschlecht | It is mandatory to mention the target gender for which your product is suitable. *Accepted values are: – Male – Female – Unisex | Unisex |
| Alter_Gruppe | You also have to submit the age group of the prospects your products are suitable for. *Accepted values: – Adult – Kids | Adult |
| produkt_typ | This attribute represents the product category you have assigned to your products in your WooCommerce store. *It is highly recommended to submit this attribute for better search results, but it’s not mandatory. | Men’s Hoodies |
| item_gruppen_id | If you have variable products, then you need to include a common item_group_id for every variant of the same product. It is basically the ID or the SKU of the parent product. | 1001 |
Conditional Required Attributes To Include In The Feed
A few attributes are not always required but are often mandatory to submit based on certain conditions. Let us look at these attributes in detail.
| Attribute Header | Instructions | Beispiel |
|---|---|---|
| sale_price | This attribute is only required if you have a discount running on your store. In that case, include the discounted price as the sale price in the feed. | 35.00 EUR |
| Farbe | The color attribute is mandatory for products that fall under the Apparel category, but you may use it for products in other categories as well. Also, if you have variable products that vary due to color, then you must submit the color attribute. | Red |
| Größe | You must submit the size attribute for products that fall under the Apparel category. You may choose to use it for products in other categories as well. Also, if you have variable products that vary due to size, then you need to submit the size attribute. | XXL |
| Material | You need to submit this attribute for variable products that vary due to the pattern (or graphic design). | Leder |
| Muster | For variable products that vary due to the pattern (or graphic design), then you must submit this attribute. | Stripped |
| shipping_weight | In your merchant center, if you set up a rule for shipping cost based on the shipping weight, then you must submit this attribute. *You may submit the unit as a suffix, which has to be the same as you set up in your merchant center. | 1.2 kg |
| Erwachsene | If you are selling any type of adult product, i.e., items or images containing nudity or suggestive content, you must submit this attribute for those products. *Accepted values: – yes – no | ja |
Other Optional Attributes You May Choose To Submit
Apart from the attributes above, there are a few more attributes that you may choose to submit if required or applicable.
| Attribute Header | Instructions | Beispiel |
|---|---|---|
| sale price effective date | If your product is on sale and its sale price has a limited time, you can use this attribute to mention the date and time when the sale will expire. **This attribute is not mandatory, but you may use it when required. | 2022-10-29T23:07:31+0100 |
additional_image_link | If you want to submit additional images for your products, you can submit the links to your products under the additional_image_link attribute, separating the image links by commas. | http://yourwebsite.com/wp-content/uploads/2022/04/image1.jpg,http://yourwebsite.com/wp-content/uploads/2022/04/image2.jpg,http://yourwebsite.com/wp-content/uploads/2022/04/image3.jpg |
| tax | Usually, you need to set up the tax rates in your Merchant Center account. But if you want to submit a unique tax rate for certain products, then you can use this attribute to do so. | 15 |
| shipping | You need to set up the shipping cost for your products in your Merchant Center account. But if you want to submit a unique shipping cost for certain products, then you can use this attribute to do so. | 3.99 EUR |
| Multipack | If you want to sell multiple quantities of the same product at a single price, then you can submit that quantity as the value for the multipack attribute. For example, you may choose to sell 6 t-shirts as a multipack. In this case, the price should be the total cost of the pack, i.e., in the case of the 6 t-shirts, the price should represent the total cost for all six t-shirts. | 6 |
Example Feed Structure Of Rakuten
Here’s an example of a Rakuten CSV feed. You may download it and view it using a CSV viewer.
Now that you have a complete understanding of how the Rakuten feed works and what required attributes you need to include in your product data, let us look at how you can generate a product feed for Rakuten easily.
7 Easy Steps To Generate Rakuten Product Feed In Your WooCommerce Store
First of all, you do not have to create a CSV feed for all of your products manually. Right now, there are several tools out there that you can use to generate a product feed for Rakuten easily.
In the next few steps, I will show you how you can generate a product feed for Rakuten using Product Feed Manager for WooCommerce. It is one of the easiest plugins to use and has a pre-made template with all the necessary attributes to help you generate Rakuten CSV feed in just a few clicks.
Follow these 7 easy steps to learn how to use Rakuten feed template, and get your CSV feed ready real quick.
Step 1 – Install & Activate Product Feed Manager
1. Go to Dashboard > Plugins and then click on the Add New button.

2. Type “Product Feed Manager” on the search box, and you will find the plugin on the search result.
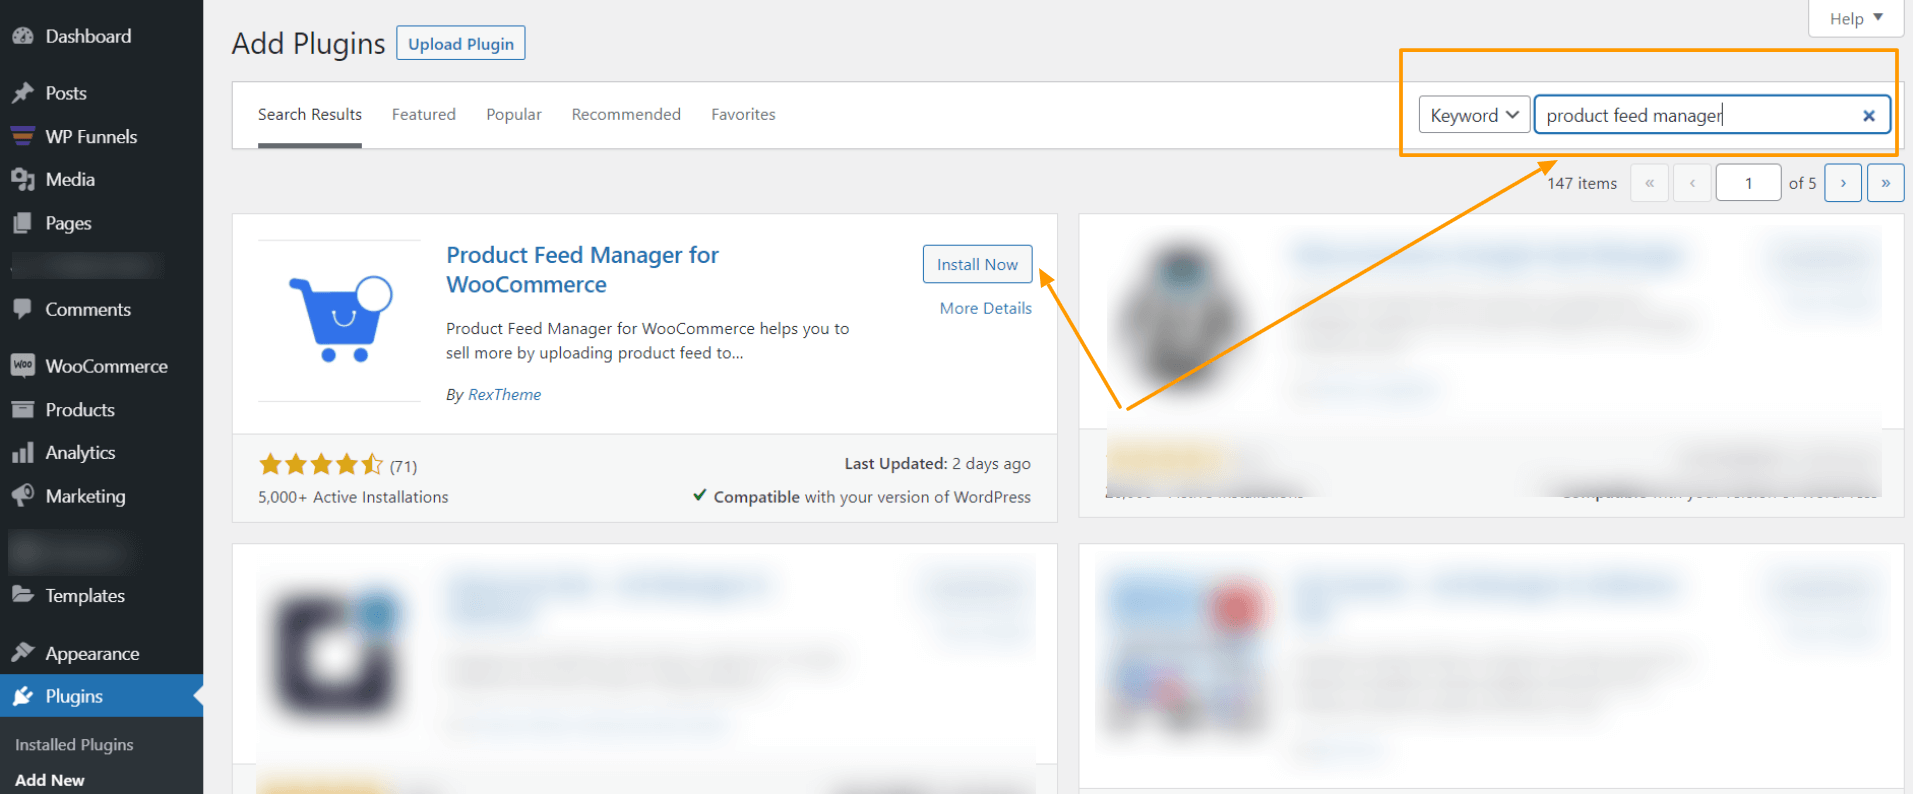
3. Click on the Install Now button.
4. Then click on the Activate button to activate the plugin.

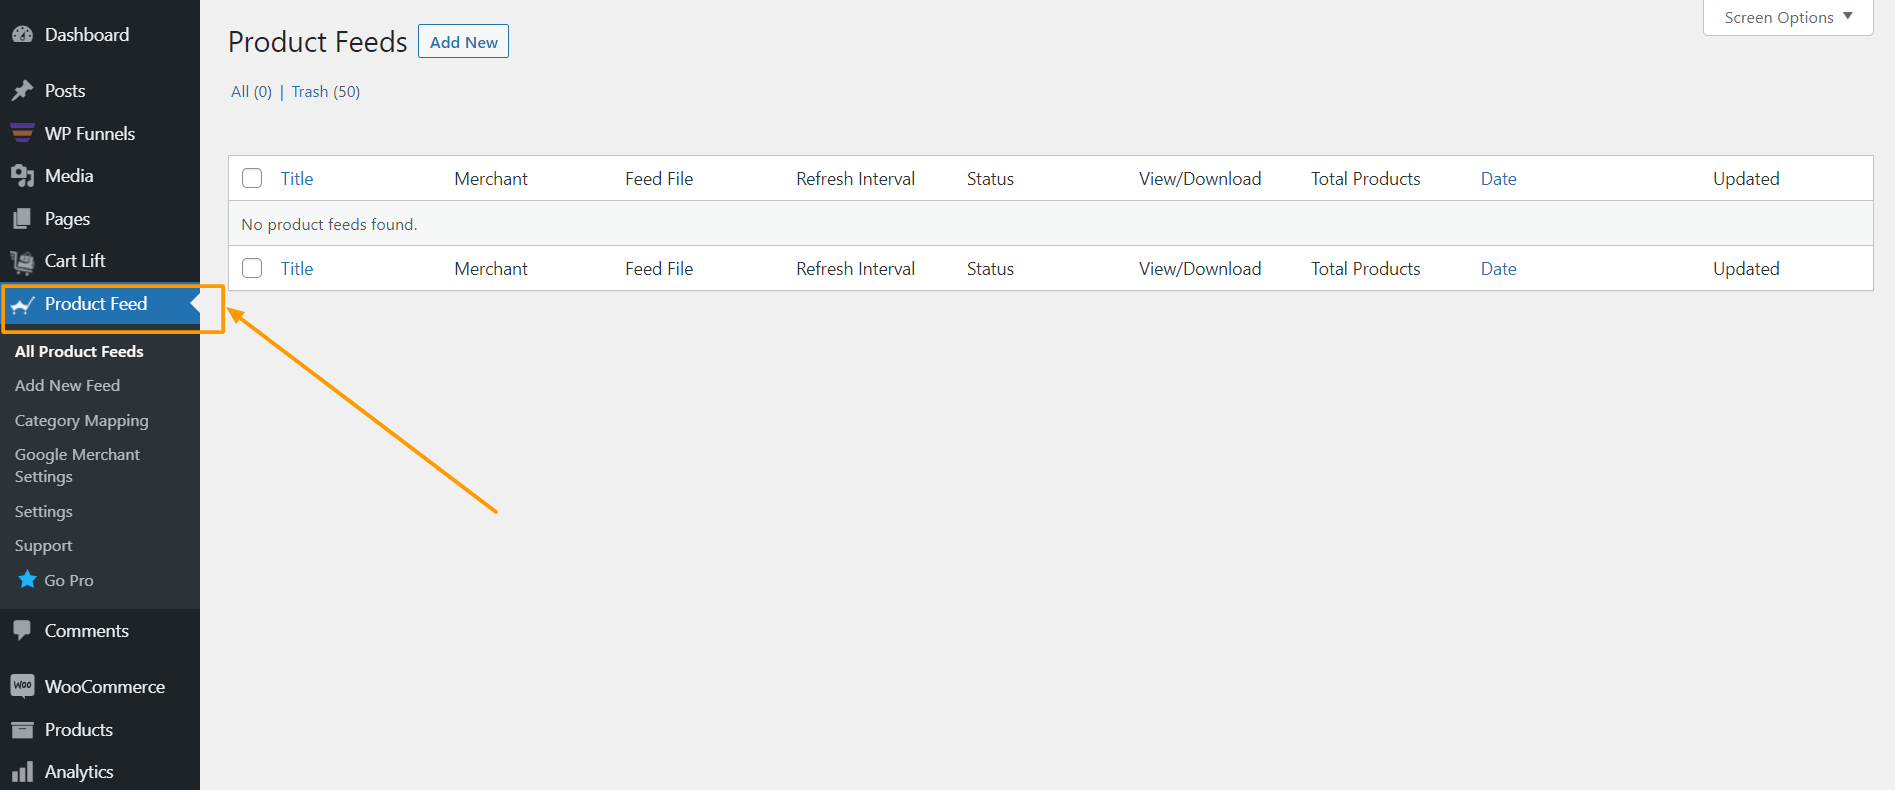
Once you have the plugin activated, you will find the menu, Product feed, among your dashboard menus.
Step 2 – Import Rakuten Template & Map Attributes
1. On your dashboard, click on Product Feed.
2. Next, click on Add New Feed button.
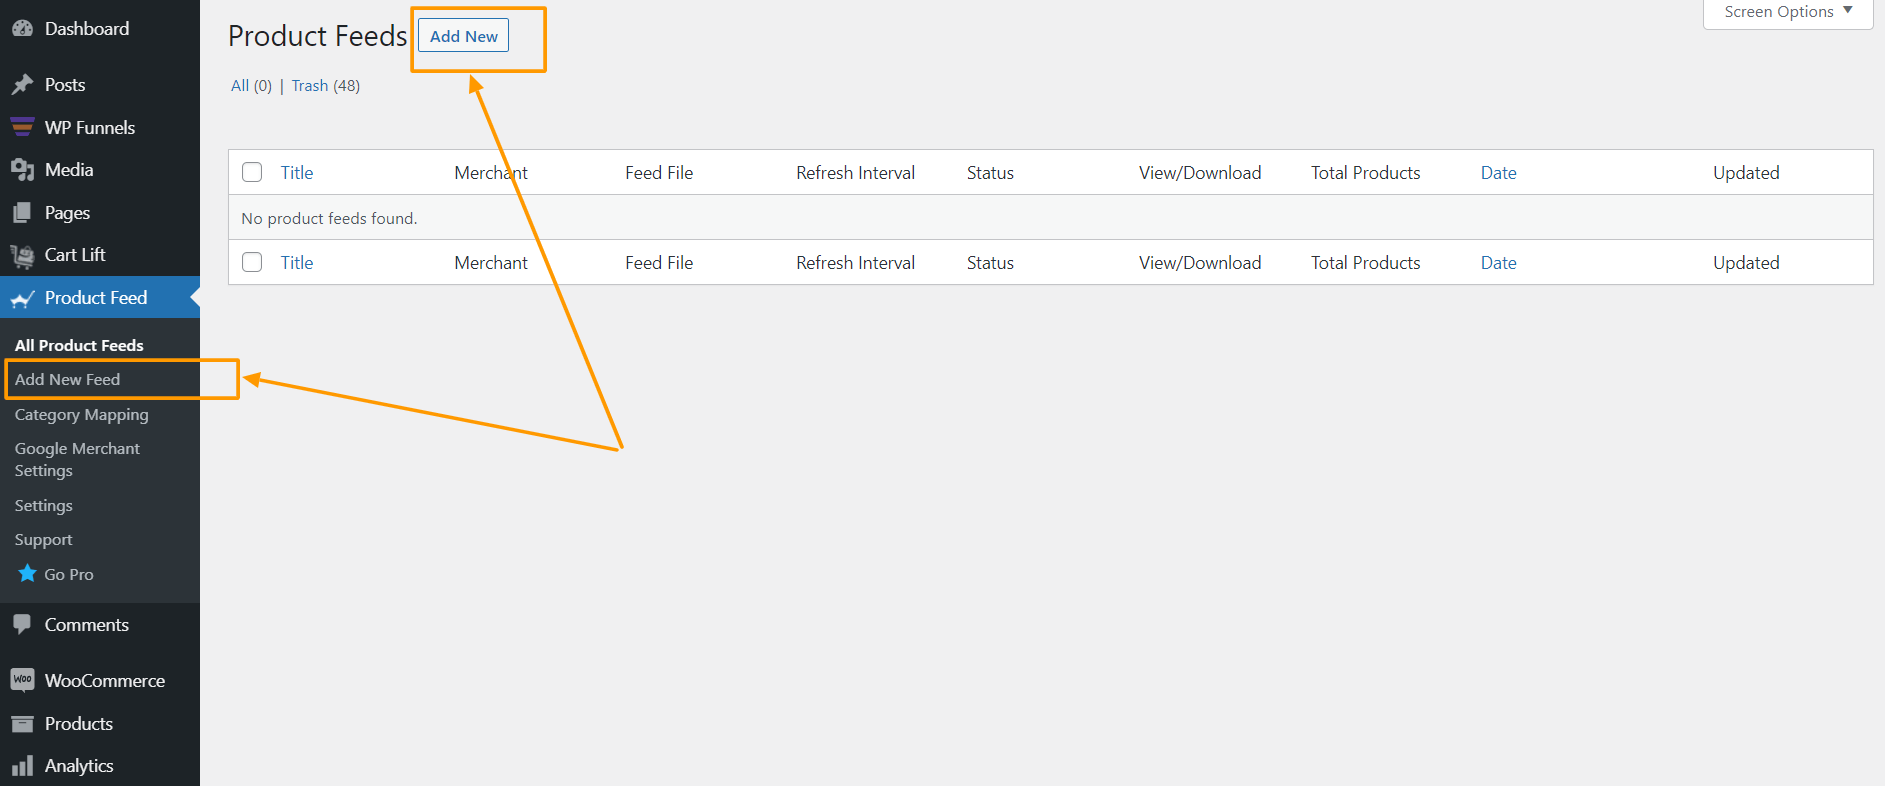
You will be taken to a blank feed generation page.
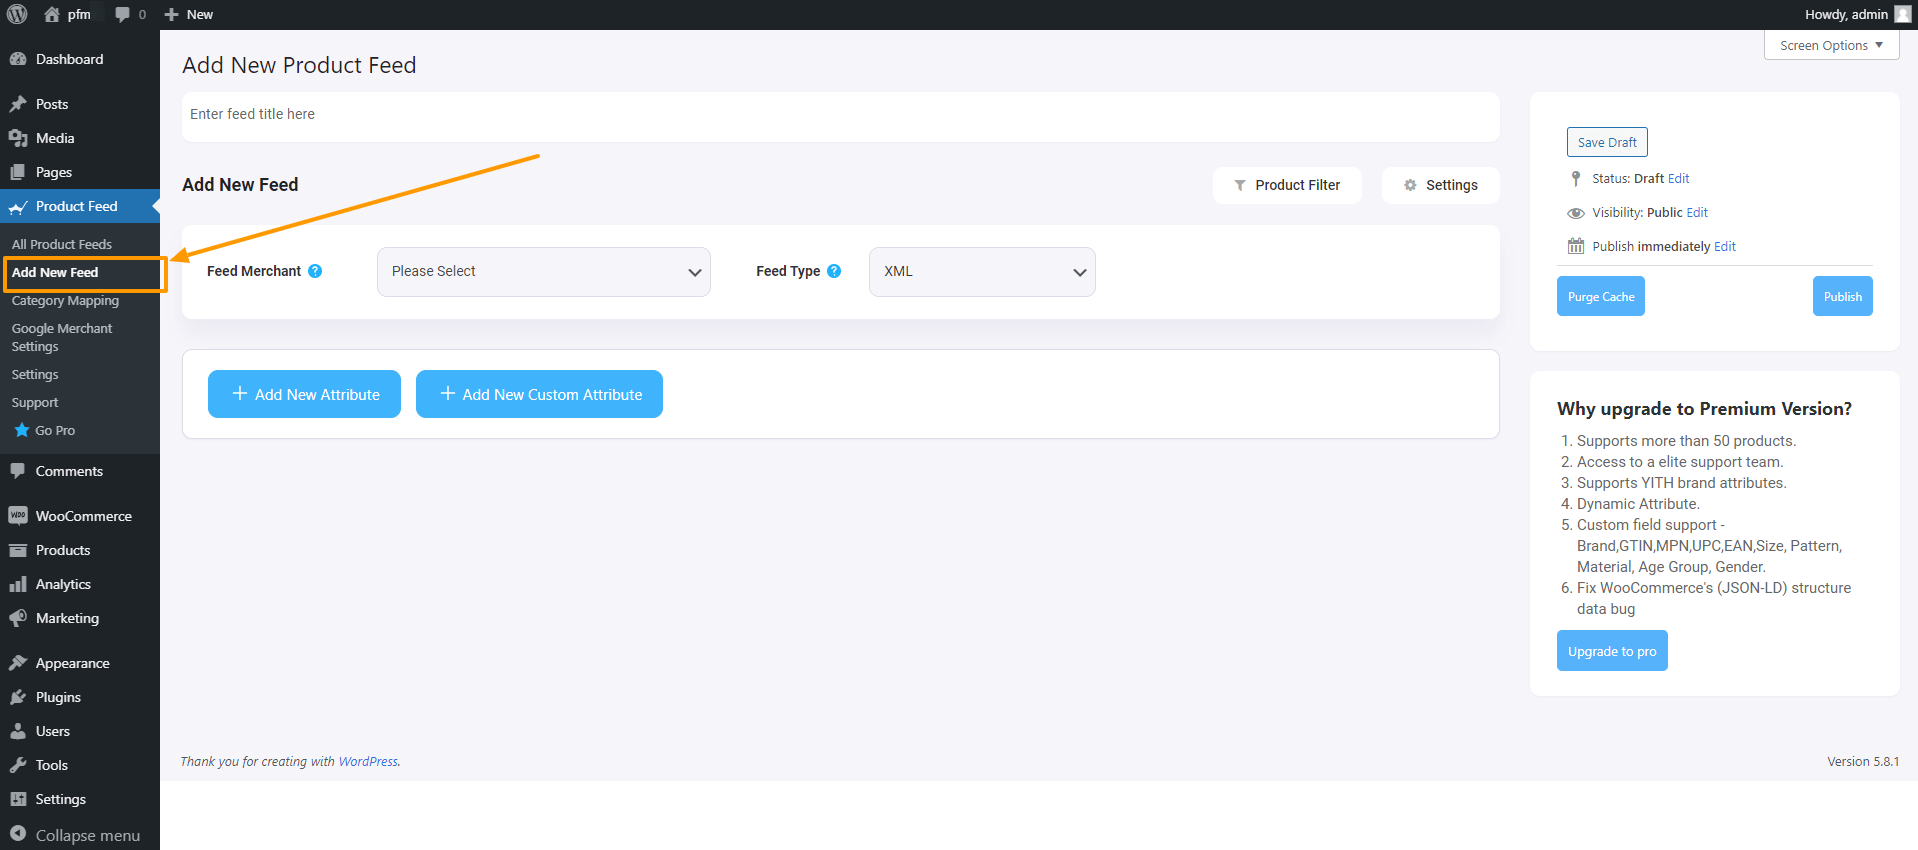
3. On top, you will get the option to add a title to the feed. Give your feed a name.
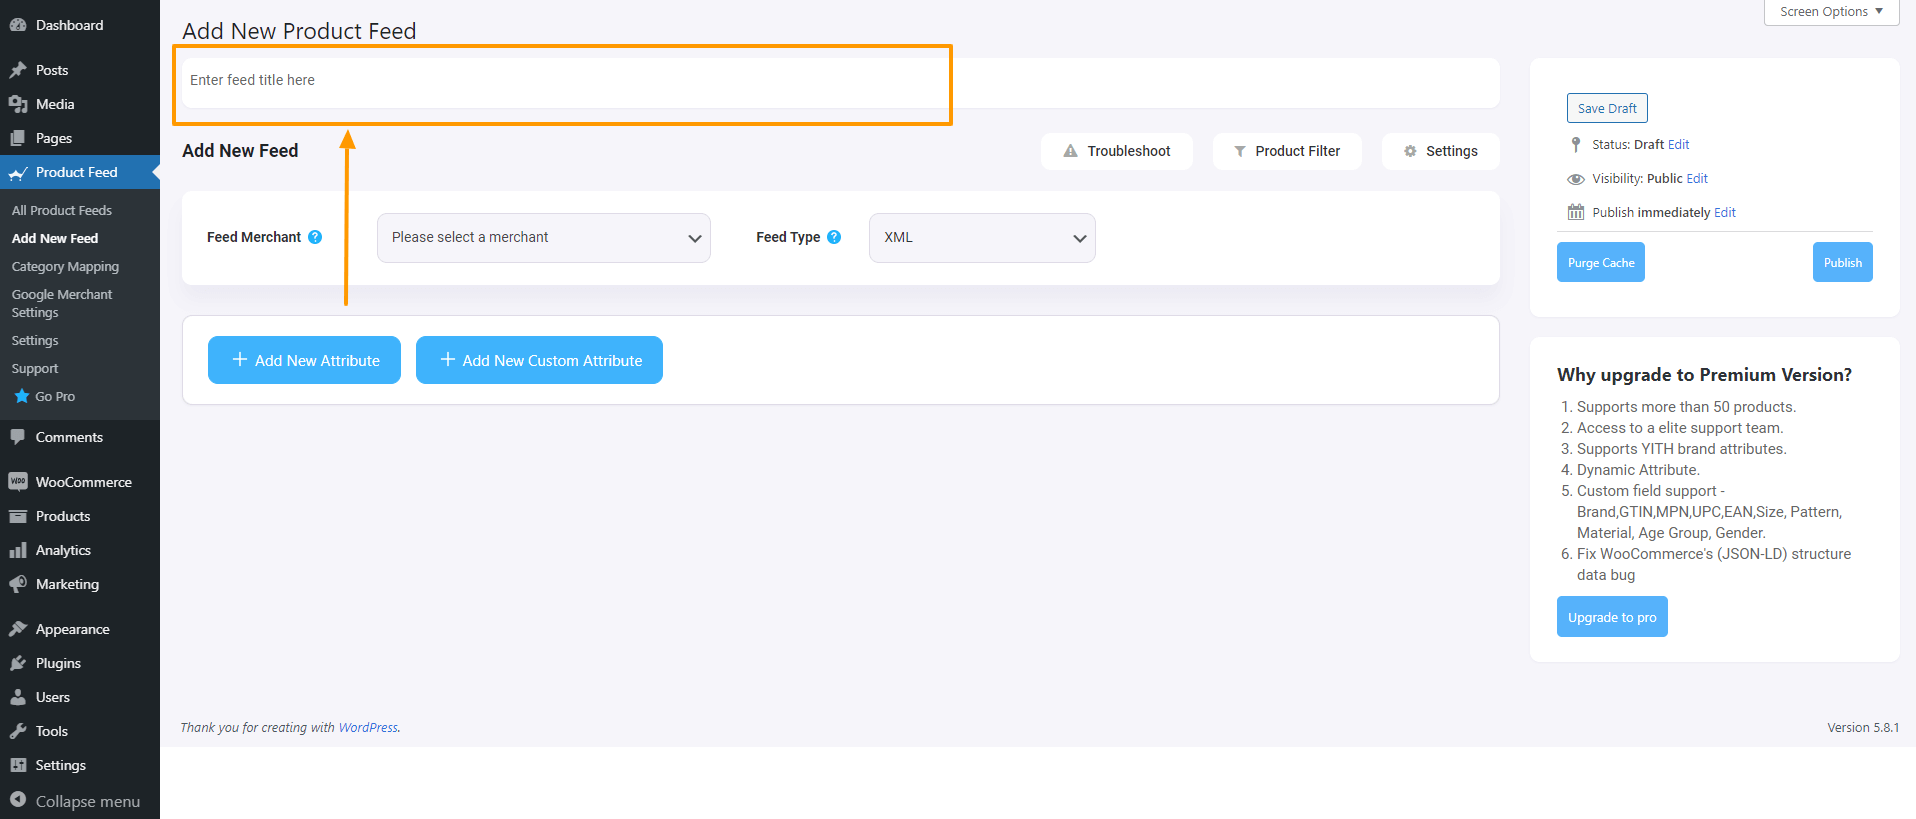
4. Just under the title, you will see an option to select your preferred merchant. Simply click on the Feed Merchant dropdown button and select your preferred merchant from the dropdown or you can search in the dropdown box.
Wählen Sie Ihren bevorzugten Händler aus, und alle erforderlichen Attribute werden unten geladen.
Select Rakuten from the dropdown list.
**Please note that for Rakuten you can only create CSV, TXT, or TSV feed, you can choose your preferred feed format from the Feed Type file format selection dropdown next to the Feed Merchant dropdown option.
Here, we will create a CSV feed for Rakuten, so let’s select CSV from the Feed Type dropdown option.
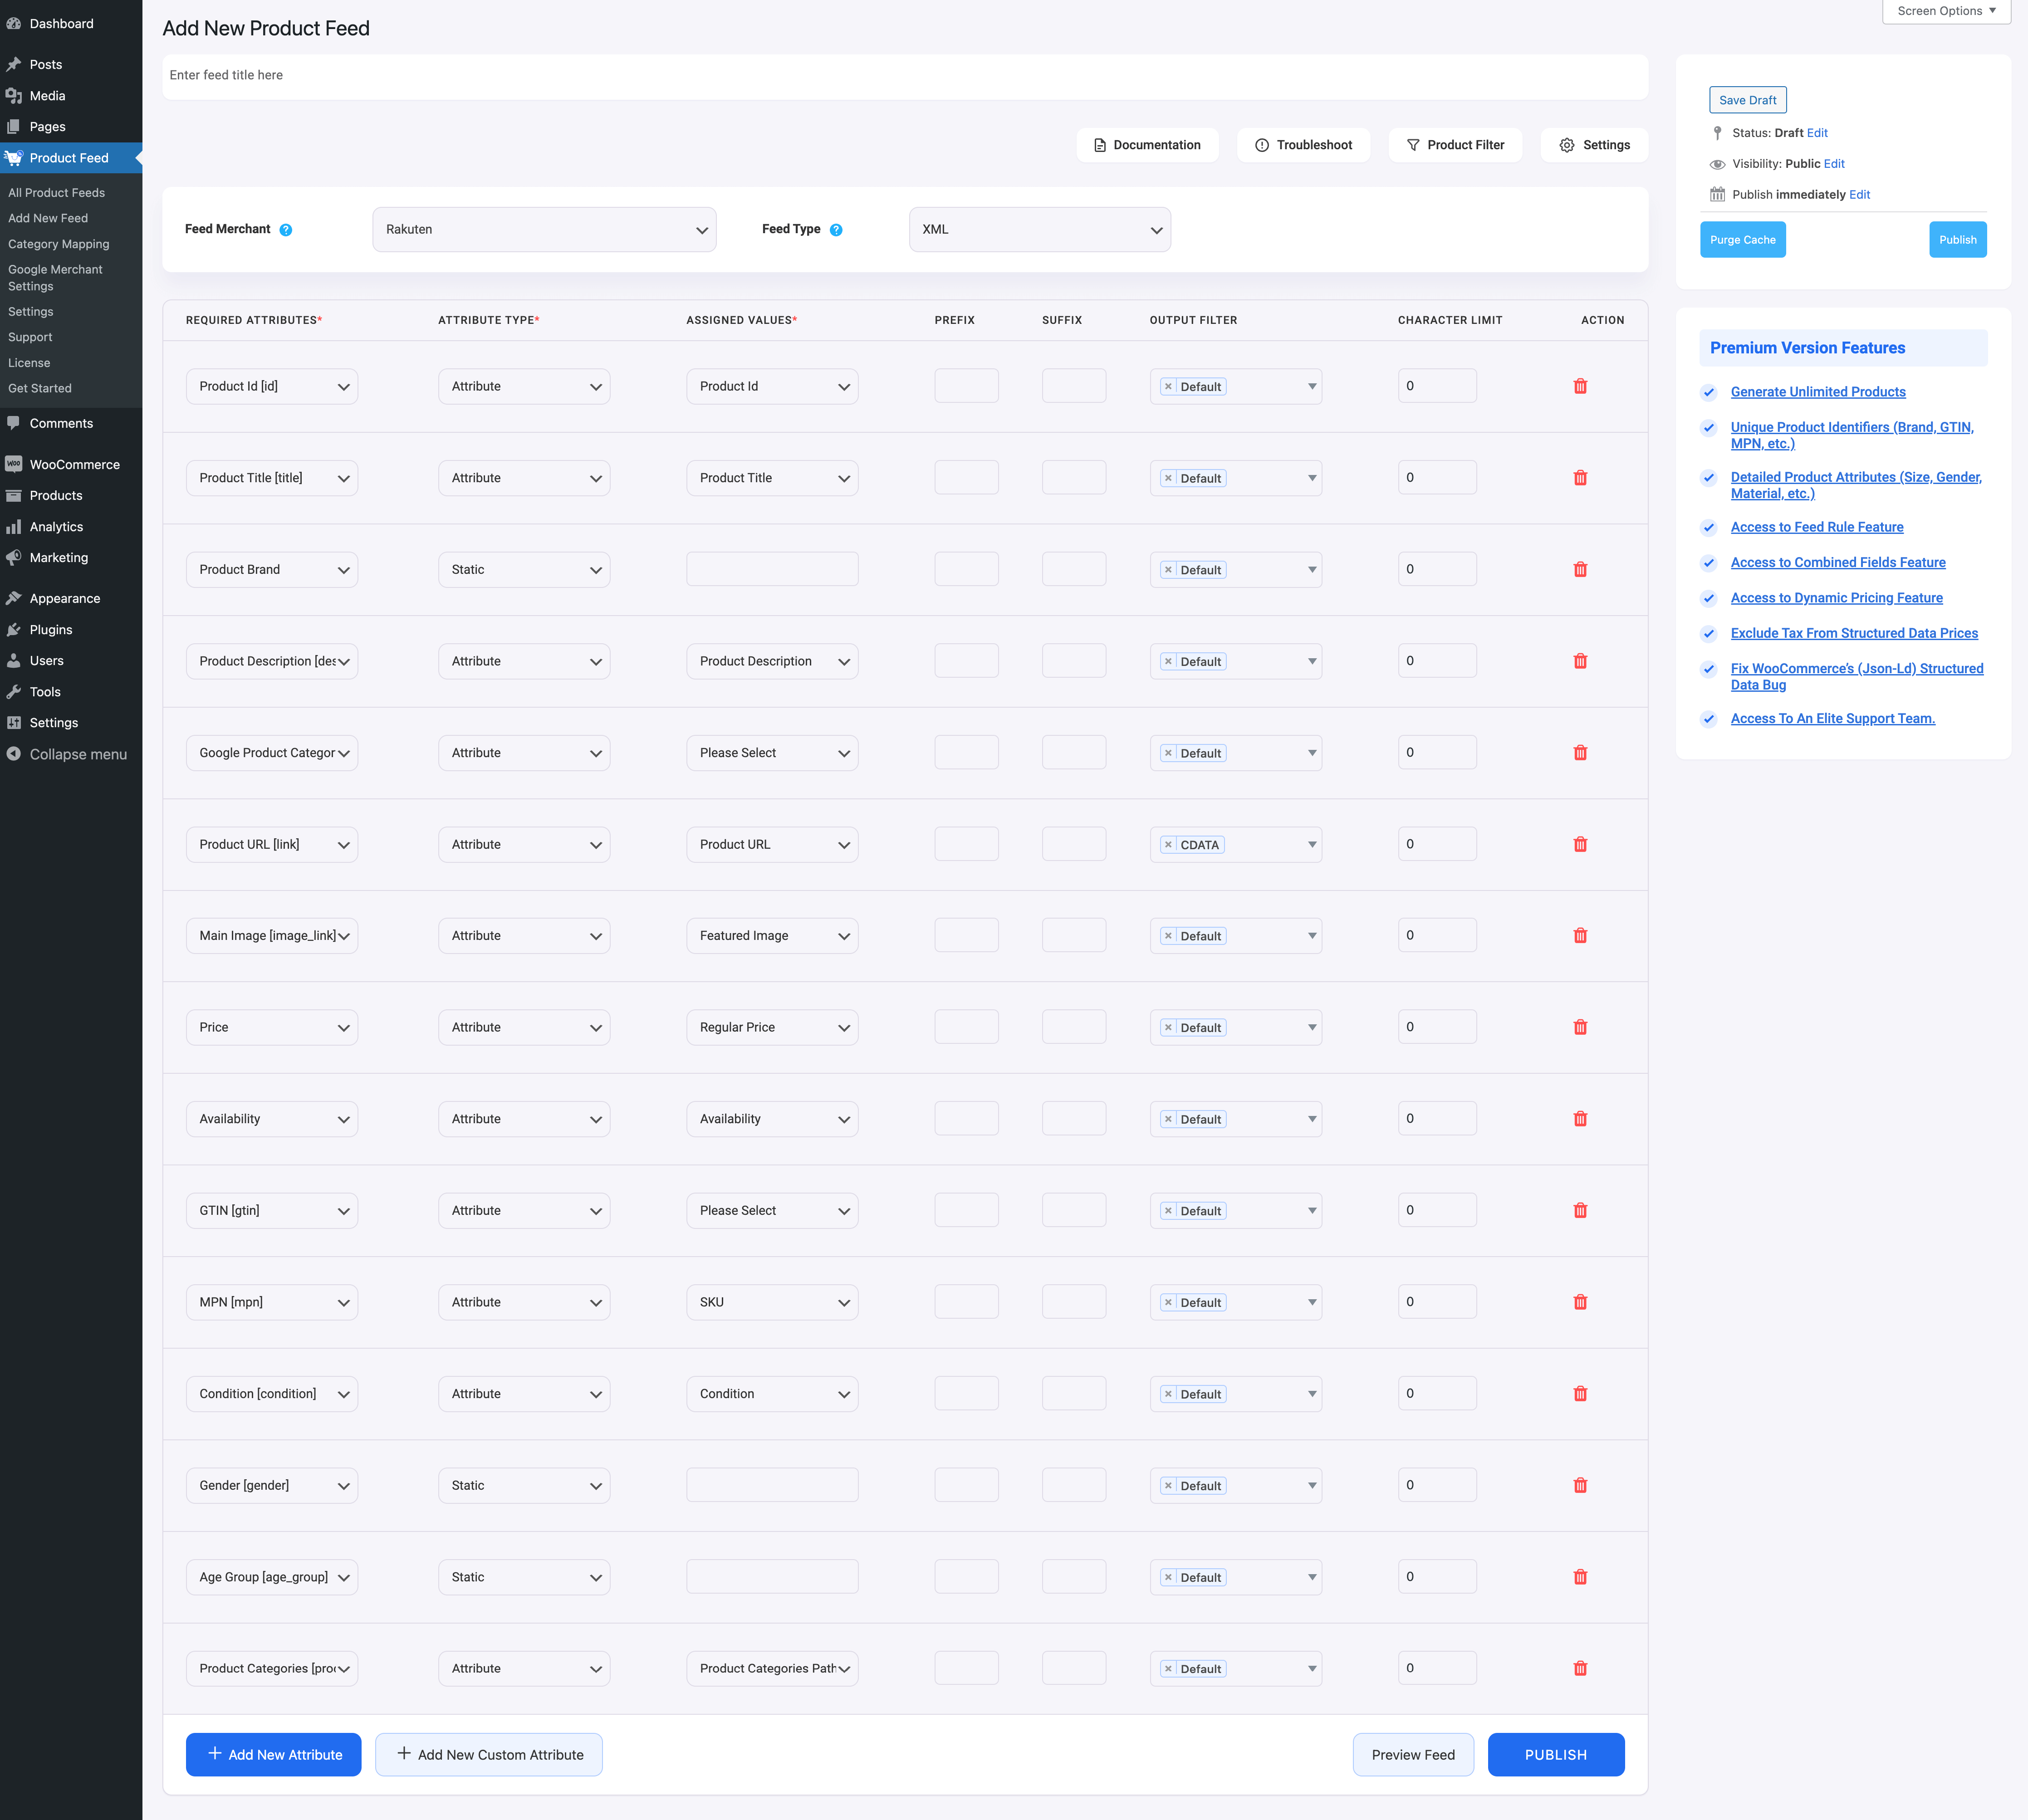
3. Sie können sehen, dass die meisten Attribute bereits konfiguriert sind - ihre Werte sind ordnungsgemäß zugewiesen, Sie können die zugewiesenen Werte nach Bedarf ändern oder sie so belassen, wie sie sind.
Die übrigen Attributwerte müssen Sie jedoch manuell zuweisen.
For Rakuten, you need to assign values for the following attributes:
- Brand –
This should be the Brand name of the product you are selling. If you are the manufacturer, you can set the type as Static and input your company name here.
If you have different brand names for different products, you will have to save the value in a custom field or product attribute and then use that value here.
**You may also use Perfect Brands for WooCommerce to assign brands, which you can use in the feed.
- Google Product Category –
Category Mapping is basically merging your WooCommerce product categories with the Google product categories.
You can configure category mapping in two ways. The first one is that you can use a pre-made category mapper, which is created for Google Shopping by default – you can use this for Facebook or other marketplaces too. And the second one is creating a new Category Mapper.
To use the default category mapper which was created for Google simply select the Googe Product Category mapper from the Category Mapping dropdown value:
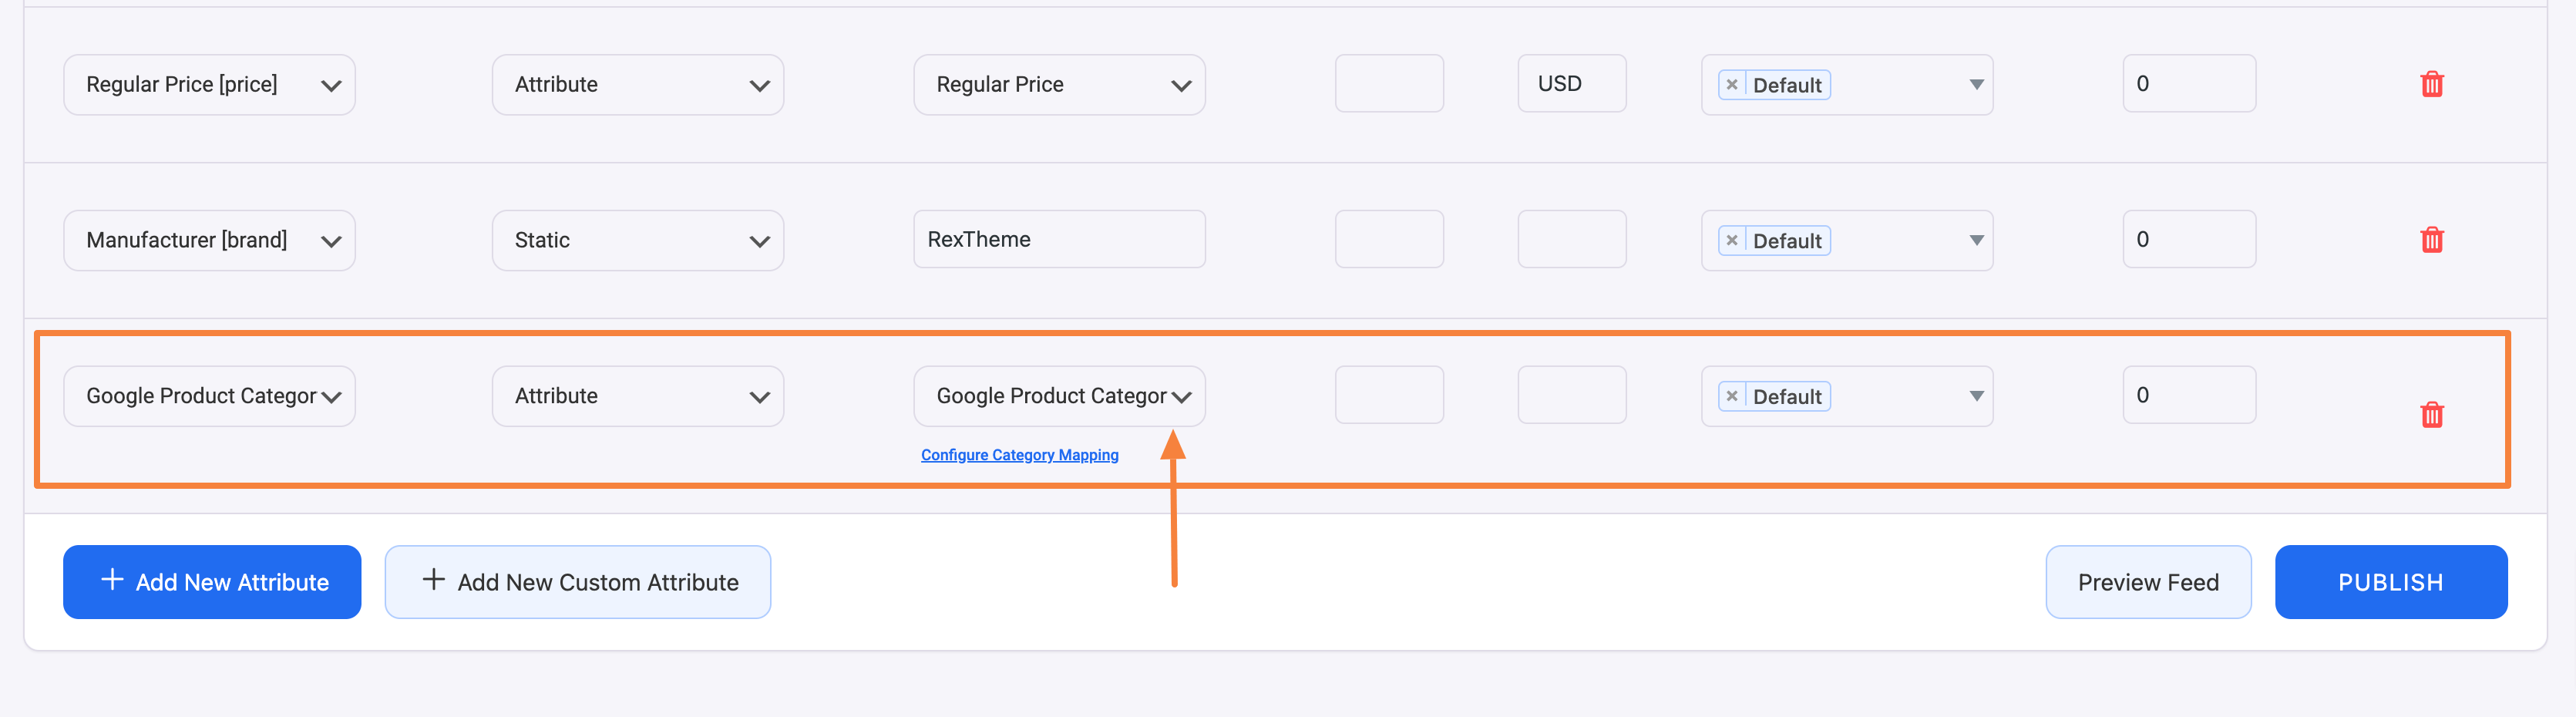
This is an empty Category Mapper. Click on the Configure Category Mapping button which you will find under the Category Mapping value, and a new tab will be opened with the default category mapper – Google Product Category. Map your categories here and click on the Update and Close button to go back to the attribute section.
However, you can create a new Category Mapper too. You need to click on the Category Mapping button from the WordPress dashboard and there you will get the option to create a new Category Mapper and to configure the mapper.
You can follow this doc to learn how to create a new Category Mapper for your feed.
- GTIN –
This is usually unique for each product. So you have to save this value in a custom field within each product and use that value here.
- MPN –
The MPN should be unique to each product. So you have to save this value in a custom field within each product and use that value here.
- Age Group –
The demographic for which your product is intended. The only two accepted values of this attribute are Adult, and Kids.
- Gender –
The gender for which your product is intended. Three predefined values are accepted: Male, Female, and Unisex.
Step 4 – Basic Configuration Settings For The Feed
1. Scroll up to the top and here, you will see that there are two options, Product Filter and Product Settings.
- Produkte Einstellungen
- Produkt-Filter
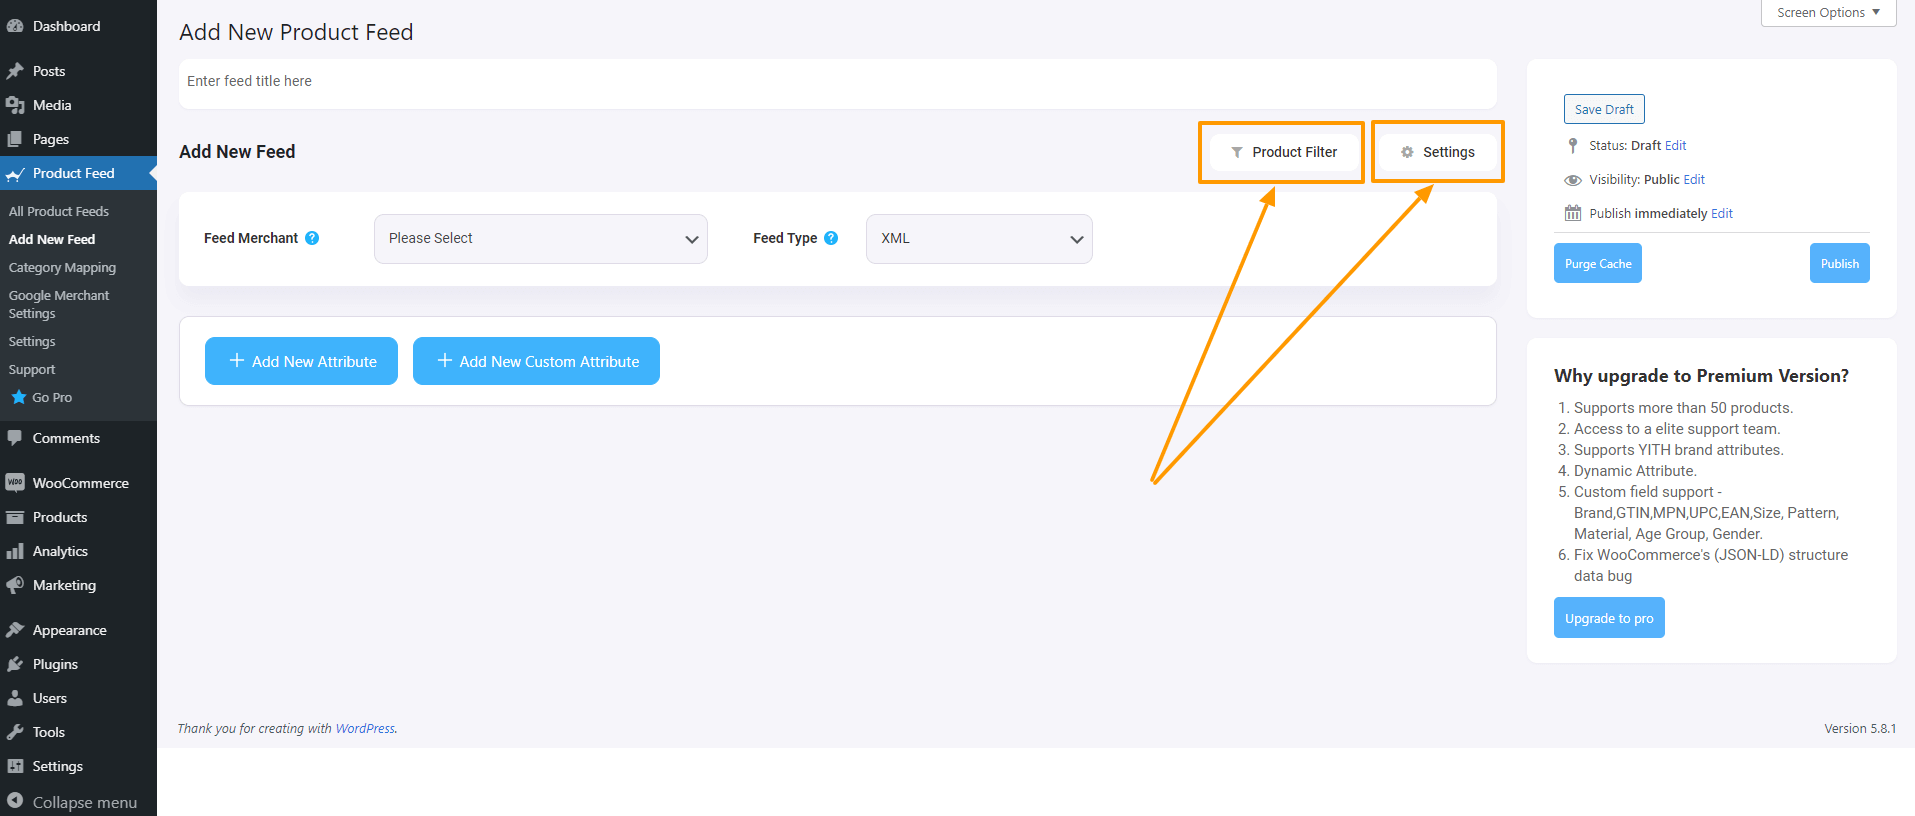
2. First, let us configure the features in the Product Settings. Click on the Product Settings button, and a drawer will open from the right side of the screen.
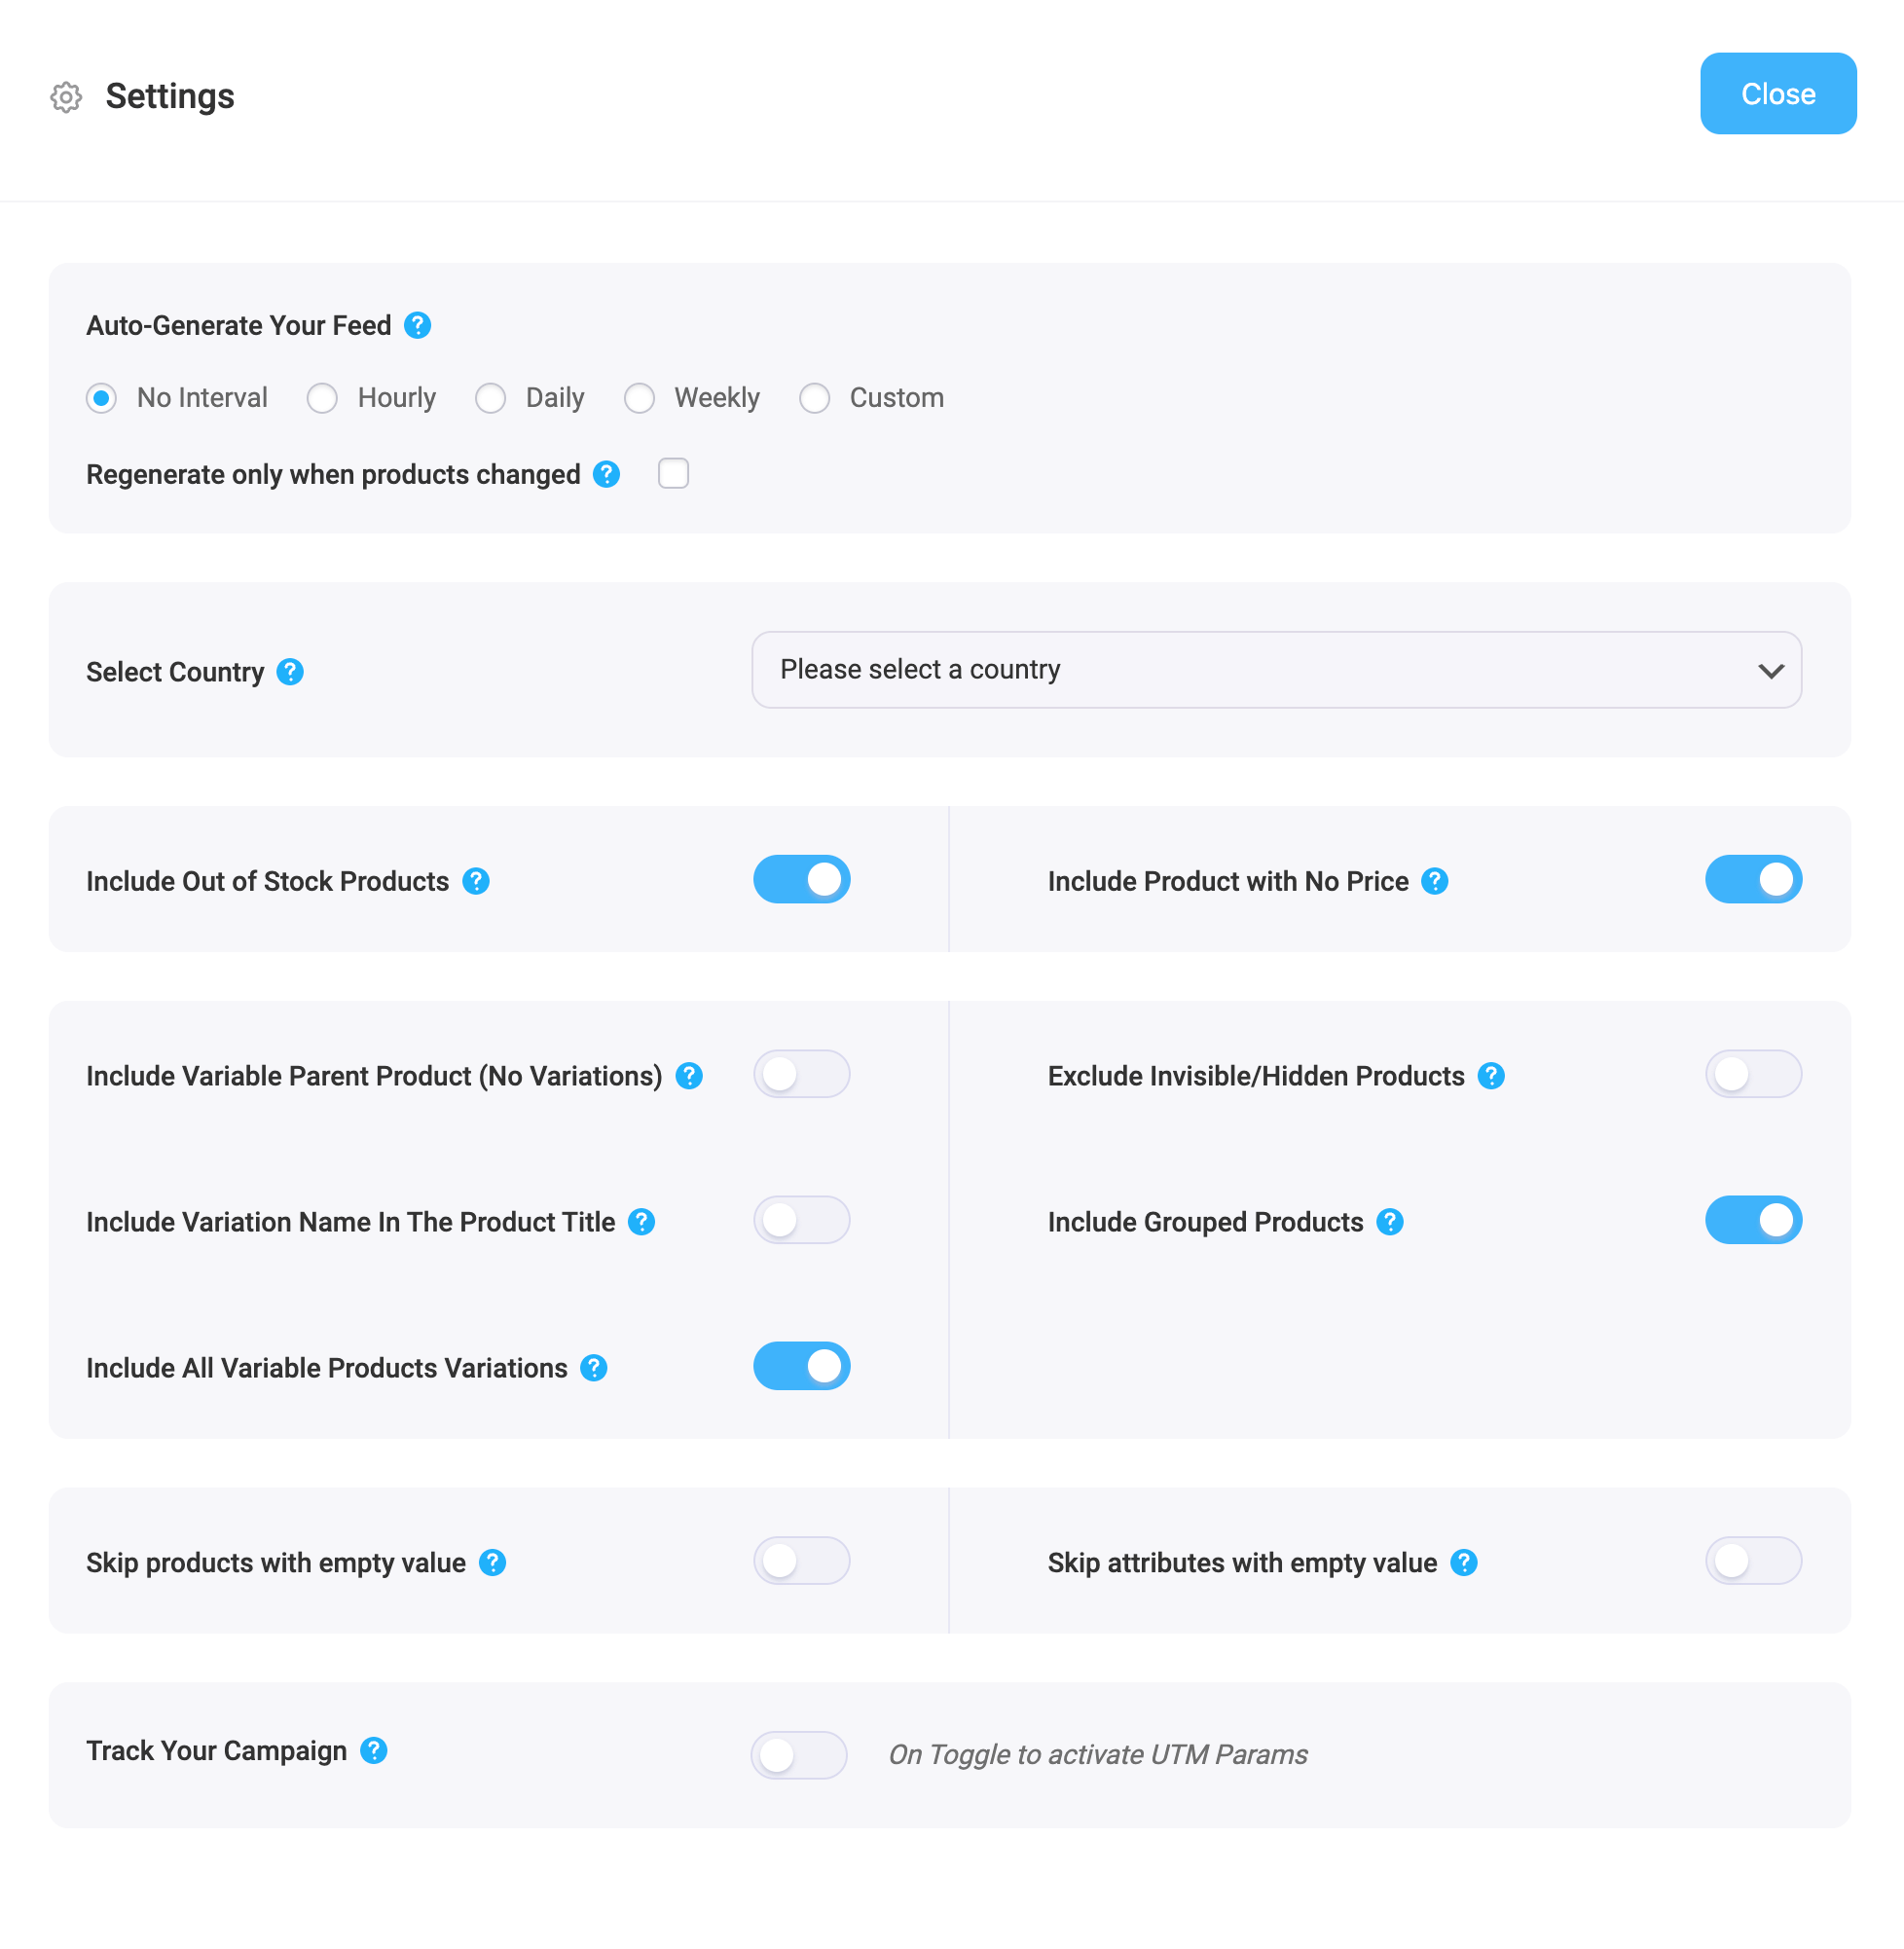
3. Die erste Option, die Sie sehen, ist Auto-Generate Your Feed.
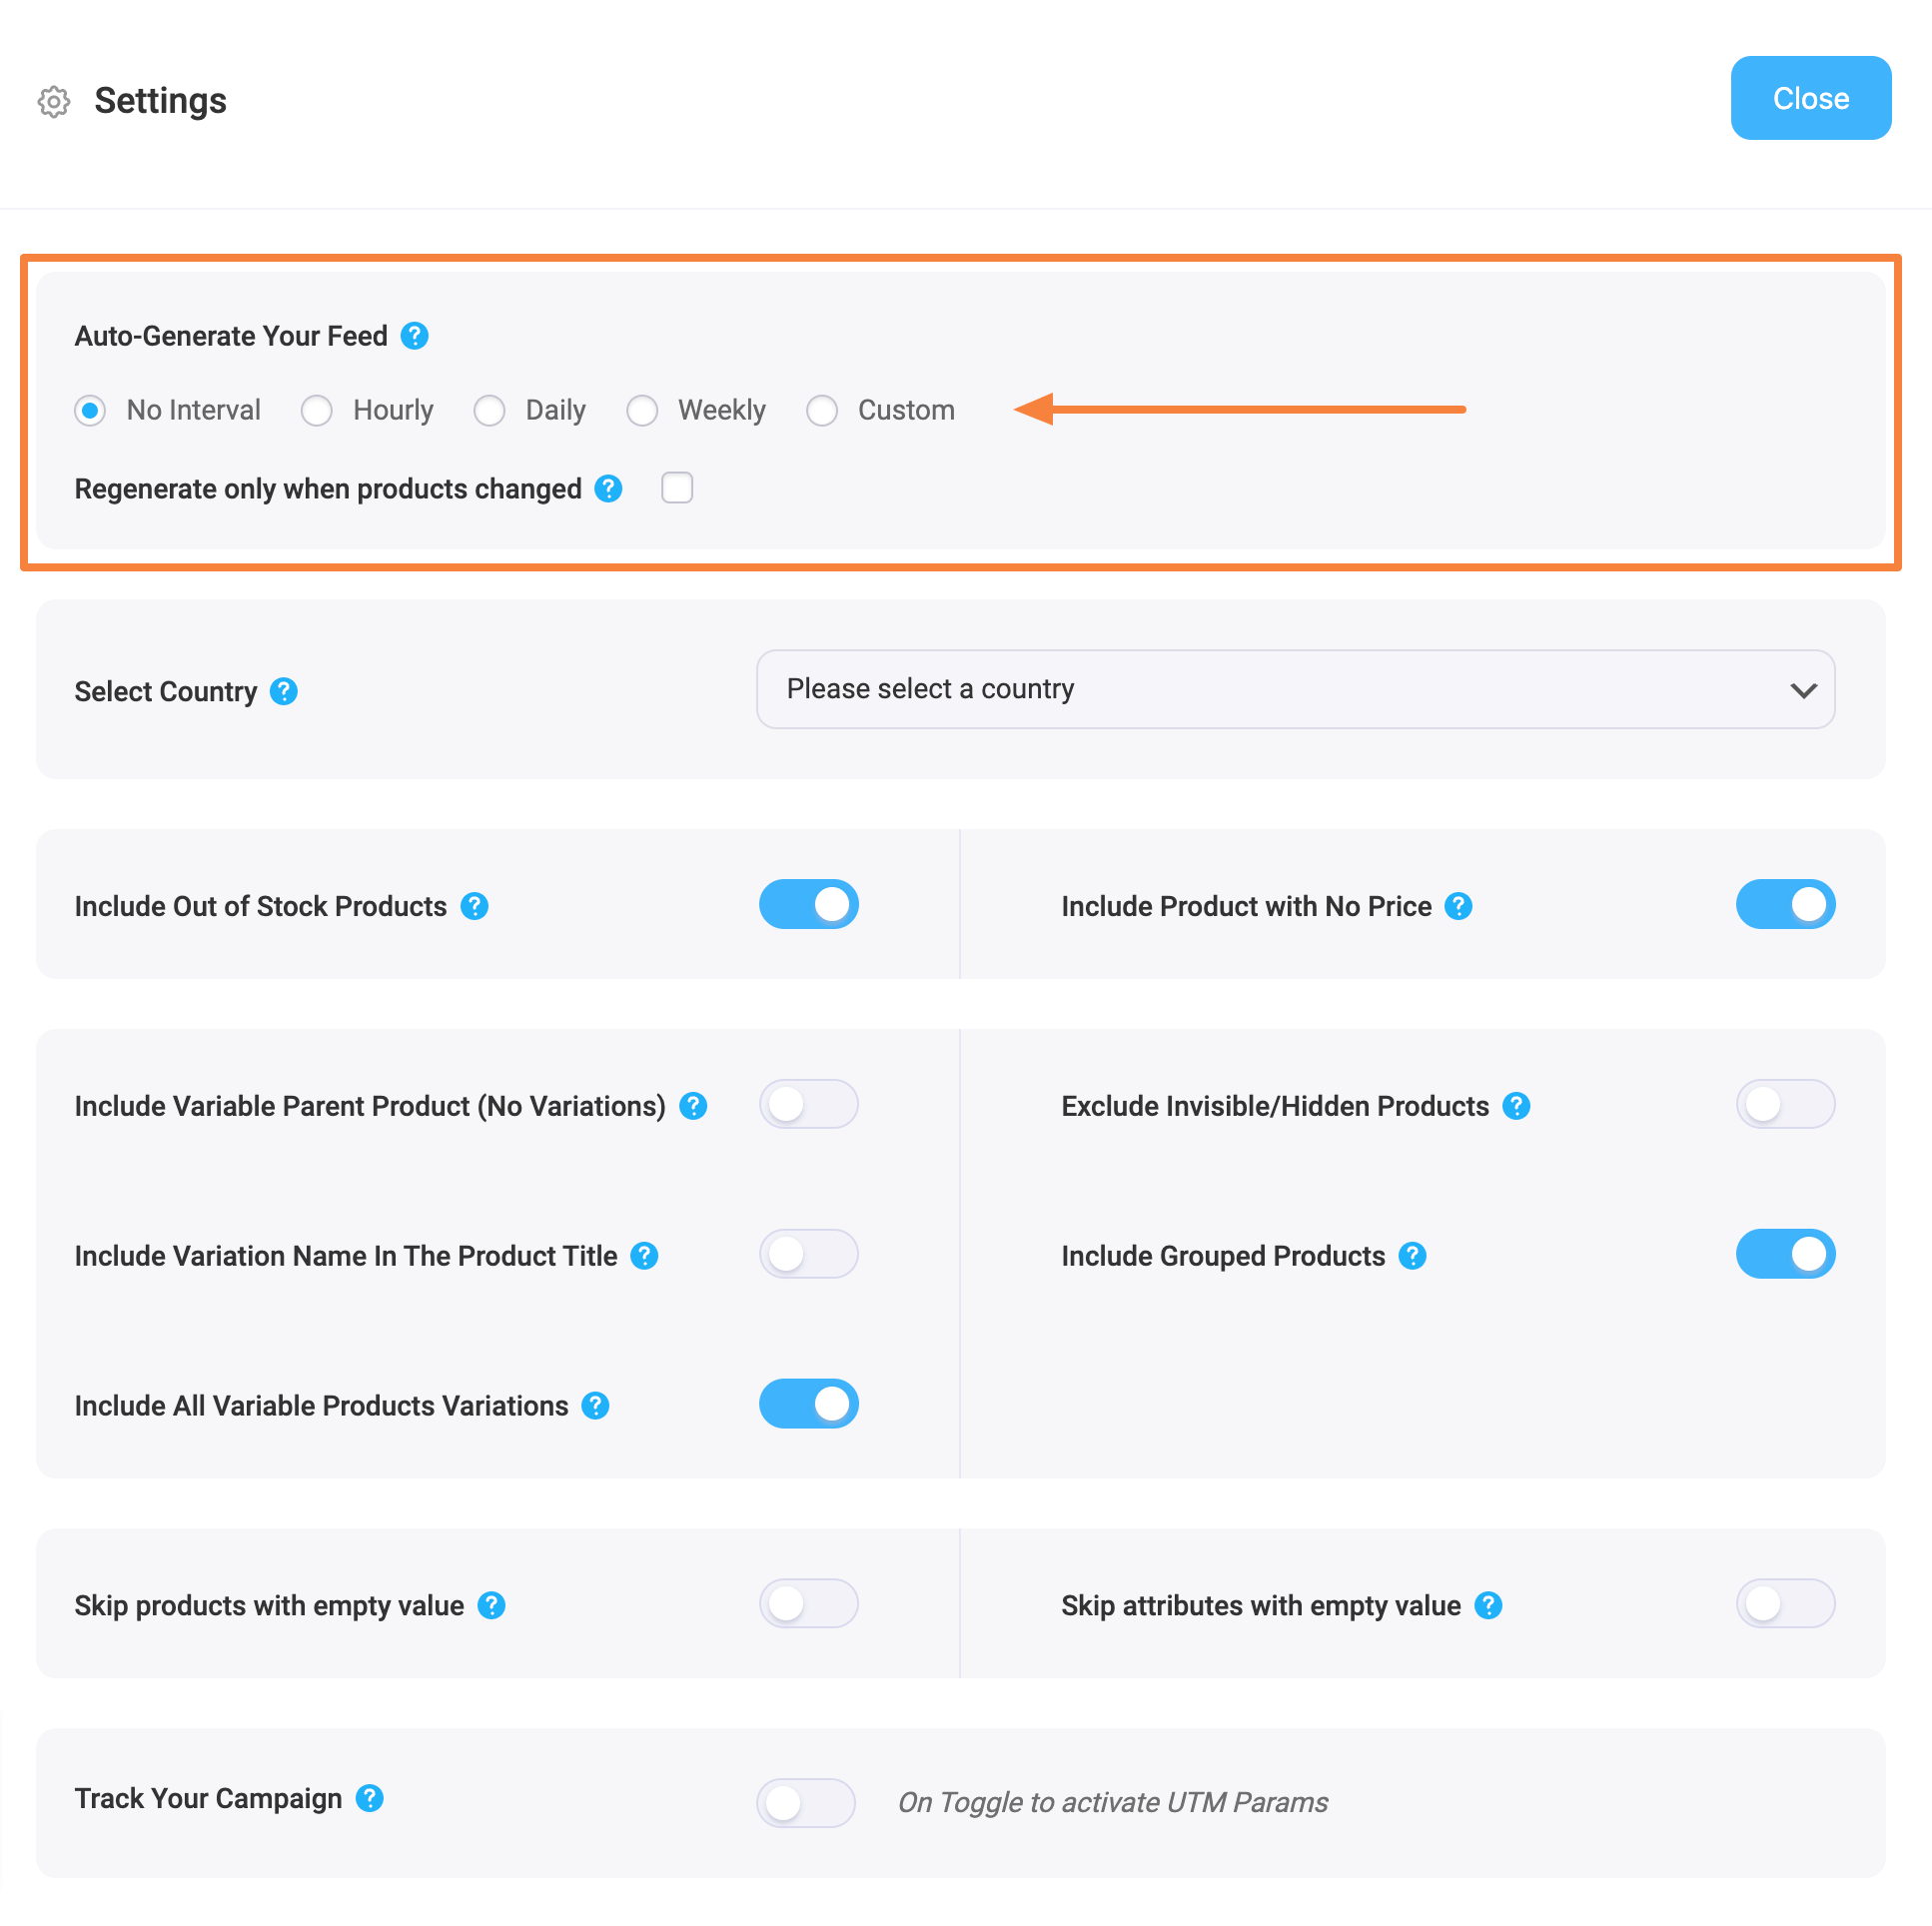
Mit dieser Option können Sie eine automatische Aktualisierung des Feeds in bestimmten Abständen planen. Wählen Sie eine Option, um eine automatische Aktualisierung einzustellen, oder belassen Sie es bei "Kein Intervall", wenn Sie keine automatische Aktualisierung des Feeds einstellen möchten.
4. Verwenden Sie dann je nach Bedarf die folgenden Optionen.
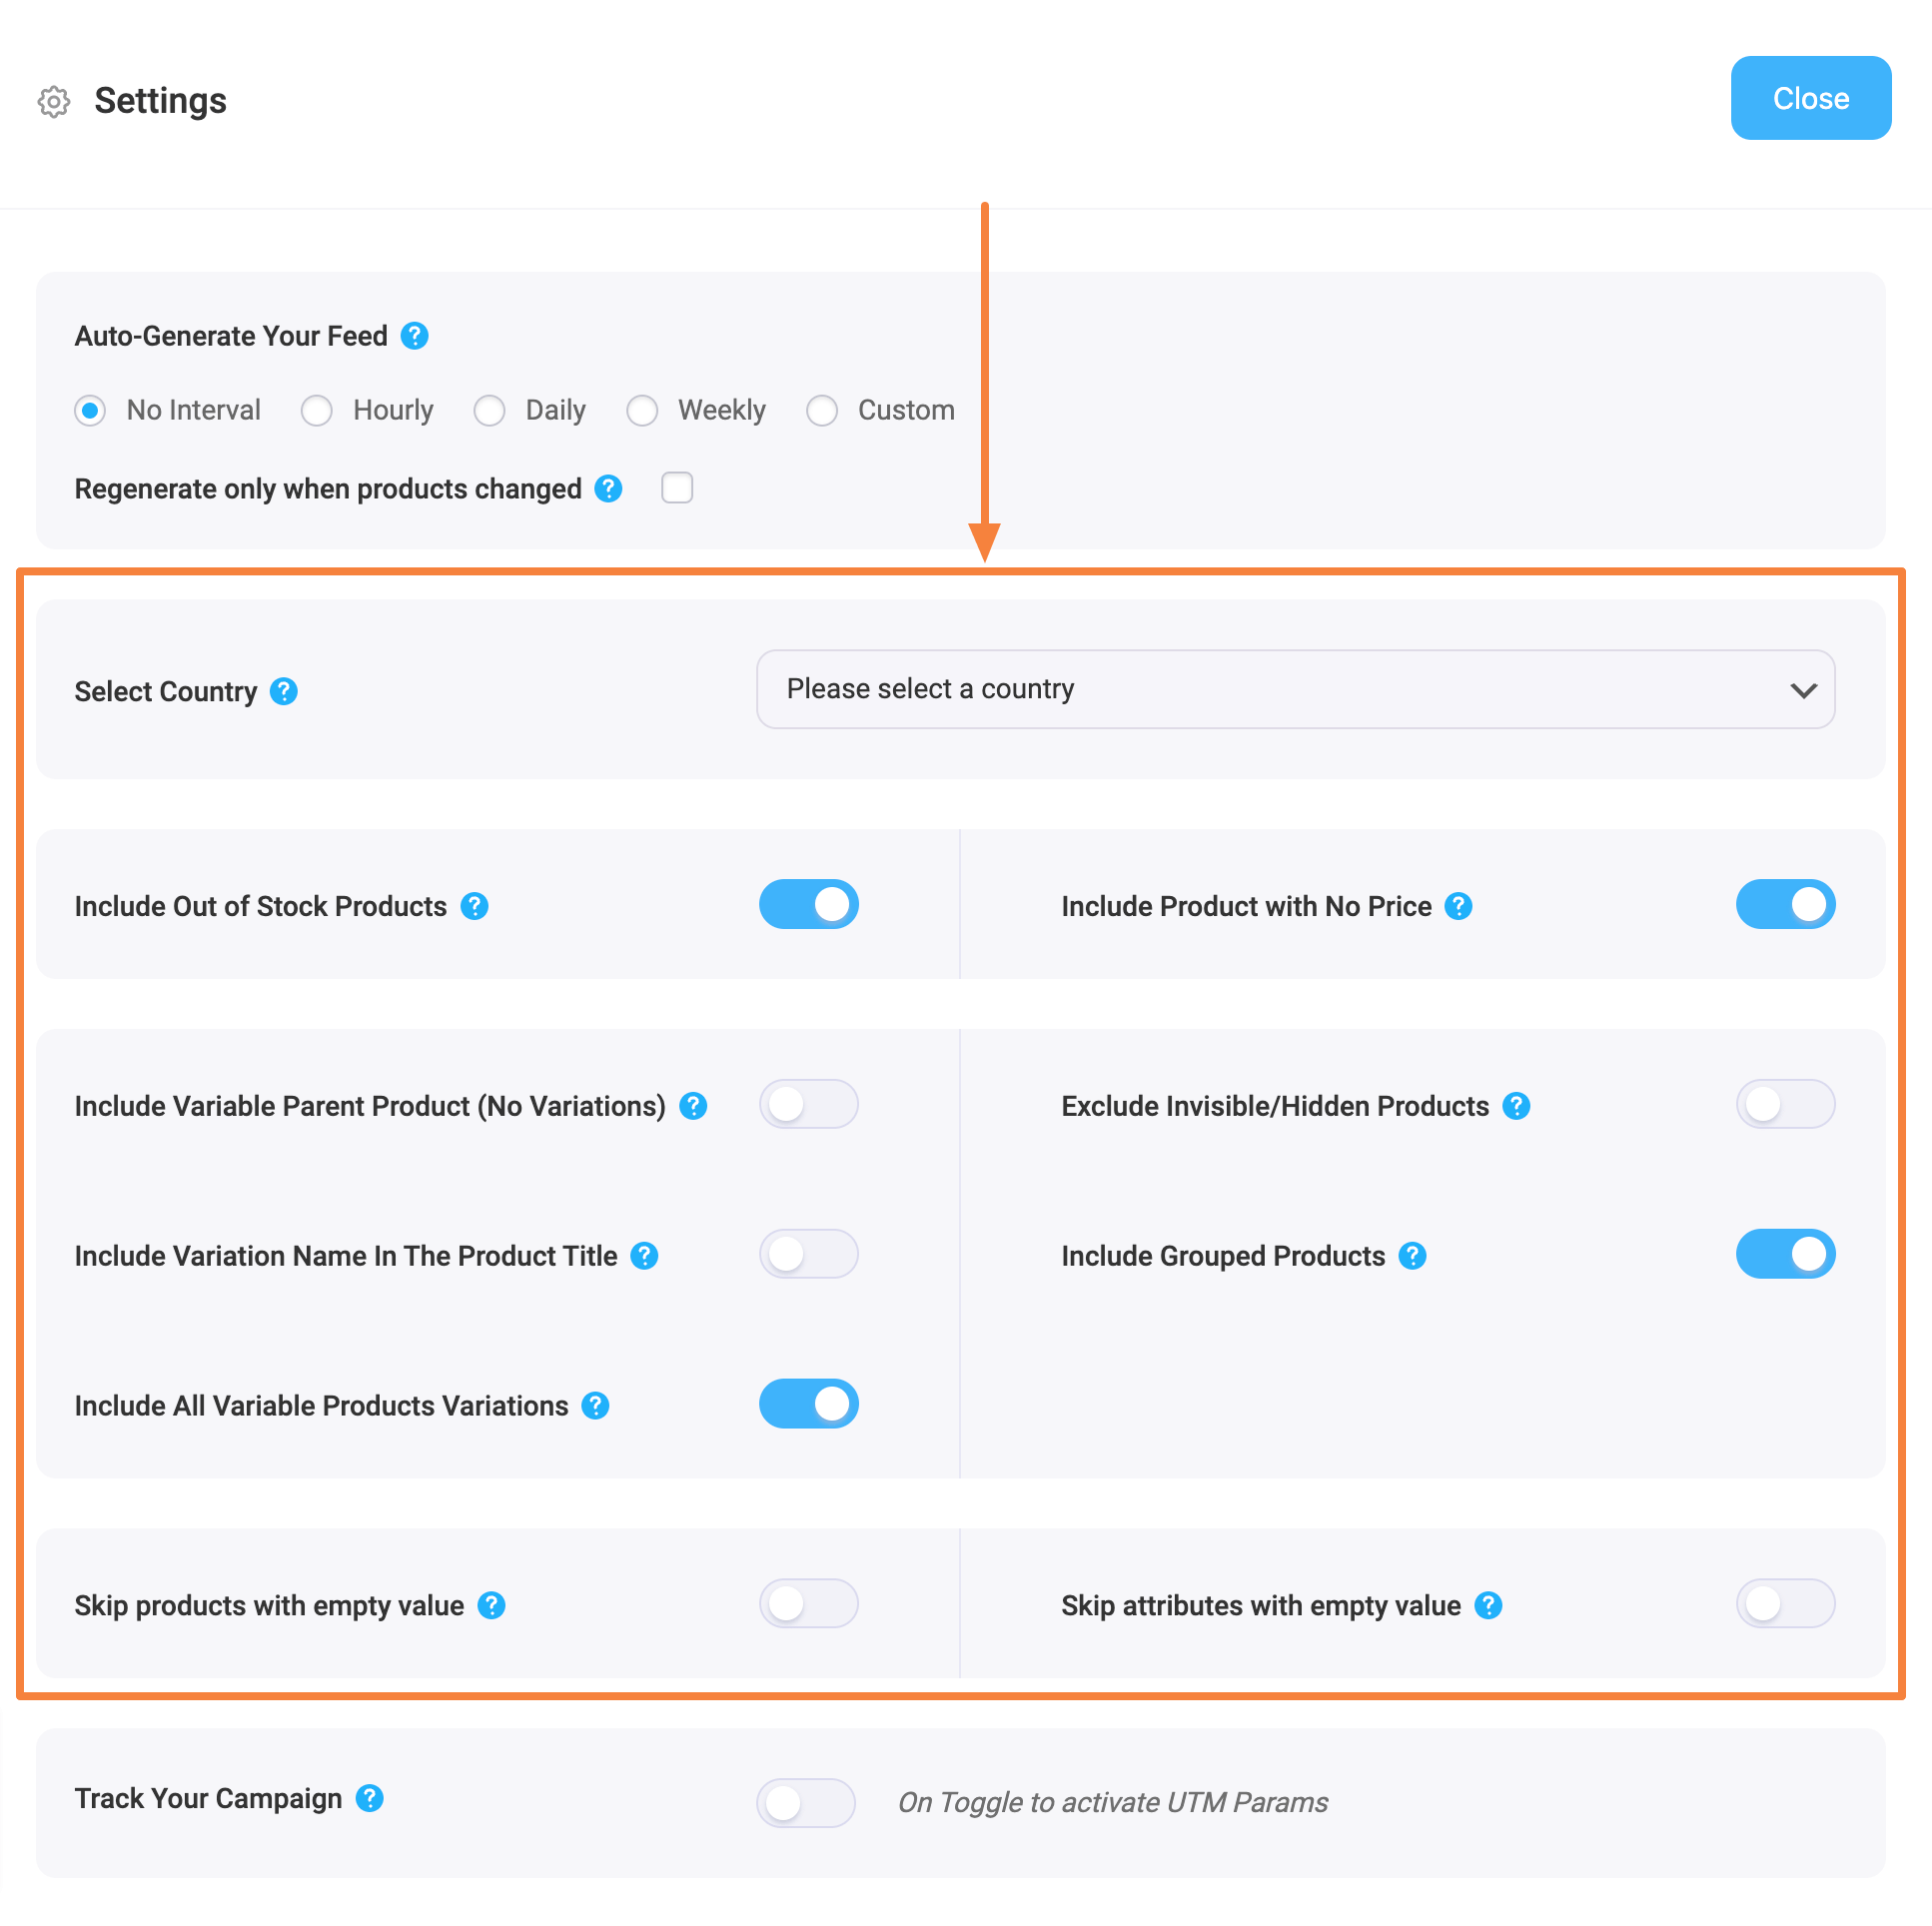
- Land/Region auswählen
- Wählen Sie eine Region aus diesem Dropdown-Menü, wenn Sie die Versandinformationen in Ihren Feed aufnehmen möchten. Sobald Sie die Region ausgewählt haben, müssen Sie das Attribut Versand in Ihren Feed einfügen, um die Versandwerte zu erhalten.
- In diesem Dokument erfahren Sie, wie Sie die Versandinformationen in Ihren Feed aufnehmen können.
- Nicht vorrätige Produkte einbeziehen
- Wenn Sie nicht vorrätige Produkte einbeziehen möchten, können Sie die Option aktivieren.
- Für diesen Feed sollten wir diese Option nicht verwenden und den Wert auf "Nein" belassen. - Include Variable Parent Product (Without Variations)
-Wenn Sie den Parent-Feed für variable Produkte einschließen möchten, können Sie die Option aktivieren.
- Wenige Händler wie Google Shopping oder Facebook verlangen nicht, dass Sie Parent-Produkte übermitteln, jedoch gibt es viele andere Händler wie eBay MIP, die verlangen, dass Sie Produktprodukte im Feed übermitteln.
- Für diesen Feed sollten wir diese Option nicht verwenden und den Wert auf "Nein" belassen. - Include All Variable Products Variations -
-Wenn Sie nur einfache Produkte in den Feed aufnehmen möchten und keine variablen Produkte, dann belassen Sie den Wert auf "Nein".
-Wenn Sie sowohl einfache Produkte als auch variable Produkte an Google Shopping übermitteln möchten, dann wählen Sie den Wert "Ja".
-Lassen Sie uns diese Funktion nutzen und markieren Sie sie als "Ja" für diesen Feed. - Include Variation Name In The Product Title
- Wenige Händler, wie z.B. Google Shopping, schlagen Ihnen vor, den Variationsbegriff zum Produktnamen hinzuzufügen, wenn Sie variable Produkte hochladen.
- Wenn Sie also die Variationsbegriffe zu den variablen Produktnamen hinzufügen möchten, können Sie den Wert auf "Ja" setzen.
- Nutzen wir diese Funktion und markieren sie als "Ja" für diesen Feed. - Gruppierte Produkte einbeziehen
- Wenn Sie gruppierte Produkte haben, ist es am besten, das übergeordnete Produkt des von Ihnen erstellten gruppierten Produkts einzureichen.
- Markieren Sie daher diese Option als "Ja". - Unsichtbare/versteckte Produkte ausschließen
- Möglicherweise haben Sie bestimmte Produkte in Ihrem Shop, die in WooCommerce als versteckt oder unsichtbar gekennzeichnet sind.
- Wenn Sie nur einen Feed für einfache Produkte erstellen möchten, können Sie diese Option als "Ja" markieren, um unsichtbare Produkte aus dem Feed auszuschließen.
- Produktvarianten sind in WooCommerce jedoch standardmäßig als unsichtbar gekennzeichnet. Wenn Sie also variable Produkte in den Feed aufnehmen, sollten Sie diese Option als "Nein" markieren.
- Da wir in diesem Feed Produktvarianten einbeziehen, werden wir diese Funktion nicht verwenden und sie auf "Nein" belassen. - Jedes Attribut überspringen, wenn der Wert leer ist
- Wenn Sie diese Funktion aktivieren, werden alle Attribute eines Produkts ausgeschlossen, wenn der Attributwert fehlt.
- Für diesen Feed wollen wir diese Option nicht verwenden und den Wert auf "Nein" belassen.
5. You can then find an option to add Track Your Campaign (Analytics parameters).
Use this option if you wish to add analytics parameters to product links on your product feed so that you can keep track of the products’ performance on Google Shopping.
6. Now, close the drawer and click on the Product Filter option. A new drawer will open from the right side of the window.
Oben haben Sie die Möglichkeit, den benutzerdefinierten Filter oder die Funktion Feed-Regeln (PRO) zu verwenden.
Über das Dropdown-Menü Filter erhalten Sie die Feed-Filteroptionen.
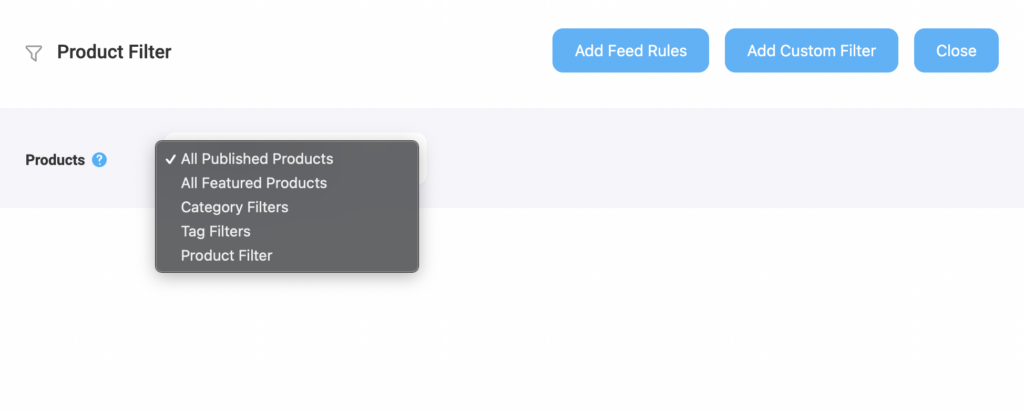
Choose the Products you want to include in the feed using any filter. The “All Published Products” is selected by default
Sie können alle anderen Filteroptionen, wie z. B. den benutzerdefinierten Filter, den Kategoriefilter und den Tag-Filter, verwenden, um die gewünschten Produkte einzuschließen (oder die Produkte auszuschließen, die Sie nicht einschließen möchten).
Für ein Basisfutter können Sie es so lassen, wie es ist.
Step 6 – Publish The WooCommerce Product Feed for Rakuten
Now, that your feed configuration is ready, it is time to publish the feed.
Scrollen Sie zurück nach oben, und Sie finden auf der rechten Seite eine Schaltfläche Veröffentlichen.
Klicken Sie auf die Schaltfläche Veröffentlichen, und Ihr Feed wird erstellt.
Sobald die Erstellung des Feeds abgeschlossen ist, können Sie den Feed anzeigen oder herunterladen.
That’s it. Your CSV feed for Rakuten is generated. You can now download and upload this file to your merchant account and list your products on the Rakuten Advertising marketplace.
Schlussfolgerung
Rakuten is a huge brand name out there and the reputation of their marketplace is immense. Promoting your WooCommerce products in this multinational platform could help you boost your revenue significantly.
As you have seen, this is how easy it is to generate a product feed for Rakuten using Product Feed Manager for WooCommerce.
You can get the plugin here:
– https://wordpress.org/plugins/best-woocommerce-feed/
– Product Feed Manager for WooCommerce Pro
Initially, test out the free version of the plugin, and once you are sure the plugin does what it claims, you can go ahead and upgrade to Pro.
So if you have the opportunity, go ahead and start promoting on Rakuten.