![How to Generate Fruugo Product Feed for WooCommerce [2025]](https://rextheme.com/wp-content/uploads/2021/08/Fruugo-product-feed.webp)
Selling products from your WooCommerce store can be challenging, but promoting on popular online marketplaces can significantly boost your sales.
One of the most reliable online marketplaces to promote your products on is Fruugo. If you run a WooCommerce store, you should also consider selling on the Fruugo marketplace.
According to AIMGroup, revenue at online marketplace Fruugo has been doubled and EBITDA rose more than 6x from £1.3 million to £8.1 million in 2022.
In this guide, I will discuss how you can prepare your WooCommerce product data to start selling on Fruugo without any hassle.
Fangen wir also an.
What is Fruugo Marketplace?

Fruugo Marketplace is a global online platform that connects buyers and sellers from various countries, enabling cross-border shopping.
As a Fruugo seller, you can list your products on this marketplace to reach a broader audience. The platform supports multiple currencies and languages, making it accessible to international shoppers.
It operates on a commission-based model, where sellers pay a fee for each sale made through the platform.
With features like automated feed updates and country-specific platforms, It offers an easy selling experience for your business looking to expand its global reach.
Which countries are supported by Fruugo?
Fruugo supports customers in 46 countries, enabling global shopping and selling opportunities. These countries include:
- Europe: Austria, Belgium, Czechia, Denmark, Estonia, Finland, France, Germany, Greece, Hungary, Ireland, Italy, Latvia, Lithuania, Luxembourg, Netherlands, Norway, Poland, Portugal, Romania, Russia, Slovakia, Spain, Sweden, Switzerland, United Kingdom
- Asia: China, India, Japan, Malaysia, Philippines, Singapore, South Korea
- Middle East: Bahrain, Israel, Kuwait, Qatar, Saudi Arabia, Turkey, United Arab Emirates
- North America: Canada, United States
- Oceania: Australia, New Zealand
- Africa: Egypt, South Africa
For more details, visit the Fruugo Countries page.
What are the benefits of selling on Fruugo Marketplace?
Selling on Fruugo Marketplace offers numerous benefits:
- Global Reach: Fruugo provides access to customers from 46 countries, significantly expanding your market and allowing you to reach a diverse international audience.
- Multi-currency Support: It supports multiple currencies, making transactions easier for international buyers and enhancing their shopping experience.
- Ease of Integration: With plugins like Product Feed Manager, integrating your WooCommerce store with Fruugo is straightforward. This simplifies product listing and management, saving you time and effort.
- Increased Sales Potential: By tapping into Fruugo’s established customer base and marketing efforts, you can boost your sales and grow your business more effectively.
- Automated Updates: Fruugo offers automated feed updates and real-time inventory management. This reduces manual workload and minimizes errors. It also ensures your product information is always accurate and up-to-date.
These benefits make Fruugo Marketplace an excellent platform for expanding your eCommerce business and reaching a global audience.
How to Generate Fruugo Product Feed for WooCommerce
To create a Fruugo product feed for WooCommerce, you’ll need to follow specific steps to ensure your product information is formatted correctly for integration with the Fruugo platform.
Let’s walk through the process together.
1. Getting Started As A Seller On Fruugo
The first thing to do is to register as a Seller on the Fruugo Marketplace. You simply need to fill out a registration form to start selling on Fruugo.
Now, there is no upfront fee to register as a seller. Fruugo will only take a small commission when you make a sale.
Fruugo will charge 15% of the shopper’s basket value (excluding VAT). And 2.35% of the transaction value will be deducted as the transaction processing fee.
So basically, you can take advantage of the huge audience and only pay a small commission when you make money.
Frankly speaking, this is a small fee compared to the huge amount of sales that you can expect from this marketplace.
2. Required Data To Upload Products On Fruugo
To upload your WooCommerce products on the Fruugo marketplace, you first need to generate a product feed with the right product data.
The best option is to generate a CSV feed with the required product attributes and upload your products directly or via one of Fruugo’s integration partners.
Let us look at the mandatory product attributes that you need to include in the product feed.
Required Product Attributes For Fruugo Feed
Product ID (ProductId)
This is the same as the WooCommerce product ID.
It is ideal for the Product ID to be unique for every product and its variants for variable products.
SKU Id (SkuId)
You may use the product SKU from your WooCommerce store for this attribute.
It is ideal for the SKU to be unique for every product and its variants for variable products.
GTINs – EAN / UPC (EAN)
Depending on where your products are manufactured from, you should have a unique global identifier such as GTIN, UPC, EAN, UCC, etc.
You need to submit this identifier value for every product and every variant of a variable product.
**You don’t normally have any default field to add this value in the product data section. So, your options are to add a custom field for each product and save the value there or add it as a product attribute to the product – the latter won’t work for variable products.
(P.S. we will later discuss how you can get that custom field easily without using codes).
Brand (Brand)
This will either be the manufacturer name or the brand name of the product.
Again, there is no default field in WooCommerce for Brand. But you can easily assign it to every product using a product attribute, a custom field, or using a WooCommerce Brand plugin.
Category (Category)
Fruugo has its own set of categories that you need to map your products into.
However, you do not need to change your WooCommerce categories to achieve this. We will learn about a tool later on in this article with which you can set up proper category mapping when generating product feed.
Image URL 1 (Imageurl1)
Use the link to the main image or the featured image of your WooCommerce product for this attribute.
Make sure this image is at least 400px x 400px in size and is an original image of the product with a white background. No texts, watermarks, or placeholders should be there.
Stock Status (StockStatus)
This should indicate if your product is available in your store or not.
Accepted values:
- INSTOCK
– When the product is in stock.
- OUTOFSTOCK
– When the product is currently out of stock but may re-stocked soon.
- NOTAVAILABLE
– When the product won’t be sold anymore and needs to be removed from the marketplace.
**Submitting the available quantity is not mandatory, but if you want to include that, then use the “StockQuantity” attribute instead.
Product Title (Title)
You may use your WooCommerce Product Title/Name for this attribute.
It is recommended to include the brand name in the product title. But do not include any promotional text, attribute names, or pricing info to the title.
Description (Description)
Describe your product briefly and try to highlight the best features of the product.
You may simply use your product description in your WooCommerce store for this attribute as long as there are no external links, emails, or contact details leading to the exit of the page.
Normal Price (NormalPriceWithVAT or NormalPriceWithoutVAT)
You may submit the current price of your products on your WooCommerce store, either with VAT or without VAT.
- If your product prices are VAT inclusive, then submit the attribute header NormalPriceWithVAT.
- If your product prices are exclusive of VAT, then use the attribute header, NormalPriceWithoutVAT
Submit any one of these attribute headers depending on your website’s price.
VAT Rate (VATRate)
For EU-based retailers, you have to submit the VAT rate in your country.
Do not include the % symbol; just submit the numerical value of the rate.
If no VAT is applicable in your country of sale (which is common for non-EU retailers), then use the value 0 for this attribute.
Now, let us look at how you can generate a product feed that includes these mandatory attributes for all of your WooCommerce products.
3. Generate Fruugo Product Feed with Your WooCommerce Products
In WooCommerce, you will find a reliable plugin called Product Feed Manager for WooCommerce with which you can generate a CSV feed for all of your products in just a few clicks.
Once you have the plugin, follow the steps below and see how easily you can generate a CSV feed with the right product attributes real quick.
Step 1 – Import Fruugo Template For Feed Generation
1. On your dashboard, click on Product Feed and then click on Add New Feed option.
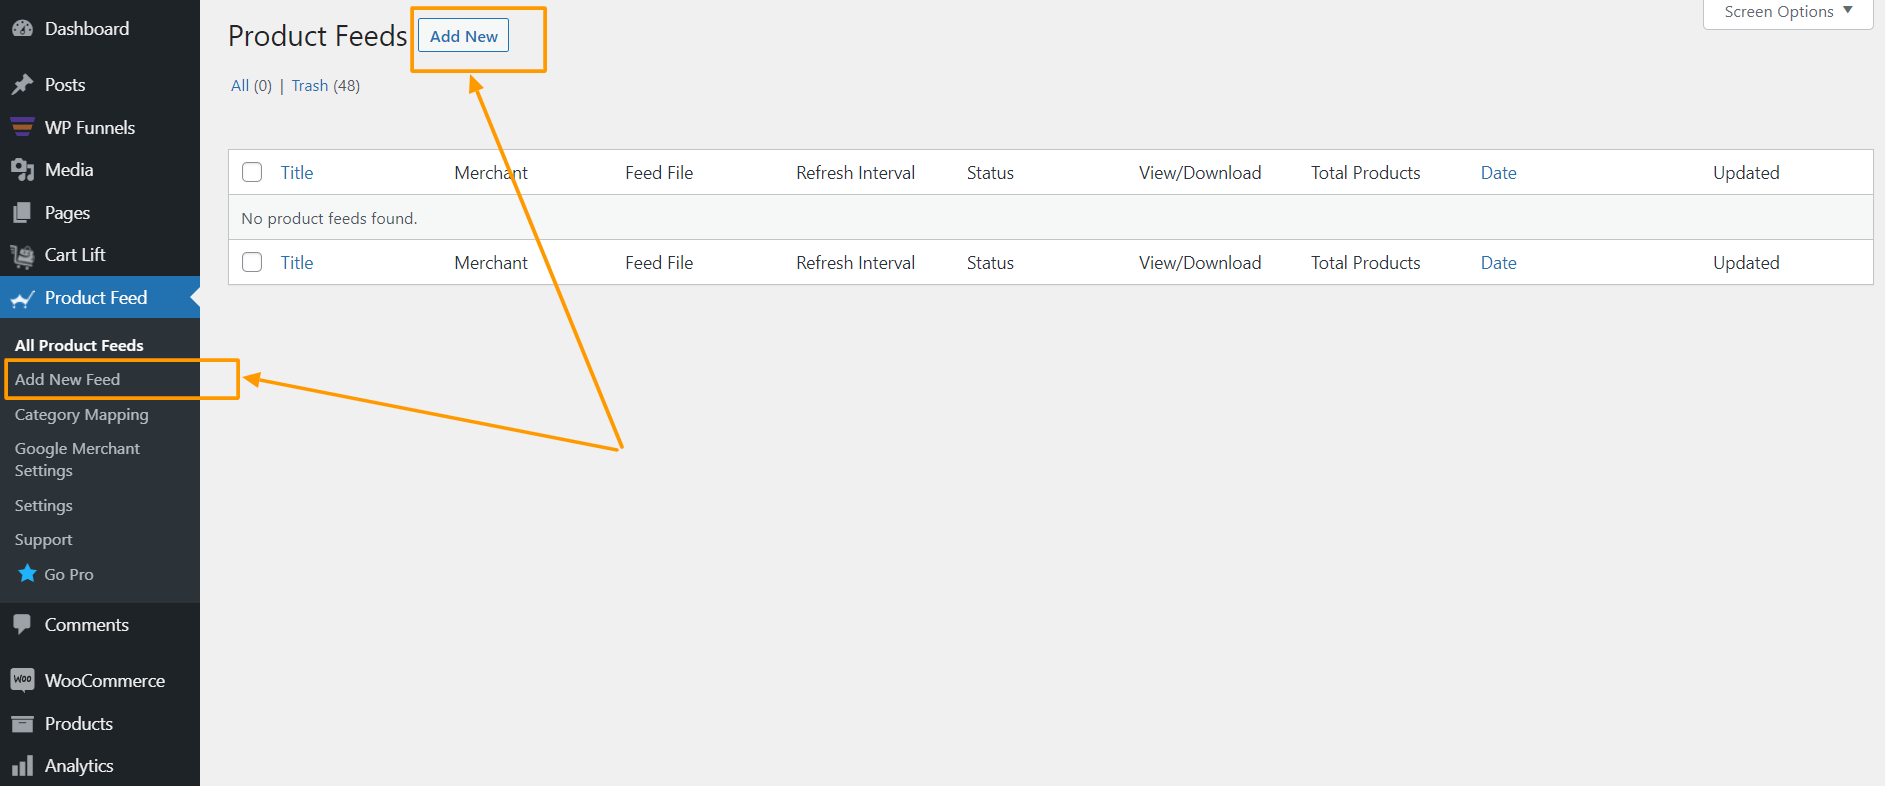
It will take you to the feed creation page

Here, on the top, you will get an option to give a name to your feed, you can skip it too.
2. Click on the Feed Merchant Dropdown and you will get the list of all the supported merchants.
You can scroll down this merchant dropdown list or you can type Fruugo in the search box, and you will get the Fruugo option in the list.

Select Fruugo and all the required attributes of Fruugo will be loaded below.
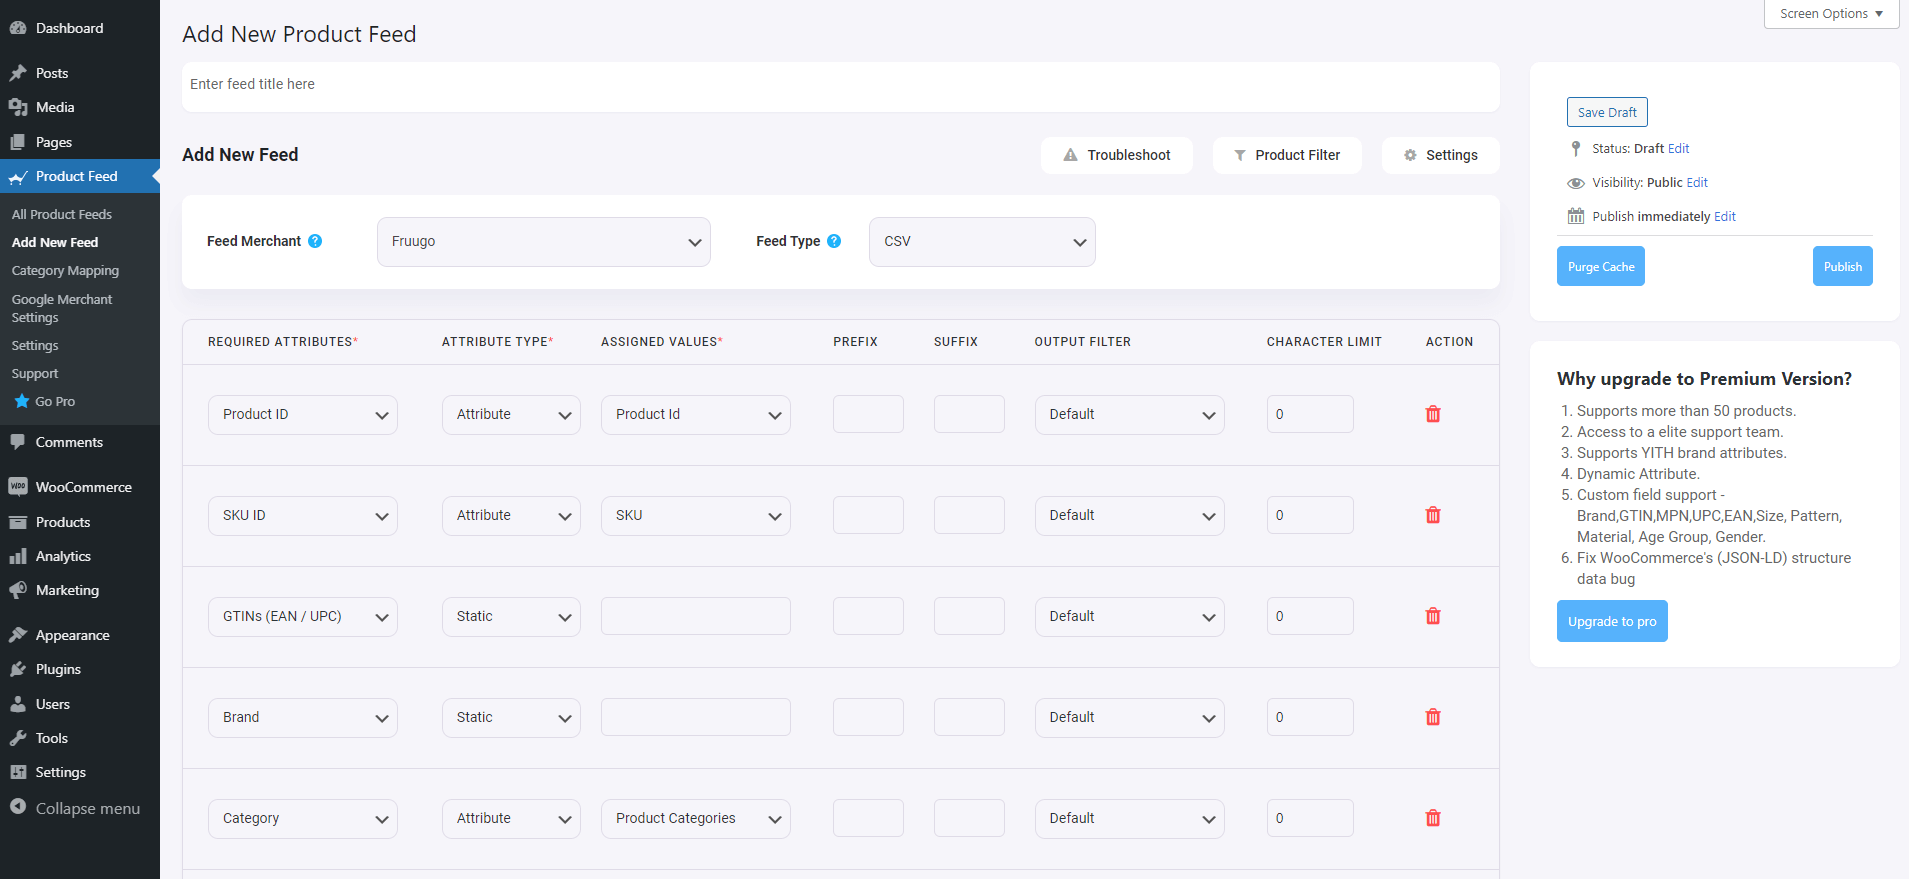
Step 2 – Create A New Product Feed
Now, you can see three buttons under the Feed Title text box, Troubleshoot, Product Filter, and Settings.
1. If you are having any issues generating feed, click on this Troubleshoot button, it will take you to the Troubleshoot page, which could be helpful for you.
2. If you want to use any filter or condition, you can click on the Product Filter option, and a drawer will slide in from the right side of the window, and there you will get the following filters:
- All Featured Items
- Custom Filter
- Category Filter
- Tag Filter
- Product Filter (Pro)
You can select any filter option and use them as per your need and click on the Close button when done.
3. Now, to schedule your feed or to choose which type of products will be included in your feed, click on the Settings button, and you will get a list of options to exclude or include products.
Change the options as per your need and click on the Close button when done.
Step 3 – Use The Fruugo CSV Feed Template
1. If you look at the Feed Merchant dropdown button, there you will get another dropdown “Feed Type”, you can click here to set the type of this feed. You can set different types of feeds depending on what types of feeds this merchant supports or what types of feeds this Product Feed Manager has the support for.
For Fruugo, CSV will be selected by default.
2. Now, in the attributes section, you will see that all the attributes are under the Required Attributes column, and their values are set according to the attributes under the Assigned Values column.
You can change any values to any attributes, simply click on the value dropdown, and select your preferred value.
All the required attributes will appear below. Now, most of the attributes will already be configured but notice that some of these attributes are unassigned.
Step 4 – Assign The Right Values to Unassigned Attributes
1. You will need to assign values for the following:
Though almost all of them will be configured by default, you will need to assign the correct values for the following:
- GTINs: On the value field, choose the value of the custom field or attribute name that you used to assign the GTIN to your WooCommerce store products.
**With Product Feed Manager for WooCommerce, you will get a set of custom fields added to your products and product variants, which you can use to assign unique identifiers.
- Brand: On the value field, choose the value of the custom field or attribute name that you used to assign the Brand to the products.
**You can try using Perfect Brands for WooCommerce to assign brands easily and use that as the value here.
- Category: Since you need to assign each product to Fruugo’s dedicated categories, you need to use category mapping if you do not want to change your WooCommerce store’s current categories.
**With Product Feed Manager for WooCommerce, you will get the category mapping feature that will allow you to achieve this easily. For now, keep this attribute unassigned, configure the rest, and Publish the feed. Then follow this guide to use category mapping easily.
- VAT Rate: On the value field, choose the custom field value you used to assign the VAT rate to your products.
For the Price, be sure to use the right attribute depending on how the prices are set up in your WooCommerce store.
Step 5 – Publish The Feed And Upload to Fruugo
1. Scroll up and click on the Publish button and the feed will be generated.
2. Setup category mapping and update your feed configuration with your mapped data. (See the previous step to understanding what to do here.)
3. Update your feed with all the default attributes assigned. Then you will be able to download your feed.
And that’s it. You can then go ahead and upload your products on the Fruugo marketplace and start getting more sales.
Schlussfolgerung
Generating a Fruugo product feed for WooCommerce is crucial for selling on this global marketplace. It involves formatting your WooCommerce product data to meet Fruugo’s requirements.
To simplify this process, consider using a product feed manager plugin for WooCommerce. These tools automate feed generation, update product information, and synchronize inventory easily.
By leveraging this tool, you can save time, maintain listing accuracy, and enhance visibility on Fruugo. This strategic approach not only improves efficiency but also increases sales potential.
If you are aiming to expand your market reach and effectively manage your Fruugo listings, utilizing a product feed manager is highly recommended.
** FAQs **
How do I start selling on Fruugo?
- To begin selling on Fruugo, you need to create a seller account on their platform. Once registered, you can list your products directly from your WooCommerce store using the PFM plugin. Ensure your product feed meets Fruugo’s specifications for easy integration.
What are Fruugo’s feed specifications?
- Fruugo requires specific product feed formats, including details like Global Trade Item Numbers (GTINs) for each product. Using automated feed generators tailored for WooCommerce helps ensure your listings are compliant and optimized for visibility.
Can I sell internationally on Fruugo?
- Yes, Fruugo operates in 46 countries. It allows you to reach a global audience through their marketplace. Utilize WooCommerce’s store categories to categorize your products effectively for different regions.
How safe is selling on Fruugo?
- Fruugo is a trusted online marketplace with positive reviews from both sellers and shoppers. They provide secure transactions and a user-friendly platform for conducting international trade.
How does Fruugo benefit shoppers?
- Fruugo offers shoppers the comfort of comparing prices from various sellers across different countries. This allows them to make informed purchasing decisions based on product availability and competitive pricing.