![How to Streamline Shipping for WooCommerce [2025]](https://rextheme.com/wp-content/uploads/2025/09/WooCommerce-Facebook-Product-Feed-1.webp)
Shipping isn’t just the final step in an eCommerce transaction; it’s where customer satisfaction is either sealed or shattered. In a competitive online market, timely and accurate delivery can make or break a brand’s reputation.
Yet, many WooCommerce store owners still struggle with inefficient shipping processes, including delayed order processing, manually generating labels, and applying inconsistent or incorrect shipping rates.
These challenges don’t just slow things down; they eat into profits, increase the risk of returns, and frustrate customers. The good news? You don’t have to tackle it all manually.
By integrating the right plugins into your WooCommerce store, you can automate and streamline every step of your shipping workflow from invoice generation to label printing to applying smart shipping rules.
Let’s dive into how you can simplify shipping and scale your store with confidence.
TL;DR – Streamline Shipping for WooCommerce
- Streamlining shipping is about making your WooCommerce delivery process faster, simpler, and more automated.
- Why it matters: Smooth shipping = more sales.
- How to enable it:
- Set up shipping zones: Assign local, national, and international zones for accurate delivery options.
- Add cost calculation: Show clear shipping costs (flat or real-time) at checkout to avoid surprises.
- Automate invoices: Send PDF invoices and packing slips automatically.
- Create shipping labels: Generate carrier-ready labels directly in WooCommerce.
- Best plugins to use for Shipping:
- Advanced Shipping for WooCommerce – flexible shipping rules
- WooCommerce PDF Invoices Plugin – automate invoices & slips
- WooCommerce Shipping Labels Plugin – quick label generation
- Final tip: Use these tools to save time, cut errors, and give customers a better delivery experience.
Why Streamlining Shipping Matters in WooCommerce
Shipping plays a critical role in shaping the customer’s post-purchase experience.
For WooCommerce store owners, an inefficient shipping process can lead to more than just internal headaches; it can directly impact customer satisfaction and long-term brand loyalty.
Poor shipping workflows often result in delayed deliveries, incorrect orders, and unnecessary manual work.
When you’re juggling multiple orders, creating shipping labels by hand or manually adjusting rates can quickly become overwhelming.
These inefficiencies slow down your operations but also increase the likelihood of human error, such as incorrect shipping addresses or mismatched documentation. The stakes are high.
According to the Baymard Institute, ‘nearly 40% of online shoppers abandon their carts due to unexpected extra costs such as shipping, and another 21% drop off when estimated delivery times are too slow’.
That’s a clear signal: customers expect speed, clarity, and reliability from the moment they hit checkout. This is where automation becomes a game-changer.
By streamlining your shipping process, automating invoice generation, label printing, and shipping rule setup, you reduce friction and boost fulfillment speed.
It not only saves valuable time for your team but also ensures your customers receive accurate orders on time, every time.

How to Streamline Shipping in WooCommerce?
When it comes to WooCommerce, streamlining your shipping process means eliminating repetitive manual tasks and replacing them with smart automation.
This article uses the following plugins to help you streamline shipping in WooCommerce. Before moving to the steps, ensure these plugins are installed and activated on your WooCommerce site.
- WebToffee WooCommerce PDF Invoices Plugin for automating invoices and packing slips.
- WebToffee WooCommerce Shipping Labels Plugin for generating carrier-compliant shipping labels.
- RexTheme Advanced Shipping for WooCommerce Plugin for setting flexible, rule-based shipping rates.
Step 1: Set Up Shipping Zones for WooCommerce
- From your WordPress dashboard, go to Advanced Shipping > Shipping Zone.
- Click on Add zone.
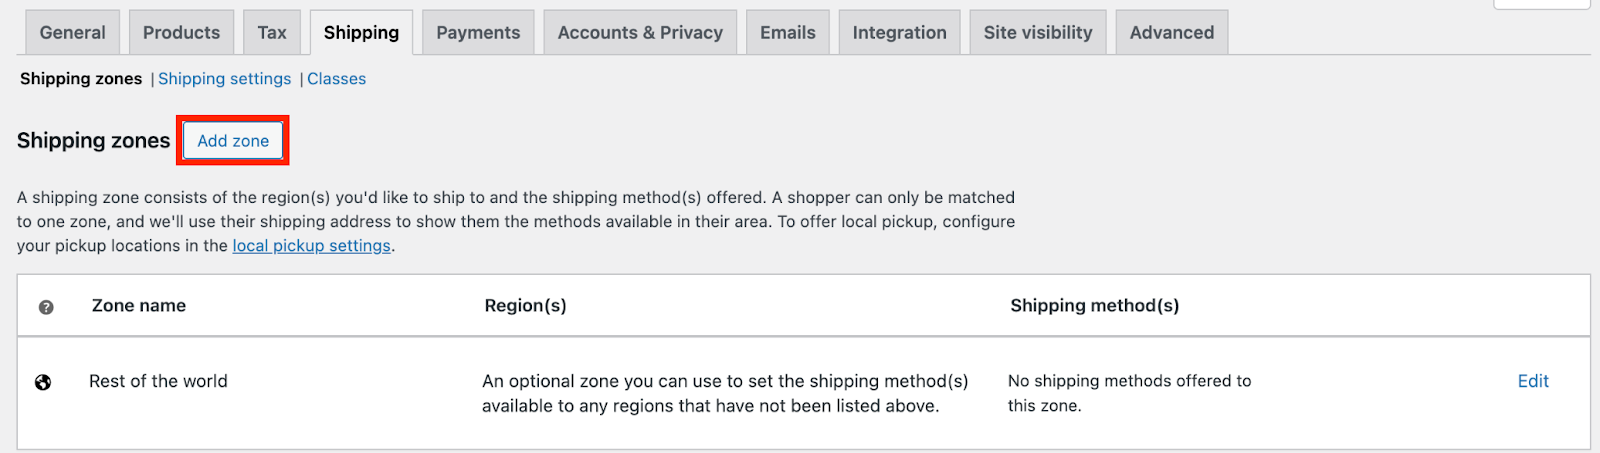
- Enter a name for the Shipping zone.
- Choose the zone regions.
- Select Shipping Method as Advanced Shipping.

- Click on Save changes.
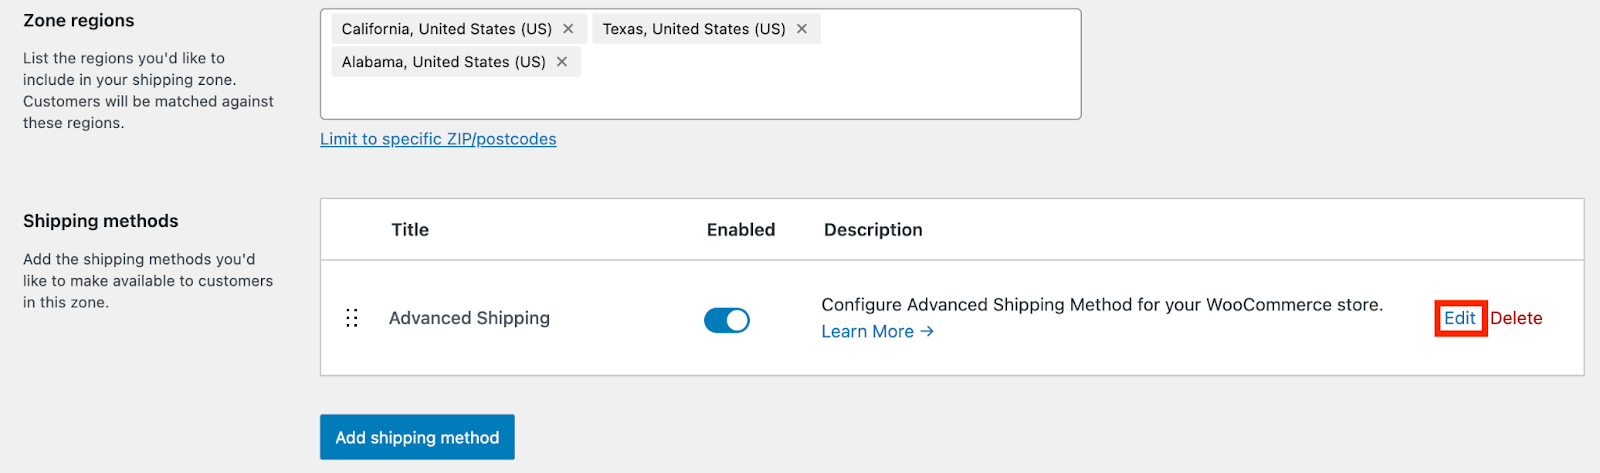
Step 2: Set up Shipping Cost Calculation
- Click on the Edit button near the Advanced Shipping.
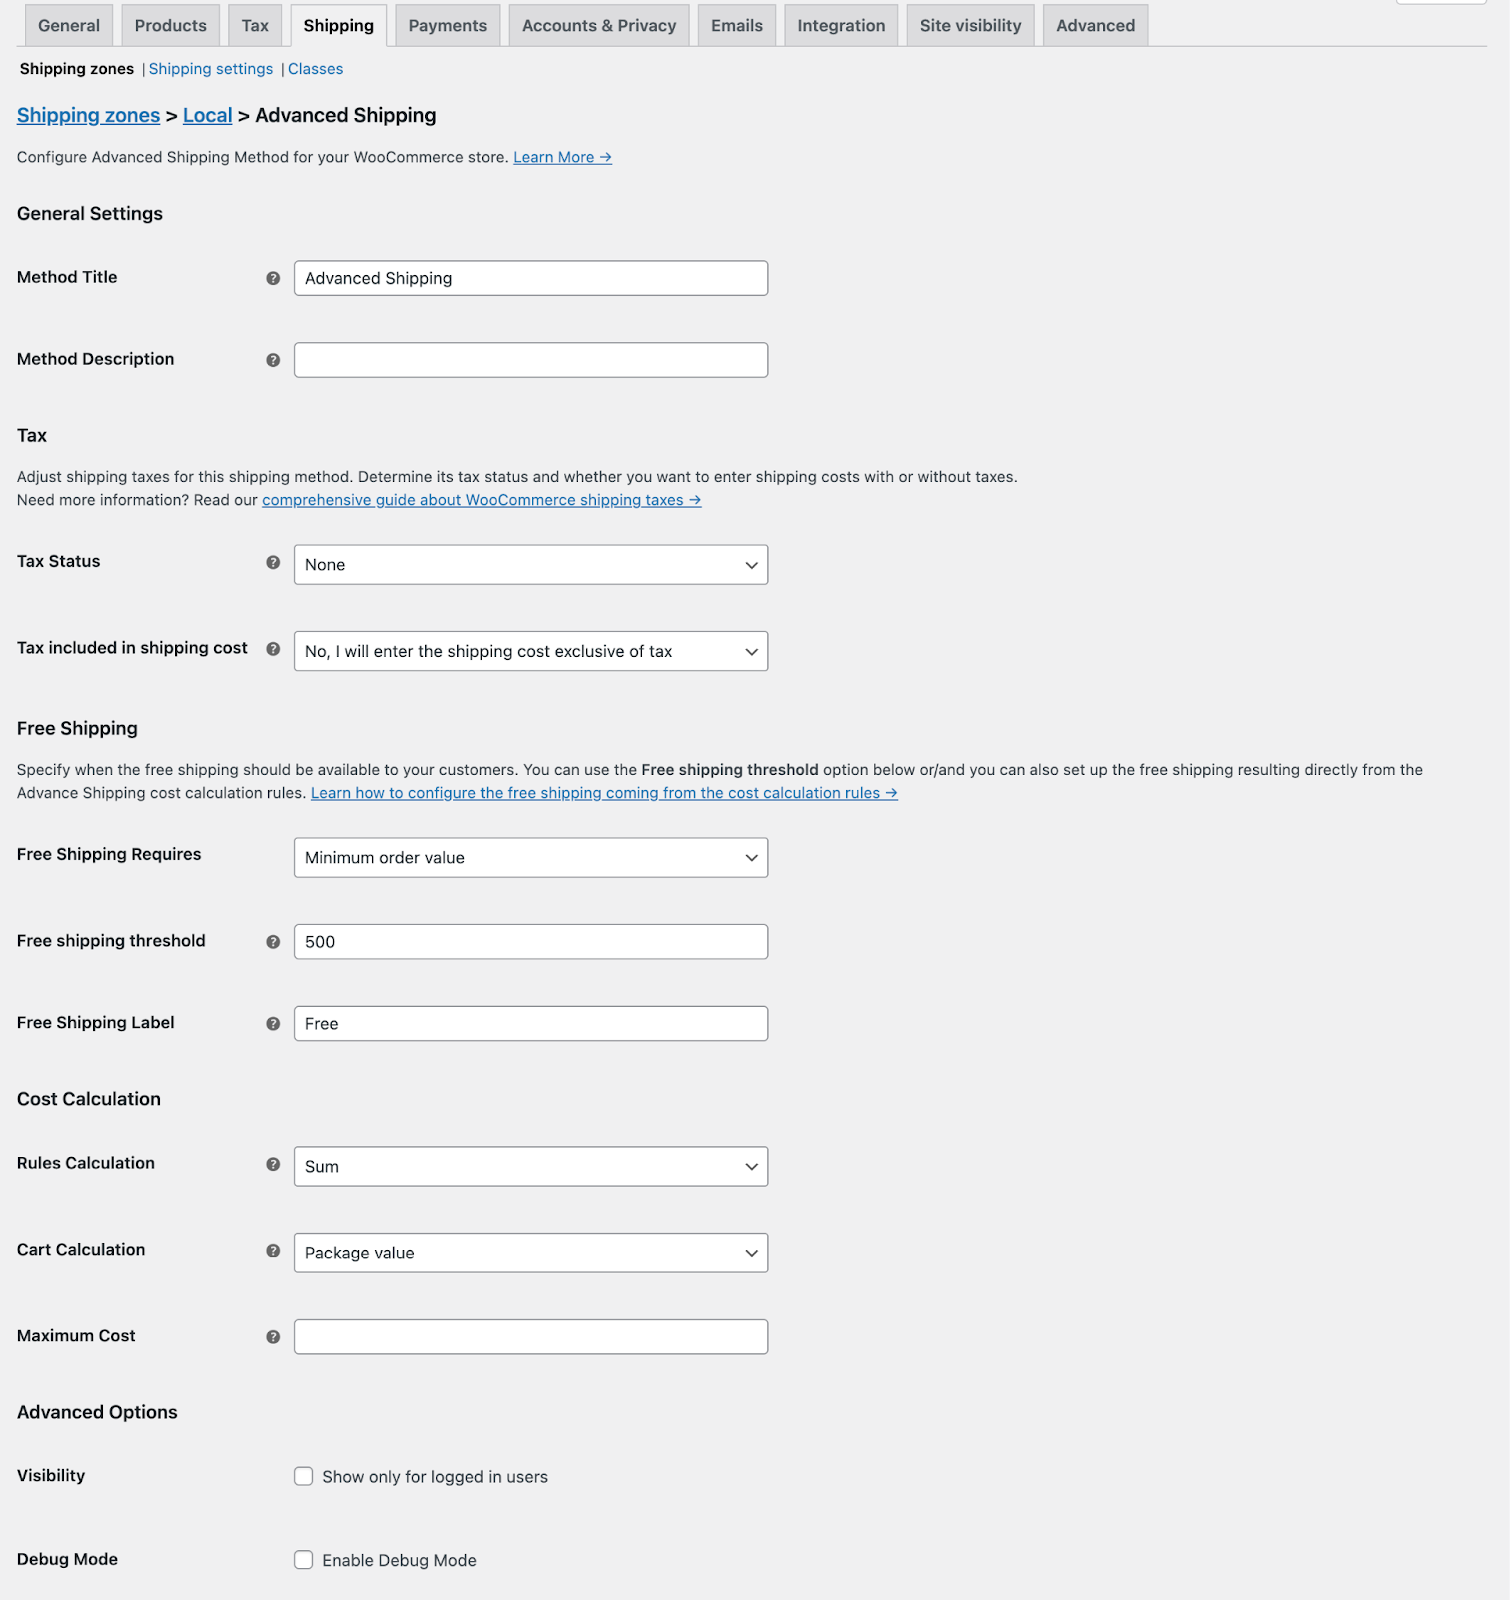
- You can customize the Method Title to something meaningful, like “Express Delivery” or “Advanced Shipping.” This will be visible to your customers at checkout. Optionally, you can also describe internal reference.
- Next, configure the Tax settings. Under Tax Status, you can choose whether the shipping method is taxable or not. Then, specify whether the shipping cost you enter should include tax or be calculated exclusive of tax.
- Under the Free Shipping section, decide what condition will trigger free shipping. For example, you can set it to activate when a minimum order value is met. In the Free Shipping Threshold field, enter the value, such as 500, and use the Free Shipping Label field to customize what the customer sees (e.g., “Free”).
- Moving on to Cost Calculation, you can determine how multiple shipping rules will be calculated using the Rules Calculation option. “Sum” is selected in this example.
- Then, choose the basis for Cart Calculation, such as the total Package value. If needed, you can also enter a cap under Maximum Cost to prevent the shipping fee from exceeding a certain amount.
- Finally, in the Advanced Options, you can restrict the visibility of this shipping method to logged-in users by checking the corresponding box. If you want to troubleshoot or test how the rule works during development, you can enable Debug Mode.
- At the bottom of the page, you’ll find the Shipping Cost Calculation Rules section where you can add conditional rules to tailor shipping costs based on product weight, location, quantity, category, or other criteria.
You can also add various conditional rules to calculate the shipping cost based on various aspects like price, cart quantity, weight, etc. (Refer to the screenshot below)
Step 3: Enable Automatic PDF Invoice Generation
Here, we’ll use the WebToffee WooCommerce PDF Invoices plugin to enable automatic PDF invoice generation.
- For this, go to Invoices/Packing > General Settings on your WordPress dashboard.
- Go to the General tab.
- Enter the company details such as name, logo, and address.
- Also, enable dedicated print buttons for Invoices, packing slips, and shipping labels.
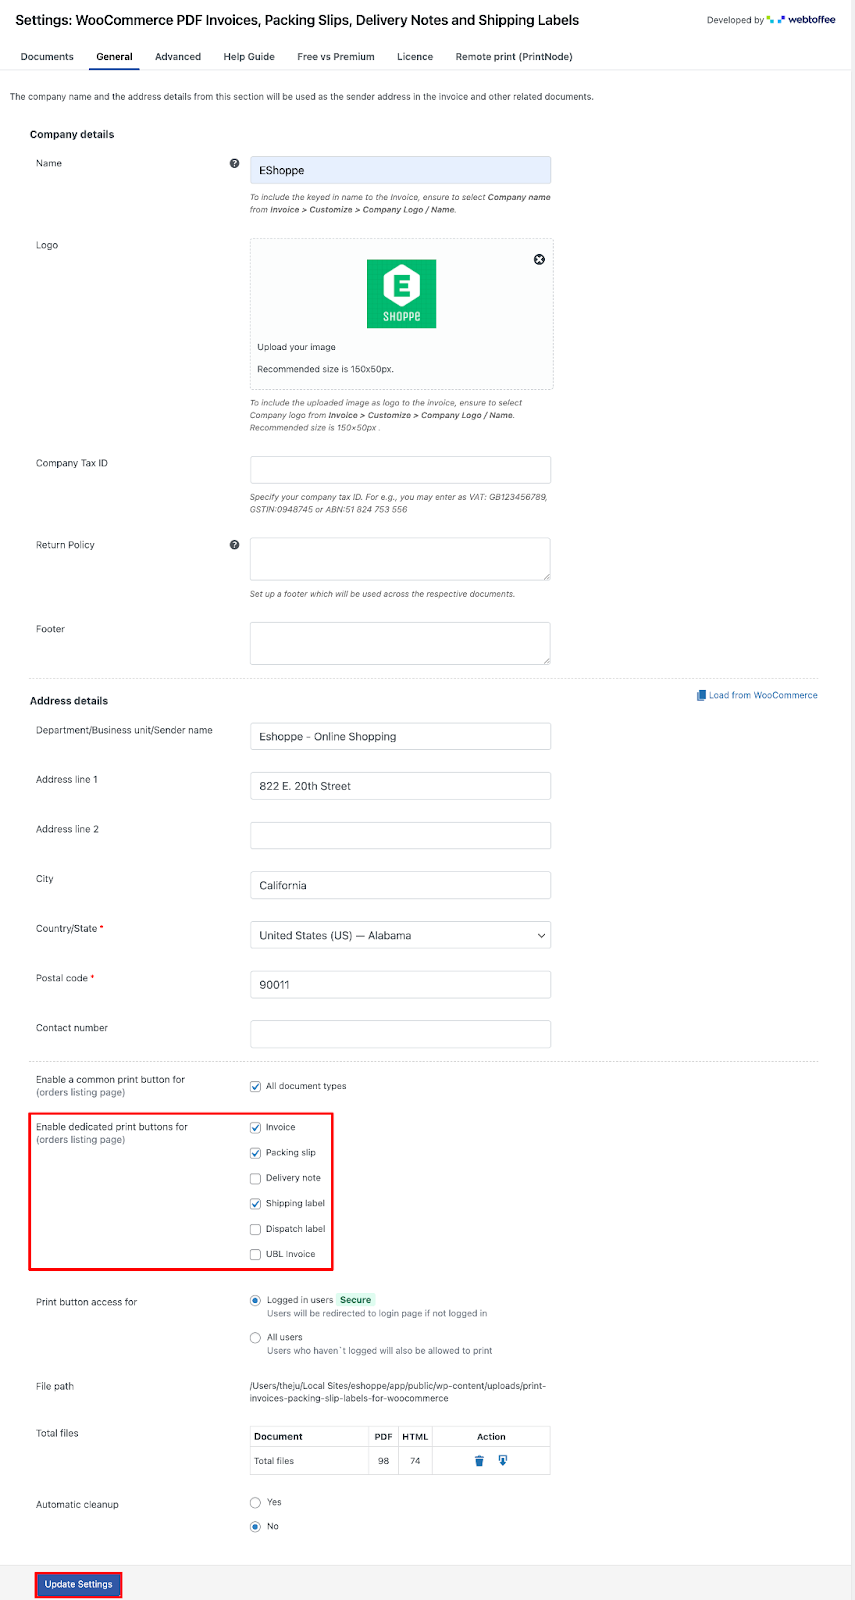
- Click on Update Settings to save the changes.
Enable the invoice feature by toggling the switch labeled Enable Invoice. This allows the plugin to print, download, and email invoices automatically.
Next, choose the invoice date format. You can either use the Order date (when the order was placed) or the Invoiced date (when the invoice is generated).
Under the Automate Invoice Creation section, you can select the order statuses that should trigger automatic invoice generation.
For example, you might choose to automatically generate invoices when orders move to the Processing or Completed status.
The plugin also allows you to attach invoice PDFs to specific WooCommerce emails. In this case, invoices are set to be included in the New Order (Admin email) and the Completed Order email notifications.
This ensures that both store admins and customers receive the invoice at the right stage of the order process.
You can also enable the print invoice button for customers, choosing where it should appear. Options include the My Account – Order lists page, Order details page, and within the Order confirmation email. This gives customers easy access to their invoices whenever they need them.
Under the Invoice Number settings, you can customize how invoice numbers are generated. In this setup, the invoice numbers begin with the prefix “wt”, use a custom number format, and are configured to be four digits long.
The starting number is set to 1, and the live preview below shows what the next invoice number will look like (e.g., wt 0014).
- You can leave the rest settings as is and click on Update Settings to save the changes.
Step 4: Enable Shipping Labels for WooCommerce
- Go to Invoice/Packing > Shipping label.
- Select the Enable multiple labels in one page checkbox. This is useful for saving paper and printing labels in batches.
- Next, set how many labels you want to appear in a single row by entering a number. In this case, it is set to 2. This controls how the labels are arranged on each printed page.
- You’ll then need to choose the shipping label size. You can either select Full Page, which prints one label per page, or choose the Custom option if you have specific dimensions in mind.
- Under the Print section, select the order statuses that should display the ‘Print Shipping Label’ button. For example, you might enable this for the Processing status so that store staff can print the label as soon as the order is being prepared.
- Once these settings are configured, click Update Settings to save your preferences and apply the changes to your store’s shipping label system.
And that’s it! You have successfully streamlined the shipping process on your WooCommerce store.
Here’s how it works:
Once a customer places an order on your WooCommerce store, the WebToffee PDF Invoices Plugin automatically generates the invoice and packing slip based on the order status, eliminating the need for manual documentation.
Next, the WebToffee Shipping Labels Plugin allows you to quickly print shipping labels, either one per page or multiple per sheet, depending on your configuration
At the same time, the RexTheme Advanced Shipping Plugin ensures that the correct shipping rules and rates are applied based on product type, cart value, location, or any custom condition you’ve set.
This integrated workflow drastically reduces manual tasks like entering shipping rates, creating invoices, and printing labels individually.
All three plugins work seamlessly together, giving you a unified and efficient system for managing post-purchase operations, from order confirmation to doorstep delivery.
Other Plugins to Help You Simplify Your Shipping Process
- WooCommerce PDF Invoices, Packing Slip, and Credit Notes – Offers more customization options for invoices and enables credit notes for refund orders.
- WooCommerce Address Labels – Advanced options to auto-generate address labels for WooCommerce
- Sequential Order Numbers – Turn WooCommerce order numbers into sequential orders with custom prefixes and suffixes.
- WooCommerce Quotes – Enable quotation requests and “Add to quote” button in WooCommerce.
- Advanced Shipment Tracking for WooCommerce – Lets you add tracking details to customer orders with real-time shipment updates across multiple carriers.
- Table Rate Shipping Method for WooCommerce by Flexible Shipping – Configure advanced shipping rules based on weight, order total, item count, or destination for more flexible delivery options.
- WooCommerce Shipping – A free official WooCommerce extension that integrates real-time shipping rates, label printing, and order fulfillment directly from your dashboard.
Schlussfolgerung
Shipping doesn’t have to be a bottleneck in your WooCommerce store’s growth. By leveraging the right combination of automation tools, you can turn a once-time-consuming process into a smooth, efficient workflow.
With the WebToffee PDF Invoices Plugin, WebToffee Shipping Labels Plugin, and RexTheme Advanced Shipping Plugin, you can automate invoice generation, streamline shipping label creation, and apply dynamic shipping rates, all without manual intervention.
Together, these plugins help reduce errors, speed up fulfillment, and provide a seamless experience for both your team and your customers.
Whether you’re processing ten orders a day or a thousand, streamlining your shipping process with the right tools can save time, boost accuracy, and help you deliver a consistently excellent post-purchase experience. Now’s the time to simplify your shipping and scale with confidence.
** FAQs **
1. Why should I streamline shipping in my WooCommerce store?
Streamlining shipping helps reduce manual errors, speeds up order fulfillment, and improves customer satisfaction. An efficient shipping process ensures timely deliveries, accurate invoices, and transparent shipping costs, which directly impact customer trust and brand loyalty.
2. Can I automate invoice and packing slip generation in WooCommerce?
Yes. With plugins like WebToffee WooCommerce PDF Invoices & Packing Slips, you can automate invoice generation based on order status. The plugin also allows you to customize invoice numbers, include them in customer emails, and enable easy printing for both admins and customers.
3. How do I set up free shipping in WooCommerce?
WooCommerce allows you to configure free shipping conditions like minimum cart value or specific products. With advanced shipping plugins, you can create flexible rules to automatically apply free shipping when customers meet certain criteria, encouraging larger purchases.
4. Is it possible to handle bulk orders efficiently with WooCommerce shipping automation?
Yes. With automated invoices, bulk label printing, and rule-based shipping costs, handling hundreds of orders becomes just as efficient as managing a few. This scalability makes streamlined shipping essential for growing WooCommerce stores.
5. Do I need multiple plugins to streamline WooCommerce shipping?
Not necessarily, but combining the right tools creates a fully automated workflow. For example, pairing WebToffee PDF Invoices, WebToffee Shipping Labels, and RexTheme Advanced Shipping ensures every step, from invoice creation to label printing to applying dynamic rates, is automated and error-free.