Limited Time Offer

Special Sale - 25% Off

12DAY
12HR
45MIN
30SEC
Get 25% OFF
Zum Inhalt springen
RexThema
  • Plugins
    • WP VR
      WP VR – Quality WP Virtual Tour CreatorCreate stunning virtual tours easily, on your own, using 360 Panoramas.
    • Produkt-Feed-Manager
      Product Feed Manager For WooCommerceMaximize Sales With The Largest Marketplaces.
    • Wagenheber
      Cart Lift To Recover Abandoned CartsRecover abandoned carts for your WooCommerce Store easily.
    • Checkoutify
      Checkoutify Checkout Field Manager for WooCommerceThe Ultimate WooCommerce Checkout Customizer.
    • Catalog Mode for WooCommerce
      Catalog Mode For WooCommerceTurn your WooCommerce store into a product showcase catalog.
    • Dynamic Discount
      Dynamic Discount for WooCommerceBoost your AOV significantly with custom dynamic discount offers.
    • Advanced Shipping Logo
      Advanced Shipping for WooCommerceSet conditional shipping and boost customer satisfaction.
    • Marketplace Auto-sync for WooCommerce
      Marketplace Auto Sync for WooCommerce – Automate Your Business GrowthAuto-sync products with leading marketplaces.
    • Alle Plugins anzeigen
  • Sell Kit Bundle
  • Blog
  • Ressourcen
    • Dokumente
    • Unterstützung
    • Brand Assets
  • My Account
    • Anmelden
  • EN
  • NL

How can we help you?

Dokumentation

Wagenheber

18
  • Getting started
    • Einführung in Cart Lift
    • Wagenheber installieren und aktivieren
    • Eine grundlegende Plugin-Übersicht - Cart Lift
    • Cart Lift effektiv konfigurieren und nutzen
  • Troubleshooting Common Issues
    • Fehlersuche bei allgemeinen Problemen - Cart Lift
  • Upgrade To Cart Lift Pro
    • Upgrade auf Pro - Cart Lift
    • License Plan Upgrade Guide for Cart Lift Pro
  • Abandoned Cart Recovery Conditions
    • Wie man abgebrochene Warenkörbe automatisch verfolgt
    • Wie Sie Ihre Kampagne zur Wiederherstellung abgebrochener Warenkörbe einrichten
    • So verwenden Sie den Twilio SMS-Service, um verlassene Warenkörbe wiederherzustellen - Cart Lift Pro
    • Wie man Benachrichtigungen für verlassene Warenkörbe und Wiederherstellung erhält
    • Vollständiger Analysebericht zur Wiederherstellungskampagne
    • Shortcodes für E-Mail-Felder in Cart Lift
    • How to Pause / Resume Individual Abandoned Cart Recovery
    • How To Set Condition To Automatically Delete Abandoned Orders After A Particular Number Of Days
    • How To Set Conditions To Exclude Carts From Abandoned Cart Recovery Campaigns
    • How To Configure Popup Editor
    • How To Configure reCAPTCHA V3 Settings in Cart Lift

Produkt-Feed-Manager

114
  • Erste Schritte
    • Einführung in den Product Feed Manager für WooCommerce
    • Erste Schritte mit Product Feed Manager für WooCommerce
    • How To Install And Activate Product Feed Manager
    • Wie man zum ersten Mal einen Produkt-Feed erzeugt
    • Product Feed Manager – Basic Plugin Overview
    • All Supported Plugins & Integrations With Product Feed Manager For WooCommerce
  • Upgrade auf PFM Pro
    • License Renewal for Product Feed Manager Pro
    • Product Feed Manager VAT/TAX Policy
    • License Plan Upgrade Guide for Product Feed Manager Pro
  • Upload Feed To Merchants
    • How to Upload your Product Feed on the Facebook Store
    • Upload your WooComerce Product Feed directly to the Google Merchant Center – (No Need For Authorization)
    • How To Auto-sync Your Store’s Products To Google Merchant Center Using Content API
    • Automatische Synchronisierung des Produkt-Feeds mit Google Merchant Center
  • Anweisungen zur Futtermittelerzeugung
    • How To Generate A Google Shopping Feed With Product Feed Manager
    • How to Generate A WooCommerce Product Feed For Facebook
    • Wie man einen benutzerdefinierten Produkt-Feed einfach erstellt
    • How To Create A Feed For eBay MIP
    • So erstellen Sie einen Target Product Feed für Target Marketplace
    • Wie man einen WooCommerce Produkt-Feed für Wish.com erstellt
    • Wie man einen WooCommerce-Produkt-Feed für Sears Marketplace erstellt
    • Wie man einen WooCommerce-Produkt-Feed für NewEgg Marketplace erstellt
    • Wie man einen WooCommerce Produkt-Feed für Walmart erstellt
    • Wie man einen WooCommerce Produkt-Feed für den Instagram-Katalog erstellt
    • Wie man Produkte auf Instagram Shop hochlädt
    • How to generate WooCommerce Product Feed for Amazon
    • How to generate WooCommerce Product Feed for Zbozi
    • How to Generate WooCommerce Product Feed for Skroutz
    • How To Create A Feed For eBay Seller Center
    • How to generate WooCommerce Product Feed for Rozekta
    • How to generate WooCommerce Product Feed for Pinterest
    • How to generate WooCommerce Product Feed for TikTok Ads Catalog
    • How to generate WooCommerce Product Feed for OpenAI Commerce
  • Alle Google Feeds
    • So erstellen Sie einen WooCommerce-Produkt-Feed für Google Remarketing (DRM)
    • Wie man einen WooCommerce-Produkt-Feed für Google Local Products erstellt
    • So erstellen Sie einen WooCommerce-Produkt-Feed für Google Local Products Inventory
    • So erstellen Sie einen WooCommerce-Produkt-Feed für Google Manufacturer Center
    • How to create a WooCommerce feed for Google Merchant Center Promotion Using Product Feed Manager
    • Wie man einen WooCommerce-Produkt-Feed für Google Shopping-Aktionen erstellt
    • So erstellen Sie einen WooCommerce-Produkt-Feed für Google Dynamic Display Ads (Google Ads)
    • So erstellen Sie einen WooCommerce-Produkt-Feed für Google Express (ehemaliges Google Shopping Actions-Programm)
    • Wie man einen WooCommerce-Produkt-Feed für Google Local Inventory Ads erstellt
    • Wie man einen WooCommerce Produkt-Feed für Google Custom Search Ads erstellt
    • Wie man einen WooCommerce Produkt-Feed für Google Dynamic Search Ads erstellt
    • Wie man einen WooCommerce-Produkt-Feed für Google Review erstellt
  • Kategorie-Zuordnung
    • Verwendung der Kategoriezuordnung für den Produkt-Feed
    • So verwenden Sie die Kategoriezuordnung für Google Produktkategorien
    • So konfigurieren Sie die Kategoriezuordnung für Facebook-Produktkategorien
  • Understanding Feed Attributes
    • Benutzerdefinierte Felder für wichtige Produktattribute hinzufügen
    • Hinzufügen eines statischen Präfixes oder Suffixes zu einem Attribut im Feed
    • So fügen Sie dem Feed ein benutzerdefiniertes Attribut hinzu
    • Wie man ein zusätzliches Produktattribut im Feed hinzufügt oder entfernt
    • Wie Sie die Versandwerte von WooCommerce in Ihren Feed aufnehmen (außer Google und Facebook)
    • Price Attributes Mapping and Understanding The Different Use Cases
    • Understanding And Configuring Feed Attributes and Their Values
    • So fügen Sie Ihrem Produktpreis eine Währung hinzu
    • How to Combine Multiple Attribute Values Using the Combined Attributes Feature
  • Understanding Basic Feed Configuration
    • Produkt-Feed-Optimierung mit Yoast SEO Produkttitel, Meta-Beschreibung und Hauptkategorie
    • So planen Sie die automatische Aktualisierung von Feeds in bestimmten Intervallen
    • Lernen über Feed-Dateitypen und wie man Feeds herunterlädt oder anzeigt
    • So fügen Sie UTM-Parameter zu Produkt-URLs hinzu
    • Optimieren Sie Produktzuführungsdaten mit effektiven Ausgabefiltern
    • So verwenden Sie die RankMath-Primärkategorie im Feed
    • Einfügen von Versandwerten in den WooCommerce-Produkt-Feed (Google & Facebook)
    • Einfügen von Steuerwerten in Ihr WooCommerce-Produkt-Feed (Google & Facebook)
    • Entfernen von HTML-Tags oder Shortcodes aus einem Feed
    • UTF-8-Codierung zum Konvertieren von HTMLEntities in Symbole in einem Feed-Attributwert verwenden
    • Umwandlung von Symbolen in HTMLEntities in einem Feed-Attributwert
    • Einfügen von CDATA in ein XML-Feed-Attribut-Tag
    • Entfernen des Dezimals aus dem Preis für Marktplaats Feed
    • Ersetzen von Leerzeichen durch Bindestriche in einem Feed-Attributdaten
    • Wie man einen benutzerdefinierten Feldwert im Produkt-Feed verwendet
    • So verwenden Sie die Yoast-Primärkategorie im Feed
    • How To Exclude Draft Products From The Feed
    • How to Add WooCommerce’s GTIN, UPC, EAN, or ISBN to Product Feed
    • Understanding The Basics Of Feed Settings
  • Feed Filters: Help Customize Feed
    • Wie man unsichtbare Produkte / versteckte Produkte aus dem Produkt-Feed ausschließt
    • Verwendung des Kategoriefilters bei der Erzeugung von Produkt-Feed
    • Verwendung des Tag-Filters beim Erzeugen von Produkt-Feed
    • Verwendung von Feed-Filteroptionen bei der Erzeugung von Feeds
    • Wie man variable Produkte in den Feed einfügt
    • Wie man private Produkte in den Produkt-Feed einbindet
    • So fügen Sie den Begriff der Produktvariation in den Produktnamen ein
    • So verwenden Sie benutzerdefinierte Filter beim Erzeugen von Produkt-Feed
    • How To Use The Product Filter Option To Include/ Exclude Specific Products
    • How To Use Brands Filter When Generating Product Feed
    • Best-Selling Products: Generate a WooCommerce Product Feed to Boost Sales
  • Feed Rules: Help Modify Product Data
    • Verwendung der Funktion "Feed Rule" zur Bearbeitung von Attributwerten
    • How to use the Feed Rules feature to manipulate your product price
  • Feed Validation
    • Feed Validator for Google Shopping
    • Feed Validator for Facebook Catalog
  • Nützliche Steuerungsoptionen
    • Umfangreiche benutzerdefinierte Felder mit eindeutigen Bezeichnern für WooCommerce-Produkte hinzufügen
    • Wie man umfangreiche benutzerdefinierte Felder zu WooCommerce-Produkten hinzufügt
    • Wie man die Steuer aus den Preisen für strukturierte Daten ausschließt
    • How to Schedule Feed Updates Based on Product Data Changes
    • So legen Sie benutzerdefinierte Zeitintervalle für die automatische Aktualisierung fest
    • Nützliche Optionen auf der Registerkarte Einstellungen
    • Produkte pro Charge bei der Chargenverarbeitung kontrollieren
    • Verbinden Sie Facebook-Pixel mit WooCommerce für dynamische Anzeigen
    • How to set 5-Minutes Time Interval for Updating Feed
  • PFM Plugin Integrations
    • How To Include Brand Value From Perfect Brands For WooCommerce In The Feed
    • Aktivieren Sie das Fehlerprotokoll für Product Feed Manager für WooCommerce
    • Wie man mit WPML / WCML den Preis des Produktfeeds konvertiert
    • Wie man mit Polylang Produkt-Feed in mehreren Sprachen erzeugt
    • Wie man mit WPML Produkt-Feed in mehreren Sprachen generiert
    • How To Include Discount Rules In The Feed Using Discount Rules For WooCommerce And PFM
    • How To Generate Product Feed In Multiple Languages | PFM + TranslatePress
  • Fix JSON-LD strukturierte Daten für variable Produkte
    • Fix WooCommerce (JSON-LD) strukturierte Daten für die Genehmigung in Google Shopping
  • Fehlerbehebung
    • Fehlendes Produkt im Facebook Commerce Manager - Facebook & Instagram
    • Google Shopping Produkt-Feed Spezifikation - Liste der Attribute
    • Fehlerbehebung bei allgemeinen Problemen - Product Feed Manager für WooCommerce
    • How to Troubleshoot Feed Errors in Product Feed Manager

WP VR

84
  • Erste Schritte
    • Erste Schritte mit WP VR
    • Wie man WP VR installiert und aktiviert
    • How To Create A Simple Virtual Tour In 2 Minutes – WP VR
    • WP VR Basic Plugin Übersicht
  • Upgrade auf WPVR Pro
    • How To Upgrade To Pro – WP VR
    • License Renewal Guide for WP VR Pro
    • WP VR VAT/TAX Policy
    • License Plan Upgrade Guide for WP VR Pro
  • WPVR Premium Add-ons
    • Wie man Fluent Forms in eine virtuelle Tour einbindet
    • Wie man WooCommerce in eine virtuelle Tour integriert
    • Wie man virtuelle Touren auf Nicht-WordPress-Websites einbettet
    • WP VR Embed Addon – Features Overview
  • Anleitung - Grundeinstellungen
    • How To Use Exclusive Features On Settings Tab To Customize A Virtual Tour
    • So fügen Sie ein Vorschaubild zu Ihrer virtuellen Tour hinzu - WPVR
    • Wie man die automatische Drehung für die virtuelle 360°-Tour aktiviert - WP VR
    • How to Customize the Tour Layout
  • Einrichten von Steuerschaltflächen
    • Verwendung von benutzerdefinierten Symbolen für Navigations- und Steuerungsschaltflächen in einer virtuellen Tour
    • How to Share Virtual Tours on Social Media
    • How To Configure A Call To Action (CTA) Button in Virtual Tour
  • Panoramabilder in Live-Szenen verwandeln
    • So fügen Sie Ihrer virtuellen Tour eine Szene hinzu
    • Festlegen des Standard-Szenengesichts auf einer virtuellen Tour
    • So legen Sie das Limit für die Aufnahme von 360-Bildern für eine Szene in Ihrer virtuellen Tour fest - WPVR
    • Verwenden der Szeneneinstellungen zum Anpassen einer Szene
  • Hotspots für Navigation und Informationen verwenden
    • Hinzufügen von Hotspots zu einer Szene in Ihrer virtuellen Tour
    • So verwenden Sie Hotspots, um Informationen, Bilder oder Videos anzuzeigen
    • Hotspots verwenden, um von einer Szene zur nächsten zu wechseln
    • Anpassen von Hotspot-Symbolen und Farbe
    • Ein selbst gehostetes Video auf WPVR-Hotspots einbetten
    • Wie man Youtube-Videos in virtuelle Touren mit WPVR einbettet
    • Wie man Hotspot-Inhalte leicht innerhalb der virtuellen Tour einrichtet - mit dem WYSIWYG HTML Editor
    • How to use the Custom Icon Class
  • 360-Grad-Videotouren erstellen
    • Ein Youtube 360 Video mit WPVR auf Ihrer Website einbetten
    • Wie man eine virtuelle Tour mit selbst gehosteten interaktiven 360-Grad-Videos mit WPVR erstellt
  • Google Street Views einbetten
    • So betten Sie eine Google Street View-Tour mit WPVR in Ihre Website ein
  • Virtuelle Rundgänge mit Teilpanorama und Vollansicht
    • So erstellen Sie eine virtuelle Tour mit Teilpanoramen oder iPhone-Panoramen
    • Wie man eine virtuelle Tour mit Handy-Panoramabildern erstellt
    • Wie man virtuelle Touren im Vollbildmodus erstellt - WPVR
    • Einrichten eines virtuellen Rundgangs mit 360-Panorama-Hintergrund
  • Veröffentlichen Sie virtuelle Rundgänge auf Ihrer Website
    • Wie man einen WPVR Shortcode zum Einbetten einer virtuellen Tour verwendet
    • How to Set Up Password Protection For Your 360 Virtual Tour – WP VR
    • How to Publish Virtual Tours Using QR Code
  • Importieren, Exportieren und Duplizieren von virtuellen Touren
    • Wie man eine virtuelle Tour dupliziert
    • Virtuelle Touren exportieren und importieren
  • Fehlerbehebung - Lösen Sie häufige Probleme
    • Fehlersuche bei allgemeinen Problemen - WPVR
    • So lösen Sie das Problem, dass die virtuelle Tour nicht angezeigt wird - WPVR
    • Wie man Assets von WPVR von der automatischen Optimierung ausschließt
    • Wie Sie die Einstellungen Ihres WPVR-Benutzerkontos und den Abonnementplan verwalten
    • WP VR Tour Not Displaying on Review and On the Published Webpage
    • WP VR Troubleshooting Guide: Embedding 360 Tours on External Platforms
  • Optimierung der virtuellen Tour für mobile Geräte
    • Einrichten eines dynamischen Front-End-Hinweises für virtuelle Rundgänge für Betrachter von Mobiltelefonen
    • Automatische Größenanpassung von Bildern auf mobilen Geräten für virtuelle Touren
    • So legen Sie für Ihre virtuellen Rundgänge eine individuelle Höhe für mobile Geräte fest
  • Demo Virtuelle Touren
    • Einfache virtuelle Tour
    • Google Street View-Tour - WPVR Pro
    • Video-Anleitungen - WPVR
    • Demo Virtueller Rundgang mit Teil-Panorama - WPVR Pro
    • Bar/Pub Showcase
  • Erweiterte Einstellungen für virtuelle Rundgänge
    • So richten Sie die exklusiven WPVR-Einstellungen ein
    • Kontroll-Skript und das Laden von Stilen für die virtuellen Touren
    • Deaktivieren von WordPress Large Image Handler für virtuelle Touren
    • Aktivieren des Gyroskop-Sensors bei virtuellen 360°-Touren
    • Hinzufügen von Hintergrundmusik zu virtuellen Touren
    • Tastatursteuerungen für Navigation und Zoom einschränken
    • So schränken Sie die Verwendung des Mausbildlaufs zum Zoomen oder Ziehen zum Verschieben einer Tour ein
    • Hinzufügen eines virtuellen Tour-Symbols oder Ihres Firmenlogos in 360-Grad-Touren - WPVR
    • Wie man YouTube-Erklärvideos in virtuelle Touren einbaut 
    • So aktivieren Sie die Unterstützung für VR-Headsets für Handys
    • Individuelle Hotspot-Symbolfarbe und -Animation in Panoramabildern einstellen
    • Wie Sie virtuelle Grundrisse in Ihre Touren einfügen - WPVR
    • How to do SEO optimization for Embeded tour
    • How To Set Scene Transition (Scene Entrance Animation)
    • How to Set Custom Zoom Settings in WPVR
    • WP VR Analytics: How to Track and Analyze Your Virtual Tours
    • Einrichten einer Szenengalerie auf virtuellen Touren
  • WP VR Plugin Integrations
    • Wie man eine virtuelle Tour mit WPVR Gutenberg Block einbettet
    • Wie man eine virtuelle Tour mit WPVR Elementor Widget einbettet
    • So verwenden Sie WP VR Oxygen Element zum Einbetten einer virtuellen Tour
    • WP VR & Dokan Integration: Empower Vendors to Create 360° Virtual Tours
    • How To Embed A Virtual Tour Using WPBakery Element
    • Wie man eine virtuelle Tour mit WPVR Panorama Modul für Divi veröffentlicht
    • Wie WPVR virtuelle Touren mit Visual Composer Element einbetten

Dynamic Discounts for WooCommerce

18
  • Erste Schritte
    • How To Install & Activate the Dynamic Discounts for WooCommerce
    • How To Create A Discount Rule For The First Time
    • Basic Plugin Overview – Dynamic Discounts for WooCommerce
  • Discount Conditions
    • How To Set Product Based Discount
    • How To Set Cart Based Discount
    • How to Set Discount Conditions for Bulk Purchases in WooCommerce
    • How To Set Discount Conditions Based on Customer Purchase History
    • How To Set Discount Conditions For Product Variations
    • How To Apply discount To The cheapest product In The Cart
    • How to Set Discount Based On Category and Tag
    • How To Set Buy X Get Y Discount
    • How To Set Stock-Based Discount
    • How To Set A Bundle Discount
    • How To Set Buy X Get X Discount
    • How To Apply Discount To Nth Quantity
    • How To Set The Cheapest Product On Cart Discount
    • How To Set “Offer One Or More Free Products” Discount
    • How to Set Attribute Specific Discount For Product Variants

Checkoutify

5
  • Erste Schritte
    • How To Install & Activate Checkoutify Pro – Checkout Customizer
    • How to Replace Your WooCommerce Checkout Using Checkoutify – Checkout Customizer
    • How To Create and Customise an Order Bump
    • How to Create a Custom Field in Checkoutify
  • Customizing Checkout
    • Creating a Multi-Step Checkout Using Checkoutify – Checkout Customizer

Advanced Shipping for WooCommerce

18
  • Erste Schritte
    • How To Install & Activate The Advanced Shipping For WooCommerce
    • Basic Plugin Overview – Advanced Shipping For WooCommerce
    • How To Add Advanced Shipping To An Existing Shipping Zone
    • How to Set Shipping Conditions For The First Time Using Advanced Shipping
  • Shipping Conditions
    • How To Set Product-Specific Shipping Conditions
    • How To Set Category-Based Shipping Conditions
    • How To Set Shipping Conditions Based On WooCommerce Product Tag
    • How To Set Shipping Conditions Based On WooCommerce User Role
    • How To Set Shipping Conditions Based on Product’s Weight, Volume, Length, Height, and Width
    • How to Add Price Based Shipping Conditions in Advanced Shipping
    • How to Add Weight Based Shipping Conditions in Advanced Shipping
    • Quantity Based Shipping Conditions: Easy Steps to Set Them Up in WooCommerce
    • How to Set Time and Day Based Shipping Conditions in Advanced Shipping
    • How to Set Country Based Shipping Conditions in Advanced Shipping
    • How to Set City Based Shipping Conditions in Advanced Shipping
    • How to Set State Based Shipping Conditions in Advanced Shipping
    • How to Set ZIP Code Based Shipping Conditions in Advanced Shipping
    • How to Set Zone Based Shipping Conditions in Advanced Shipping

Catalog Mode for WooCommerce

7
  • Erste Schritte
    • How To Install & Activate the Catalog Mode for WooCommerce
    • Basic Plugin Overview – Catalog Mode For WooCommerce
  • Settings
    • How To Set Users Rules For Catalog Mode
    • How To Configure Catalog Mode Options
    • How to Manage the Exclusion List in Catalog Mode
    • How To Configure the Inquiry Form in Catalog Mode
    • How to Create and Manage Custom Buttons and Labels

Marketplace Auto-Sync for WooCommerce

4
  • Erste Schritte
    • How To Install & Activate Marketplace Auto Sync
    • Basic Plugin Overview – Marketplace Auto Sync
    • How To Set Up an Auto Sync For The First Time
    • How To Auto-sync with Google Merchant Center
  • Startseite
  • Dokumente
  • WP VR
  • Importieren, Exportieren und Duplizieren von virtuellen Touren
View Categories

Virtuelle Touren exportieren und importieren

Do you want to export a virtual tour from one WordPress site and import it to another seamlessly? With WP VR Pro – the premium version of the popular 360° panorama and virtual tour plugin for WordPress – you can easily transfer complete virtual tours across different websites. This powerful feature saves time when migrating immersive 360-degree experiences, such as real estate tours, hotel walkthroughs, or product showcases.

WP VR Pro’s export and import functionality allows you to download a tour as a ZIP file from one site and upload it to another, preserving all scenes, hotspots, custom icons, controls, and settings. Perfect for agencies, developers, or anyone managing multiple WordPress sites!

Note: This feature is exclusive to WP VR Pro. The free version does not support tour export/import.

You can now Export a virtual tour from one website and Import it on another site that has WPVR Pro installed and activated.

Let’s say you have a good virtual tour on one WordPress site, and you want to feature that on another WordPress site of yours. So you can simply export it from the first website, and import it on the second easily.

Follow the steps below to export and import a virtual tour.

How To Export A virtual tour #

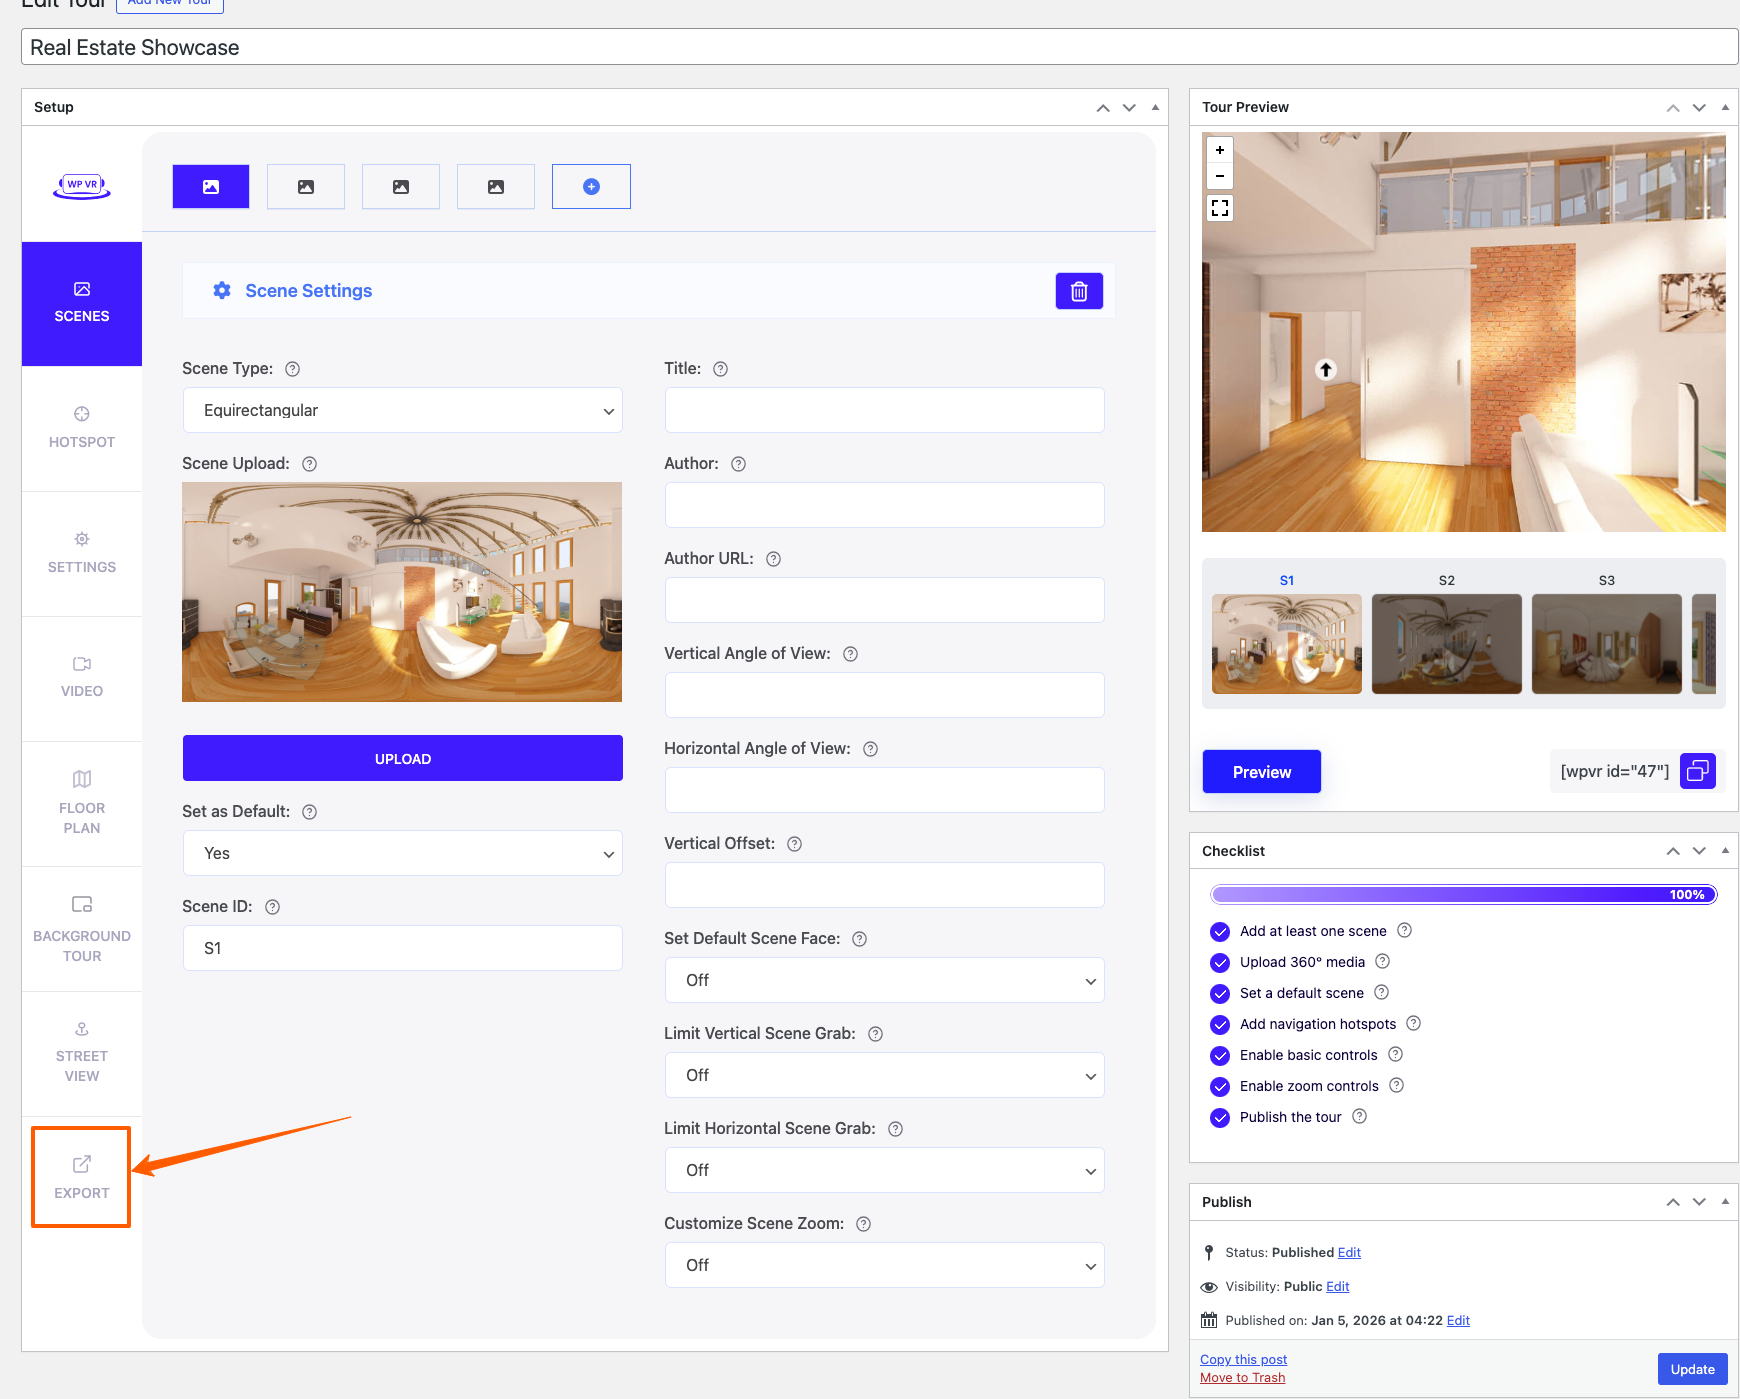
1. Once you published tour, a new Export tab will appear on left side.

How To Export And Import Virtual Tours 1

2. Click on the Export tab and you will find the option to download the tour.

How To Export And Import Virtual Tours 2

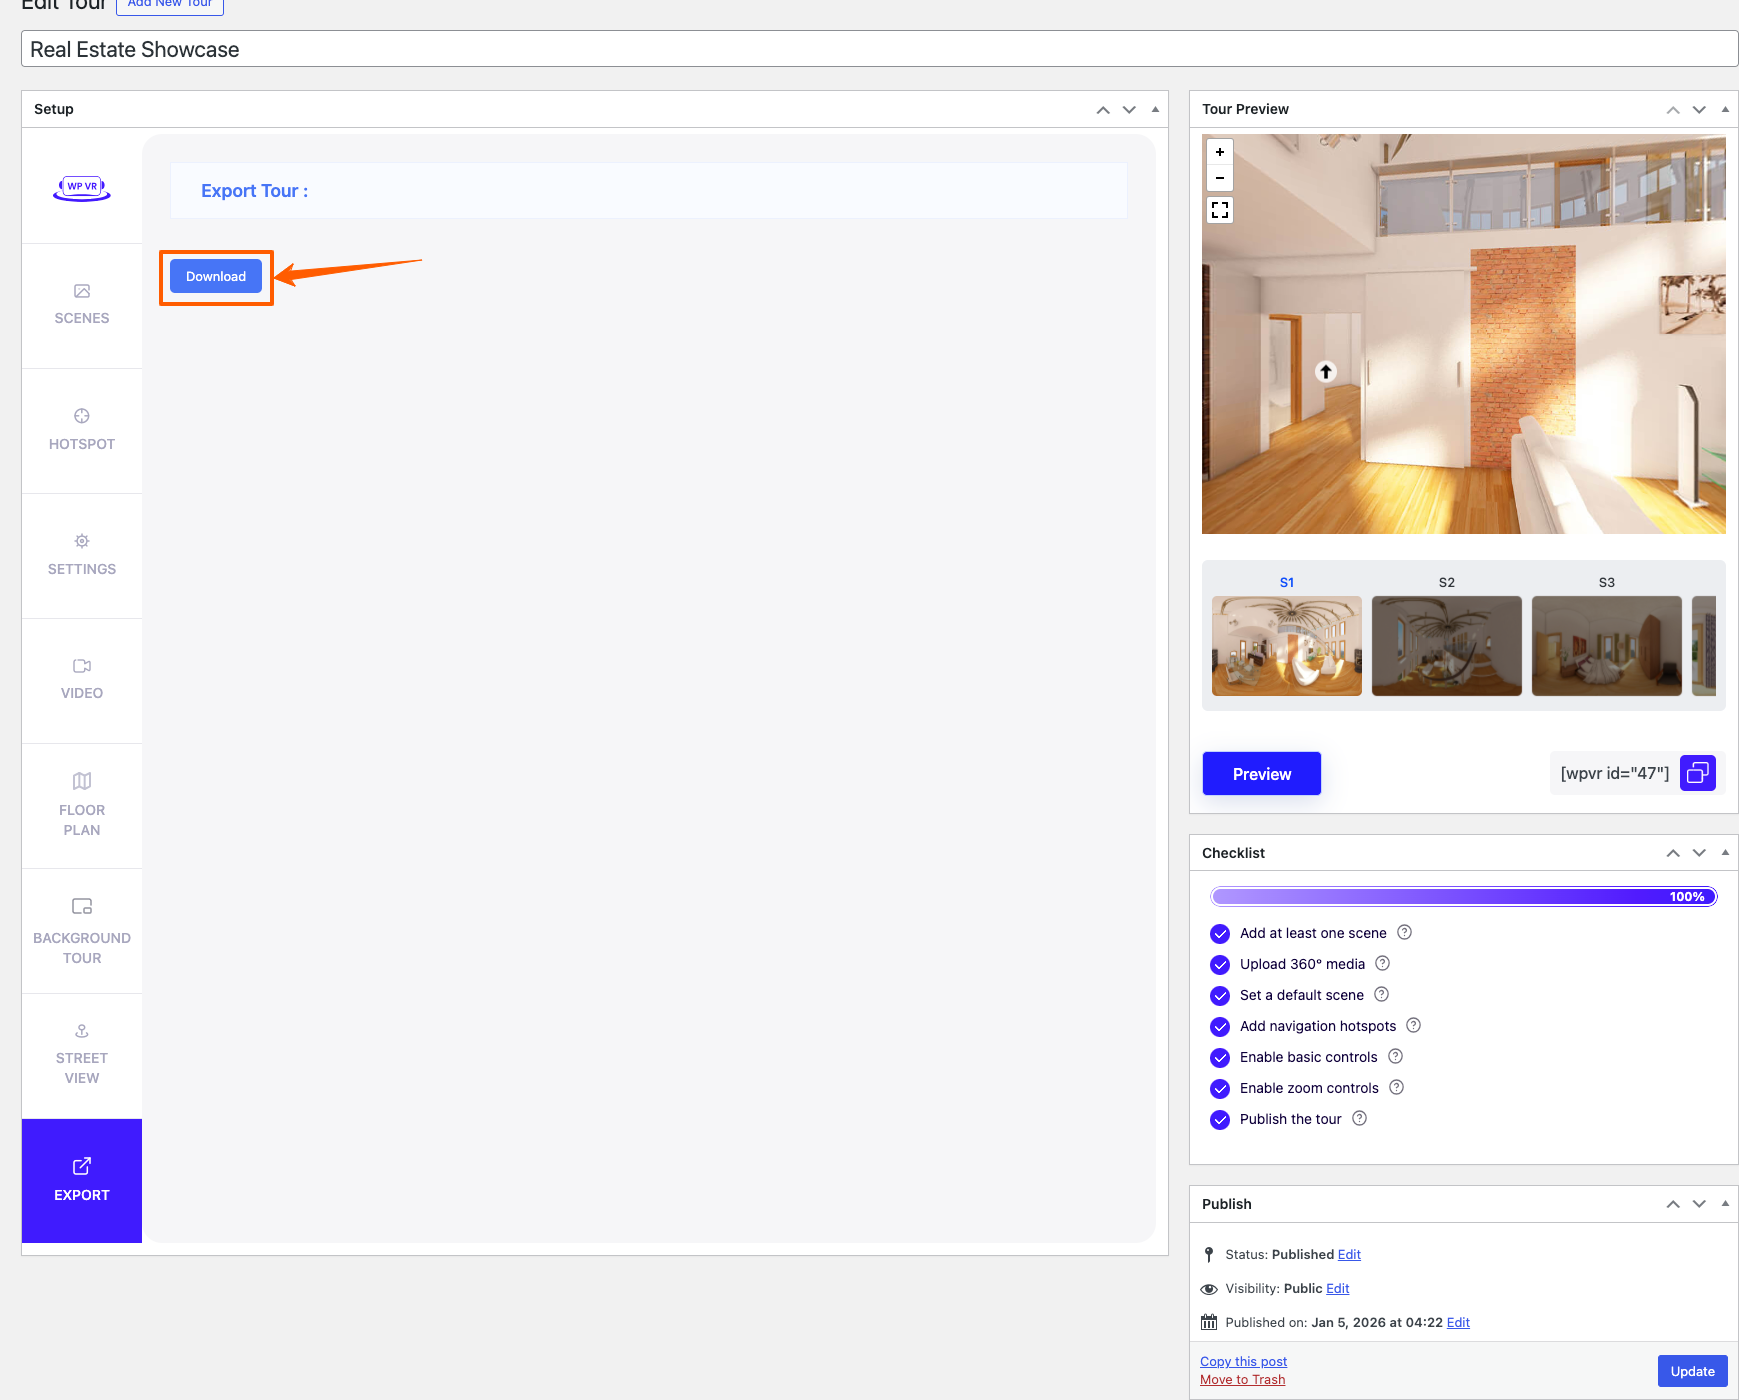
3. Click on Download, and a copy of your tour will be downloaded in zip format.

Damit haben Sie erfolgreich eine virtuelle Tour exportiert.

How To Import A Virtual tour? #

If you have a downloaded copy of a WPVR virtual tour, then you can import it on any site that also has WP VR Pro.

1. Go to Dashboard > WP VR

How To Export And Import Virtual Tours 3

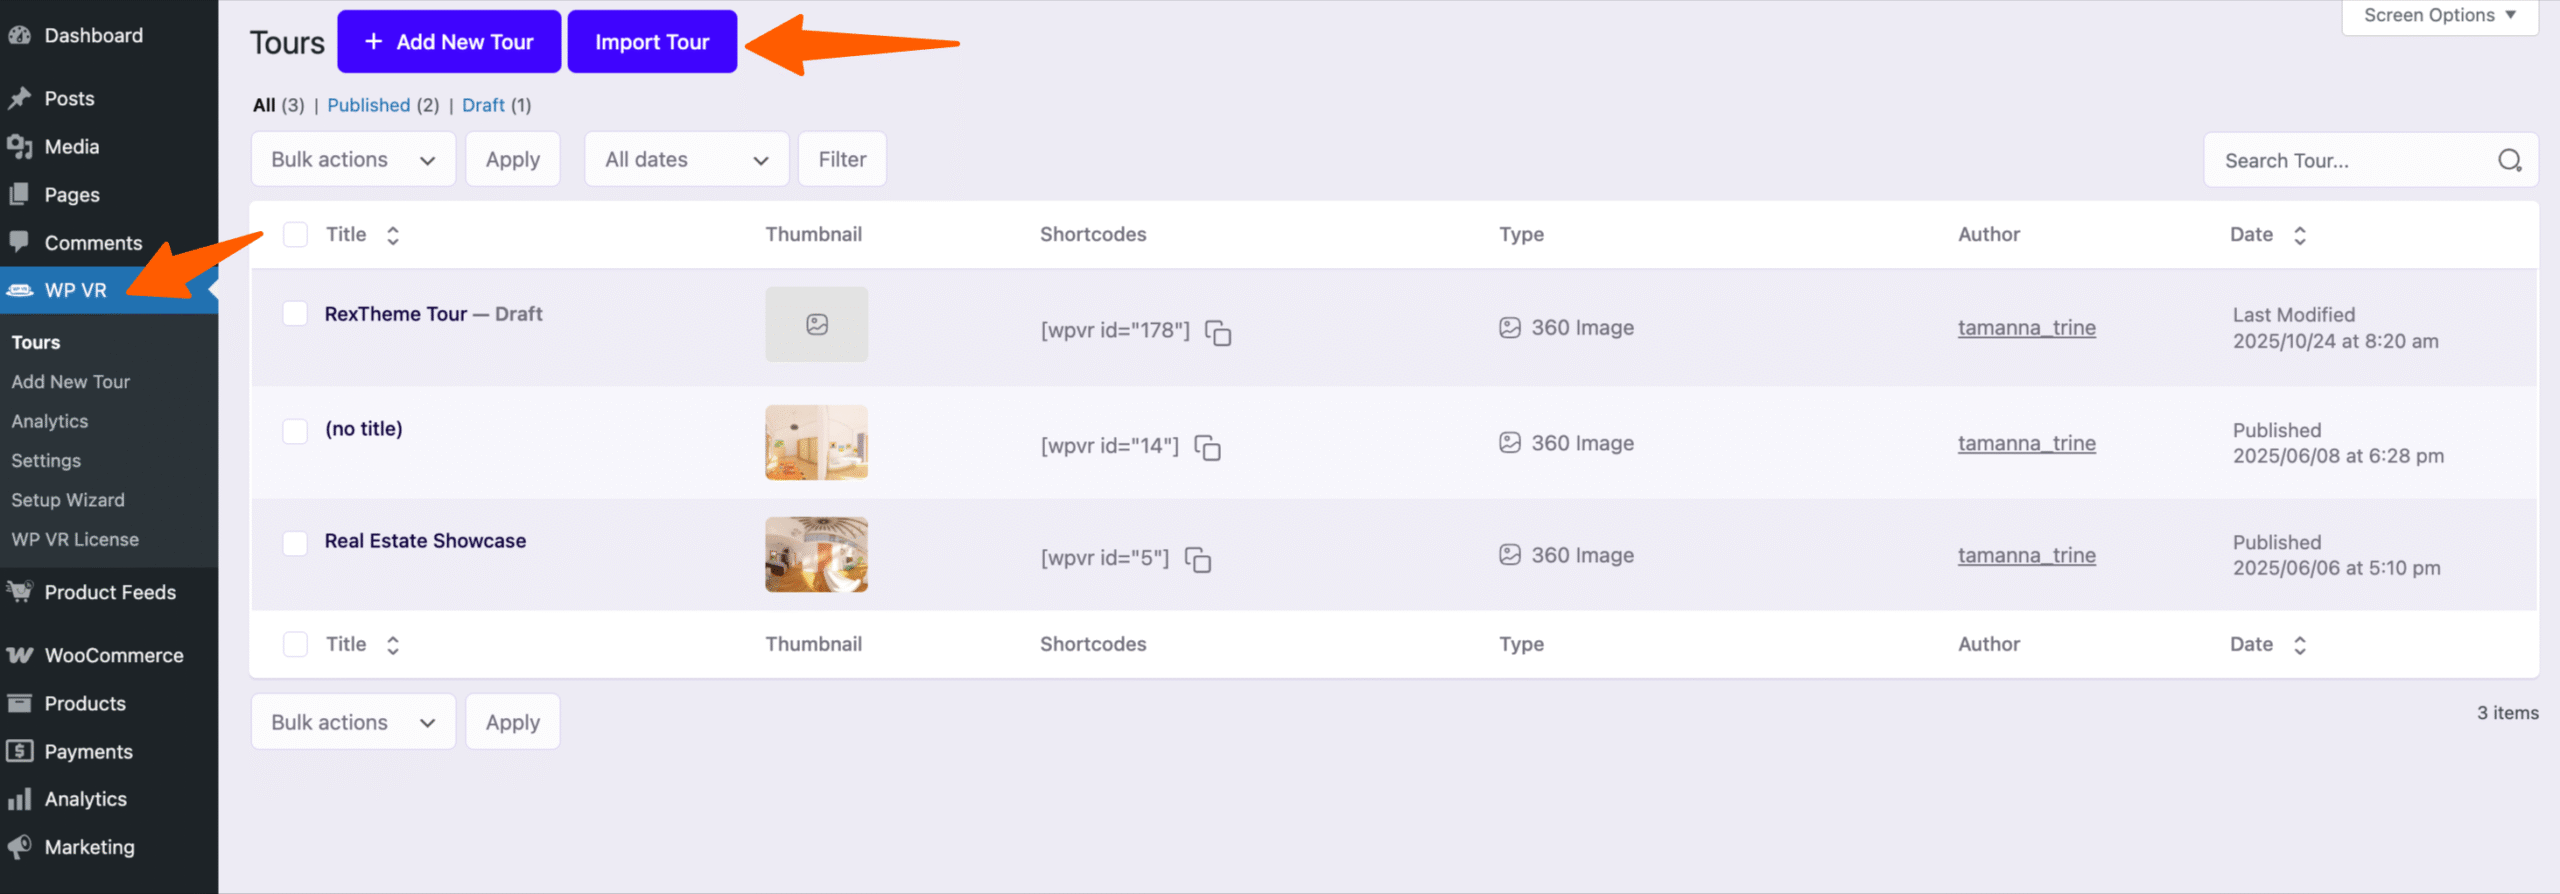
2. On the top, you will find a button called Import Tour. Click on it and you will find to upload the tour file.

How To Export And Import Virtual Tours 4

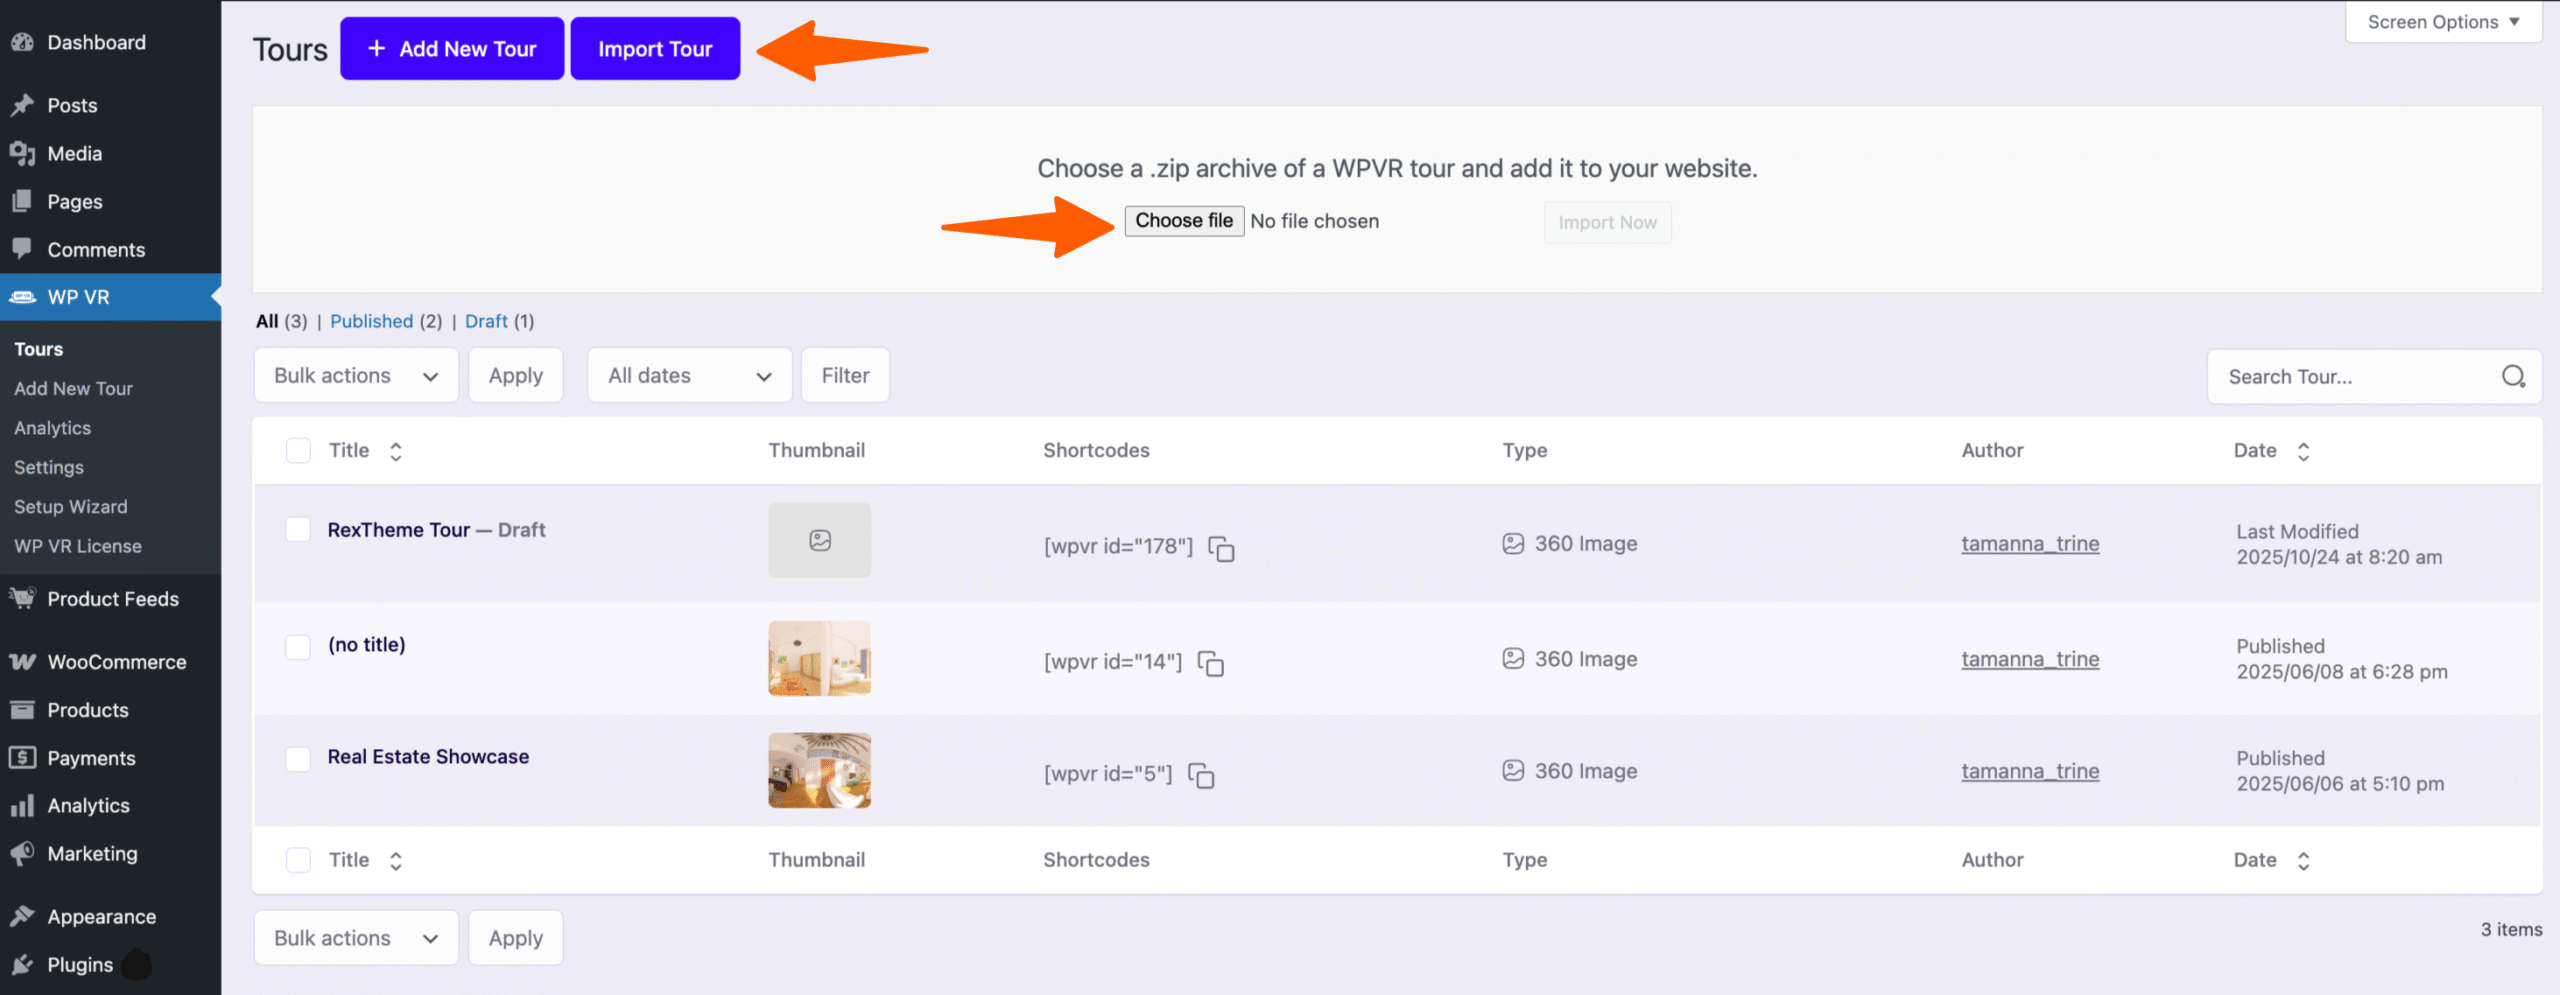
3. Choose the tour file and then click on the Import Now button

Once the import is complete, it will take you directly to the tour editing page of the imported tour.

That’s it. You have successfully imported the tour. You can then simply go to Dashboard > WPVR > Tours and see that the tour is added with a new tour ID.

Still stuck? How can we help?

How can we help?

Updated on January 8, 2026
Inhaltsübersicht
  • How To Export A virtual tour
  • How To Import A Virtual tour?
RexThema

Stay updated with our latest releases and useful guides.

By subscribing RexTheme you agree to Privacy Policy.

Produkte

  • WP VR
  • Produkt-Feed-Manager
  • Wagenheber
  • Checkoutify
  • Dynamic Discount
  • Advanced Shipping
  • Catalog Mode
  • Marketplace Auto-sync

Ressourcen

  • Nutzungsbedingungen
  • Datenschutzerklärung
  • Refund Policy
  • Affiliate Policy
  • Support Policy
  • Bug Bounty Program

Company

  • Blog
  • Dokumentationen
  • Changelog
  • Partnerprogramm
  • Brand Assets
  • Kontakt

Copyright © 2013 - RexTheme