- Last updated on: 22 mins read
How To Create A Real Estate Virtual Tour To Increase Property Sales [2024]
The real estate industry is now super competitive. While there is a fall in real estate sales worldwide, the number of realtors is rapidly increasing.
According to FitSmallBusiness, 36.7% fewer homes were sold last year compared to 2021.
However, the number of licensed realtors in the USA increased to over 2 million this year compared to 1.6 million in 2022.
Hence, as a realtor, you must find new ways to stay ahead of the competition and attract more potential buyers.
One of the best ways to connect with clients in 2023 is to use real estate virtual tours.
The fact is, people no longer want to watch polished images and optimized videos to choose properties. Your only options would be to make them visit your properties or get a virtual walkthrough of the homes for sale.
Today, you will learn how you can create a real estate virtual tour easily. After reading this article, you will learn
- how virtual tours can help you close more deals
- the right way to capture 360 images of your properties
- how to choose the right virtual tour software
- craft an engaging virtual tour of real estate properties
Eventually, you will be able to create stunning virtual tours of homes for sale to attract the right buyers. So let’s begin.
Table Of Contents
Benefits Of Real Estate Virtual Tours To Sell Properties
Steps To Creating A Real Estate Virtual Tour
1. How To Take 360 Photos Of Your Properties
Benefits Of Real Estate Virtual Tours To Sell Properties
It’s 2023. Even Zillow started using virtual tours a long time ago. As a realtor, you must accept that virtual tours are now an essential element in your sales strategy.
Your Buyers Expect A Virtual Tour
As more and more realtors are using commercial real estate virtual tours to sell and rent their properties, your clients are now getting used to experiencing VR property tours.
According to the annual report by the National Association of Realtors:
- 54% of the buyers will not look up to a property if it doesn’t have 360-degree images.
- 50% of the buyers found virtual tours really useful.
This indicates that if you do not use visual tours, there is a possibility that you may end up losing up to half of your potential buyers to your competitors.
Having said that, there are more reasons why commercial real estate virtual tours can help to sell more properties effectively.
i. Keep Visitors Engaged & Create A Connection With Them (unlike flat Images)
A virtual tour will create more engagement than regular flat images as the viewers feel like they are taking an actual live tour. Integrating virtual tours into listings for shared apartments can significantly enhance the appeal to potential renters by providing a comprehensive view of the communal living spaces and amenities.
Since the view seems realistic, they will know exactly how the property is built and if it’s something they would like in real life.
Images make it difficult to imagine the house in reality – after a visit, you may notice some areas are smaller than expected or less coordinated than in the images.
A virtual tour will help avoid this sort of situation to a great extent.
ii. Trigger Buyers To Make A Decision Even Before Giving You A Call
Usually, a buyer tends to look into several listings based on his budget and location preference before inquiring about the ones he finds suitable as per the images.
If you use real estate virtual tours, you may have a chance to land a deal more easily.
Basically, people already know that images can be altered and misleading at times. Plus, useful information on the home listing page may not be easy to relate to while looking at the images.
Hence buyers tend to call several agents to find out more about the houses and often visit multiple properties before making a decision. (Your time invested may not always be fruitful.)
With a virtual tour, you have the option to add relevant information at the right spots via tooltips or click-to-view content within the tour. This will help to eliminate all unnecessary questions and convince a few to make a temporary decision. When they call you, it will be much easier for you to invite them for a live visitation.
These people are already interested, and you will have a greater chance of closing the deal during the live tours of houses.
According to Property Week, using virtual tours will reduce the number of your wasted viewings by 40%.
iii. No More Wasted House Visits
As a real estate agent, one of the most irritating issues you have to face is wasted viewings of your properties.
Many people visit the properties, and you take time and effort to give them a good tour, but most of them end up declining your offers.
If someone requests a live visit after taking a virtual tour, then he/she is probably serious about the deal, thus increasing the possibility of closing deals for your property with less effort.
Steps To Creating A Real Estate Virtual Tour
Now that you know the benefits of using a virtual tour to sell more properties, let us look at how you can easily create a real estate virtual tour.
The following are the main steps involved:
- Take 360 photos of your property for sale.
- Choose a reliable virtual tour software.
- Build a 360 virtual tour for real estate.
- Customize your tour Into an engaging virtual walkthrough.
Let us look at these in detail.
1. How To Take 360 Photos Of Your Properties
The first step of this process is to take 360 panoramic images of your houses or properties, which you may then convert into a 360 virtual tour.
In this case, you have 4 possible options:
- Use a professional assistant to capture & edit 360 images.
The best option is always to get professional help. But sometimes, the expenses may not result in a good ROI. So you have to be calculative in terms of expenses before seeking professional virtual tour creators.
- Get a tripod & DSLR to capture images in all directions and stitch them into a panoramic image.
In this case, you have to capture images at fixed angles in all directions manually. And then use a stitching app to turn them into a 360 panoramic image.
~ Here is a guide to shooting good panoramic photos.
- Use 360 panorama apps on your iPhone or Android mobile
You will find amazing apps to help you capture great panoramic images via a guided photo session.
~ Here are a few iPhone apps to capture 360 photos.
~ Here are some Android apps to take 360 panoramas.
- Capture 360 images using a drone.
Aerial photography using drones can be an amazing experience while delivering high-quality output.
~ Here is a guide to capturing 360 photos using a drone.
Your panoramic images together will become a 360 virtual tour using the right VR software.
2. Choosing The Right Virtual Tour Software
You want to make sure you are able to create a property virtual tour that not only gives a realistic tour but also keeps the visitors engaged with the right details.
You want the tour to advocate for your property and answer as many property-related questions during the tour as possible. Hence, you need to choose a real estate virtual tour software that has all the right features.
Following are some of the crucial features you should look for when choosing a virtual tour creator.
Crucial Features To Look For In An Ideal Real Estate Virtual Tour Software

i. Ability To Display Information Inside The Virtual Tour
You can make the tour more meaningful for your buyers by providing additional information on the property before visiting.
So, you will need a virtual tour creator that will allow you to place relevant information at suitable spots in the tour.
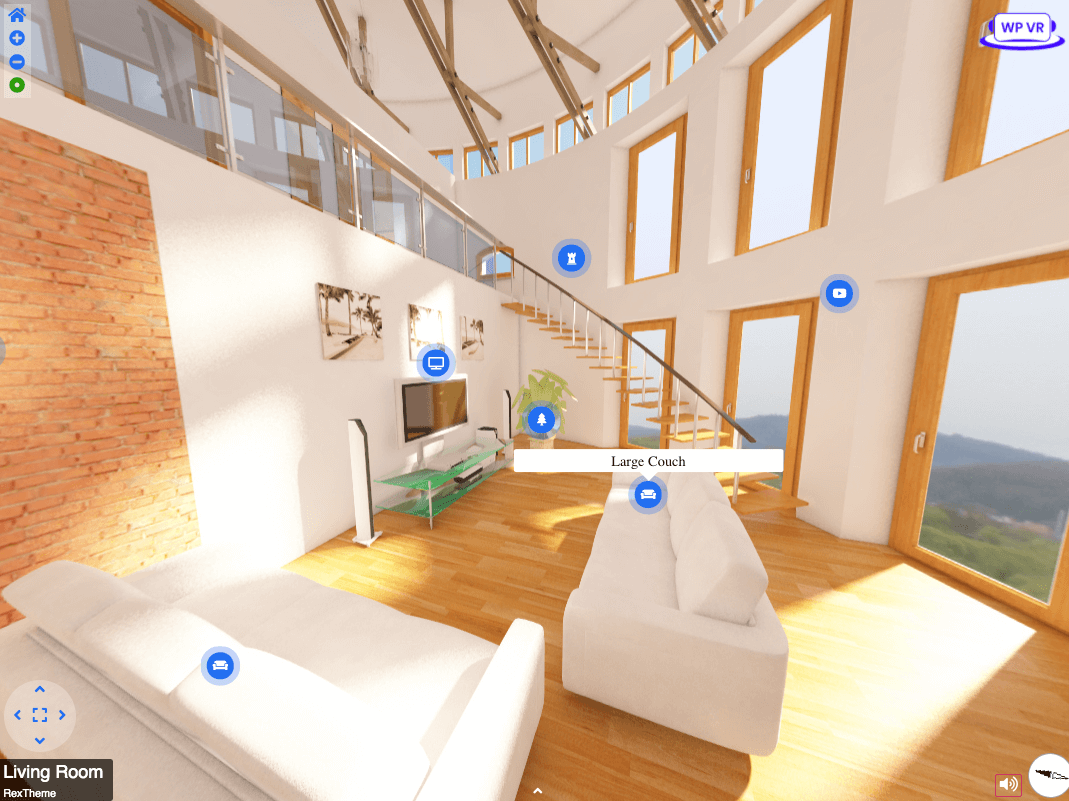
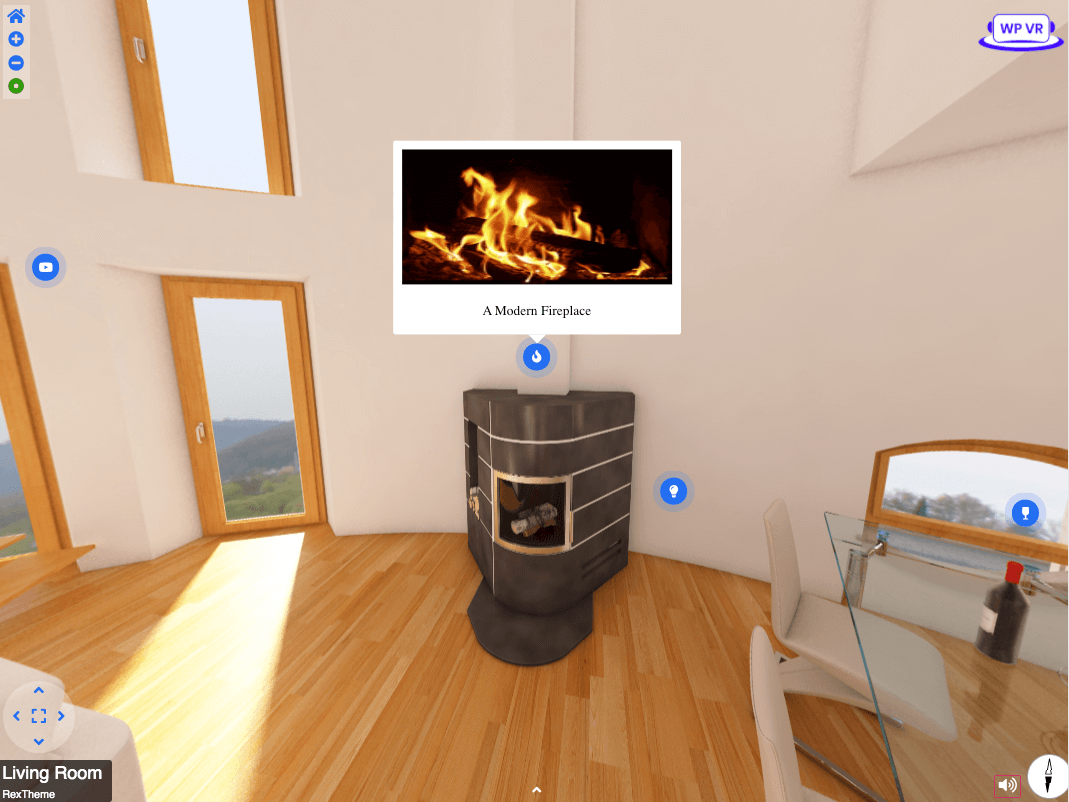
For example, let’s say the fireplace is an exotic one. You may include a tooltip on top of the fireplace where people can hover to learn what type of fireplace it is, along with a preview of how it looks when lit. Or, let’s say there is a swimming pool on the property. Then you can let people click on an icon to learn about its dimensions.
You may even consider providing information such as the floor type, ceiling material, etc.
All of these will make it easier for the buyer to realize if this is what he/she is looking for.
So find a tool that lets you add such engaging materials.
ii. Make It Easy To Contact You
After taking the tour, you would want the visitor to contact you ASAP. Hence, you have to make it easy for the buyer to reach out to you if they like what they see.
The best option here would be to include a contact form within the tour.
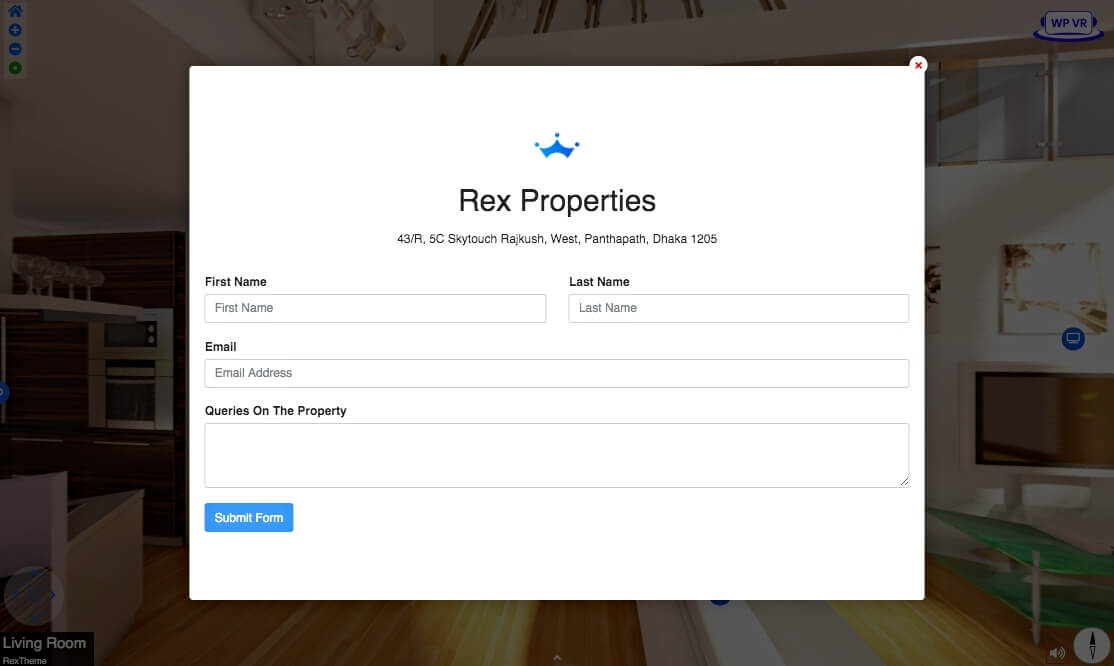
Since the buyer is interested, why make him look for your contact details elsewhere? Simply get him to book a call with you during the tour.
This means the contact form is an important feature you would want to have in your virtual tour creator.
iii. Use Company Branding
While contacting you is great, many may still want to decide on this later. Hence, you need to find a way to create a place in the prospect’s mind so that he trusts you in dealing with the house.
In that case, you may include your Company logo on a corner of the real estate virtual tour so that clicking on it will give people further details about your business location, the service you offer, and additional and contact information.
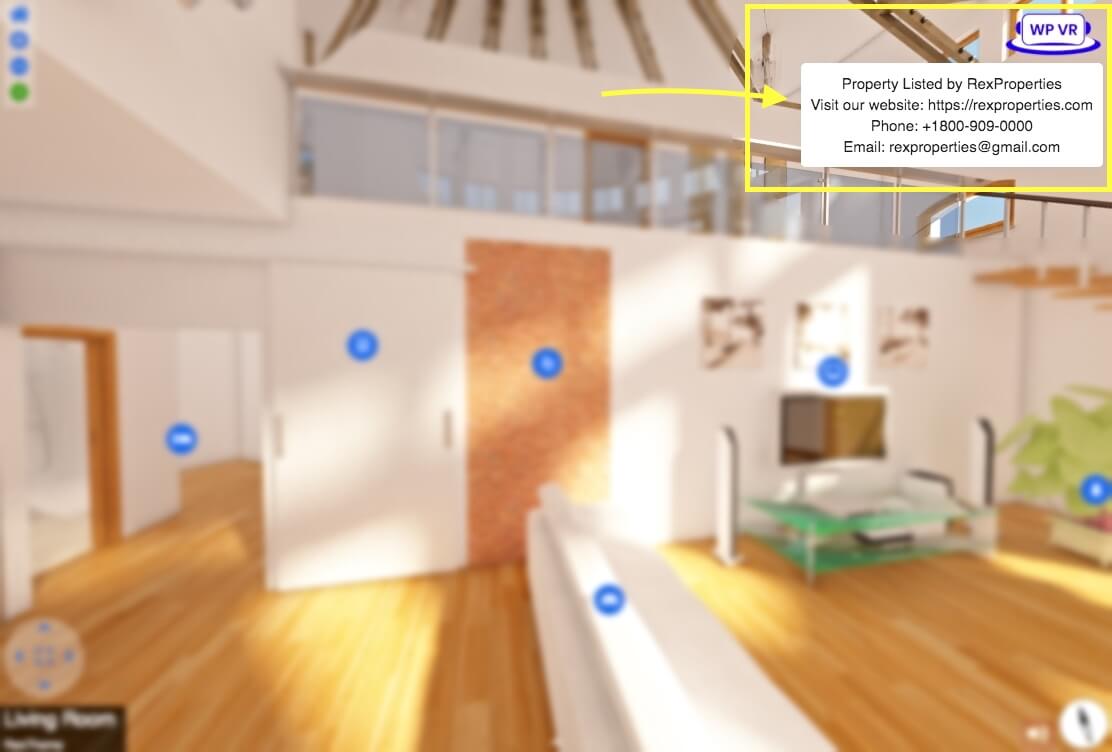
This is partially a brand promotion. People will remember you more easily if they see your logo. Plus, it will help to gain trust now that they know you have a physical location.
(It will also help your re-targeting Ads to get noticed more effectively.)
So, branding opportunity is a good feature to have in your VR software.
iv. Option To Include A Gallery To View All Available Scenes
The easier your buyers can navigate the tour, the more time they’ll spend on it.
If the property has a lot of rooms or scenes, then the virtual tour can be confusing when navigating back and forth between different scenes in the tour.
A logical thing to do here is to include a gallery that will show all the available rooms/scenes on the property, which people can click to view right away.
v. Cover Every Inch Of The Property For An Interactive Tour
Keep in mind that the virtual tour should be a replication of a real-life tour. So make sure you manage to highlight all the rooms or views of the property.
For example, if a house has 5 rooms, then you should include at least 5 scenes in the virtual tour (1 for each from the middle of the room).
Plus, it’s an added benefit if you include scenes for the restrooms, kitchen, front yard, and backyard. For a duplex, a view from the stairs will be great.
Now, your tool should be able to connect these scenes to make them into a tour. Basically, you need to be able to include hotspots that people can click and go to the other room.
For example, let’s say you are in the yard just outside the main entrance. Then you may place an icon on the entrance section that people can click to enter the house.
Recommended Real Estate Virtual Tour Creator For You ⚙️
All the features listed above are just the core features you would look for in your virtual tour software.
Based on these requirements, we recommend you use a WordPress website and go for the tool – WPVR.
WPVR is right now the no.1 virtual tour creator in WordPress and has all the features from above, plus more.
All you have to do is upload your 360 panoramic images, and this plugin will turn it into a 360 virtual tour.
Besides the core features, you will get additional features to make the tour even more engaging such as an interactive house floor map, a short introductory video, background music, mobile responsiveness, custom hotspot icons & navigation control, and many more.
3. How To Create A Real Estate Virtual Tour Easily
So far, you have learned how to capture 360 panoramas and know what to look for when choosing the right virtual tour plugin. Now, it’s time to create your property virtual tour.
I’ll be using WPVR to show you how it’s done.
First, I will create a basic virtual tour. And then, I will use additional features to make your tour engaging.
Create A Basic Real Estate Virtual Tour (For Beginners)
You may start by using the free version of WPVR to create a basic real estate virtual tour.
- Here’s how you can install and activate WPVR.
Now, follow the steps below to craft your real estate virtual tour.
1. Add Scenes to Your Virtual Tour
Upload your 360 images to WPVR by following the steps below:
i. Go to WordPress Dashboard > WP VR > Add New Tour.
You’ll be taken to the General Settings page of WPVR.
ii. Set a title for your virtual tour.
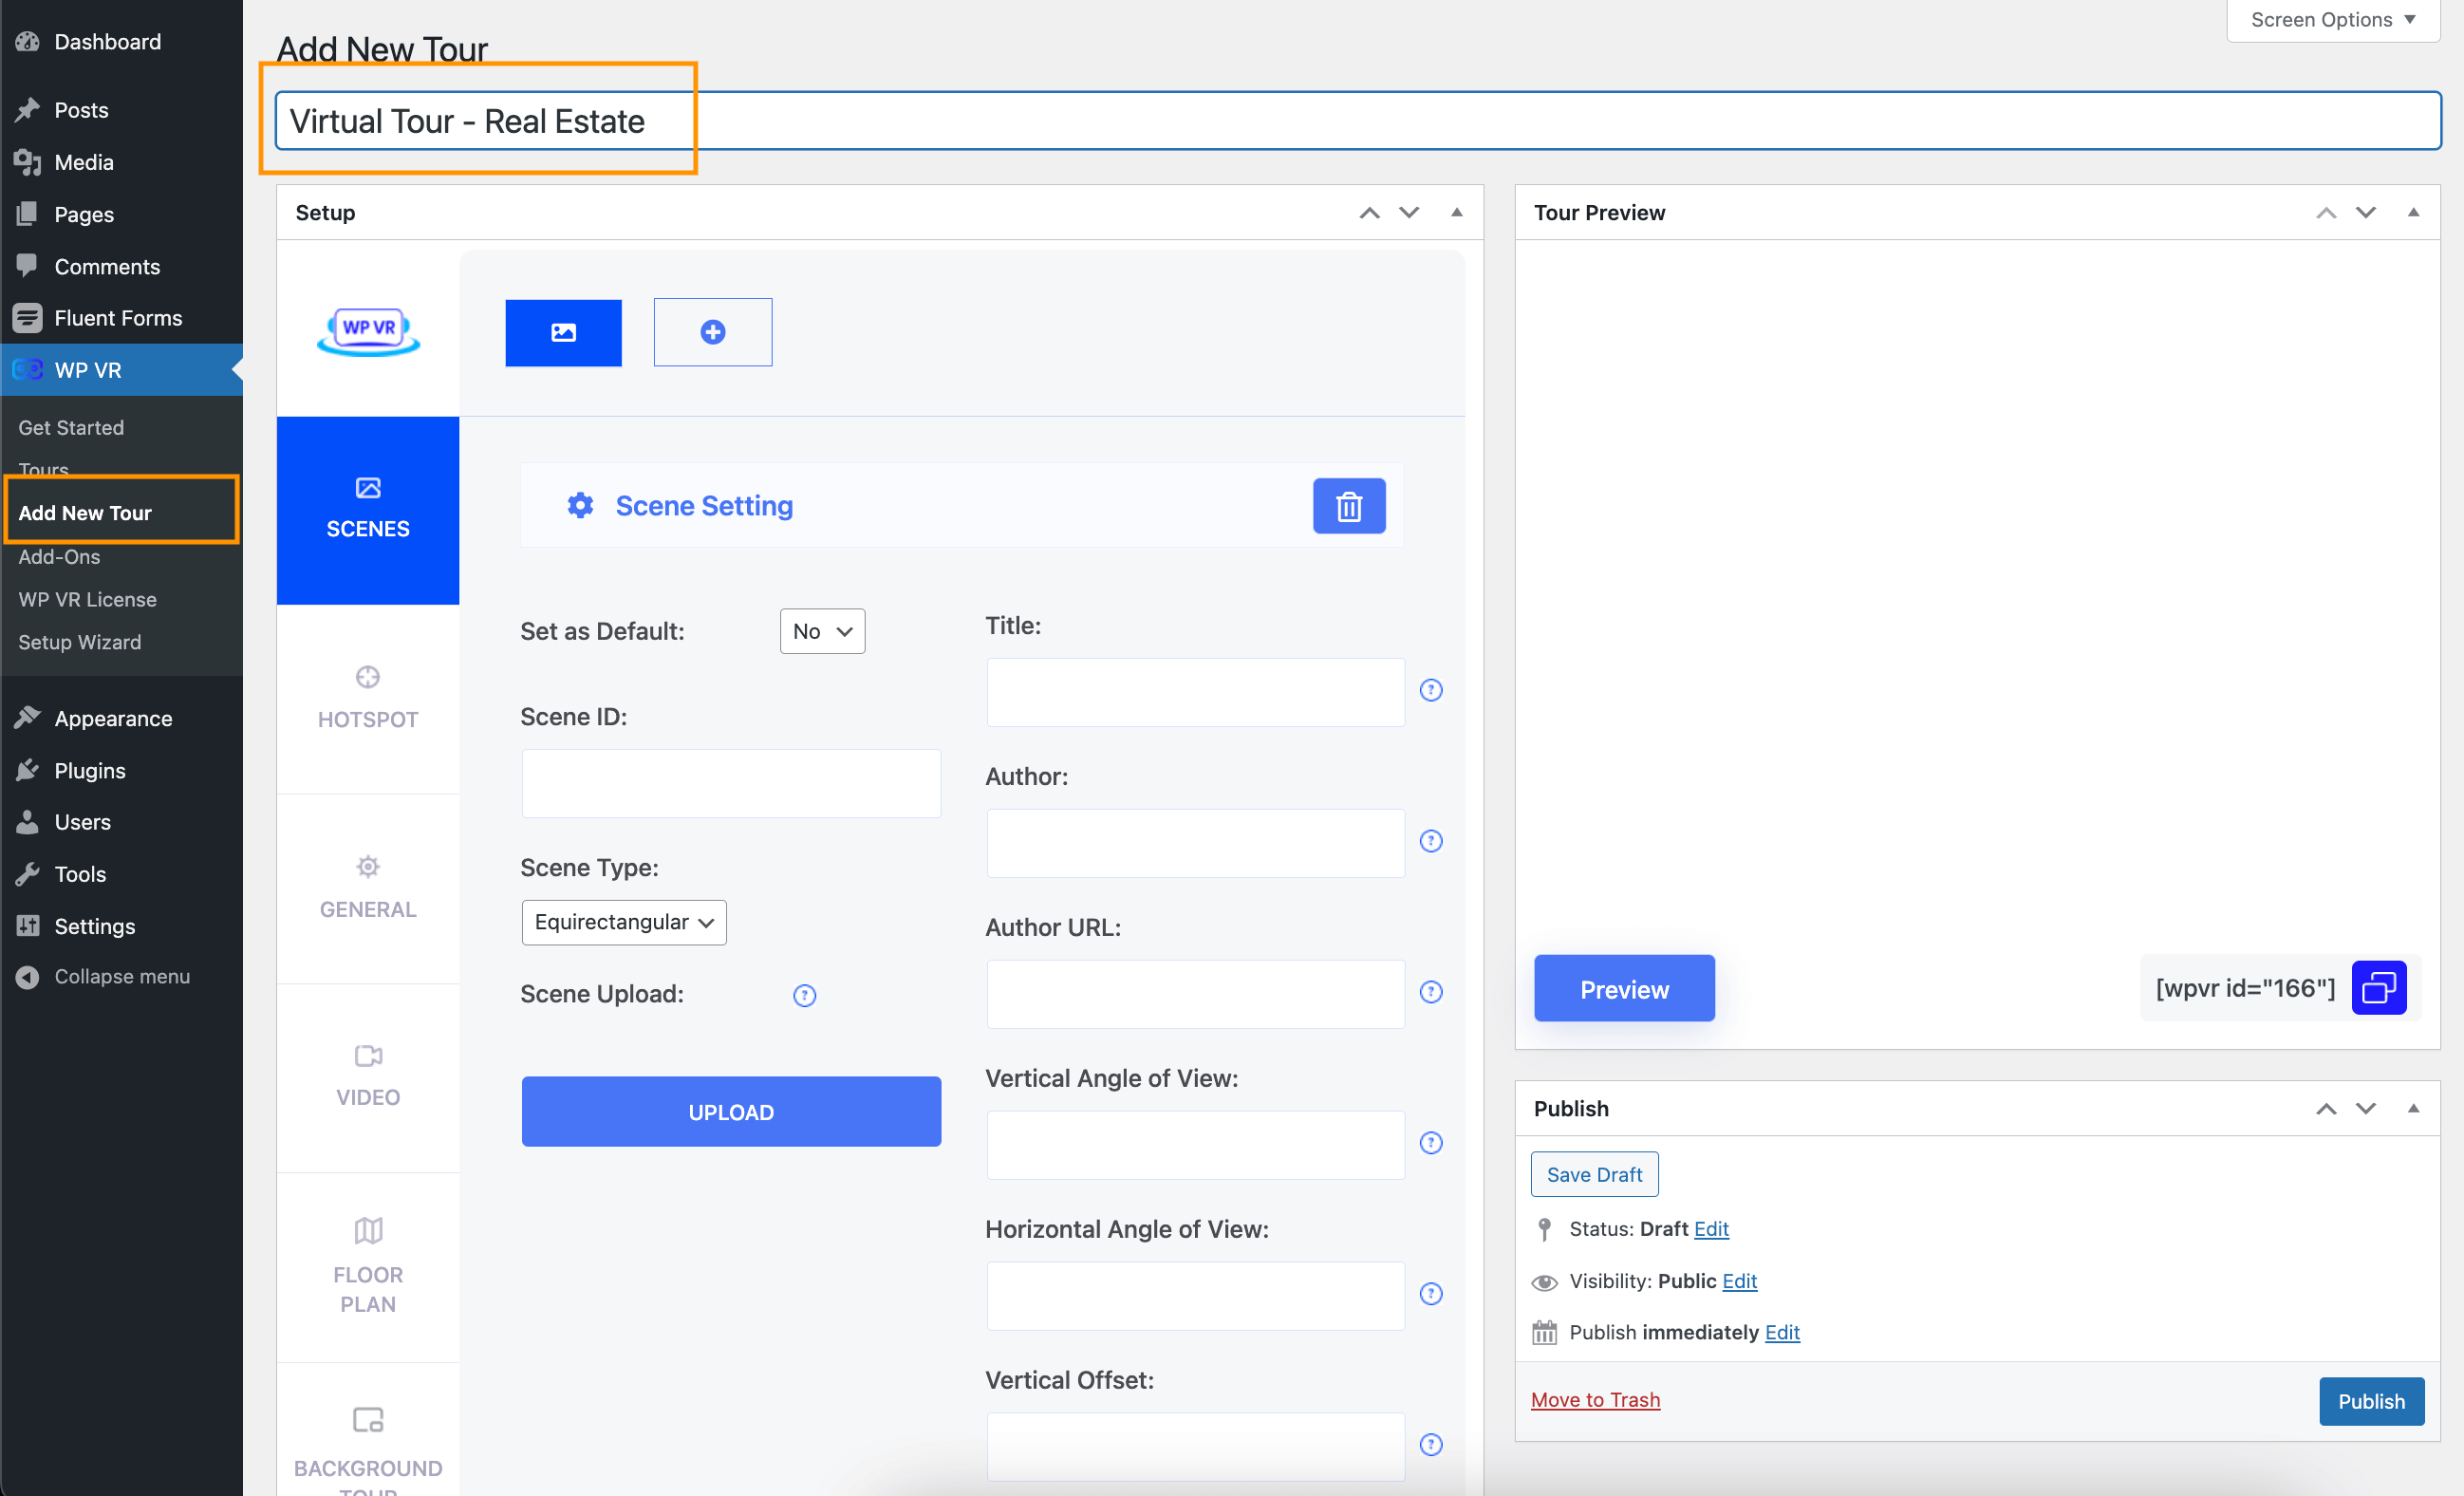
iii. Click on the Scenes tab.
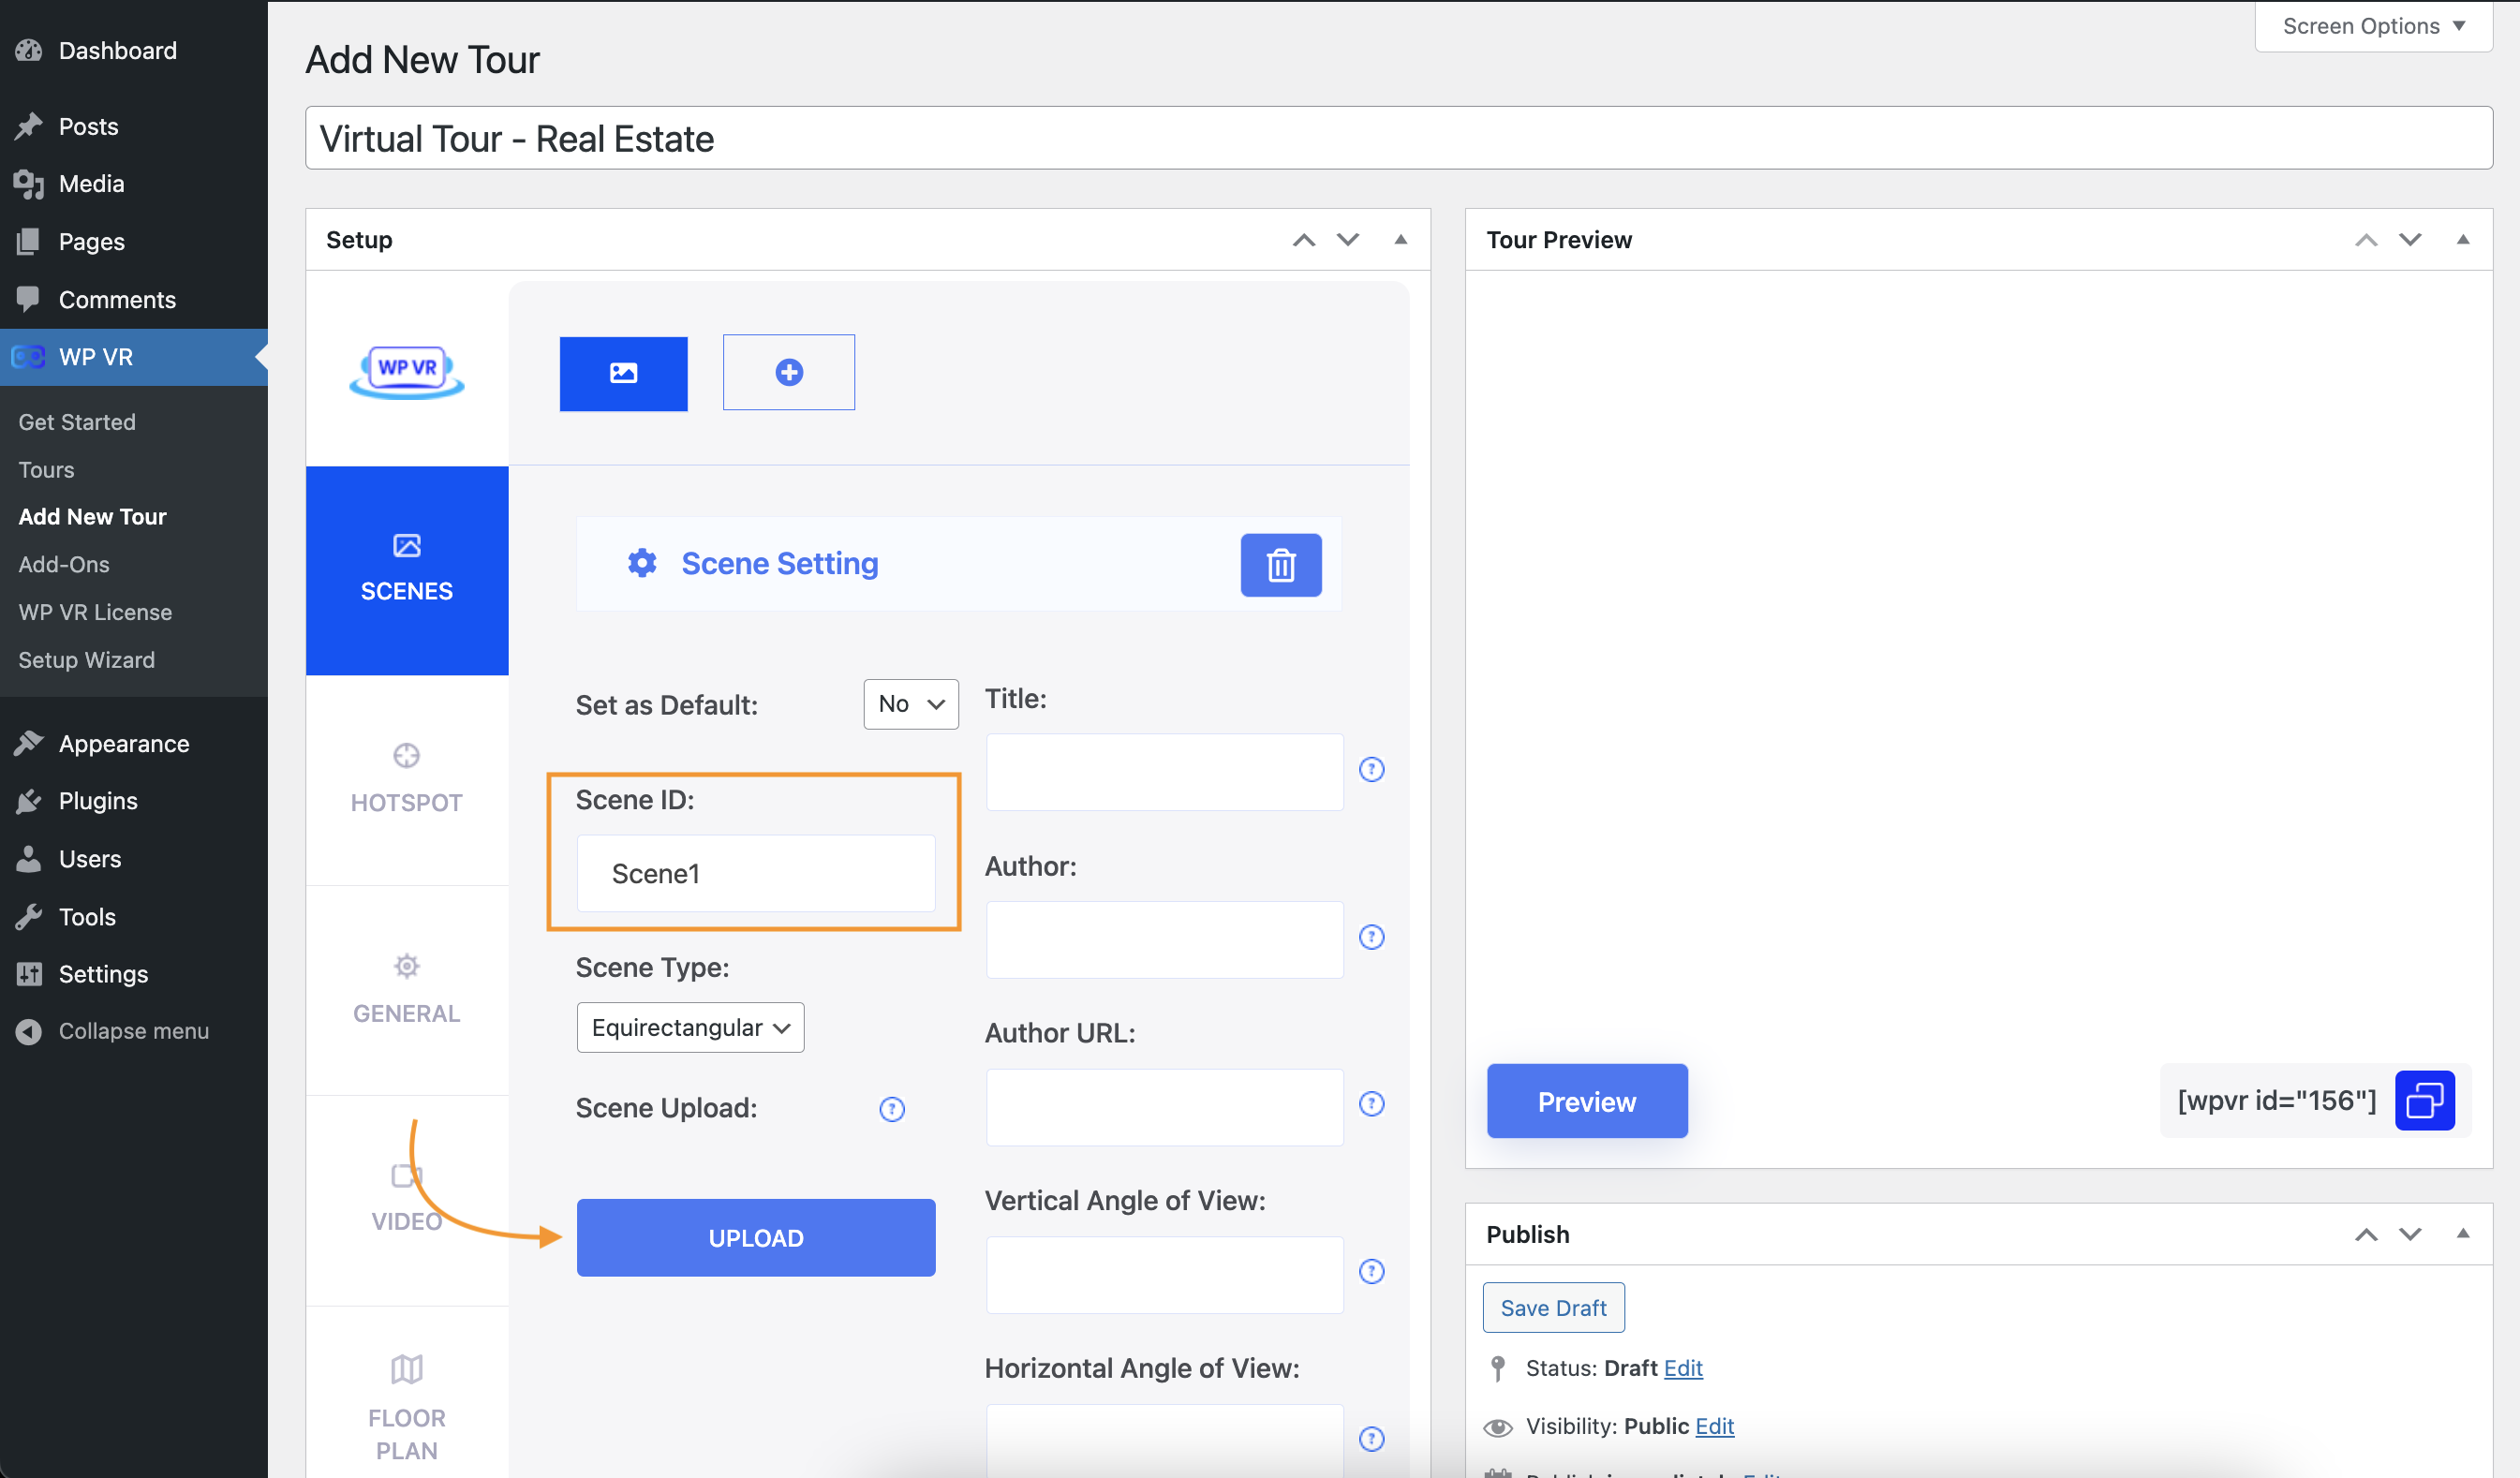
Here, you can upload your 360 panoramas one by one, and each one will be considered one scene.
But before you upload the images, follow the next two steps first.
iv. Set the first scene as default.
Click the Set as Default option and choose Yes. It means that this scene will be the 1st scene of the tour.
(You may choose another scene as default when you upload more images.)
v. Assign a Scene ID to your scene.
Each scene should contain a unique Scene ID.
vi. Click on the Upload button to upload a 360-degree image.
You can manually upload an image or choose from your media folder.
Similarly, you may add more scenes by clicking on the “+” icon on top and then uploading images for them.
Here, I’ve added 4 scenes with different panoramic images.
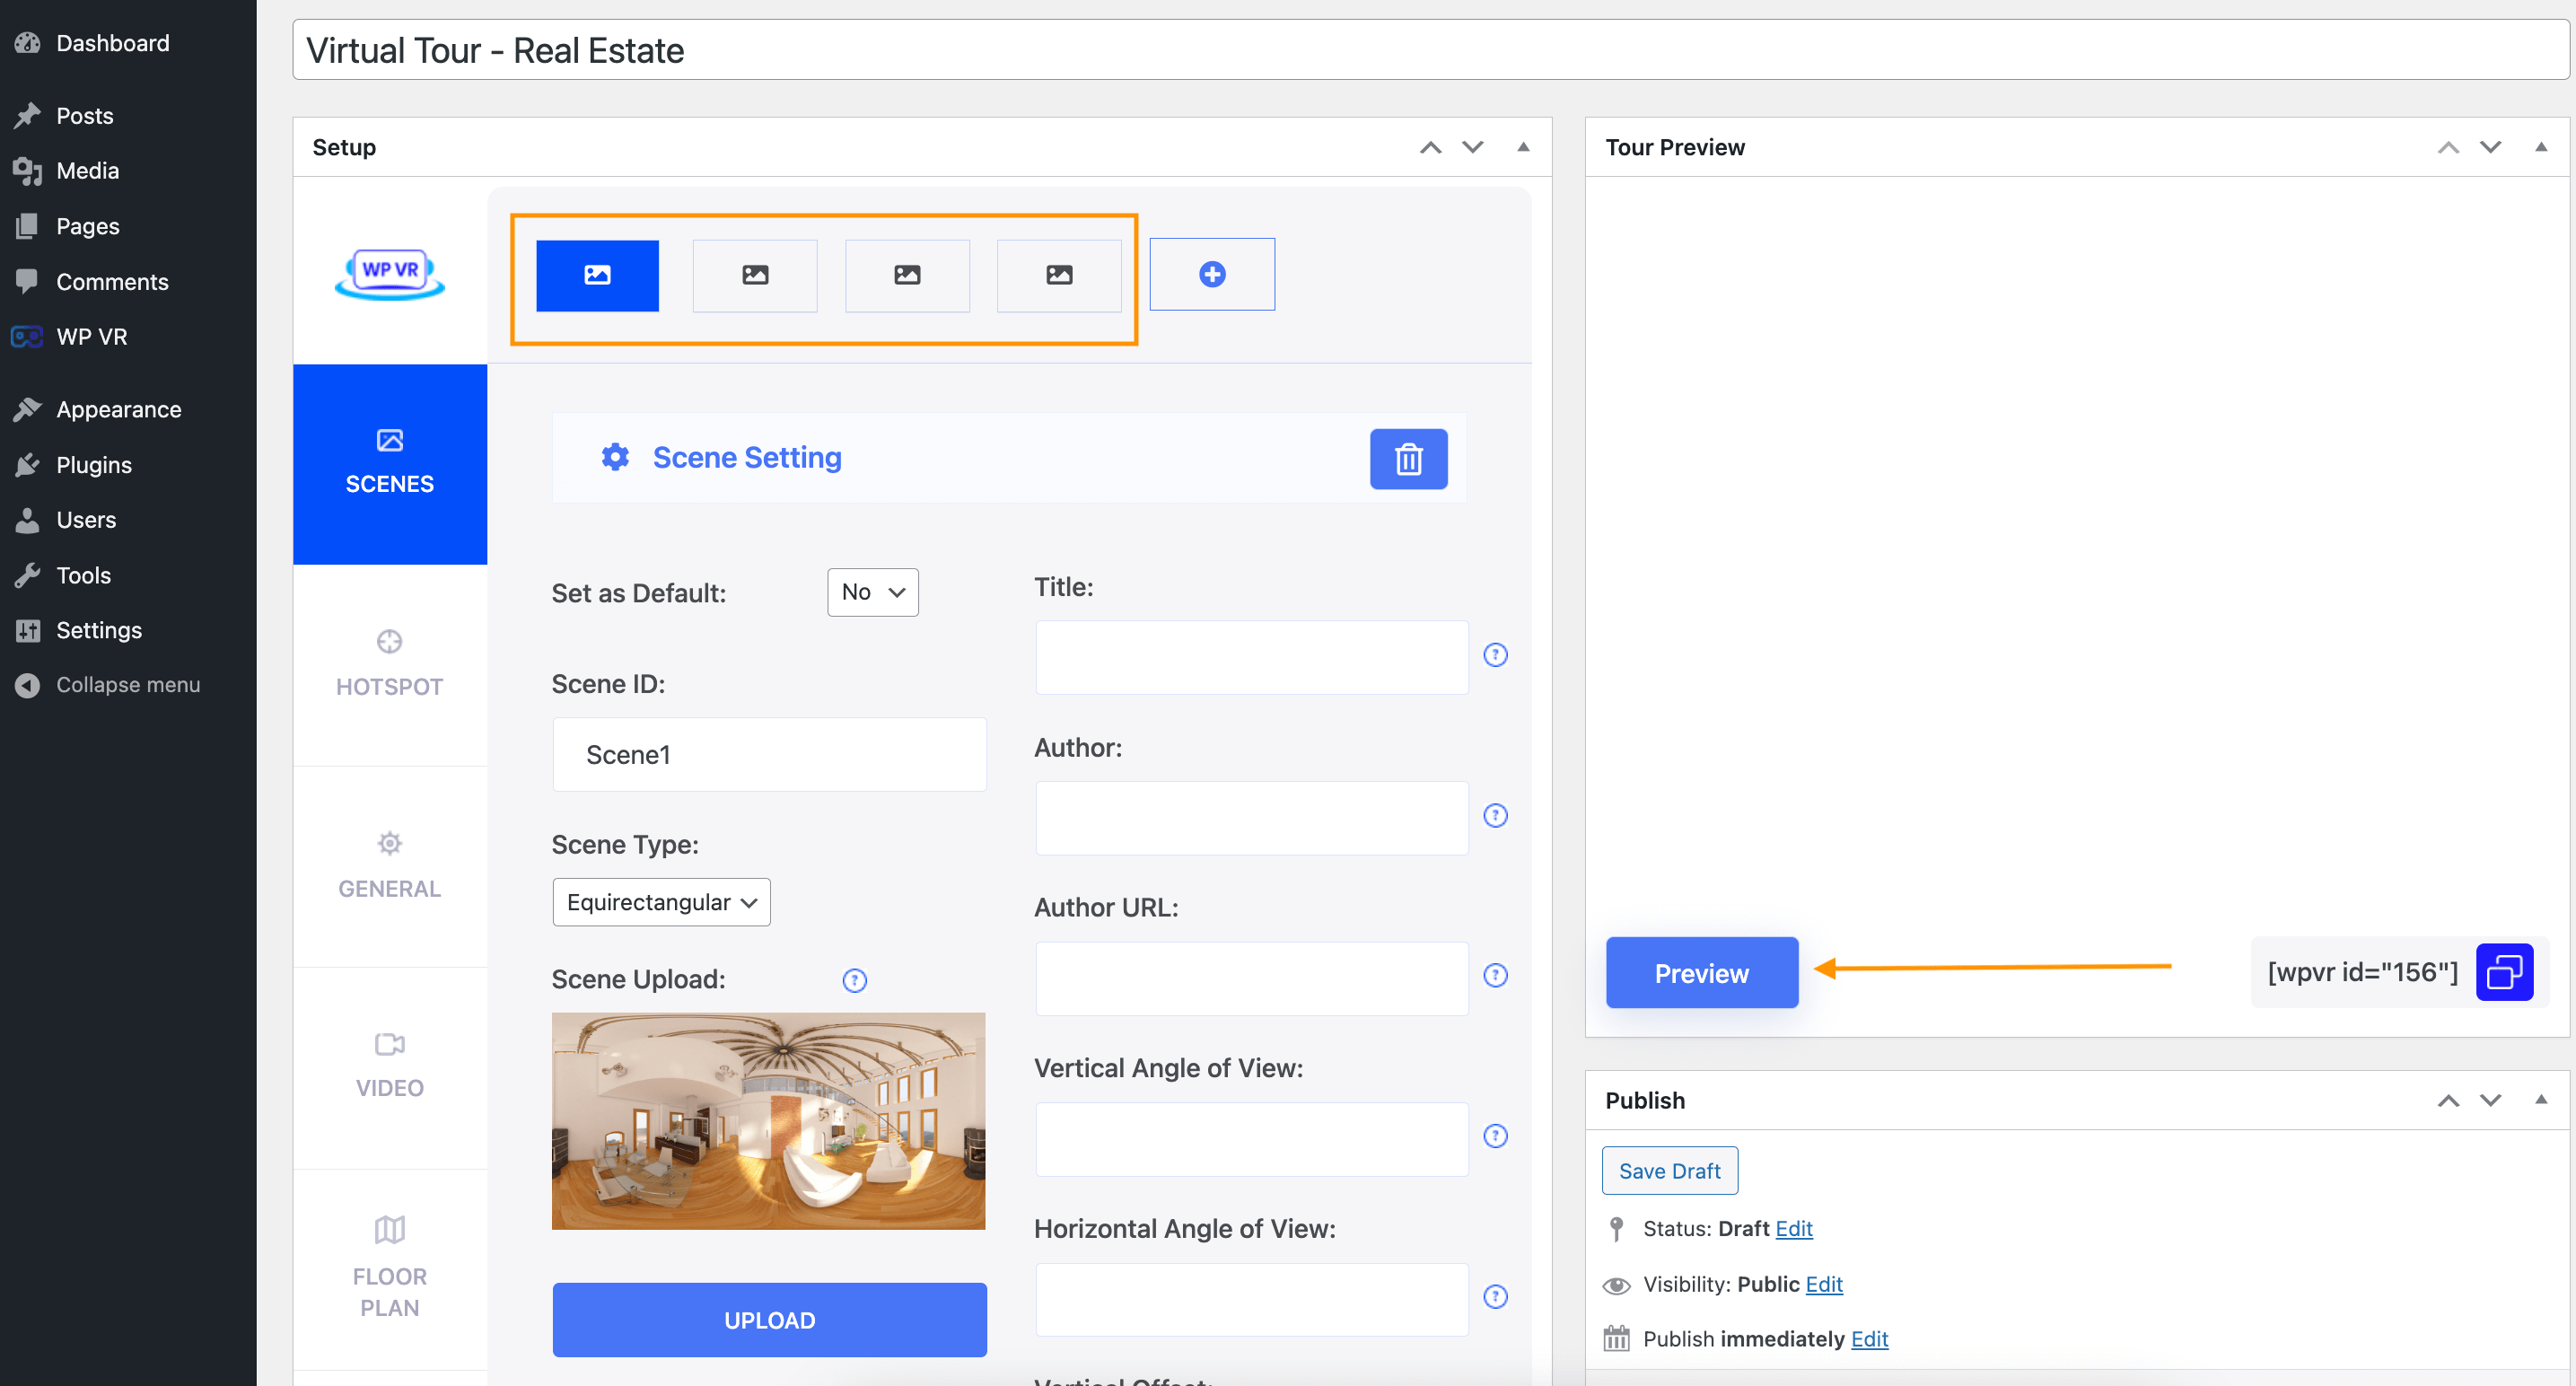
After uploading, each scene will have a thumbnail of it under the Scene Upload section.
vii. Click on the Preview button.
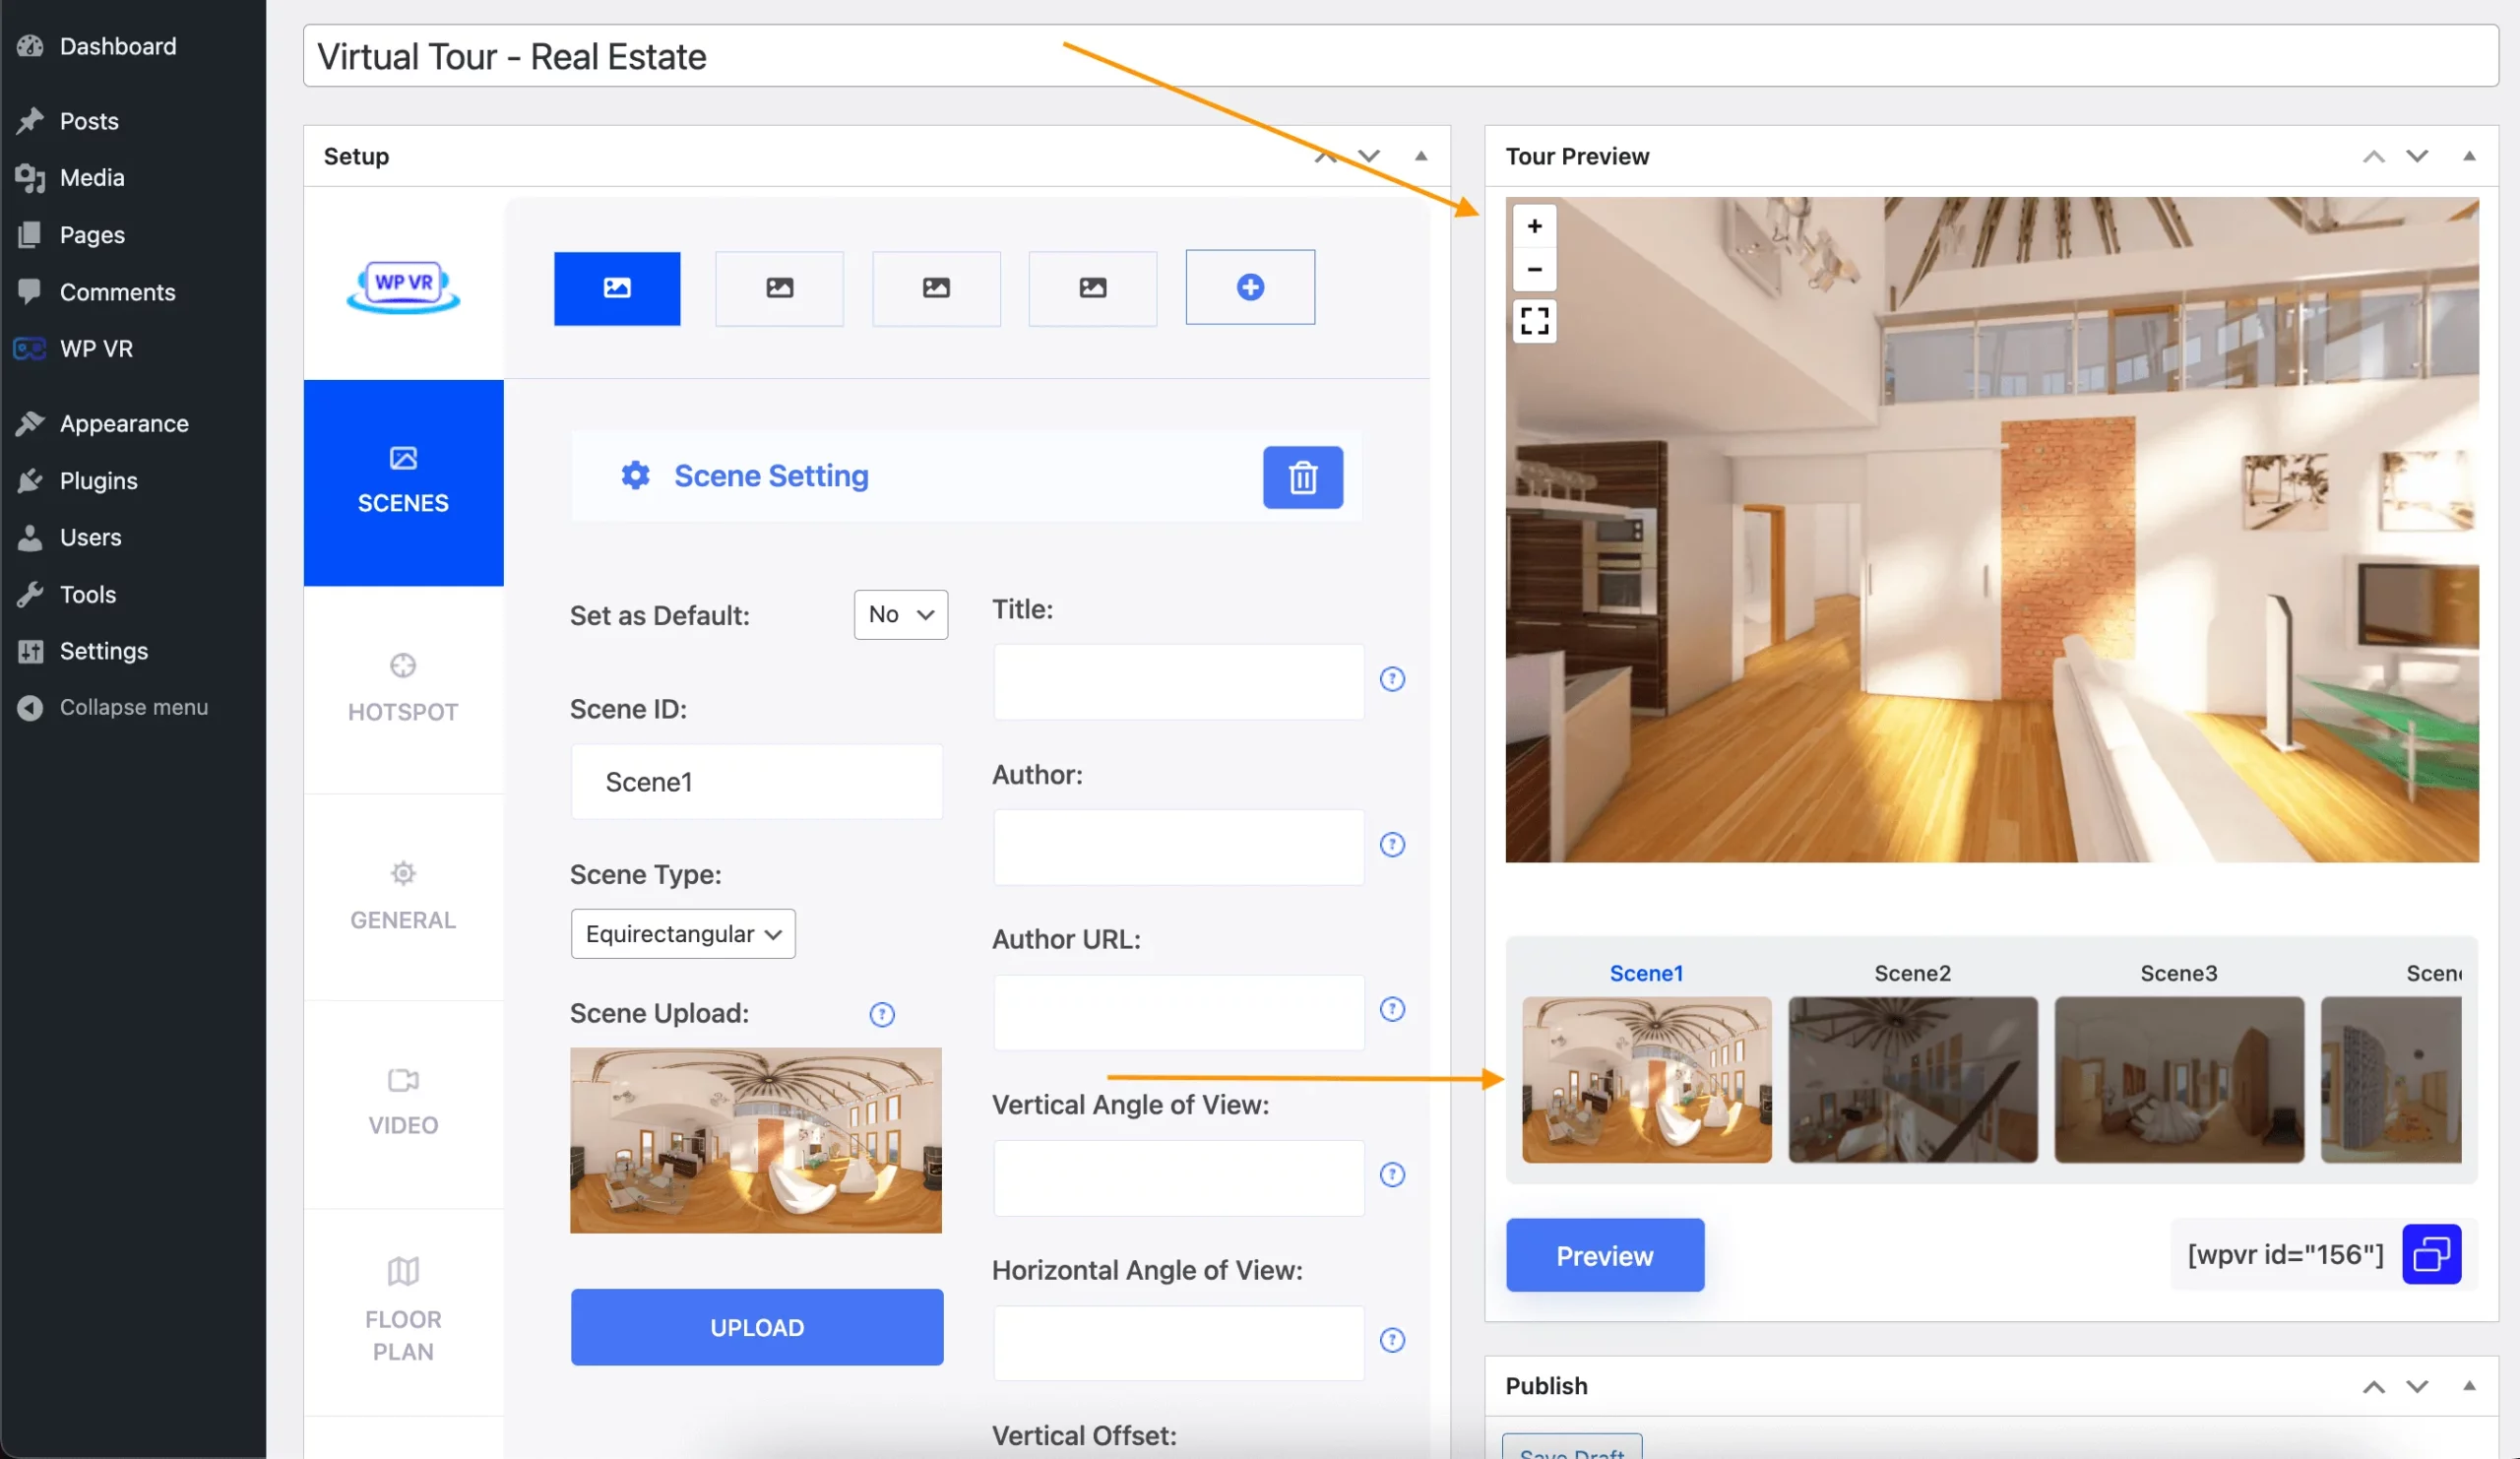
You’ll see a live preview of your virtual tour in the Tour Preview section on the right side.
You can add up to 5 scenes on each virtual tour on the free plugin. (With WPVR Pro, you can add Unlimited Scenes on a virtual tour.)
Your scenes are uploaded, but now, you can only view the 1st scene. To be able to view the others, you need to add hotspots that people can click to go to other scenes.
2. Connect Your Scenes Into A Virtual Walkthrough Using Hotspots
Suppose you uploaded 4 scenes. Now, we will see how you can add the option for visitors to move between multiple scenes of your real estate virtual tour.
i. While on Scene 1, Click on the hotspots tab
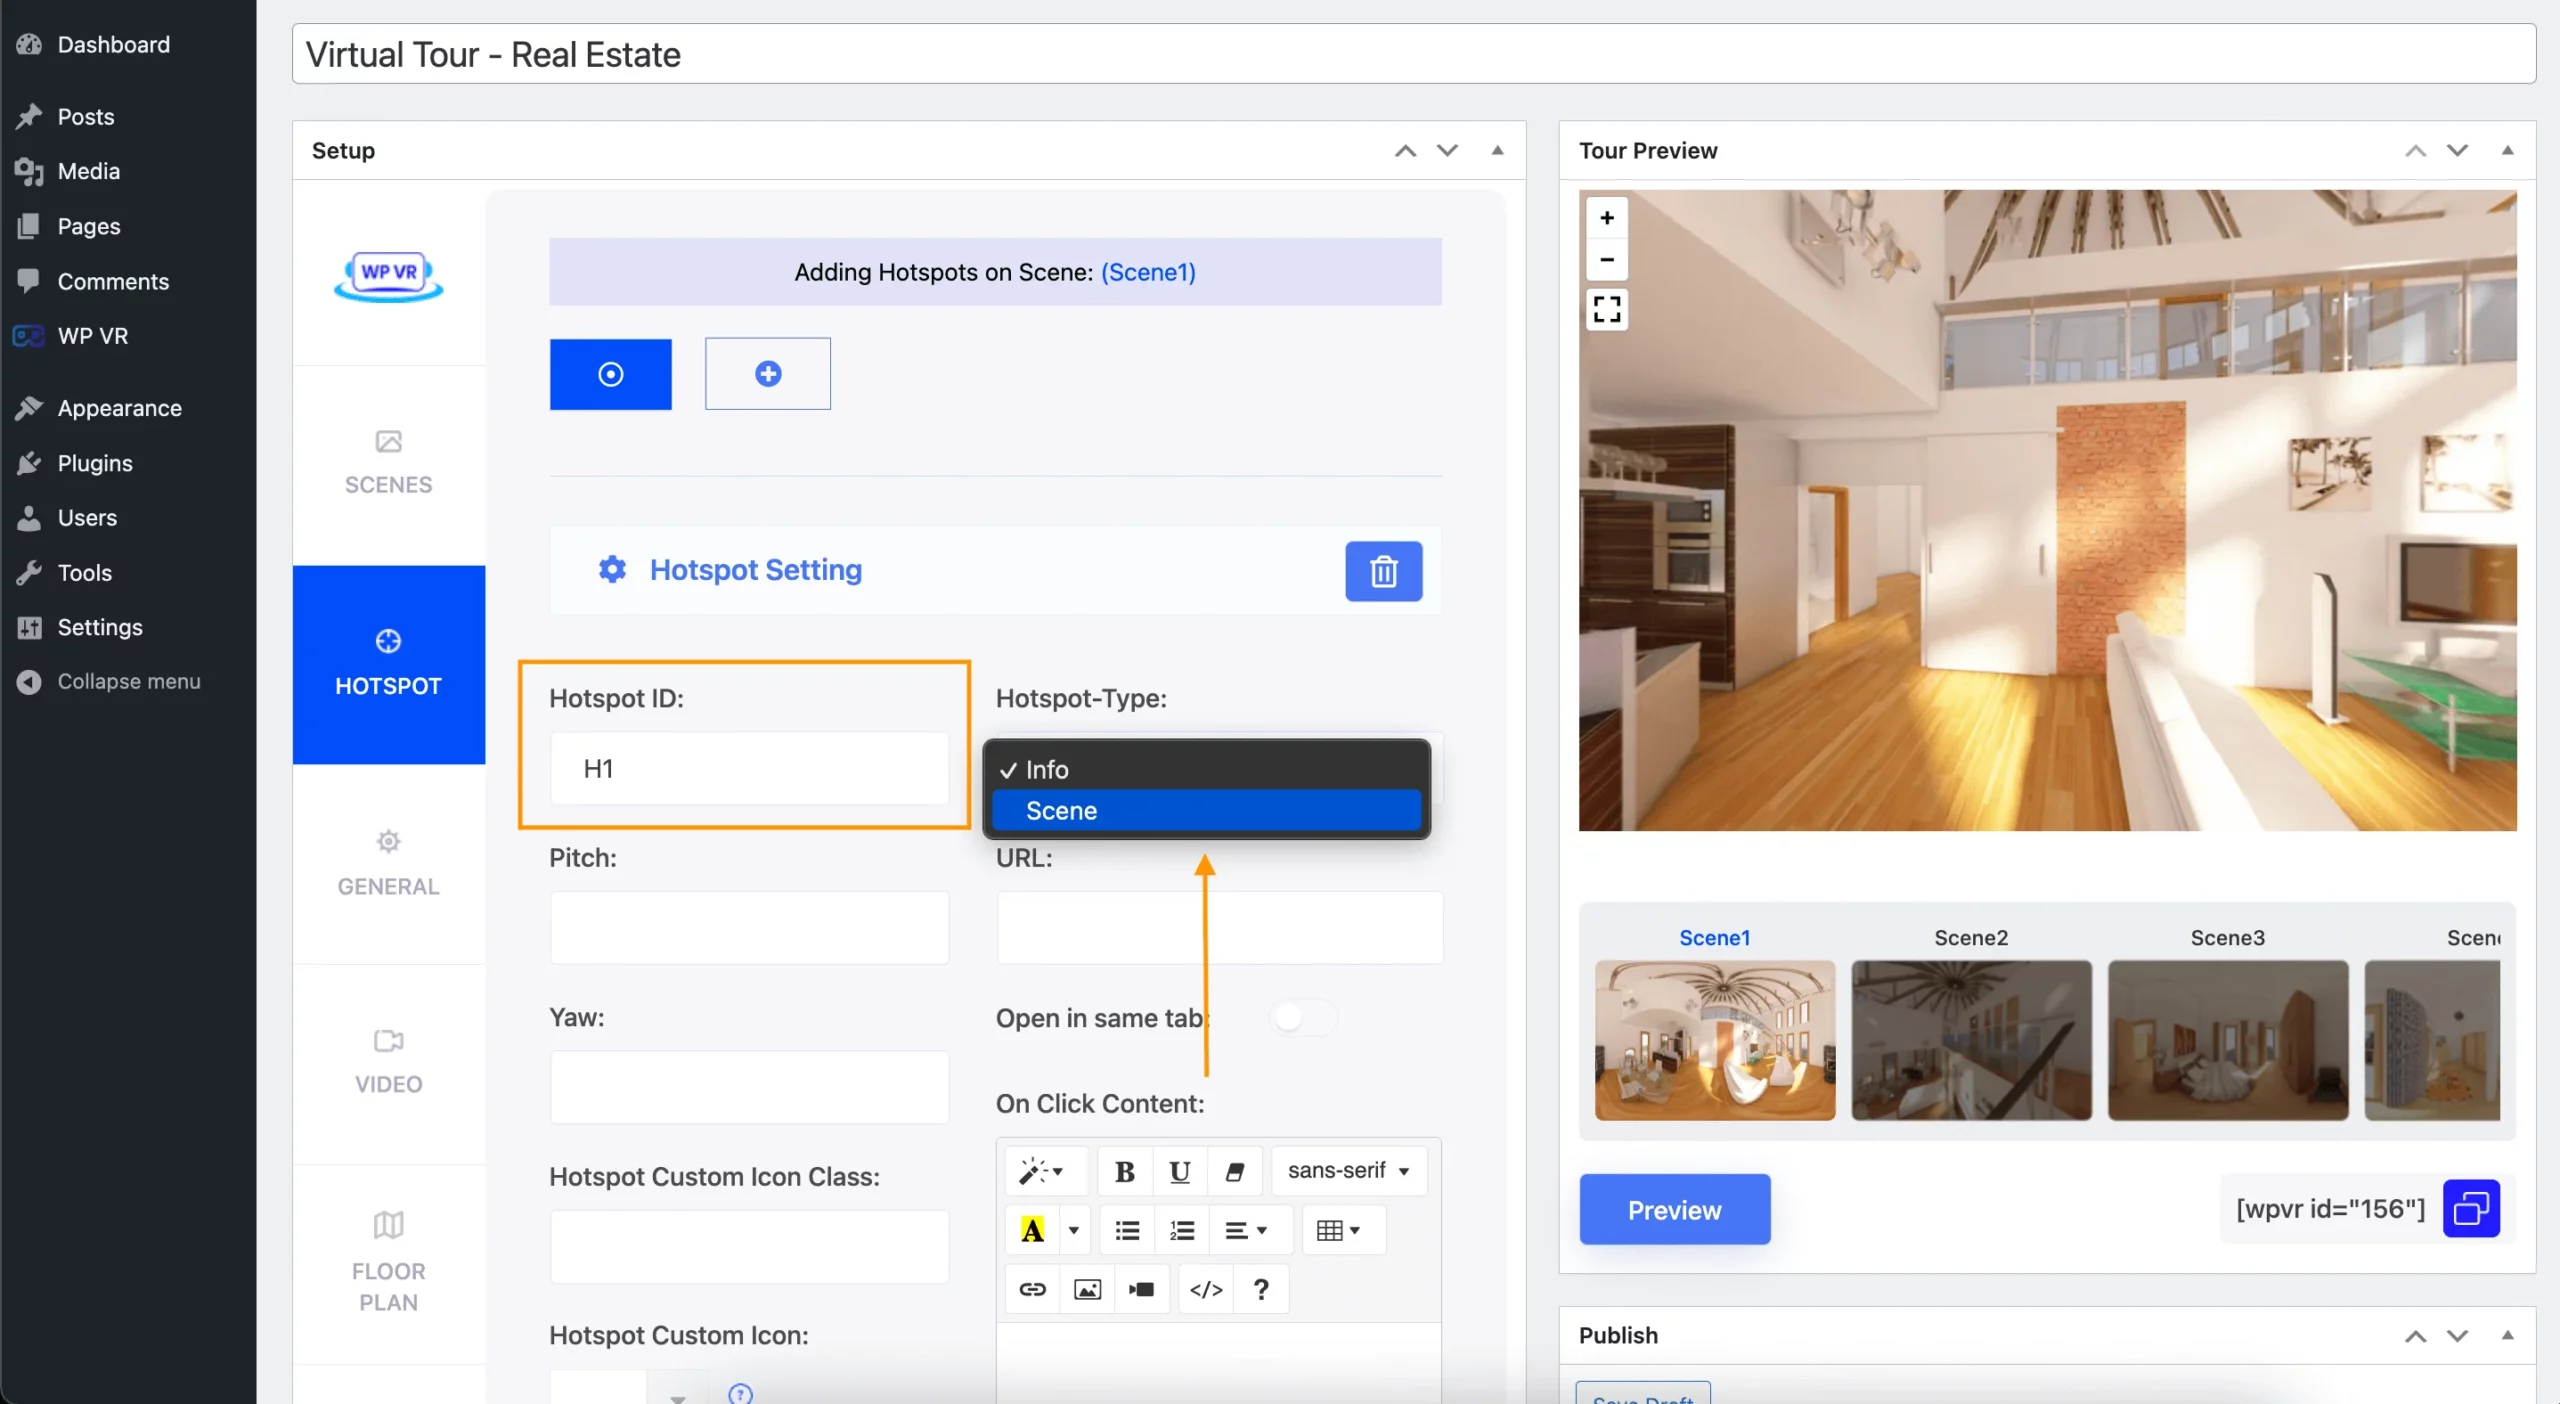
ii. Here, set a unique hotspot ID.
iii. Change the hotspot type to Scene
iv. On the preview on the right, click on the spot you want to place the hotspot.
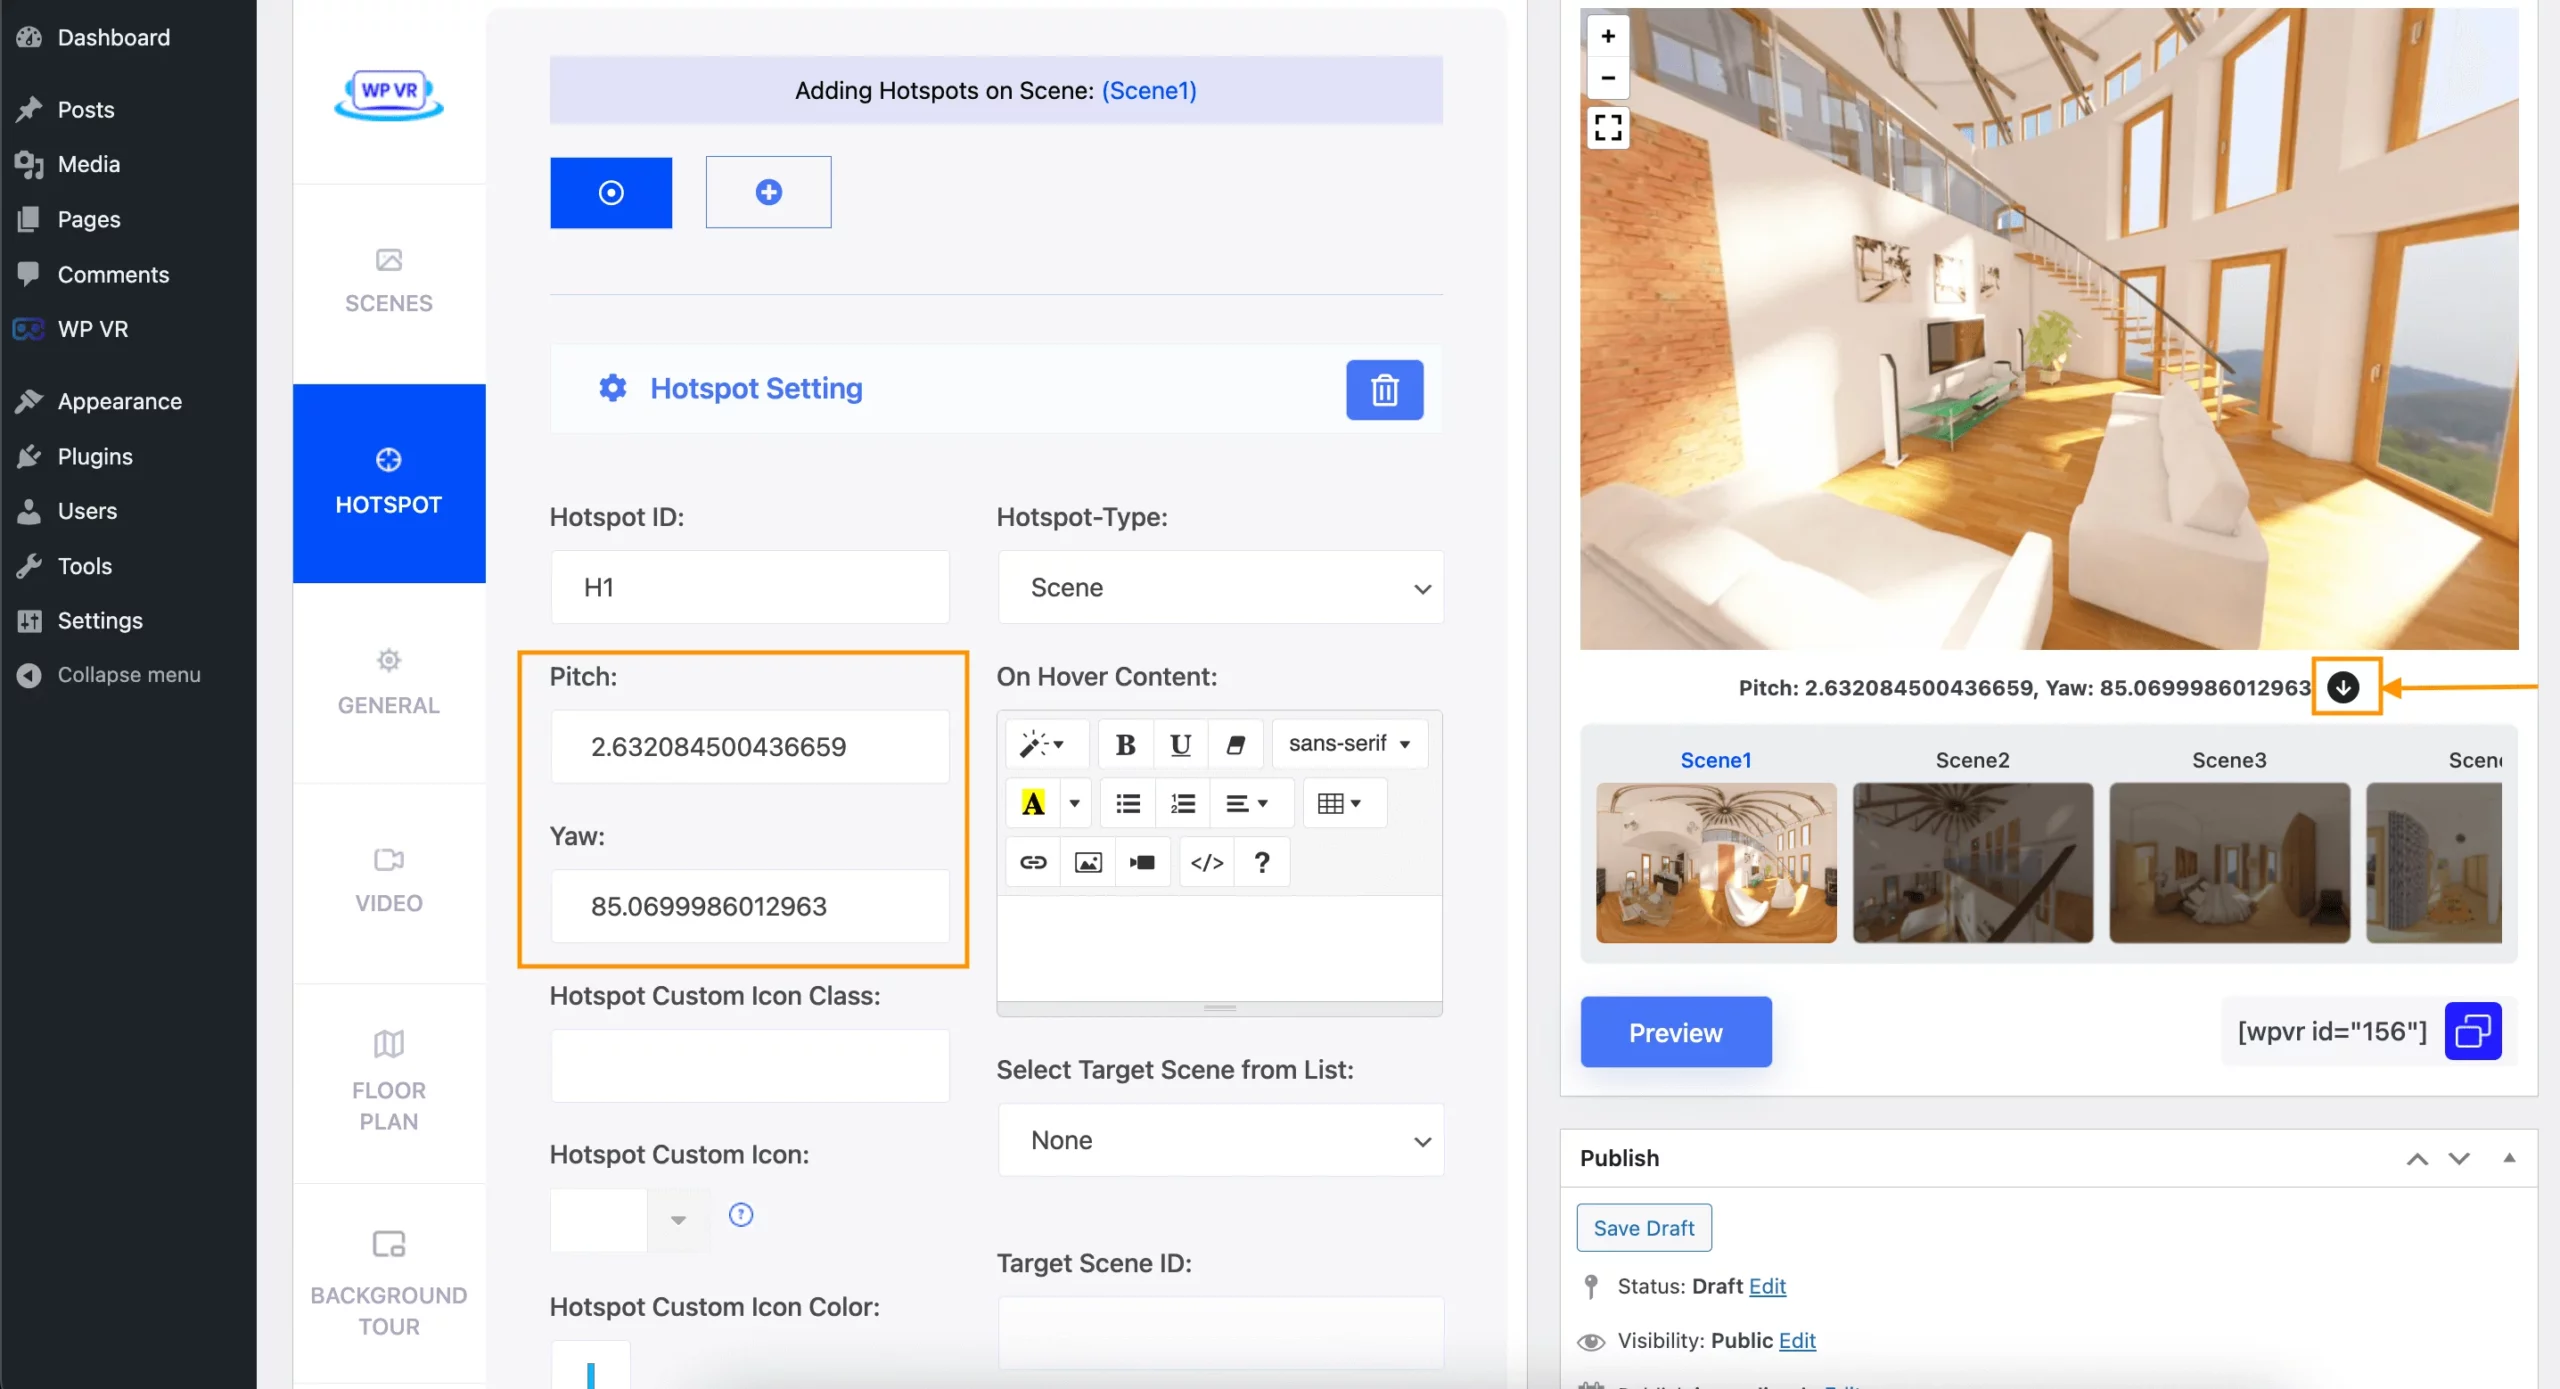
When you click, some coordinates will appear called ‘Pitch’ and ‘Yaw.’
Click on the “arrow-down” button to its right. It will add the coordinate values in the respective fields on the left.
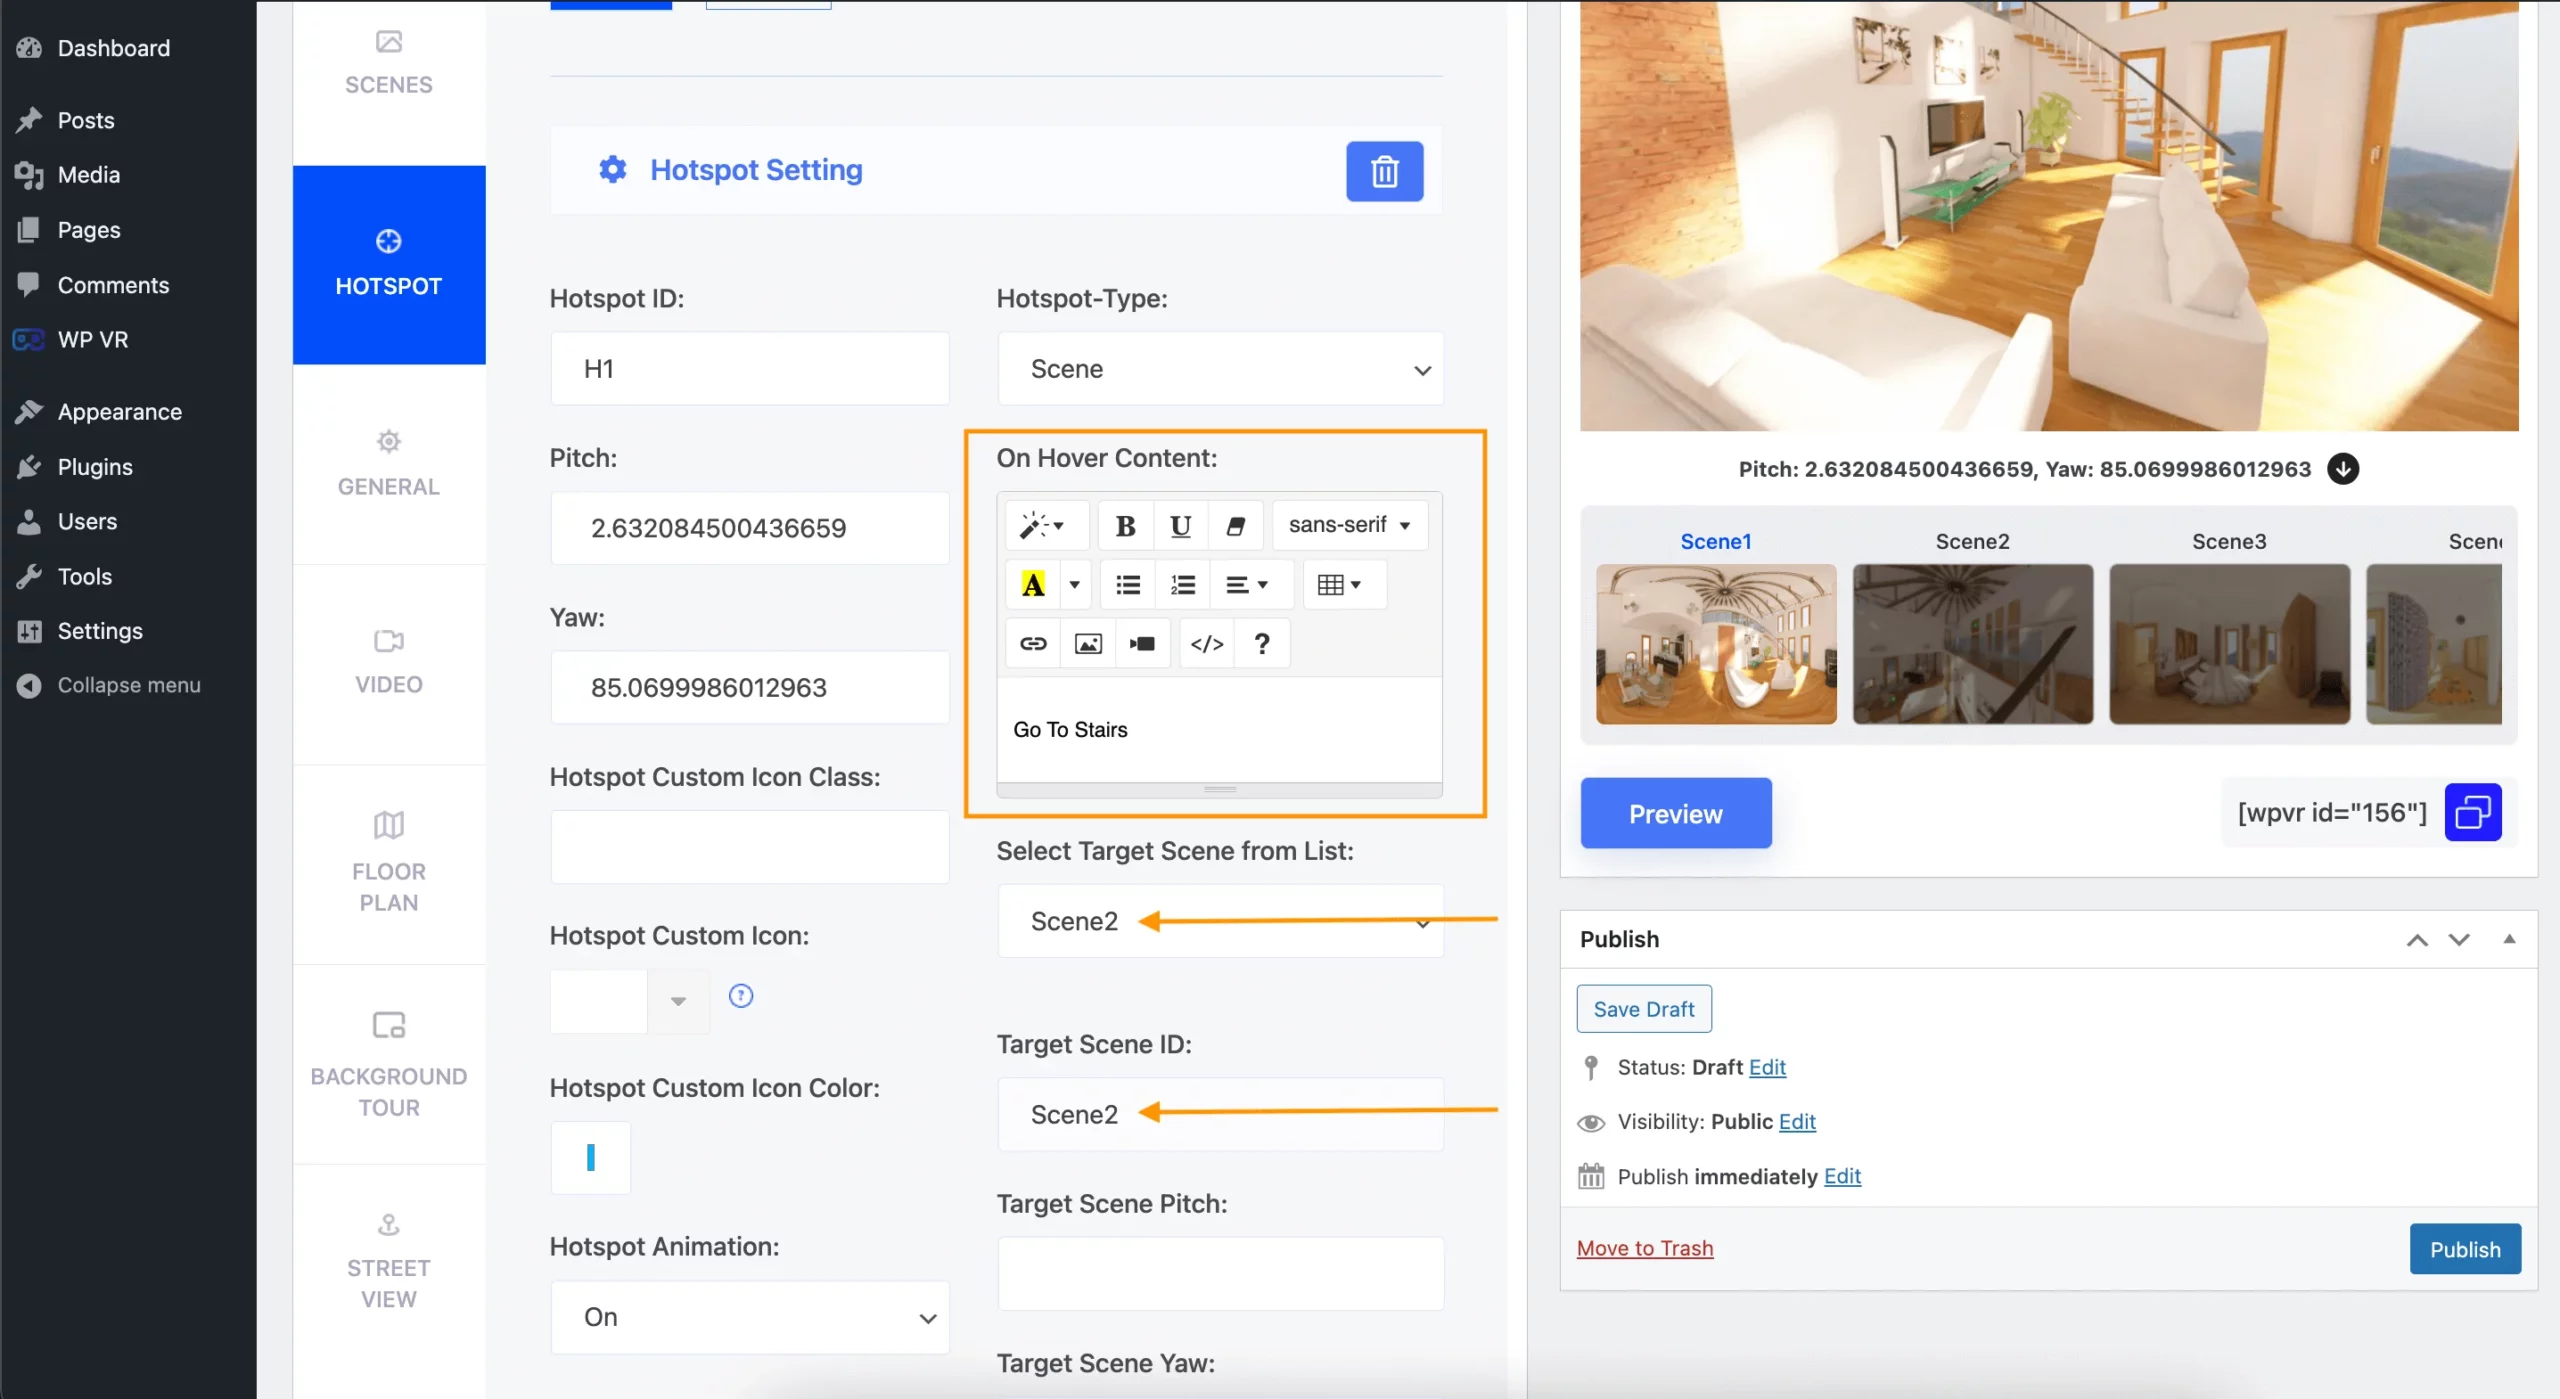
v. Add a short tooltip as on-hover content for this hotspot.
For example, if that hotspot leads to “Master Bedroom,” add it as on-hover text so that people know where they are going next.
vi. Under Select Target Scene from List, choose the Scene ID where you want your viewers to go by clicking on this hotspot.
Repeat the same for the rest of the scenes and you will have a complete real estate virtual tour ready. Now, people will be able to move from one scene to another.
**To add hotspots to other scenes, go to the scenes Tab and click on the scene window from the top to view its settings. Set this scene as default and click on preview. Then go to the Hotspots tab and add hotspots to that scene. After you have added hotspots to all the scenes, return to the 1st scene and set it as default.
3. Add Information In Your Tour
Now, your tour is set. Next, you can make this tour more interesting and engaging by adding more information.
i. Again, go to the scene in question, then go to the Hotspots tab.
ii. Here, choose the Scene type as “Info.”
iii. Then collect the Pitch and Yaw from the Preview to place the hotspot.
iv. Under the Scene Type, add content.
The On-hover Content will be displayed when someone hovers over the hotspot icon.
The On-click Content will be displayed on a pop-up within the virtual tour when someone clicks on the hotspot icon.
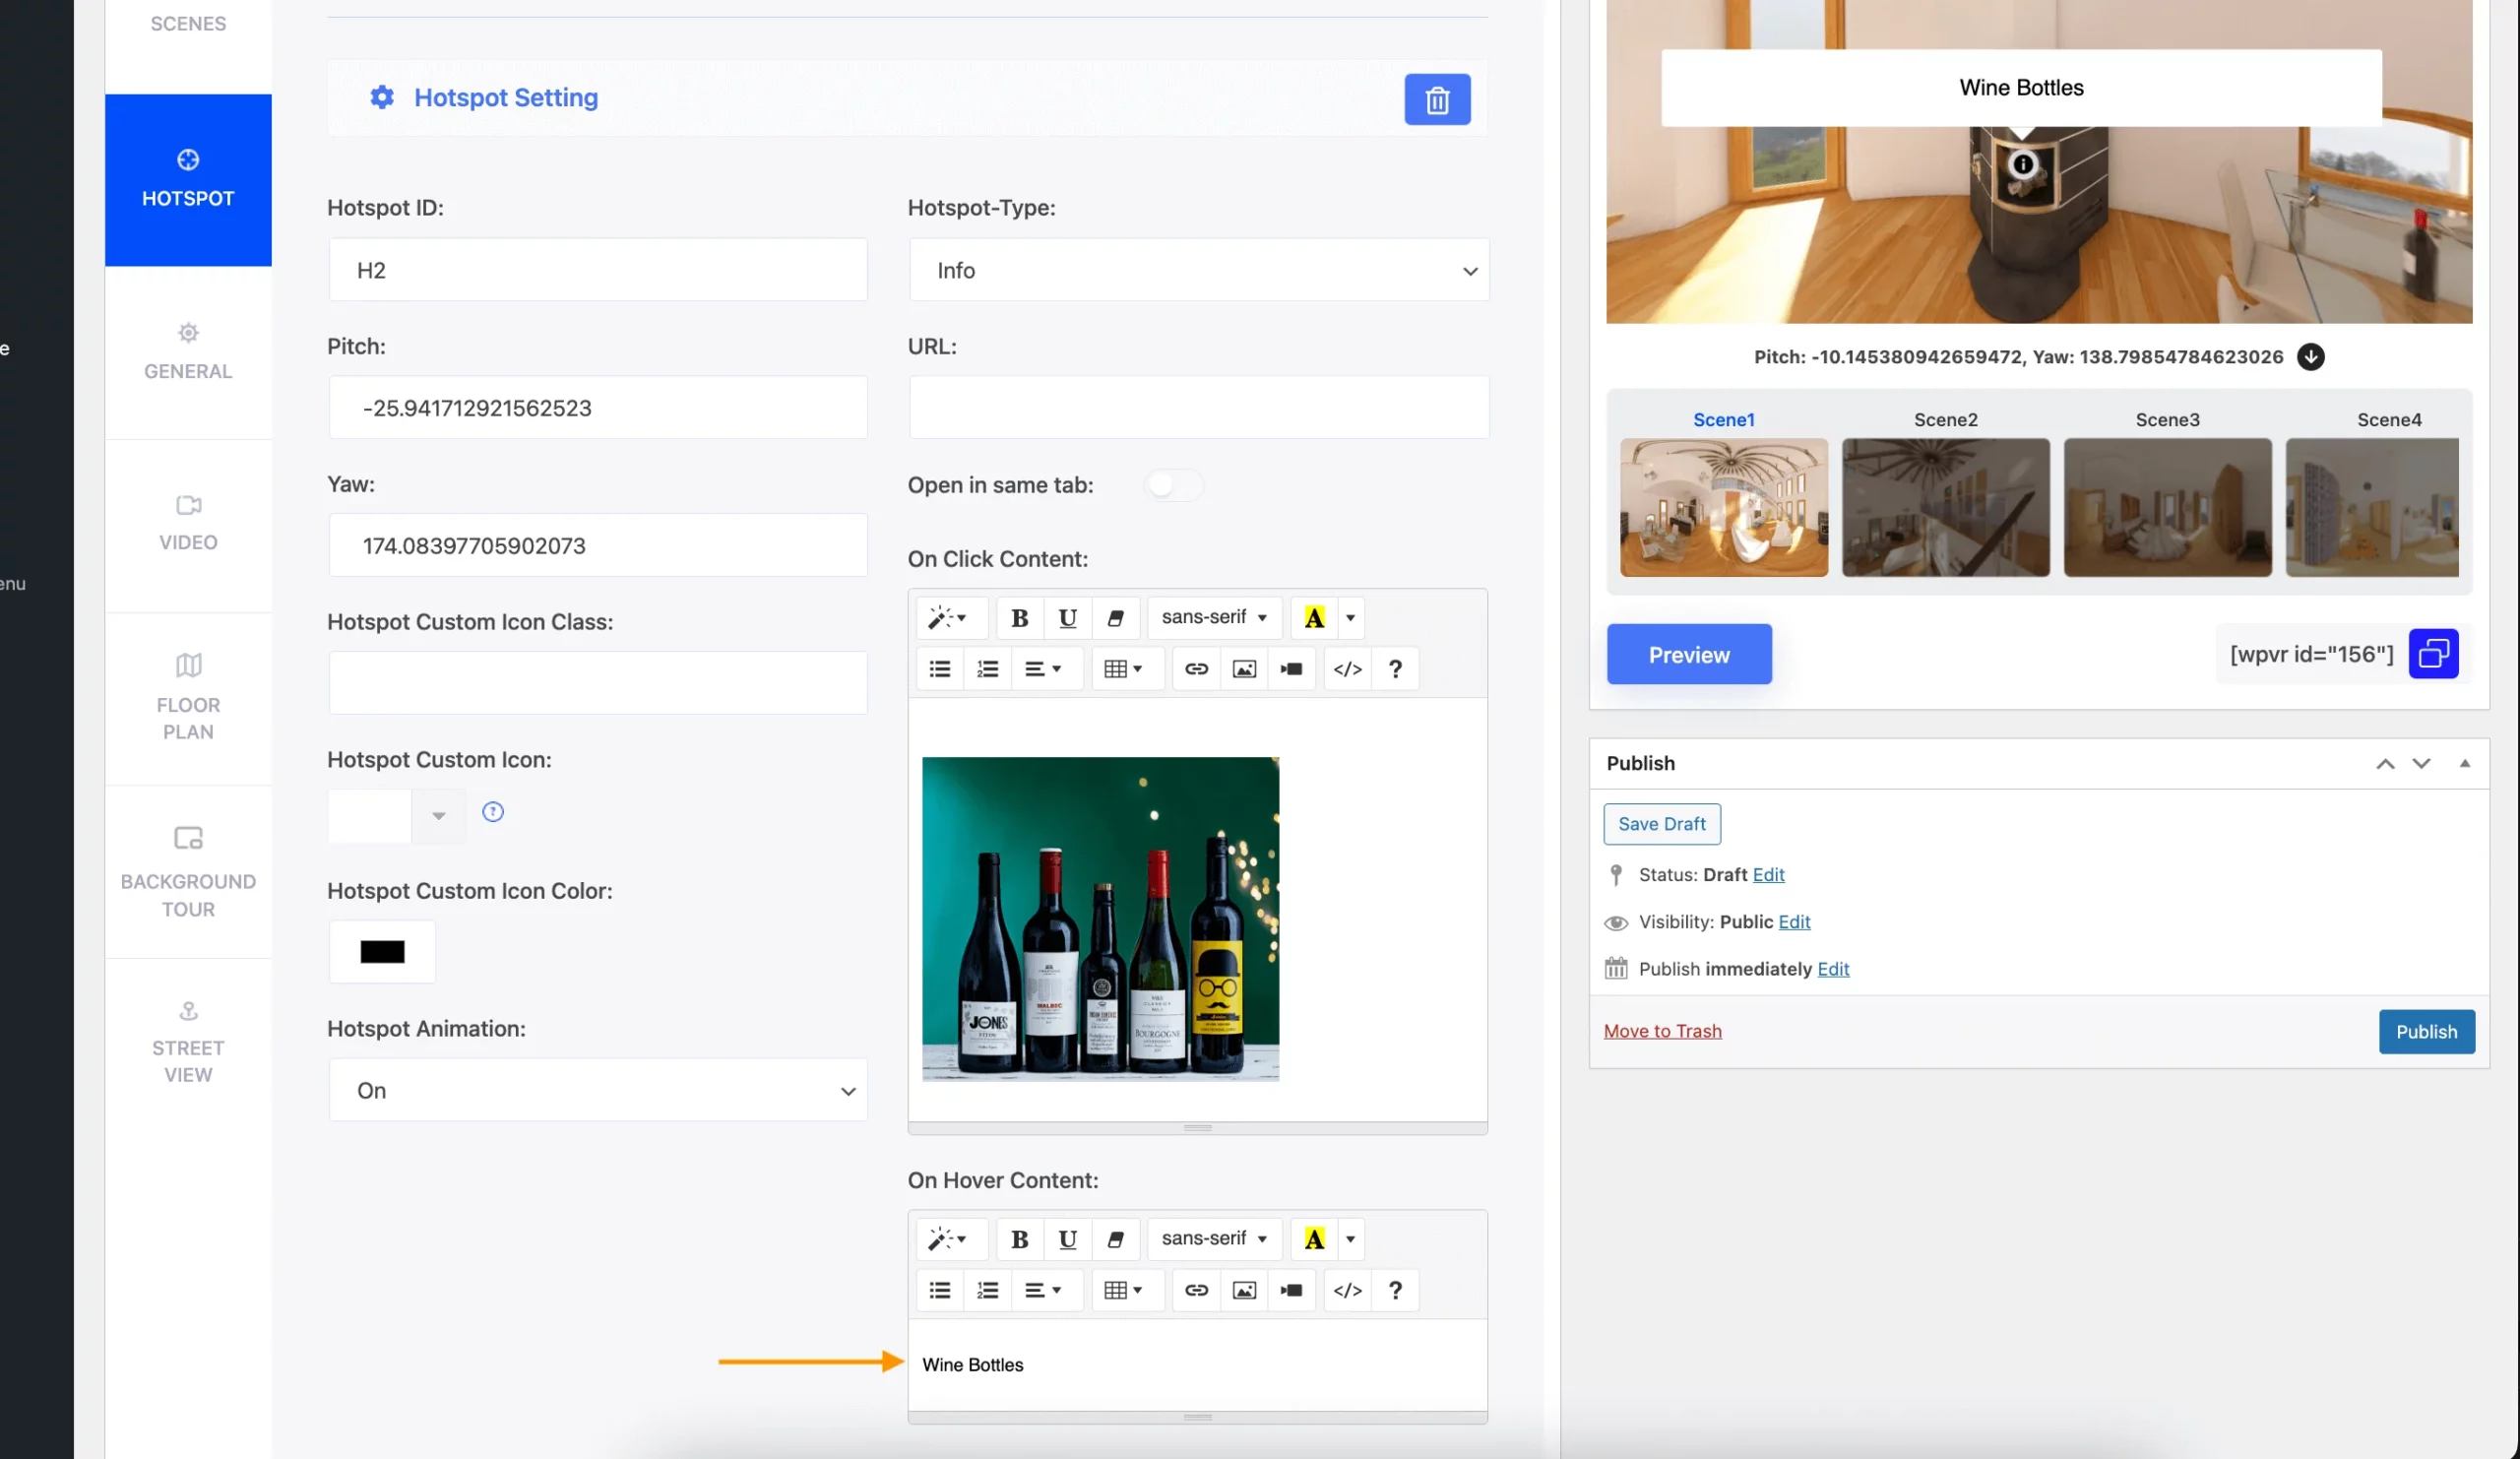
In the On-Click Content, you will be able to add content using a WYSIWYG editor to show text, image, video, GIF, or audio.
You may even add shortcodes of booking forms or lead forms.
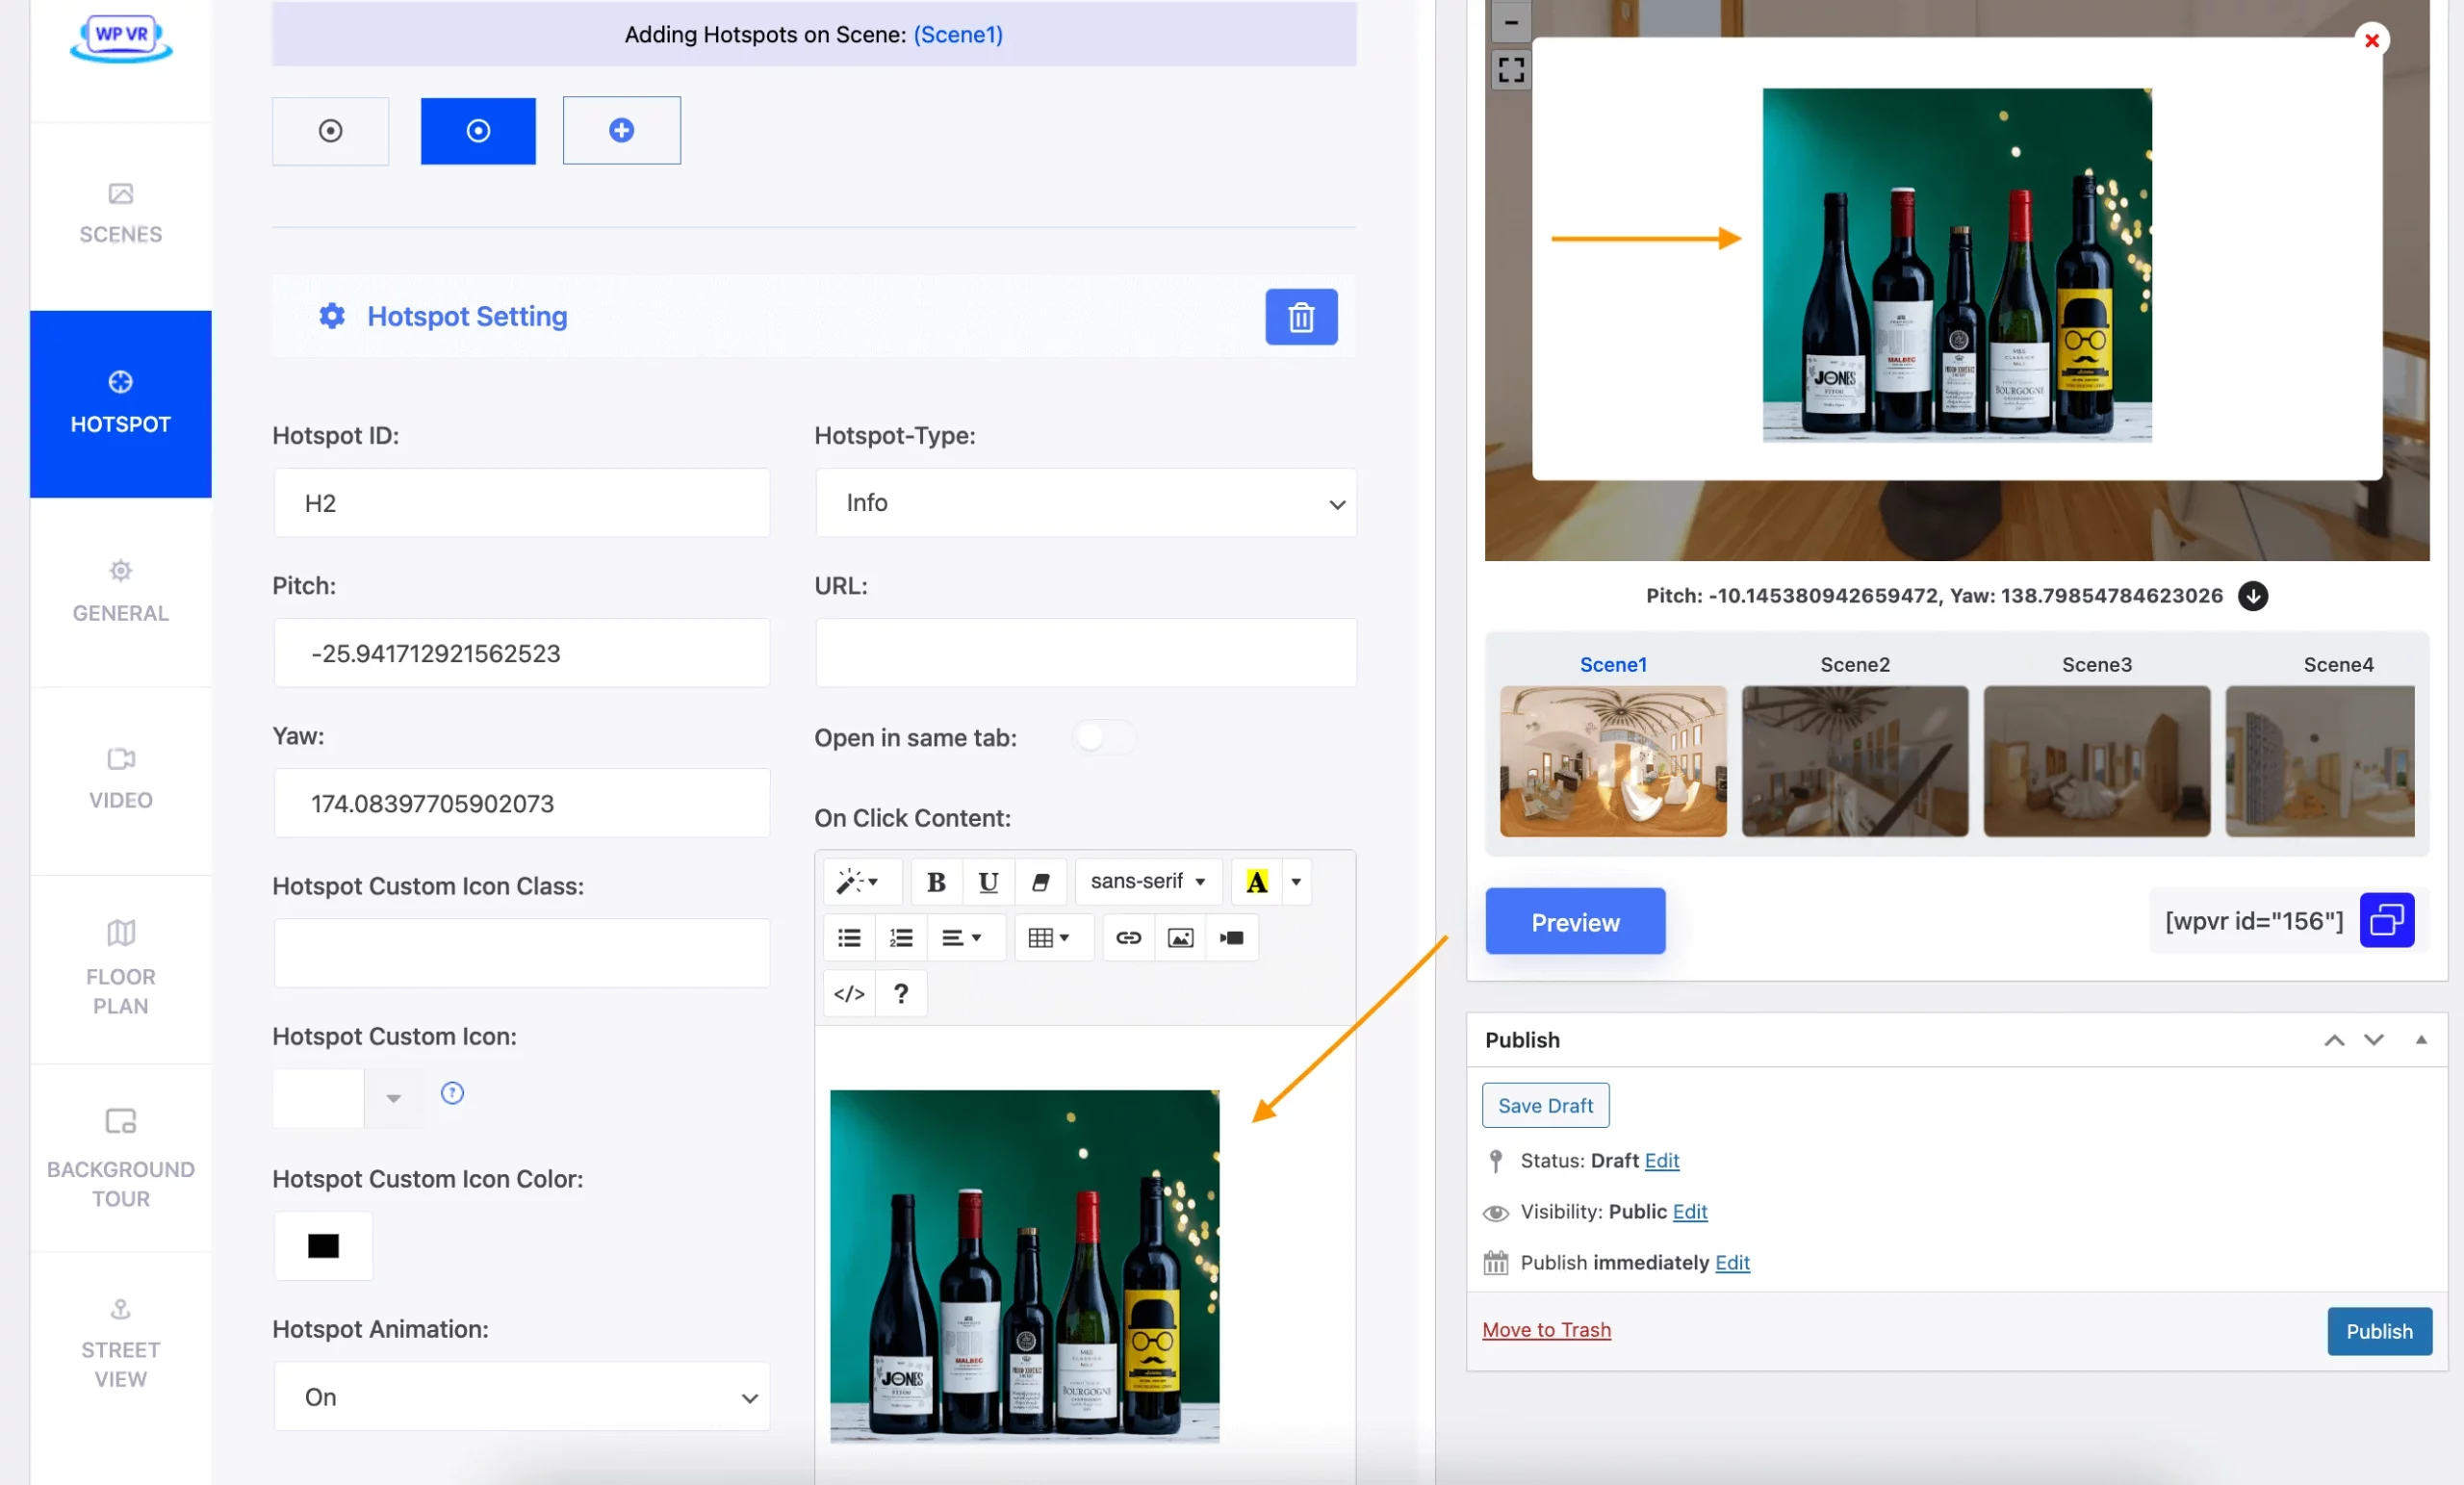
You can set images, videos, and GIF files here.
And on the URL field, you can add a URL of any website so that clicking on the hotspot will rather take them to that website. So, you could take them to more listings of the same category of houses in the desired location.
You can add up to 5 hotspots on each scene. With WPVR Pro, you can add Unlimited Hotspots to each scene.
4. Set Up The Basic Settings and Control Buttons
Go to the General tab.
Here you’ll find two options are enabled by default:
- Tour Autoload
- Basic Control Buttons
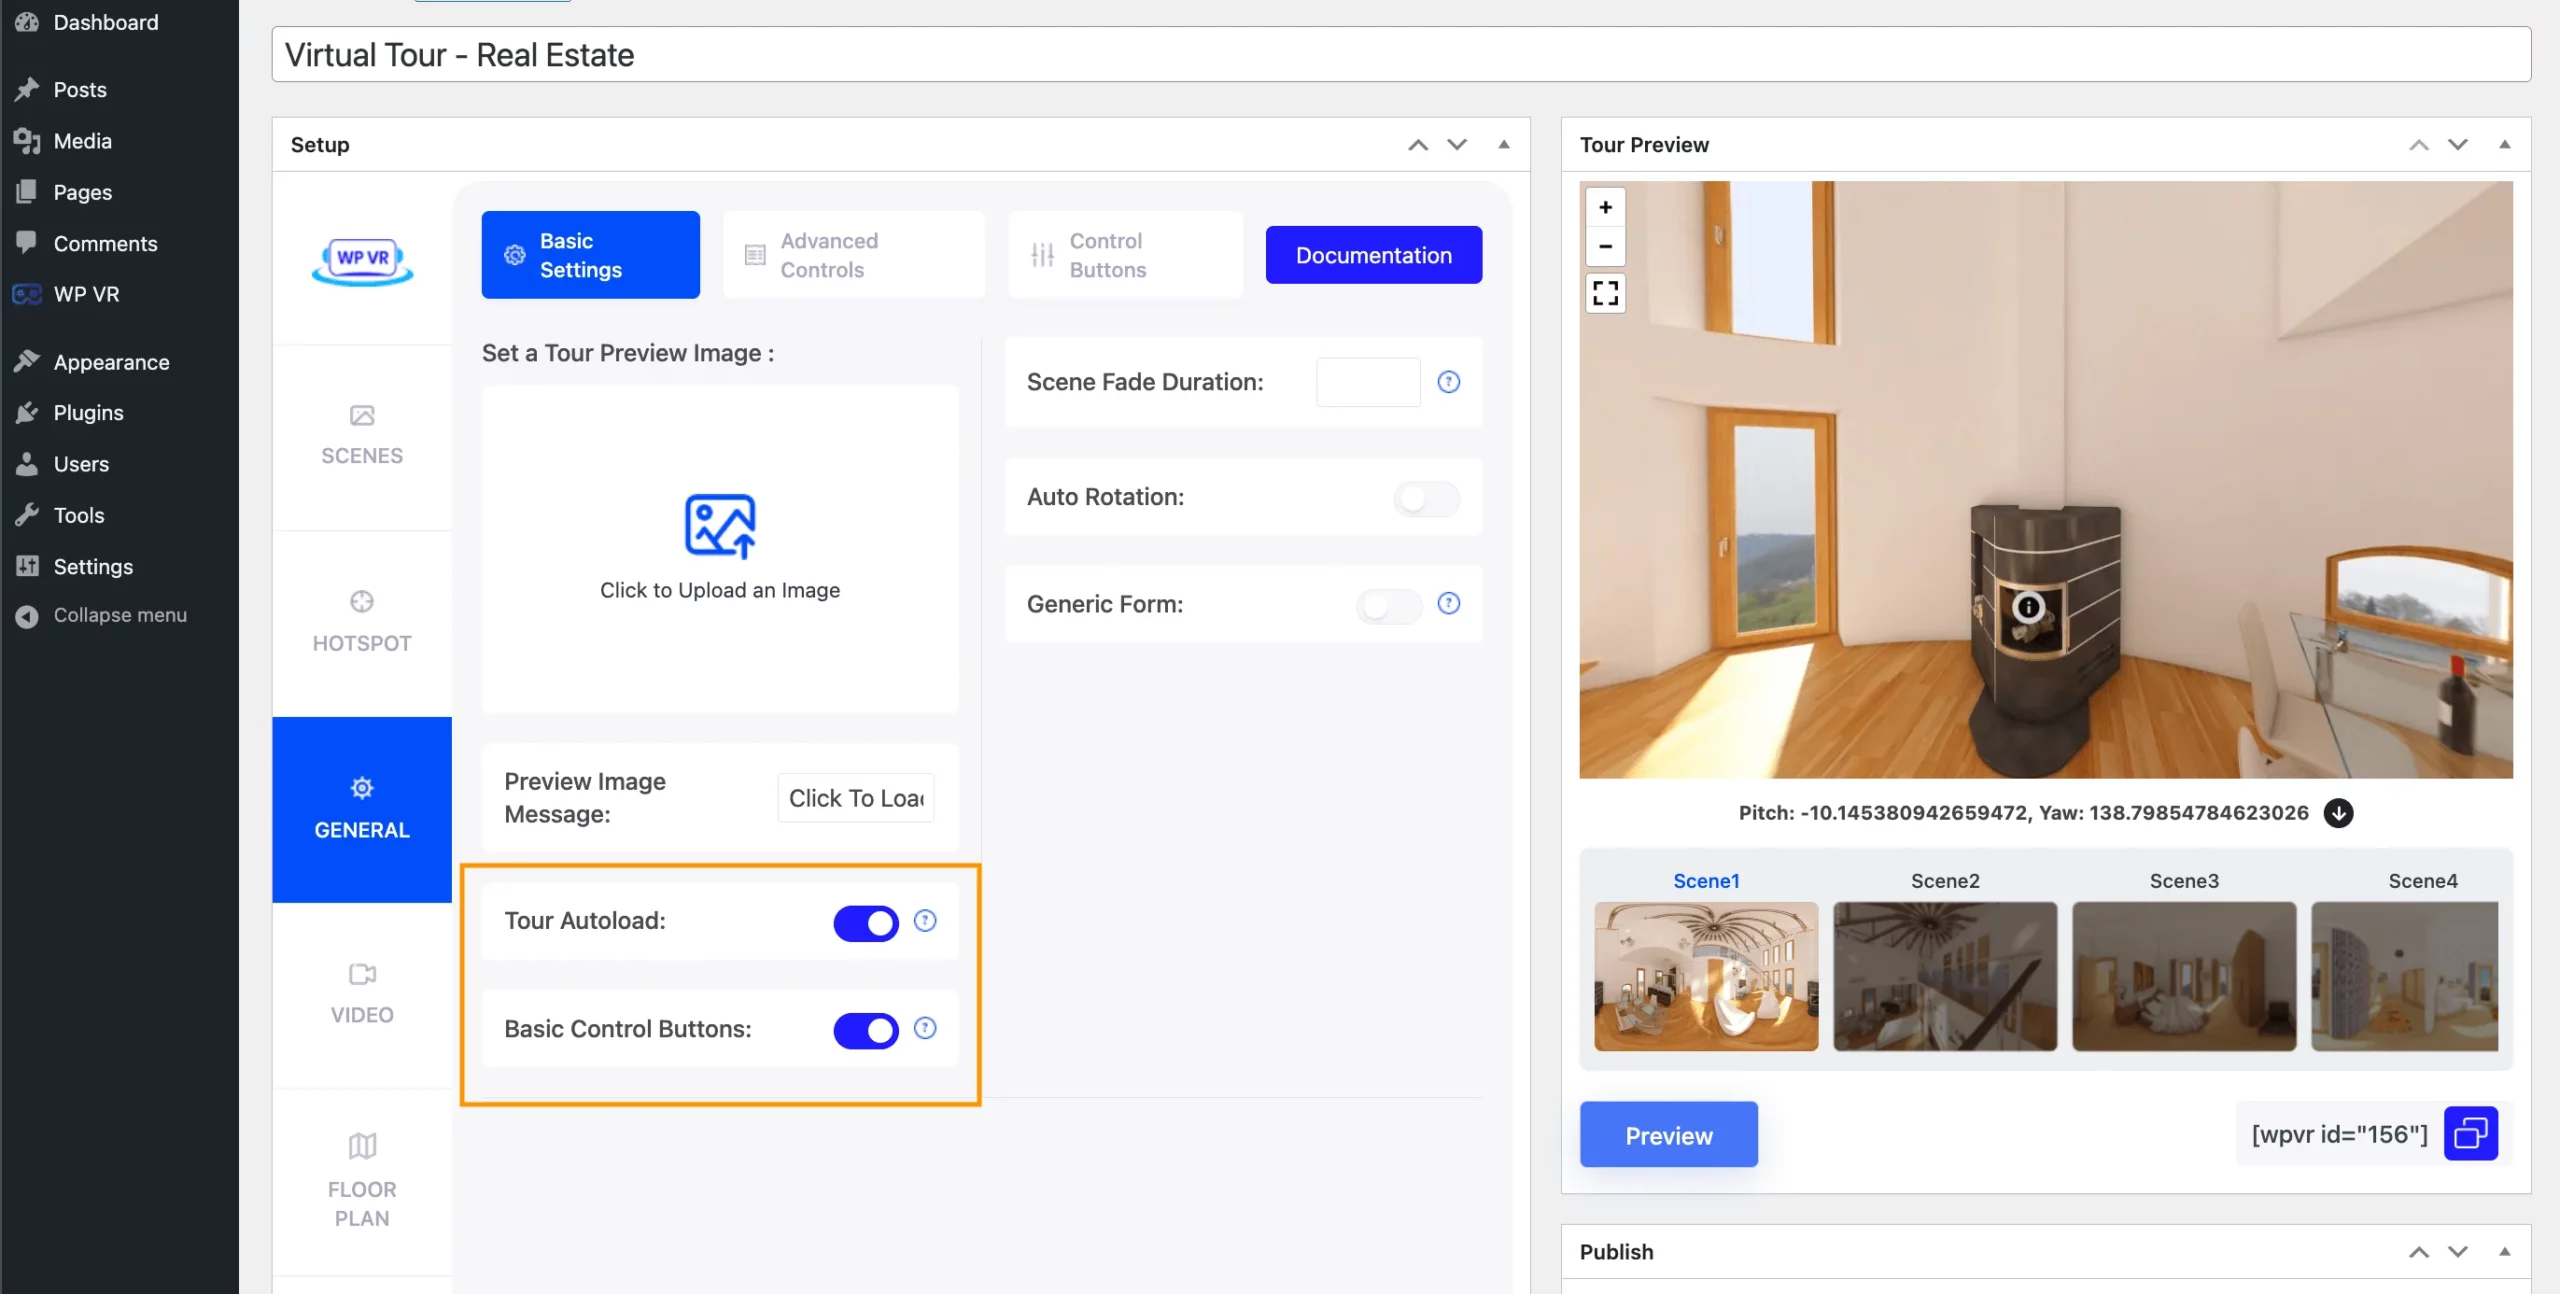
Keep the Tour Autoload option enabled to automatically load the virtual tour once you land on the web page that contains the virtual tour.
Enabling the Basic Controls will display a few basic navigation control buttons, ‘fullscreen,’ ‘zoom-in,’ and ‘zoom-out’ on the virtual tour.
Once this is done, Publish the tour, and it will be ready. You can then embed it on any web page or post in your website.
Here’s how this tour looks like:.
But this is just a basic tour. Time to make it even better by using WPVR Pro.
Customize Your Tour Into An Engaging Virtual Walkthrough
To carry out the next few customizations, you will need WPVR Pro.
- Here is how you can upgrade to WPVR Pro.
Activate WPVR Pro and then follow the steps below.
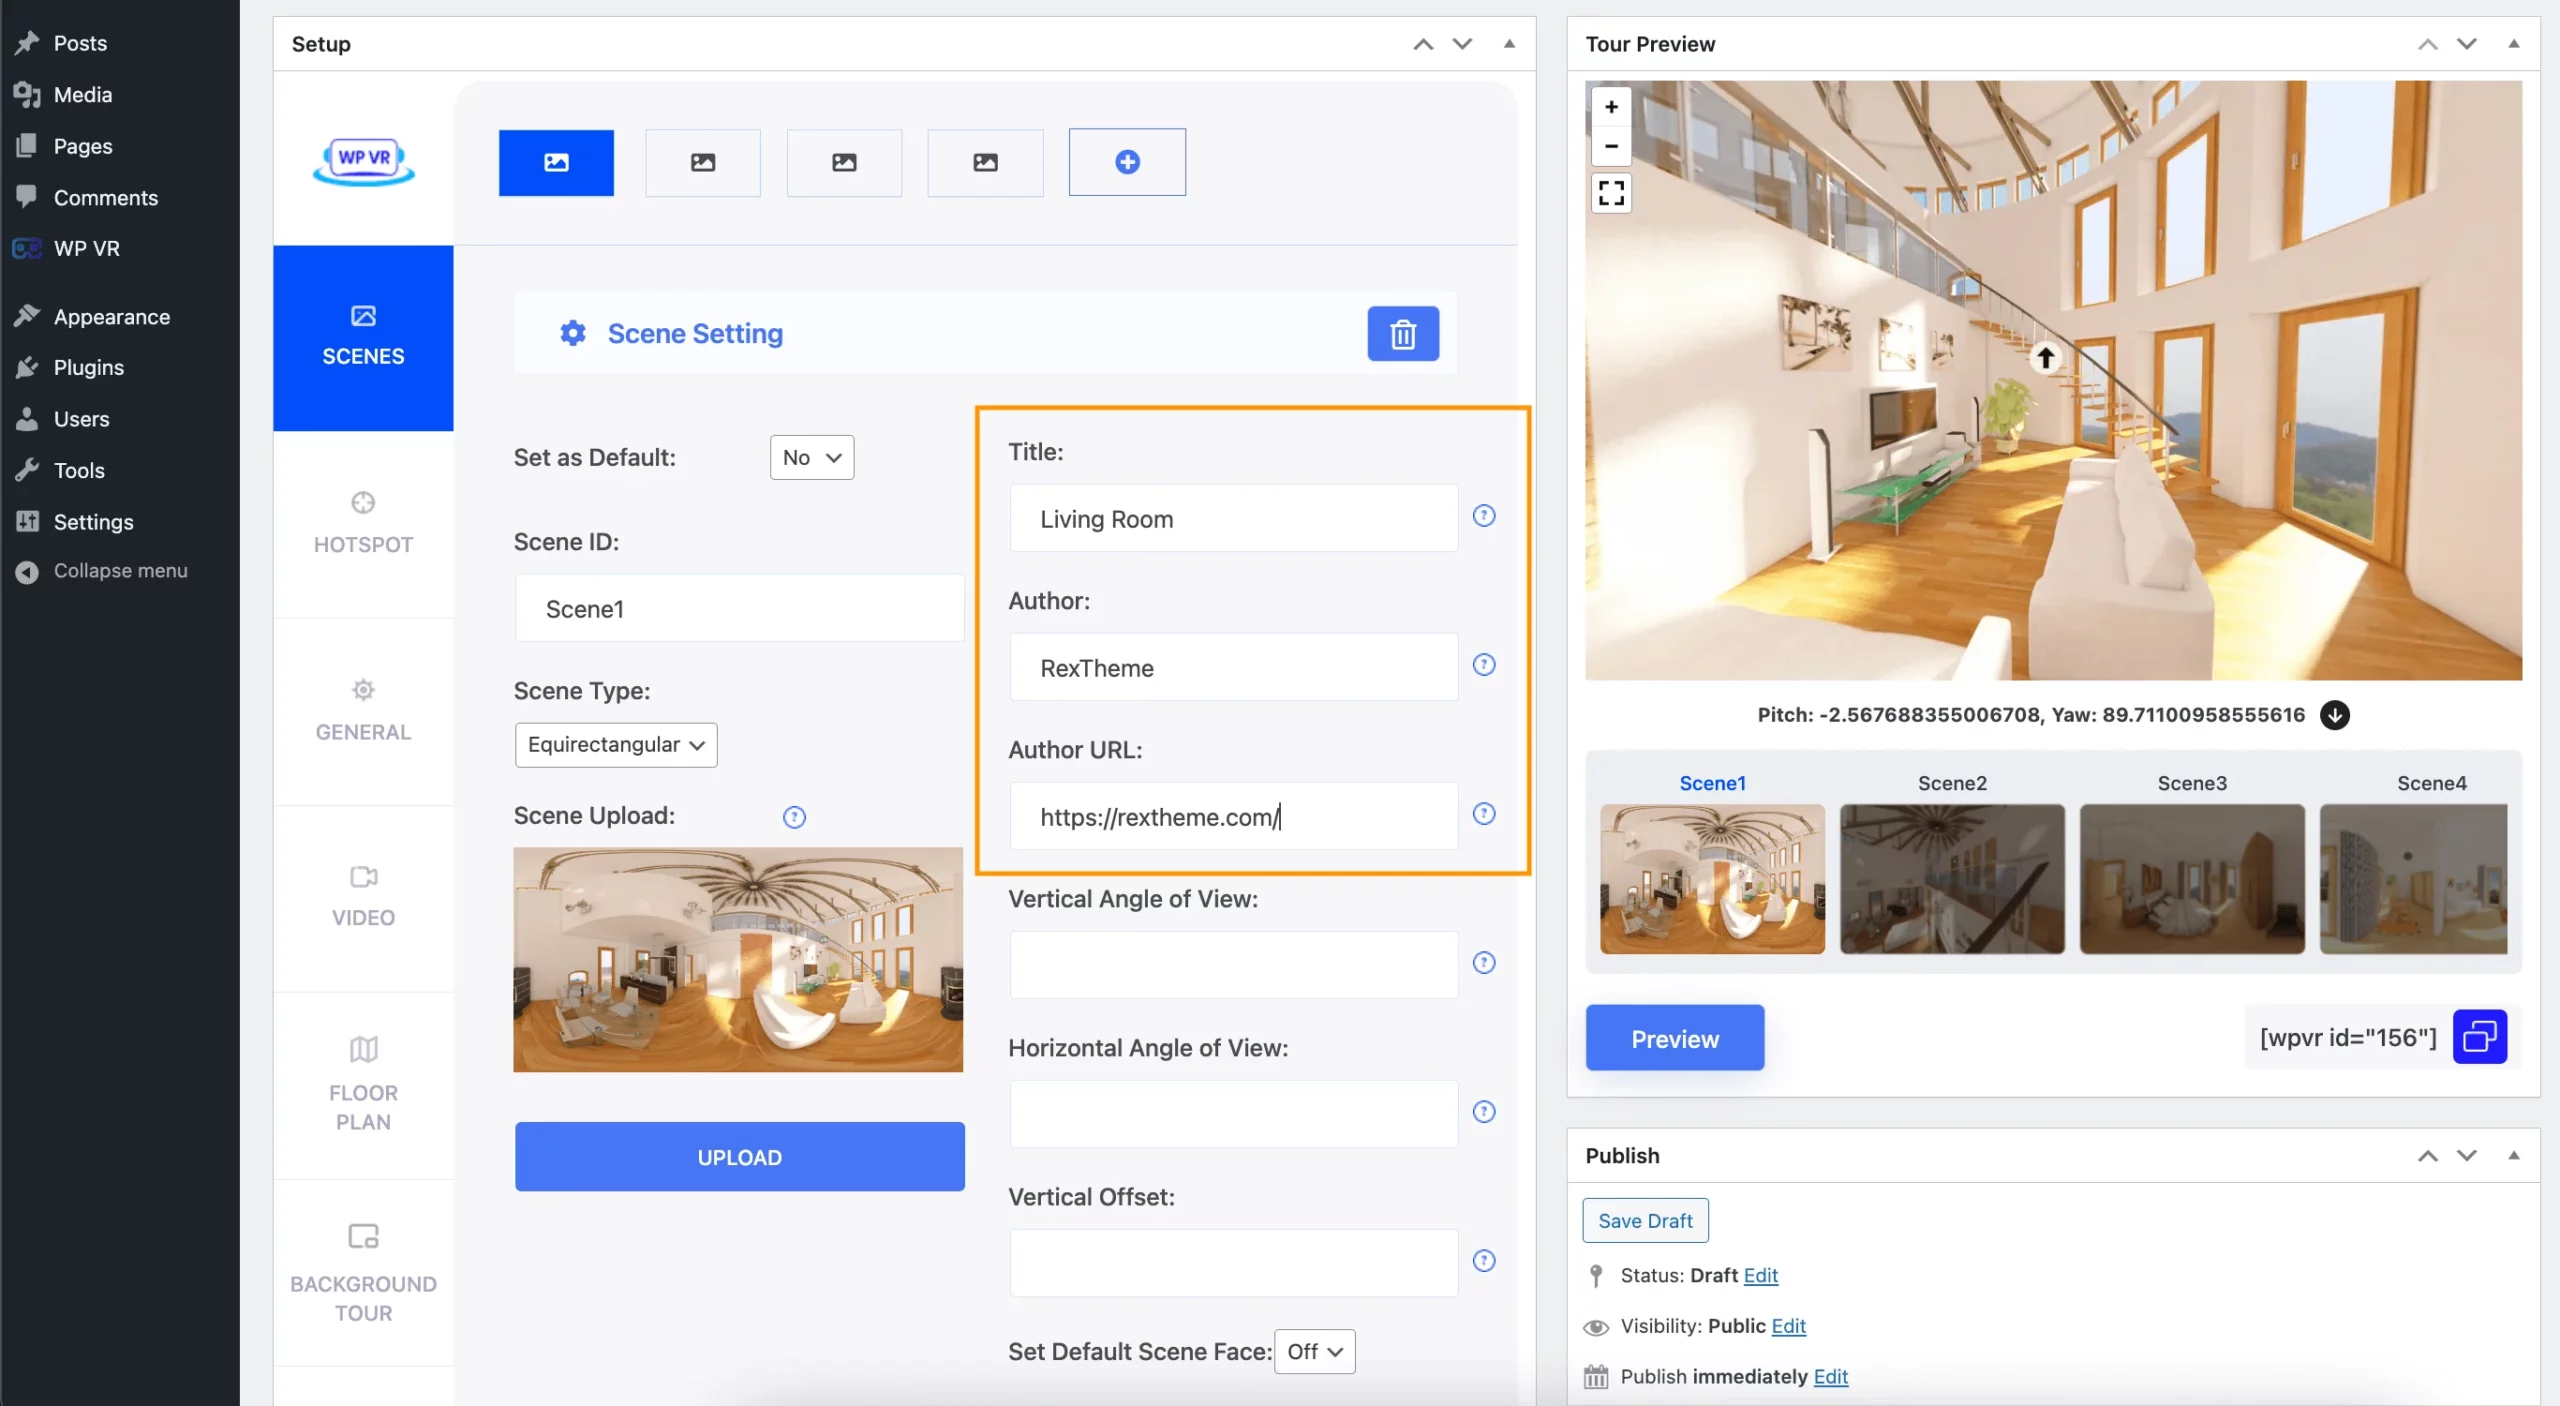
1. Add Scene Title and Author Information on Each Scene
Go to the Scenes tab. Now, you’ll find these options:
- Title
You may give the name of the scene. - Author
State who created it. You may use the company name here if you want - Author URL
You may add a link to your website or social profile which people can visit by clicking on the Author URL.
2. Customize The Hotspot Icons of Your Real Estate Virtual Tour
Go to a Hotspot tab under a scene.
Here you’ll find these options:
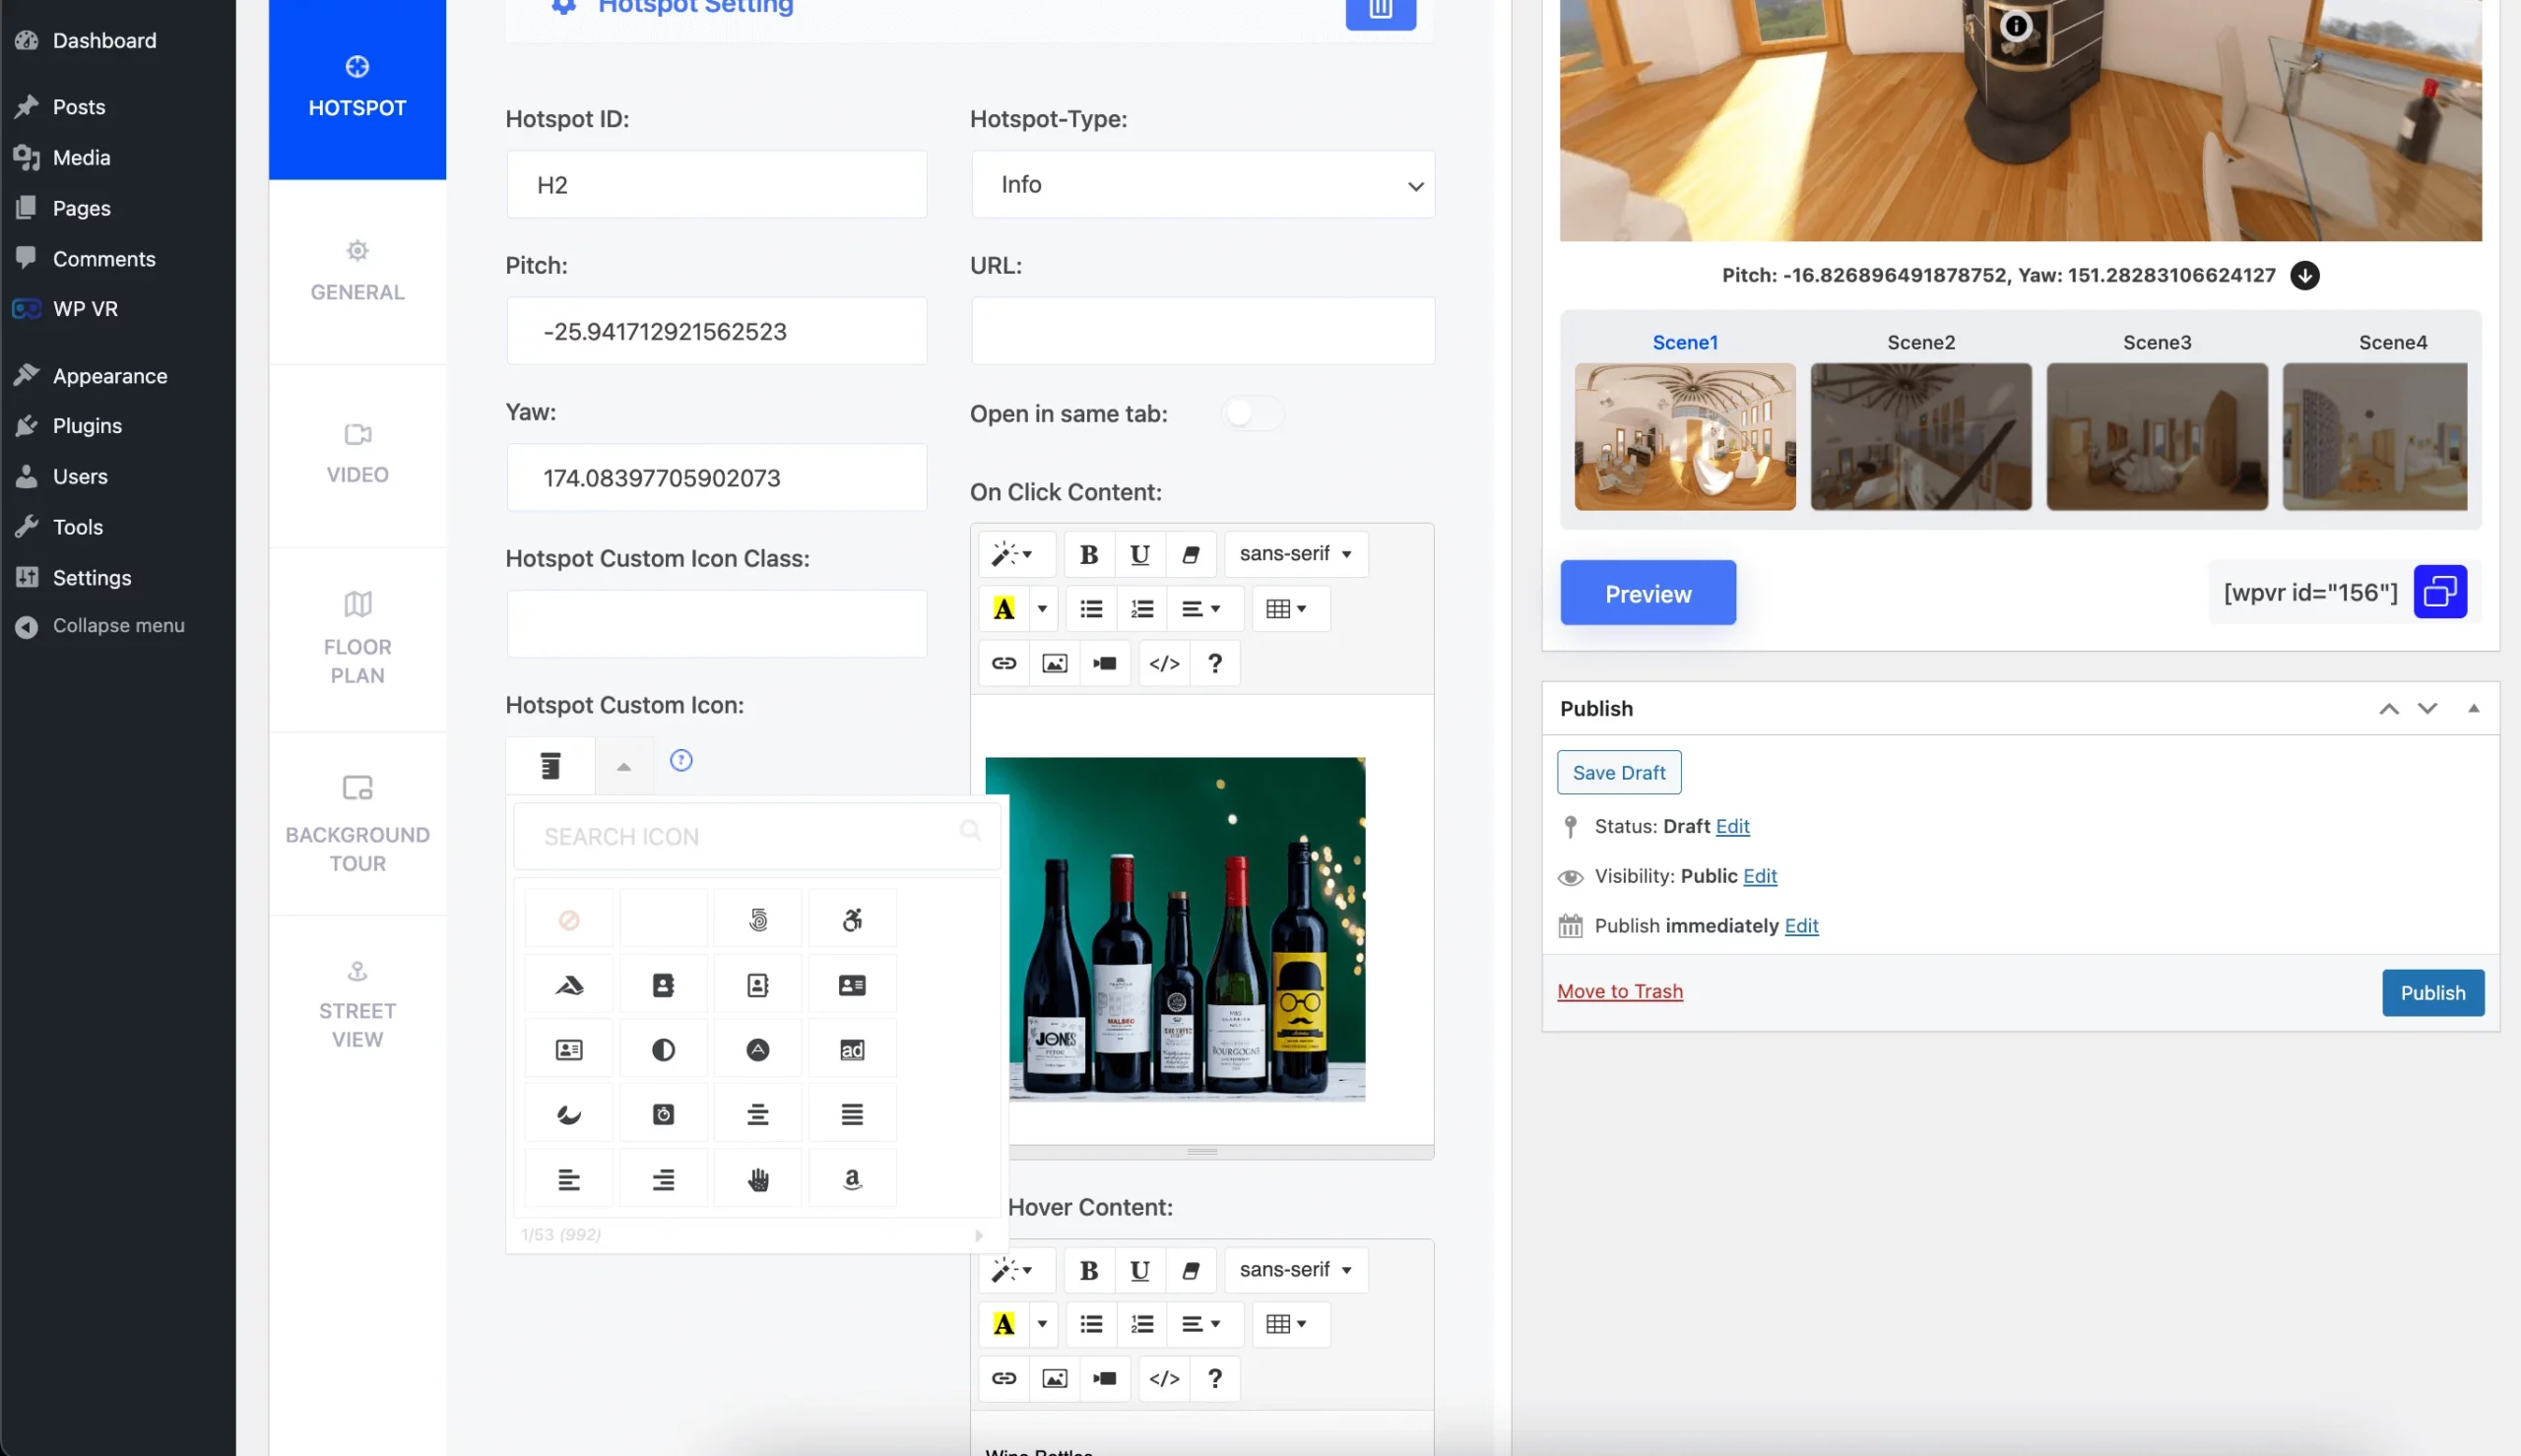
- Hotspot Custom Icon
- Hotspot Custom Icon Color
- Hotspot Animation
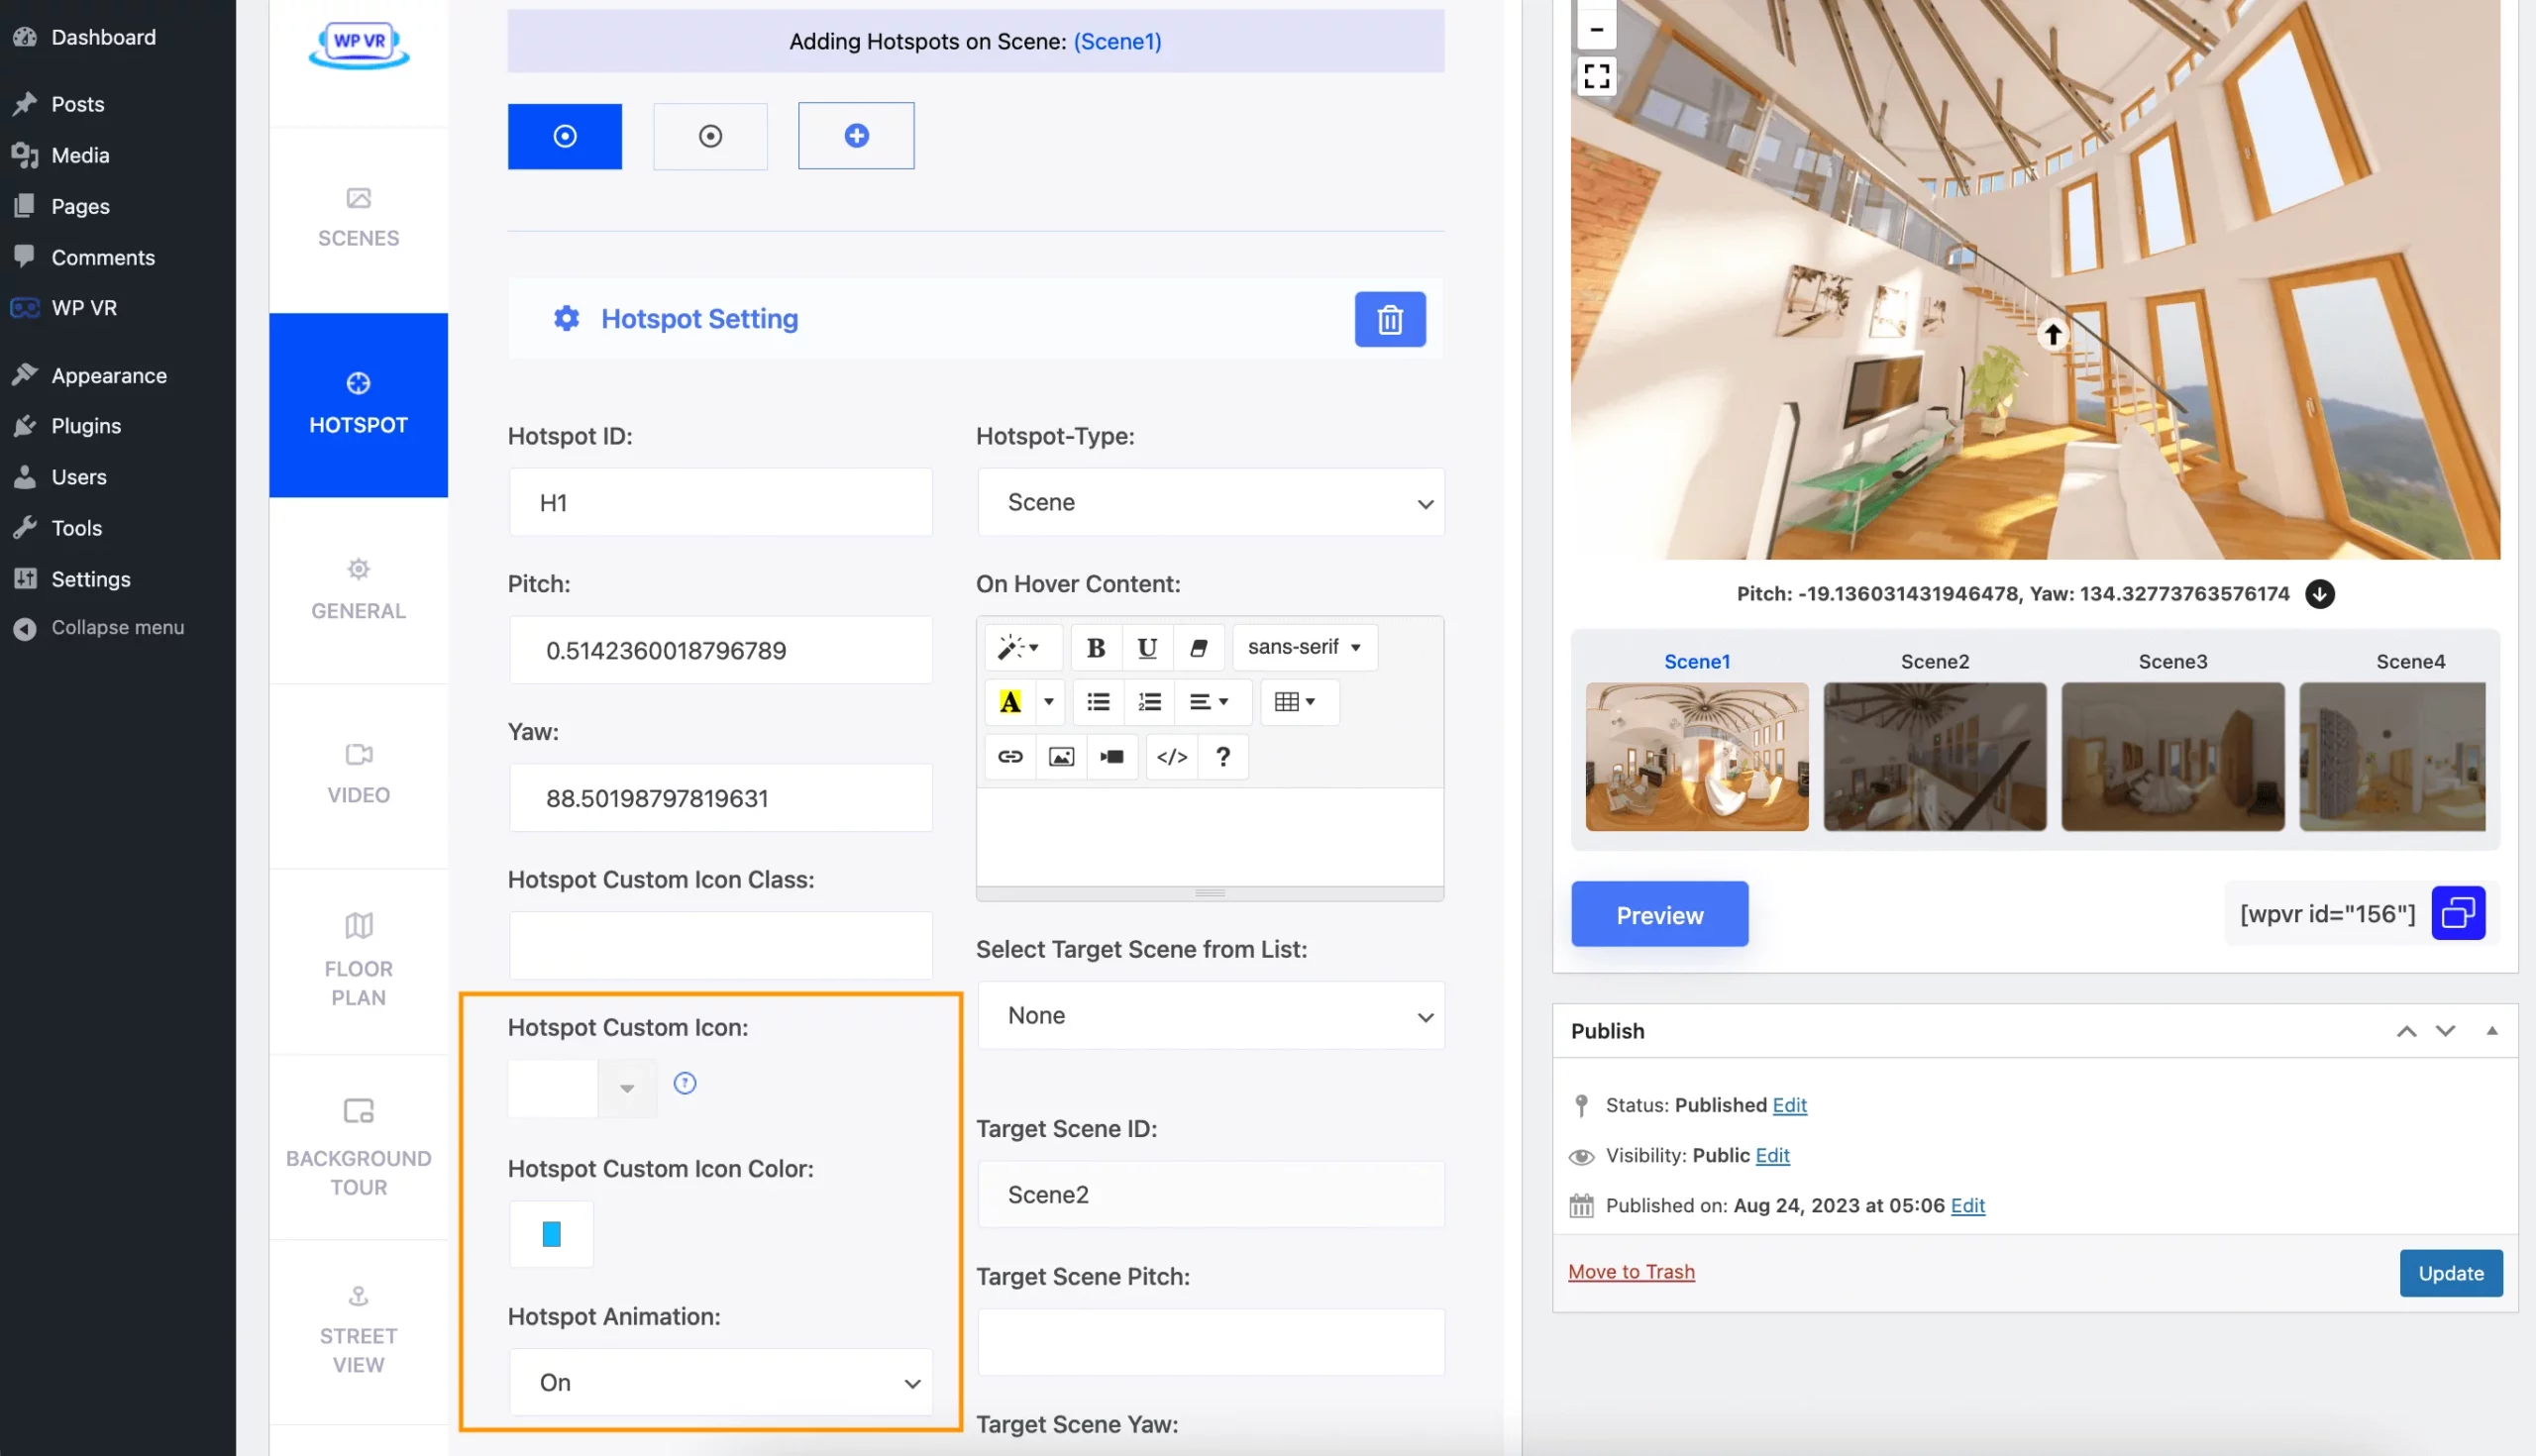
> Hotspot Custom Icon:
Using this option, you can set custom icons for your hotspots.
Just click on the dropdown option, and you’ll find 900+ custom icons you can choose from.
> Hotspot Custom Icon Color
This option allows you to set a custom color for your hotspot icons.
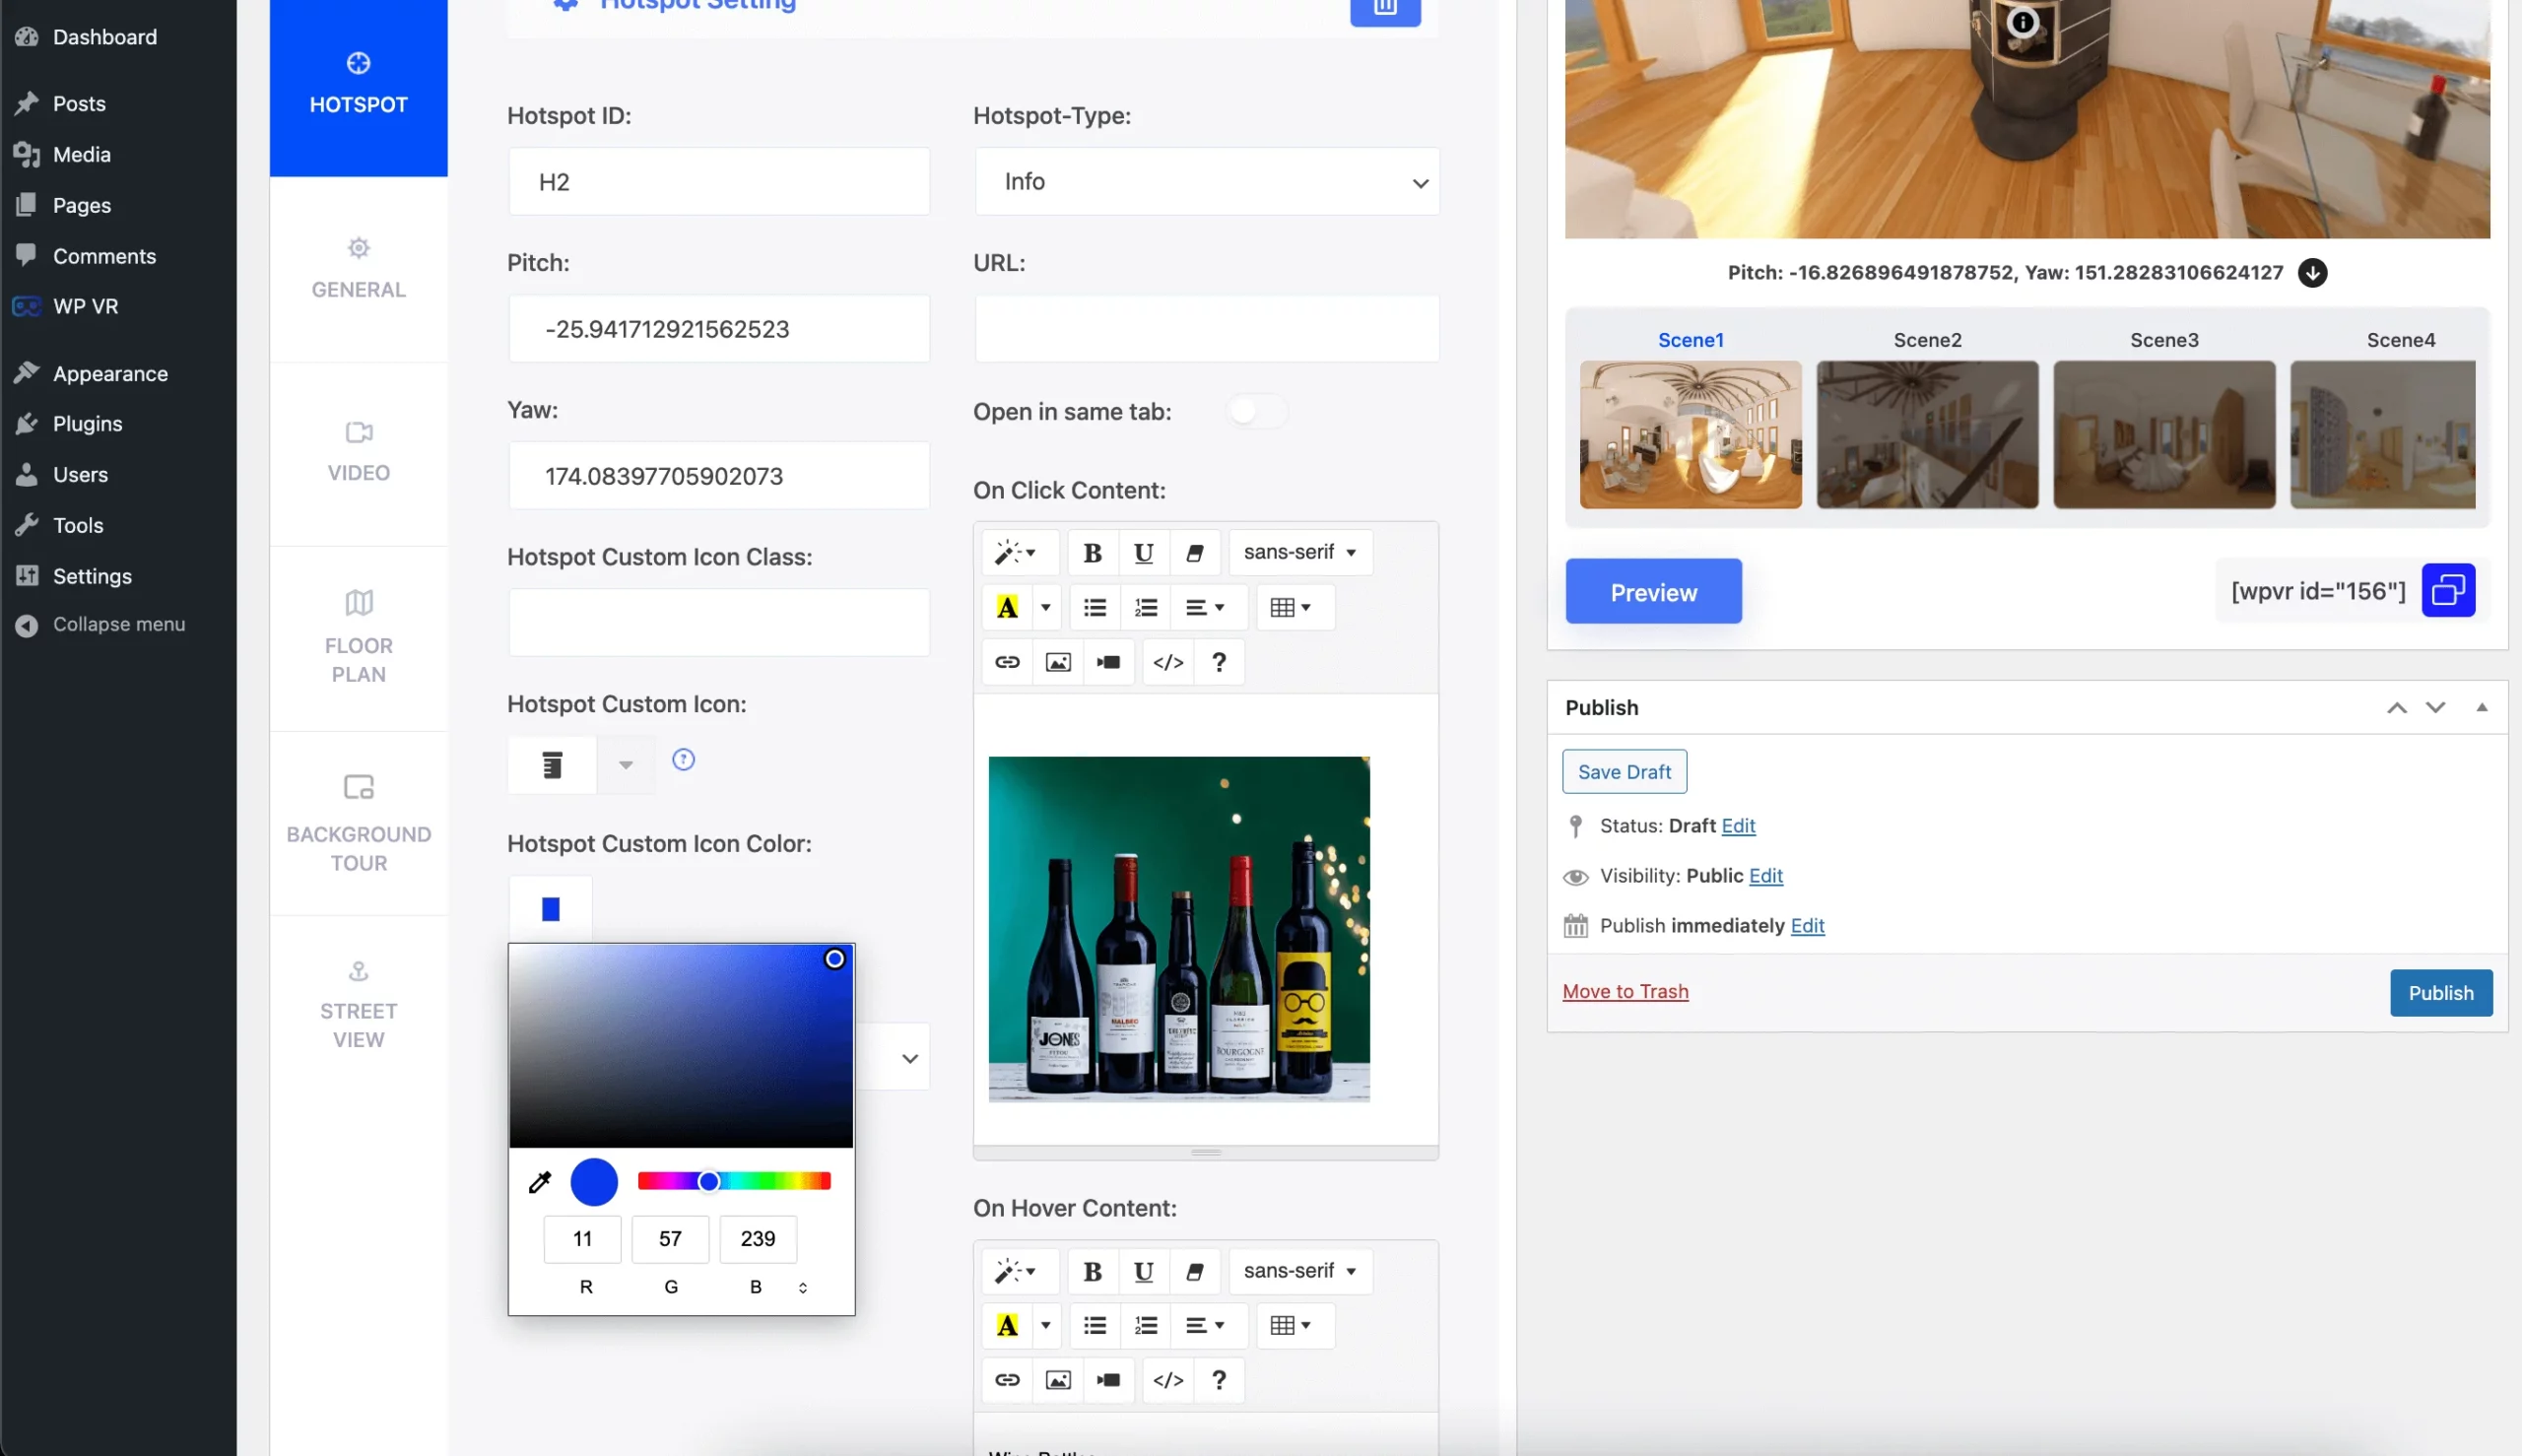
You can add custom colors from RGB, HSL, and Hex mode.
Hotspot Animation:
By turning this option On, there will be smooth and slow flickering animation on your hotspots.
3. Display A Scene Gallery on Your Virtual Tour
Since we’ve created this virtual tour with multiple scenes, we can enable the scene gallery option where all the scenes will be shown as a thumbnail.
Go to the General section then click on the Advanced Controls tab.
You’ll find an option here named Scene Gallery.
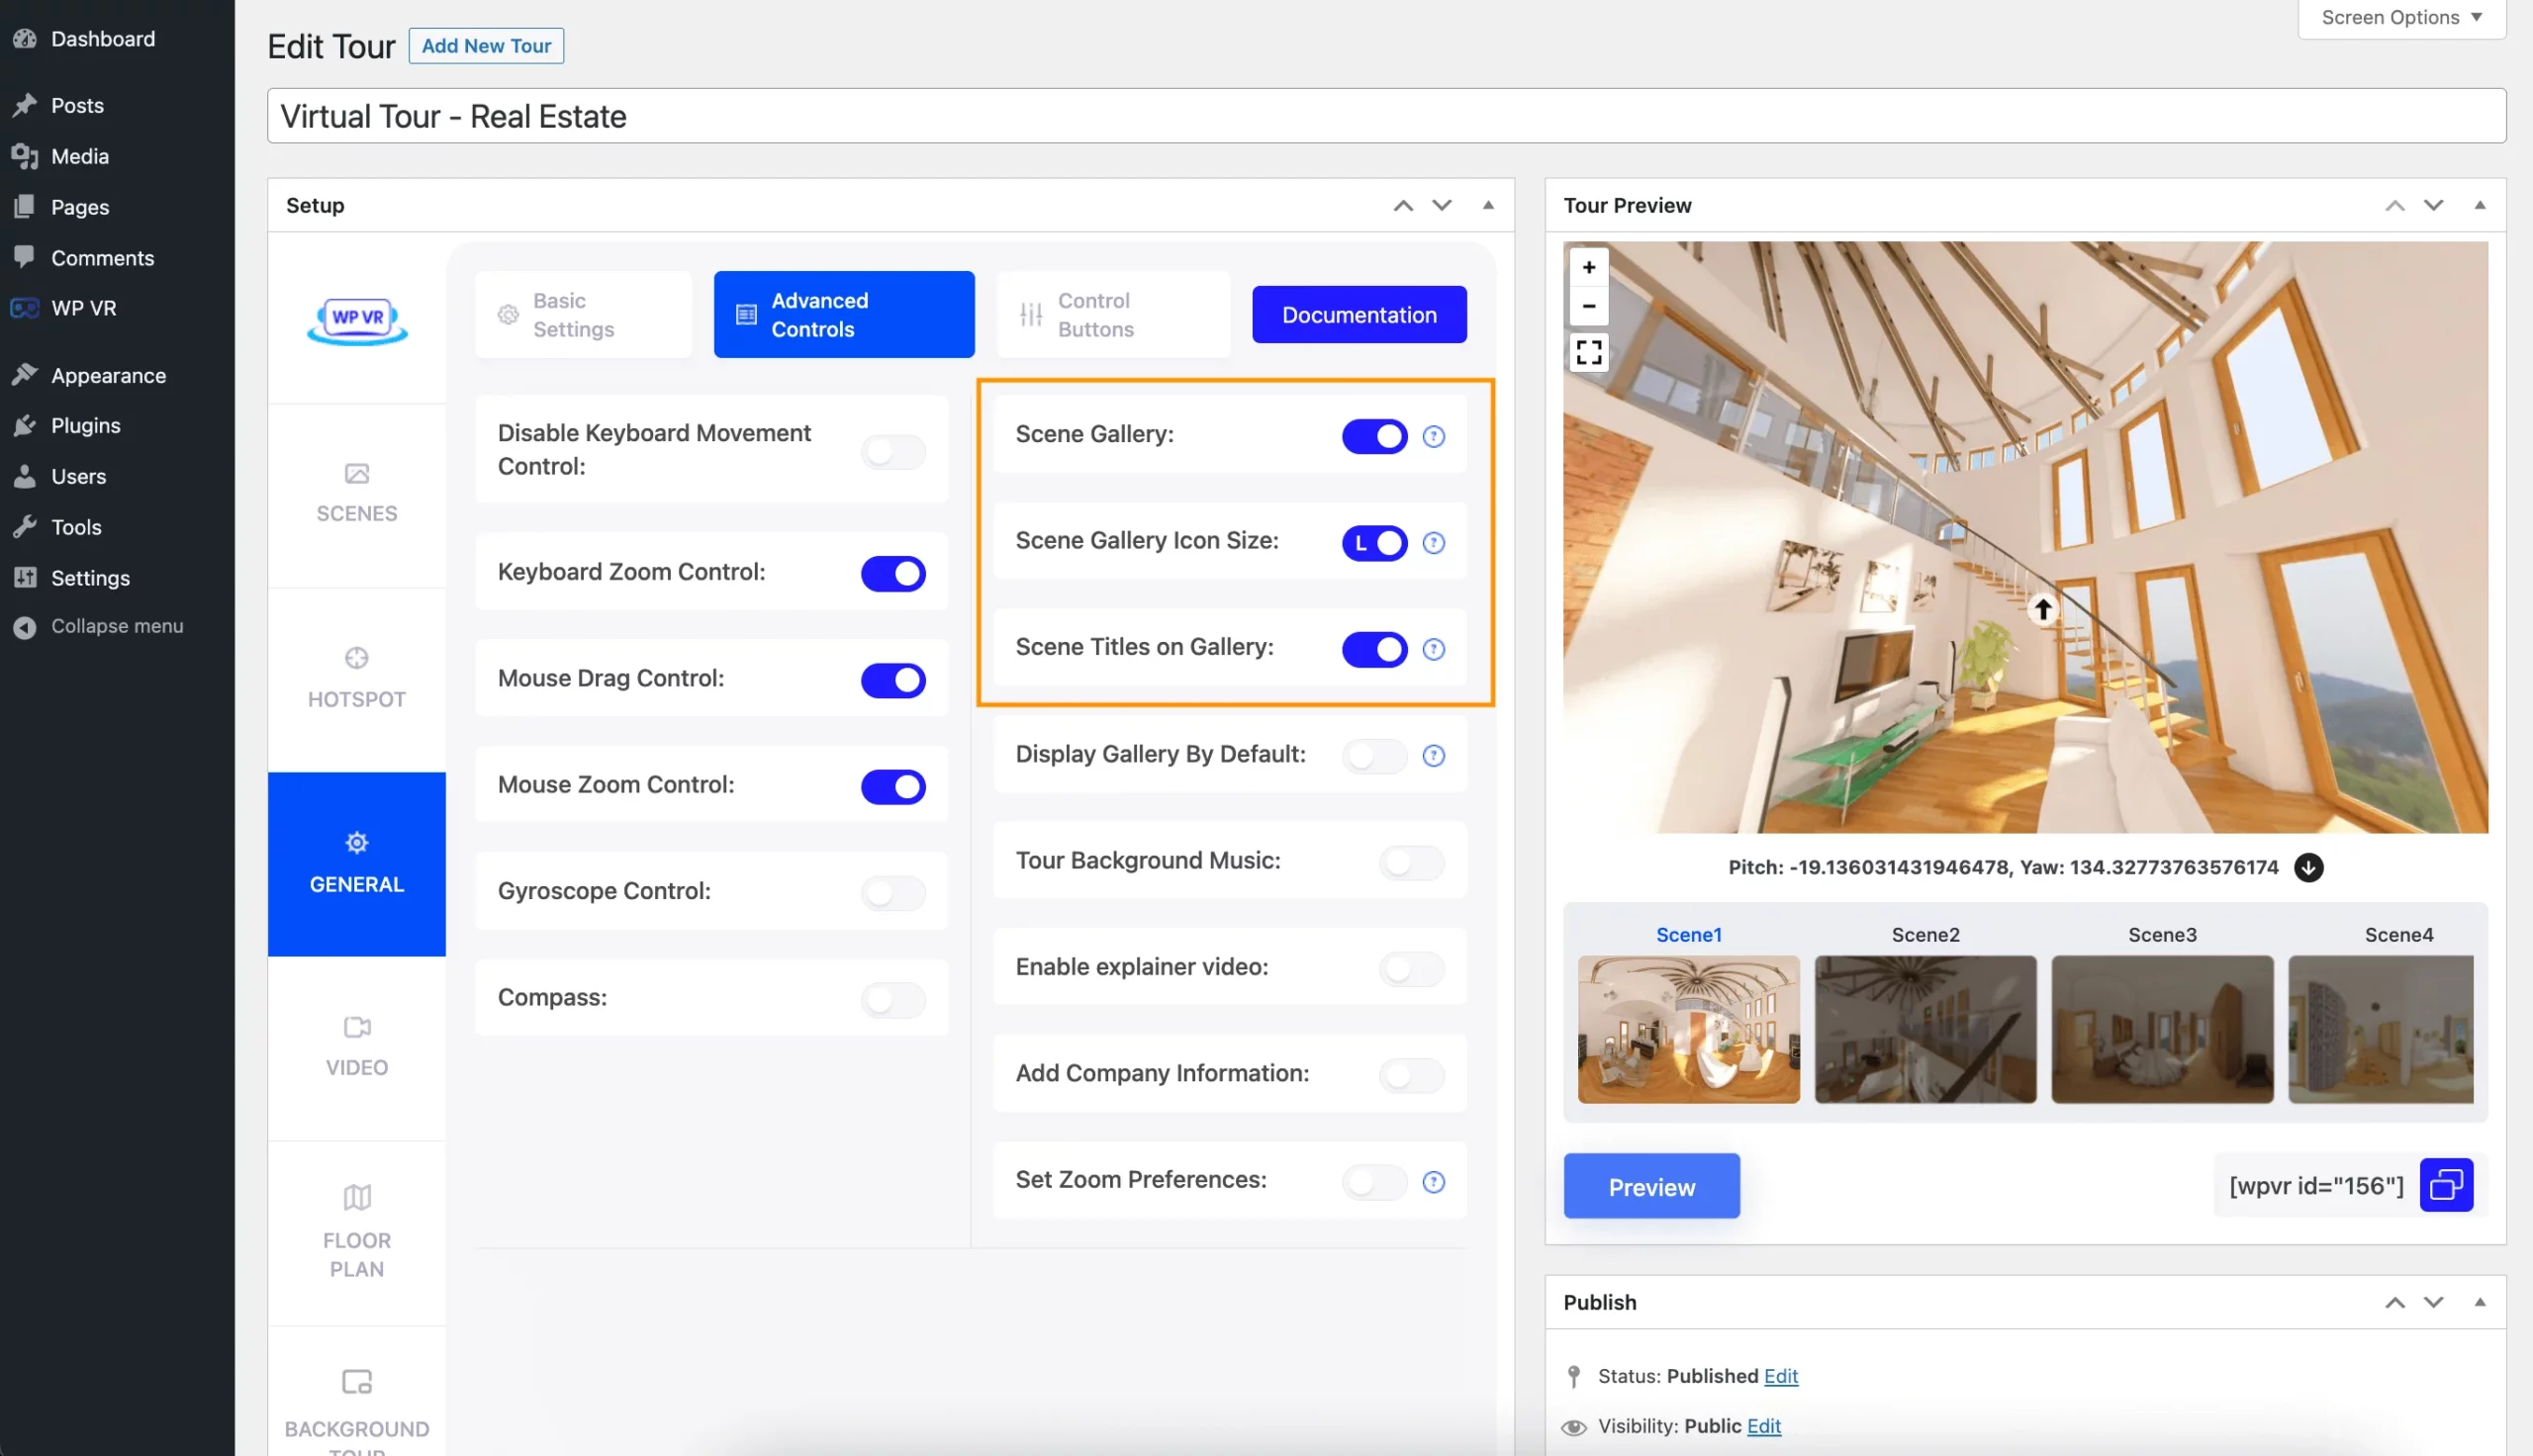
Turn it on, and a new option named ‘Scene Titles on Gallery‘ will appear.
This option will show your scene titles at the top of each scene thumbnail in the scene gallery.
We’ll be turning all the option On as well.
4. Add Background Music on Your Property Virtual Tour
You can also add soothing background music to your entire virtual tour to make it enjoyable.
While on the Advanced Controls tab, enable the Tour Background Music option.
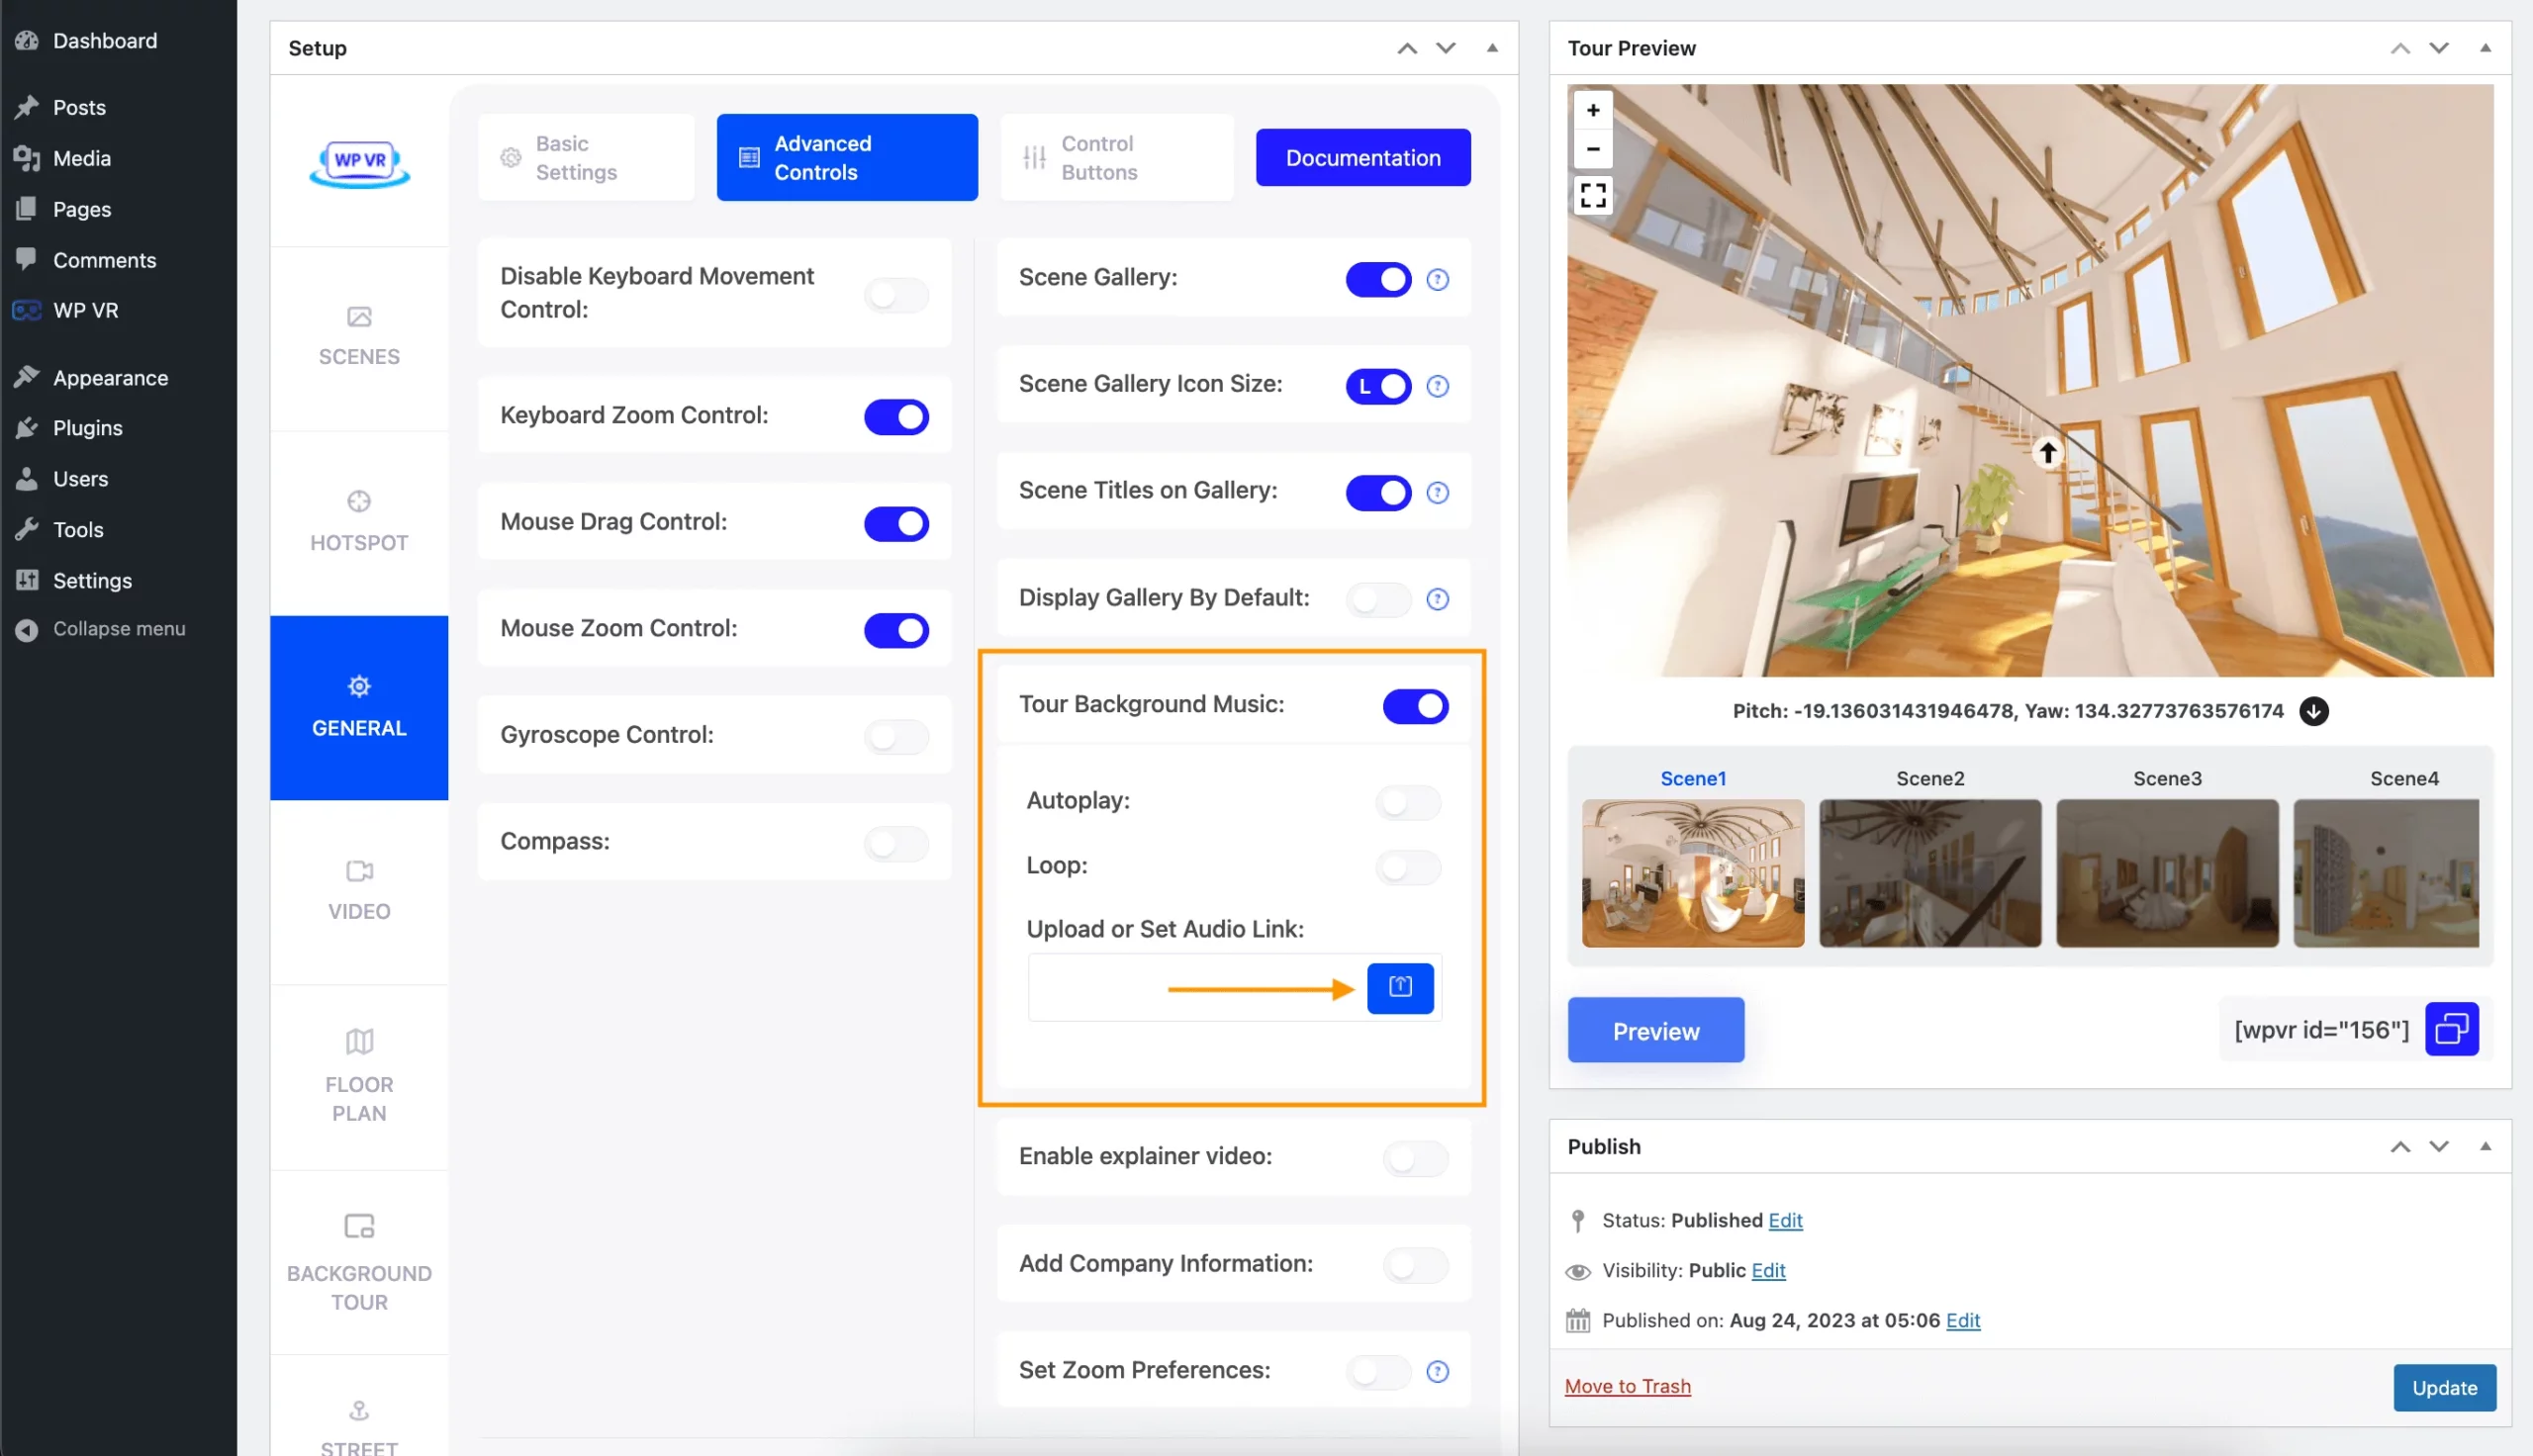
These new options will appear:
- Autoplay
Turning on the Autoplay option will automatically start playing the background music. - Loop
Turning on the Loop option will play the background music on a loop. - Upload or Set Audio Link
With the Upload or Set Audio Link field, you can either set an audio link here or upload the audio file manually or from your media server.
5. Add your Real Estate Company Logo and Description
Adding your company logo on this virtual tour will show authority and let your clients learn a little more about your company and service.
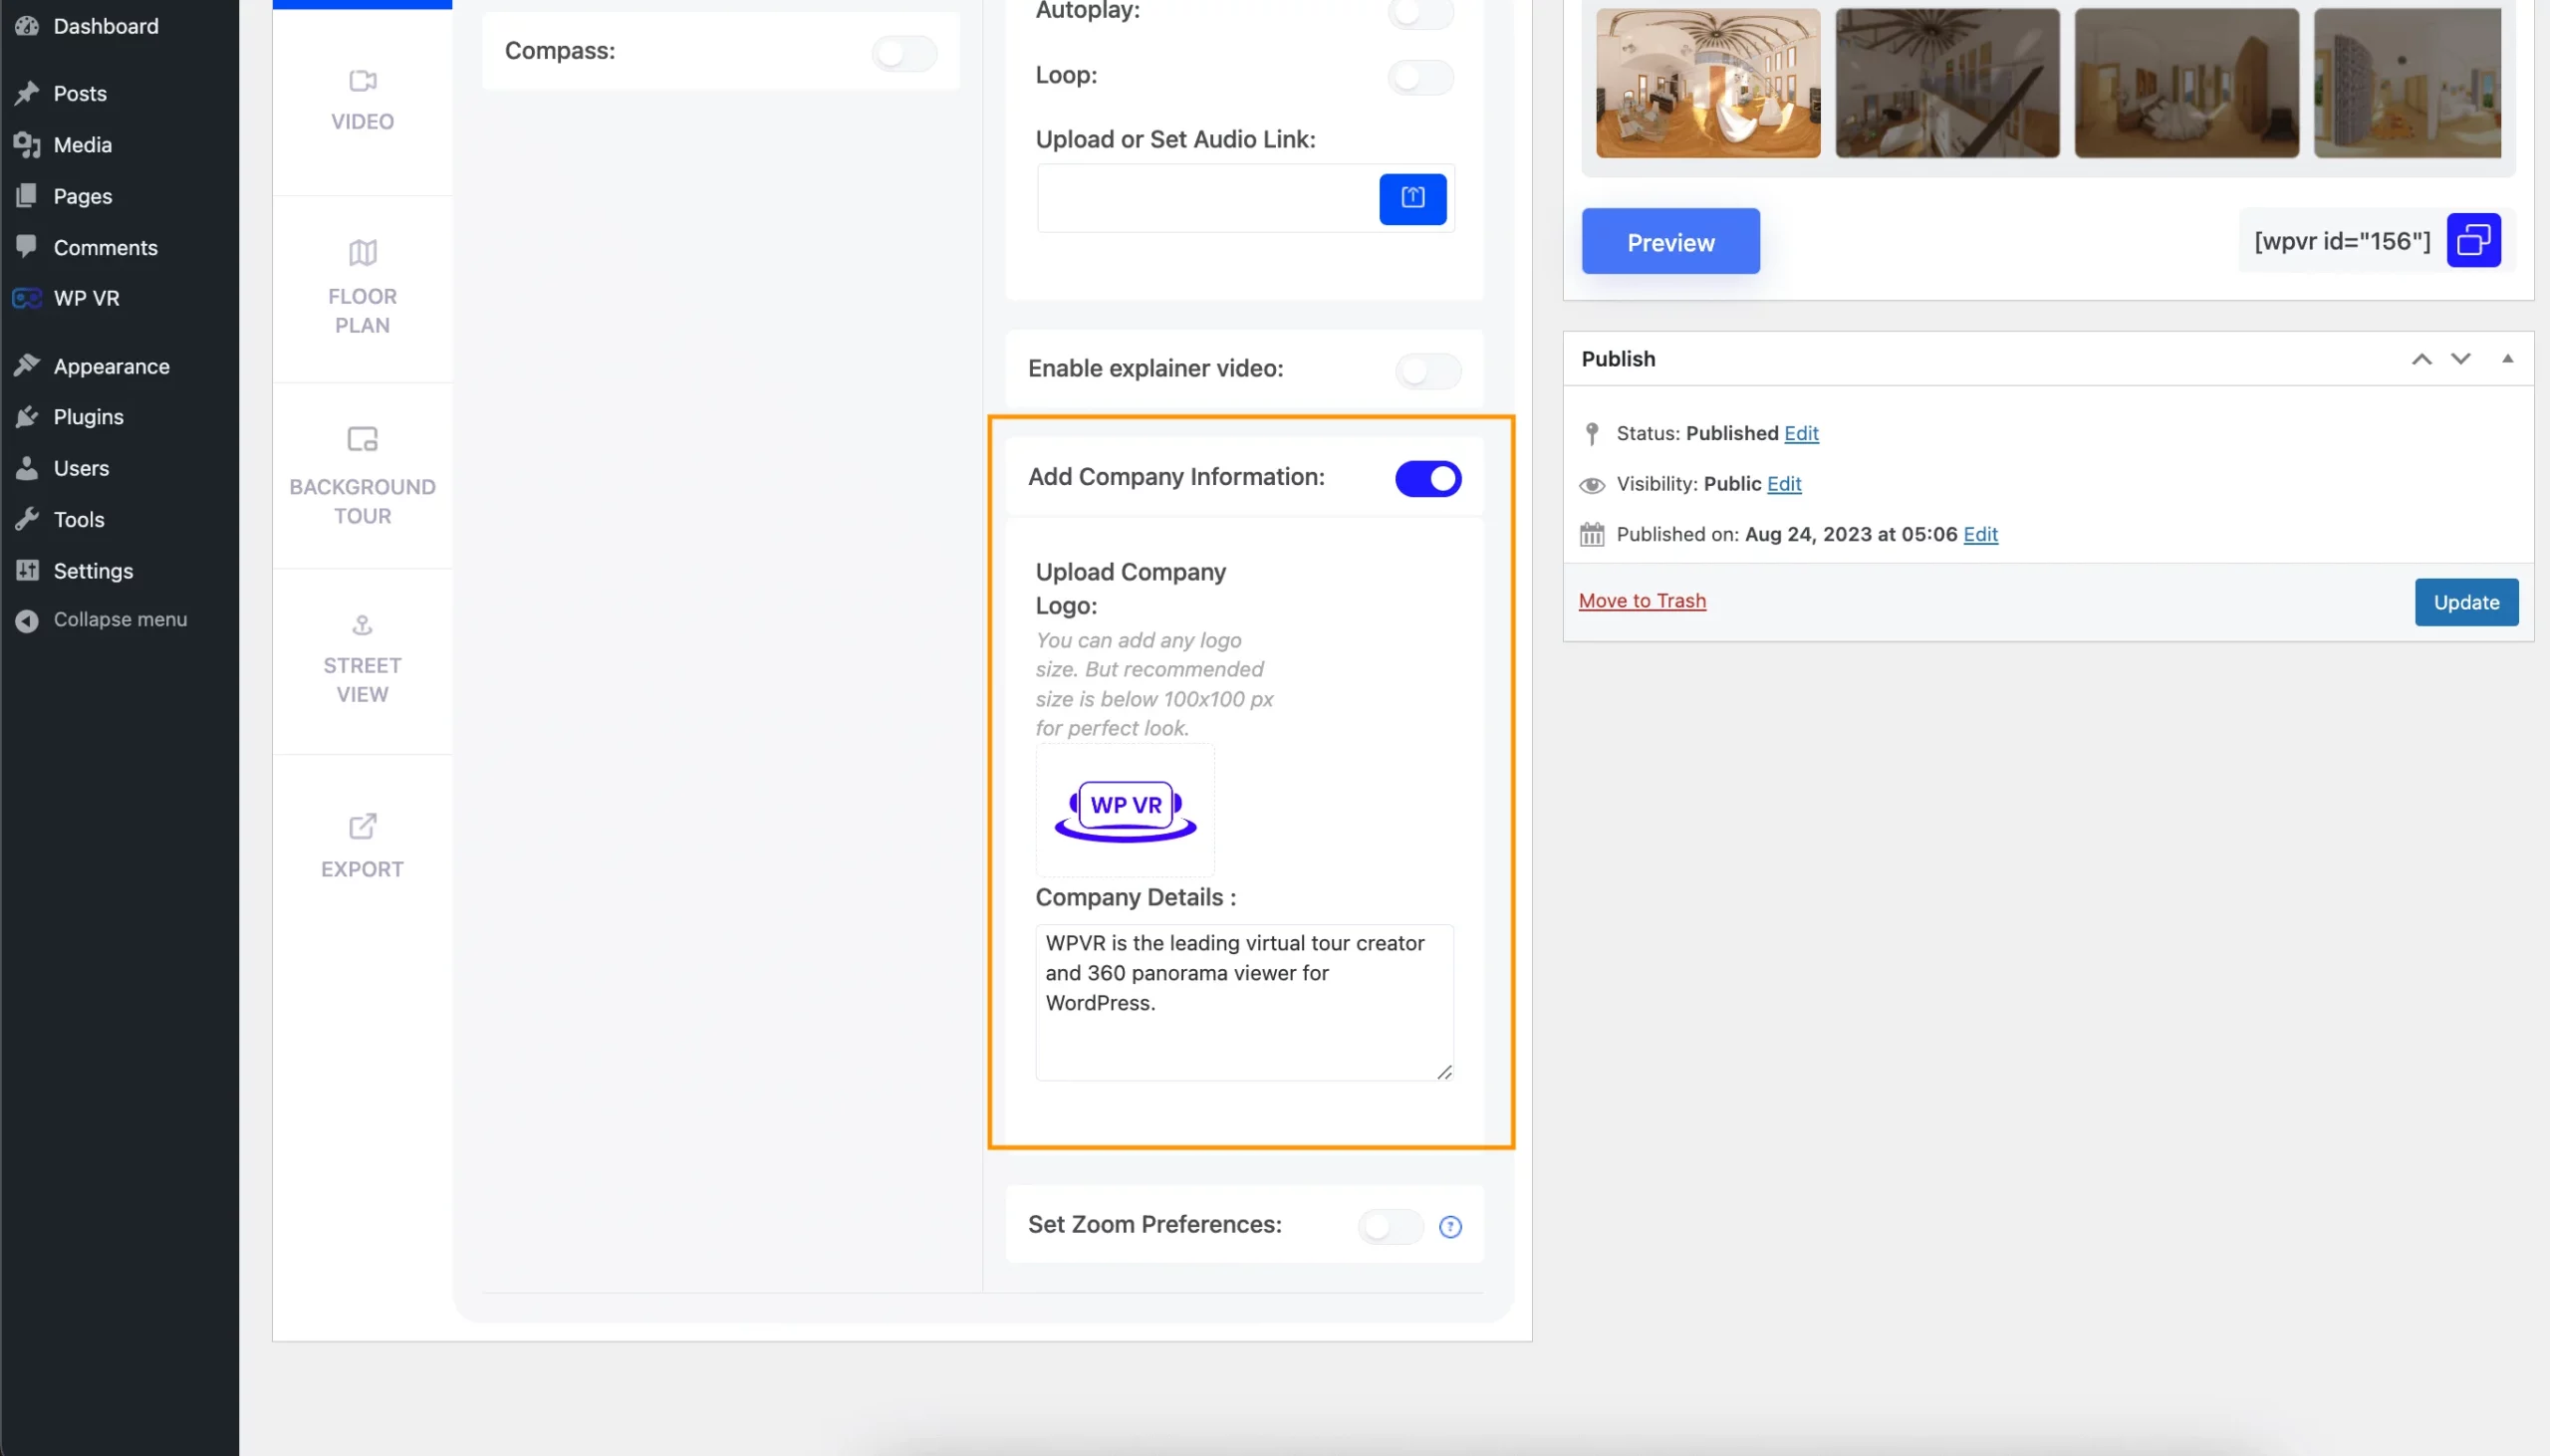
Here, you’ll find these two options:
- Upload Company Logo
This will allow you to upload a company logo to be shown on the top right corner of your virtual tour. - Company Details
You can add a small but informative description of your company here. Once your viewers click on your logo, this description will appear.
6. Add A Home Button To The Virtual Tour
WPVR allows you to add a home button on your real estate virtual tour that will take your viewers to the default scene by clicking on it.
To add this button, go to General > Control Buttons.
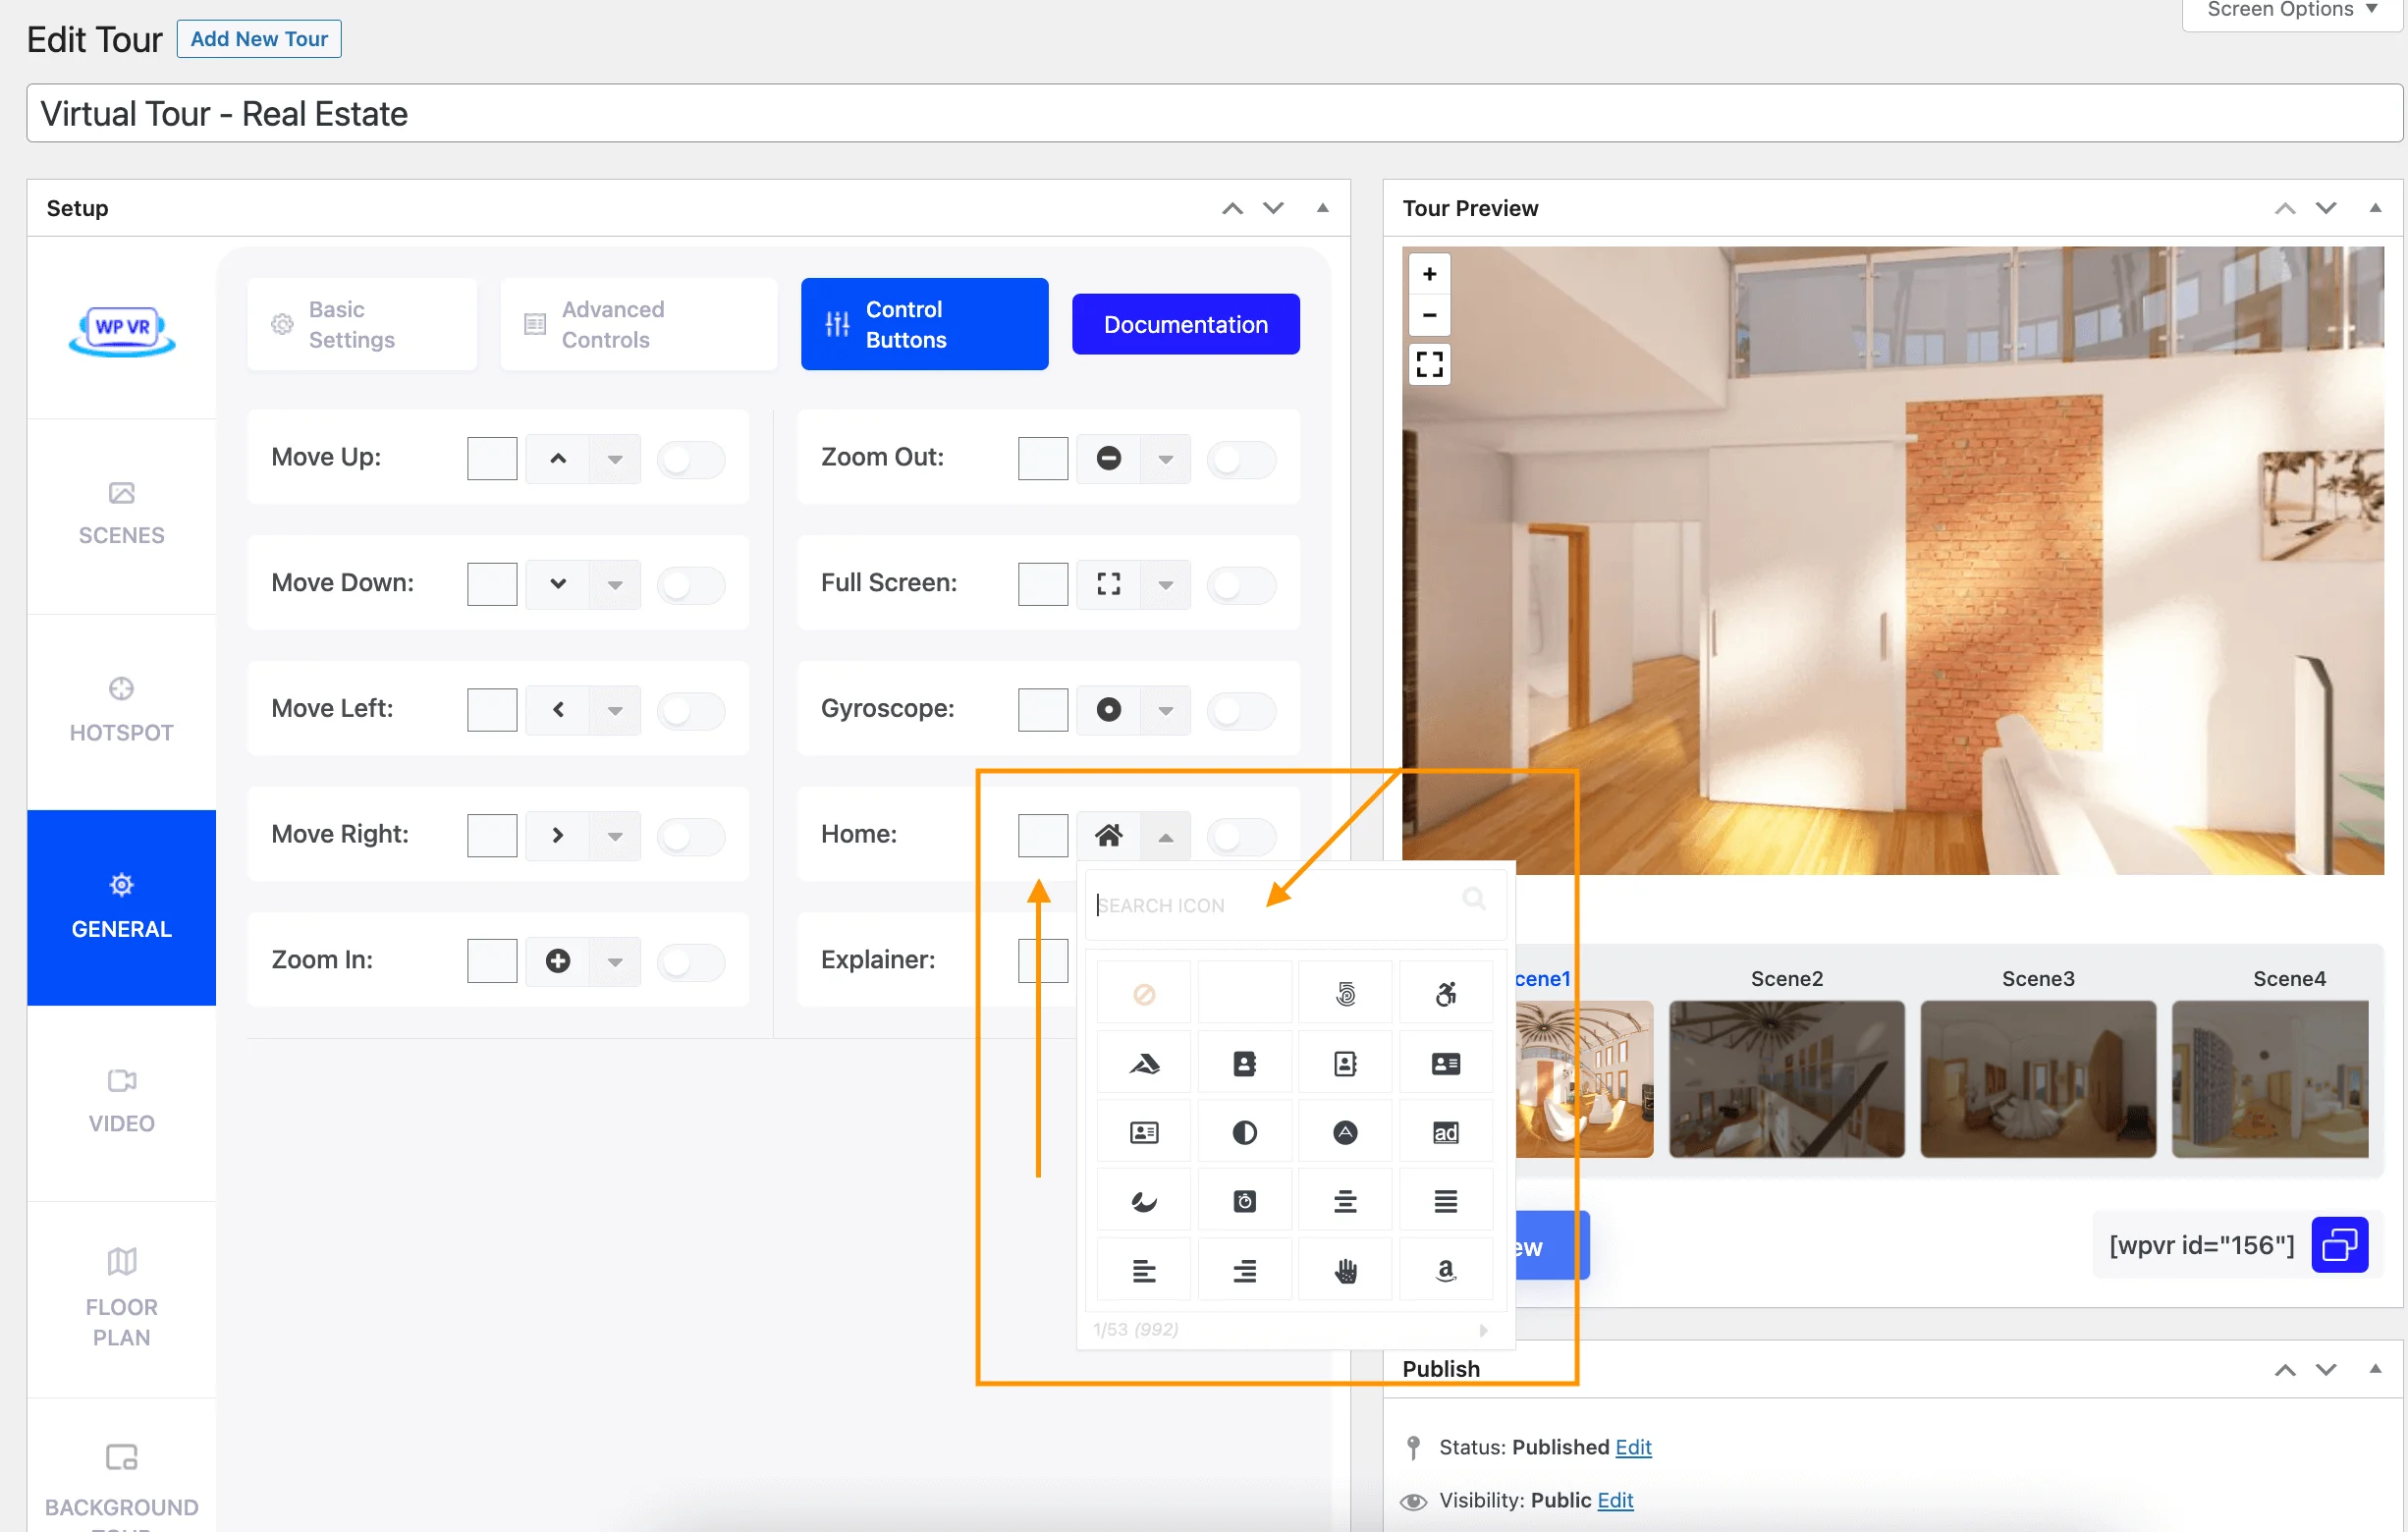
Find the Home option and turn it On.
You can also customize its icon and icon color.
7. Add Contact Forms On Your Tour
One of the most important elements you can add to your real estate virtual tour is a contact form.
Suppose a potential buyer just had a look around your tour and is now interested in the property. Now, he’ll try to contact you to learn more about this property and arrange a visitation.
You can allow him to contact you instantly by keeping a contact form on this virtual tour.
For this, you will need to install the WPVR Fluent Forms Add-on and the FluentForms plugin on your site.
You will get the Add-on for free when you get WPVR Pro.
Once you’ve created a suitable form for this purpose, you can easily integrate this form into your real estate virtual tour by following the steps below:
i. Create a form in Fluent Forms.
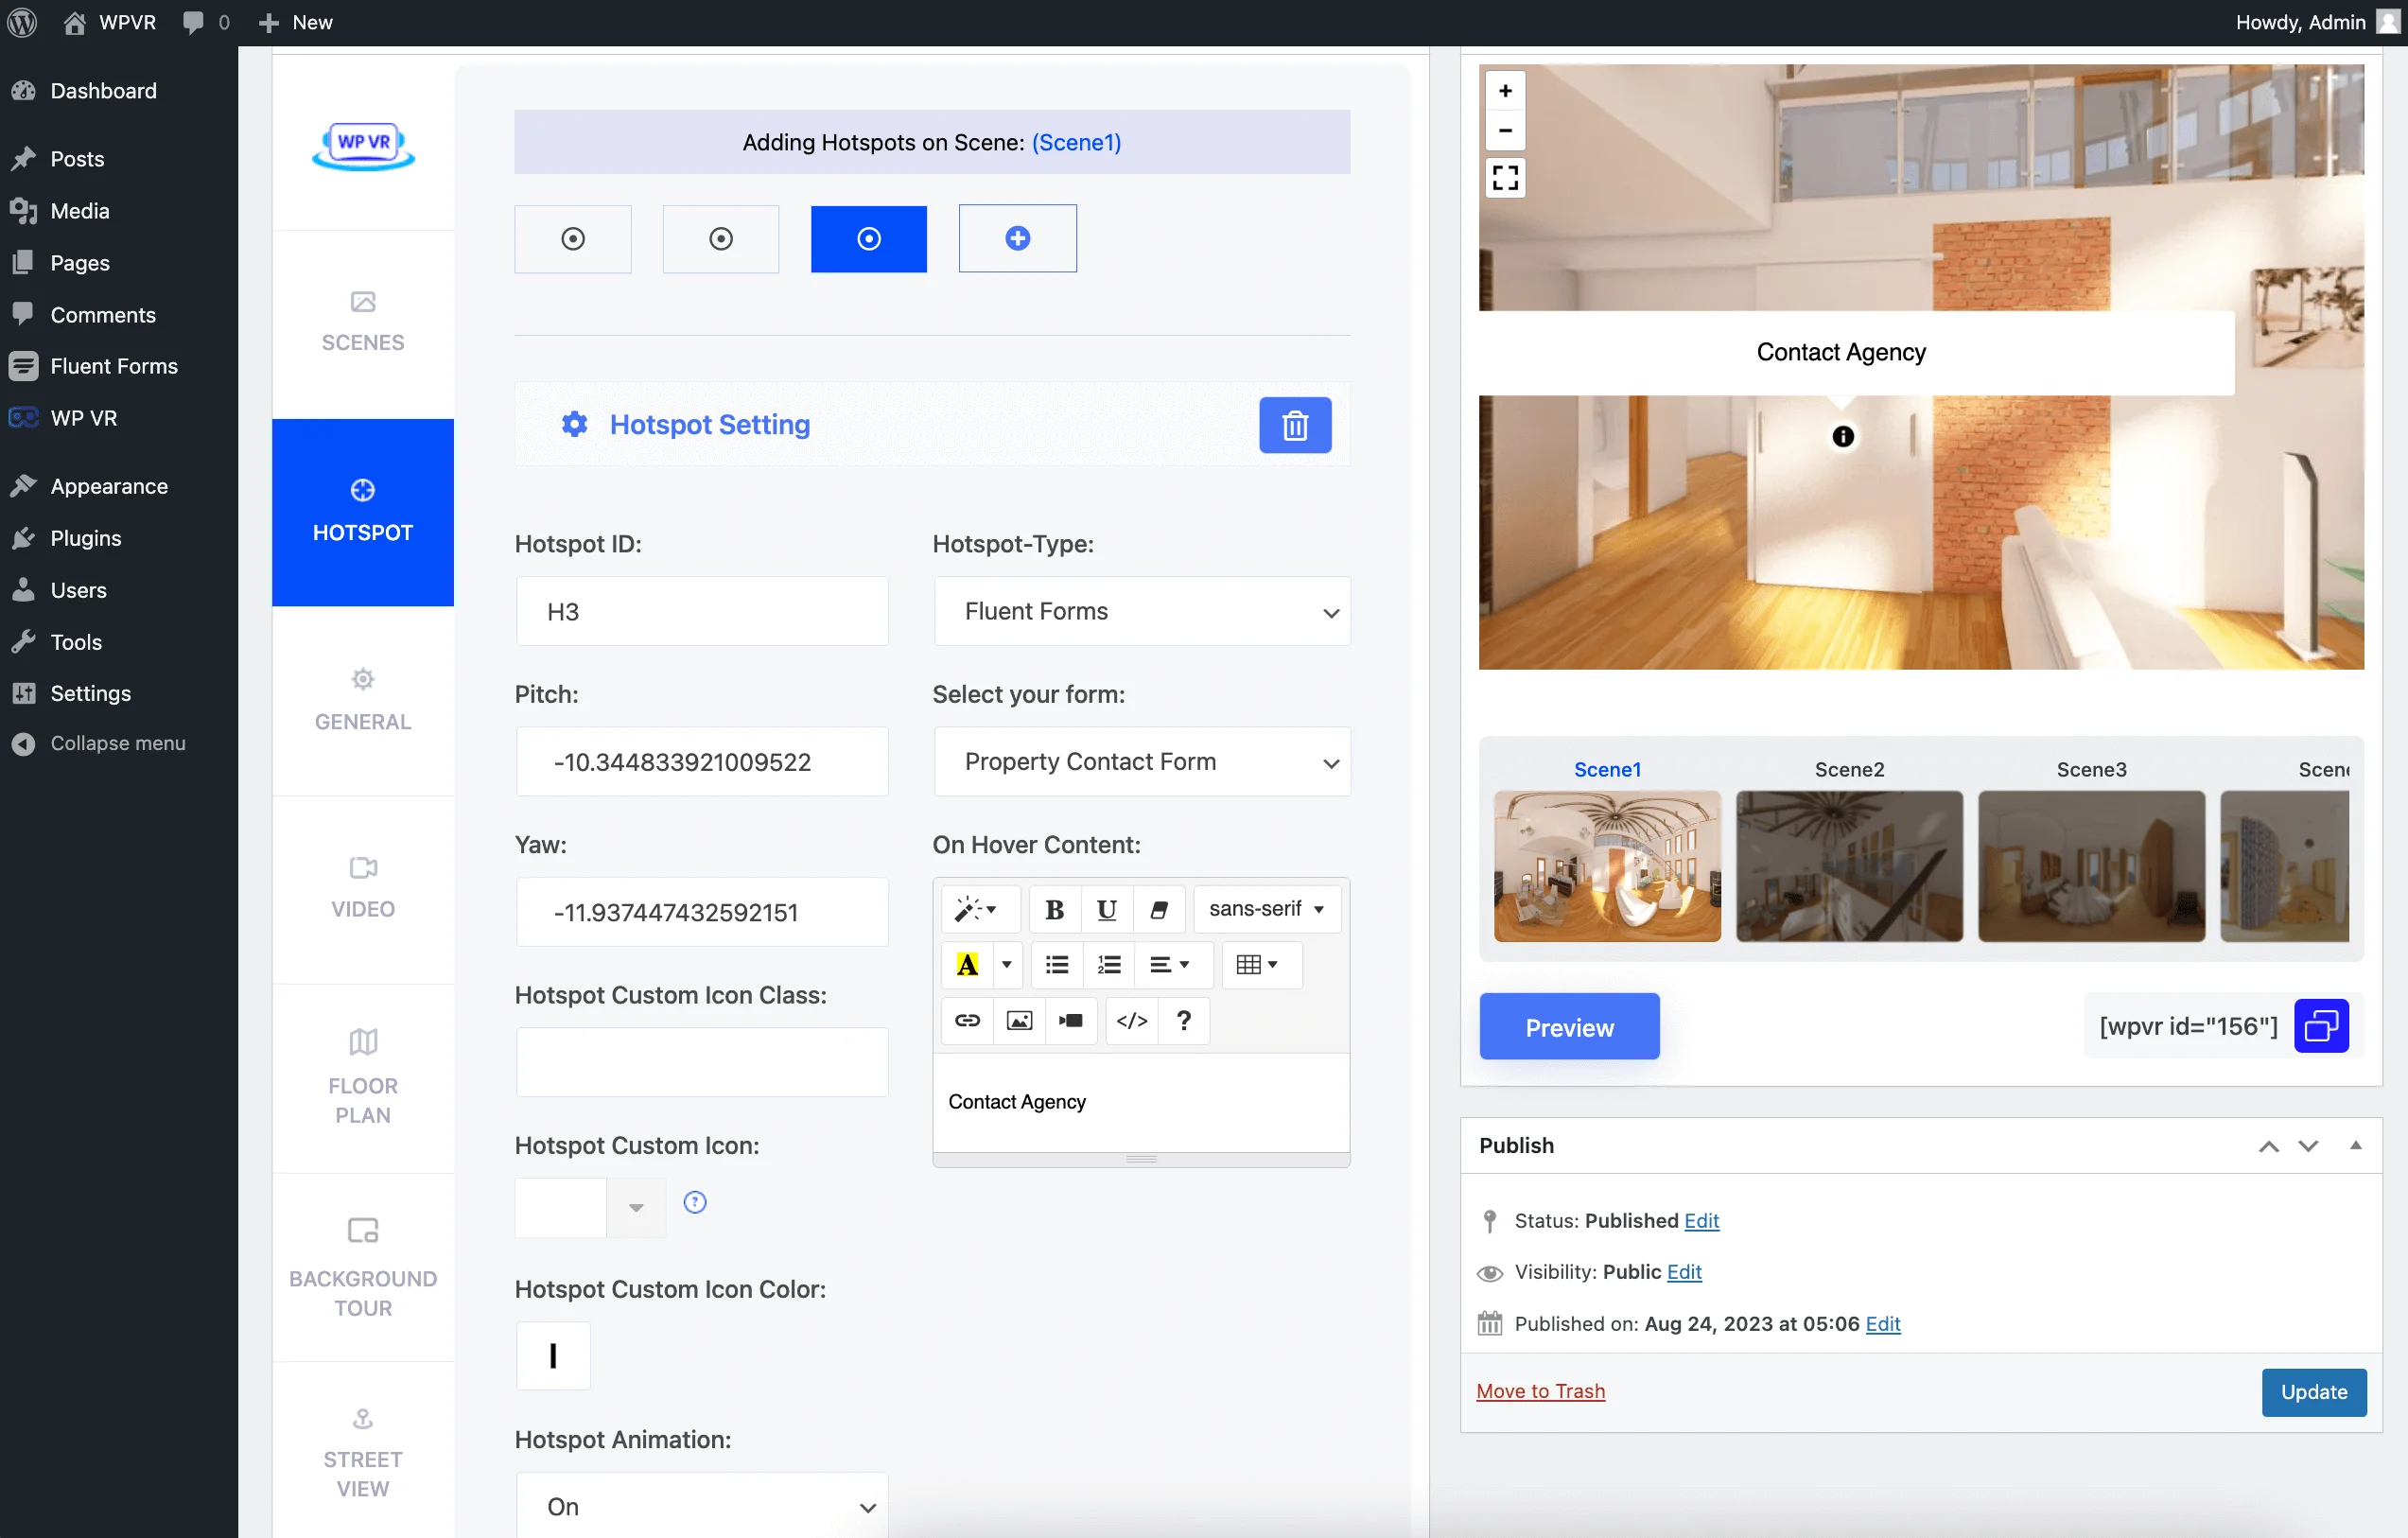
ii. Go to the Scenes section and add a new hotspot.
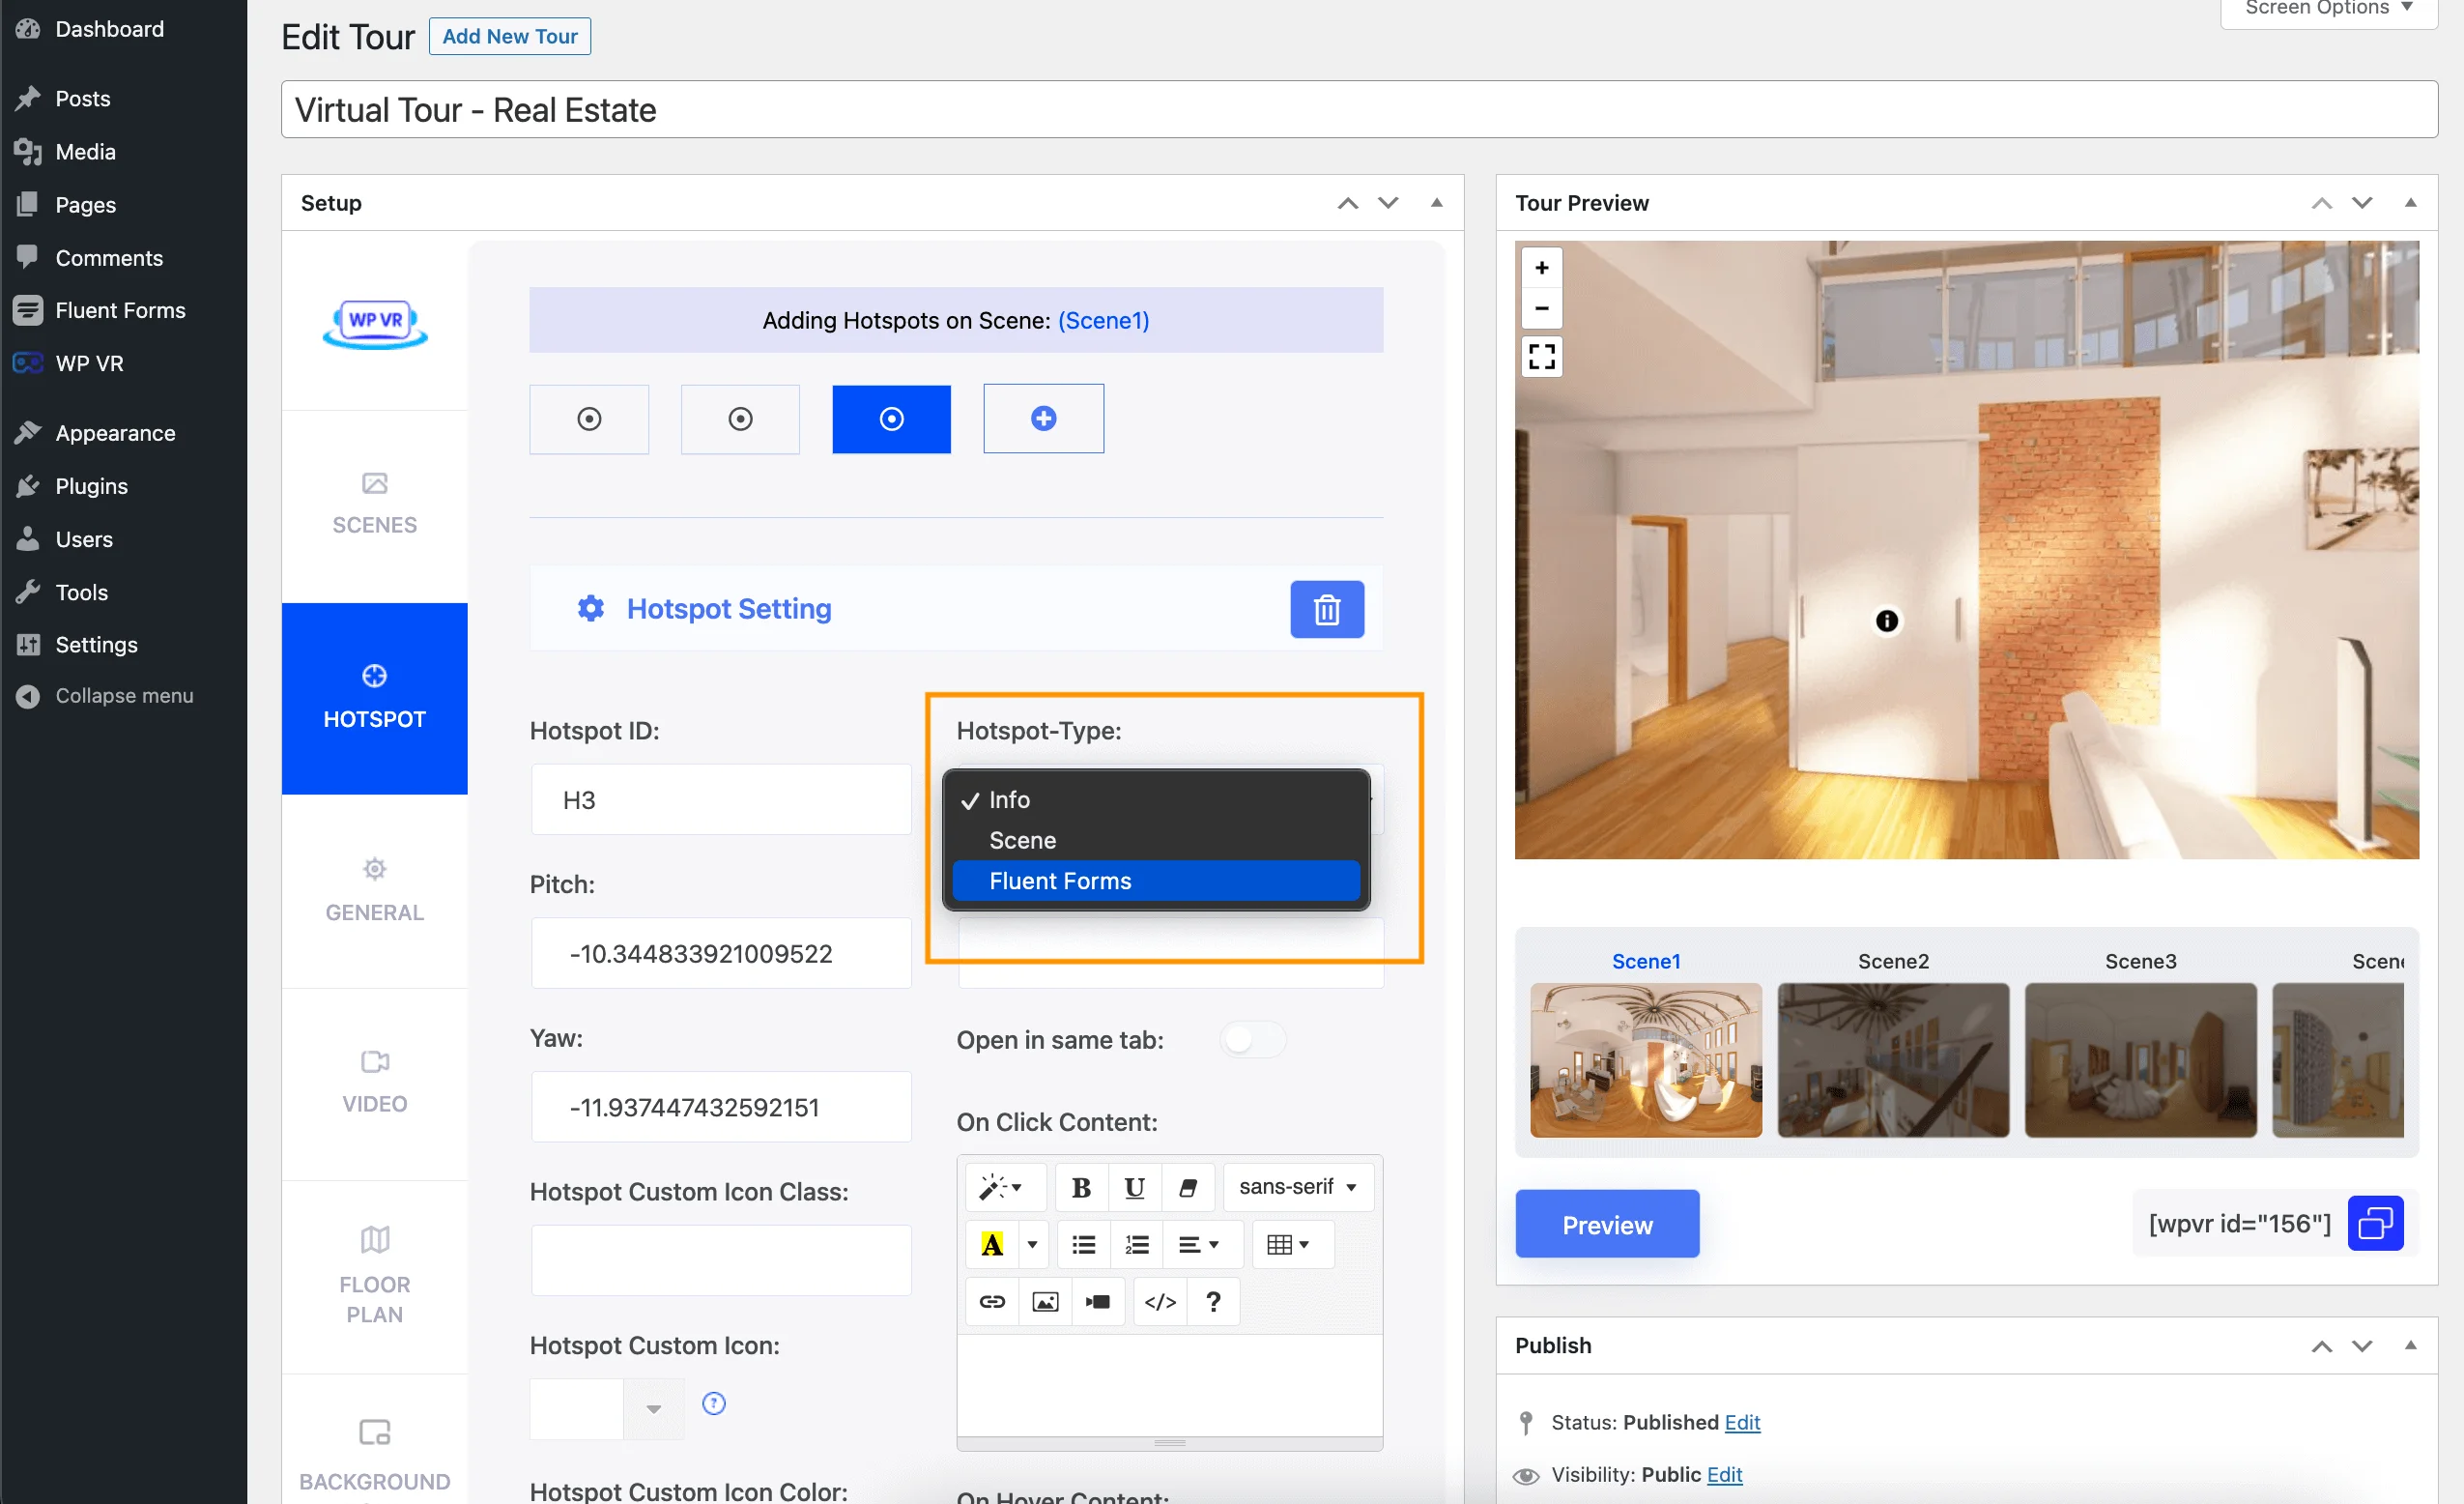
iii. Select the Hotspot-Type as Fluent Forms.
iv. From the Select Your Form section, choose your desired form.
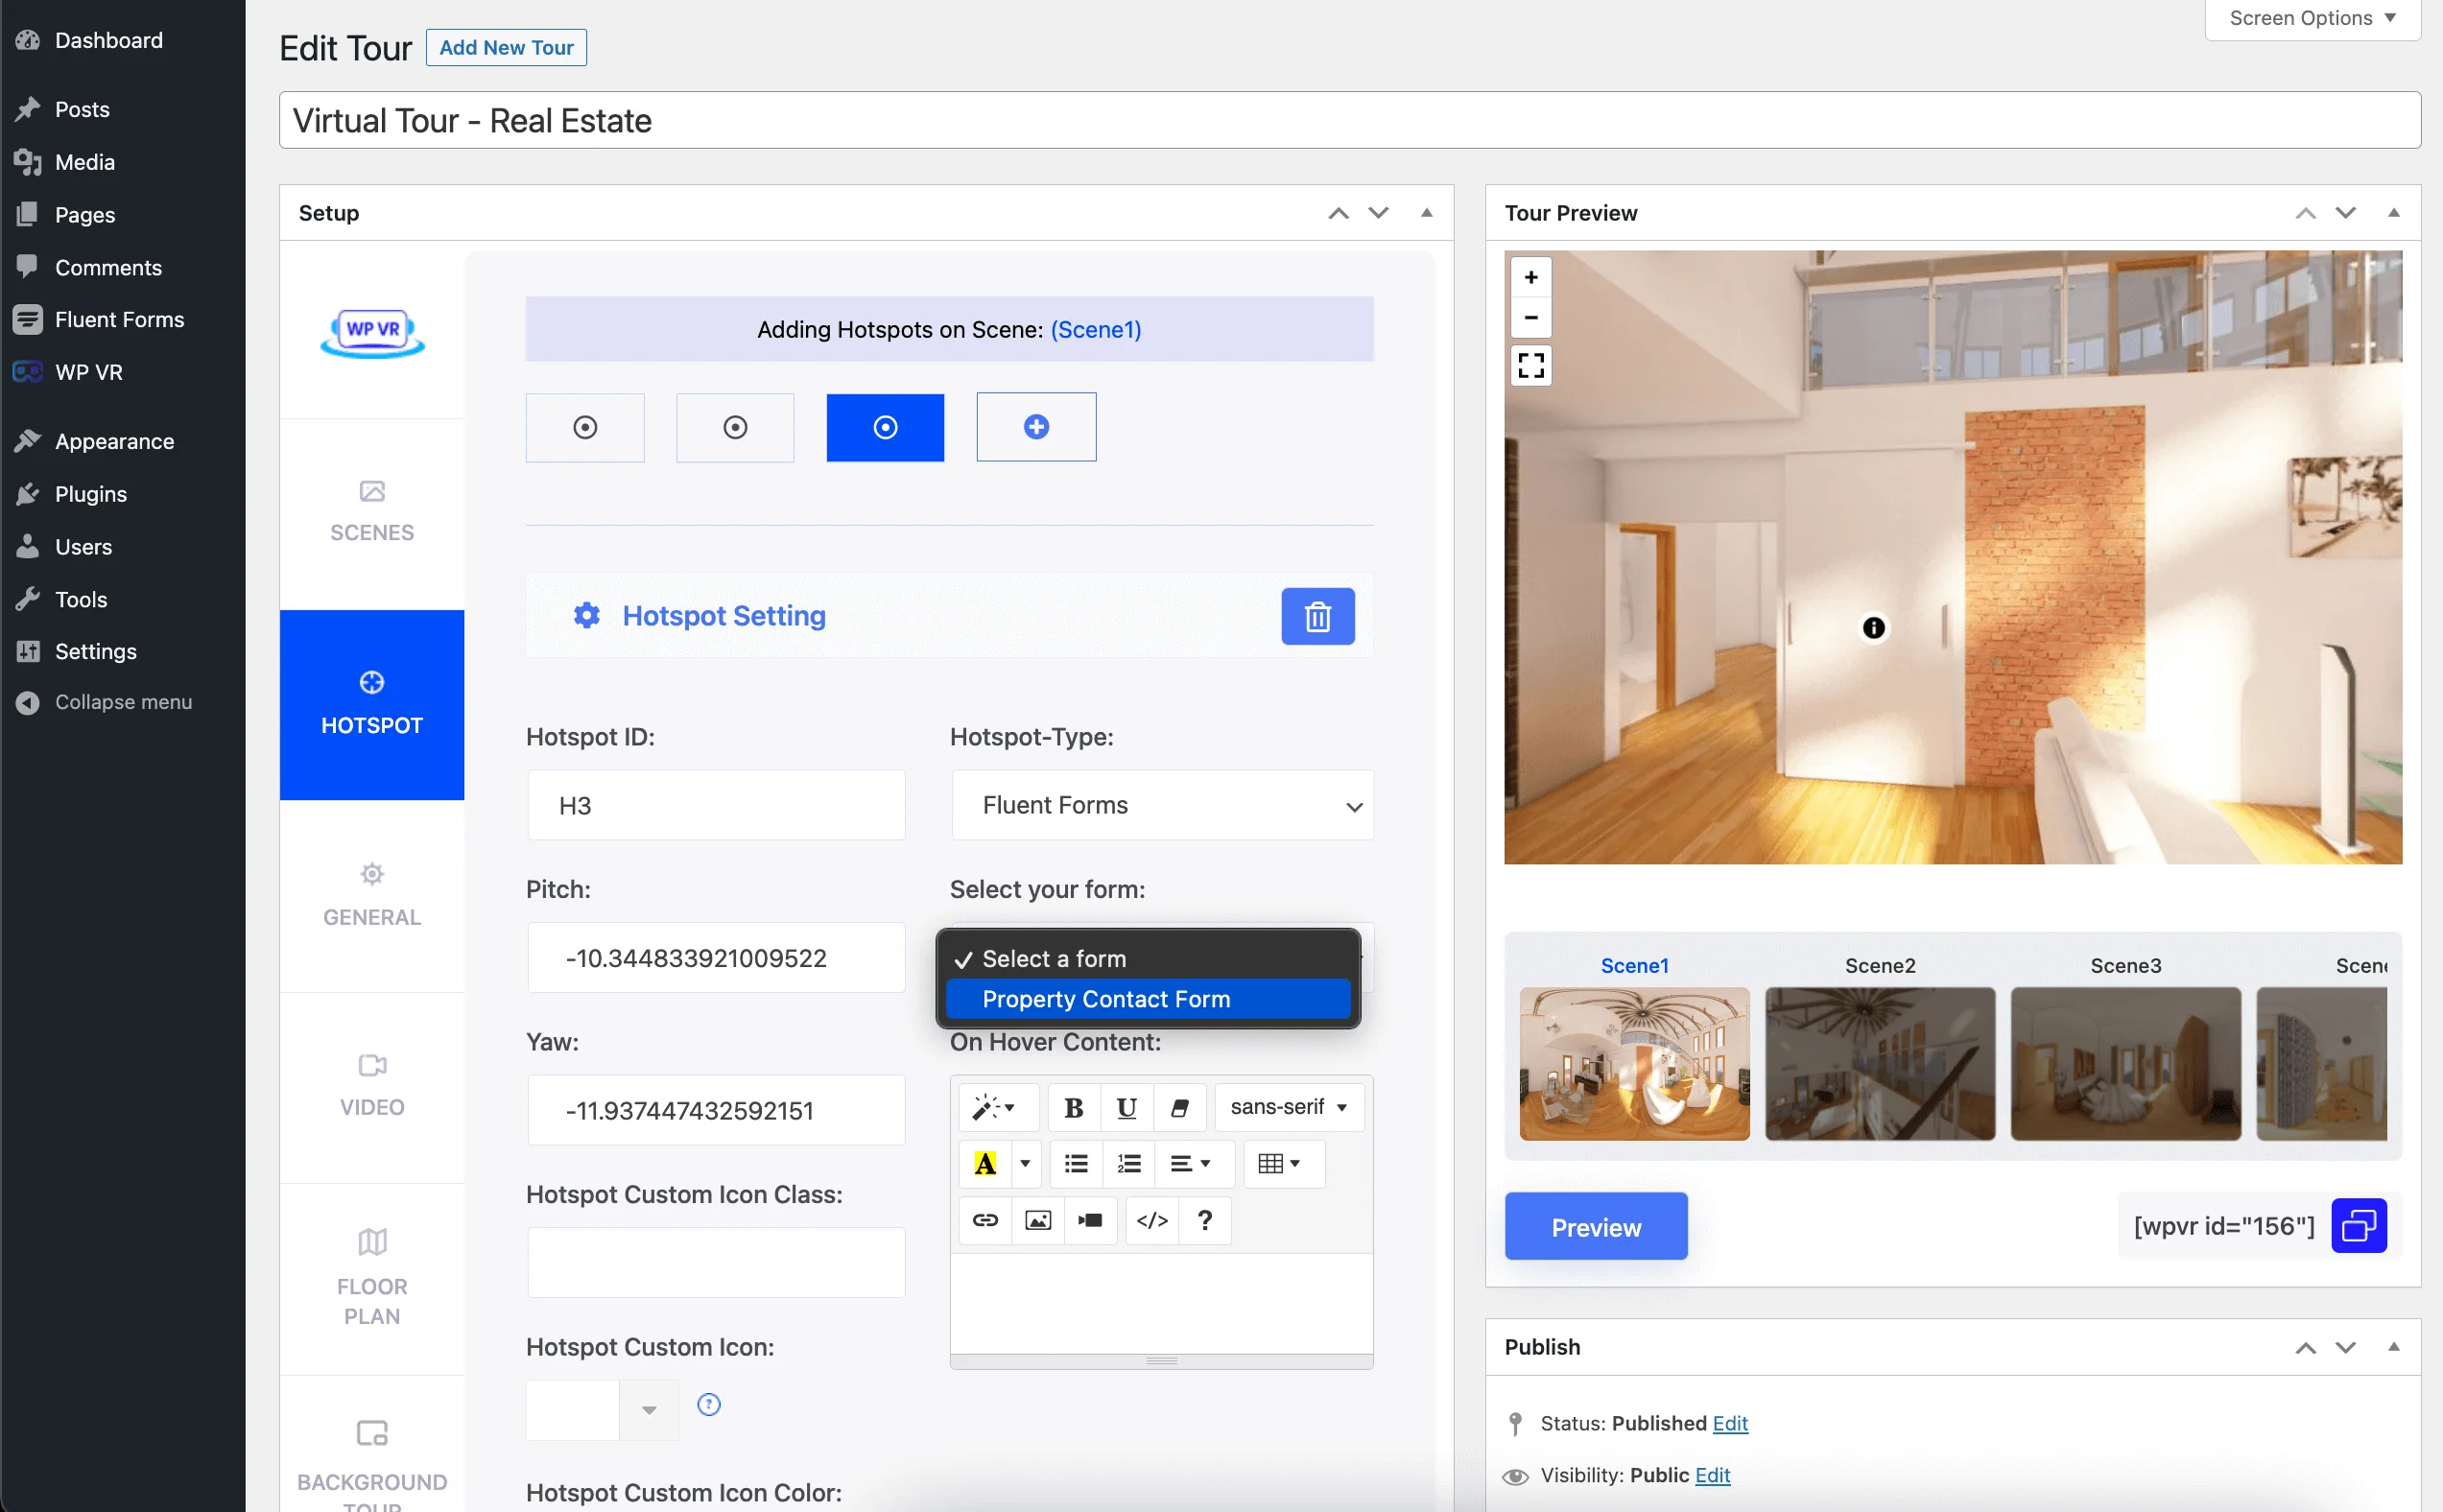
v. Publish or Update the virtual tour.
vi. Now, the form hotspot will appear on the tour preview.
Click on the hotspot, and the form will pop up on the tour.
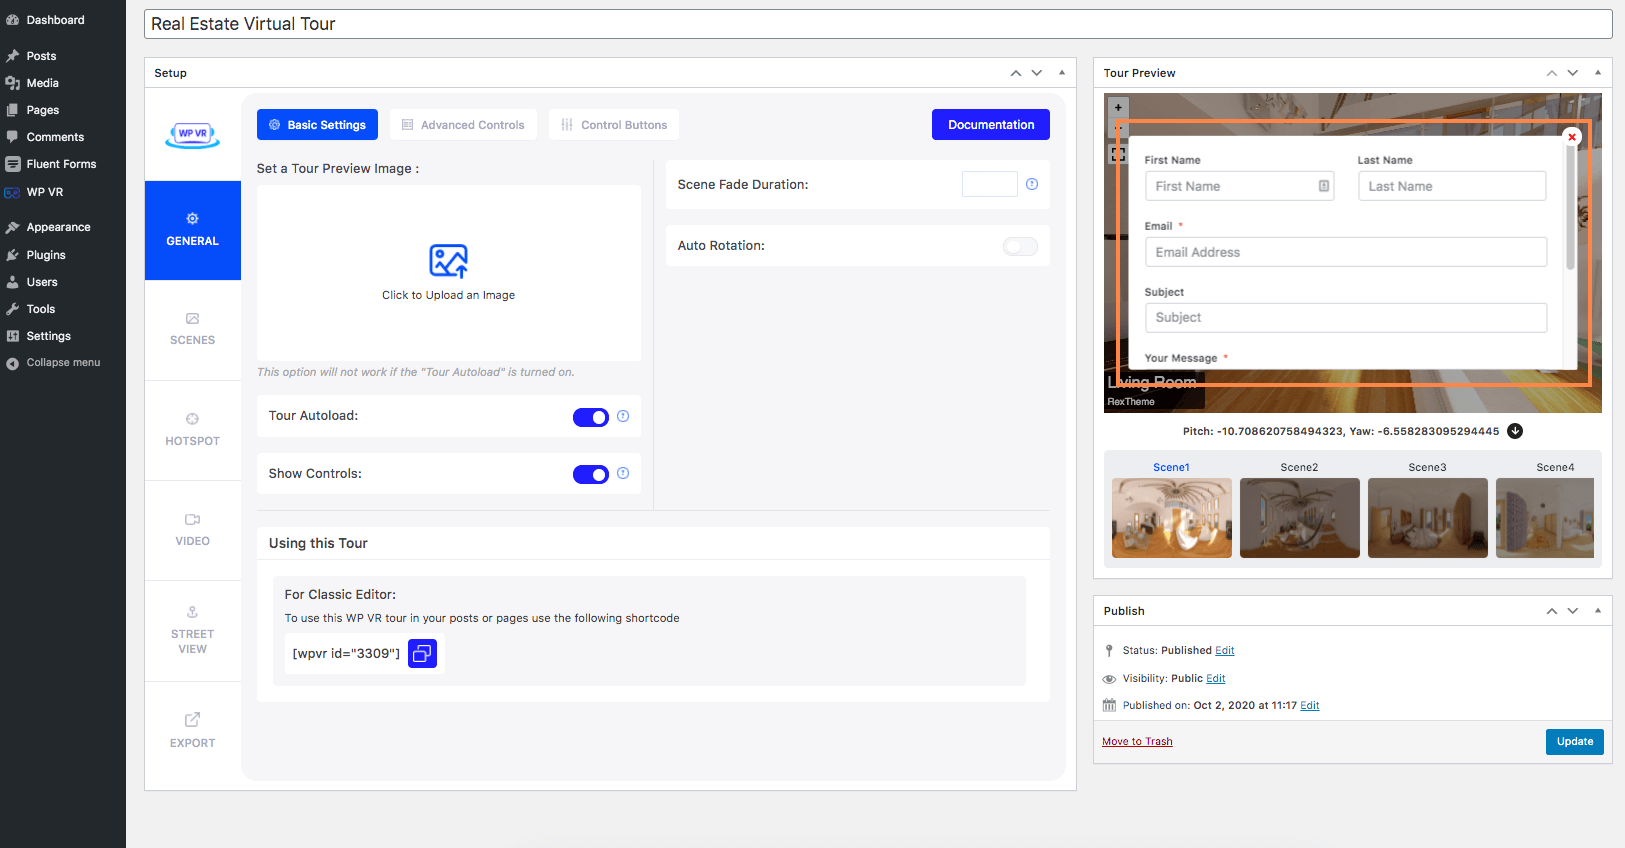
So now, your potential clients can contact you immediately when they’re experiencing the tour.
8. Add a house floor plan to your virtual tour
Having floor maps of virtual tours of houses will make the experience more meaningful and interactive.
- Here’s how you may add a floor map to your virtual tour.
Once you are satisfied with your tour, view it on your website.
This is how your commercial real estate virtual tour looks like after you’ve applied all the customizations.
You can realize it’s way more engaging than the basic real estate virtual tour.
- Check out all the features of WPVR Pro.
Pricing Of WPVR To Create A Real Estate Virtual Tour
When you calculate real estate virtual tour pricing, you will be surprised that it’s not as high as you would expect.
If you use WPVR, the software will cost you as low as $59.99.
Initially, the equipment may seem expensive if you go for the DSLR or the drone approach. But using your phone would mean it would cost less than $200.
But think of the long-term benefit. Your equipment cost will be one-time, and the software cost will be a yearly cost. But your tours will be created on a monthly basis, and you will be able to earn back thousands of dollars through successful home sales.
So, if you think about it, you won’t be spending too much, but the earning potential is huge.
Author’s Note
As you can see, I’ve easily created a complete virtual tour of a real estate property using WPVR, and you have learned why you should use virtual tours of houses close more deals.
However, the main concern of an ideal real estate virtual tour is creating the tour properly and using all the crucial elements of the tour. So, even if you don’t use WPVR, make sure that you’ve used these elements on your virtual tour.
The main goal here is to ensure your virtual tour leaves a mark in your visitors’ memories so that they end up purchasing homes from you.
So go ahead and create your next real estate virtual tour and stay ahead of your competitors!
You can also check out these virtual reality stocks if you’re thinking about investing in the VR industry.
Since you’re working in the real estate industry, you can check out this amazing list of free real estate WordPress plugins.
WPVR is one of the best real estate virtual tour software out there. Follow this guide and use WPVR to take your real estate business to the next level.


![How To Create A Real Estate Virtual Tour To Increase Property Sales [2024]](https://rextheme.com/wp-content/uploads/2020/10/How-To-Create-A-Real-Estate-Virtual-Tour.jpg)


Hello, is it possible to set a iframe with an RTMP videostreaming, i want to make some virtual speaker conference rooms with screen and the idea will be the live conference with external rtmp server.
Hi Dani,
Right now, this feature is not available in the plugin.
However, it sounds like an awesome idea.
We’ll see if we can work on this in the future.
Thanks,
Hi there.
I found your blog from Google while searching for a related matter and it was really helpful.
It looks great. I have bookmarked it in my google bookmarks to come back again.
Ranique Jase Marcellus
Hi Indirmeden,
I’m glad to know that this guide helped you.
Let me know which part you liked the most here.
You guys should take part in a contest for one of the best sites on the web.
I will highly recommend this website! Great article.
Arleen Dolph Land
Hi Turkce,
We’re really glad to know about this.
And thank you for the great words.
There is definitely a lot to learn about this subject.
Hi Erotik,
Definitely! And we’ll be posting more useful guides on virtual tours in the upcoming weeks.
Thanks.
After looking at a few of the blog articles on your website, I seriously appreciate your way of writing a blog.
I added it to my bookmark site list and will be checking back in the near future.
Hi Erotik,
Thank you for your kind words.
Let us know if you want us to cover any specific topics on virtual reality.
Thanks.
It was quite instructive.
Thank you!
Thanks for sharing the content.
You’re welcome.
amazing Article and original picture. I appreciate you sharing.